
Doku is a payment gateway that lets you accept payments through virtual accounts, retail outlets, e-wallets, QRIS, and credit cards. Qiscus Shop connects to your existing Doku merchant account, so there is no need to open an account with another provider.
Doku is available for stores using IDR only. A store can have only one payment gateway active at a time, so enabling Doku means disabling Midtrans or Xendit first.
Prerequisites & Setup
Before you begin, make sure you have an active Doku merchant account.
Step 1: Get Your Doku API Keys
Log in to your Doku Back Office. Use the Sandbox dashboard if you are setting up a test configuration.
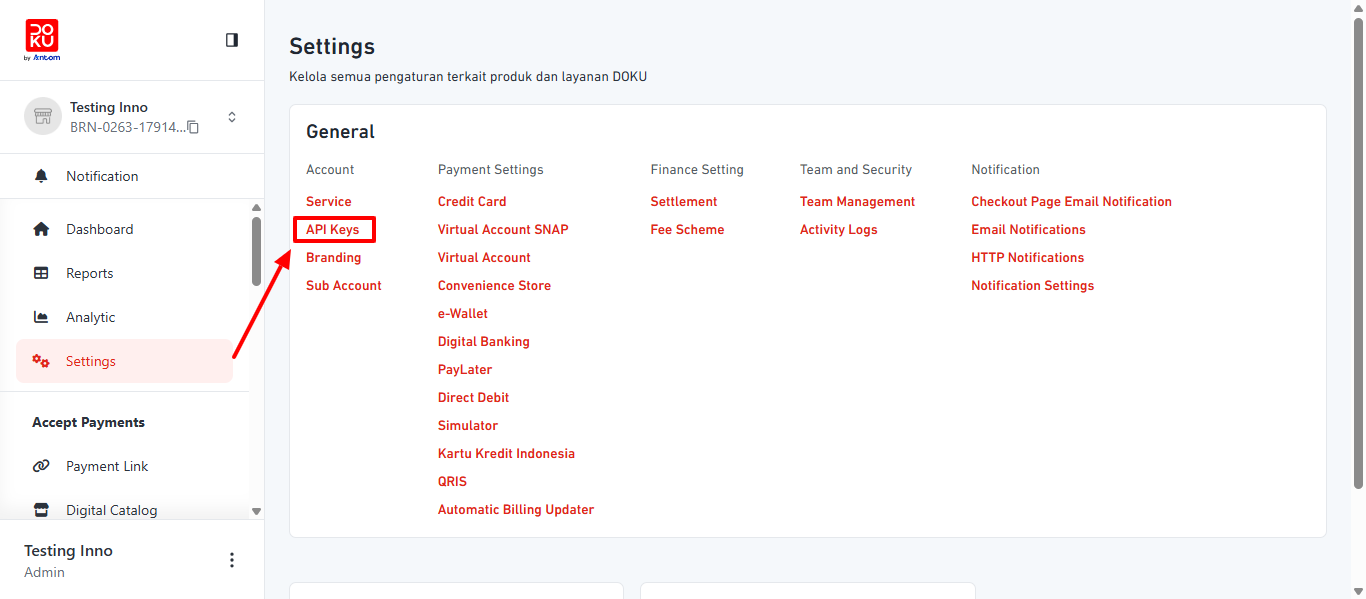
From the side navigation, select Settings.
Under Account, select API Keys.
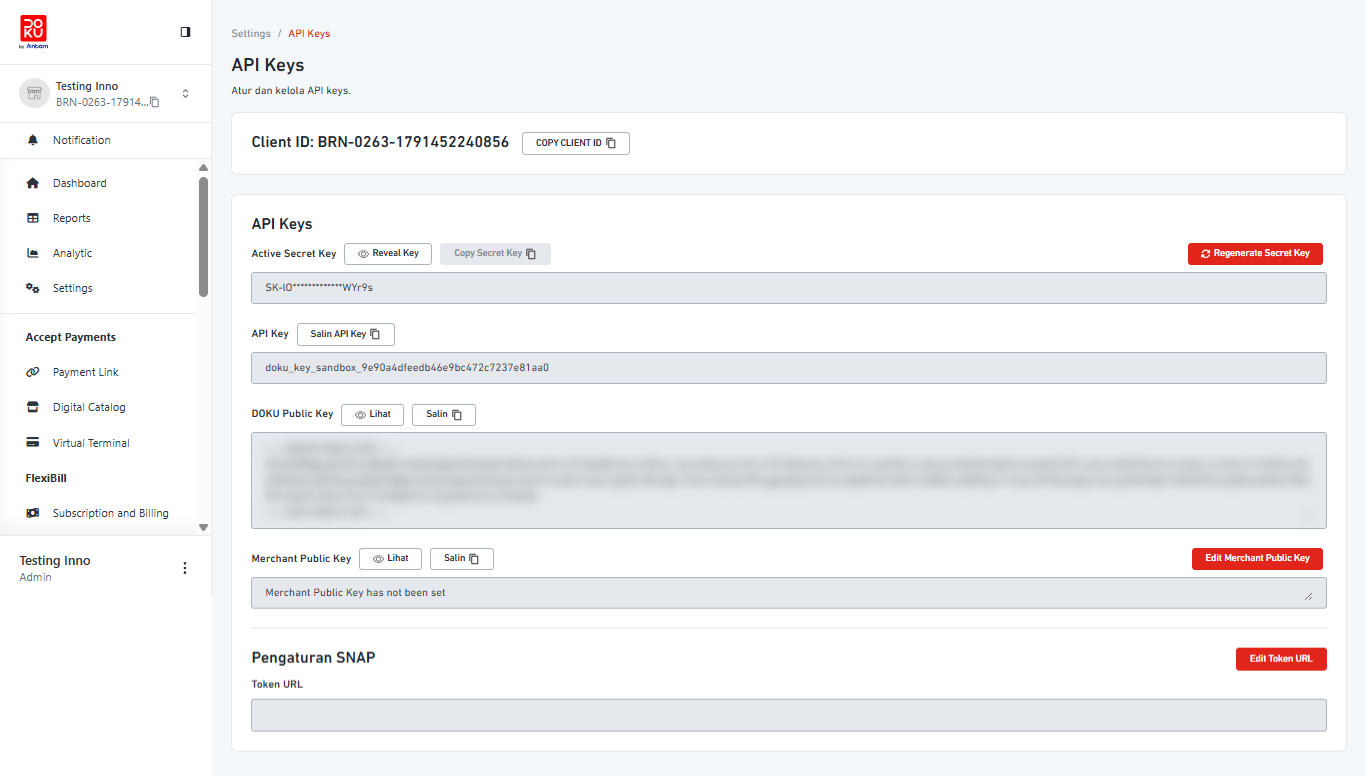
Copy your Client ID.
Click Reveal Key and enter the 6-digit verification code sent to your email. Your Secret Key is shown for 30 seconds, so copy it before it is hidden again.
Step 2: Add Doku as a Payment Gateway
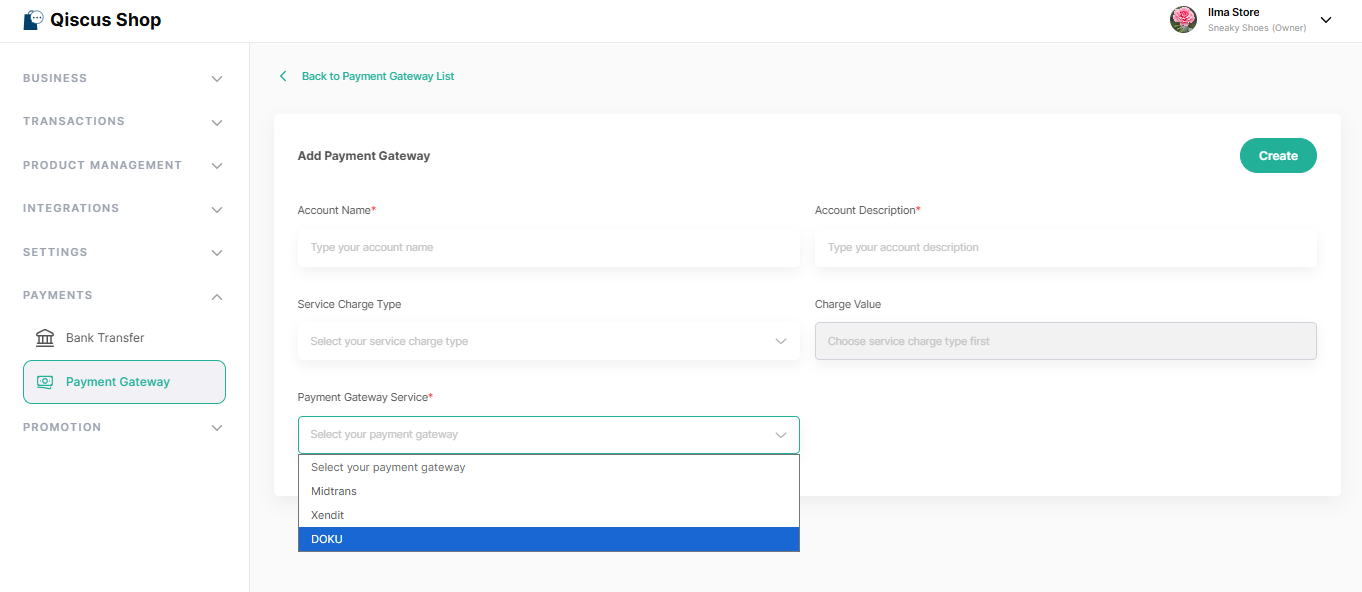
Go to Qiscus Shop Dashboard → Payment Gateway from the left sidebar.
Click Add Payment Gateway.
Fill in the following fields:
Field | Description |
|---|---|
Account Name | A name to identify this payment gateway (e.g. |
Account Description | A short description (e.g. |
Service Charge Type (optional) | Select whether to apply a service charge, either |
Charge Value (optional) | Enter the charge amount based on the selected charge type |
Payment Gateway Service | Select DOKU from the dropdown |
Step 3: Configure Doku Account Settings
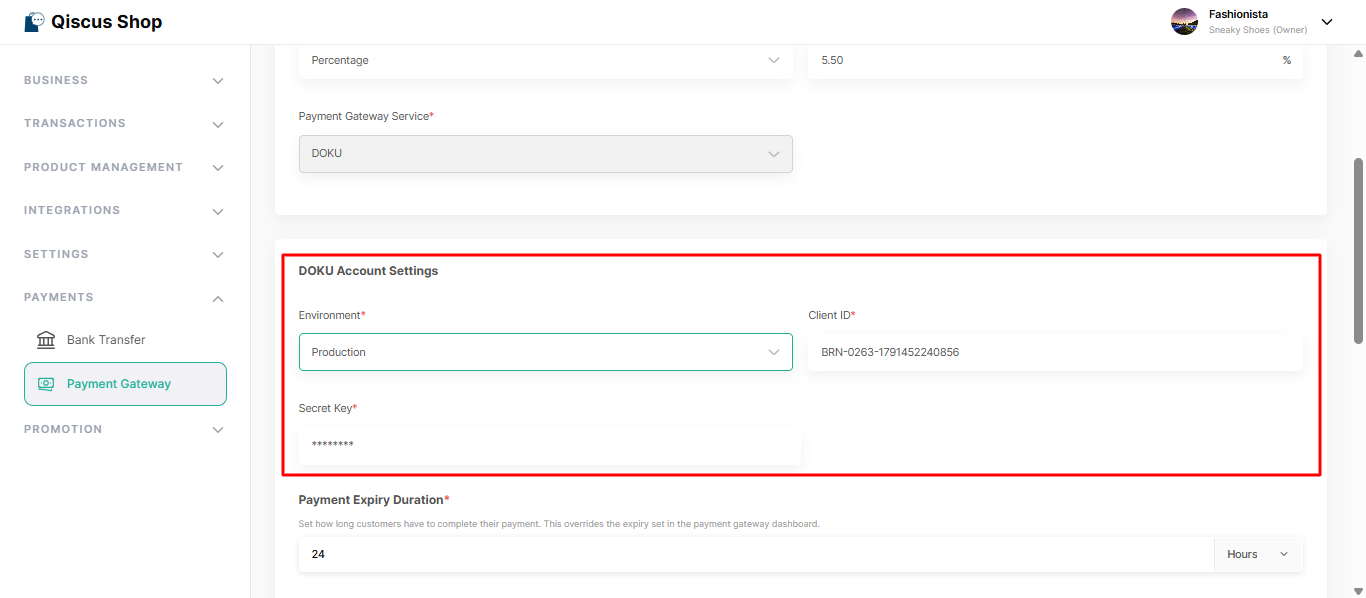
Under the DOKU Account Settings section, fill in:
Field | Description |
|---|---|
Environment | Select |
Client ID | Your Doku Client ID, from Step 1 |
Secret Key | Your Doku Secret Key, from Step 1 |
All three are required. The Secret Key is masked after saving, and it is kept when you save other changes without typing it again.
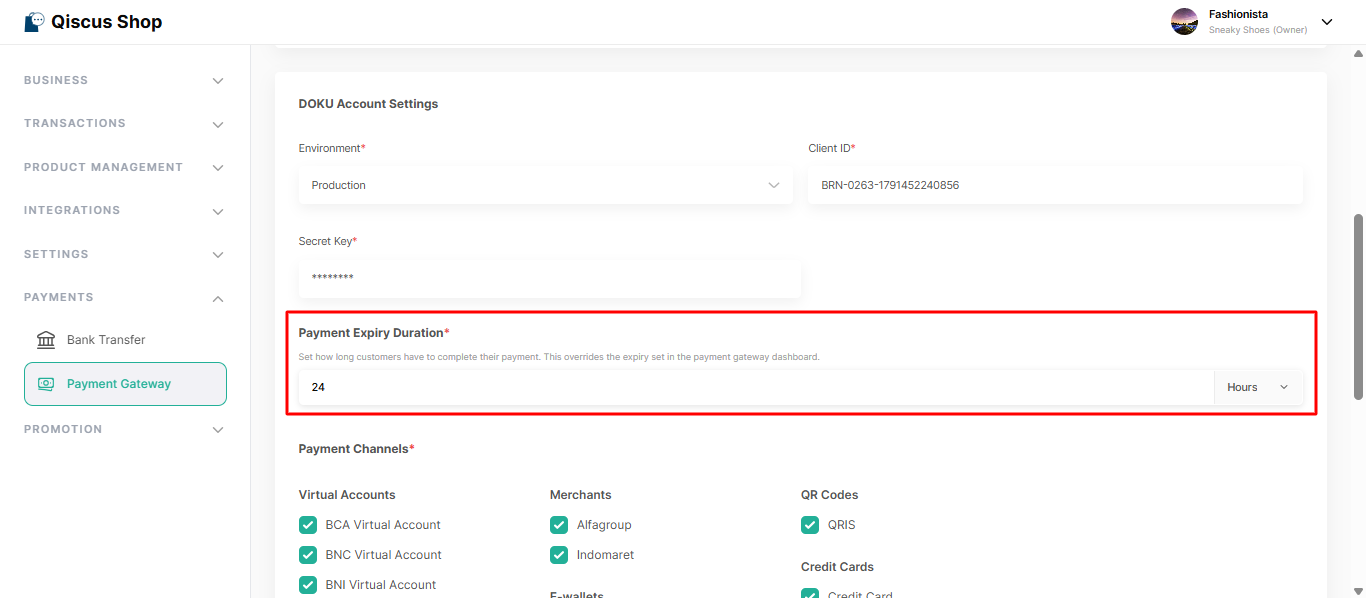
Step 4: Set the Payment Expiry Duration
Under Payment Expiry Duration, set how long customers have to complete their payment. This overrides the expiry set in your Doku Back Office.
Enter a whole number and select a time unit:
Minutes,Hours, orDays. The default is24Hours.The minimum is 15 minutes and the maximum is 30 days.
The duration applies to every Doku payment channel, in both Sandbox and Production.
For orders using Scheduled Delivery, payment expires at whichever comes first: the end of the delivery window, or the checkout time plus this duration. The order is cancelled at that moment, and payment reminders stop with it.
This field is required.
Step 5: Configure Payment Channels
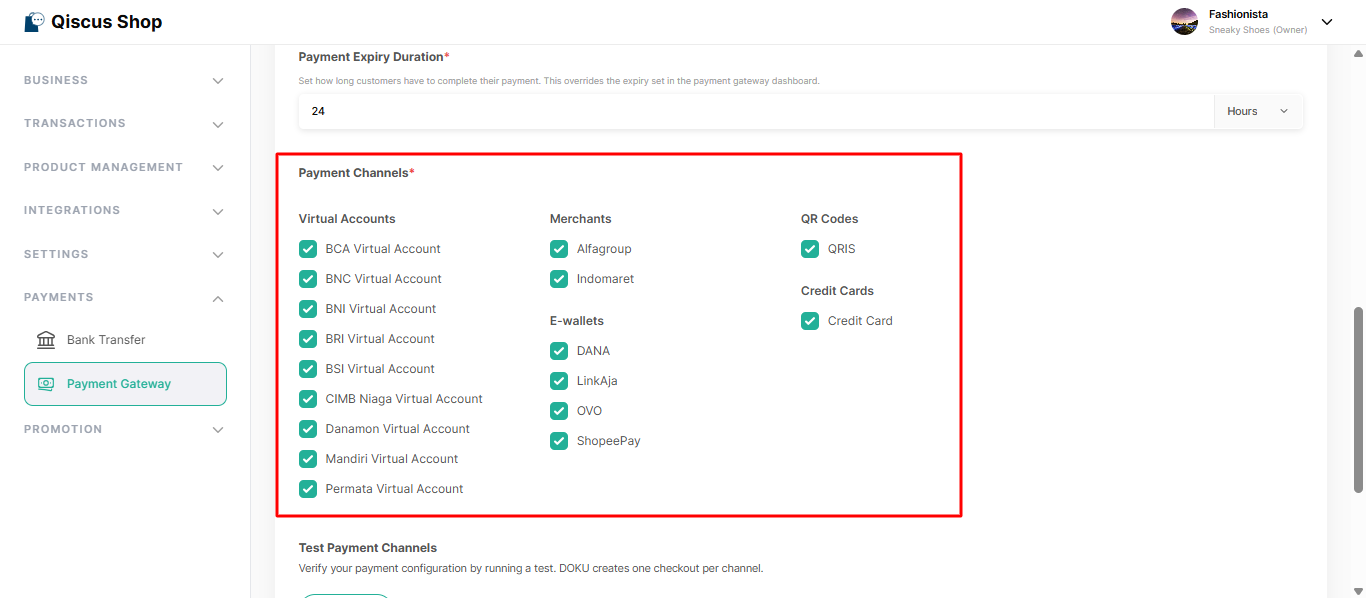
Under the Payment Channels section, select the channels you want to offer your customers. At least one channel is required. Only the channels you enable here appear on the payment page of your microsite, grouped by type.
Doku supports 17 channels:
Group | Channels |
|---|---|
Virtual Account | BCA, BNI, BRI, Mandiri, Permata, CIMB Niaga, Danamon, BSI, BNC |
Merchant | Alfagroup, Indomaret |
E-wallet | OVO, DANA, ShopeePay, LinkAja |
QR Code | QRIS |
Credit Card | Credit Card |
Step 6: Test Your Configuration
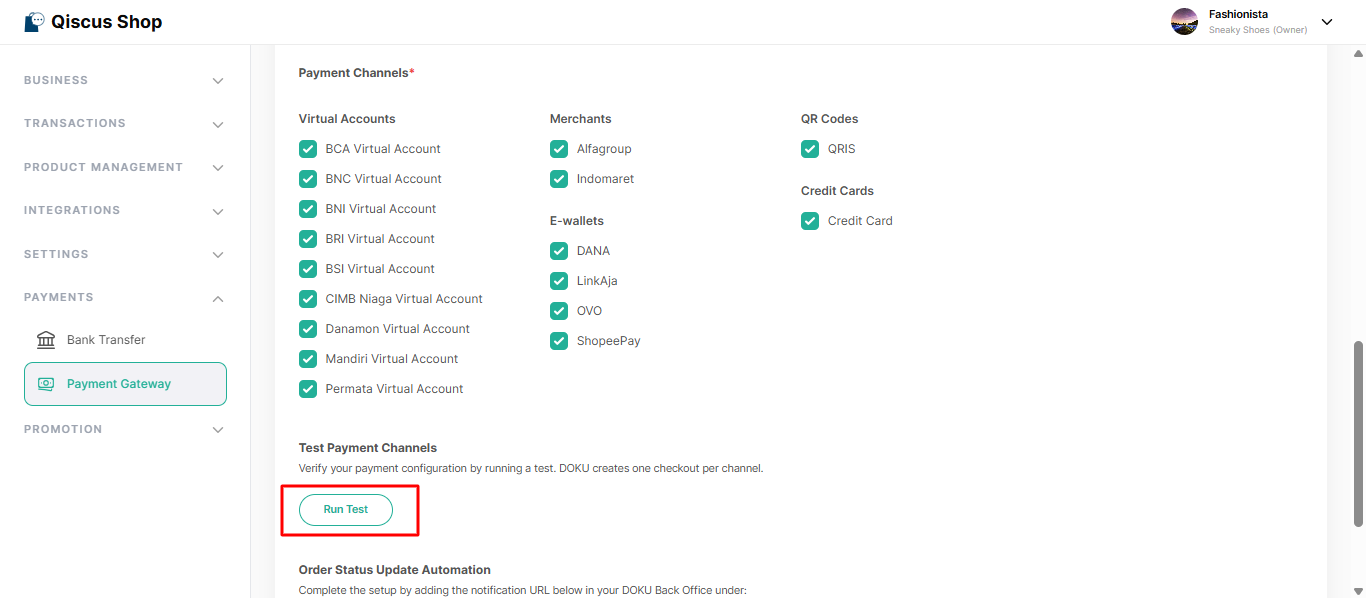
Under the Test Payment Channels section, click Run Test to verify your Doku configuration. Doku creates one checkout per channel. Confirm all channels return a successful result before going live.
Step 7: Save the Configuration
Click the Create button at the top right of the page to save your Doku Payment Gateway configuration.
Step 8: Set Up Order Status Update Automation
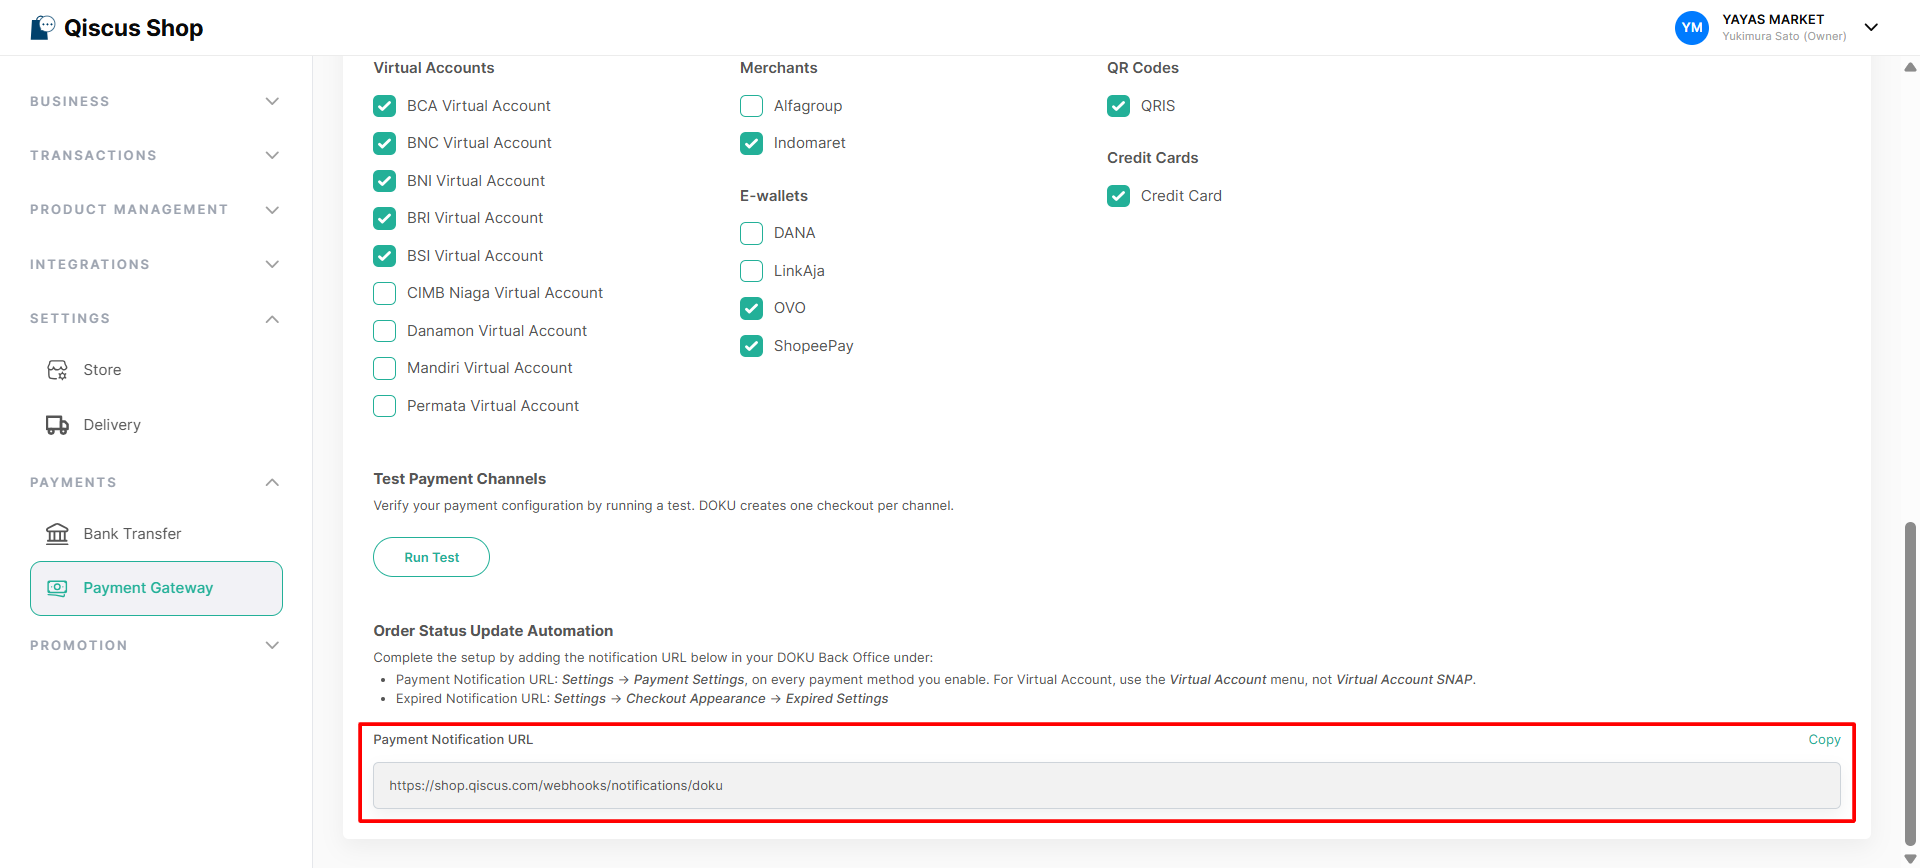
Doku reports what happened to a payment by calling a notification URL. Register that URL in your Doku Back Office in two places: one for payments that succeed, and one for payments that expire. Qiscus Shop uses the same URL for both.
In Qiscus Shop, open the Doku gateway's settings page and scroll to Order Status Update Automation.
Click Copy next to the Payment Notification URL field. This is the URL you paste into both settings below.
Register the Payment Notification URL
This one is set per payment method, so repeat it for every channel you enabled in Step 5.
In Doku Back Office, go to Settings → Payment Settings and open the menu for that payment method. For virtual accounts, use the Virtual Account menu, not Virtual Account SNAP.
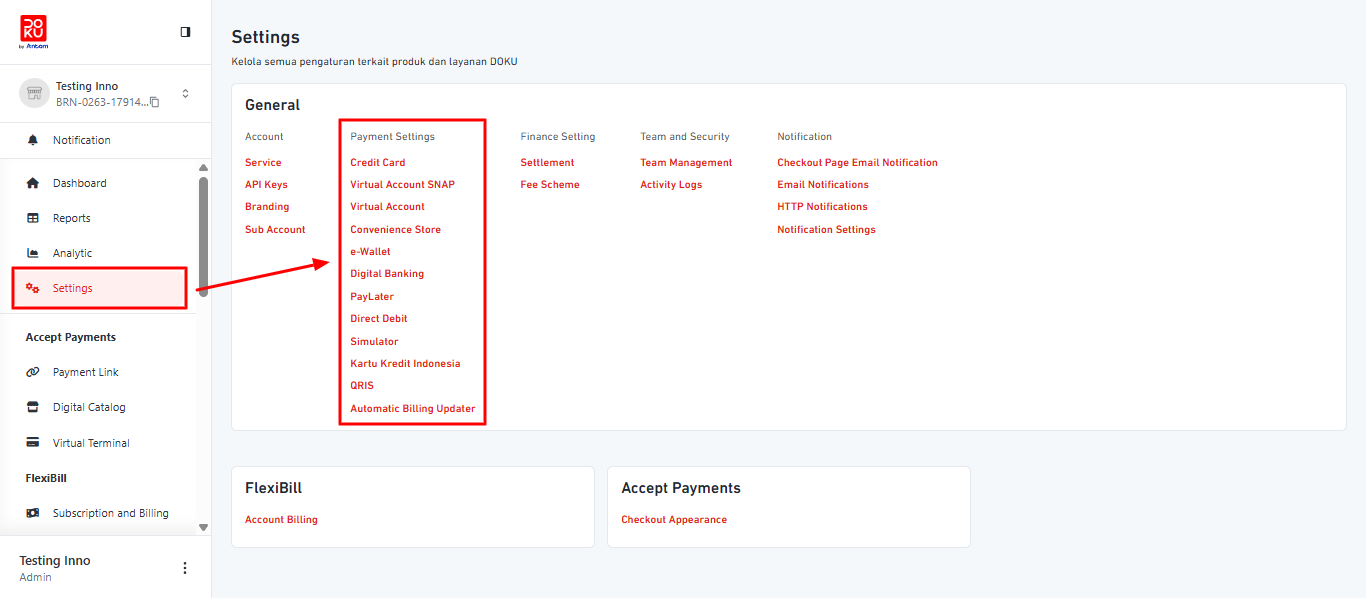
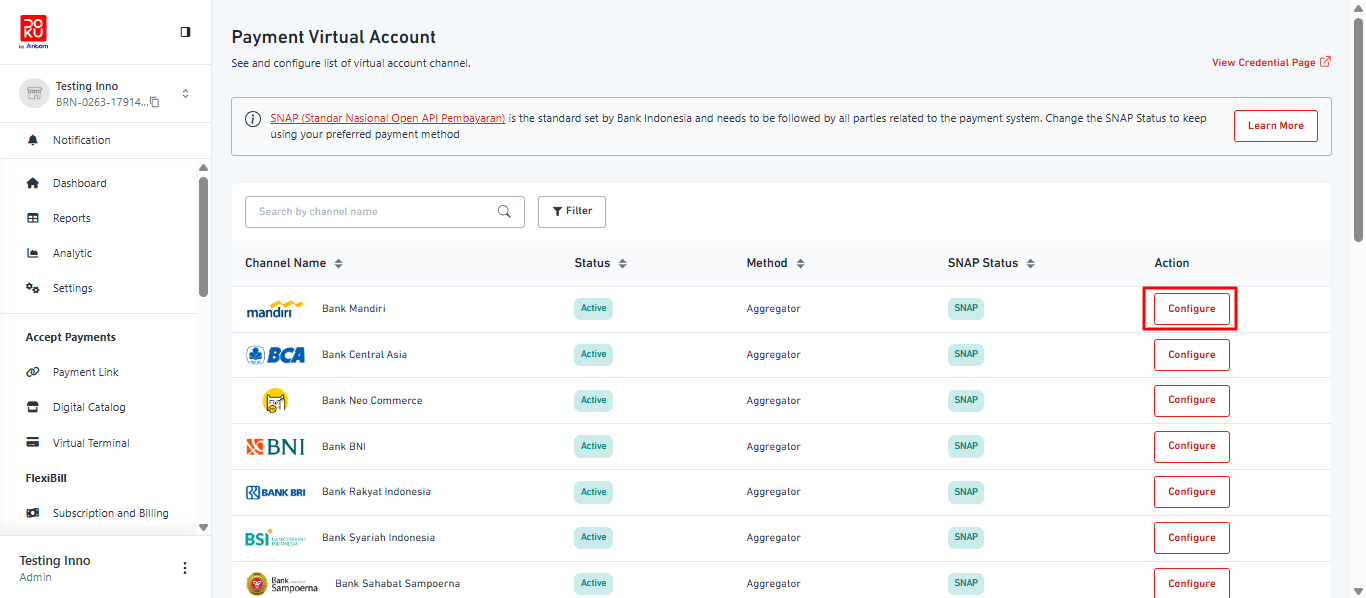
Find the row for the channel you enabled, for example Bank Mandiri, and click Configure.
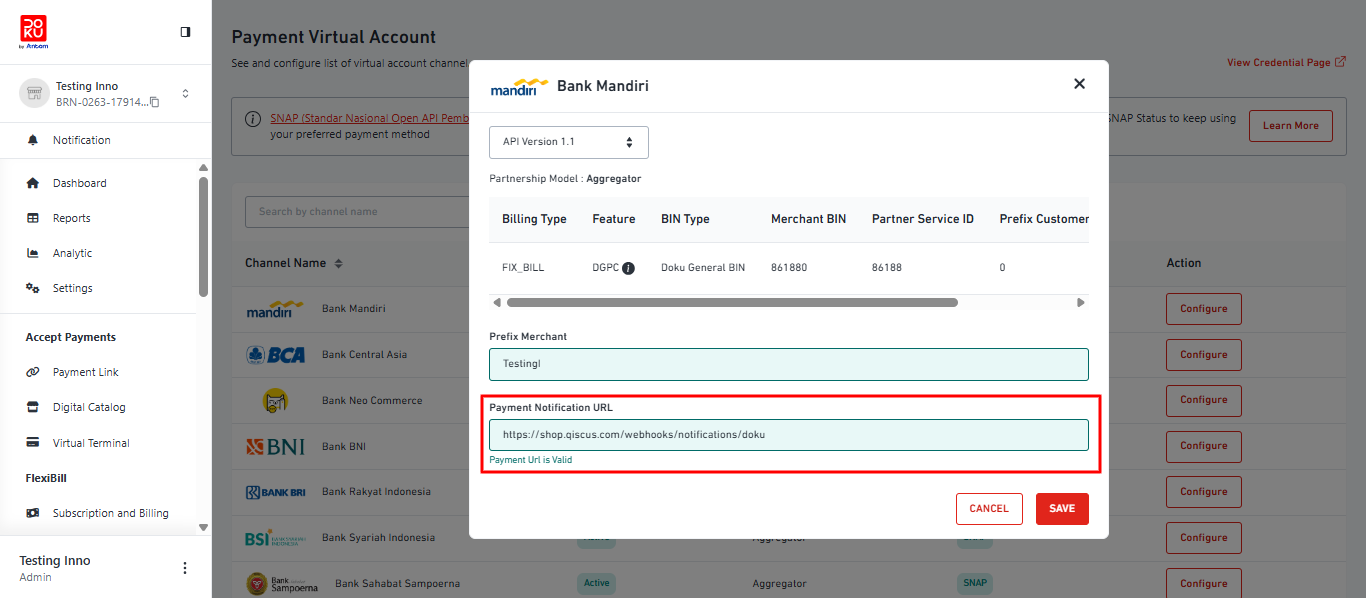
Paste the URL you copied from Qiscus Shop into the Payment Notification URL field, then click Save.
Register the Expired Notification URL
This one is set once for the whole store, not per payment method.
In Doku Back Office, go to Settings → Accept Payments → Checkout Appearance → Expired Settings.
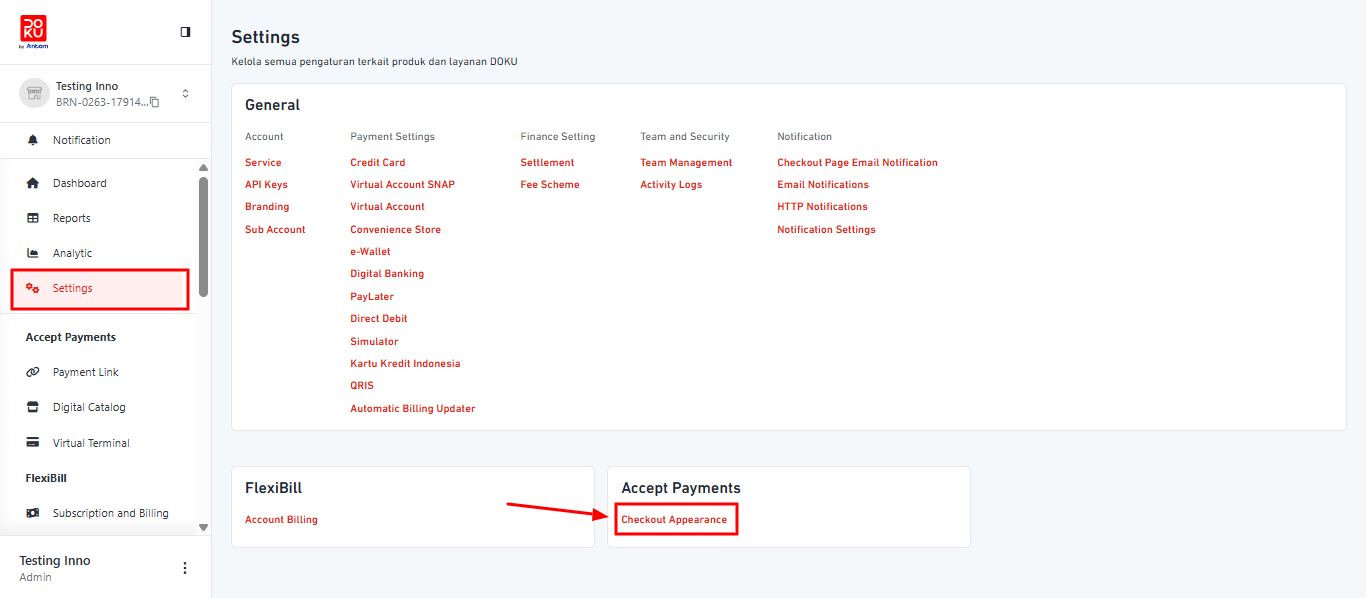
Turn on Expired Notification, paste the same URL you copied from Qiscus Shop, then click Save.
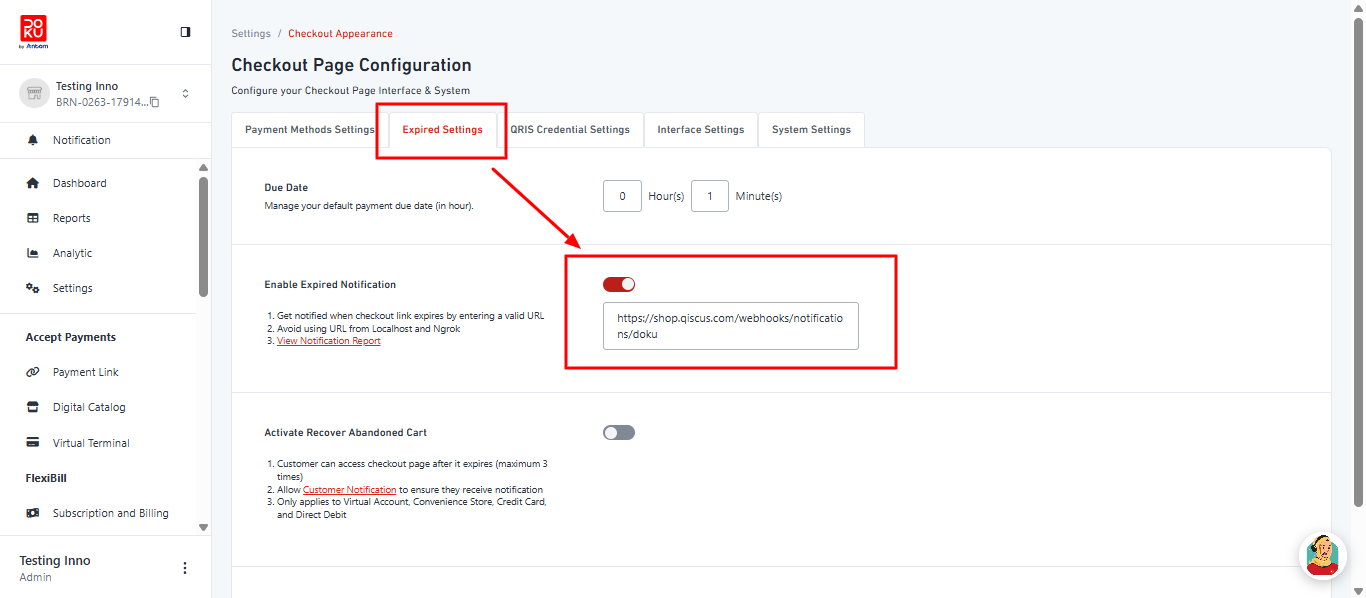
If the Expired Notification URL is not registered, Doku will not tell Qiscus Shop when a payment has expired. Orders whose payment link has already died will not move to Cancelled on their own.
Step 9: Turn Doku On
A payment gateway is saved switched off, so nothing changes for your customers until you turn it on.
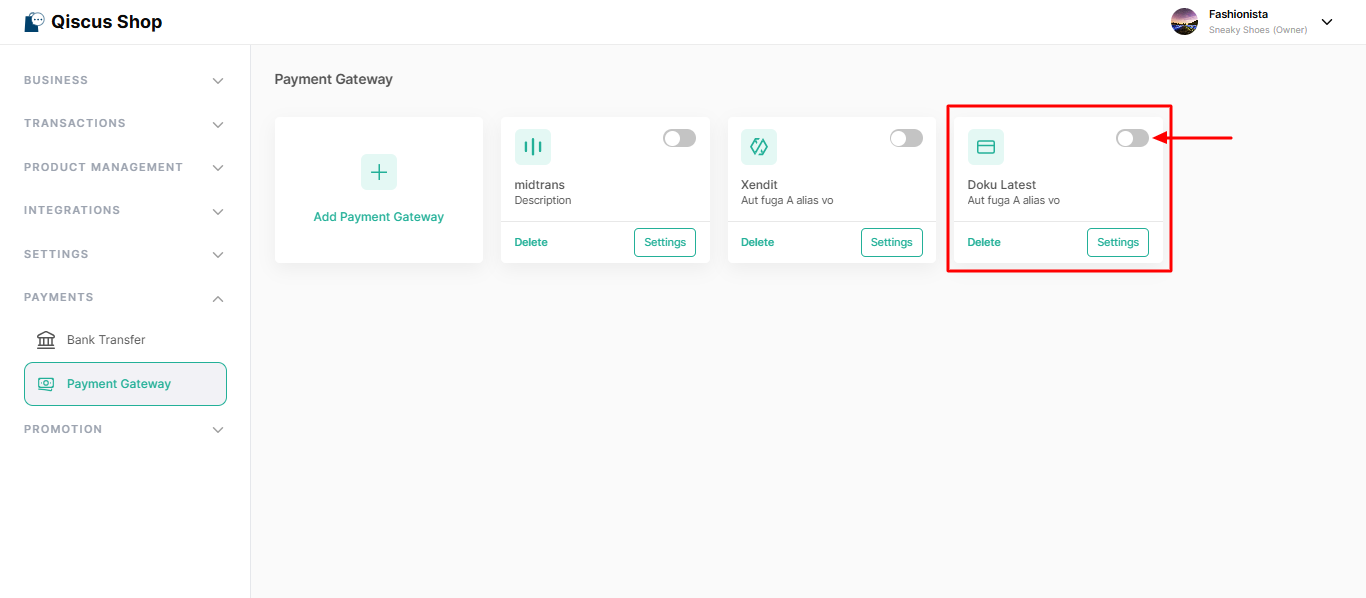
Go to Payment Gateway in the left sidebar.
Find the Doku card and switch its toggle on.
If another gateway is still active, Qiscus Shop warns you instead of switching it over. Turn the old one off first, since a store can have only one payment gateway active at a time.
Doku is ready to use
That is the whole setup. The channels you enabled now appear on the payment page of your microsite, grouped by type, and orders move to Paid or Cancelled on their own as Doku reports each payment back.
Before taking real orders, place one test order from your microsite and follow it through to a paid status, so you can see the whole flow end to end.
Looking for a different provider? See Payments for the full list.