Customer data plays a central role in modern business operations. With customer data, you can create personalized experiences, improve marketing strategies, make informed business decisions, and stay competitive in today's data-driven business landscape. However, companies often do not make optimal use of customer data.
Customer Data Platform (CDP) is usually used by businesses to collect, centralize, and manage customer data from various sources. CDPs are designed to create a unified and comprehensive customer profile. Customer data will be aggregated into a single database, which can be used to enhance the customer experience.
In Qiscus Omnichannel Chat, you will get a 360-degree view of a customer data to create powerful personalization. The Qiscus system will collect customer data from various sources such as inbound messages from ads, purchase history from Qiscus Chat n Shop, Qiscus CSAT, Qticketing, QCRM, and other external events.
Through CDP, you will get several benefits, including:
Crafting Tailored Campaigns: Genuine personalization is the key to establishing meaningful and enduring customer relationships. Leveraging a CDP, you can harness the wealth of data available on each customer to deepen your understanding of them and craft personalized experiences that cater precisely to their preferences.
Elevating Engagement: Brands and businesses gain comprehensive insights into how customers interact with their products and services, leading to enhanced engagement. This deeper understanding helps in fostering more meaningful connections with customers.
Enhanced Customer Profiles: A CDP centralizes, consolidates, and standardizes all customer data points, resulting in enriched customer profiles. This comprehensive view allows businesses to understand their customers even more.
Precision in Targeting: By capturing user activity, a CDP enables refined targeting strategies. This means reaching the right audience, at the right time, and through the right channels, optimizing the impact of marketing efforts.
There are several changes to the Customers, Inbox and Analytics menus related to the implementation of Customer Data Platform.
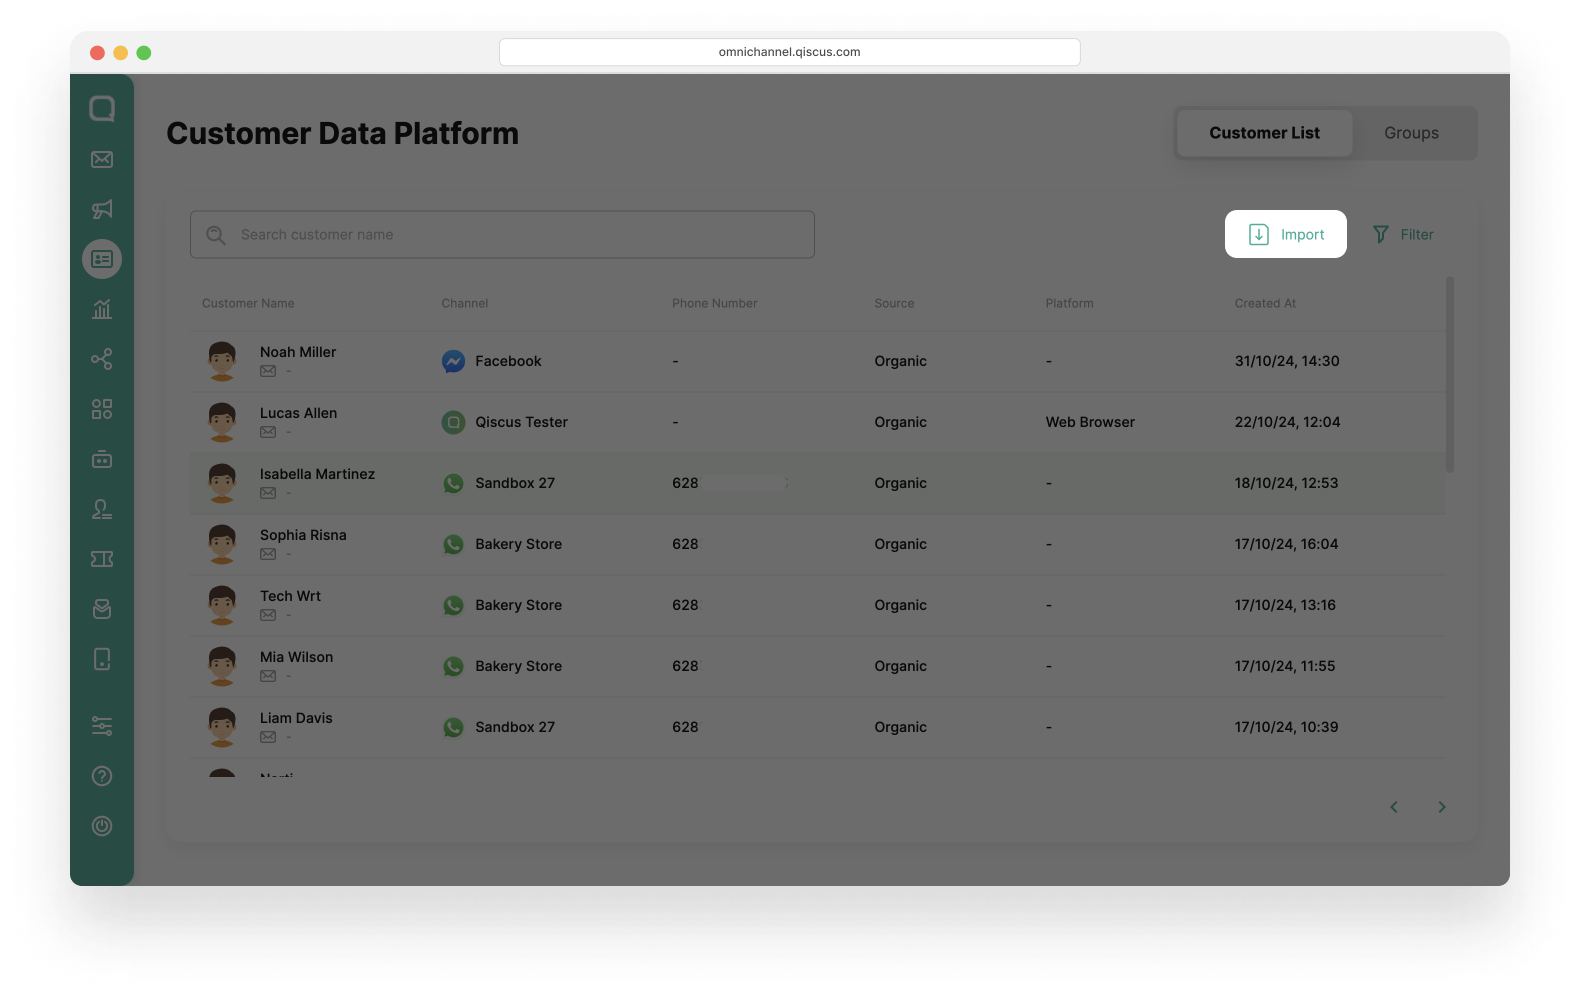
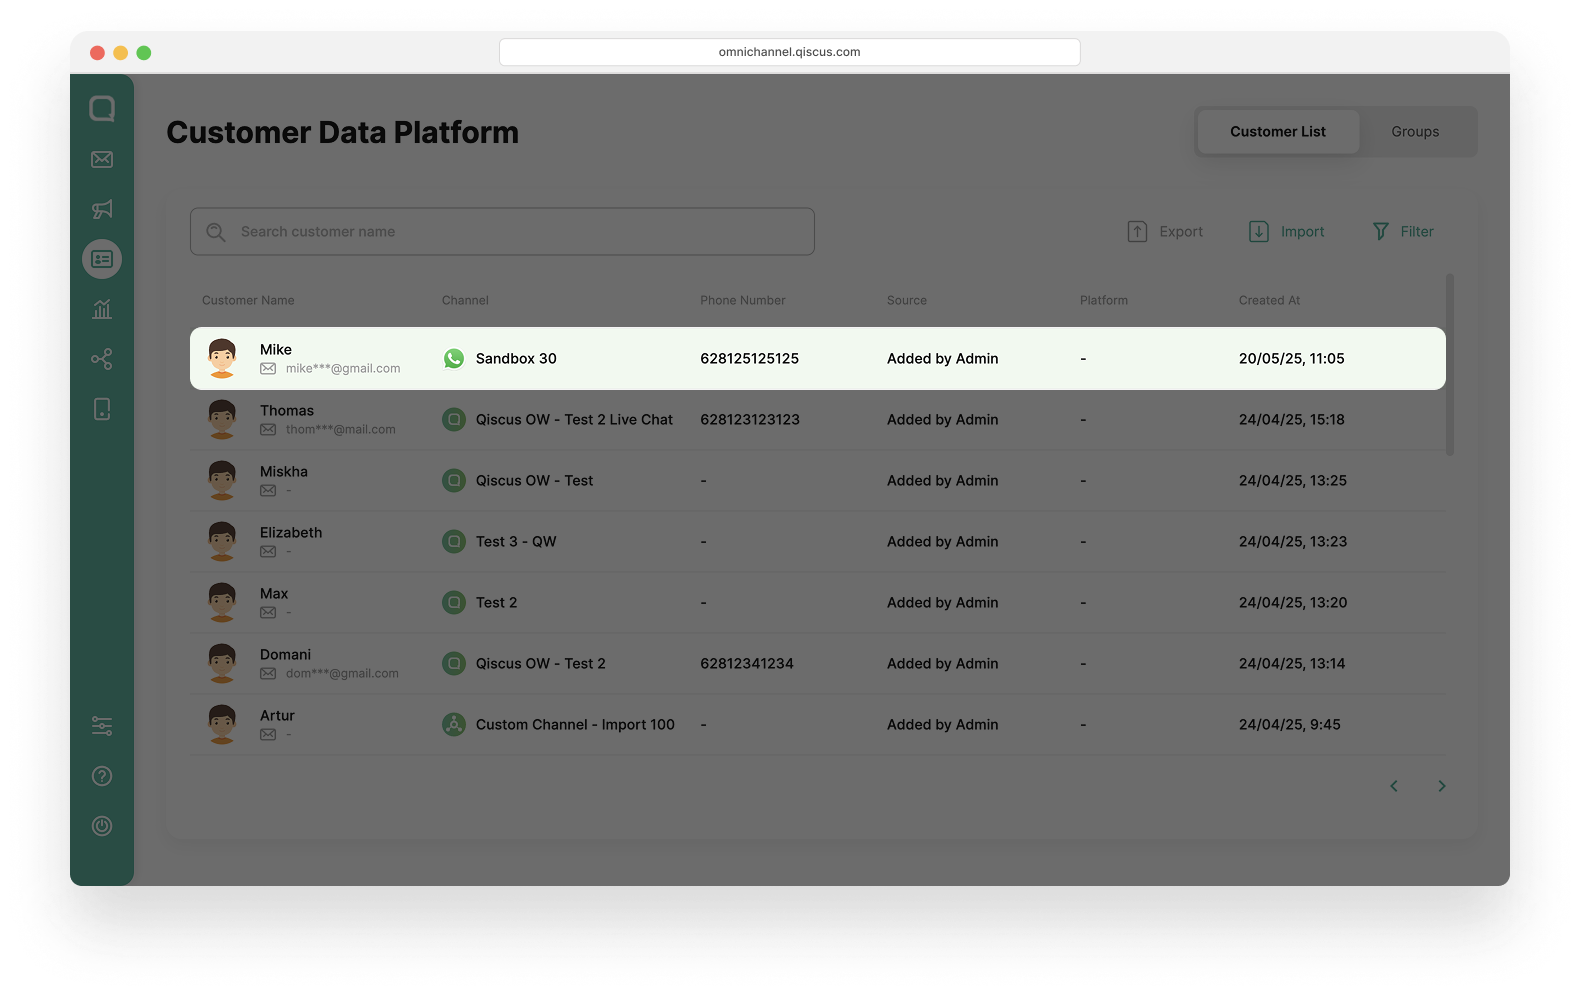
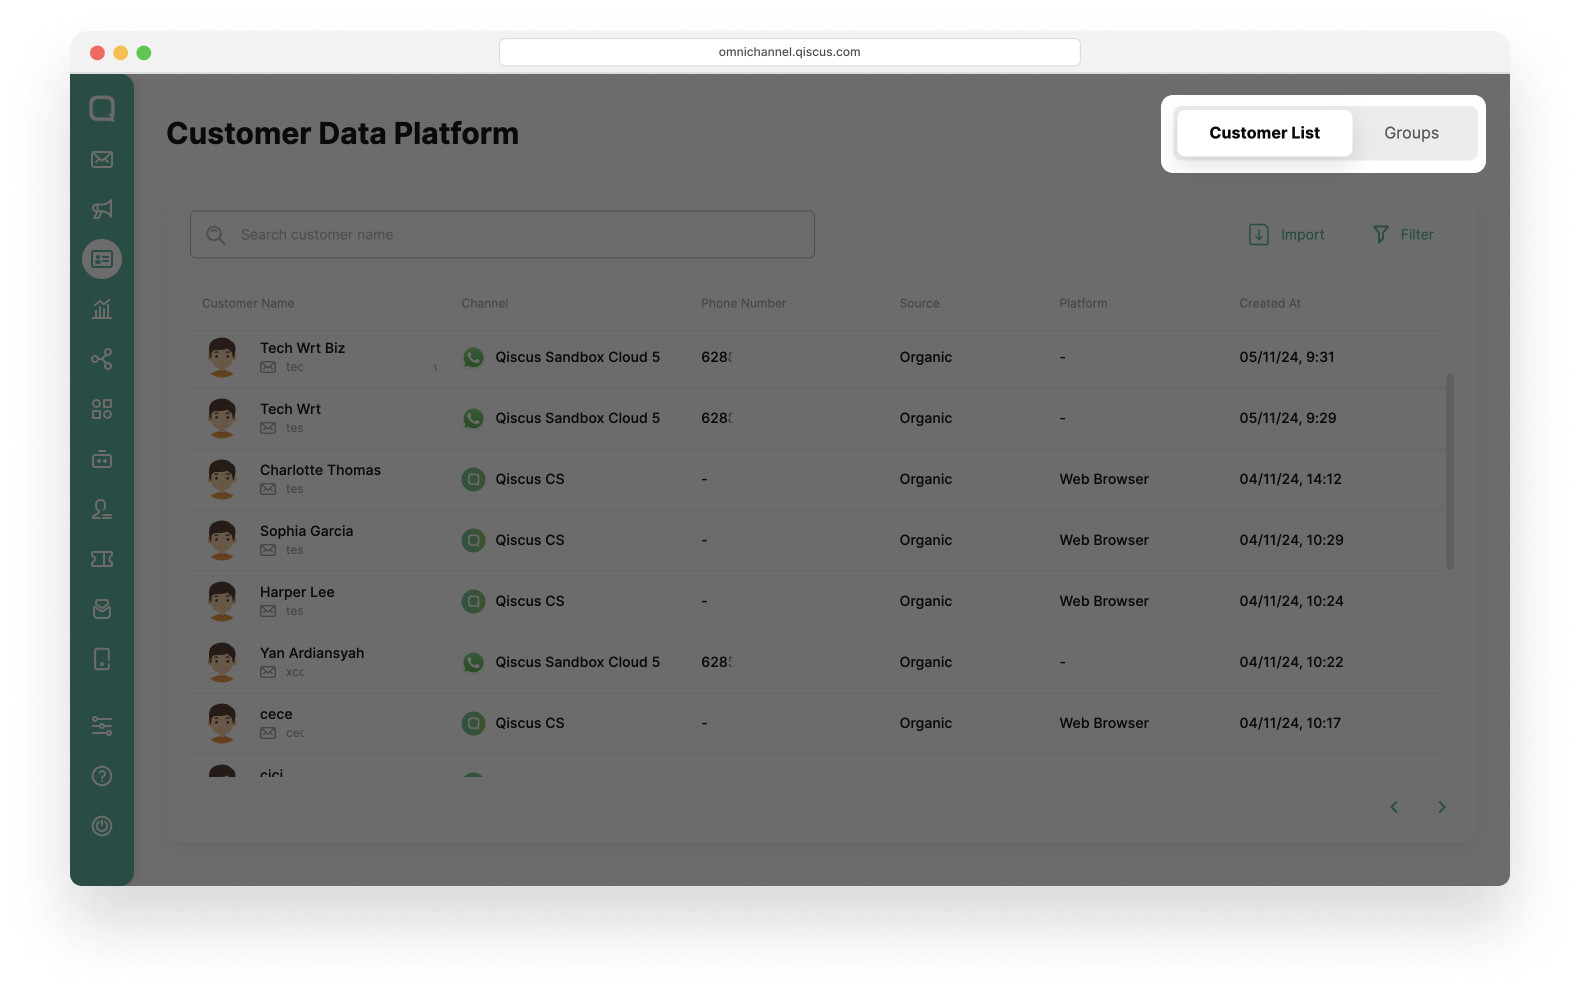
Customers List
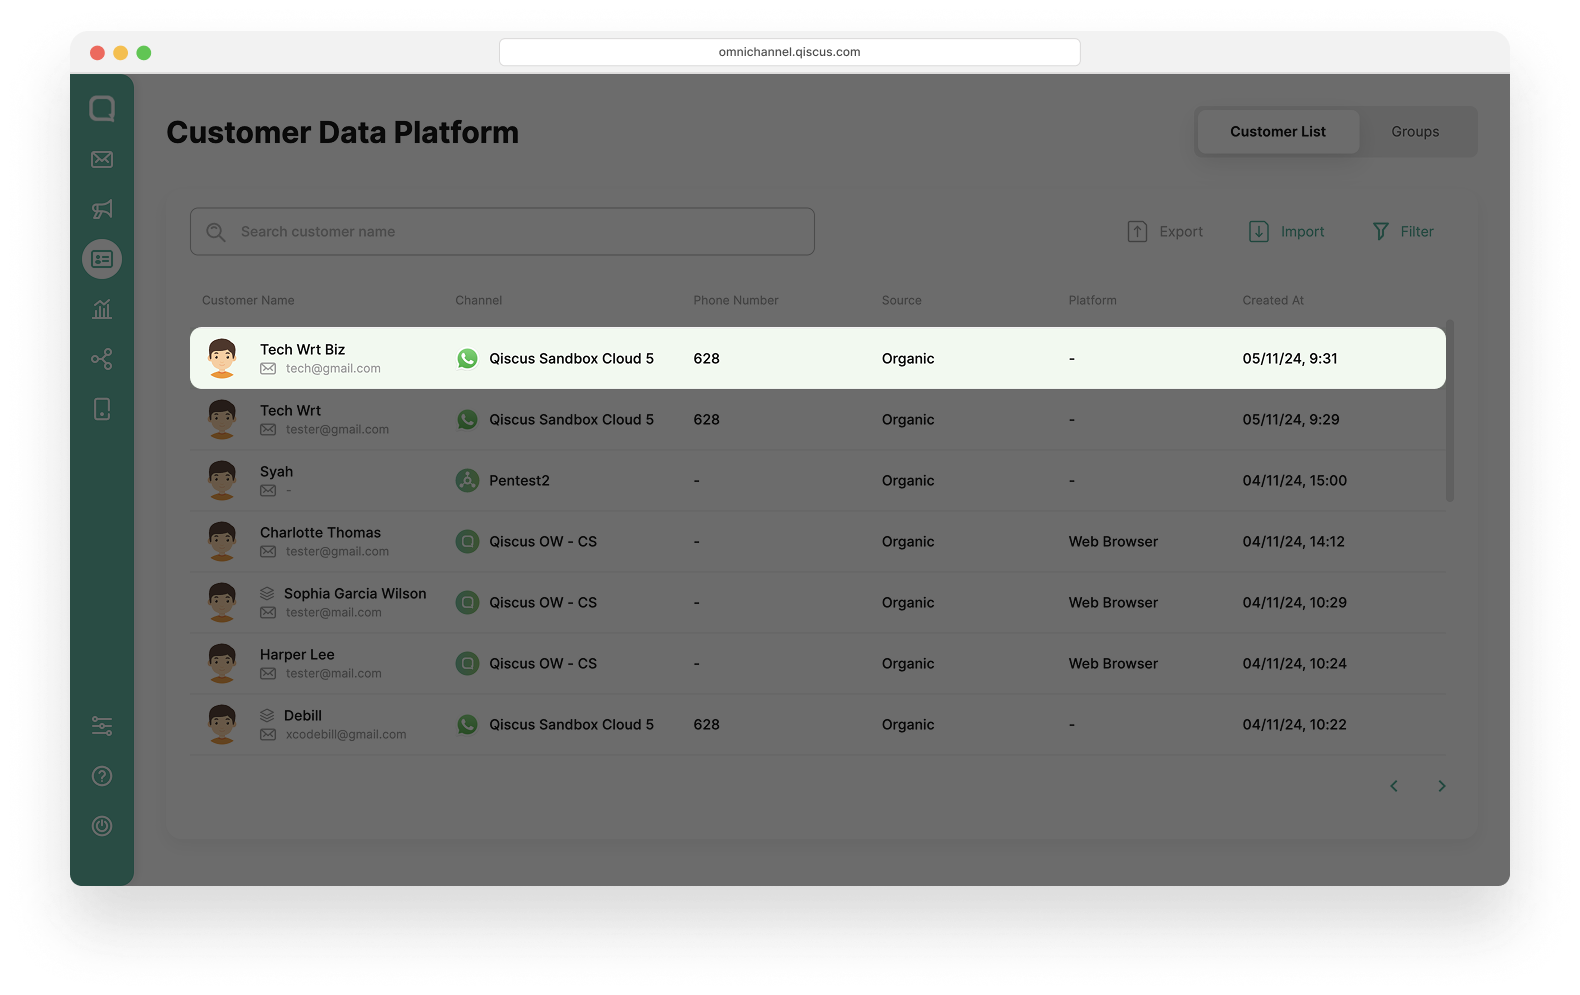
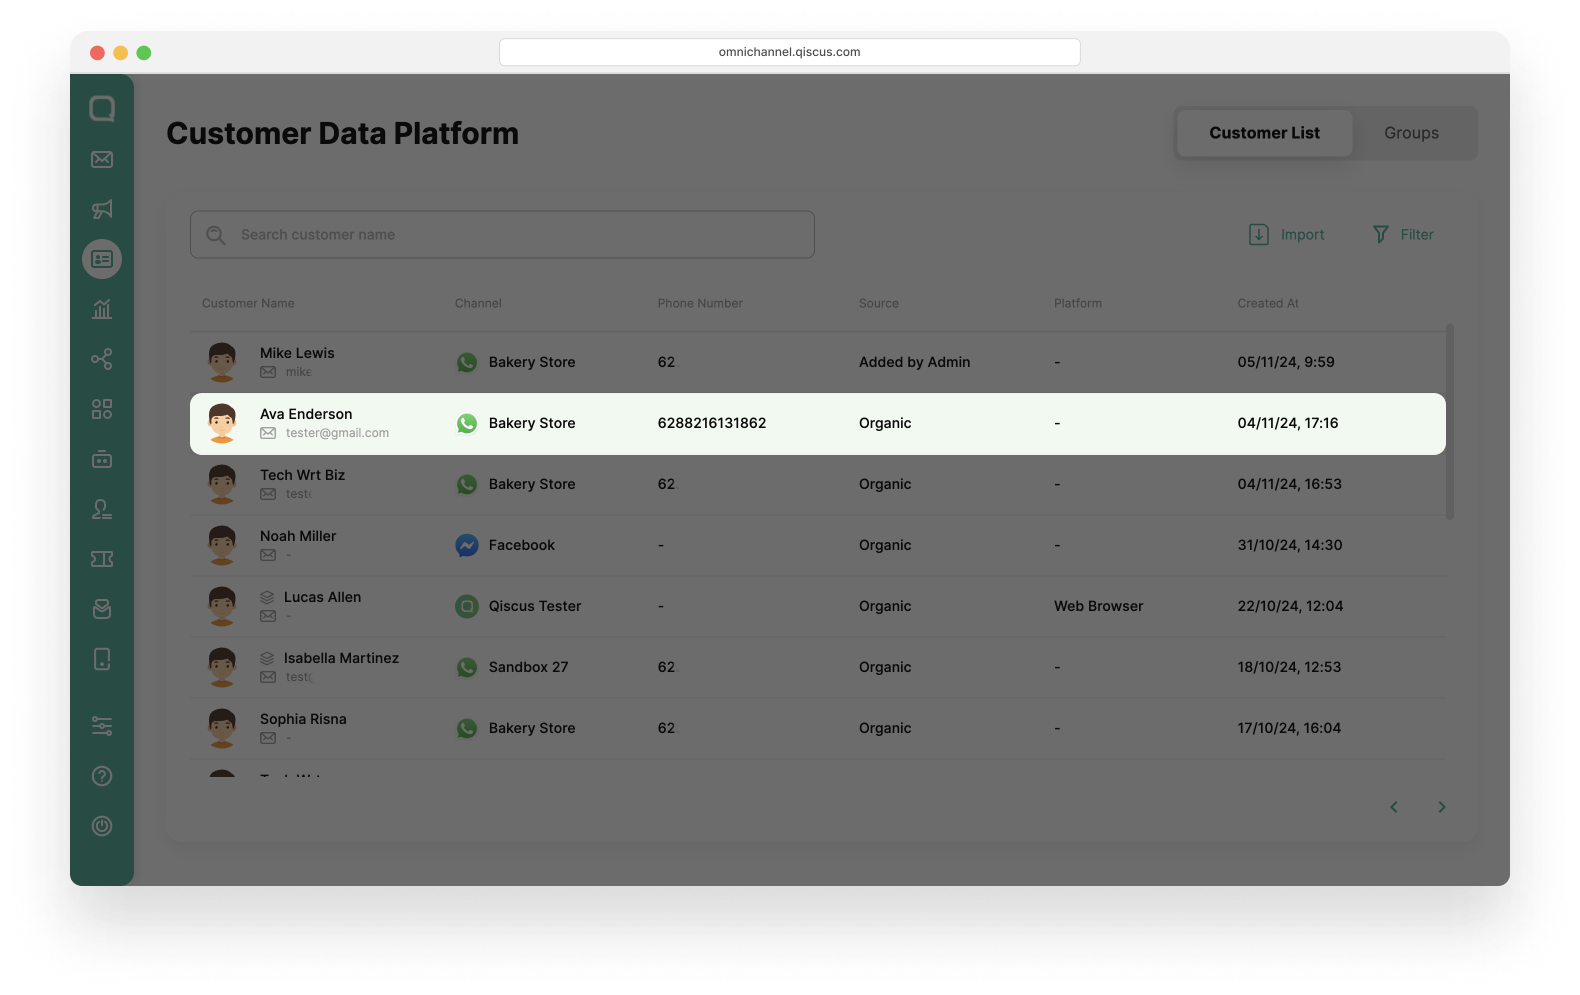
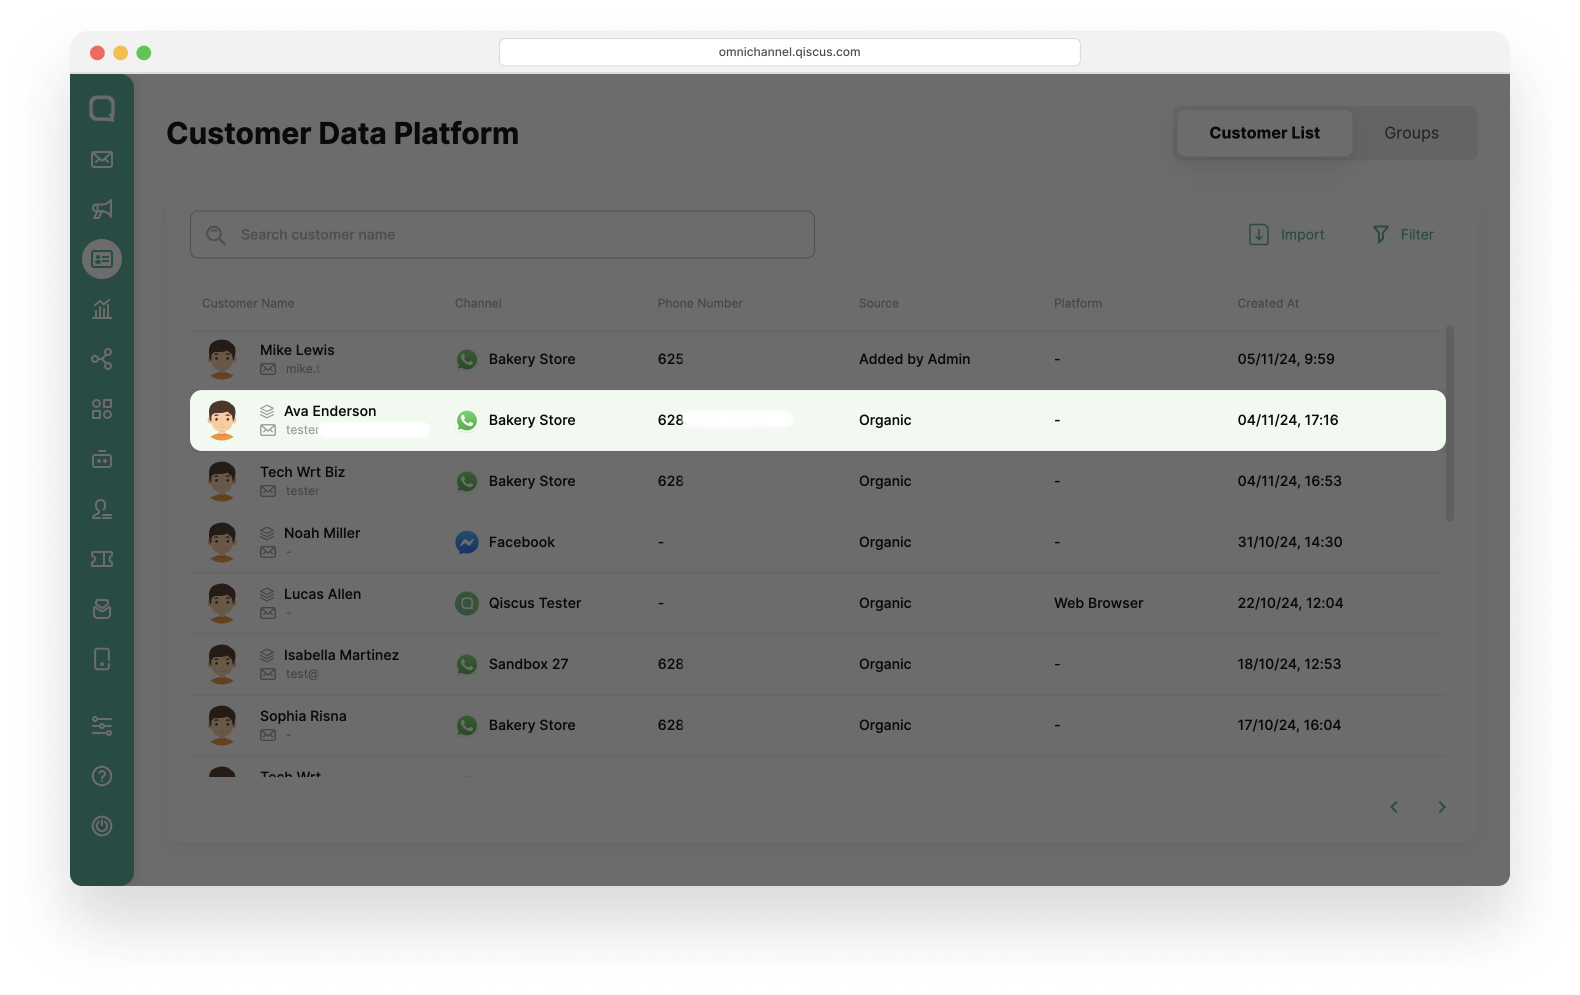
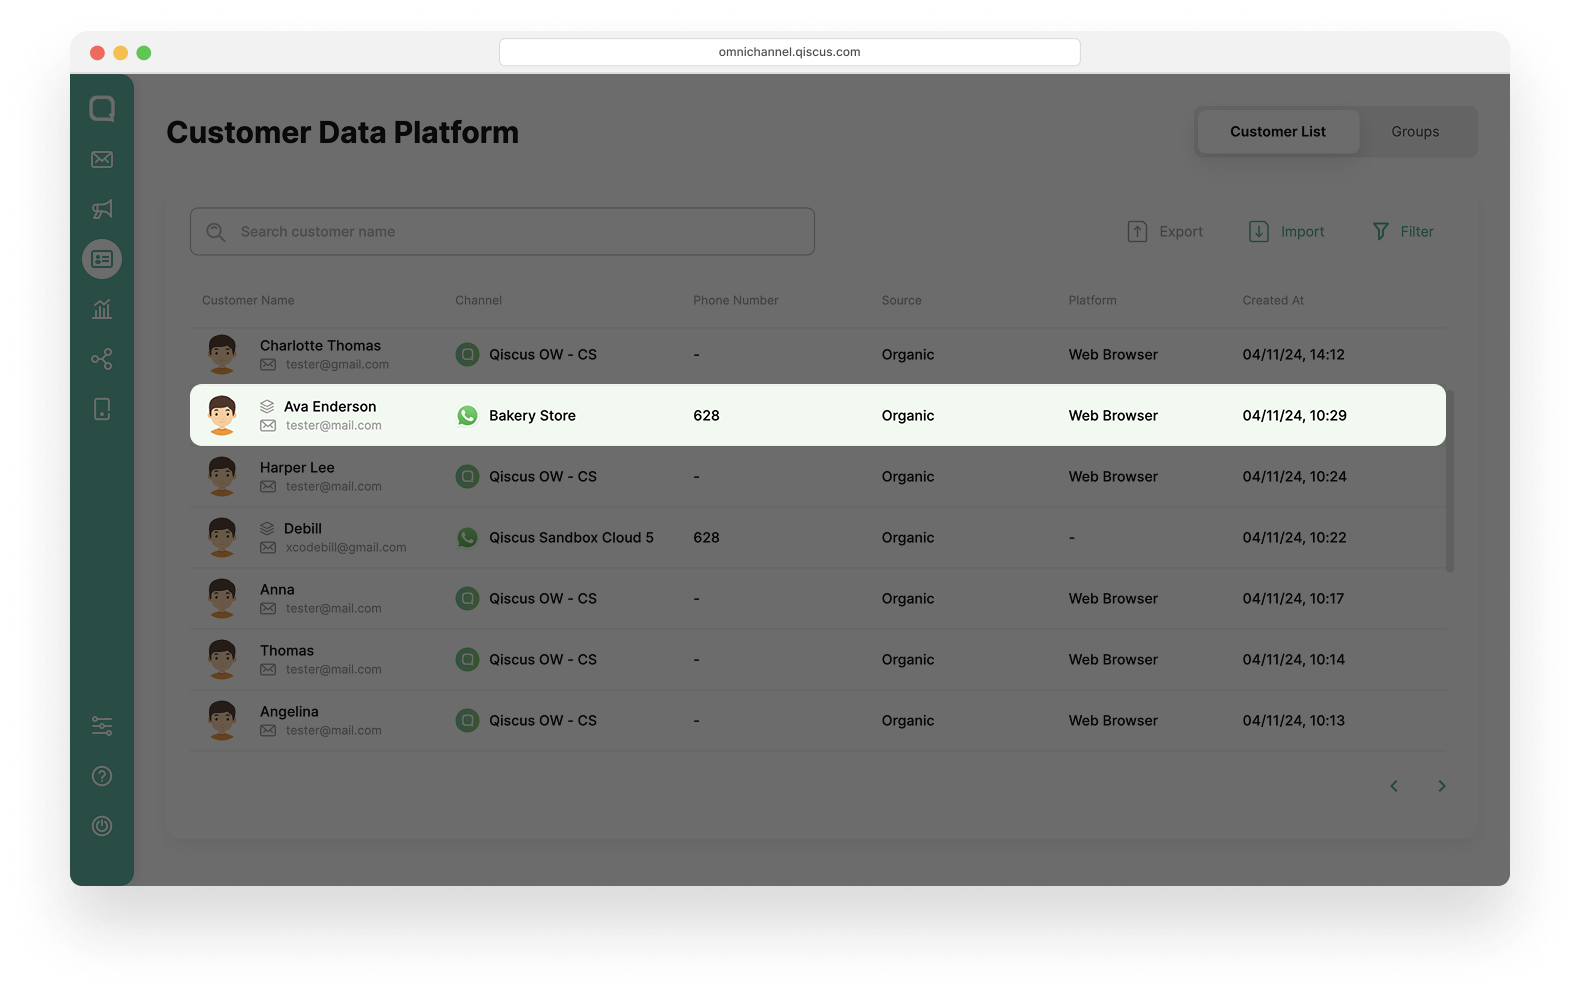
Customer List is a feature on the Qiscus Omnichannel Chat platform that displays a complete list of customers who have interacted with your business. Here, you can view details like customer names, channels, phone numbers, source of communication (Added by Admin, Ads, Organic, and Broadcast), and platforms they accessed (web browser or mobile apps). The Customer List feature enables you to efficiently monitor and manage customer data in a comprehensive way.
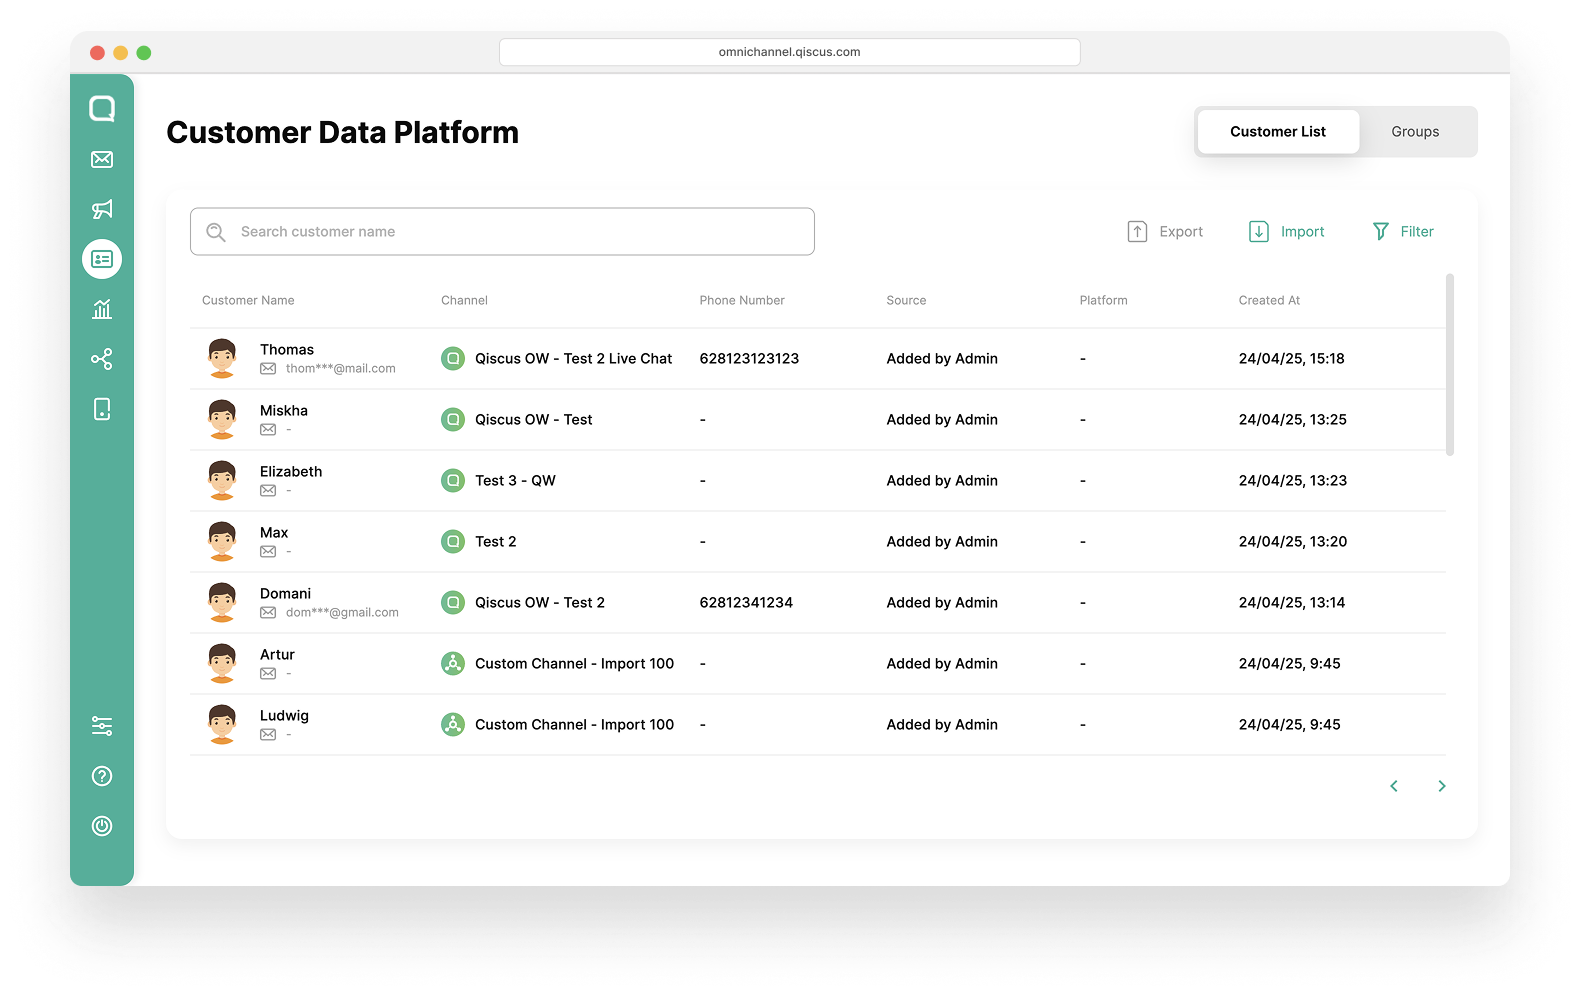
Added by Admin = Customer data created when the business manually adds it from the inbox.
Ads = Customer data created when a customer contacts the business through WhatsApp Ads.
Organic = Customer data created when a customer directly contacts the business.
Broadcast = Customer data created when the business sends a WhatsApp broadcast.
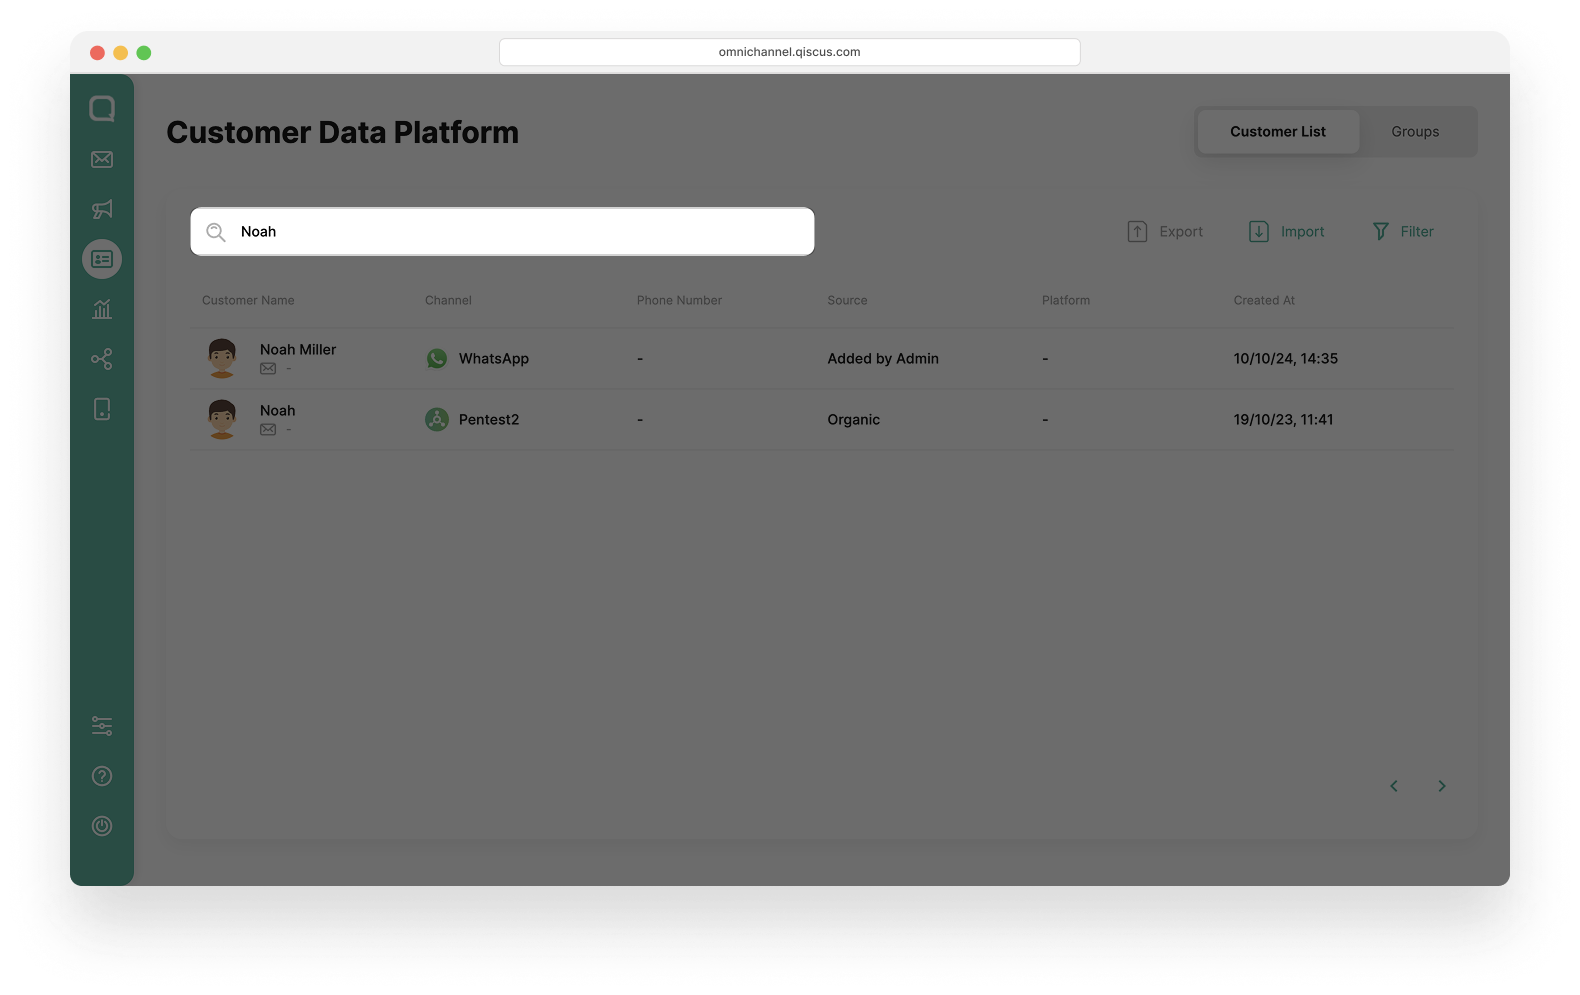
Search Customer
This feature allows you to quickly and efficiently search for customer data. You can search by customer name like this:
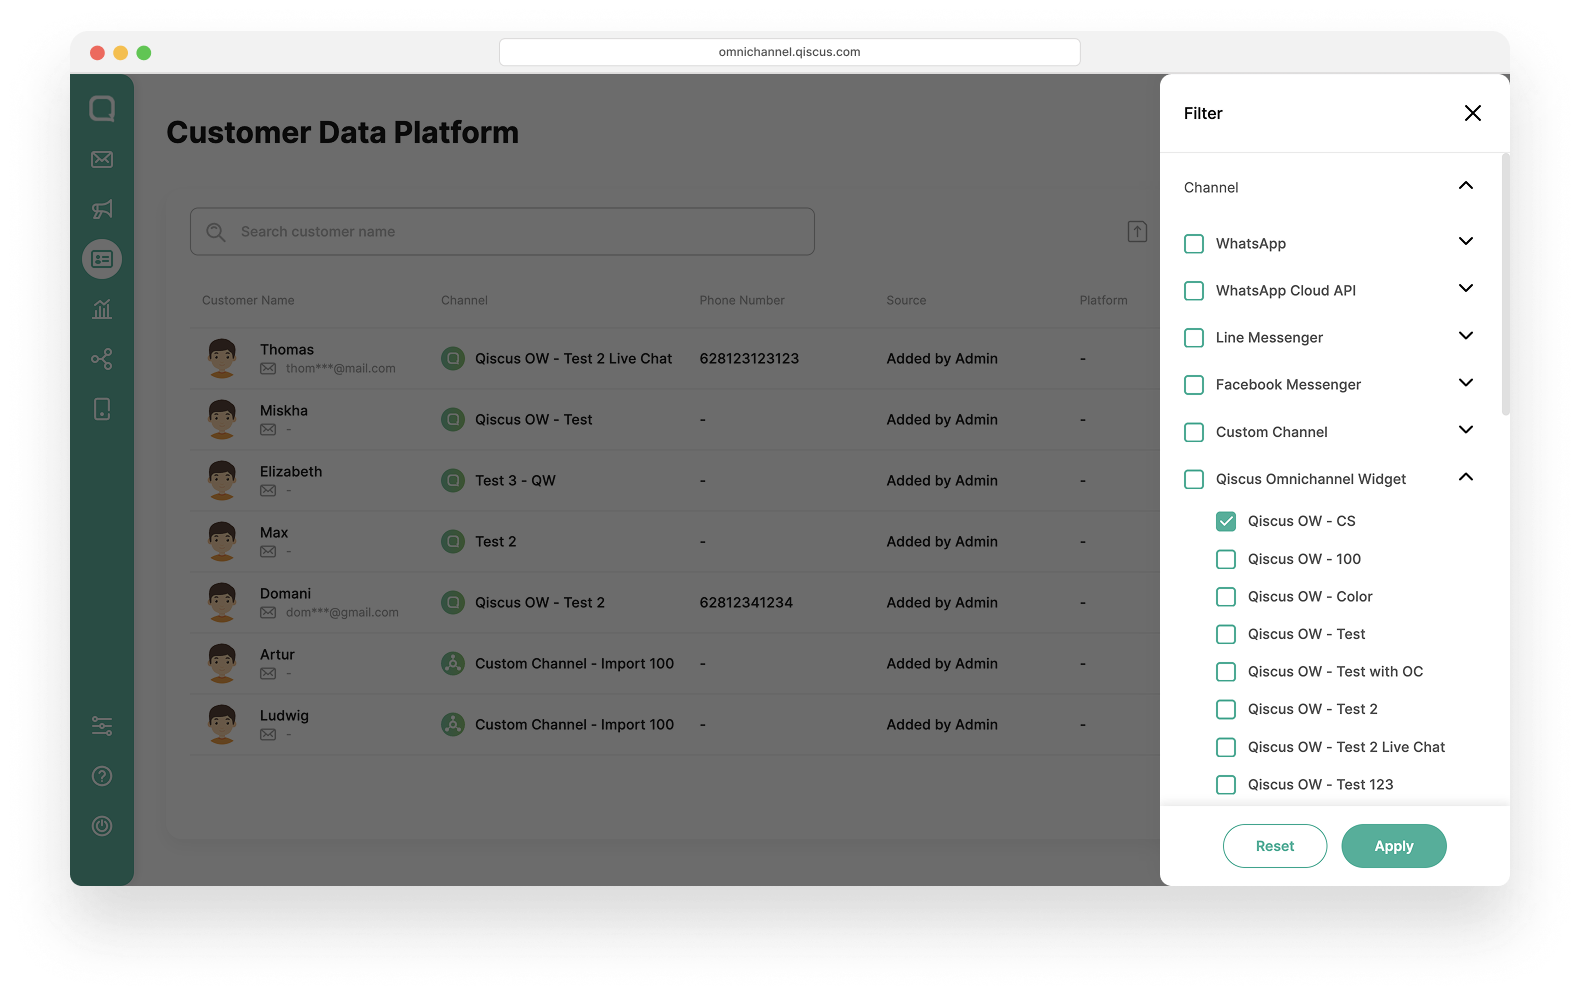
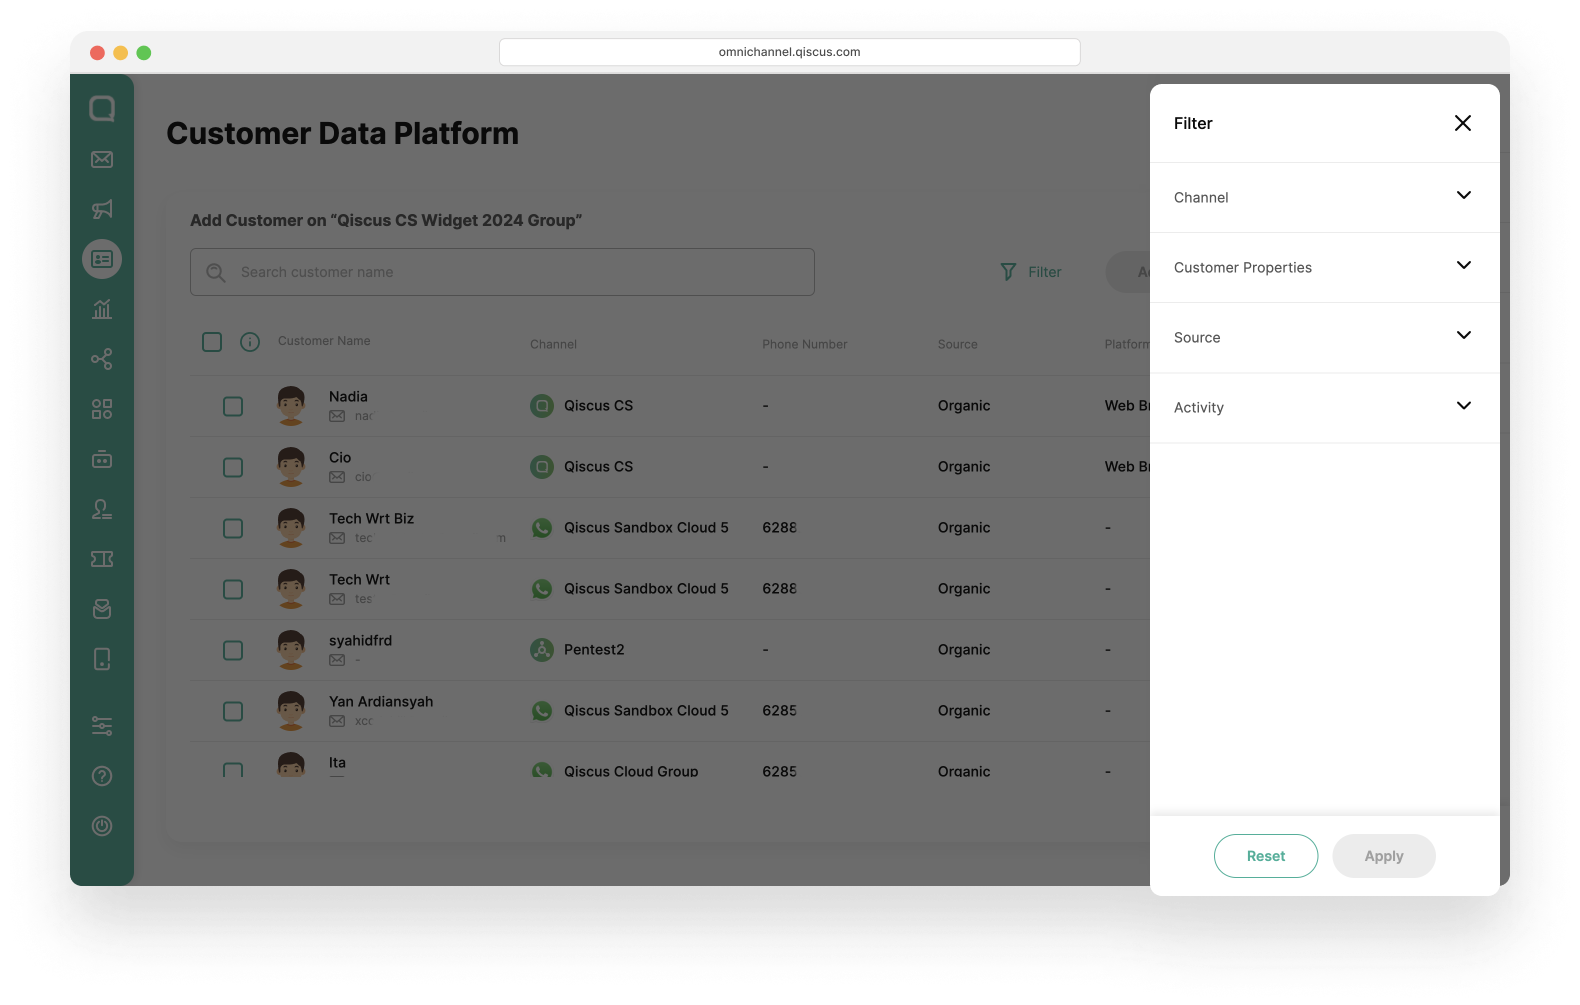
Filter Customer
With the filter feature, you can refine the customer list based on specific criteria to display more relevant information. Several filter options are available, including:
Filter by Channel
Filter by the communication channel used or integrated.
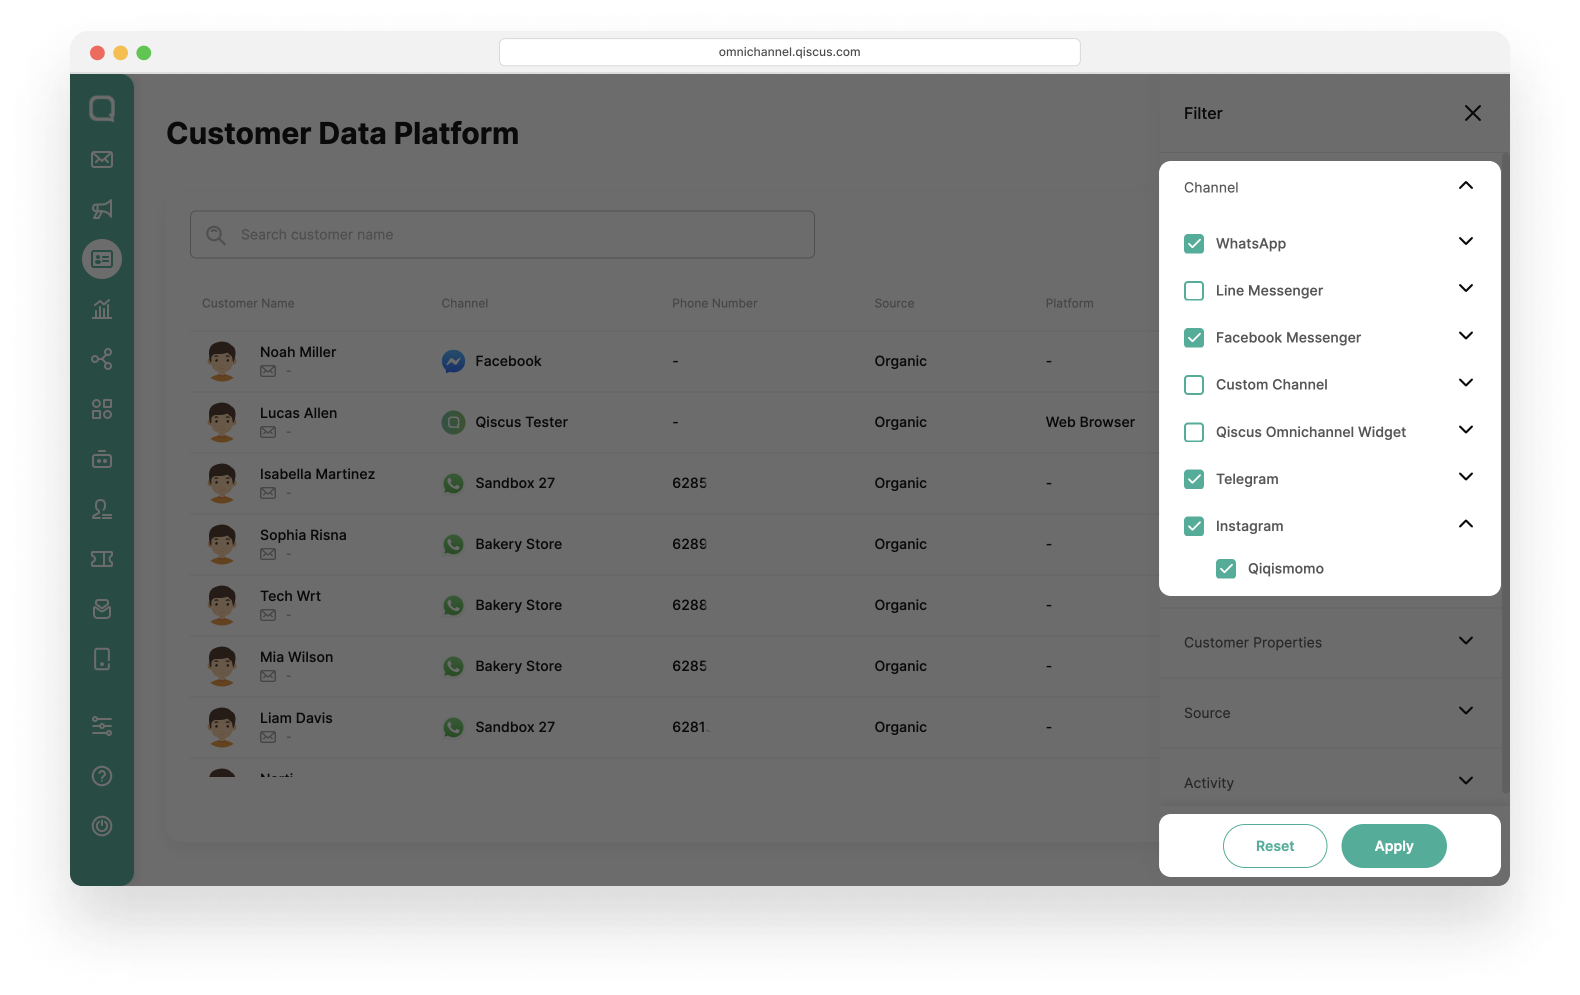
If you filter channels other than WhatsApp, the Ads and Broadcast sources will be automatically disabled.
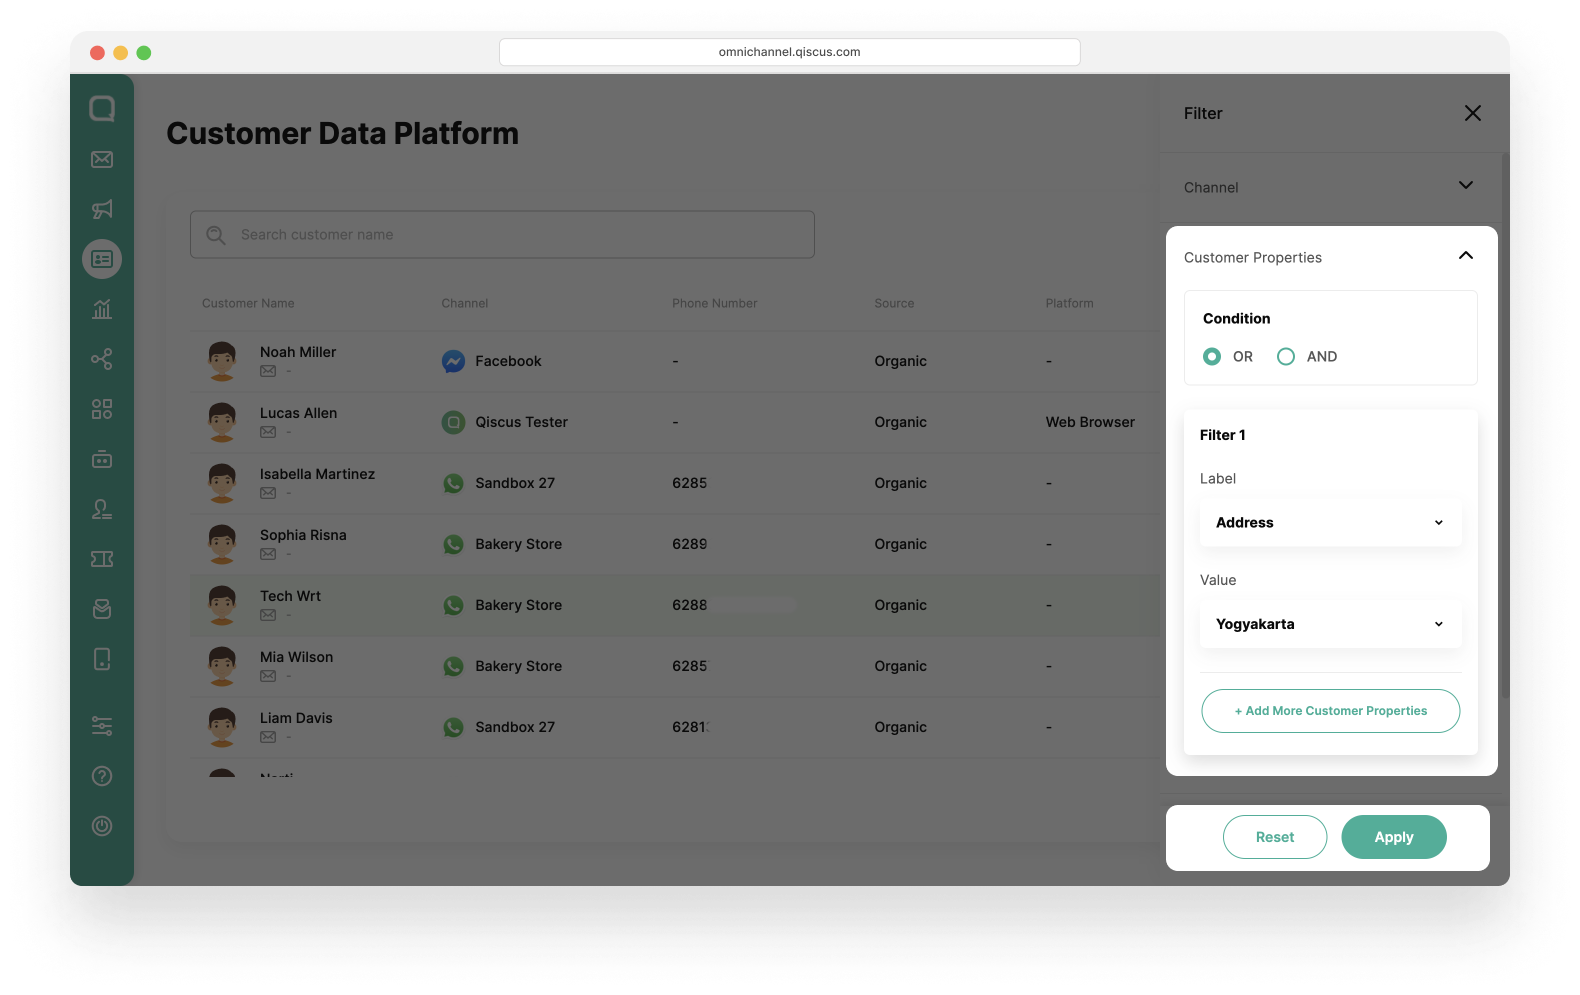
Filter by Customer Properties
Filter based on specific attributes assigned to the customer.
Filter by Source
Filter based on the source of the customer’s communication (Added by Admin, Ads, Organic, and Broadcast)
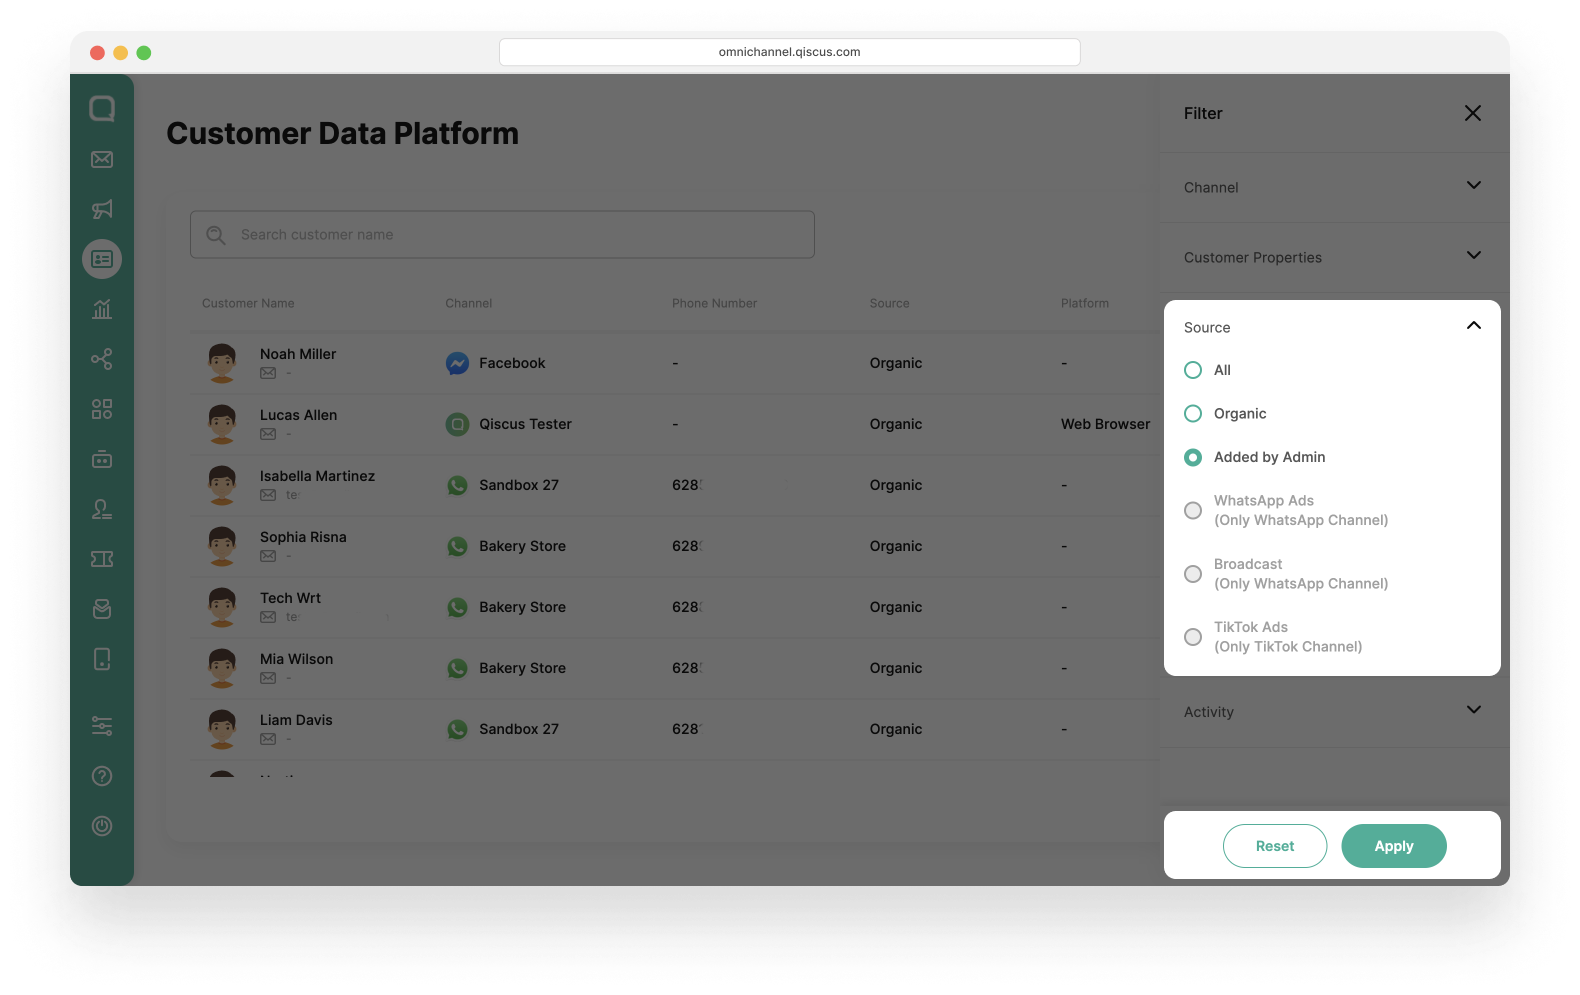
Source Ads and Broadcast will be disabled if you do not select WhatsApp channel.
Source Ads and Broadcast will be automatically enabled and can be selected if you select the WhatsApp channel.
If you have selected a WhatsApp channel, then selected ads, then changed the channel filter to another channel such as Line, then the source will change to All.
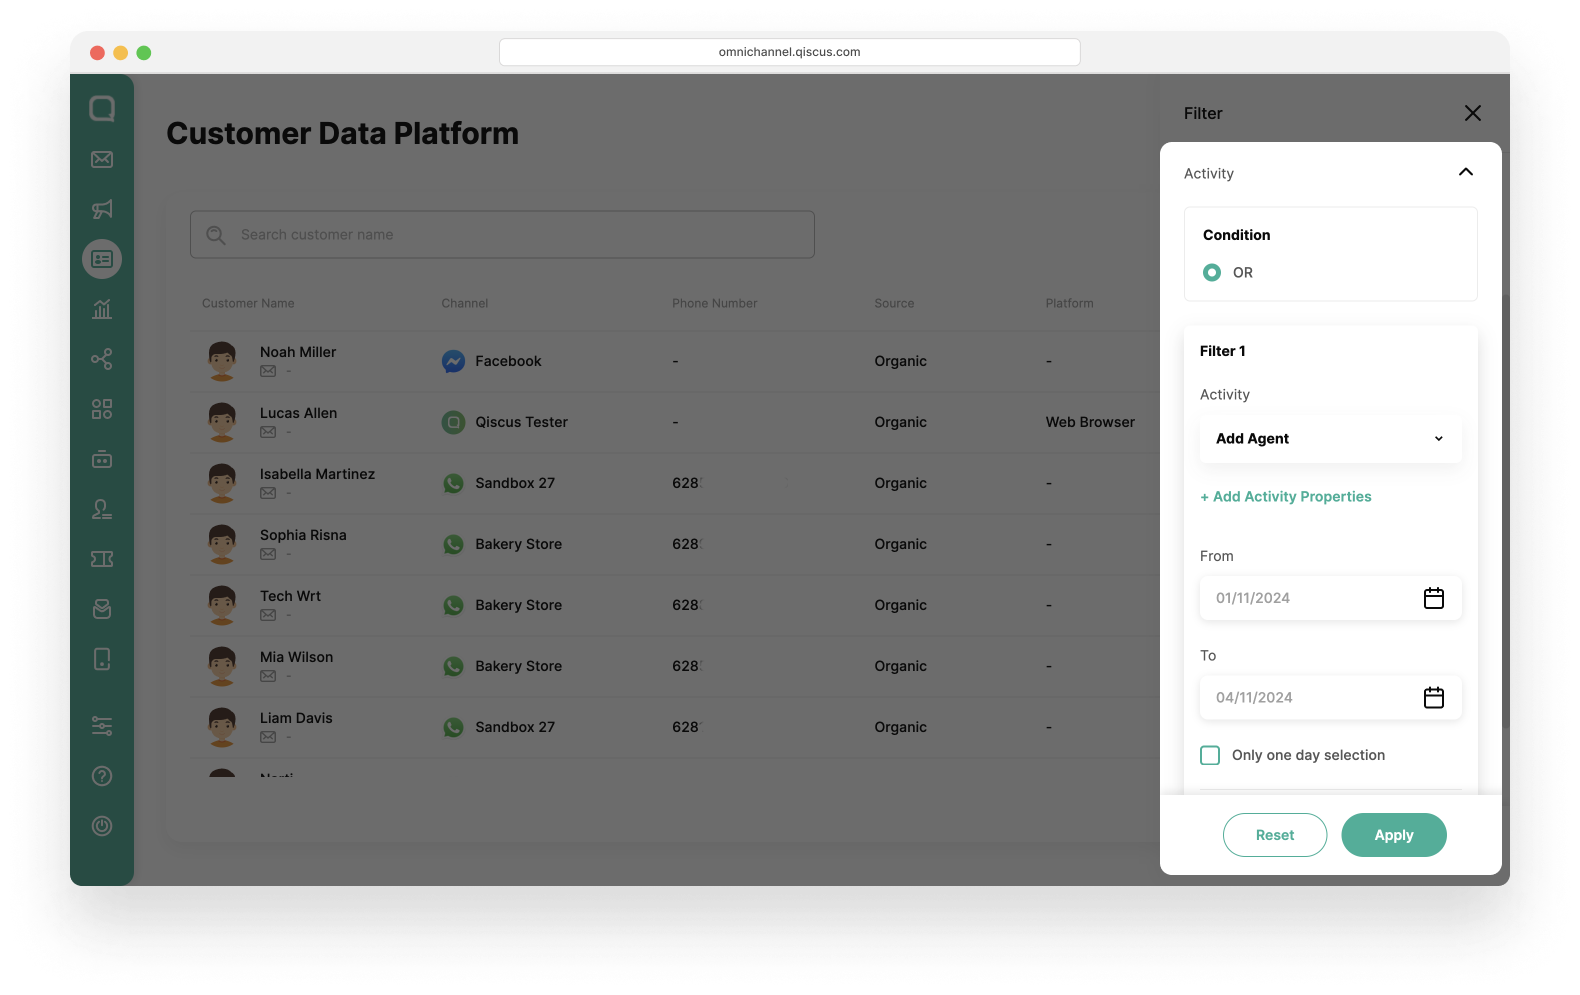
Filter by Activity
Filter based on the customers activity and activity date. Enabling you to monitor recent engagement levels effectively.
Activity Type:
Available Activity: These are predefined activity types available in the Qiscus Omnichannel Chat platform.
Custom Activity: These are specific activity types created by your business or ability to incorporate external activities from third-party apps or external Qiscus sources. For more information click here.
Activity Date:
Date Range: Select a start and end date to view customer activities within a specific timeframe.
Single Day: Choose a single day to filter activities that occurred on that date only by checklist the One day selection checkbox.
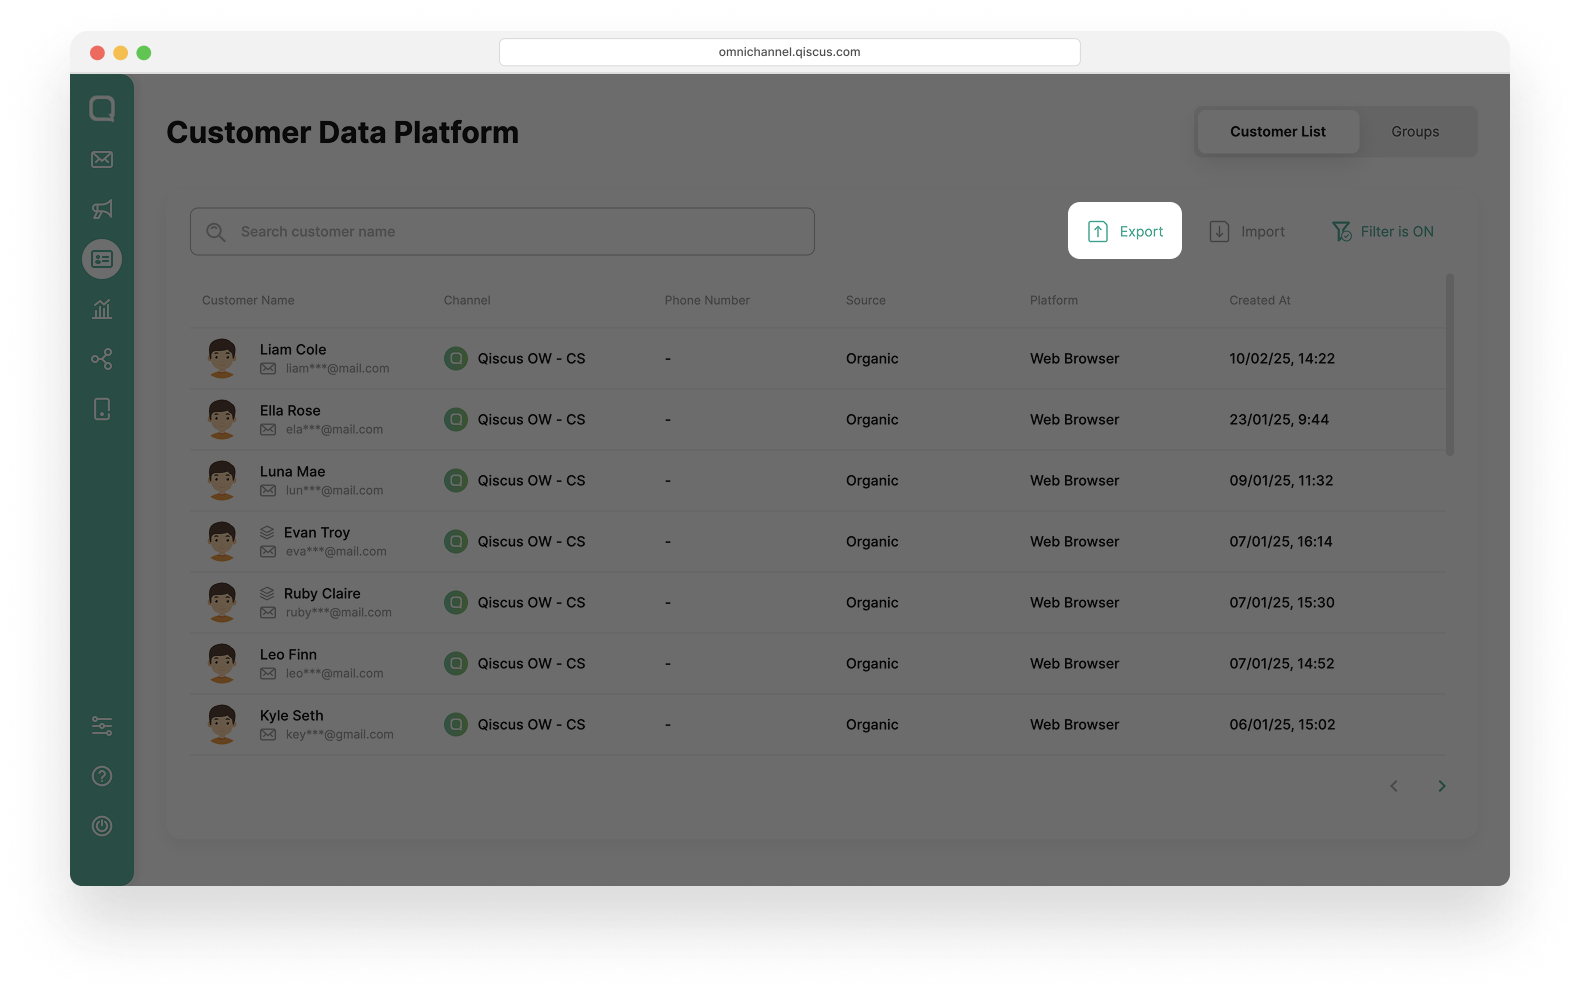
Import & Export Customer Data
The Import & Export feature allows you to manage customer data efficiently. With Export, you can download filtered customer data for your business needs. With Import, you can bulk upload new customer data using a supported CSV format.
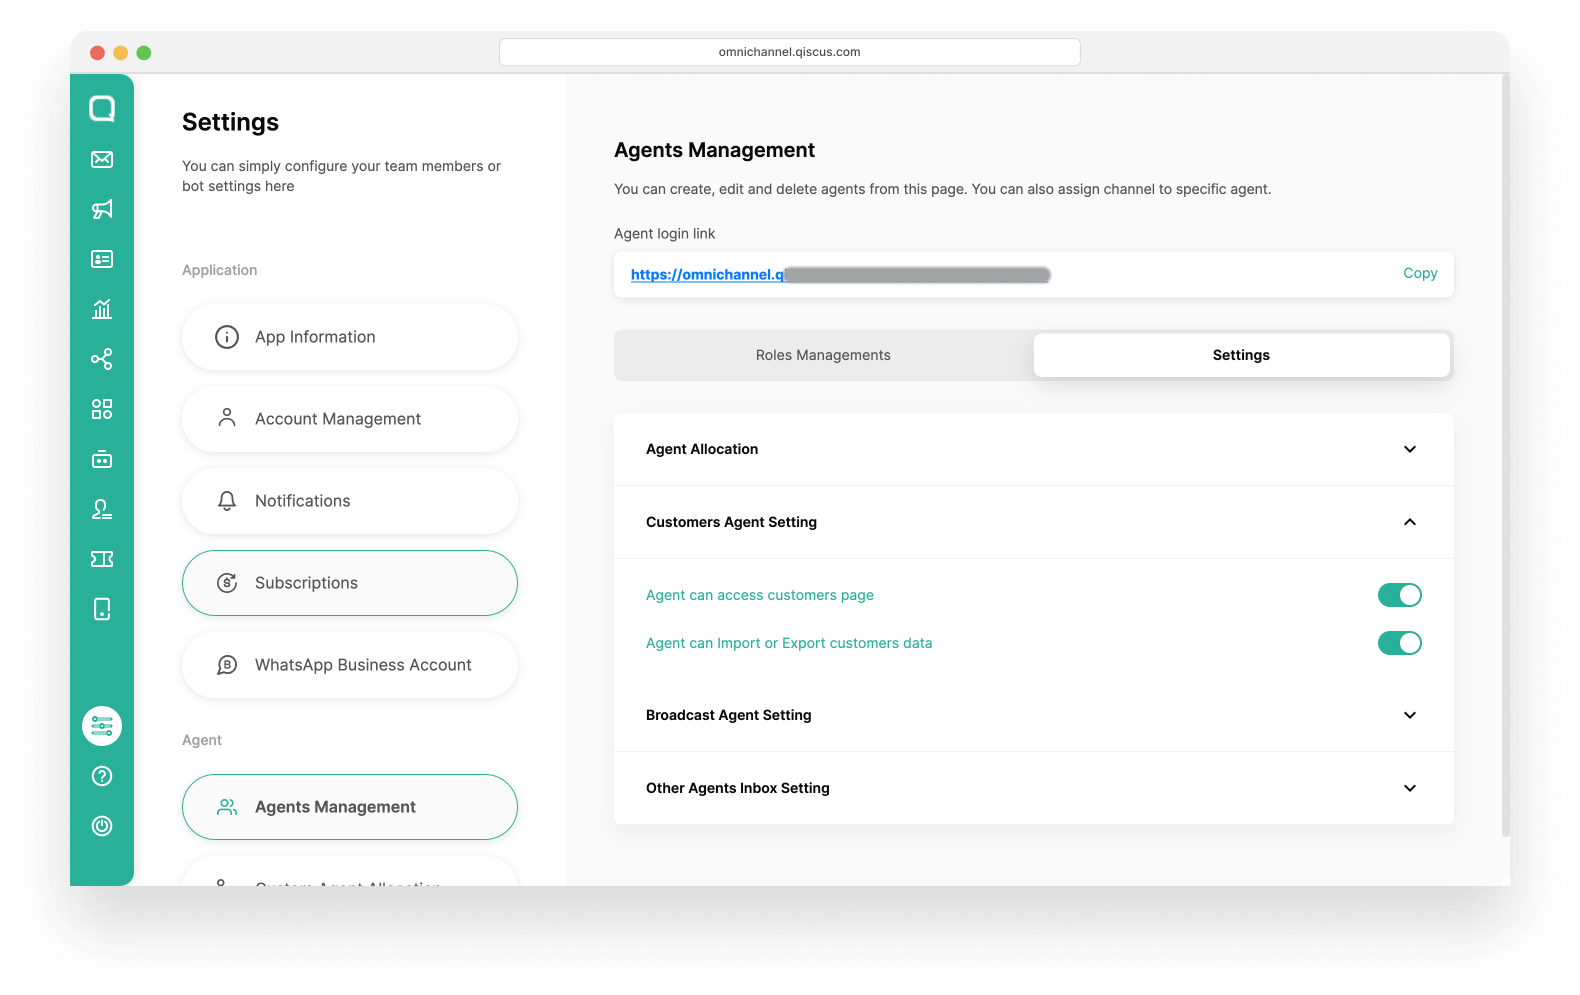
By default, only an admin can import or export customer data. To grant agents access to this feature, go to the Settings menu > Agent Management > Settings tab, select Customers Agent Setting, and enable the "Agent can Import & Export Customer Data" toggle.
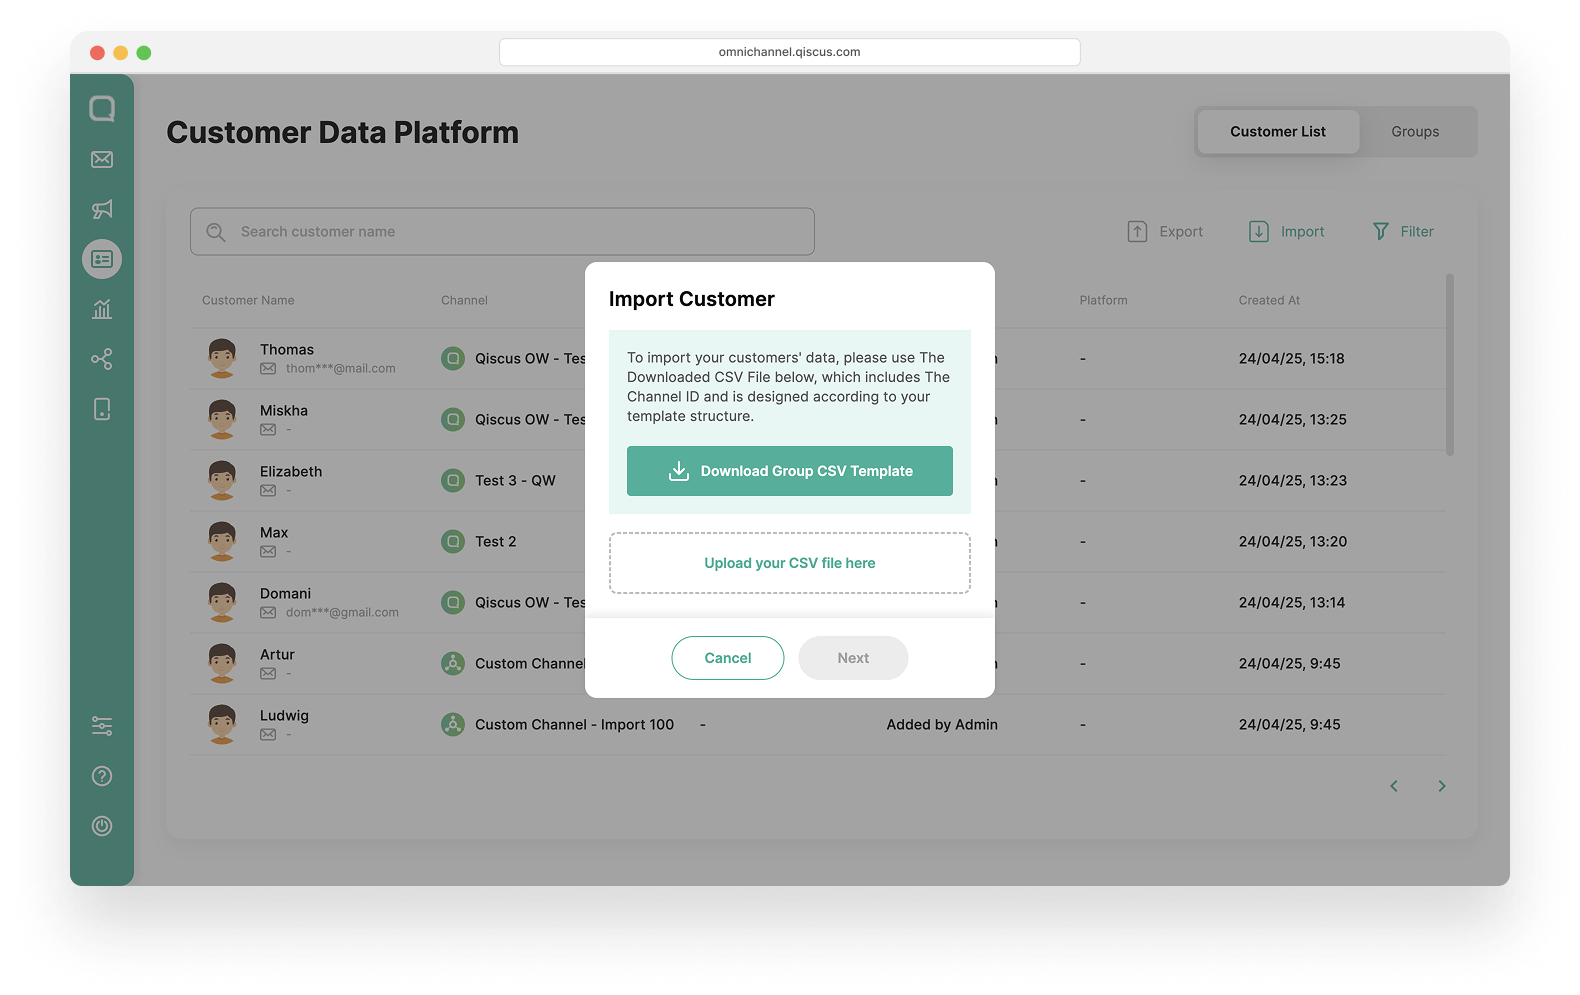
Import Customer Data
You can easily add new customers to the list by using the import feature. The data upload process is quick with support for commonly used file formats. Ensure the file format matches the supported template to minimize upload errors. You can follow these step to Import Customer Data:
Click the Import icon at the top of the Customer List.
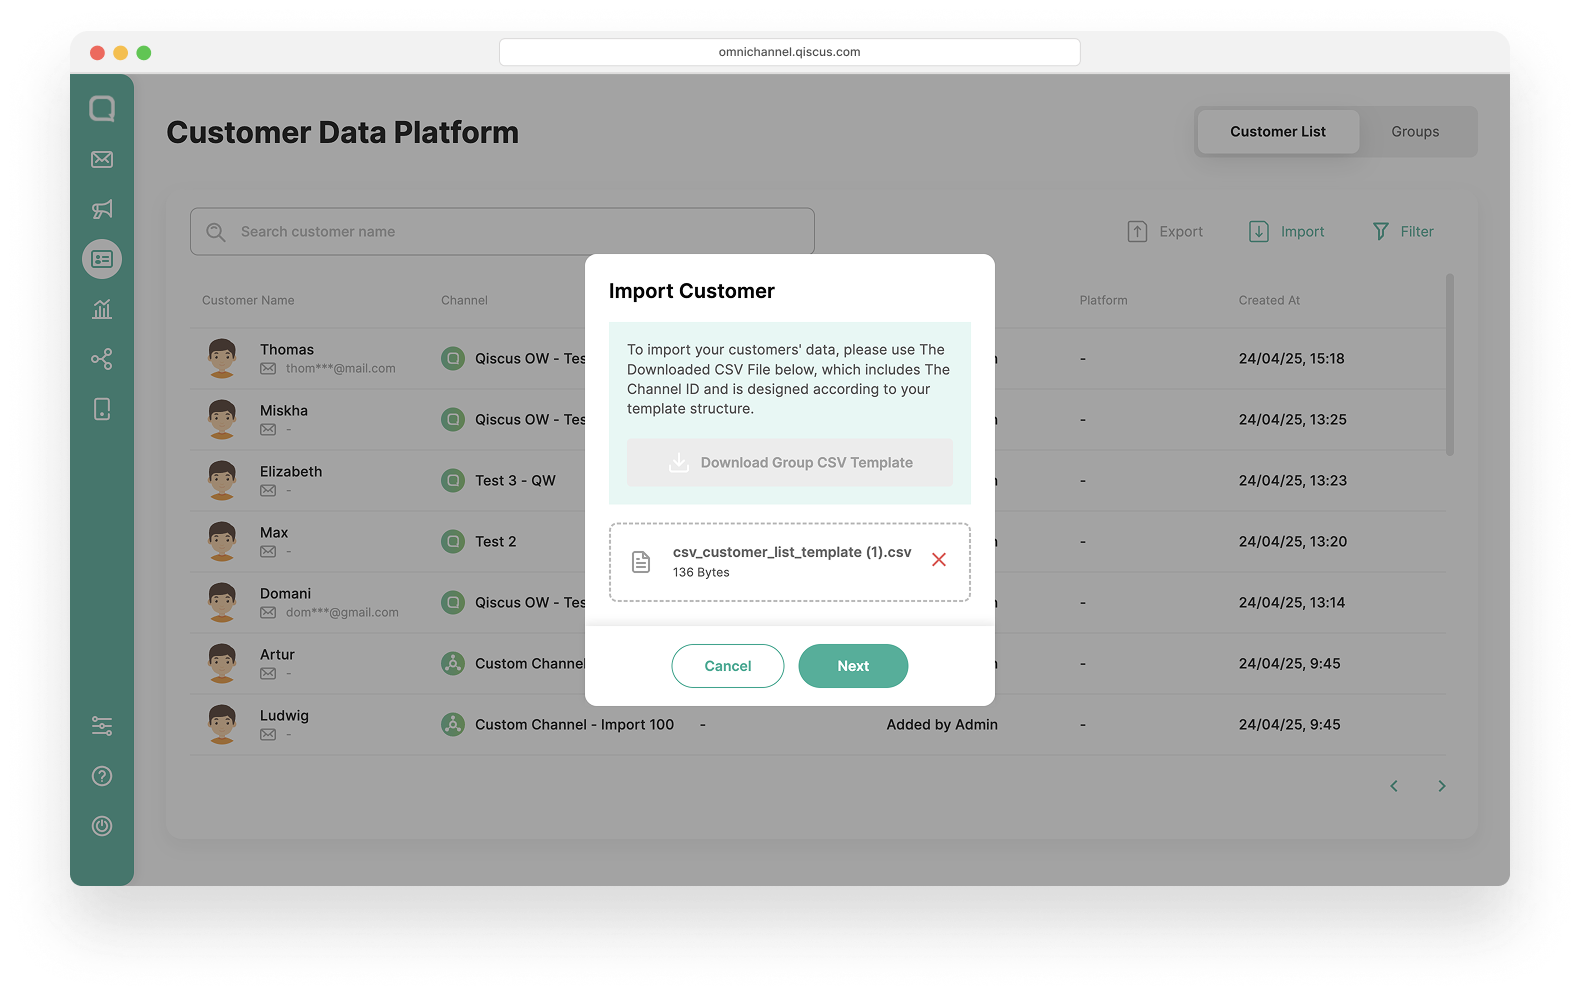
Download the template to match the required format. After the template is downloaded, fill in customer data in the template, save it. After that click Upload your CSV File here then click Next.
name = Your customer’s full name.
identifier = Unique ID of your customer for the channel.
example
Qiscus Widget channel = 628123*** or a*@g**.com (Phone number or email based your channel configuration)
WhatsApp channel = 628123*** (WhatsApp phone number)
Instagram channel = 123123*** (Instagram unique ID)
Telegram = 15937*** (Telegram unique ID)
Line = U1b123c708123be1e4**3f9 (Line unique ID)
Facebook = 891123123*** (Facebook unique ID)
Custom = based your custom channel identifier type
Tiktok =u5VvqMelDwP+tgE*** (Tiktok unique ID)
email = Your Customer’s email address.
phone_number = Your Customer’s phone number.
channel_id = Channel identifier. Download the CSV sample to see supported formats and examples.
source = Channel source identifier. Download the CSV sample to see supported formats and examples.
Supported channel source identifier list =
qiscus
telegram
wa
line
fb
ig
custom
tiktok
channel_name = Your Integrated channel name.
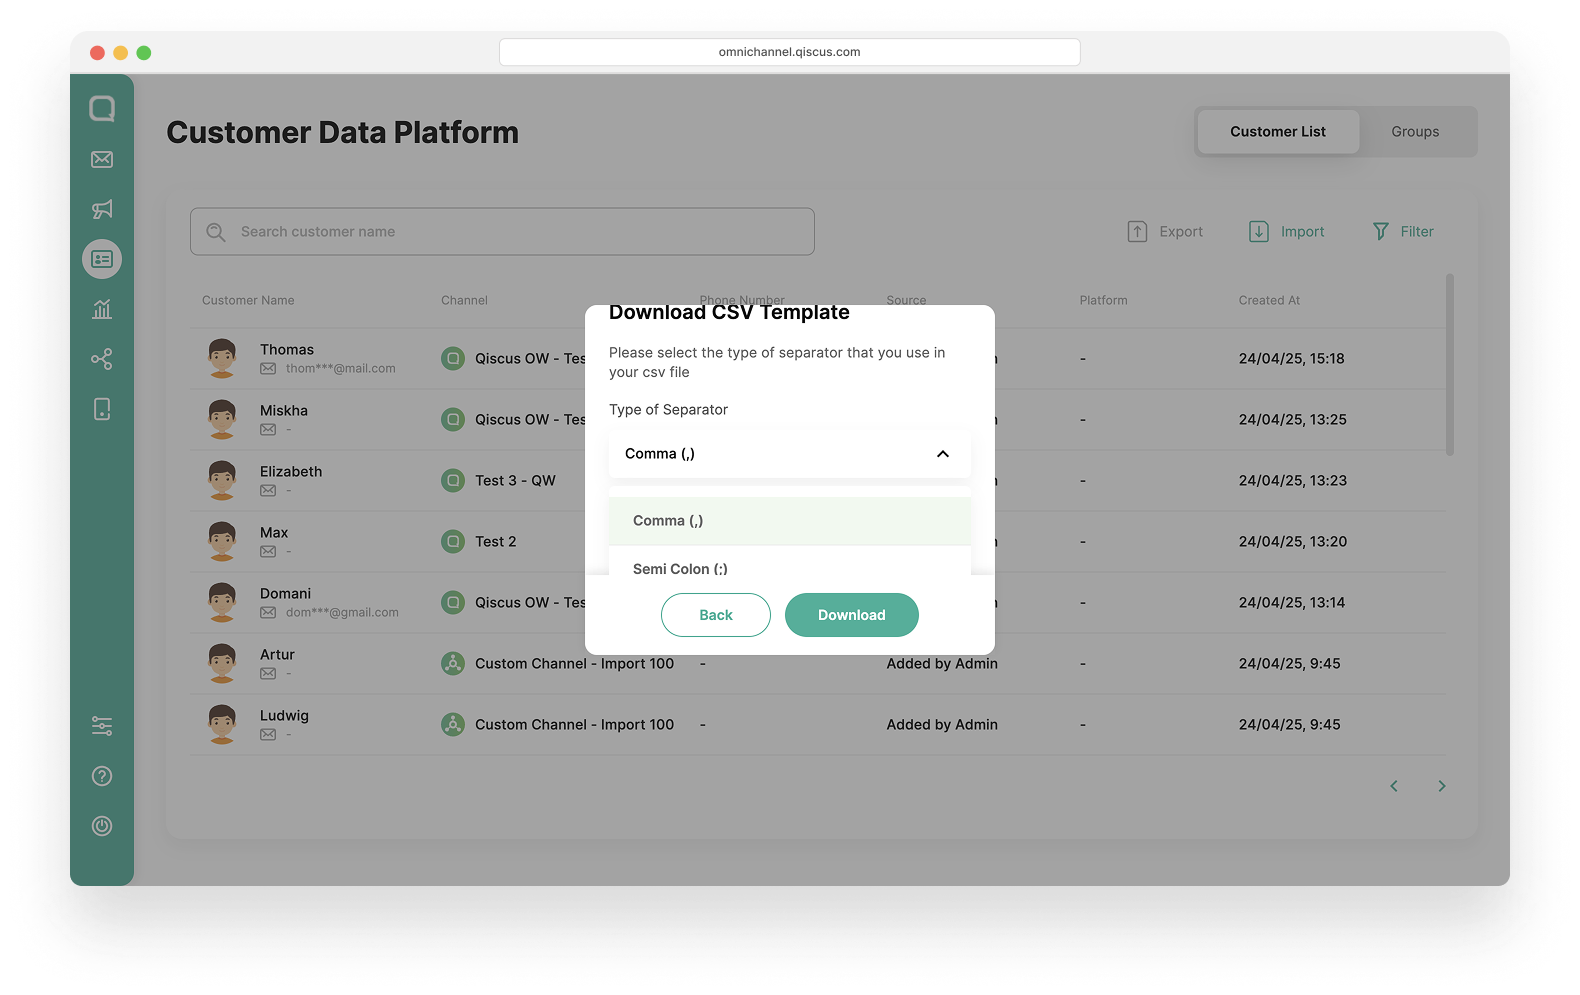
Select the separator type (comma or semicolon).
Click Upload.
The import feature supports a maximum of 1,000 customers per file. If your file exceeds this limit, a file upload error will occur. Split your file into smaller batches and try again.
The new data will be added to the Customer List once the process is complete.
Export Customer Data from Filter
This feature enables you to export customer data based on the applied filters. The exported data is saved in an easily accessible format (CSV), making it convenient for further analysis or business purposes. Follow these step to Export Customer Data:
Go to the filter feature and filter customers according to your needs.
After applying the filter, click the Export icon.
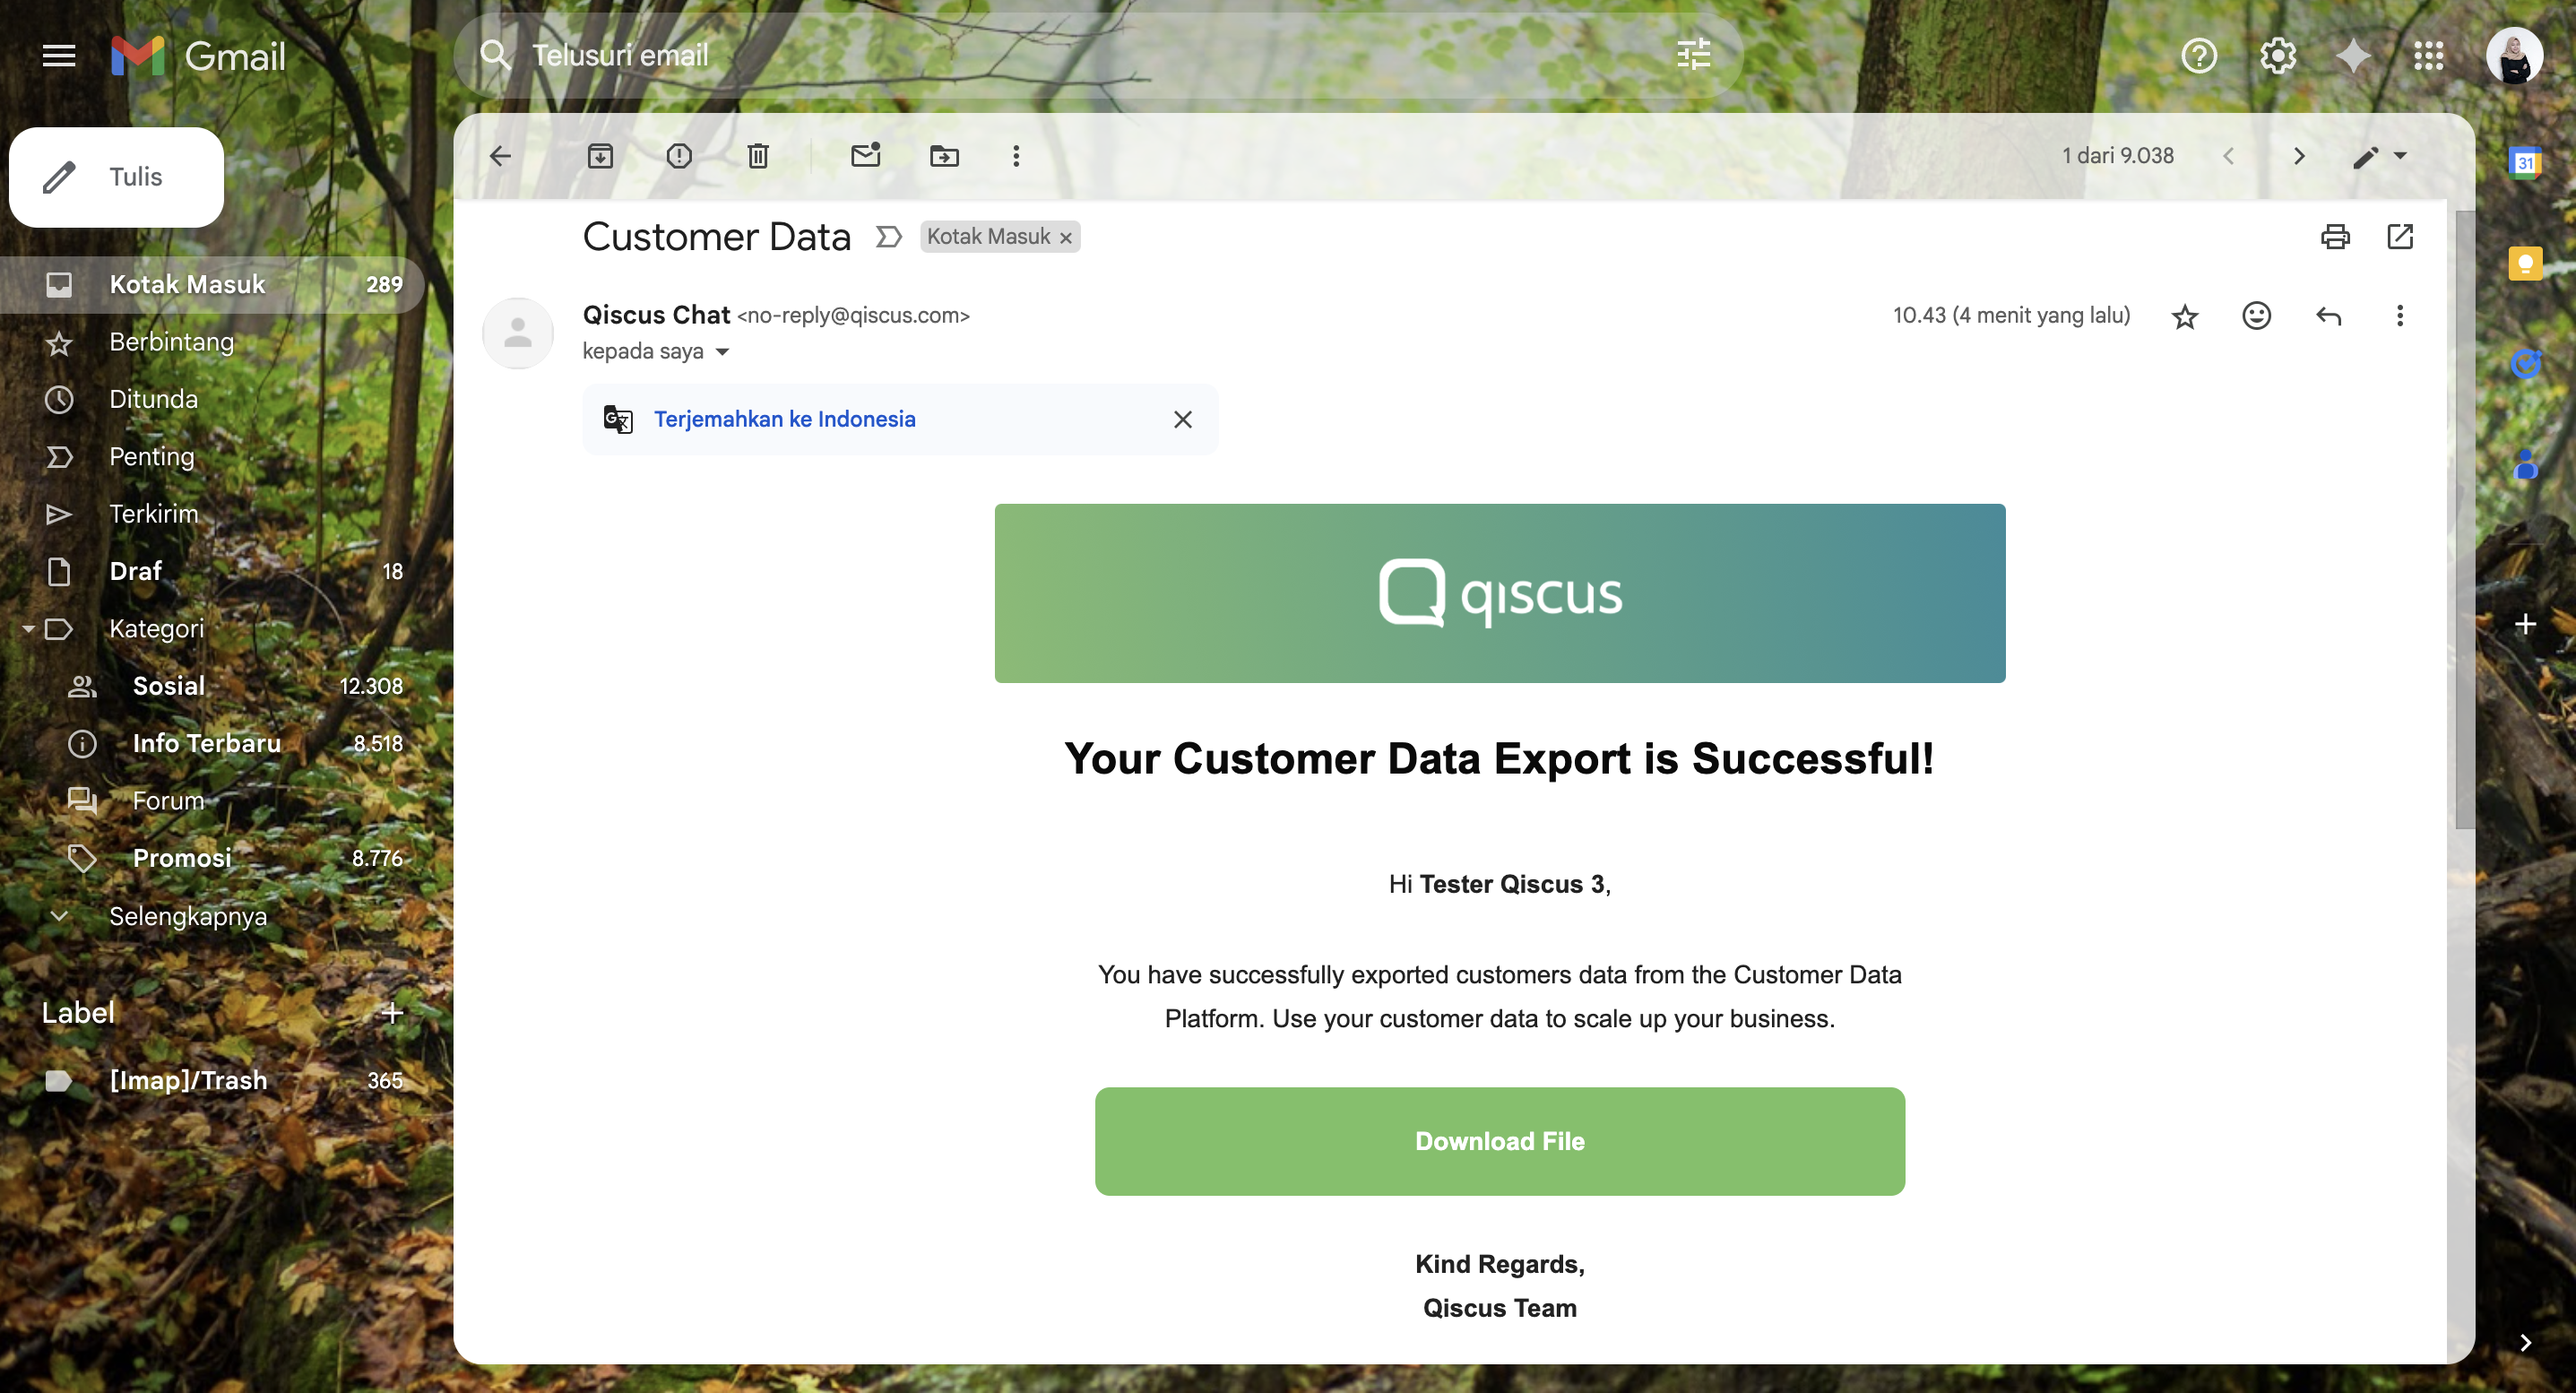
Fill in your Email Address and click Export, the customer data exported file will be sent to your email.
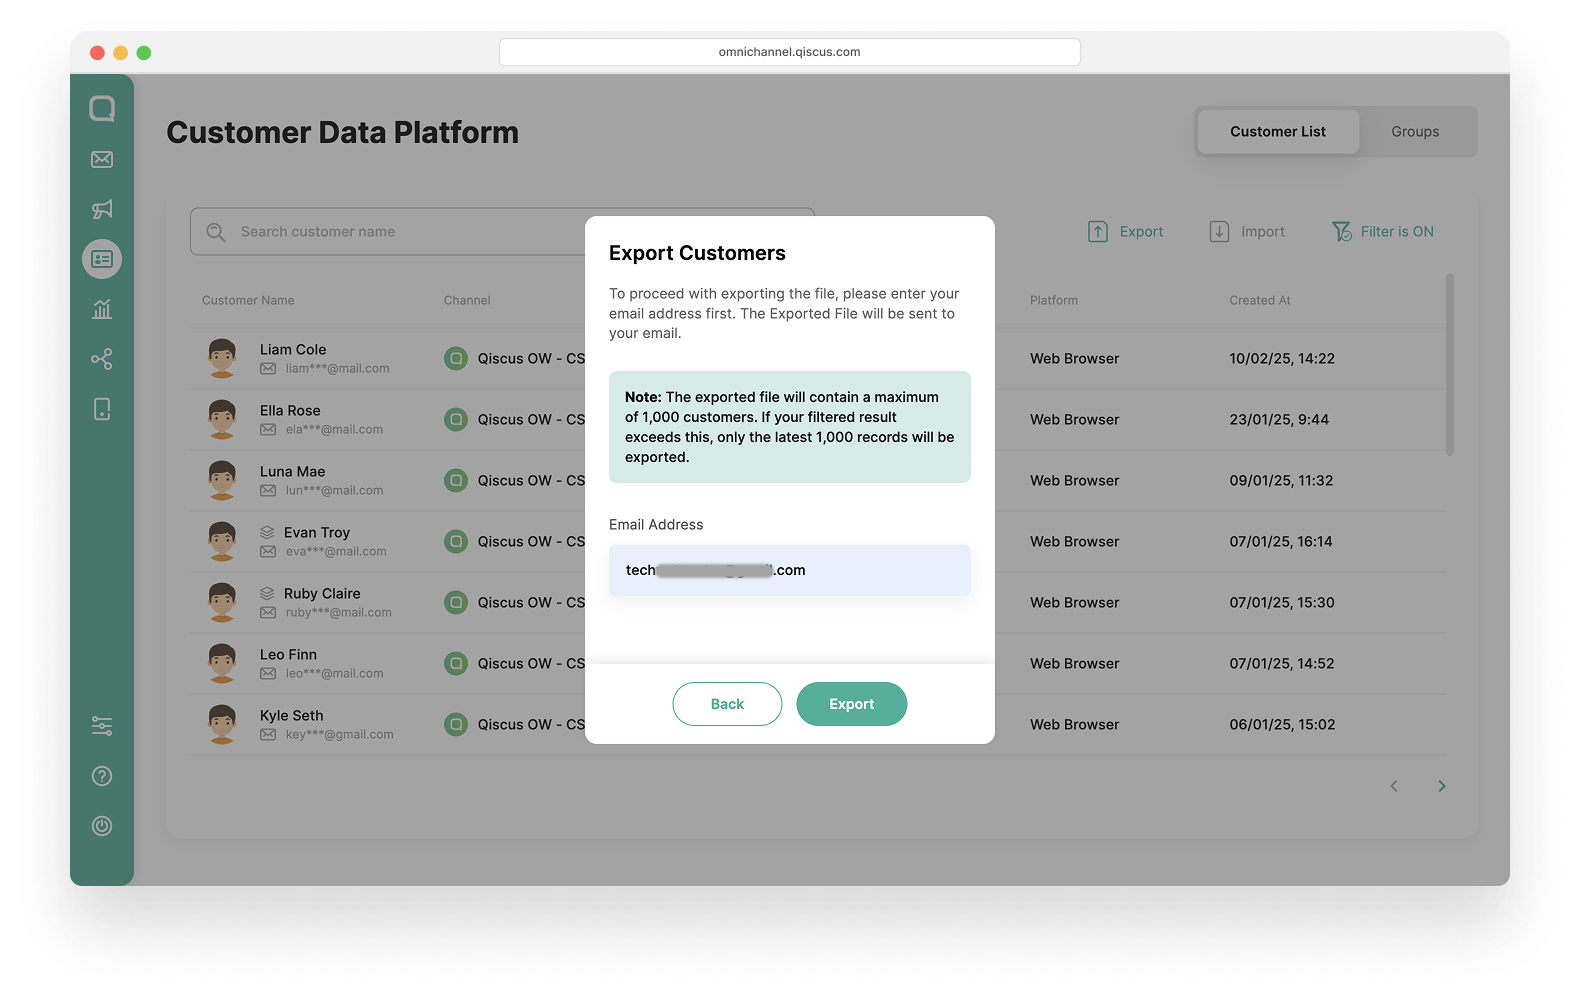
The exported file will contain a maximum of 1,000 customers. If your filtered result exceeds this, only the latest 1,000 records will be exported.
Wait a few moments, an email will be sent to your inbox. Click the Download button in the email to get the file.
Customer Details
Edit Customer Profile
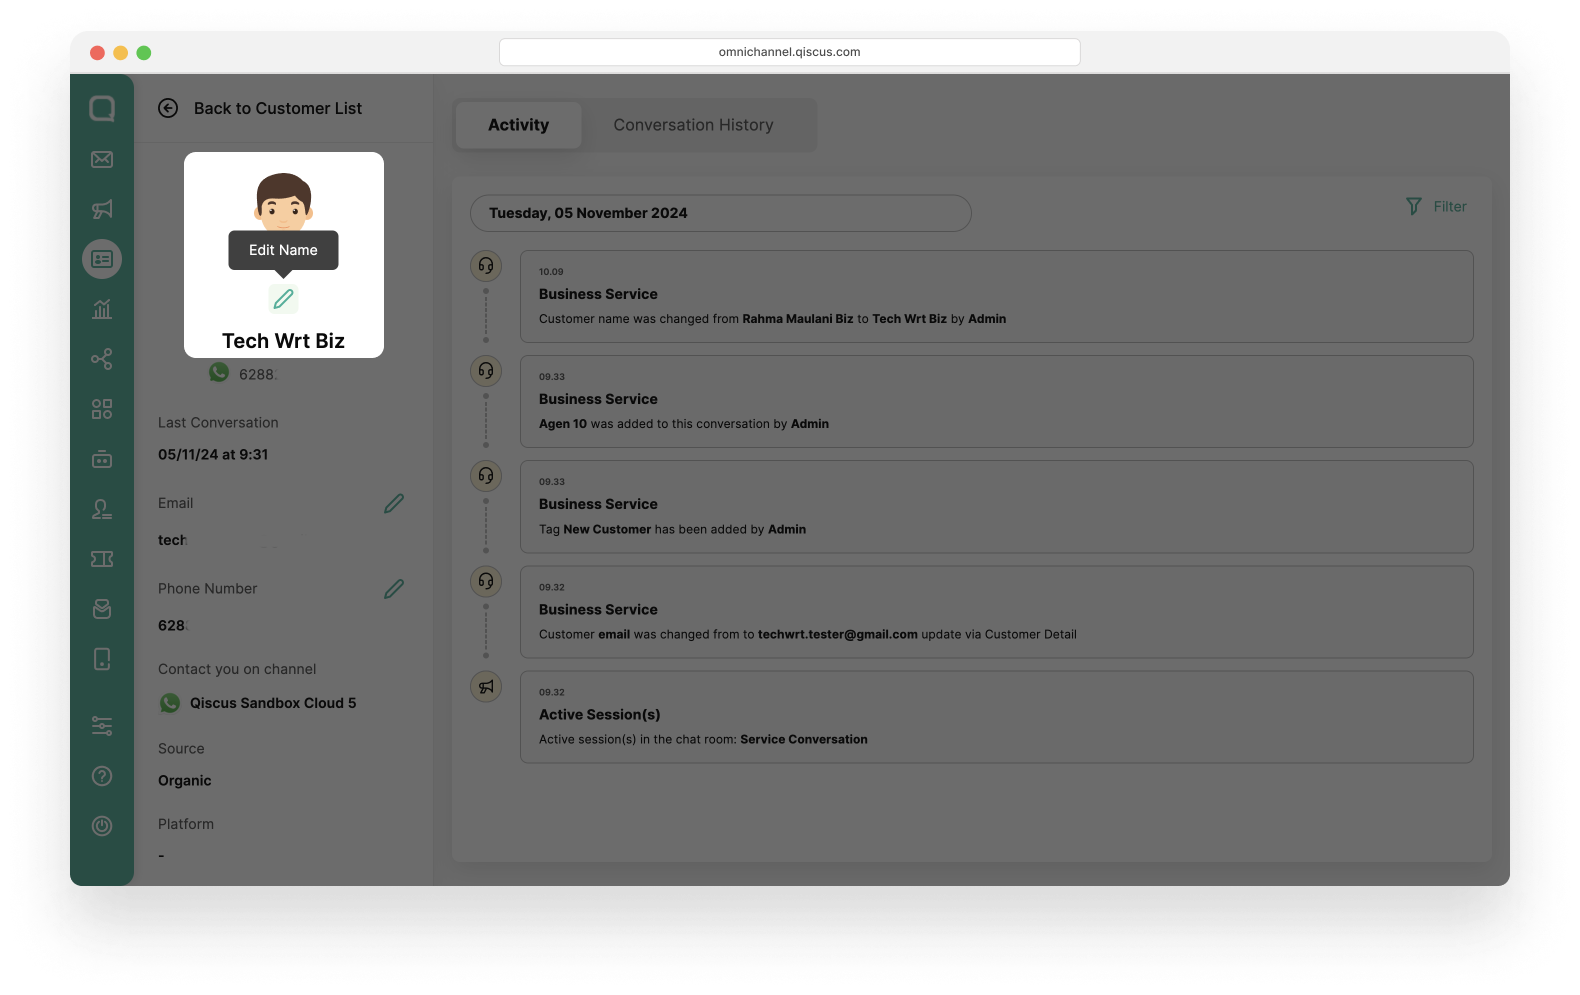
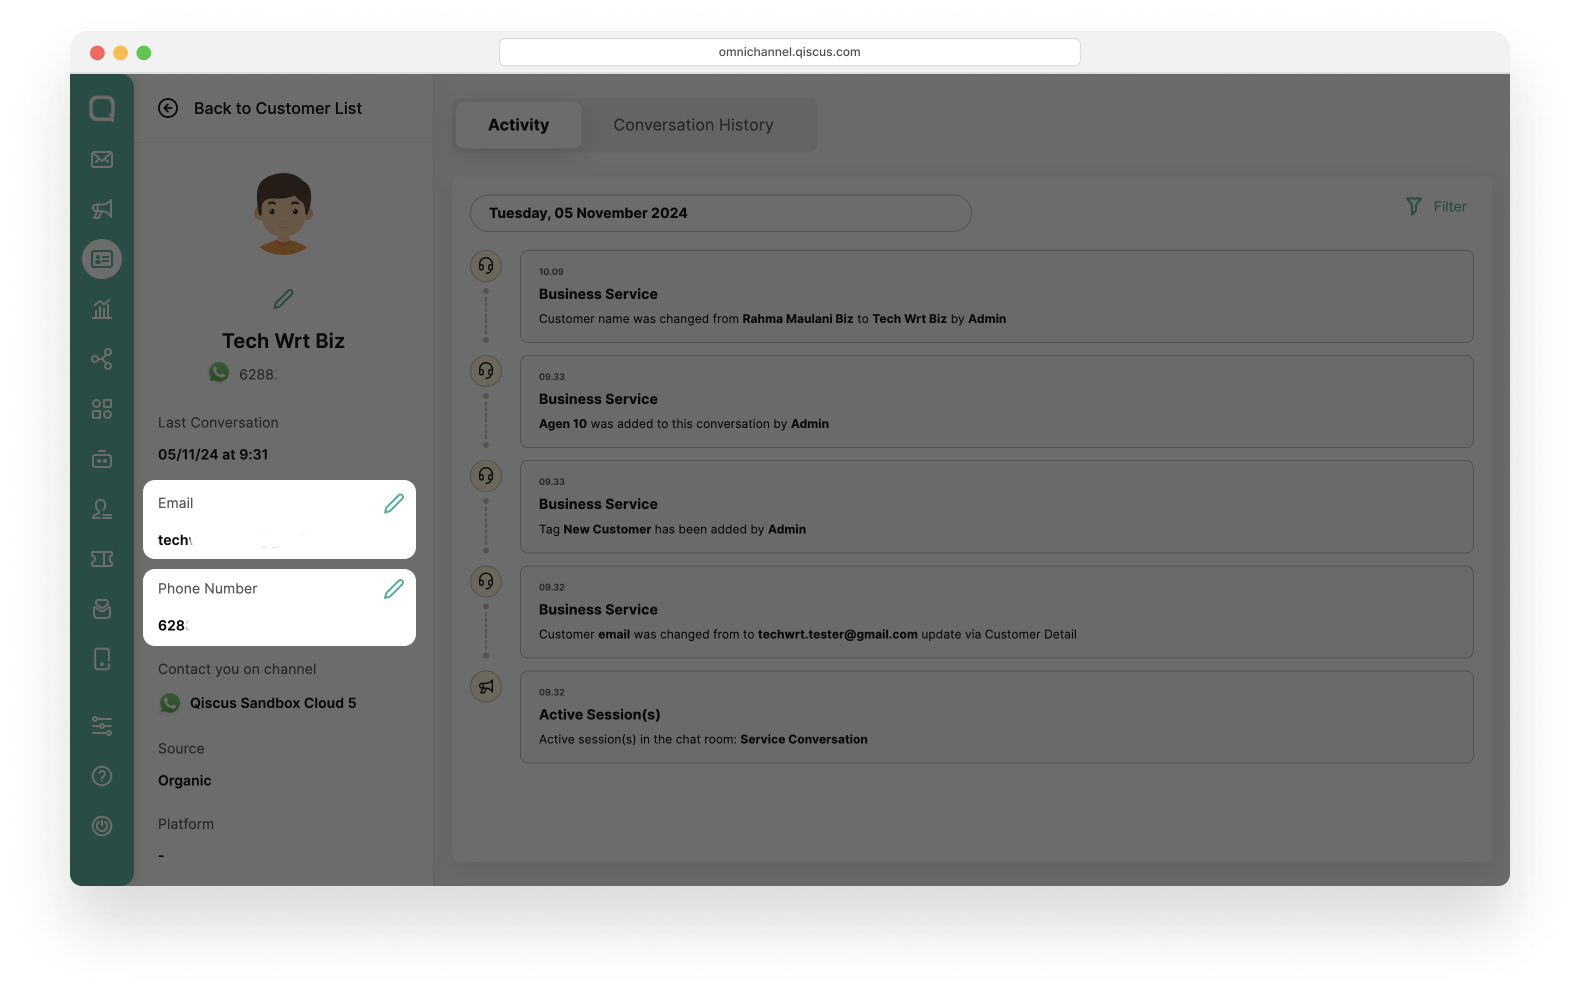
When you select a customer, you'll gain access to a comprehensive profile of that customer. This page will help you understand your customers better. You can edit your customer information and understand your customer context through the activity and history conversations section. To edit your customer information, you can follow these steps:
Select a customer,
Click the pencil icon above the name to edit the customer name,
Click the pencil icon next to the email and phone number to add or edit the email and phone number,
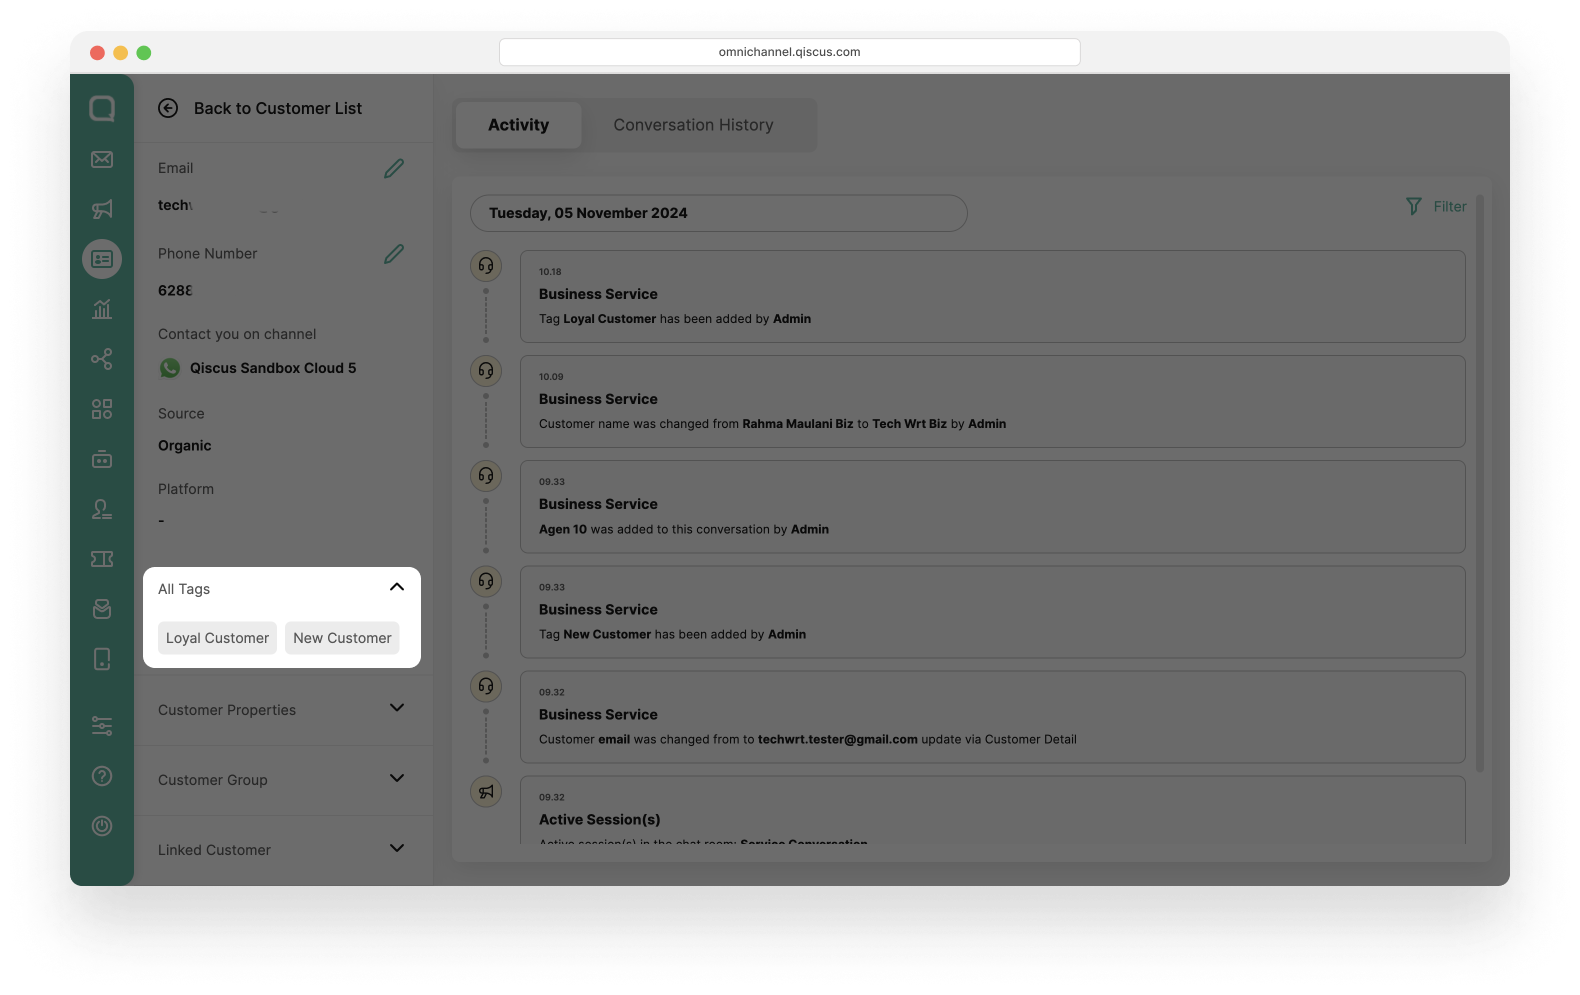
Click dropdown All Tags to see tag,
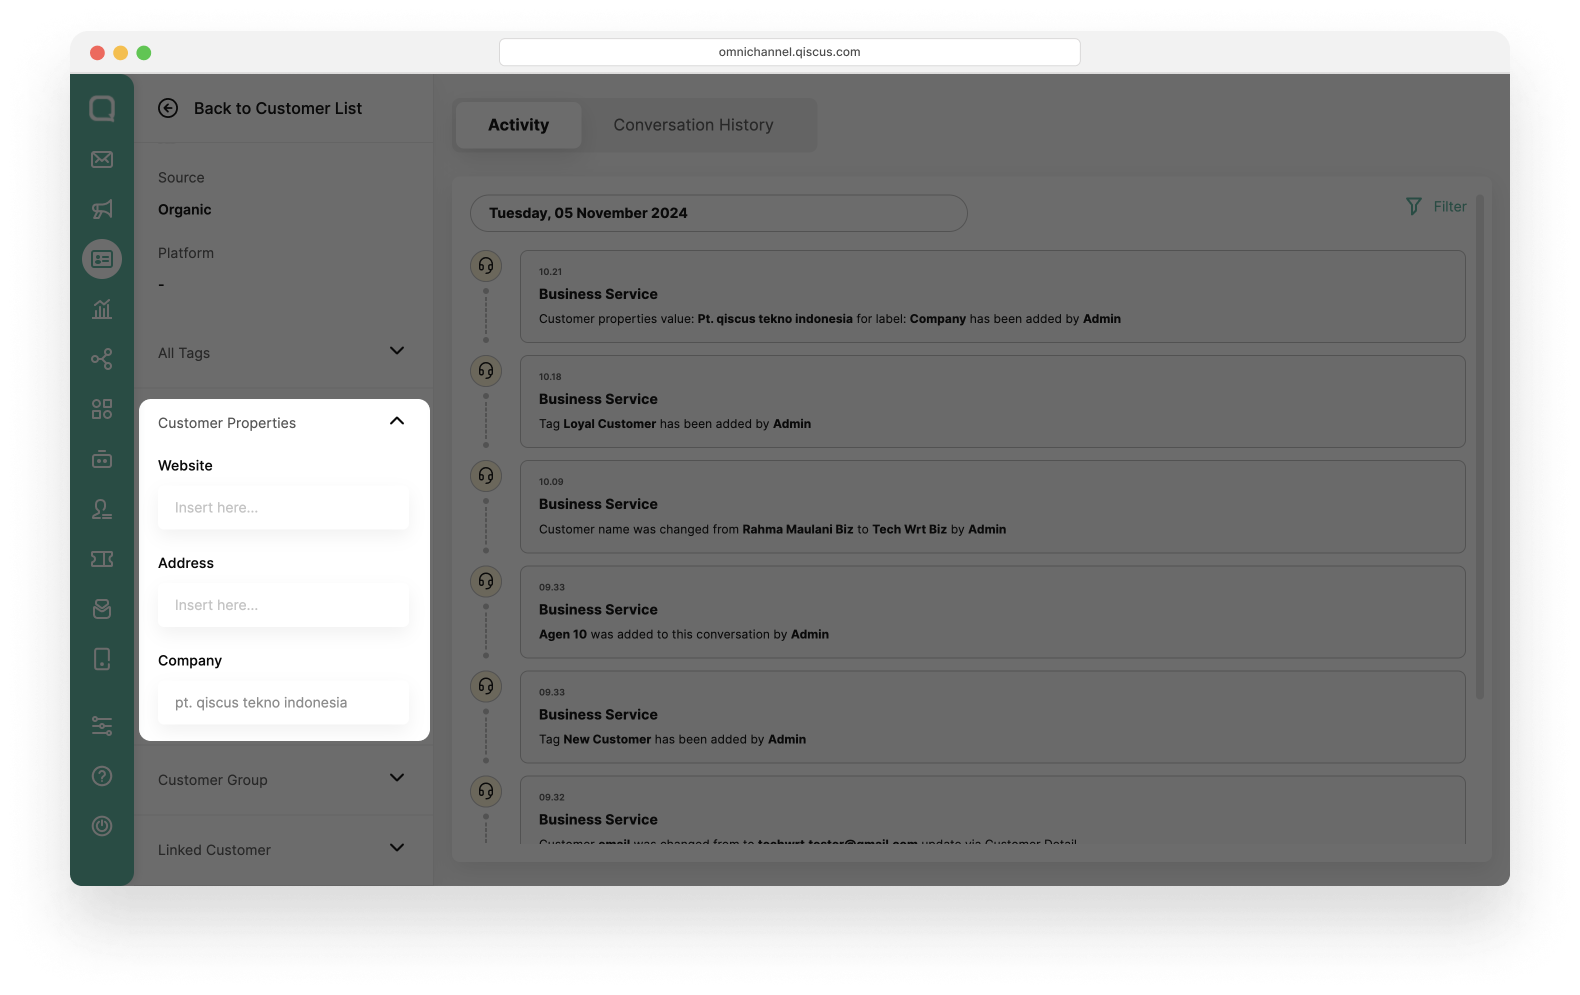
Click dropdown Customer Properties to see or add a value to customer properties,
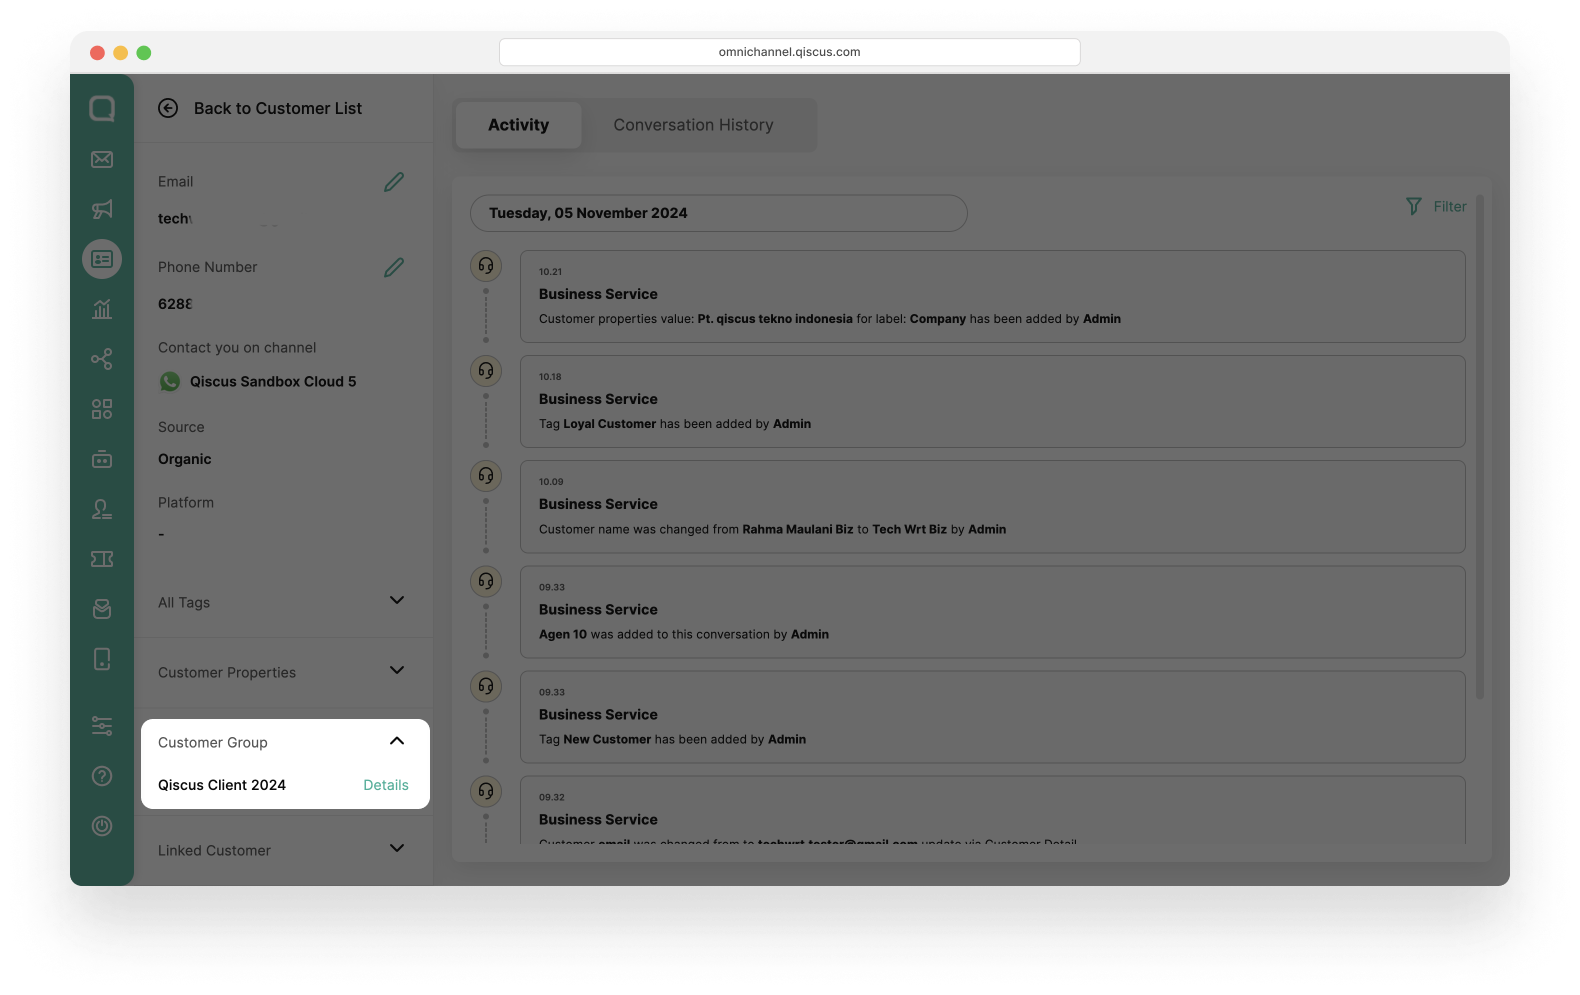
The Customer Group section contains a list of all customer groups where the customer is a member.
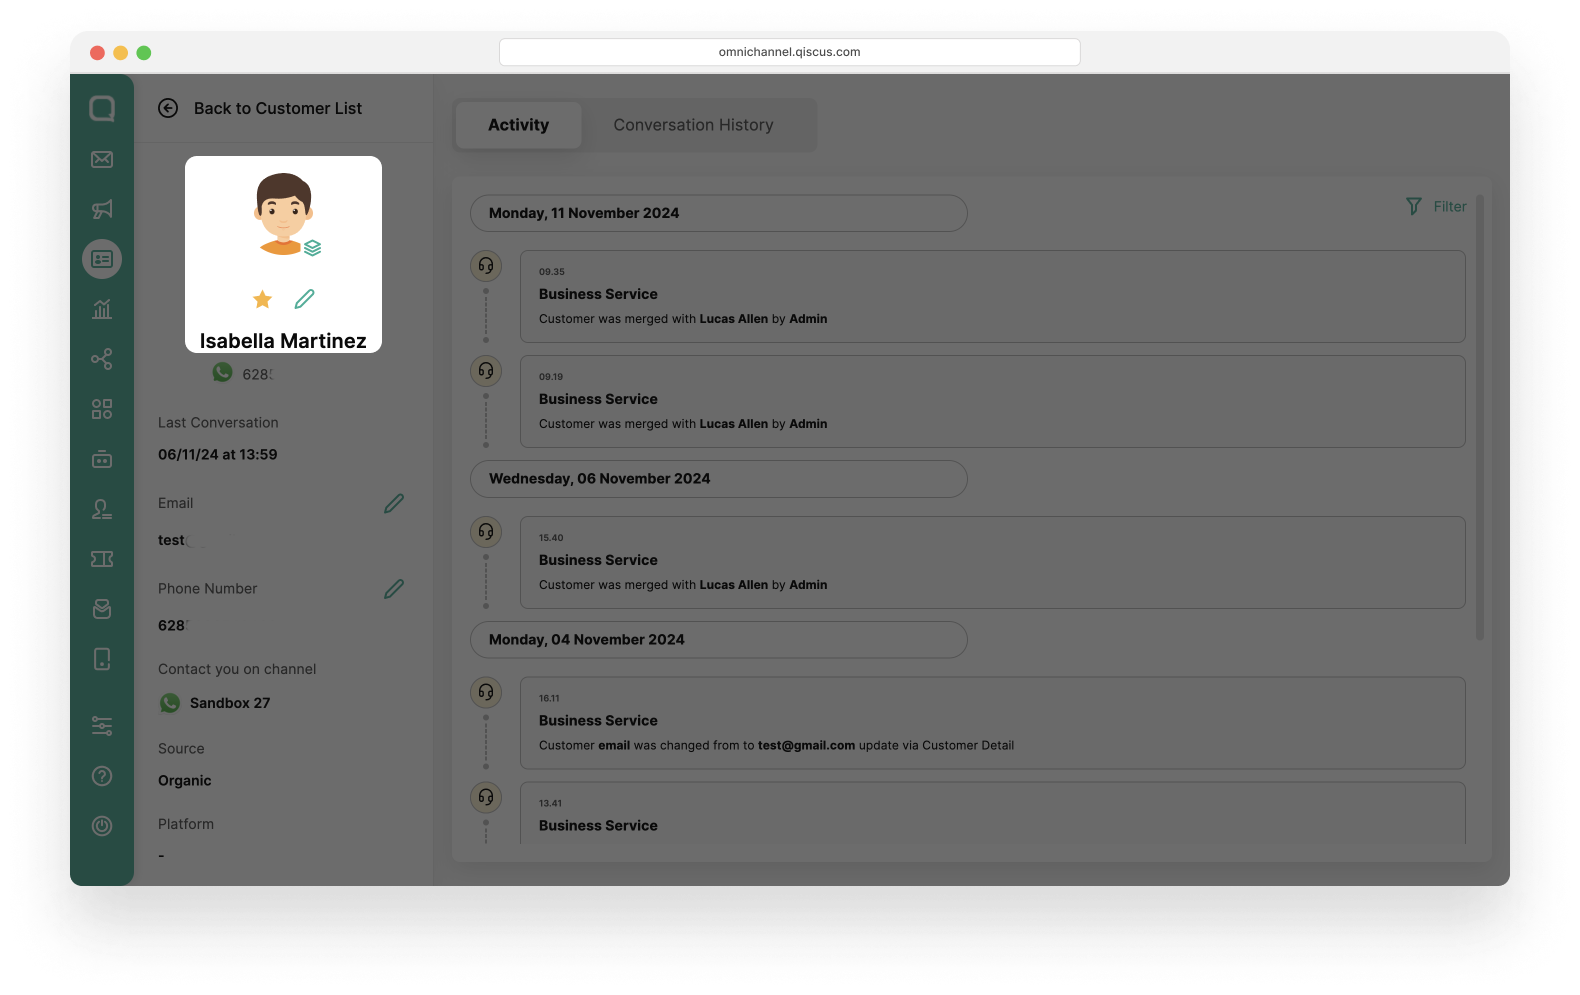
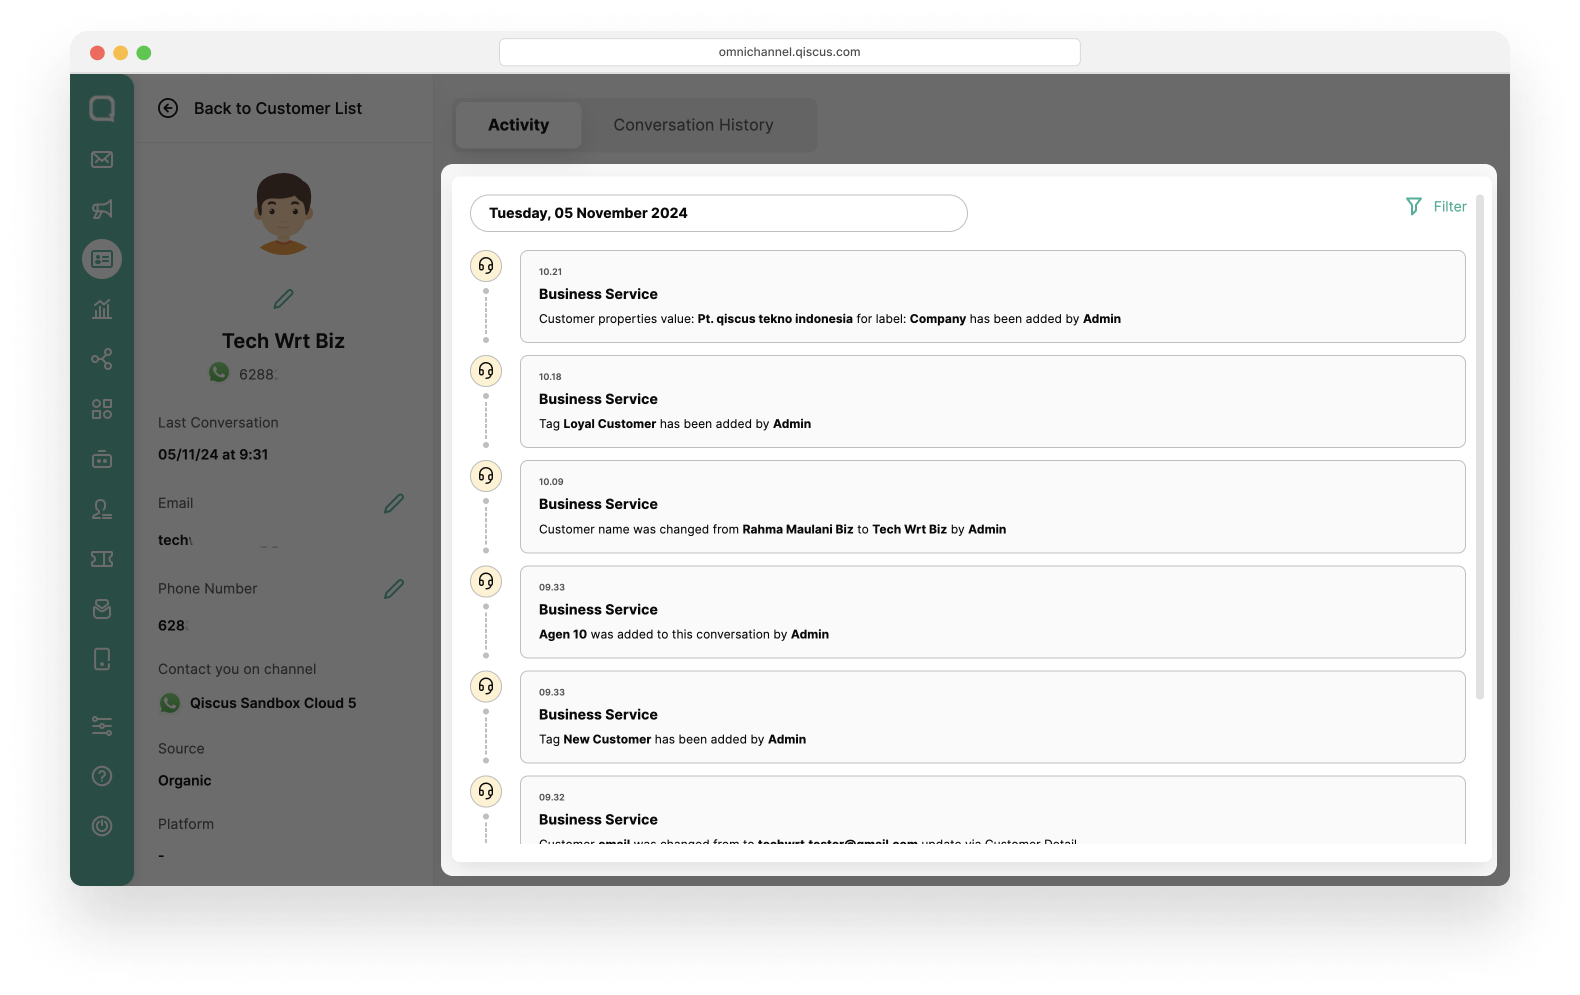
Customer Activity
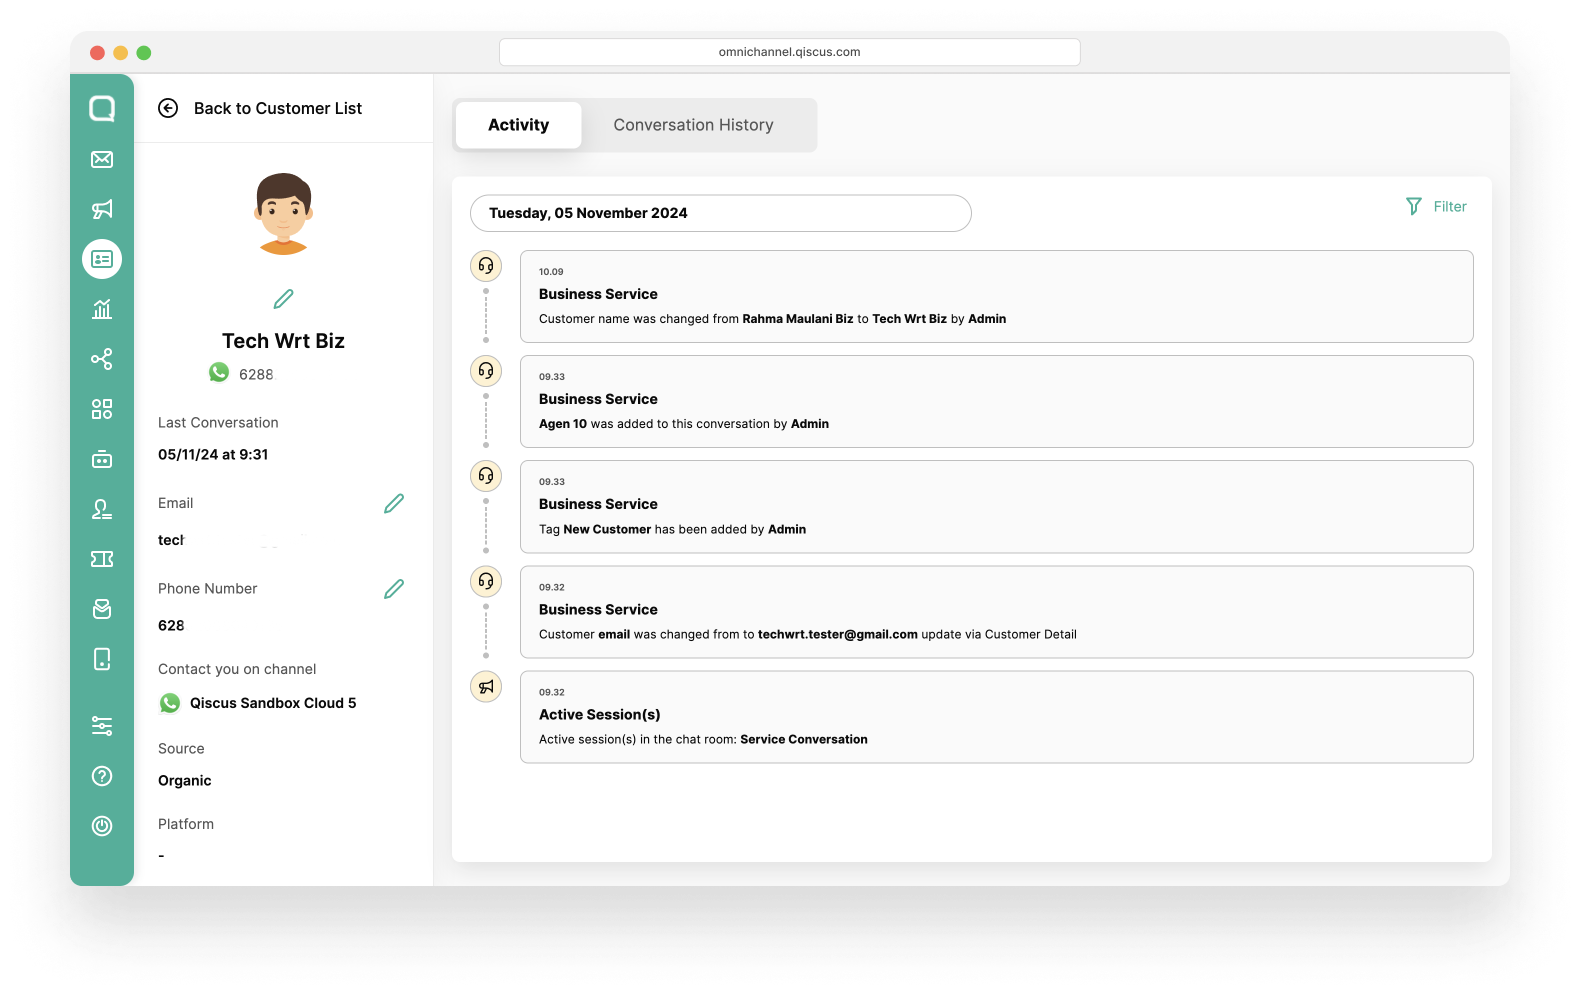
Within the customer details page, you'll find two tabs: Activity and Conversations History.
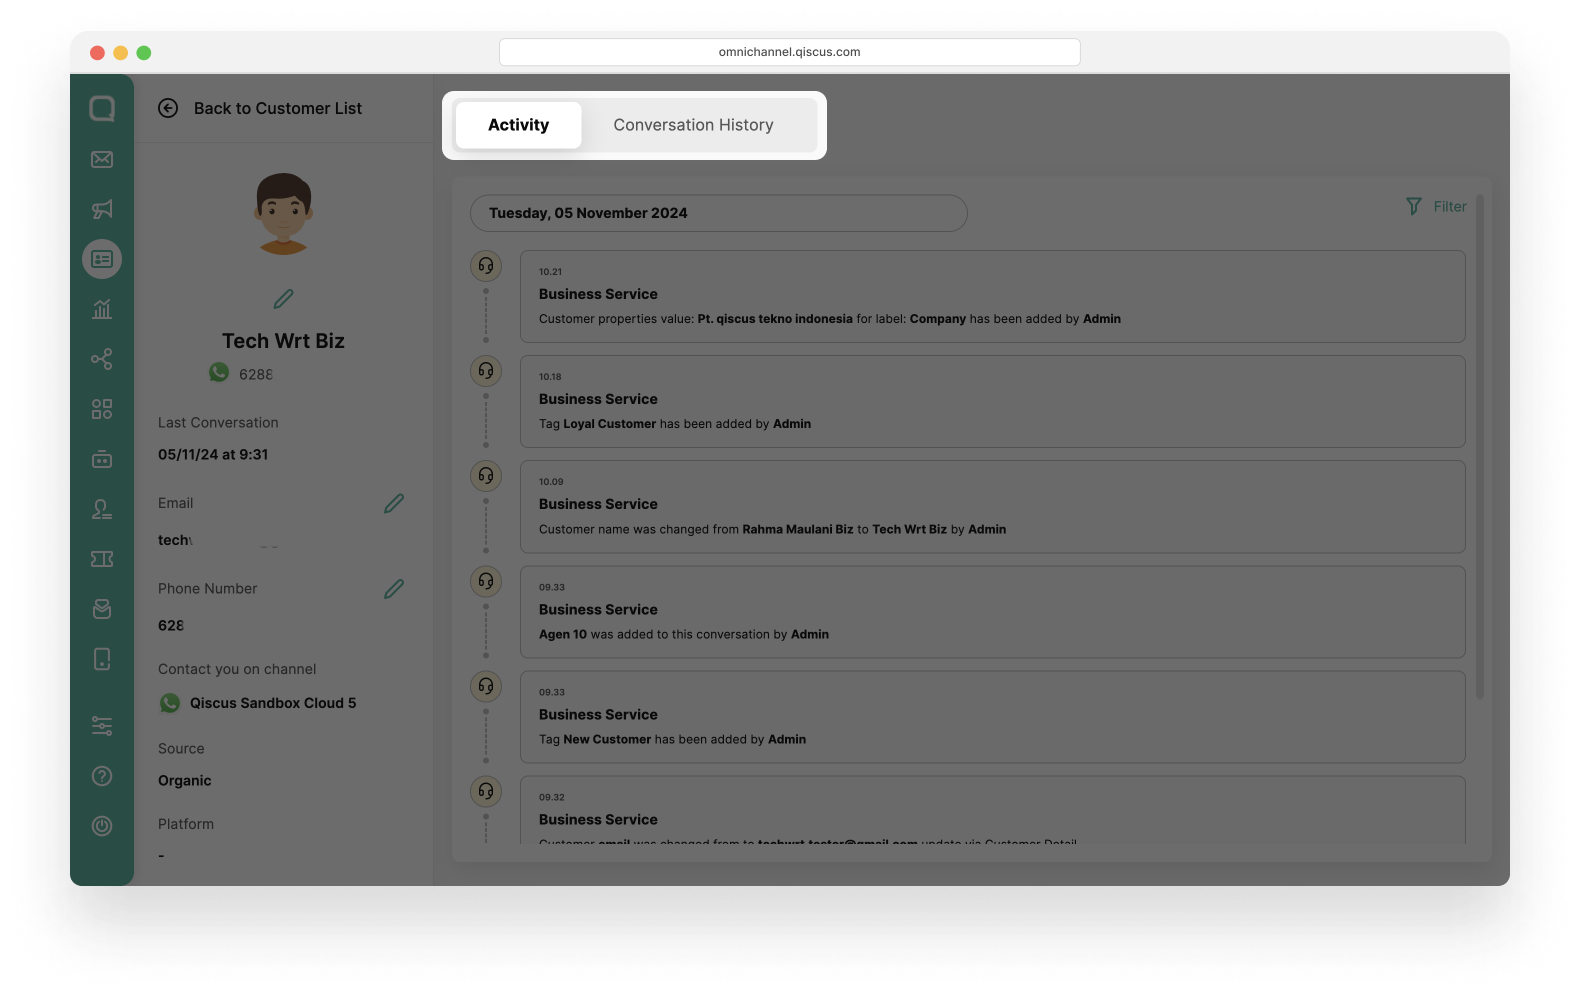
Activity
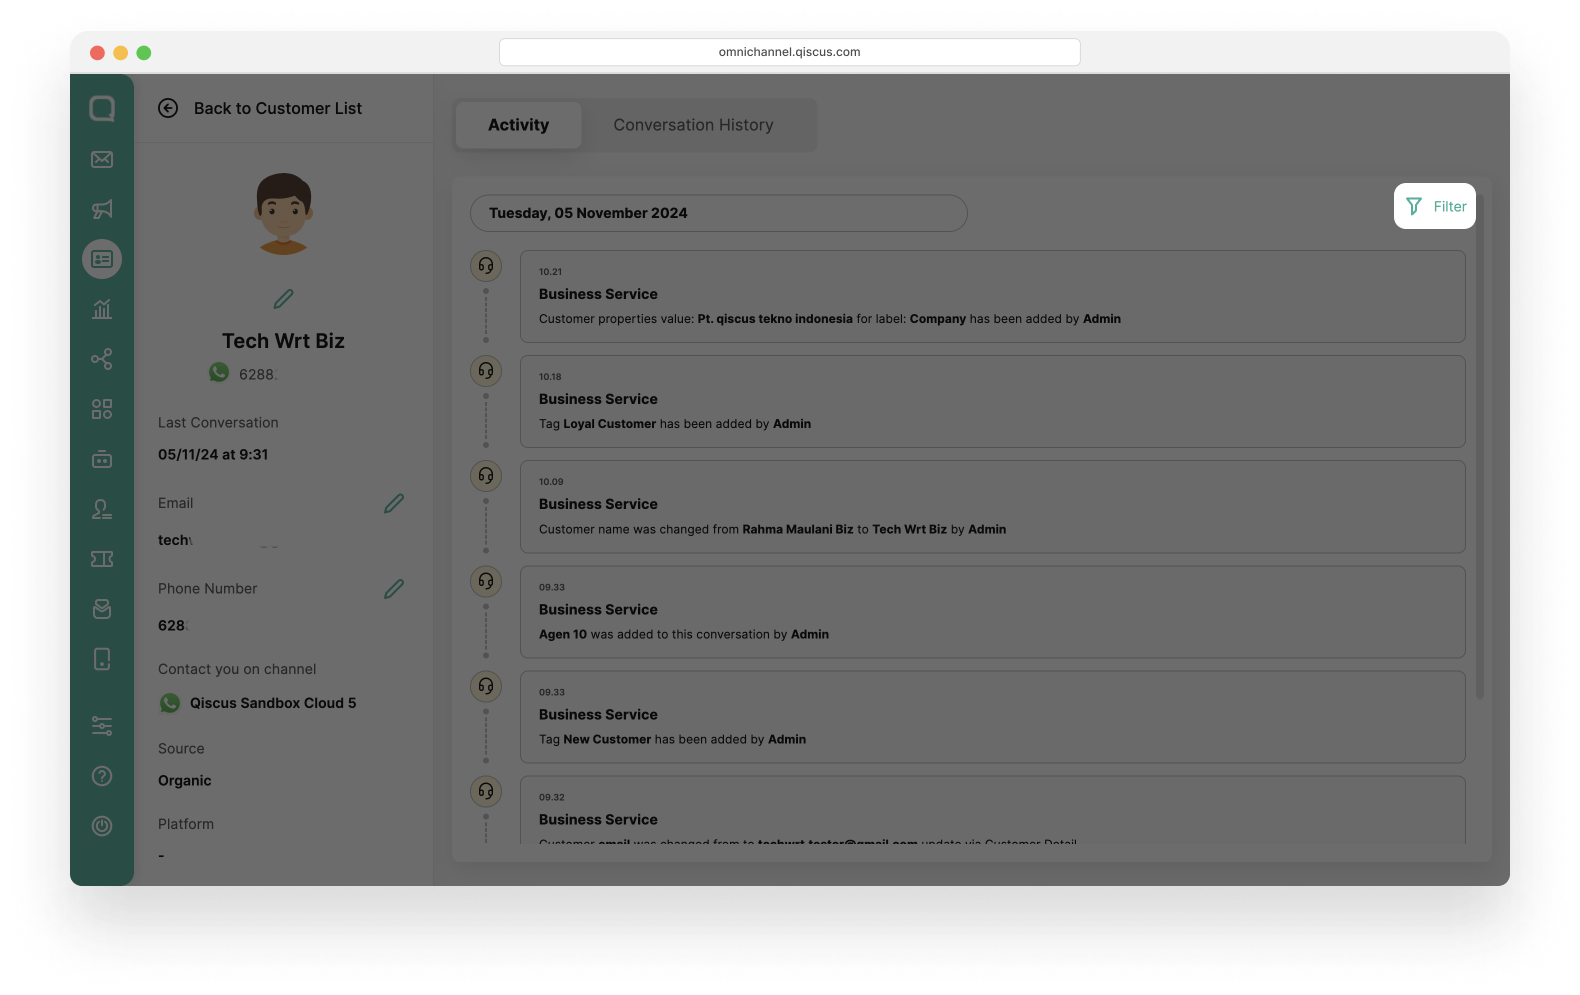
The Activity tab presents a chronological list of events that have taken place in the customer's chat room. These events are initiated by specific actions or occurrences. Here, you can view detailed information regarding when these activities occurred and the nature of each event.
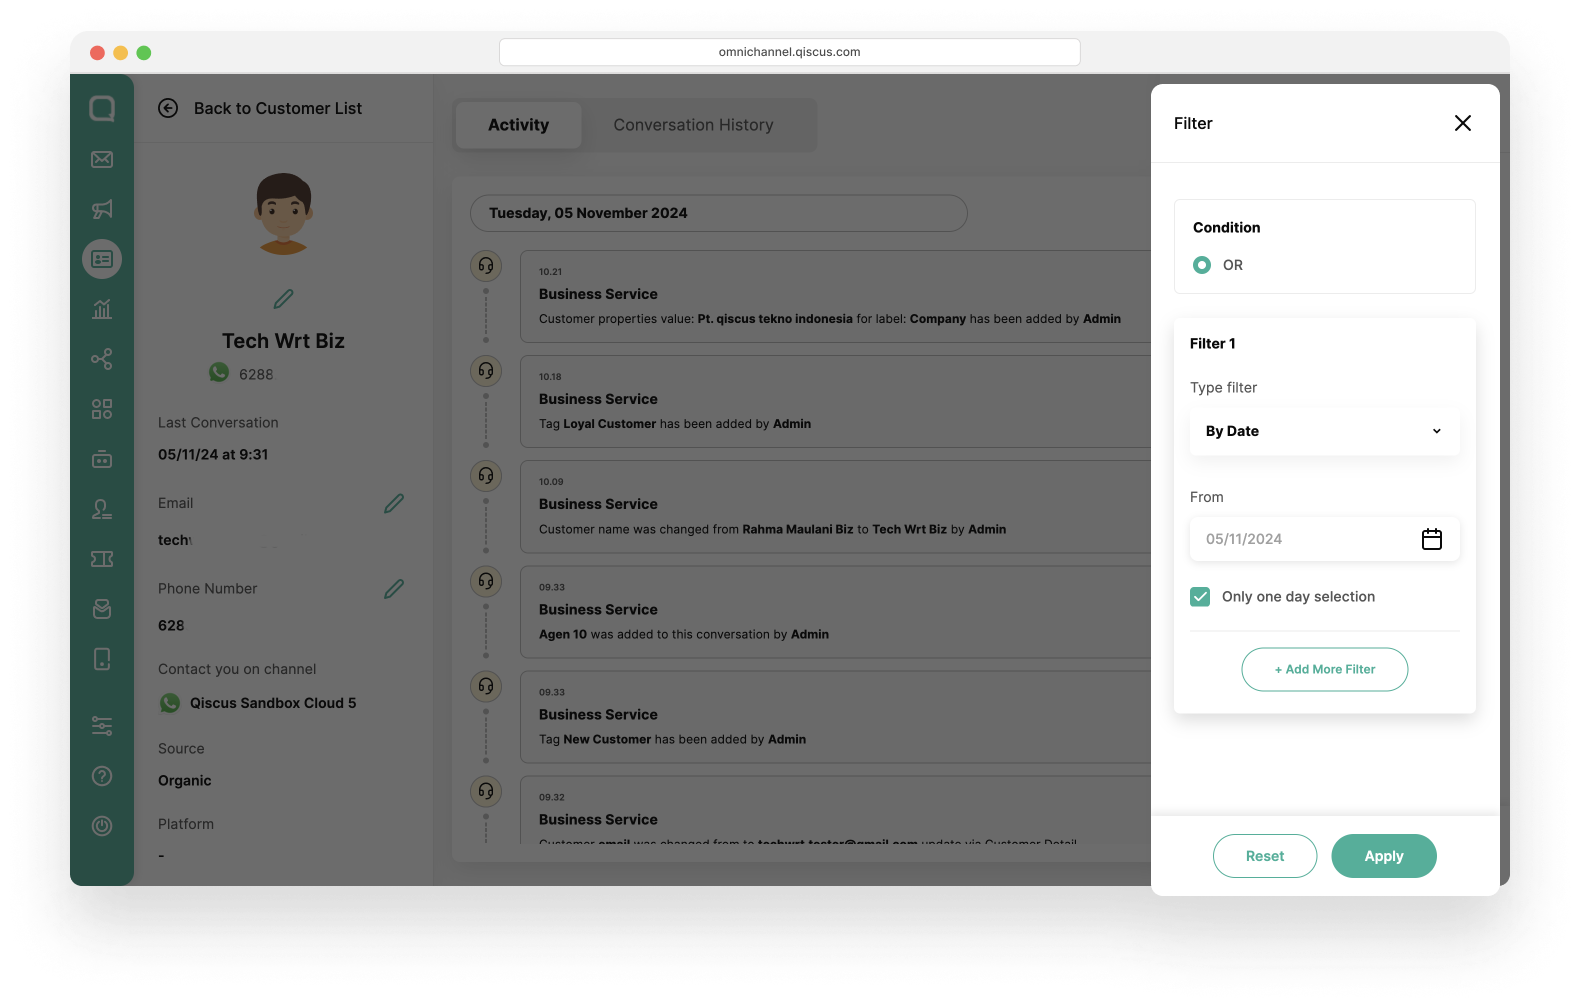
Within the Customer Activity , you can apply specific filter to refine the activity by clicking filter icon.
Filter by Activity Type : Choose specific activities to filter, selecting from one or multiple activity types with activity date based on your needs.
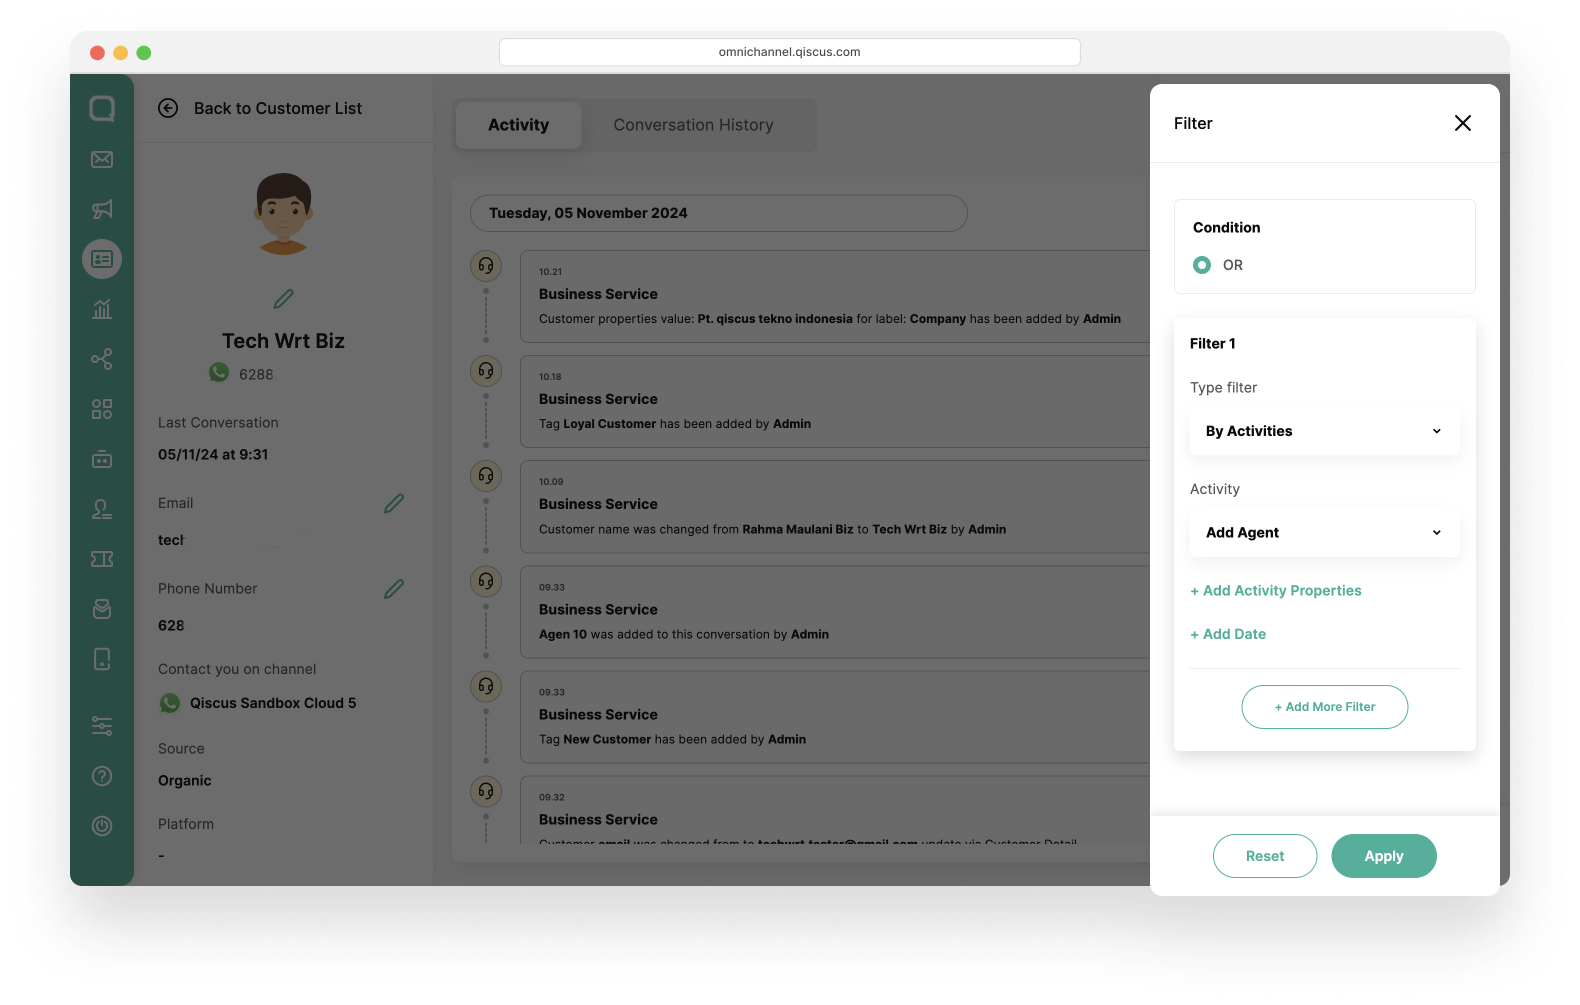
Filter by Date: Specify a date range or select individual dates to view relevant activities.
Conversation History
Meanwhile, on the Conversations History tab, you can see all customer conversations. Conversations history is divided into Ongoing and Resolved.
Ongoing: On the Ongoing tab, you can see the conversation that are currently taking place between the agent and the customer.
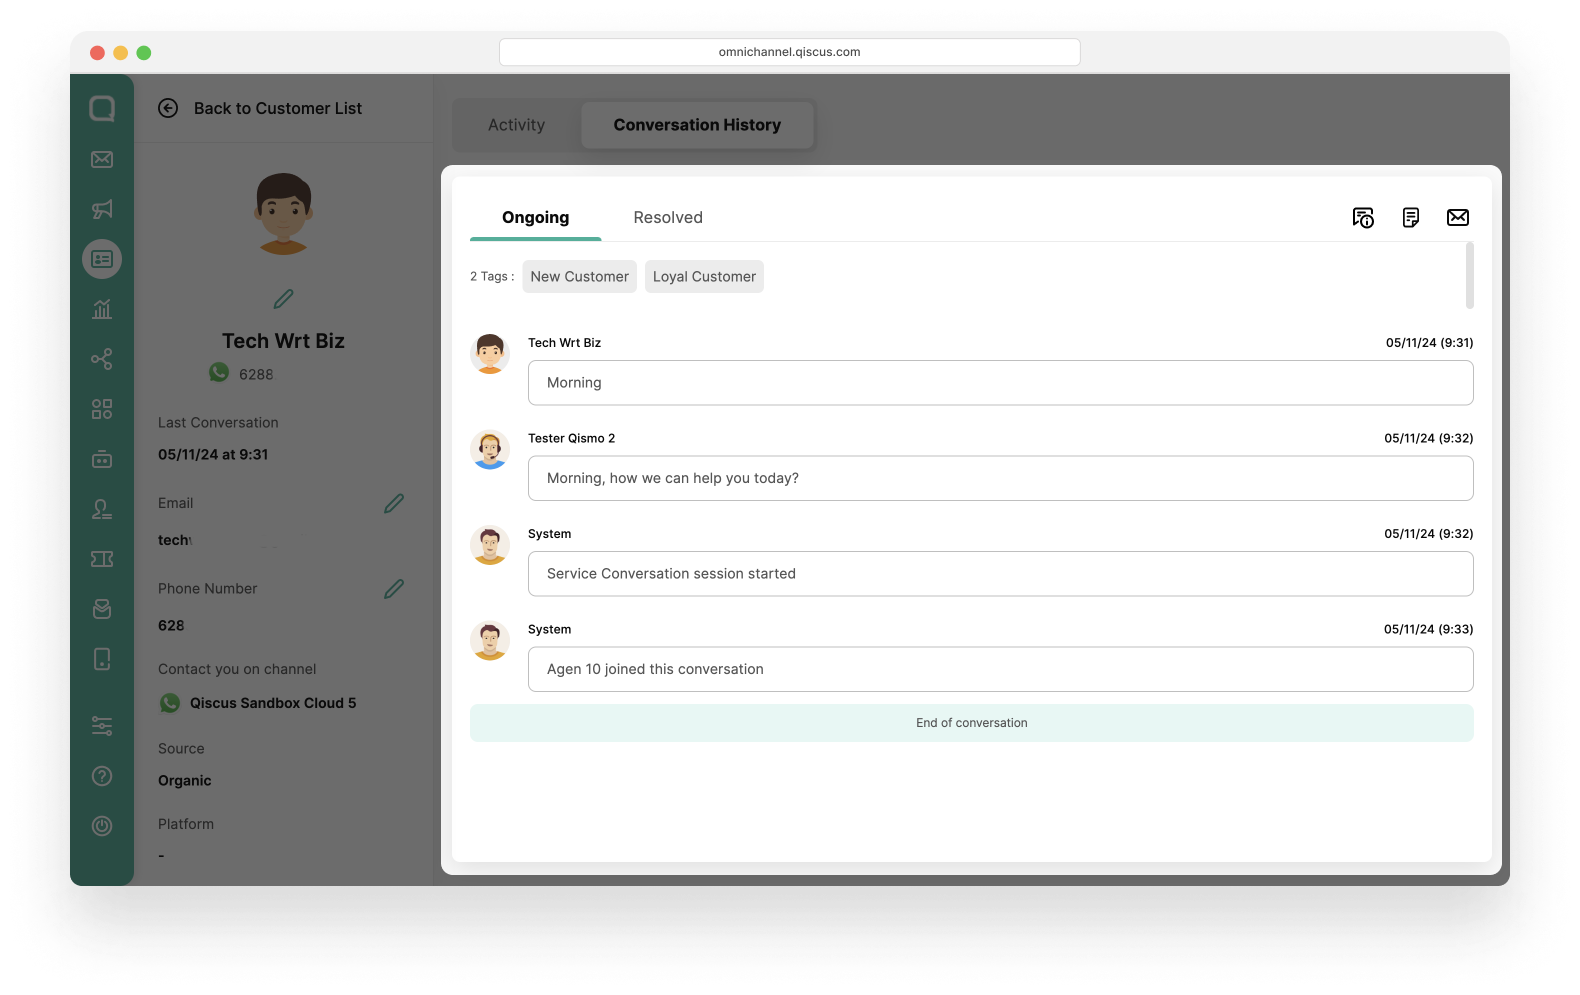
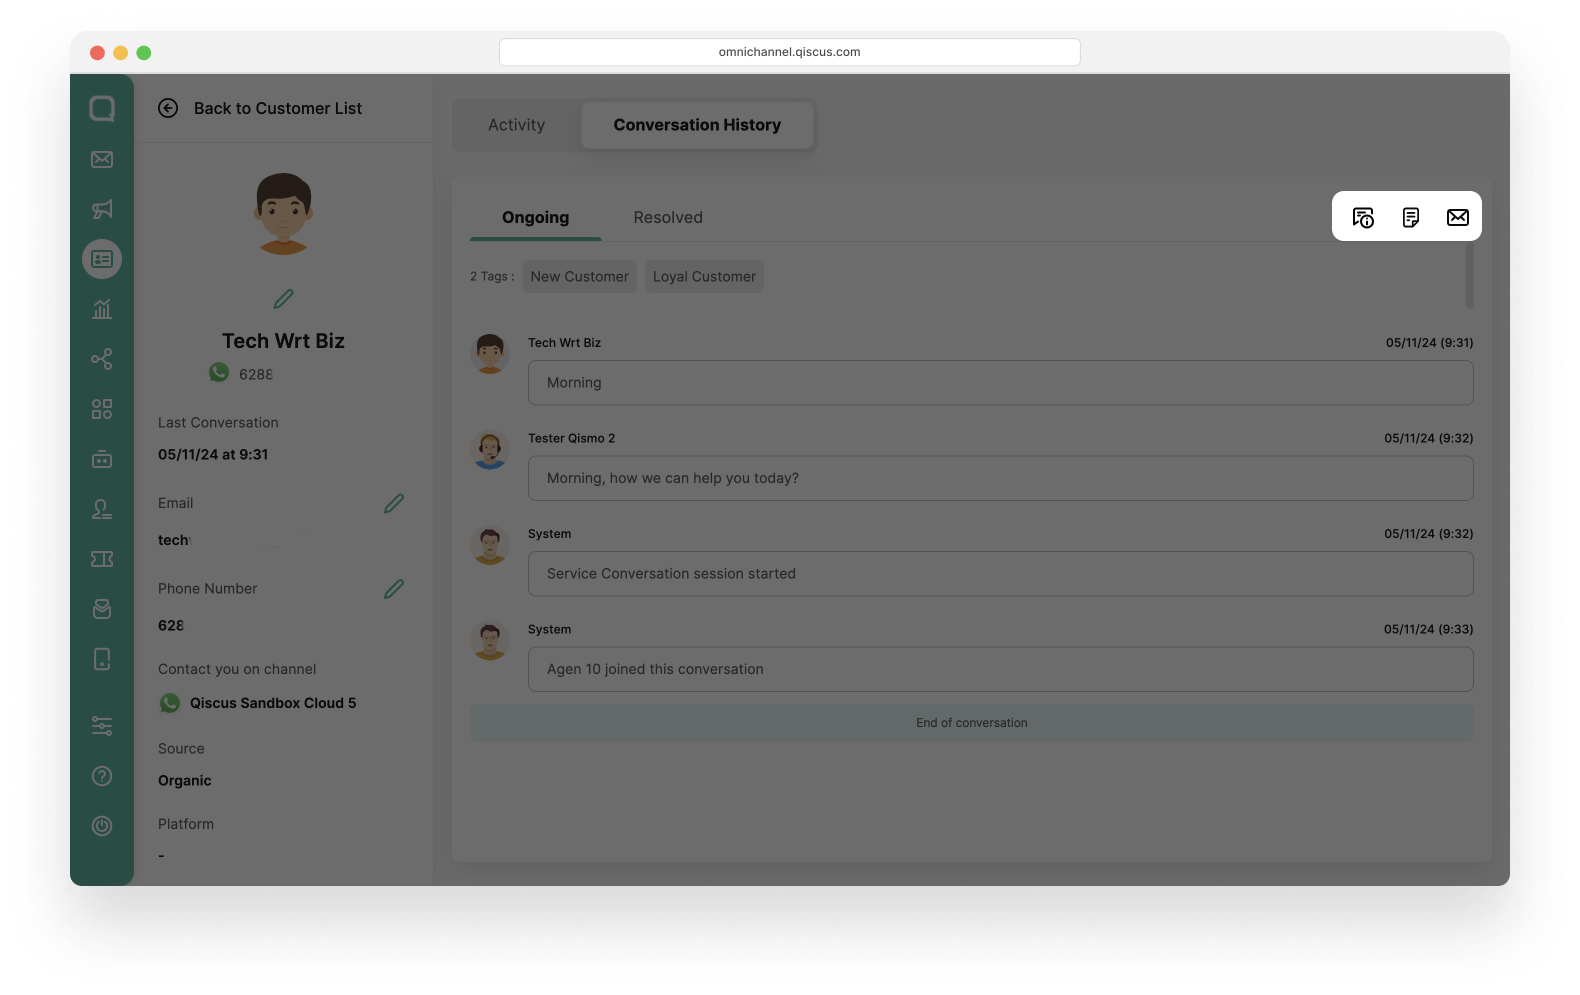
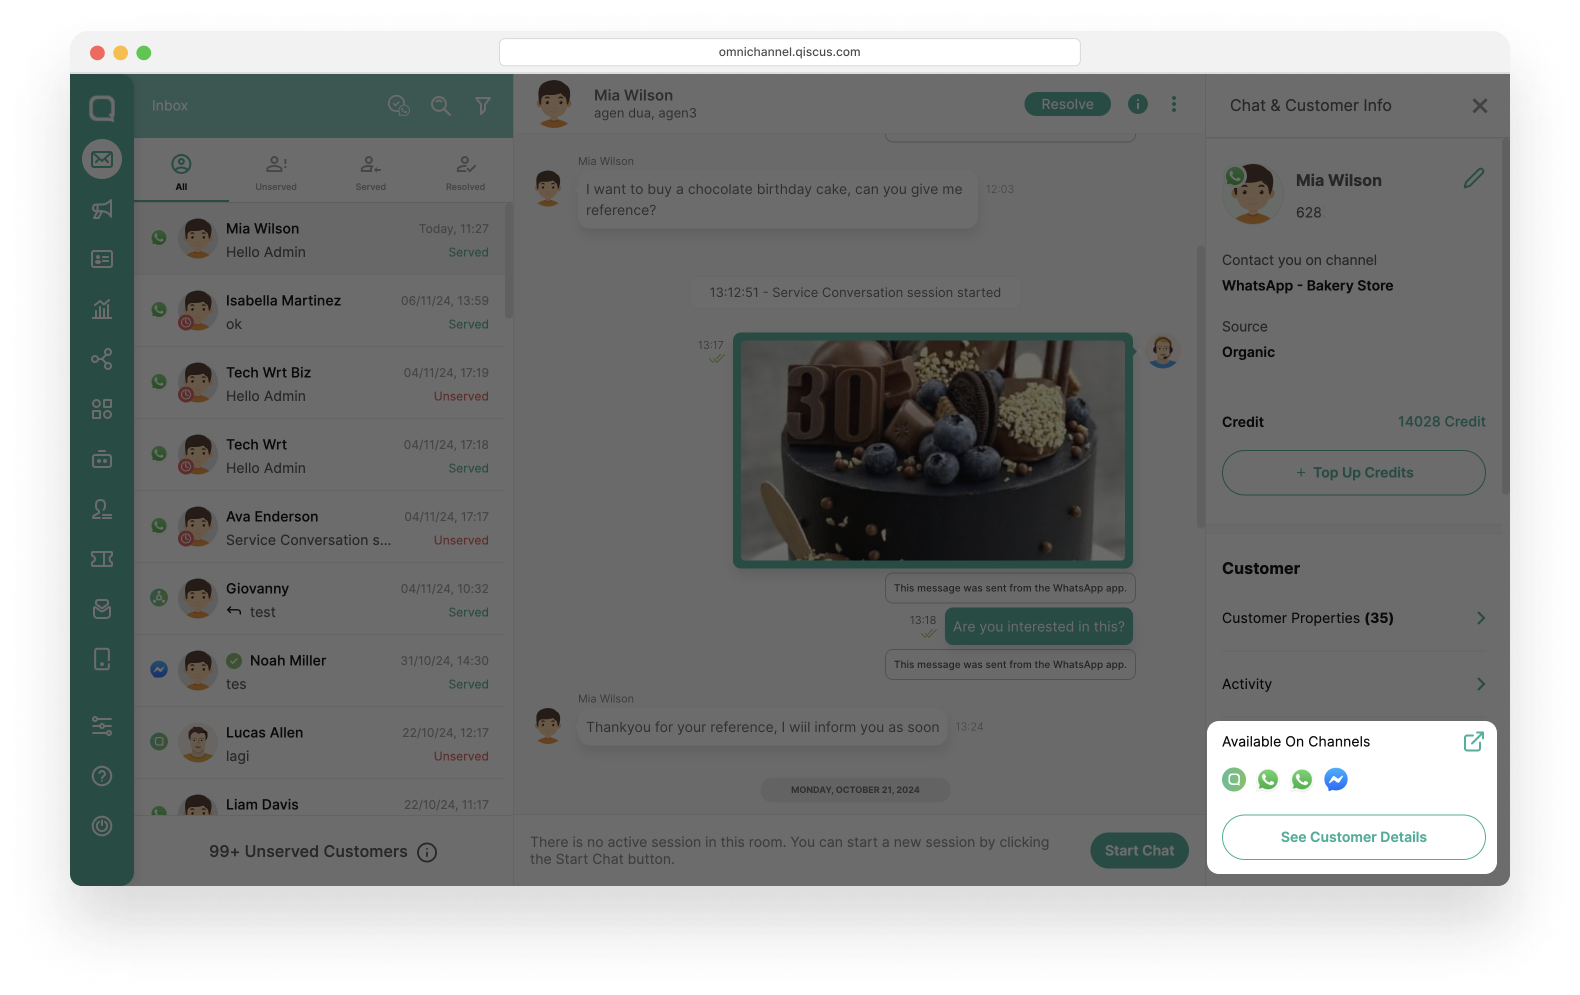
On the top right side, you can see 3 icons, Additional Information, Notes, and also Go To Inbox. If you click Additional Information and Notes, a pop up information will appear. Likewise, if you click Go To Inbox, you will automatically be directed to the Inbox page.
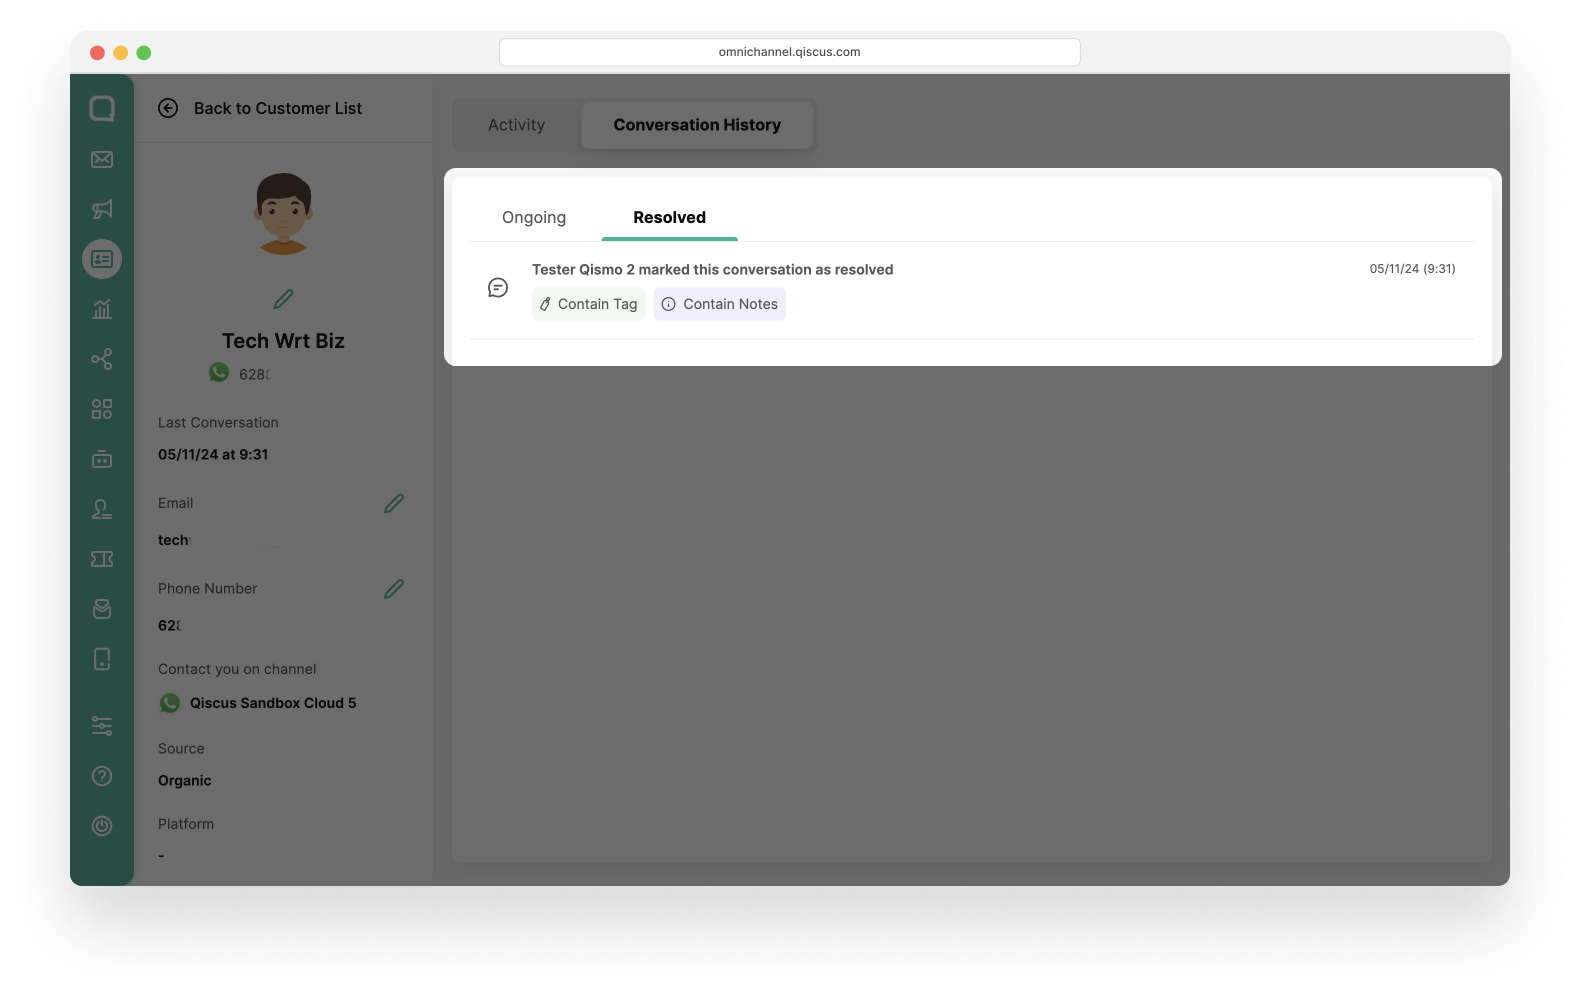
Resolved tab: On the Resolved tab, you can see the conversations that have already been resolved. Click the conversation to see the details.
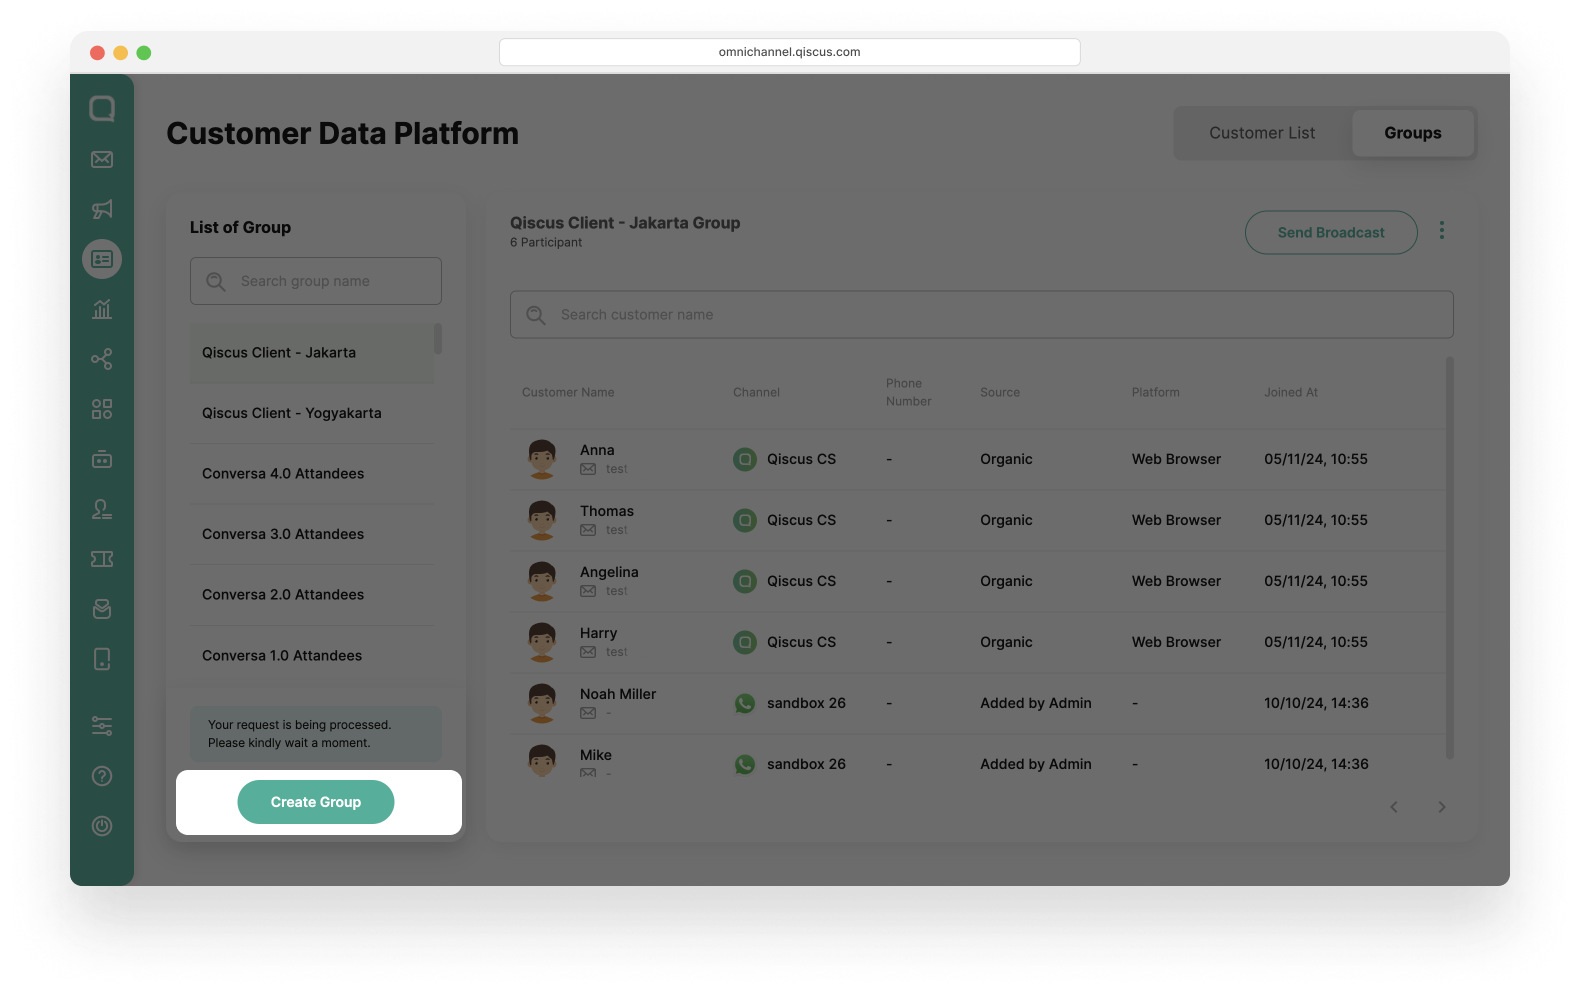
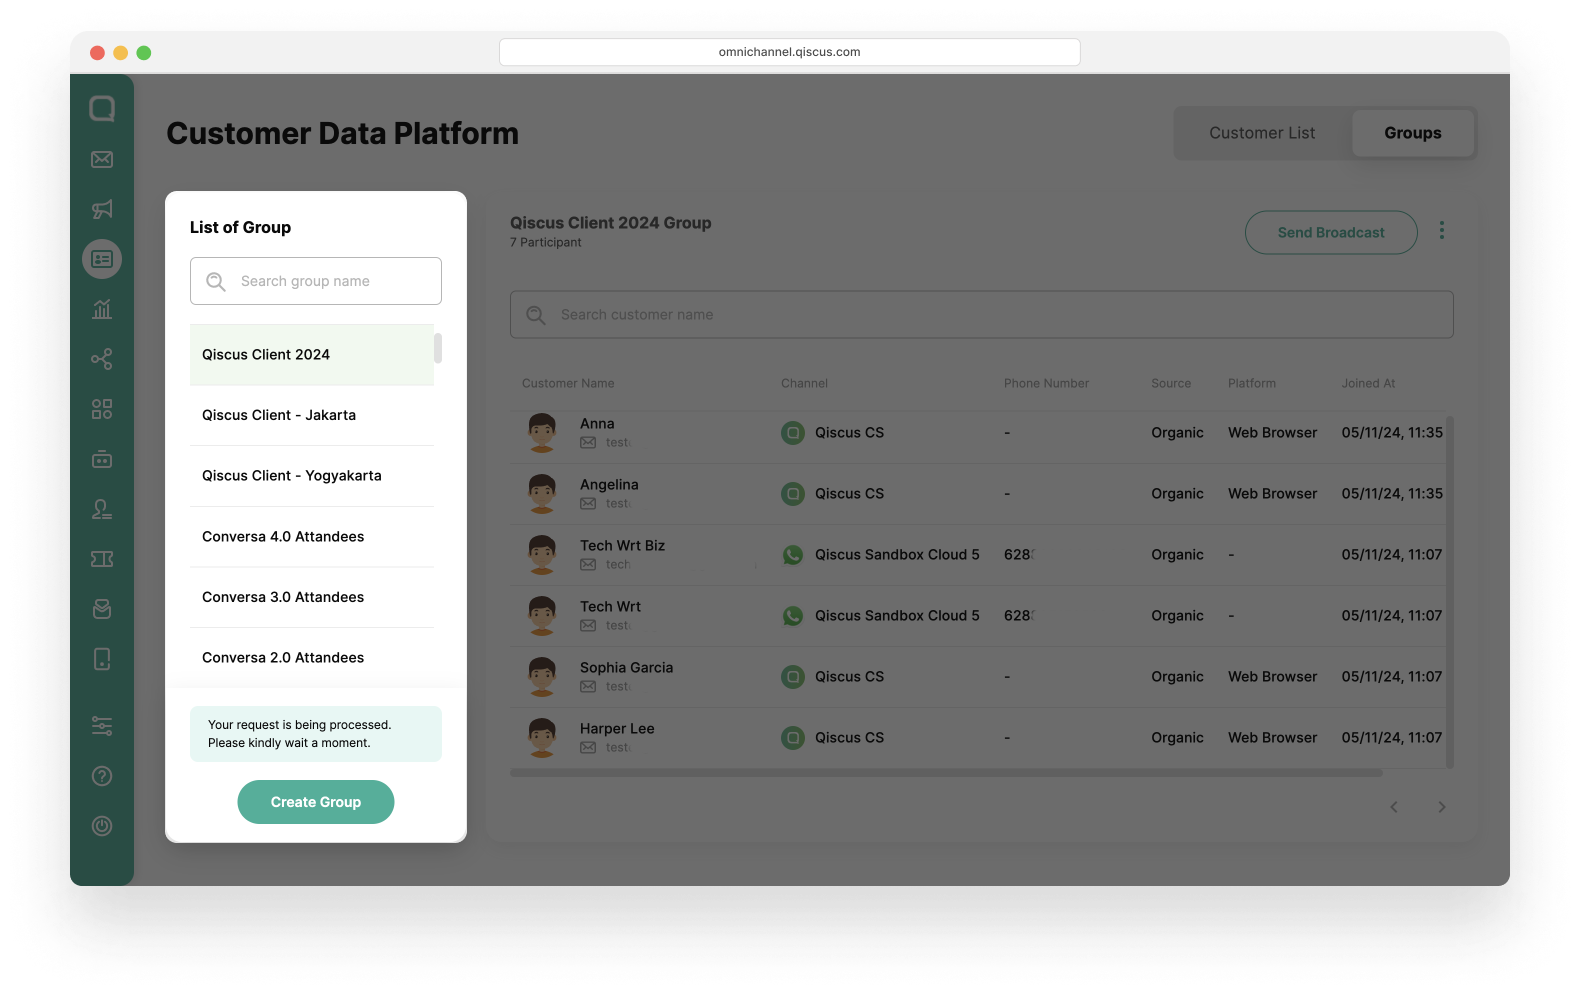
Customer Groups
Customer Groups page is a place where you can create a group of customers based on the customer properties. Customer properties can be used for any data, such as website, interest, address, etc. To learn more about customer properties, you can access this link. Before getting started, here are a few things to know:
You need to fill the value of customer properties in your customer information
You can only have customers in a group of up to 10000 members. You can contact us to have more than 10000 members in one group.
There is no limit to the number of group creation,
The conditions (OR/AND) in the filter group apply to all customer properties. You can use filters for up to 5 customer properties,
You can set the filter based on channel, customer properties, OR/AND source.
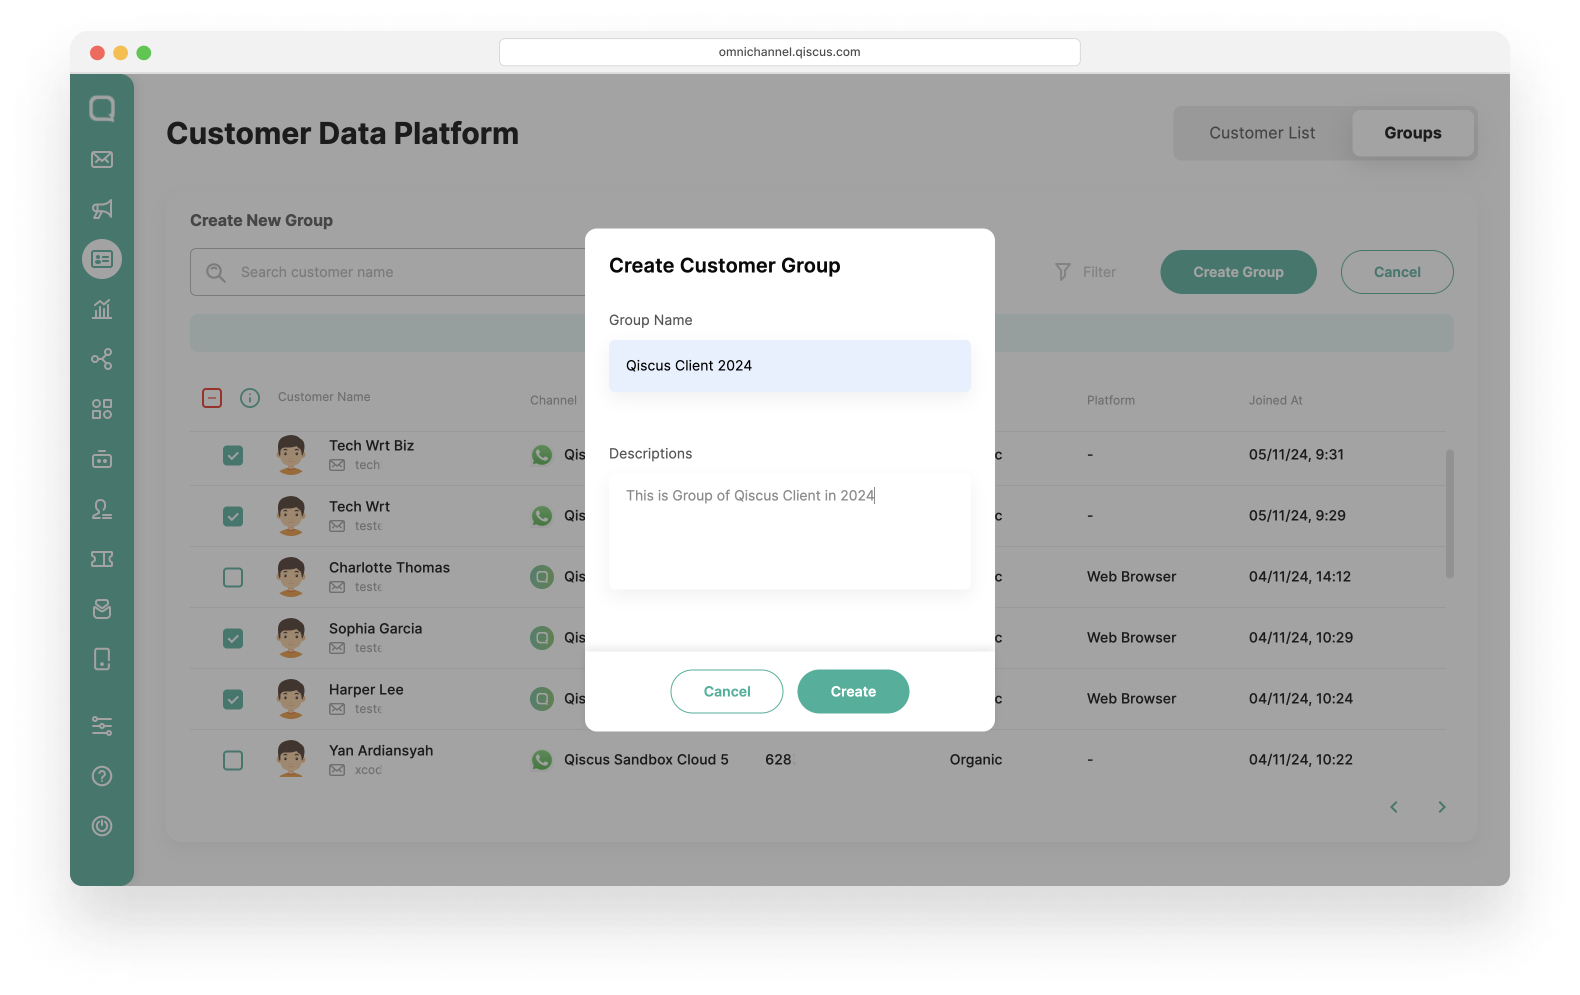
Create Customer Group
You can create customer group with the following steps:
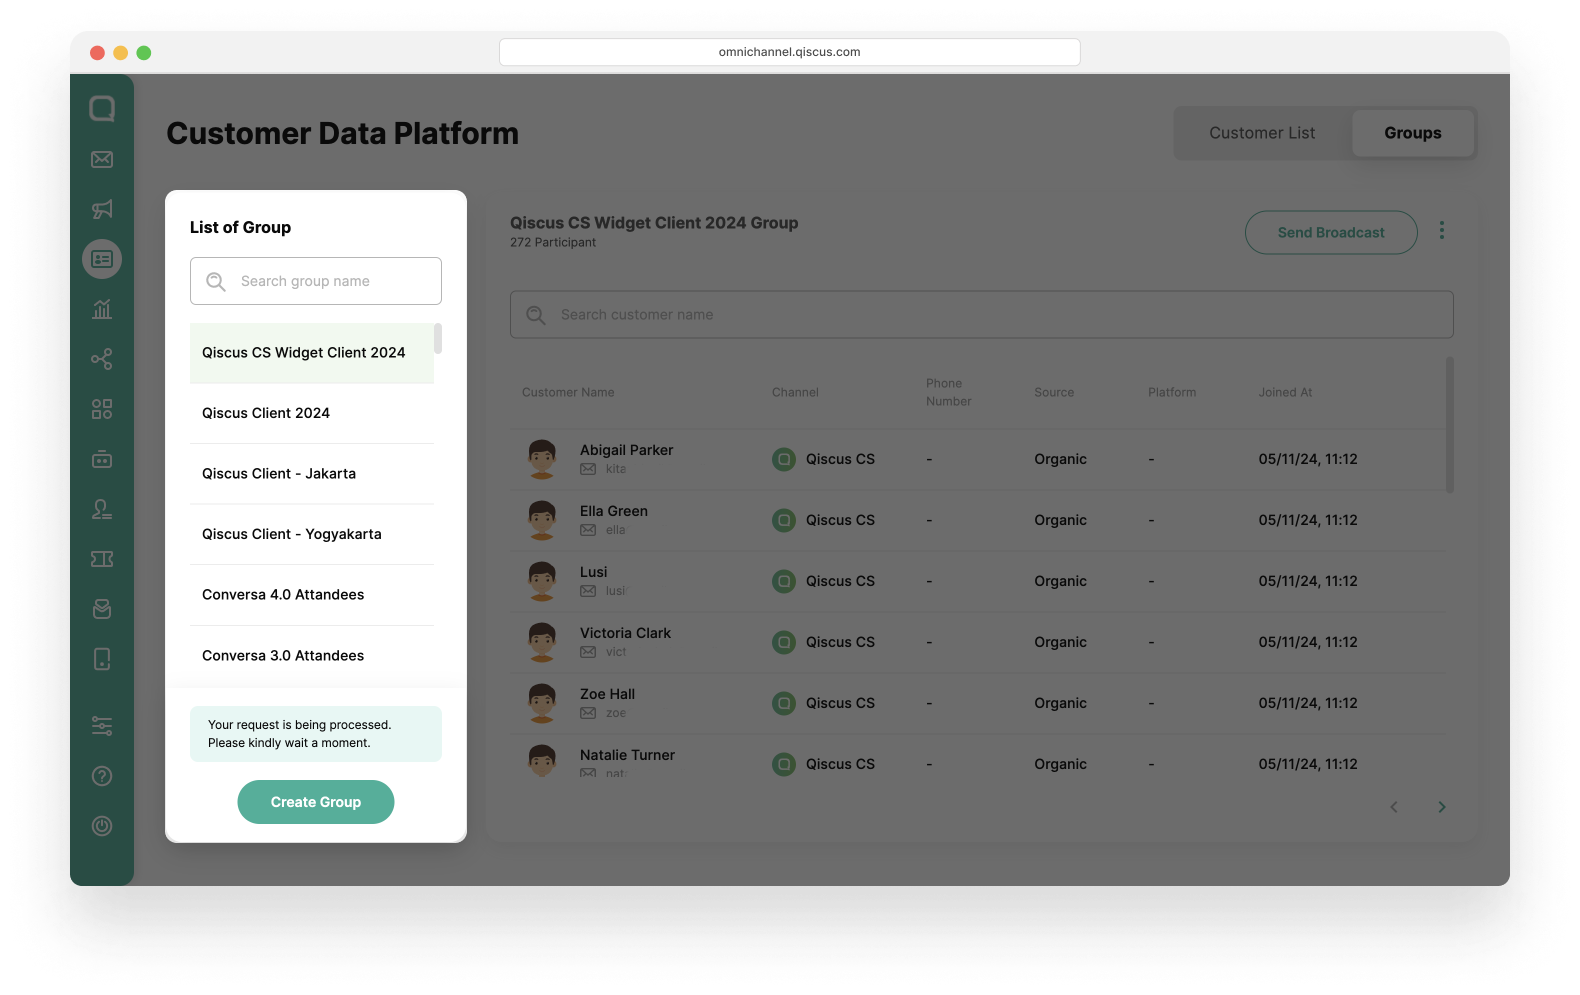
Click the Groups tab,
Click Create Group button,
You can choose one of two methods to create a customer group:
** Using the checkbox to the left of the customer list
Select the customers you want to be in a group,
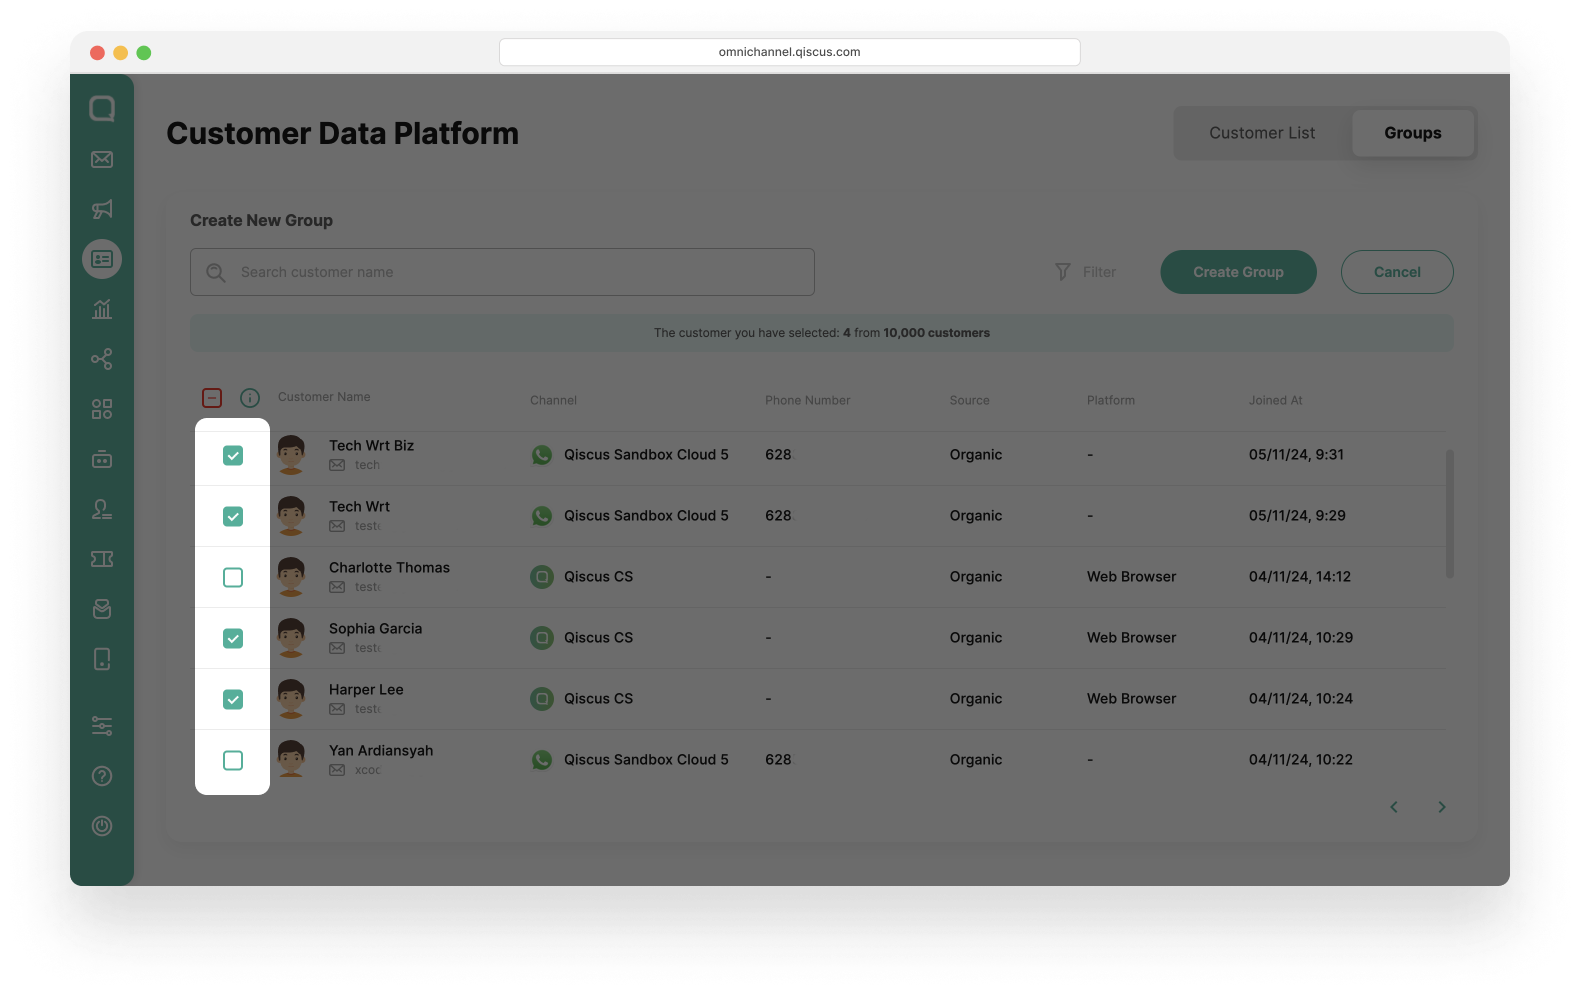
You will get a notification about how many customers have been selected, after that click Create Group button,
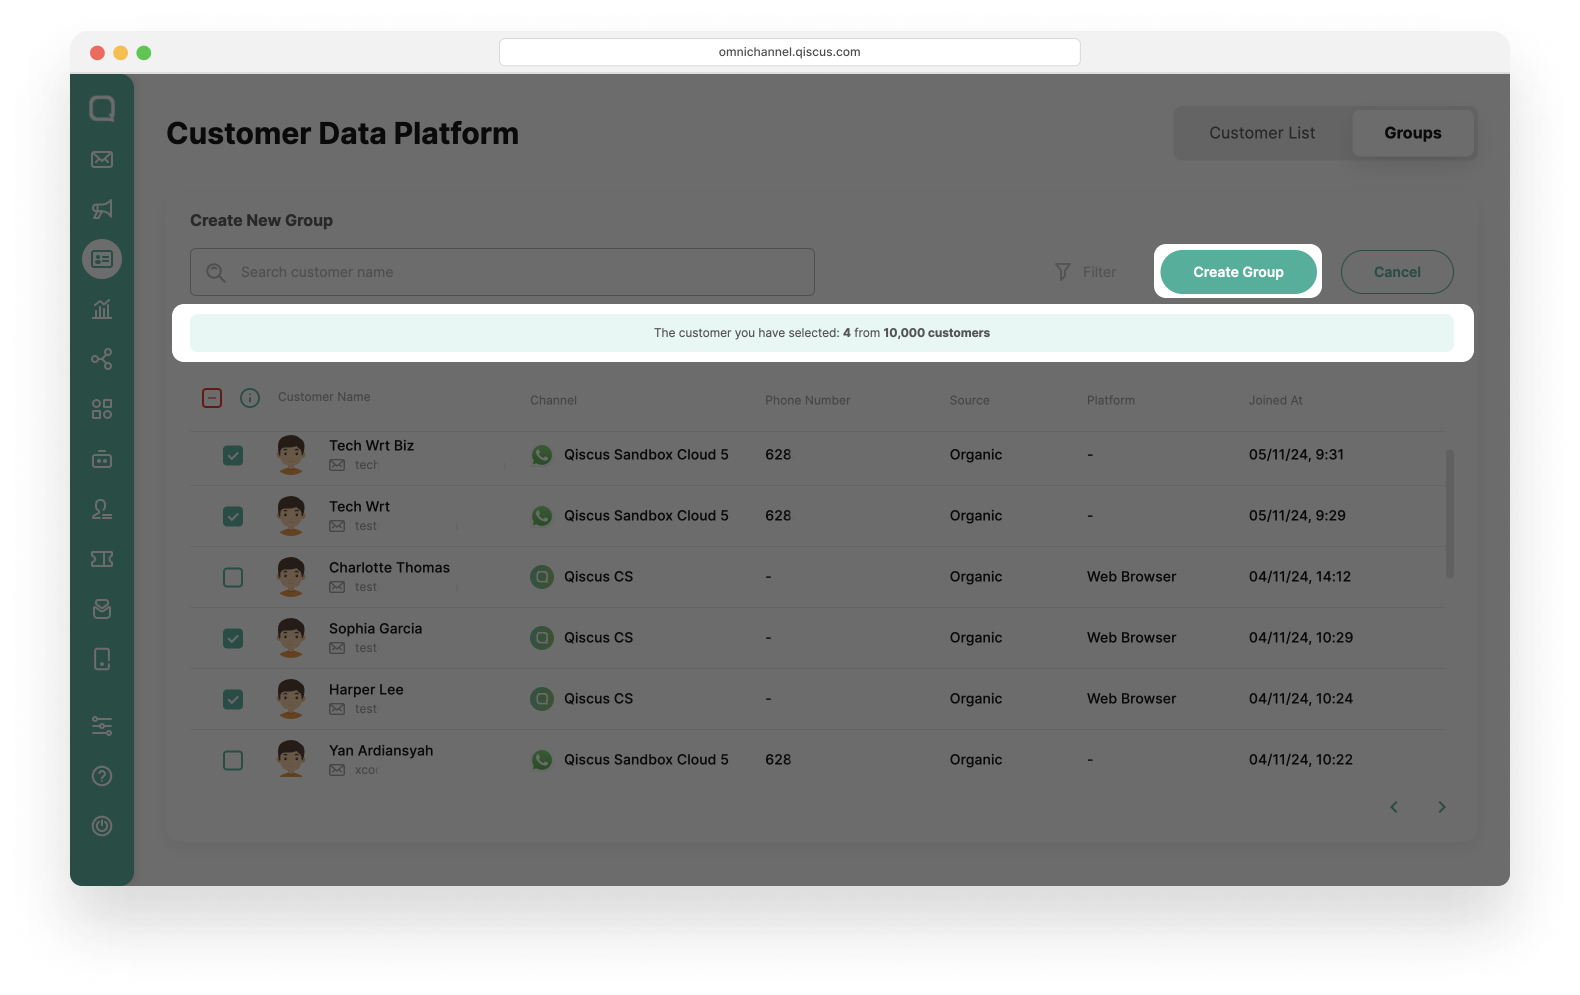
Fill in the Group Name and the Descriptions, and click the Create button.
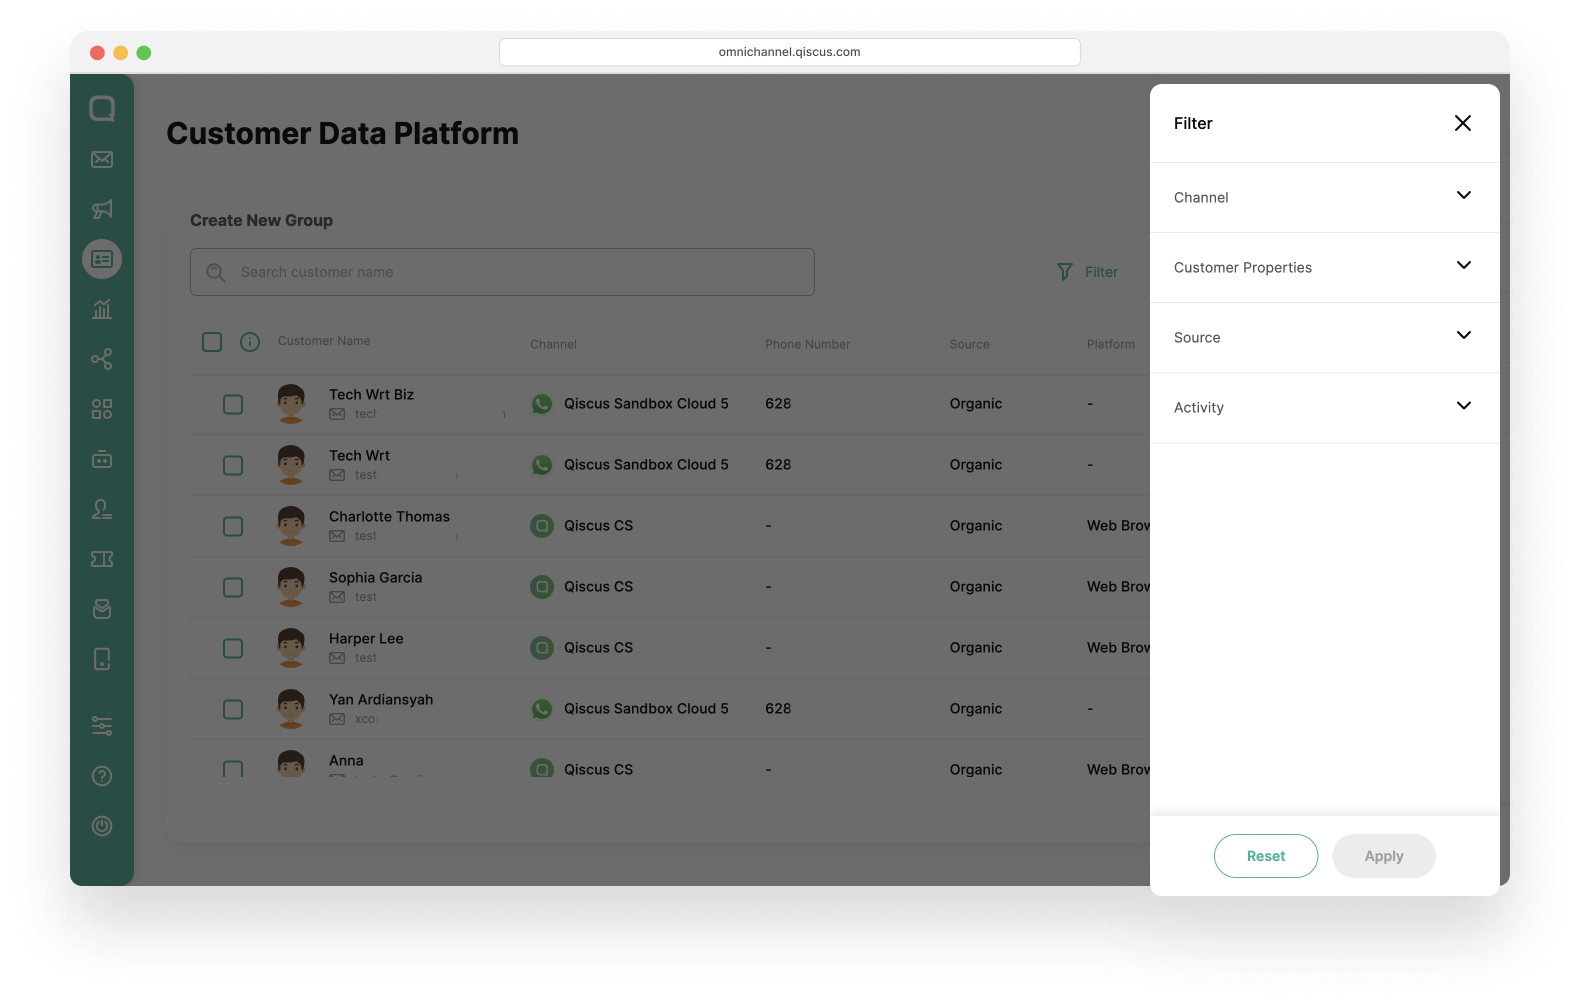
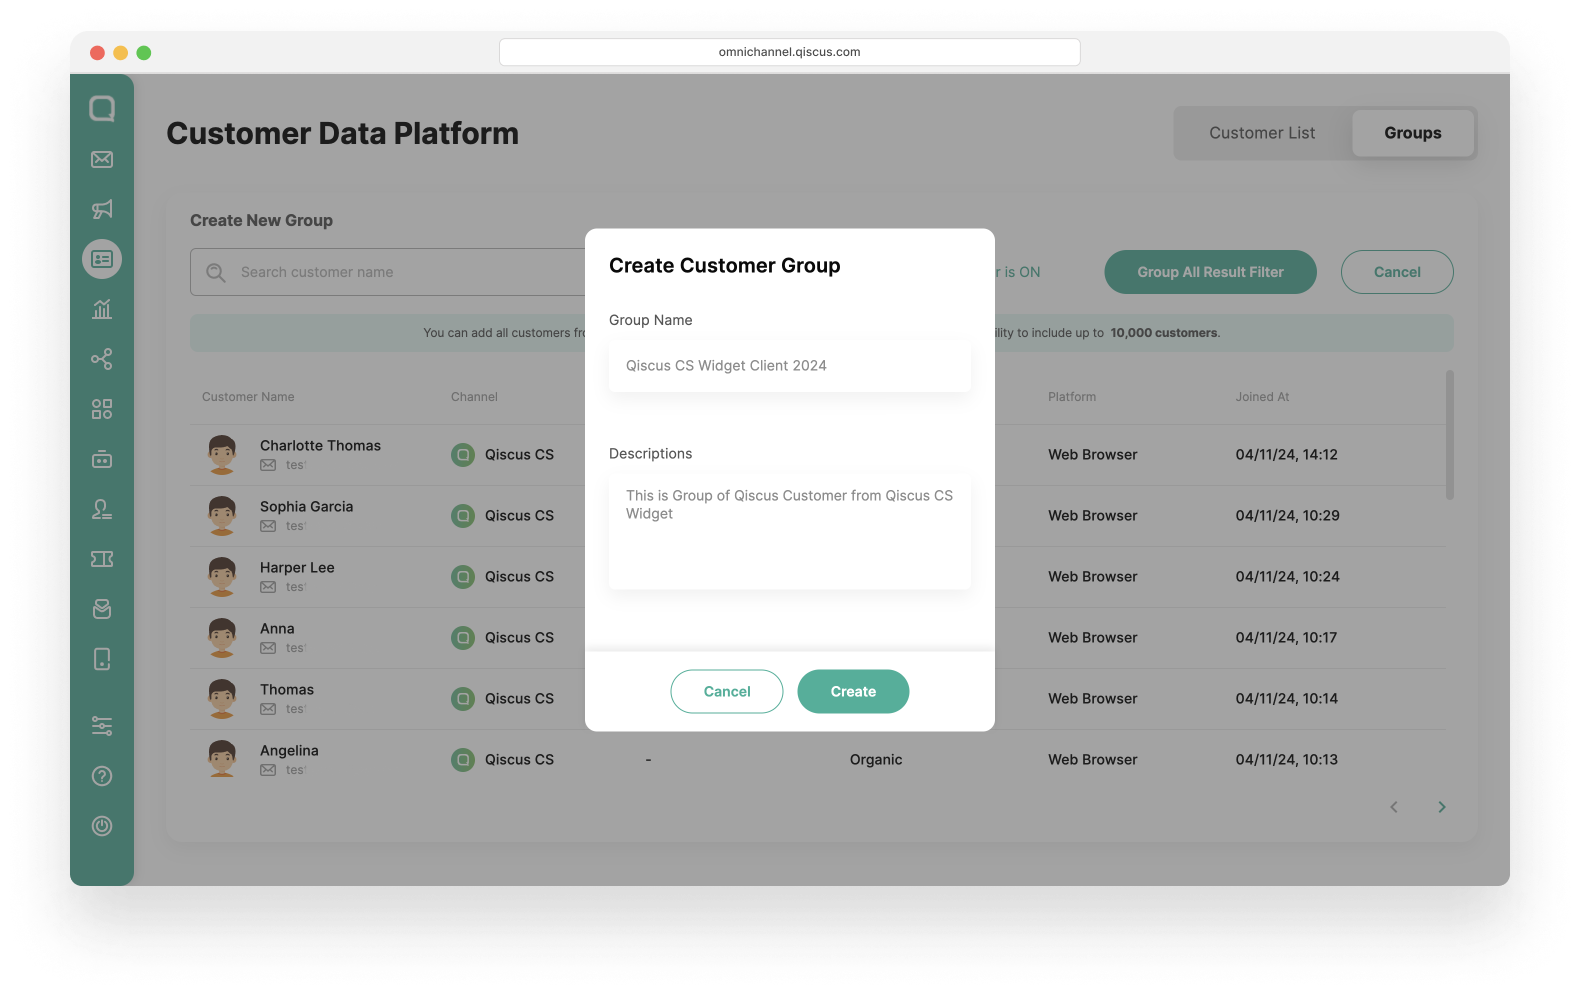
Using the Filter button
Click the Filter button,
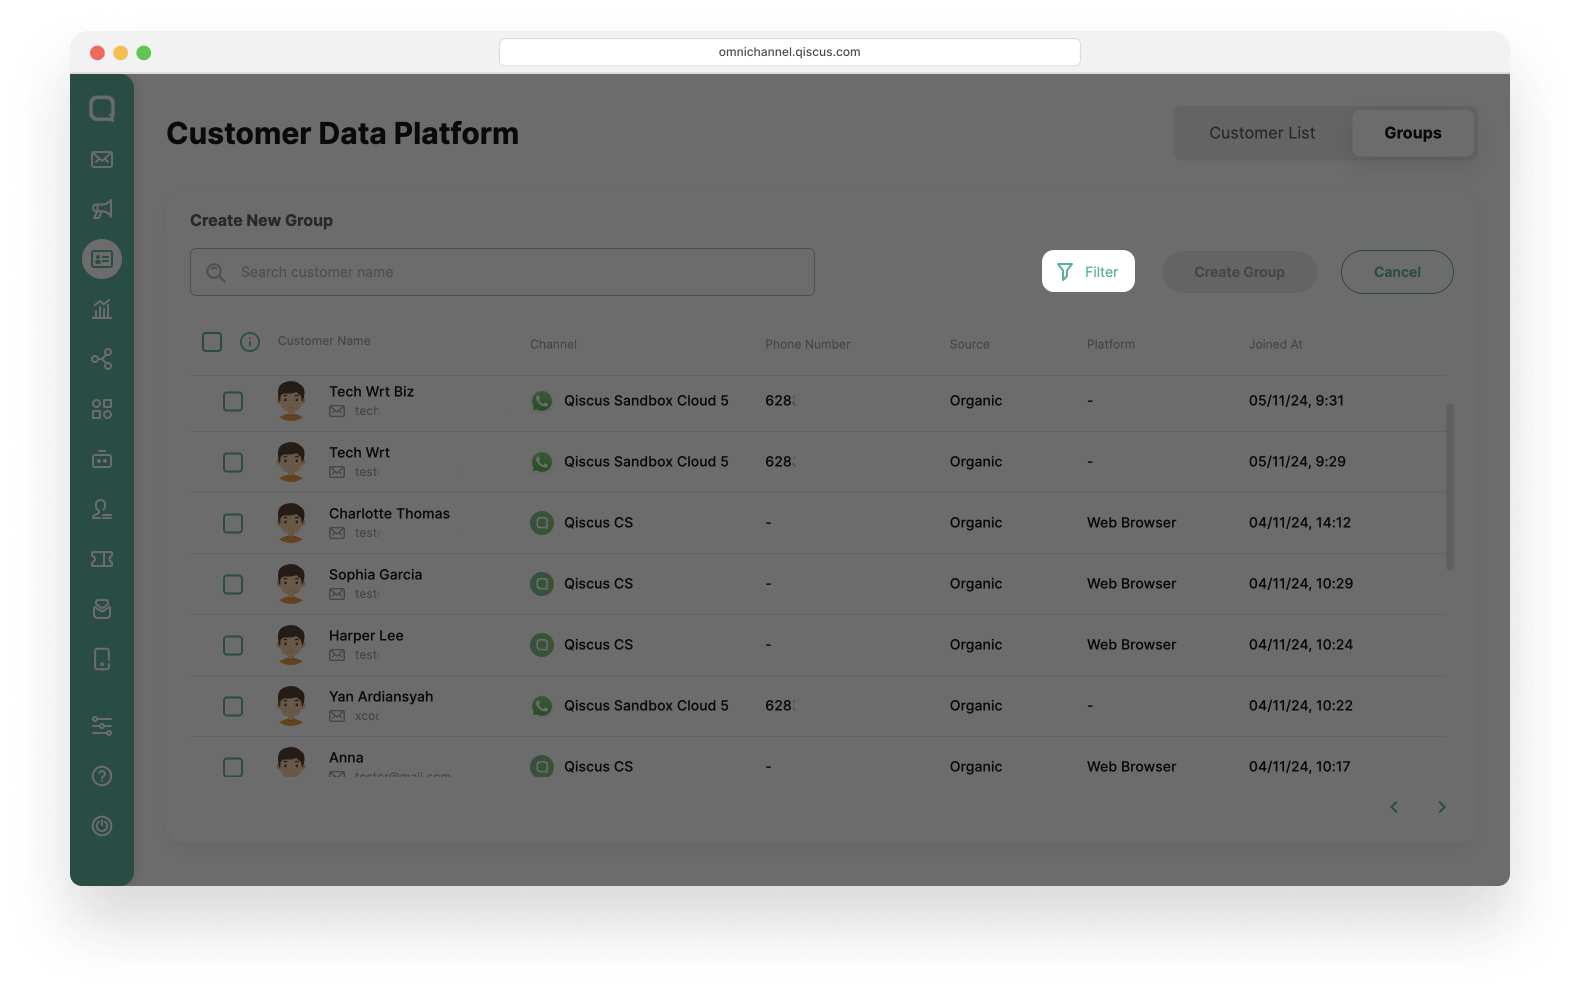
Select the filter condition. You can set the filter based on Channel, Customer Properties, Source, OR/AND Activity. Click the Apply button,
Click Group All Result Filter button,

Fill in the Group Name and the Descriptions, and click the Create button.
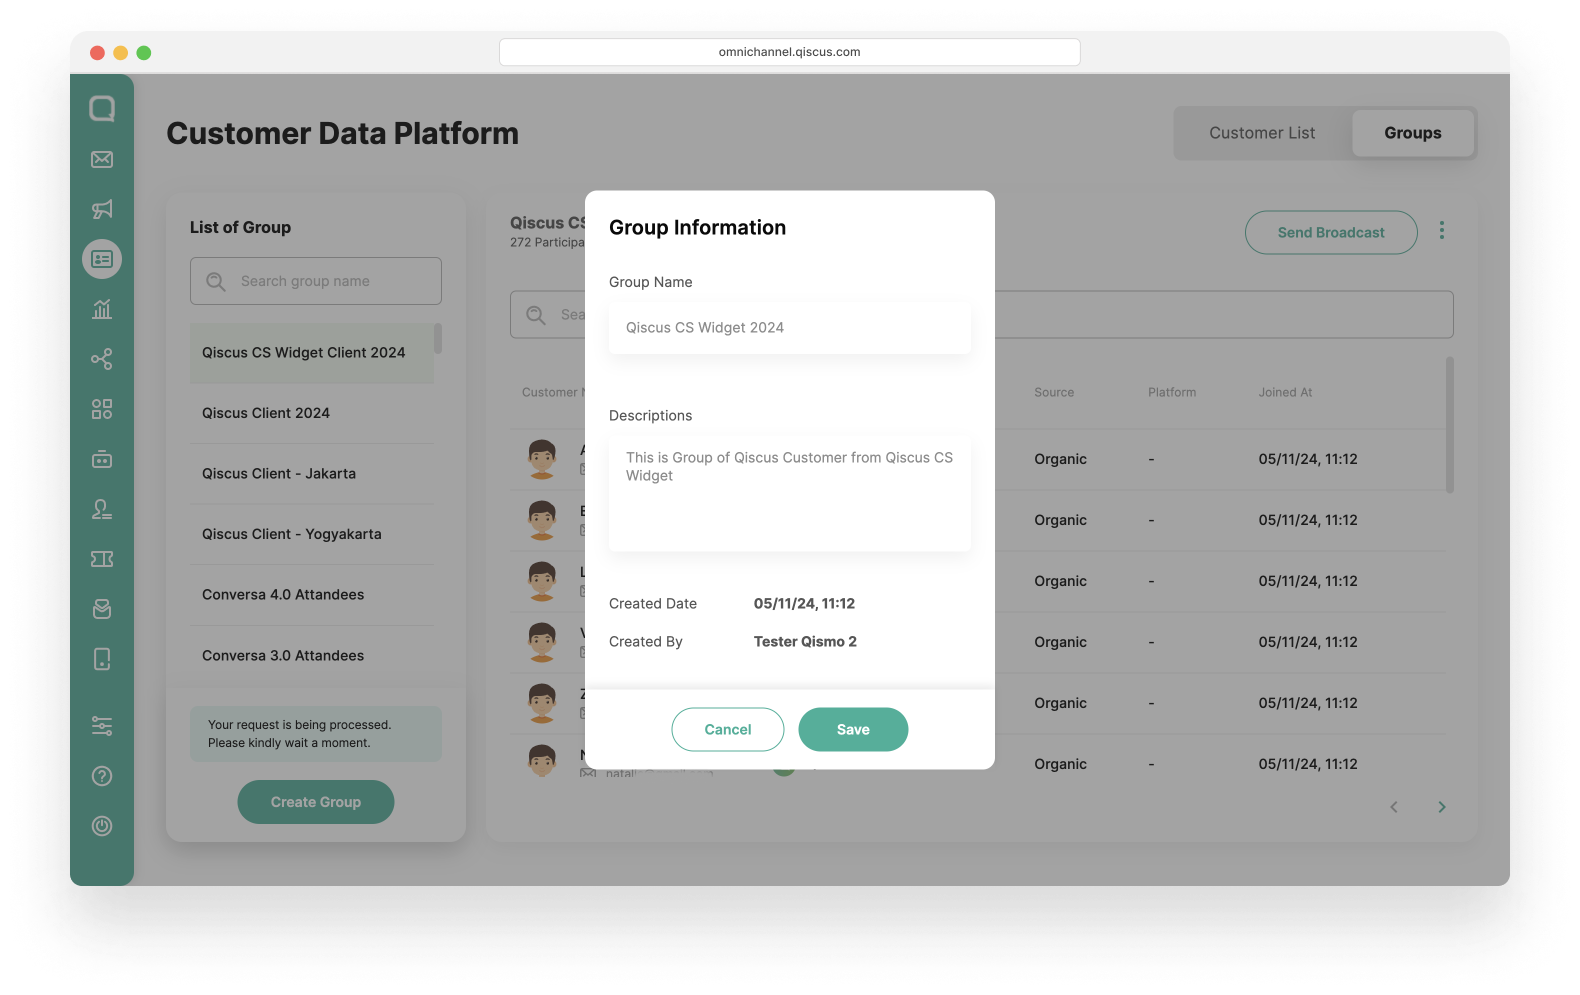
View and Edit Customer Group Information
Select a Customer Group,
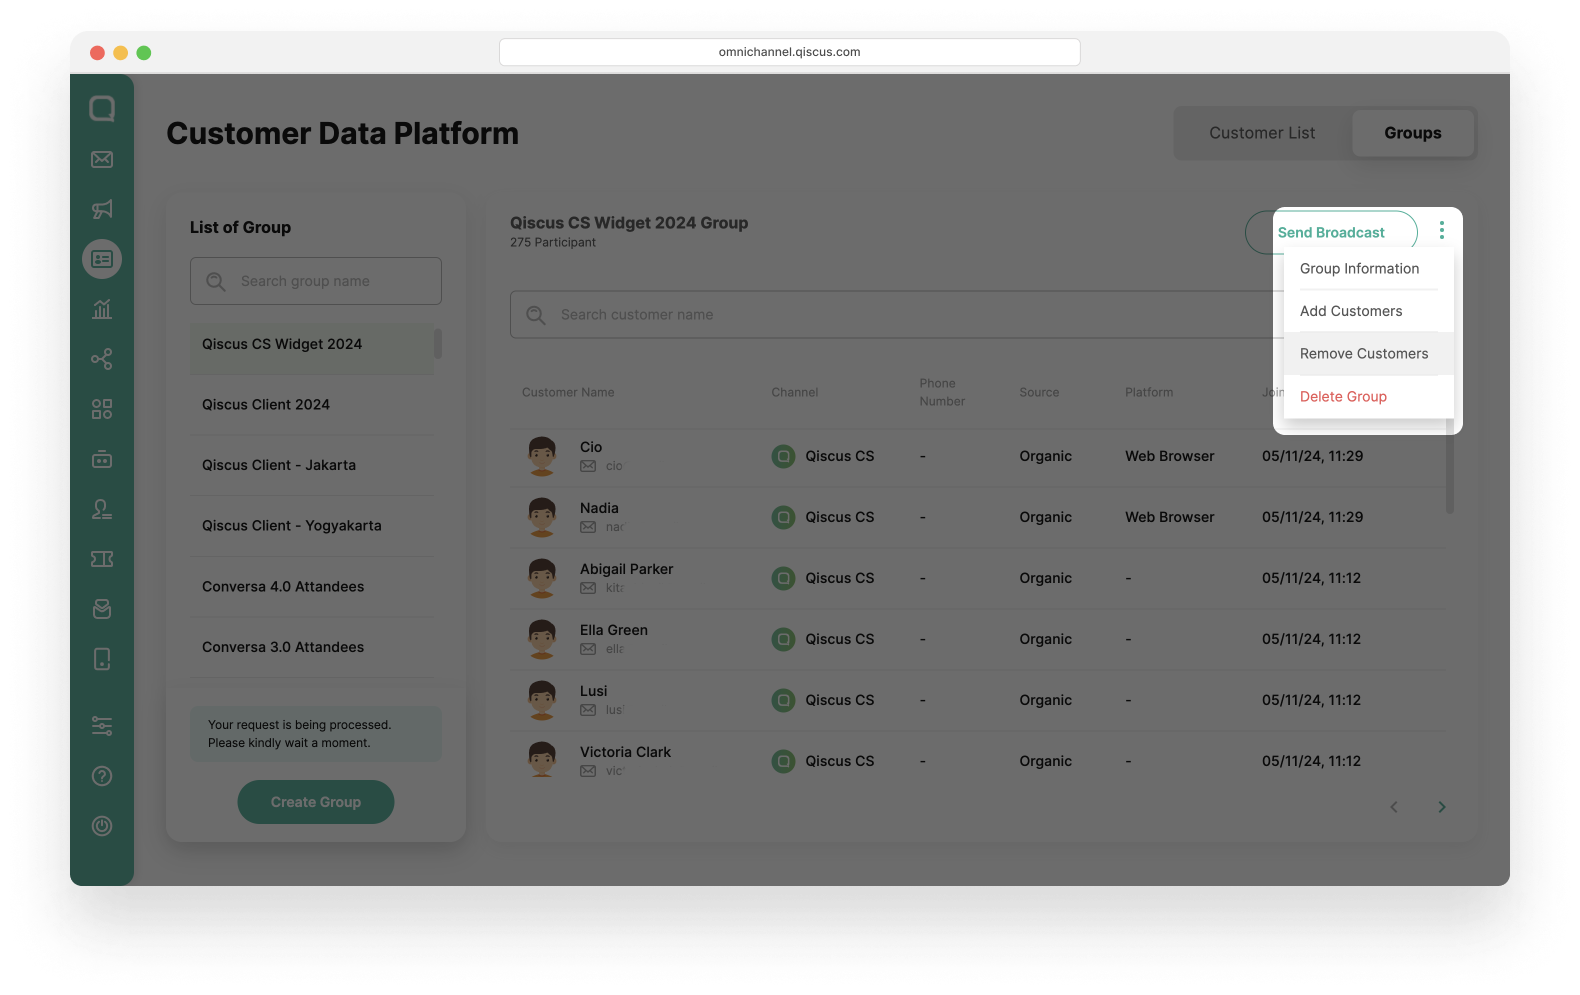
Click the kebab button (three vertical dots), and click the Group Information,

Edit the Group Information, and click the Save button.
Add Member of Customer Group
Select a Customer Group,
Click the kebab button (three vertical dots), and click the Add Customers,

You can choose one of two methods to add members to an existing group.
Using the checkbox to the left of the customer list
Select the customers you want to add to a group,
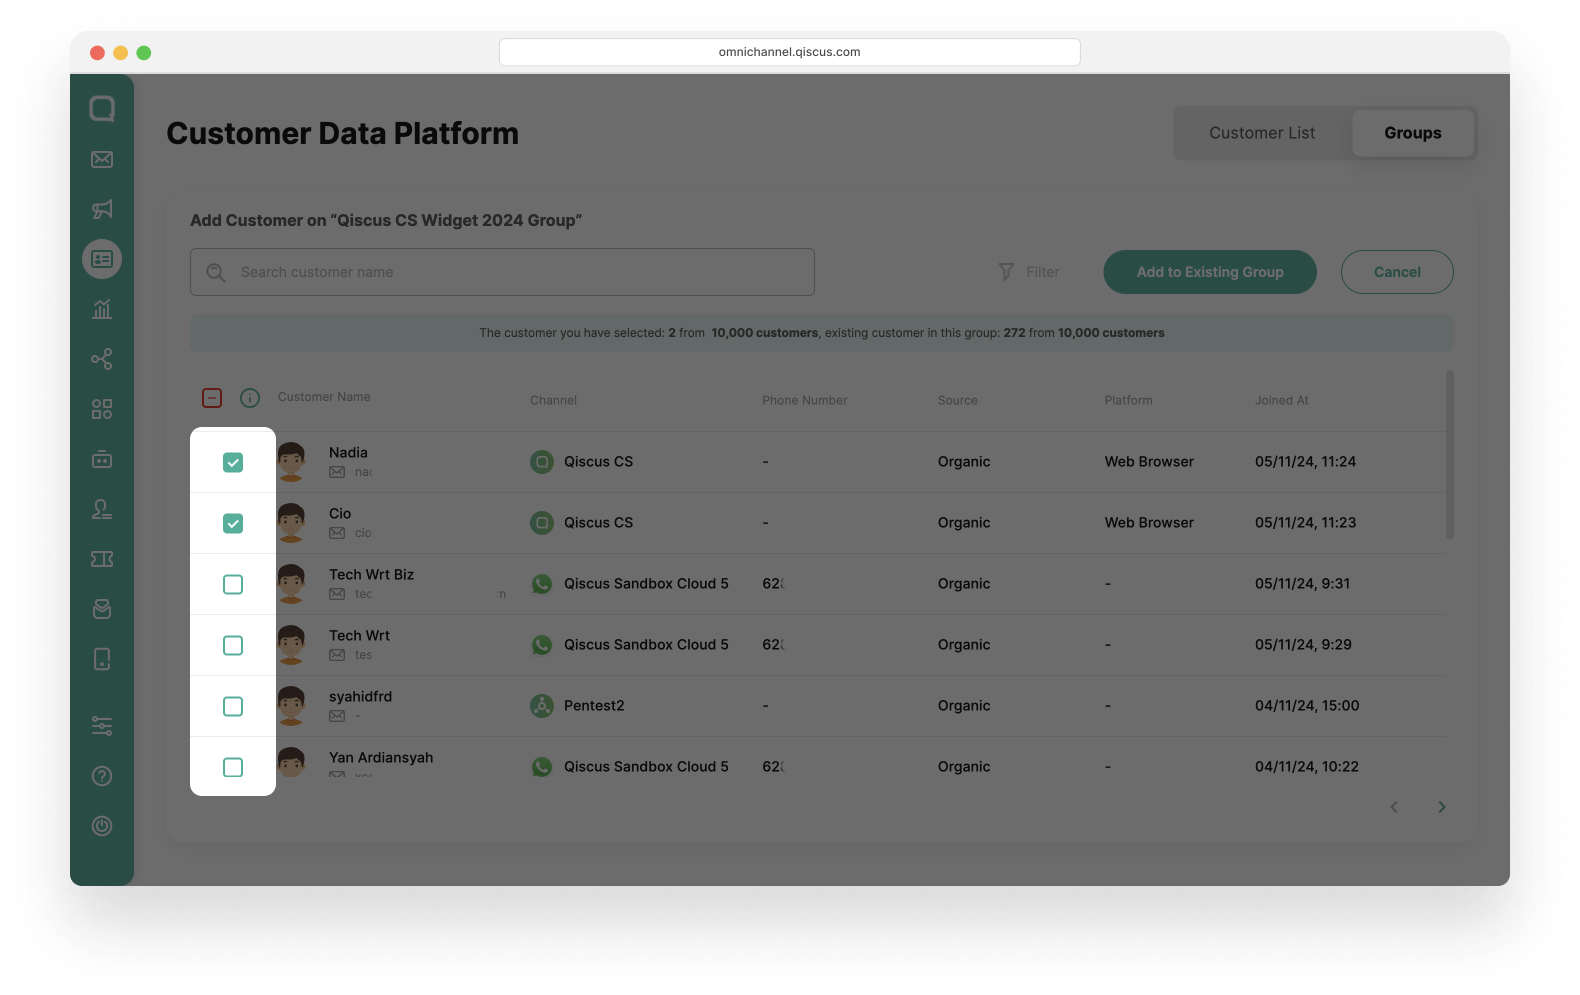
- You will get a notification about the number of customers in the group and how many customers have been selected, Click Add to Add to Existing Group button.
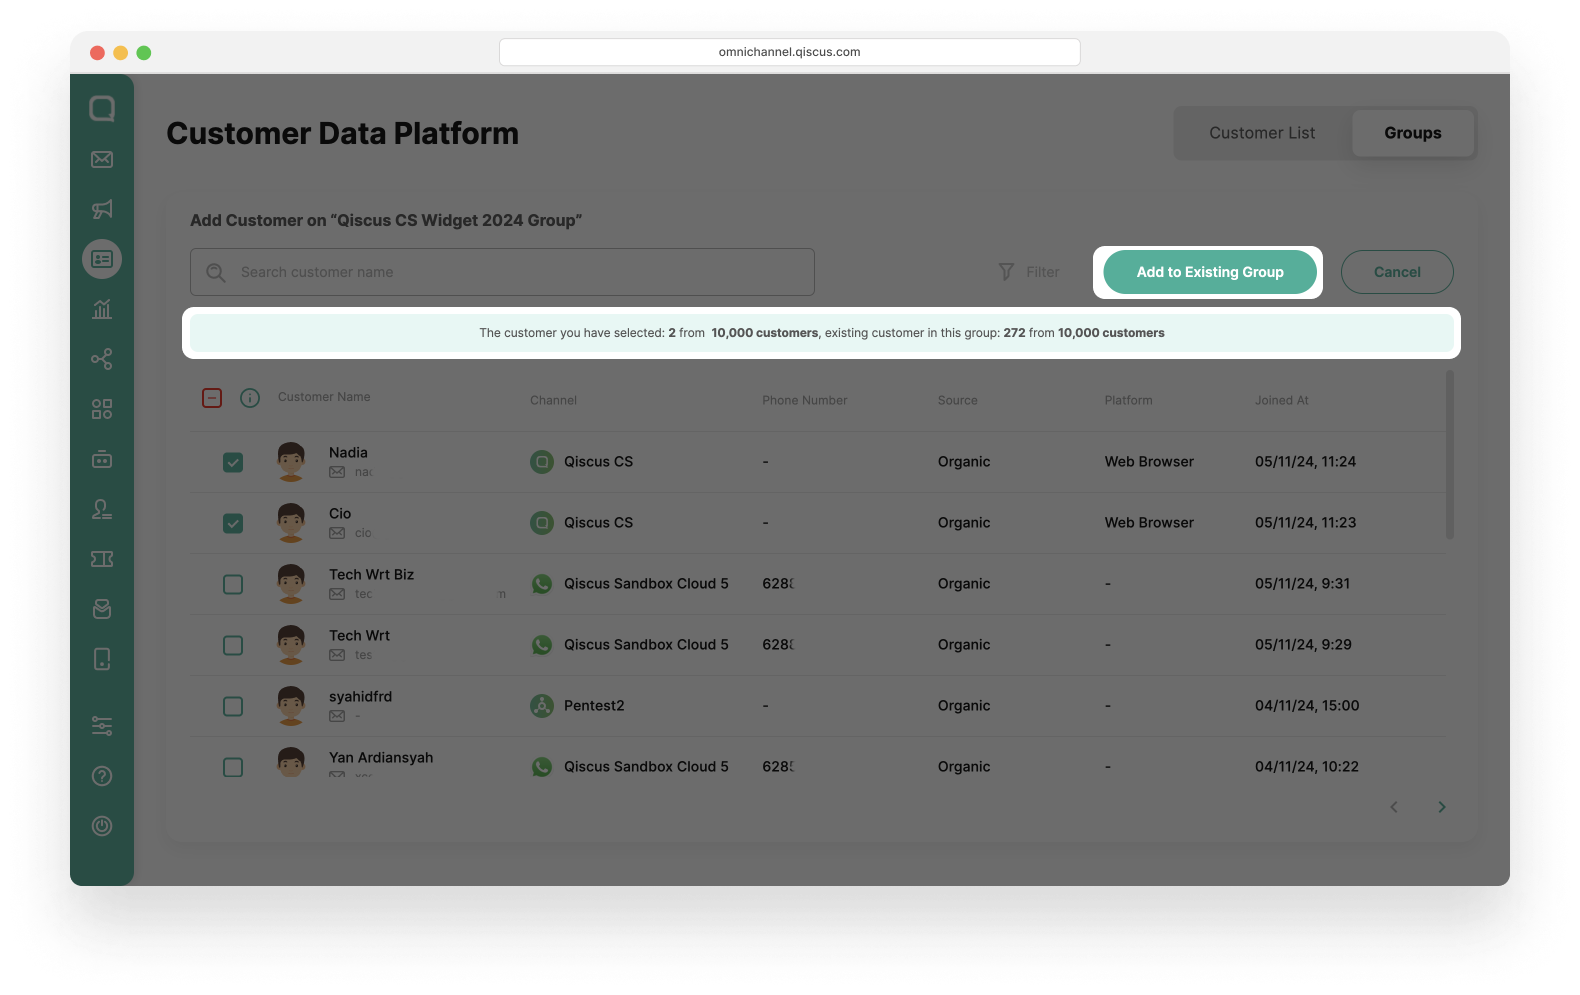
Info You can click the checkbox at the top to select all the customers on a given page.
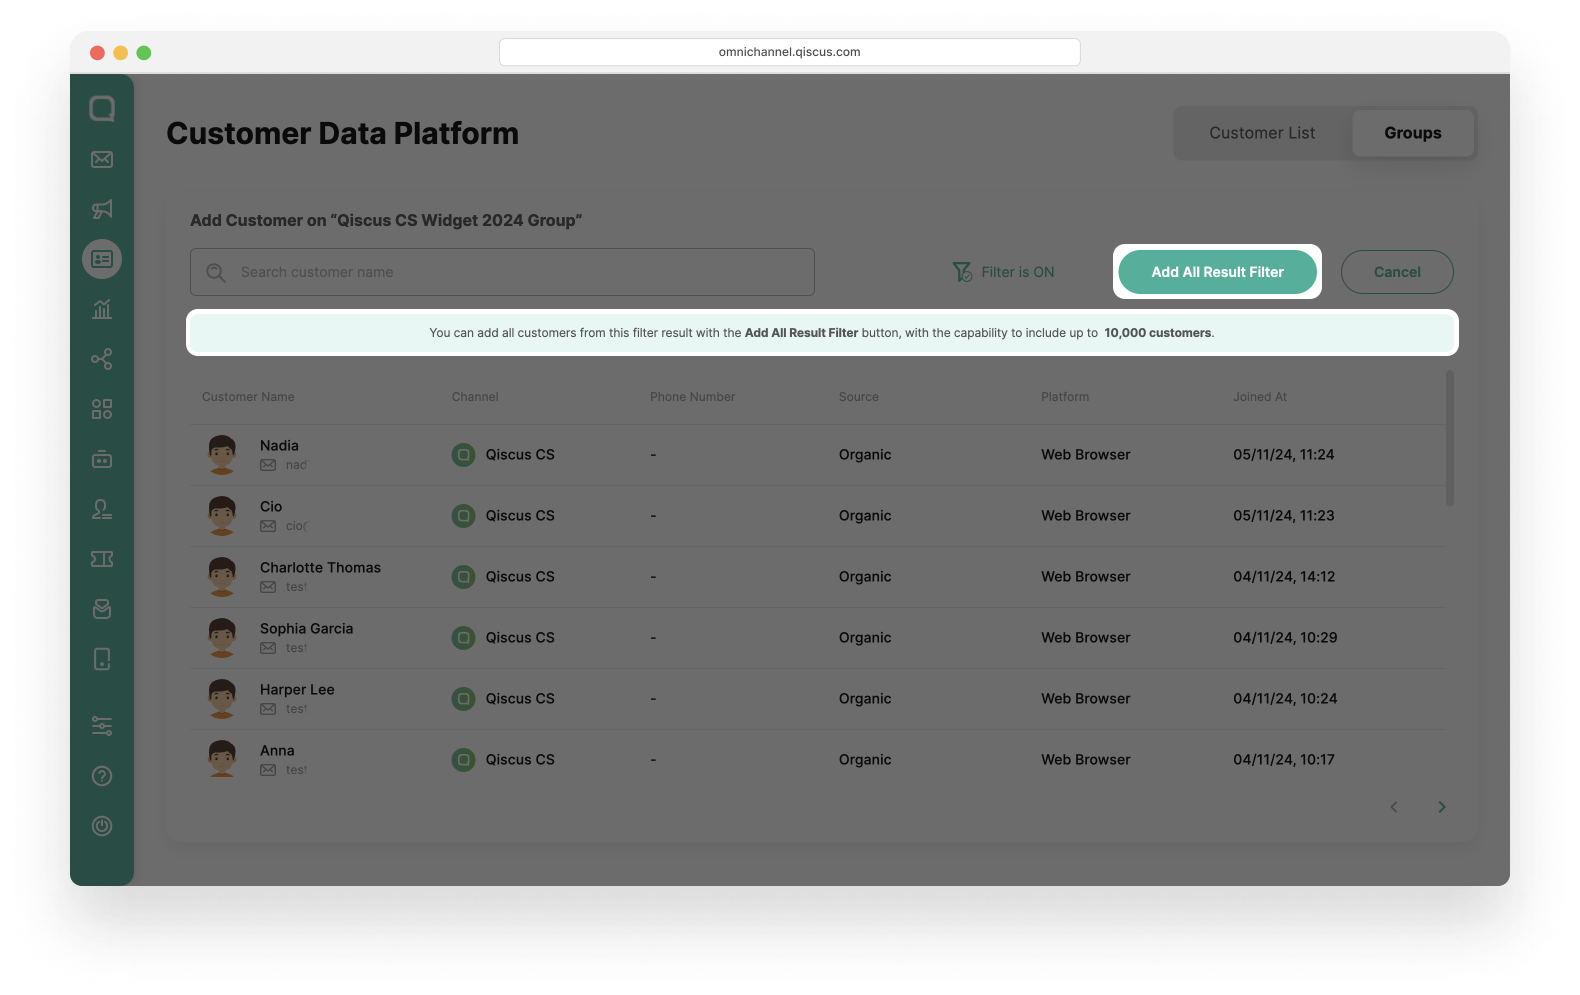
Using the Filter button
Click the Filter button,
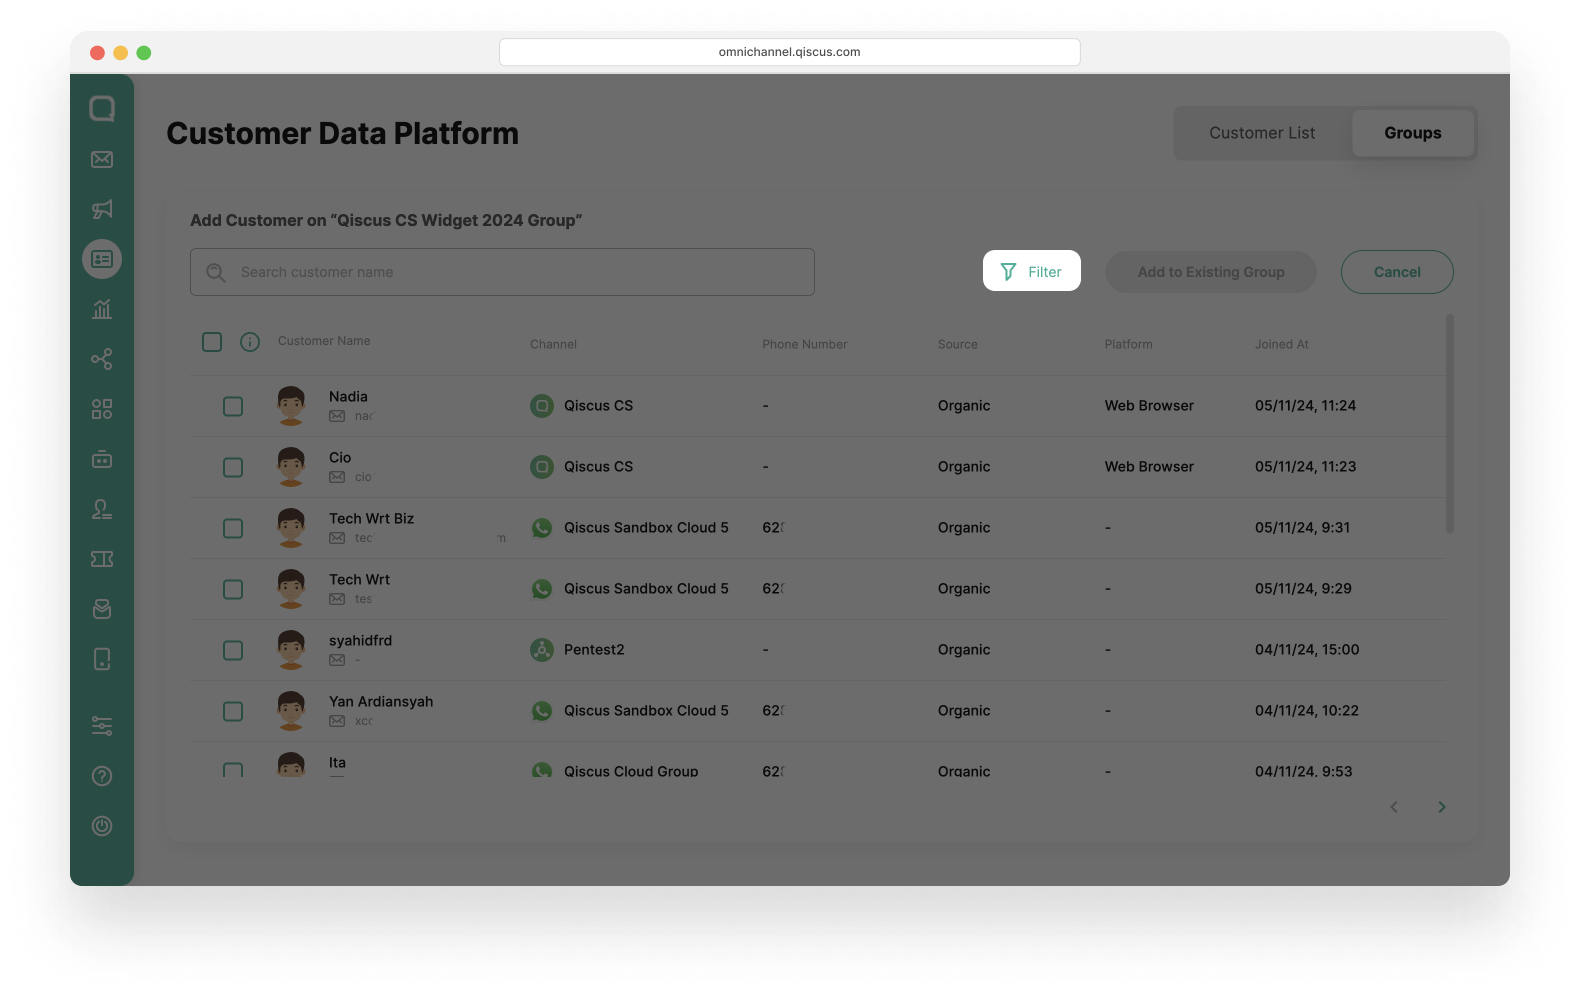
Select the filter condition. You can set the filter based on channel, customer properties, source, OR/AND Activity. Click the Apply button,
Click Add All Result Filter button.
Remove Member of Customer Group
Select a Customer Group,

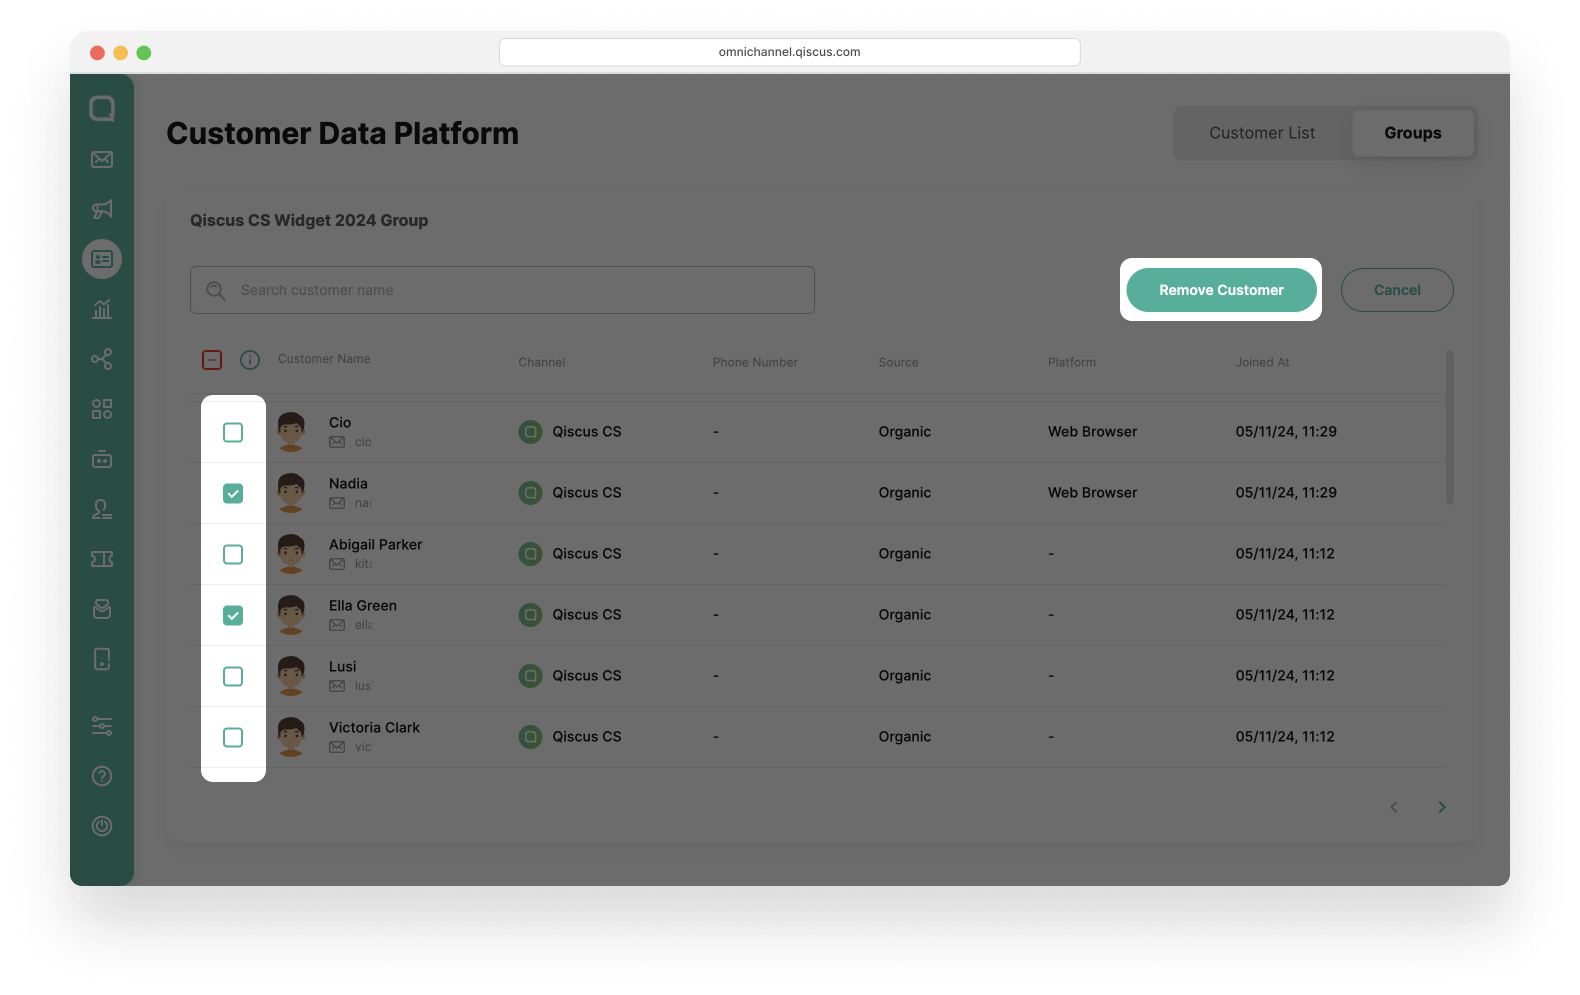
Click the kebab button (three vertical dots), and click the Remove Customer button,
Select the customers, and click the Remove Customer button.
Delete Customer Group
Select a Customer Group,

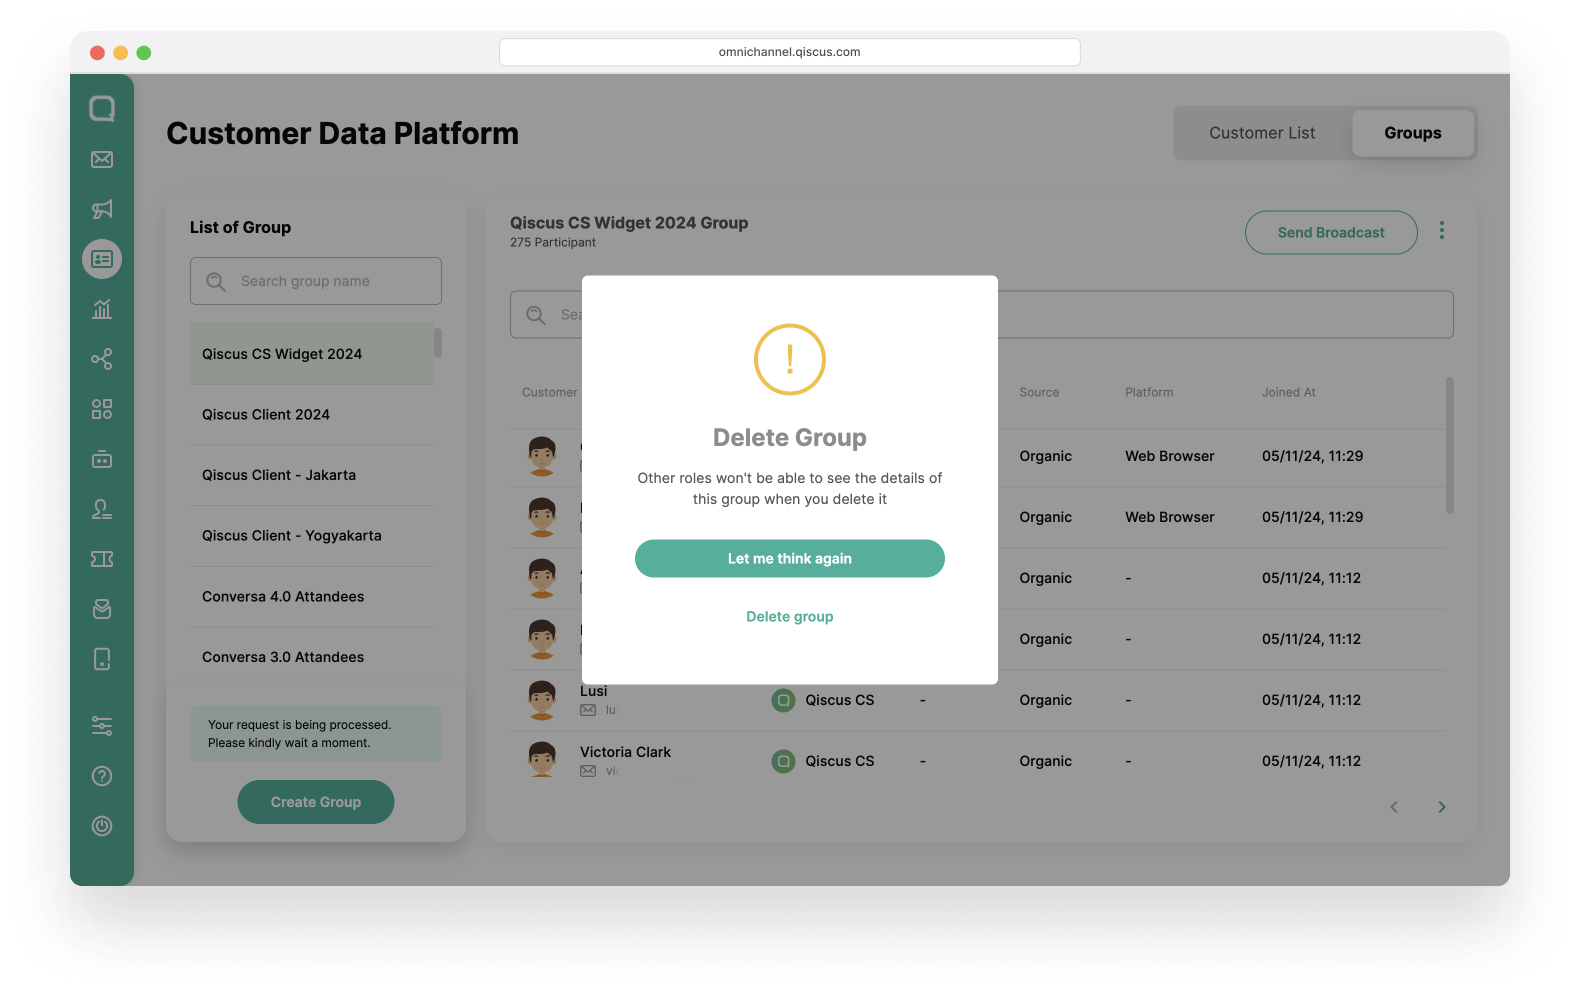
Click the Kebab button (three vertical dots), and click the Delete Group button,

Click the Delete Group button in the Delete Group Confirmation pop up.
Send Broadcast Message to A Group
Select a Customer Group,
Click Send Broadcast button,
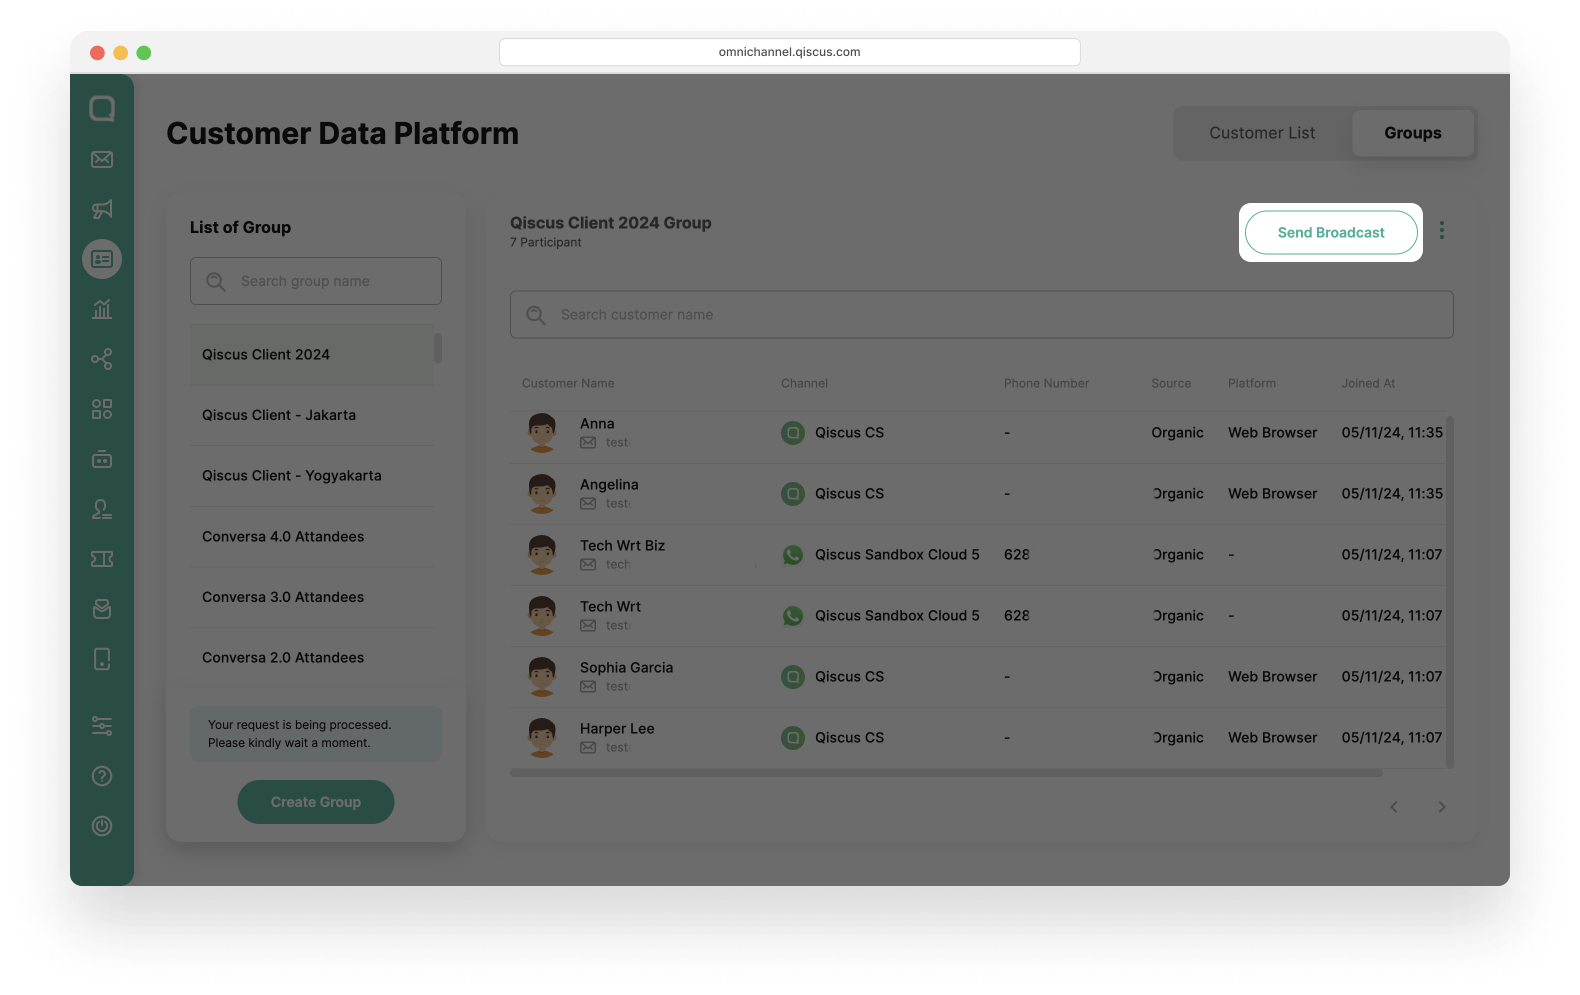
You will be redirected to Outbound Message page,
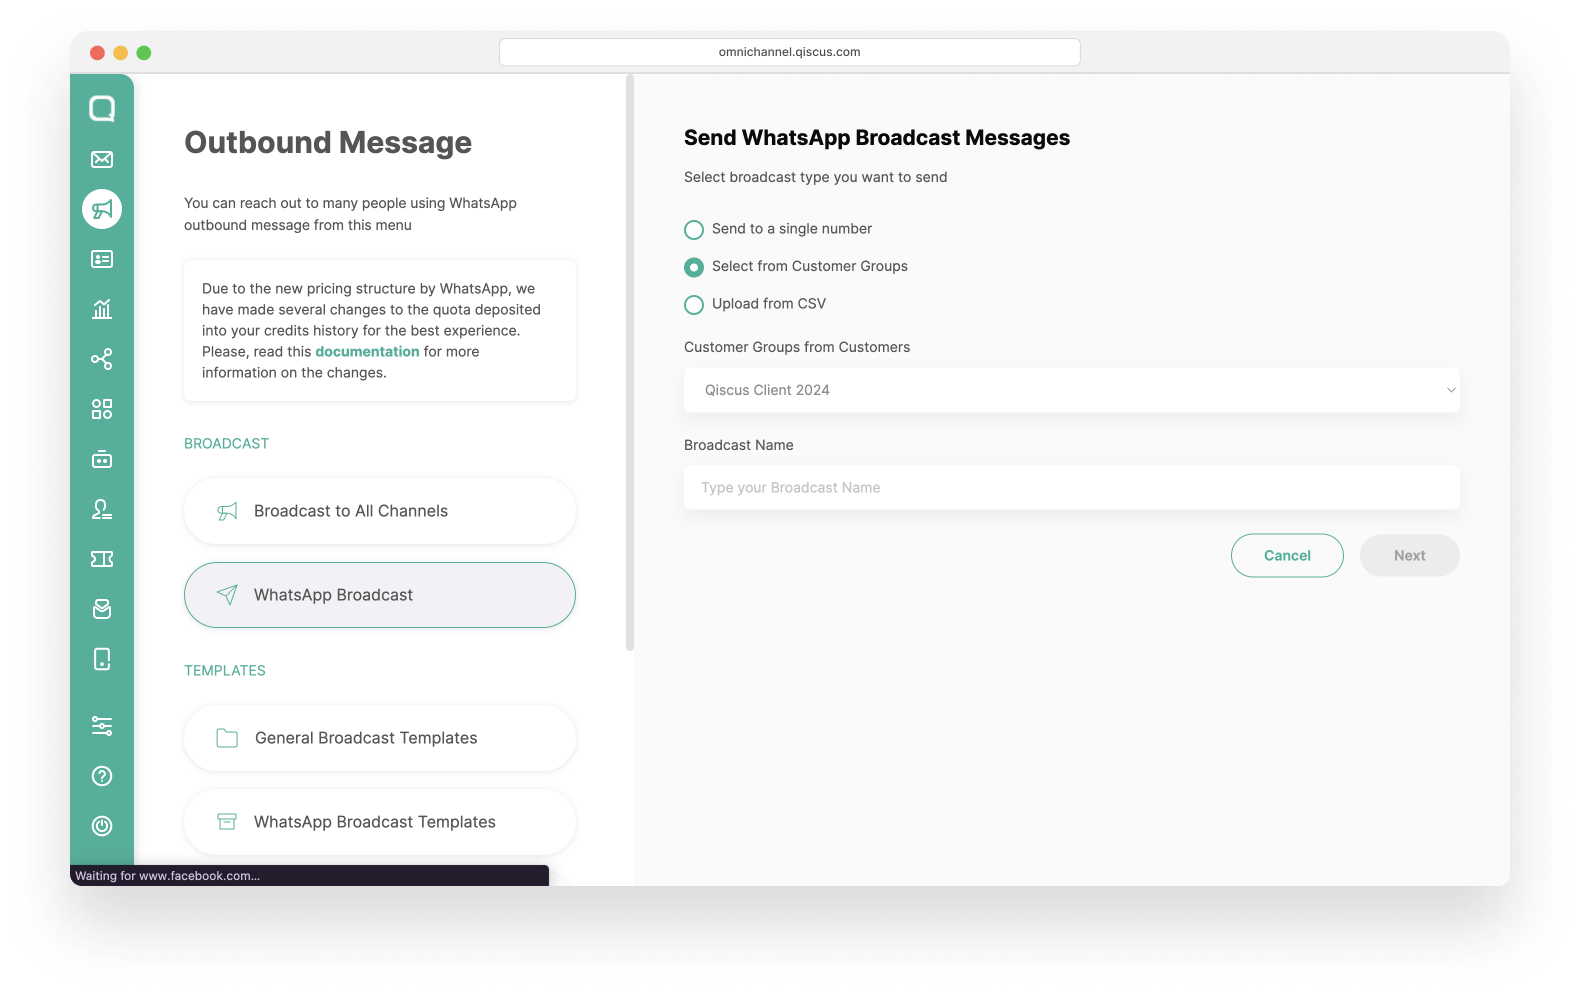
Follow these steps in Broadcast Template Message with Customer Group.
Broadcast Template Message with customer groups is currently only available for Enterprise.
Merge Customer
In business, the same customer often uses several different channels to connect with your business. The Merge Customer feature will help you identify and manage customers who are actually the same. Hence, using Merge Customer feature will effectively reduce broadcast costs since you don't need to send messages to all channels but only to a customer who use one of the most active channels.
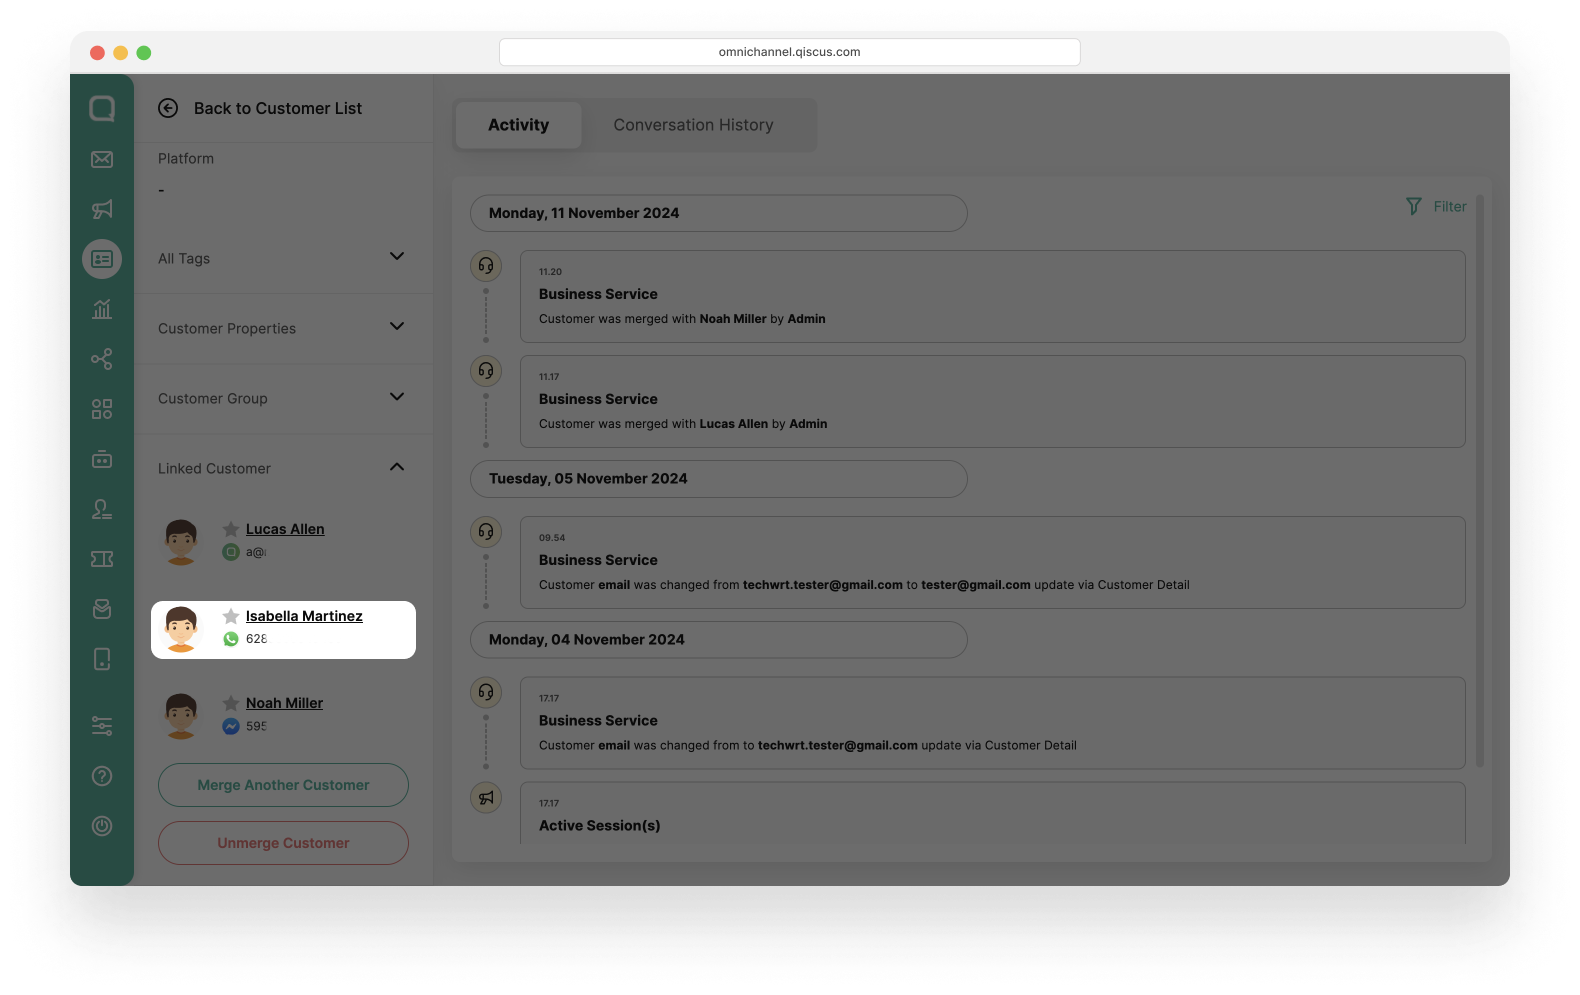
In the Customer List, you will see several symbols next to the customer's name. Here are the meanings of the symbols in the Merge Customer feature:


There are two ways to merge a customer with an existing customer, via the Inbox menu and customer detail.
Via Inbox Menu
Go to Inbox Menu on the sidebar and select a customer you want to merge. Click the kebab button (three vertical dots), and click Merge to Existing Customers,
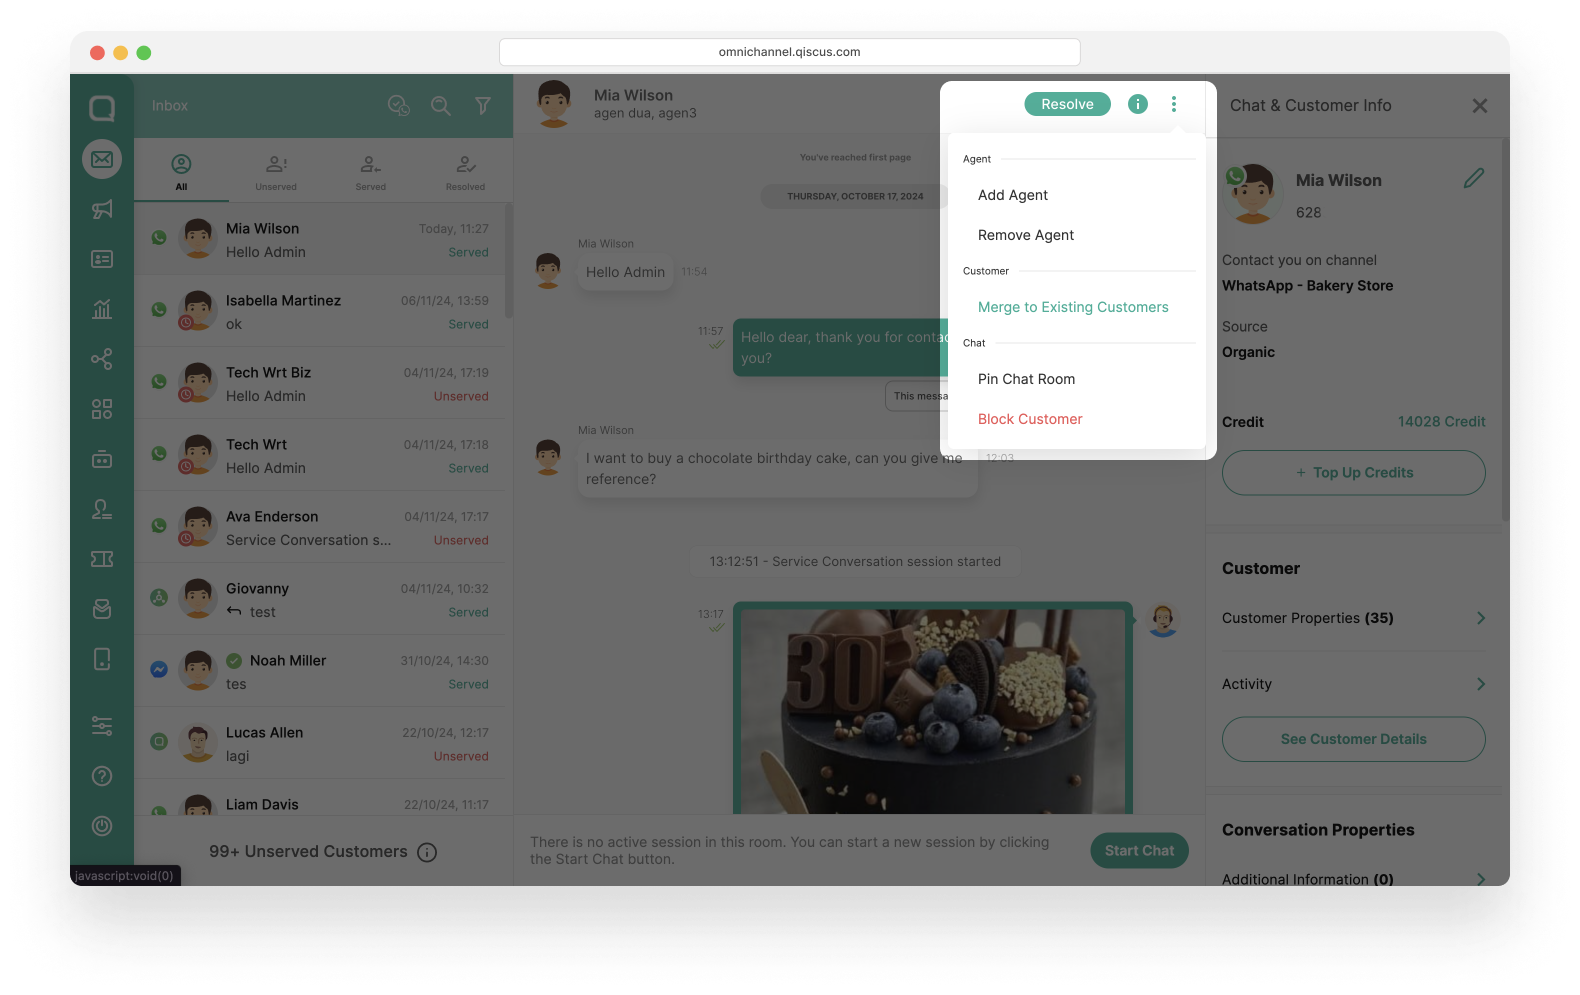
If a customer has merged with another customer, the Merge to Existing Customer menu will not appear.
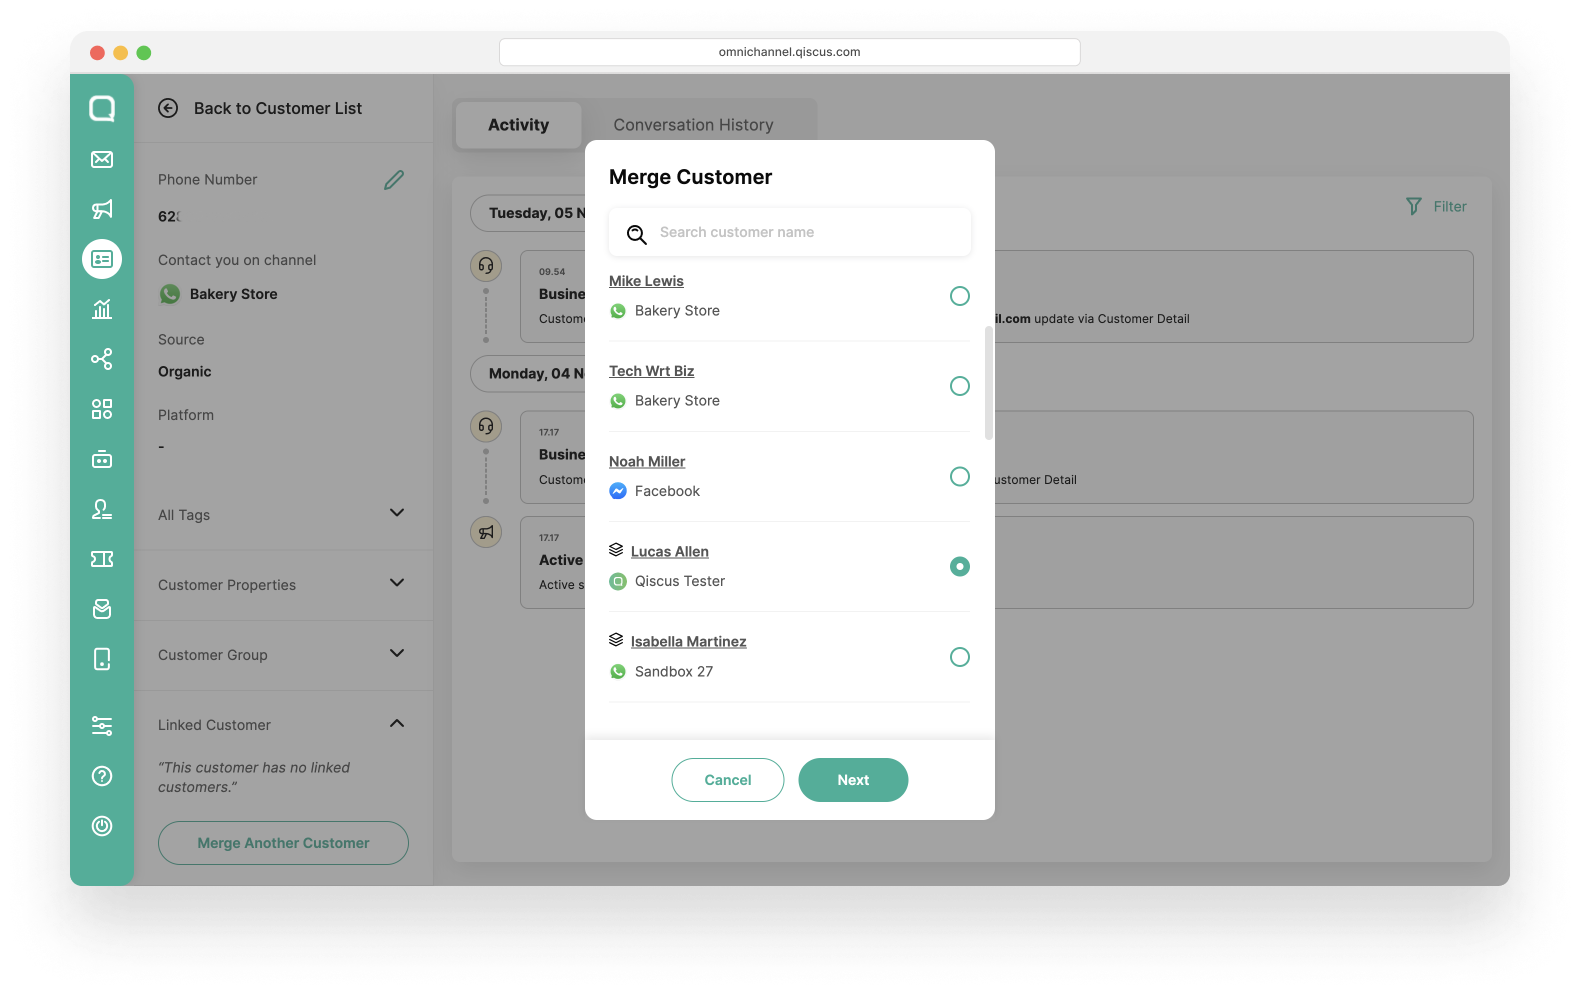
Select a customer you want to merge and then click Next. In addition, you can search for customers by name,
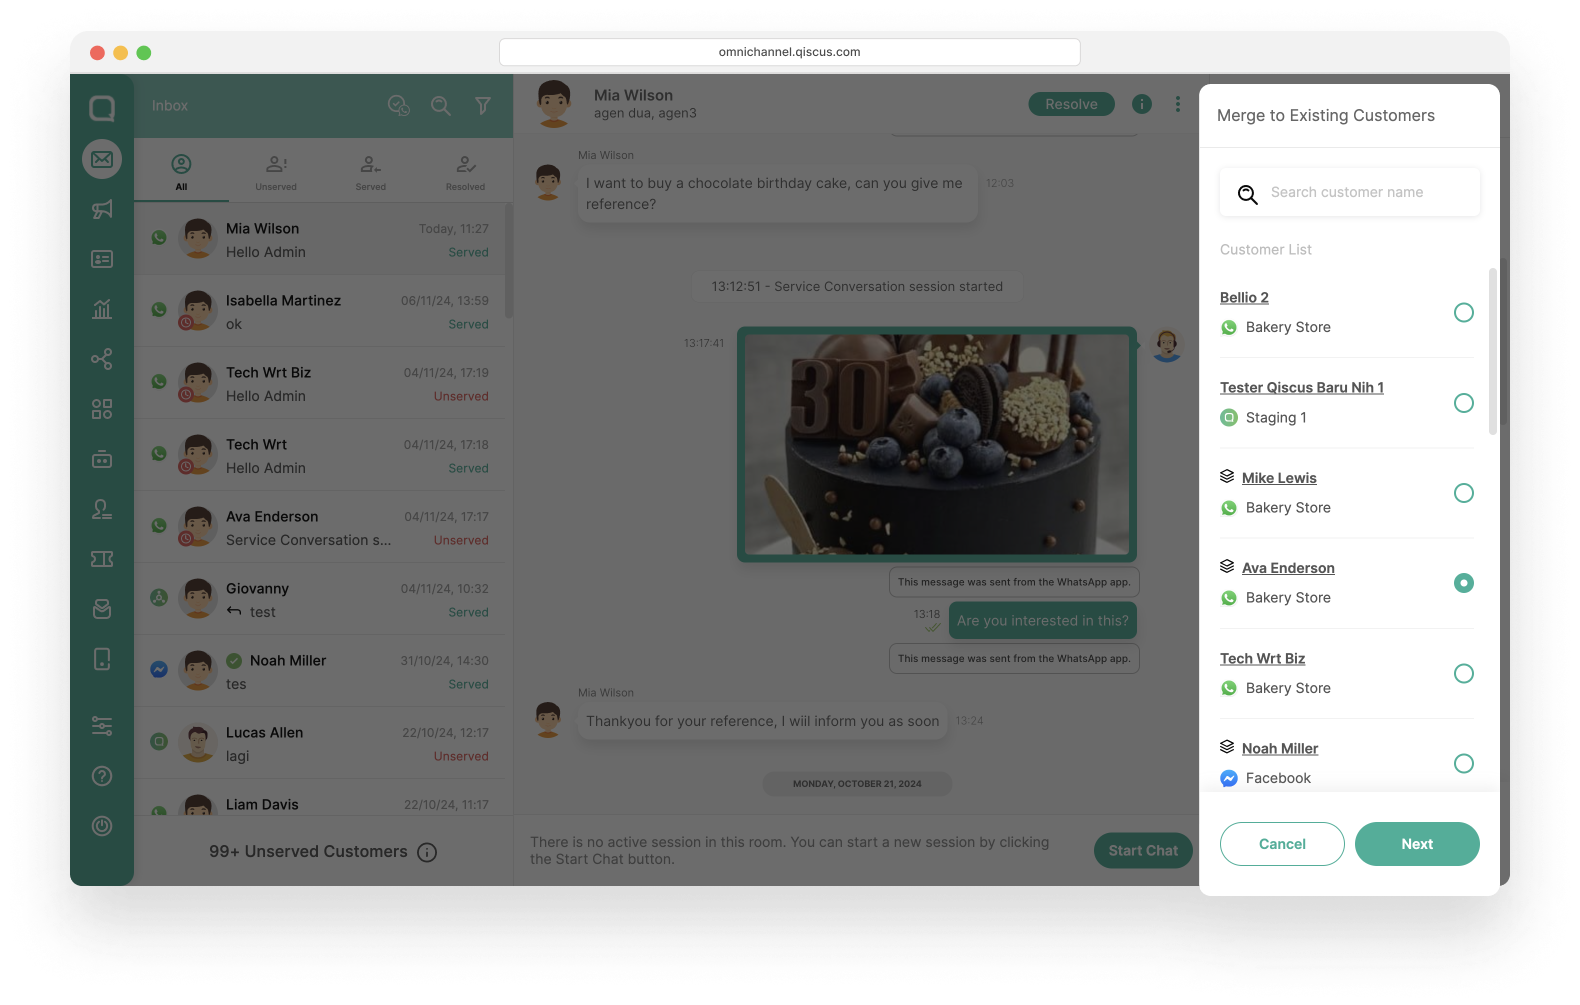
You will get information regarding the Customers Details. If the customer you want to merge with has already merged with other customers, you will see a list of other linked customers. Click Merge,
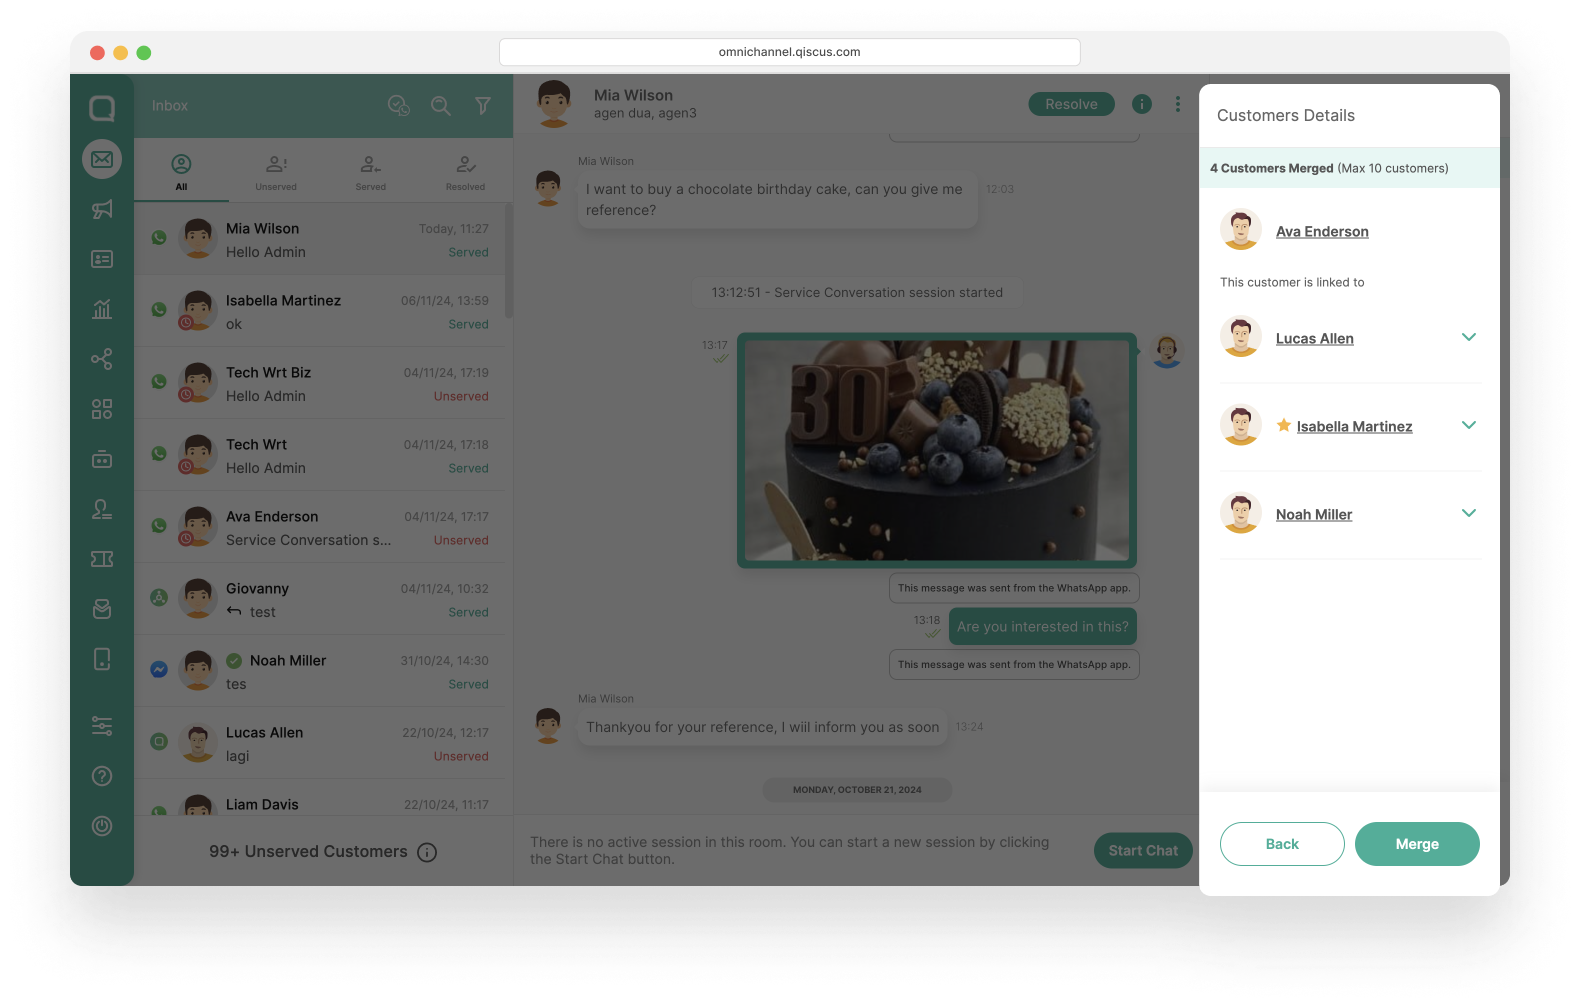
Once finished, you will see which channels the customer is available on.
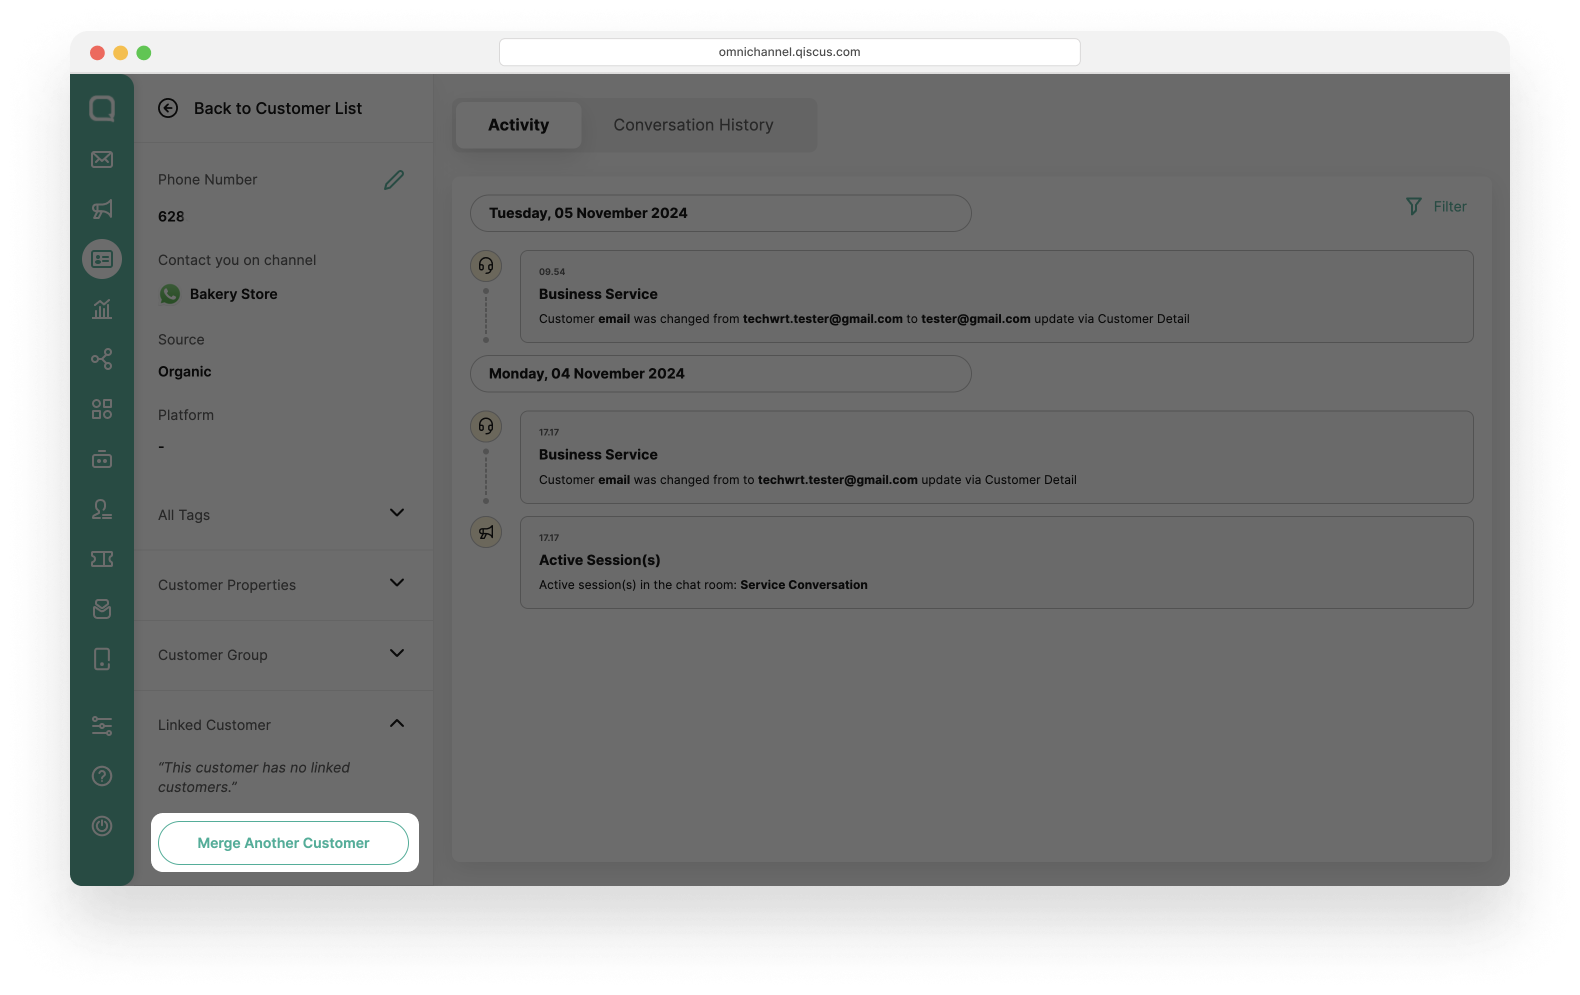
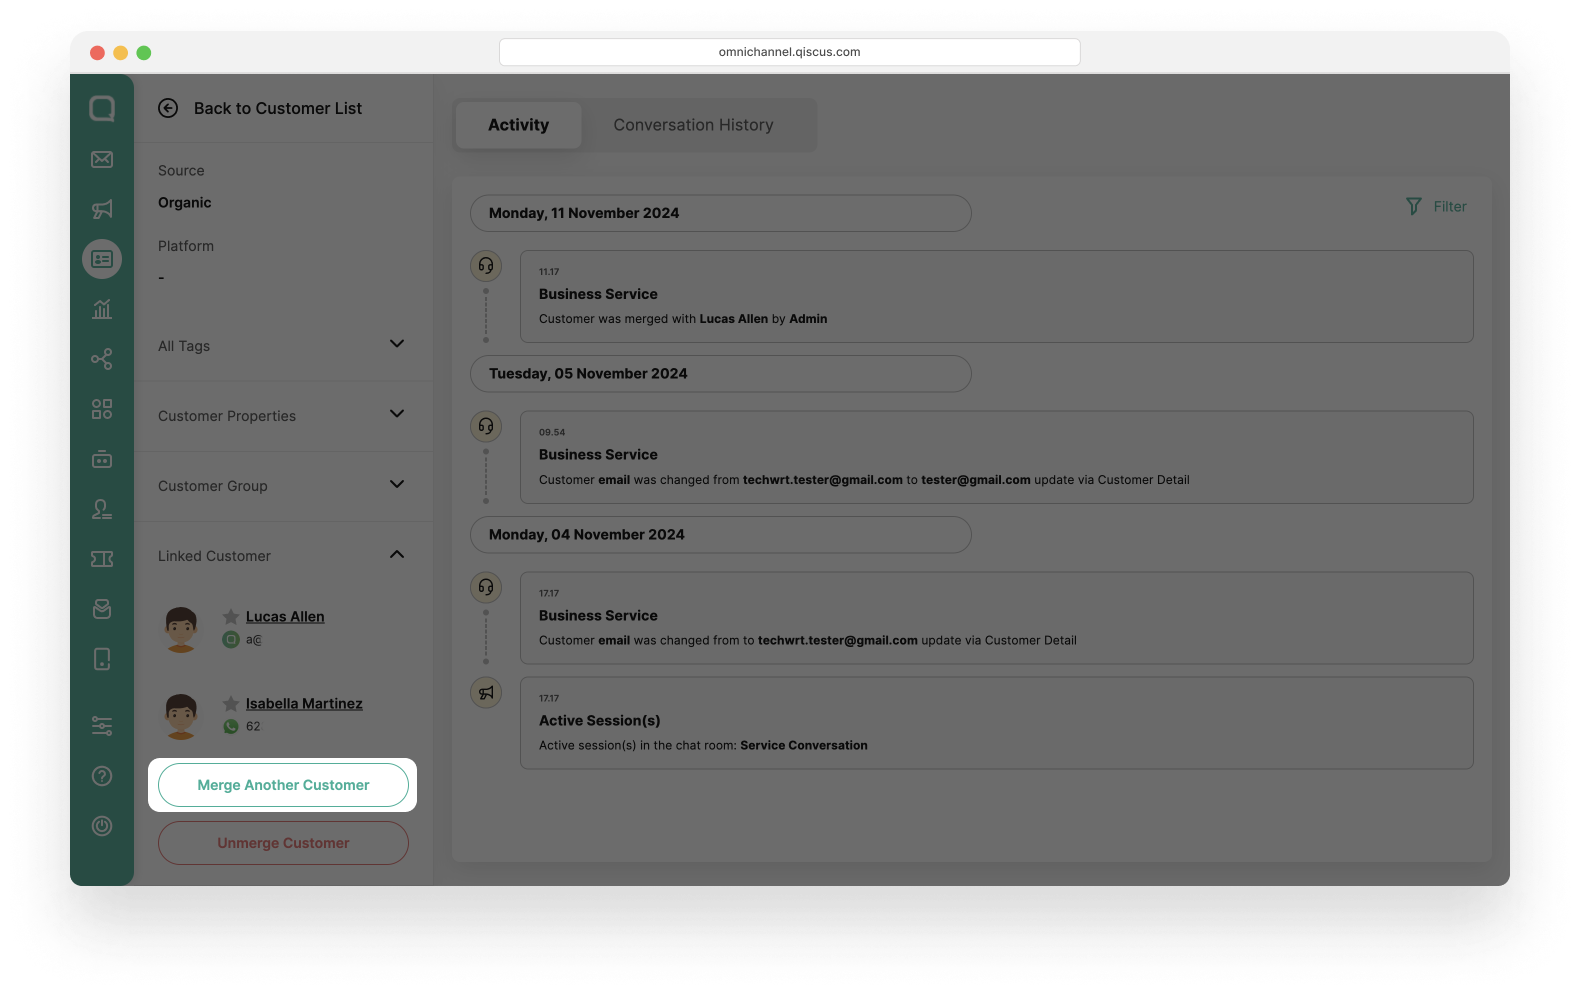
Via Customer Detail
Other than via Inbox menu, you can also merge customer via customer detail.
Go to the Customers menu on the sidebar. Select a customer you want to merge from the Customer List,
If the customer is not yet linked to other customers, "This customer has no linked customers" will appear in the linked customer dropdown,
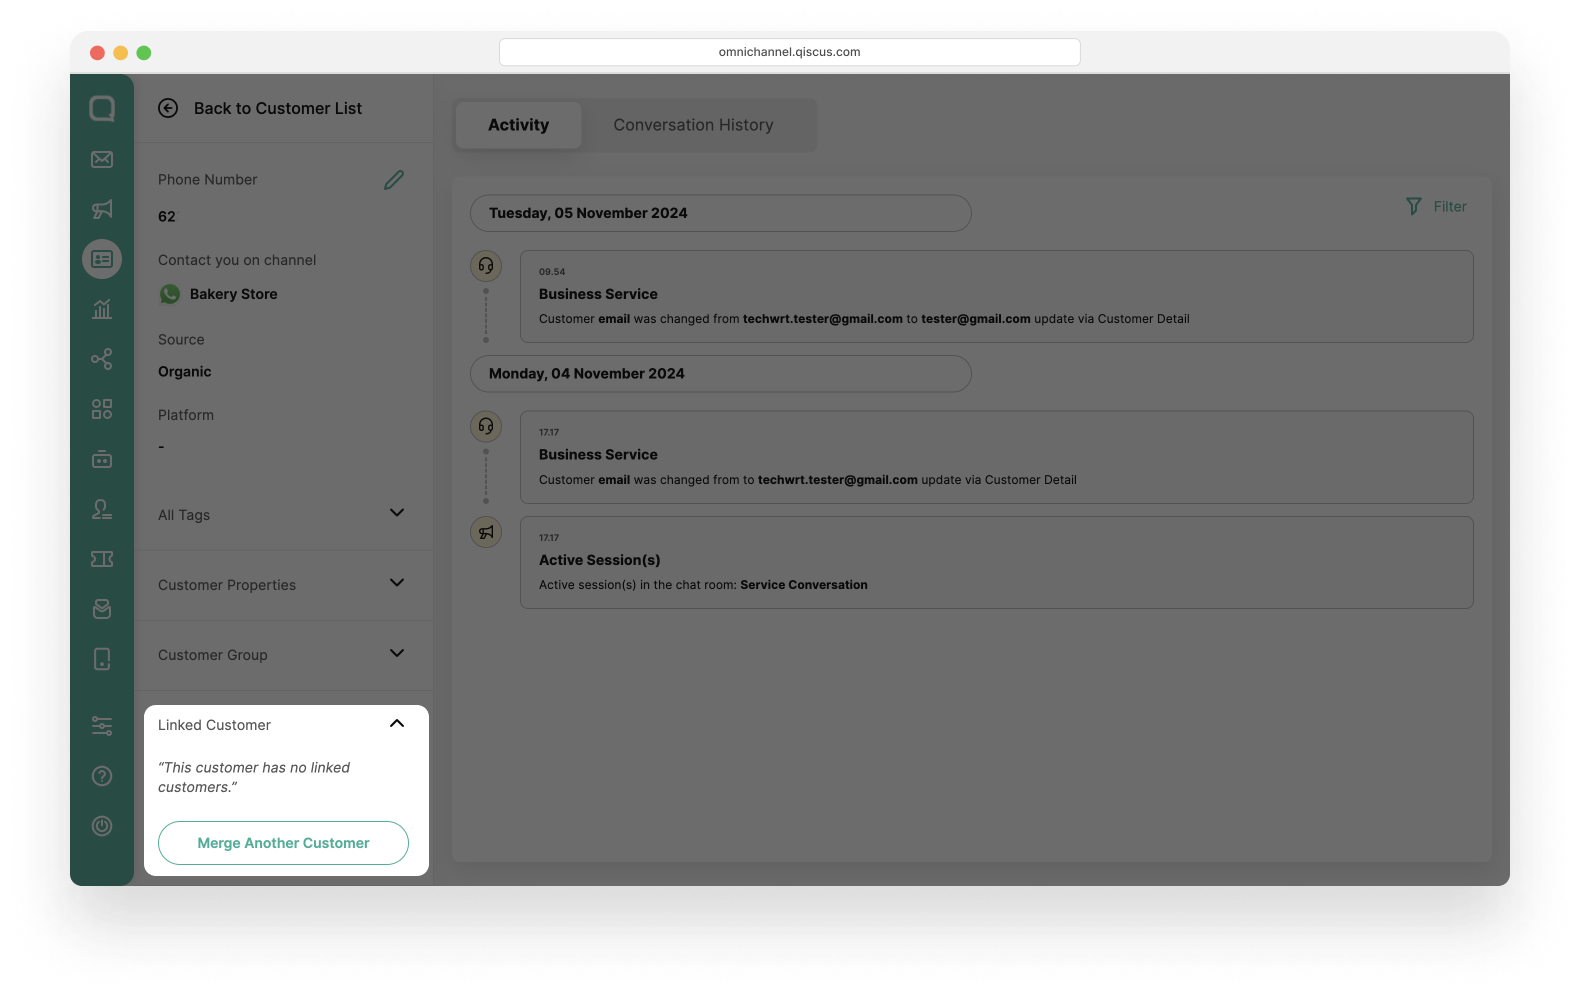
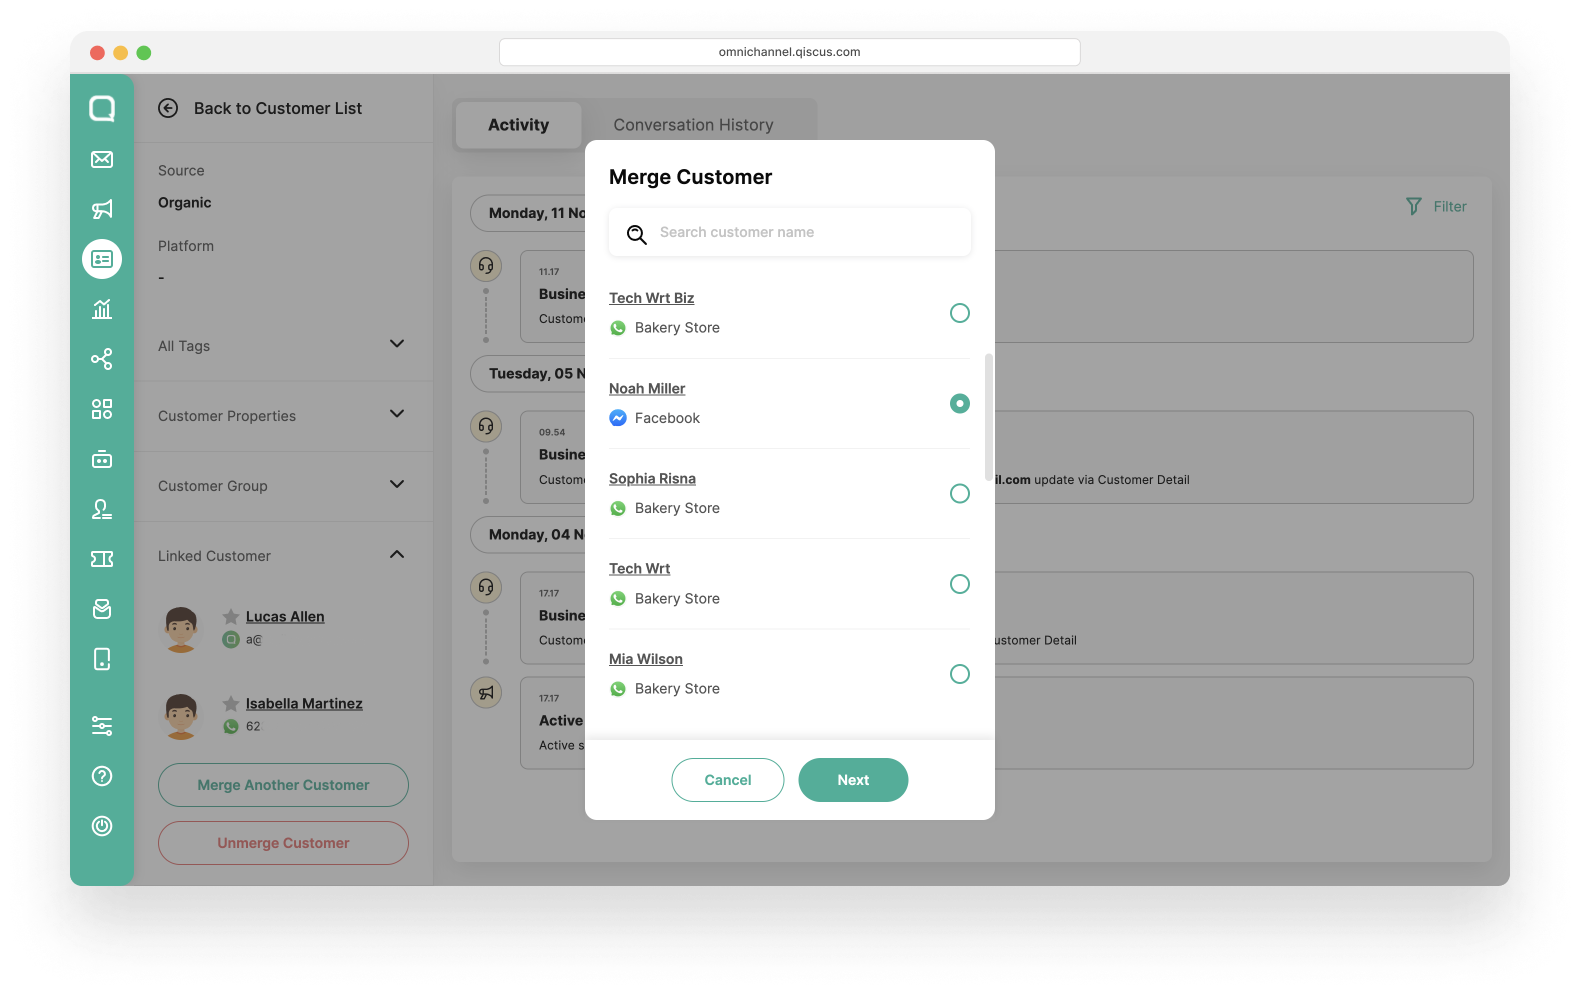
Click Merge Another Customer button,
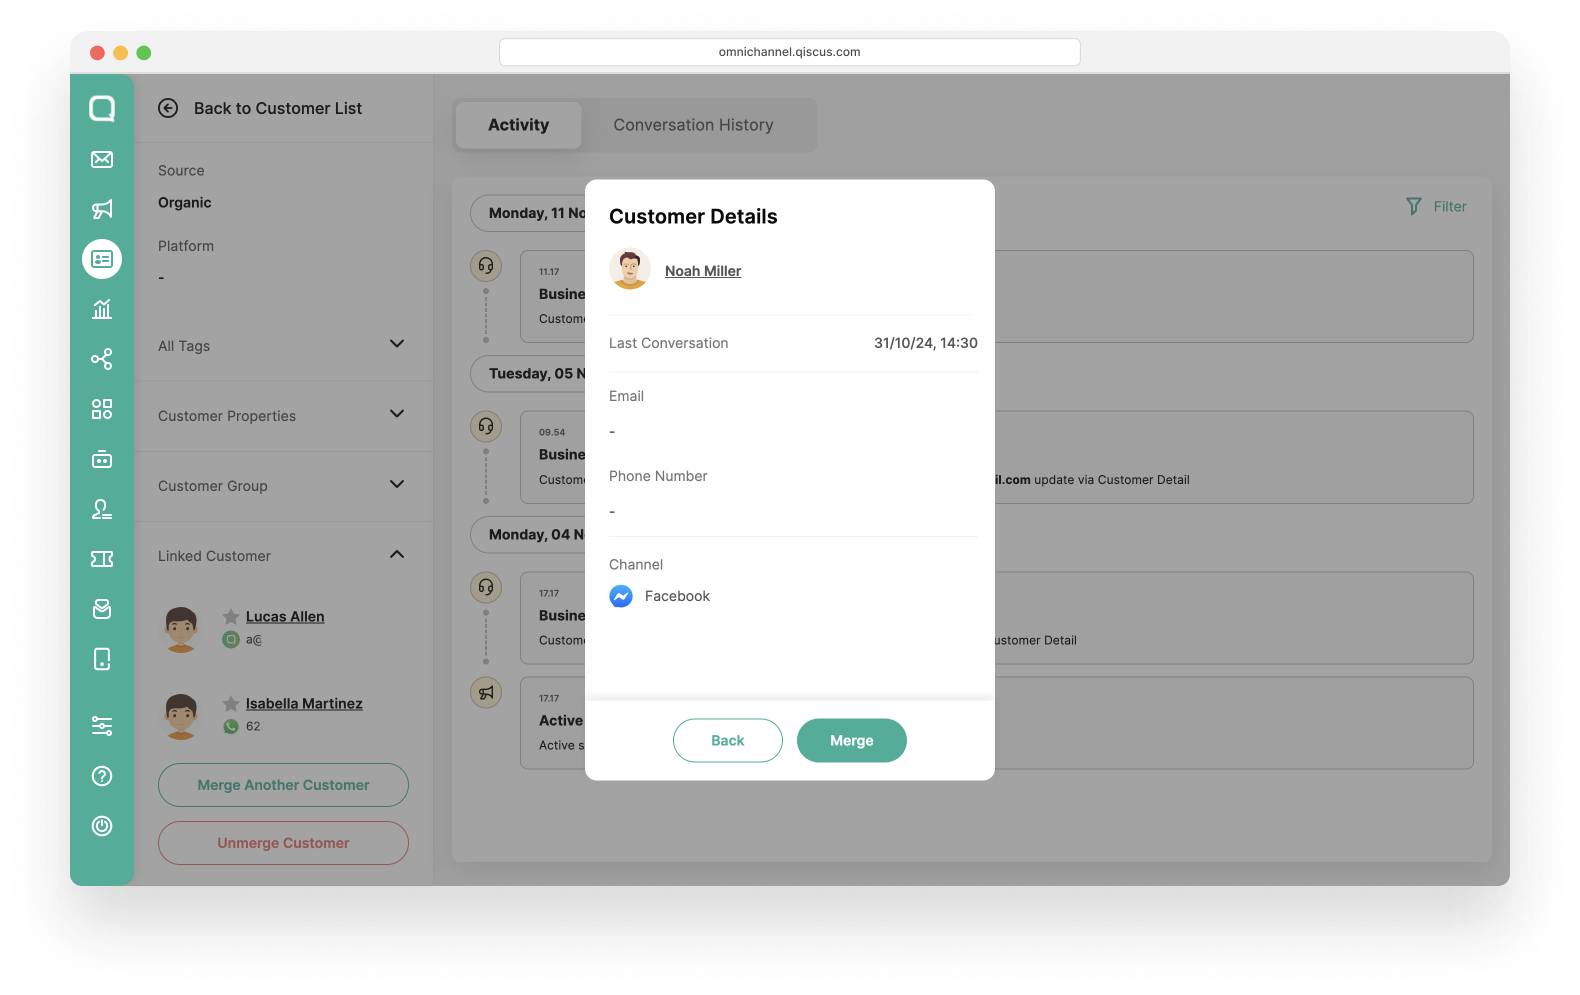
Select a customer you want to merge and then click Next. In addition, you can search for customers by name,
You will get information regarding the Customers Details. If the customer you want to merge with has already merged with other customers, you will see a list of other linked customers. Click Merge,
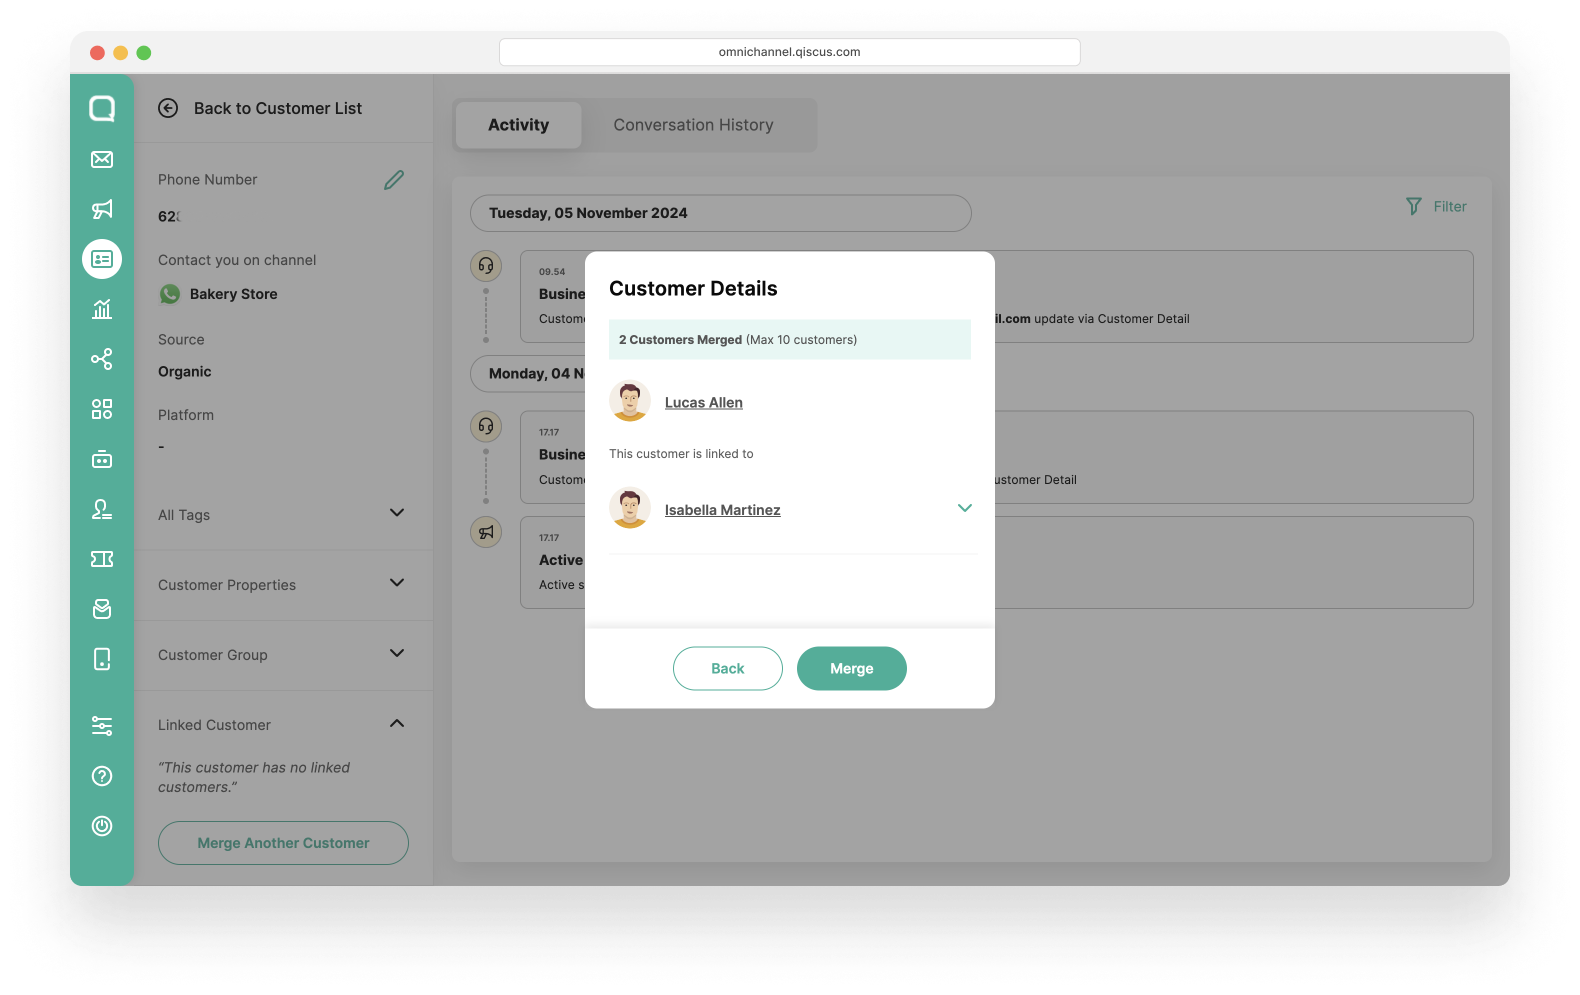
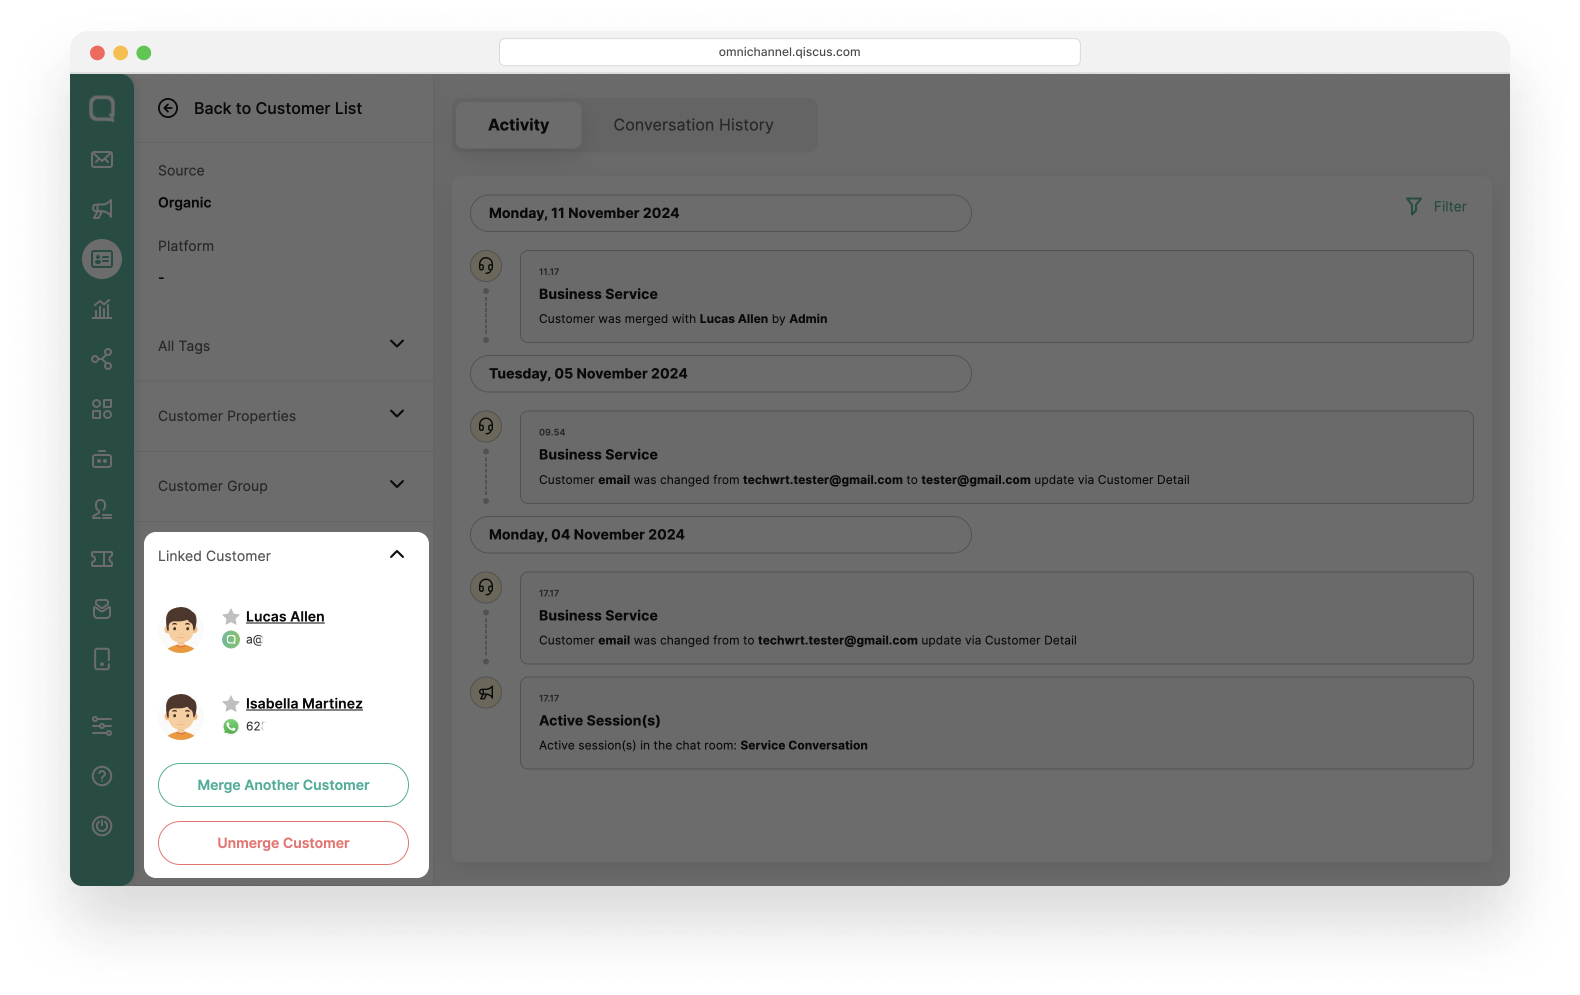
Once finished, you will see all linked customers in the customer detail.
Merge Another Customer
You can add another customer to merge by following these steps:
Click Merge Another Customer button,
Select a customer you want to merge and then click Next. In addition, you can search for customers by name. For Merge Another Customer feature, you can only merge customer who has not yet linked with other customers,
You will get information regarding the Customers Details. Click Merge.
You can only merge a maximum of 10 customers.
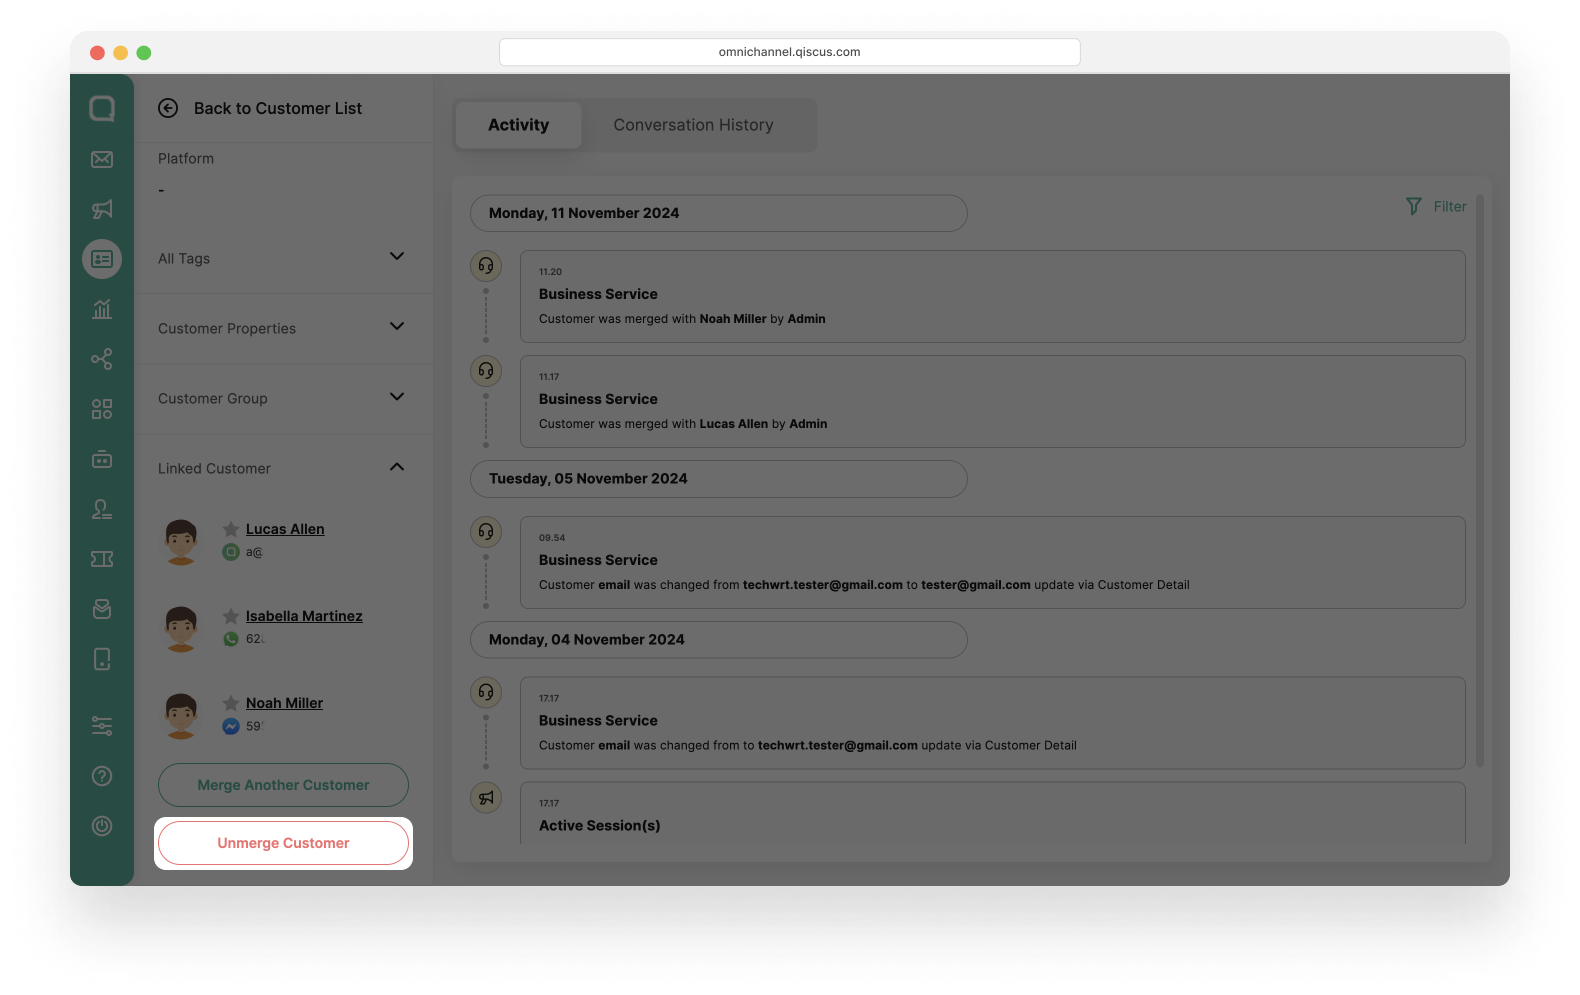
Unmerge Customer
After the merge customer process is complete, you have the option to unmerge. However, if you unmerge a customer, this customer will have no relation with the previously merged customers. Follow these steps to unmerge a customer.
Select a customer you want to unmerge,
Click dropdown Linked Customer and then click Unmerge Customer button.
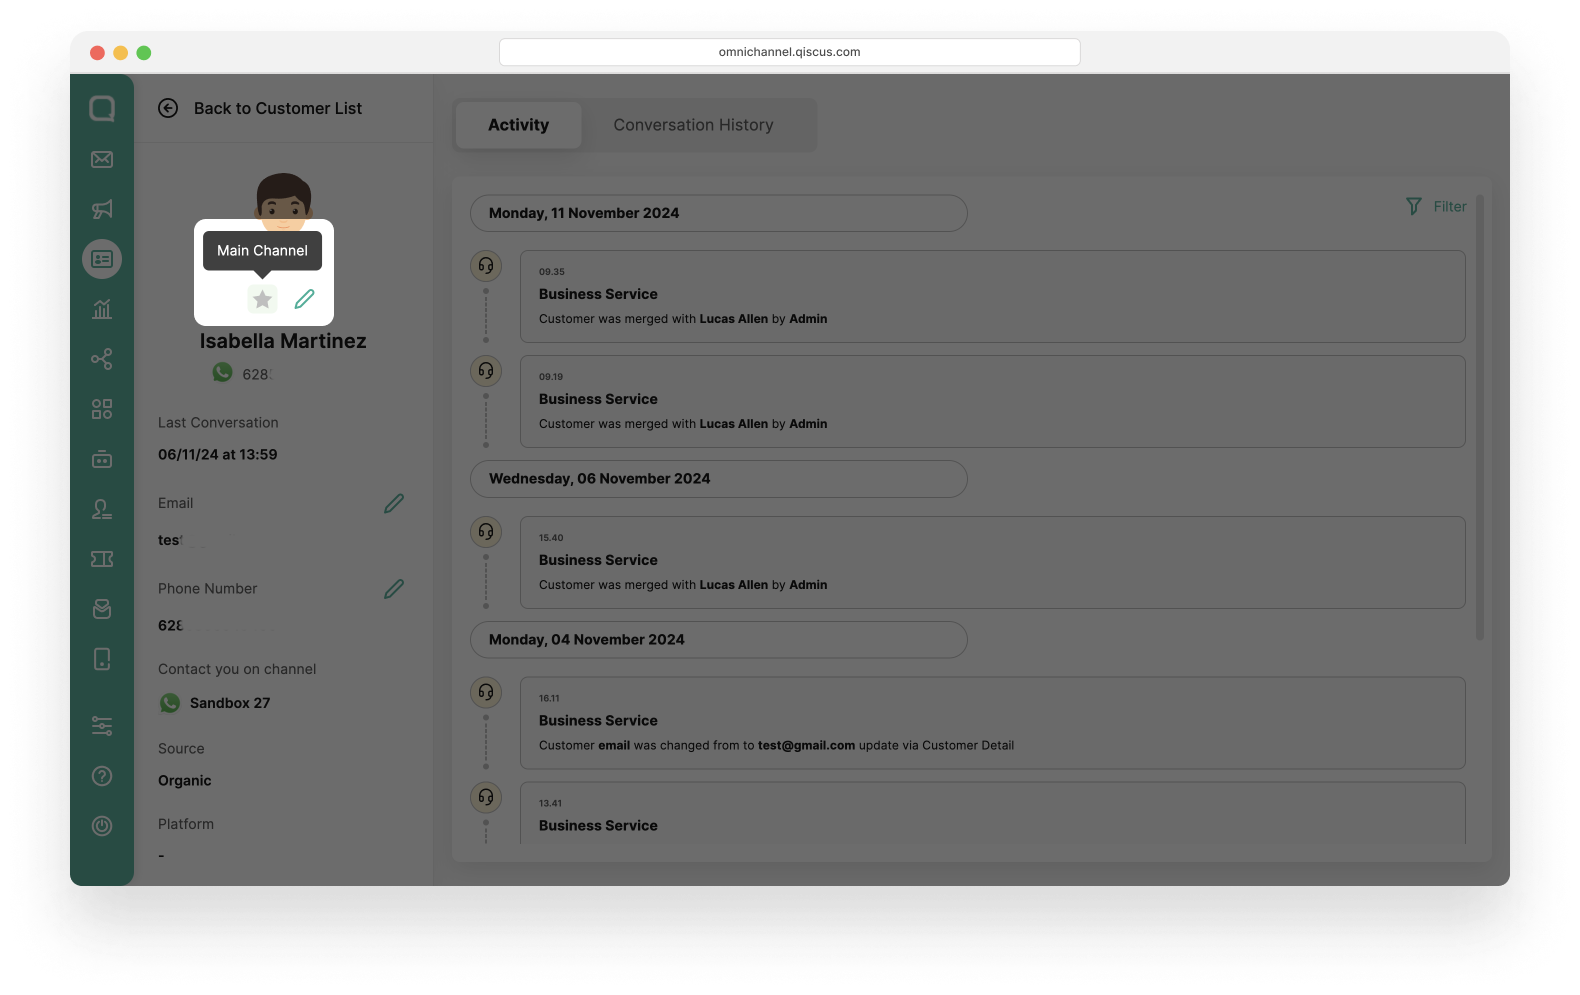
Set the Main Channel
You can set the Main Channel for merged customers to help you identify the channel that customer use the most. The Main Channel will be marked with a star symbol next to the customer's name. You can follow these step to set the Main Channel.
You can only set 1 Main Channel.
Select a customer with linked customer icon,
If the currently selected customer will be used as the Main Channel, then click the Star icon above the name,
If the customer you want to use as the Main Channel is not the one currently selected, click dropdown Linked Customer, and select the customer you want to set as the main channel.
You will be redirected to the customer details page of the selected customer. Click the Star icon above the name,

Once selected, he color of the star icon will change.