Custom Ticket Views let you create, organize, and switch between tailored ticket lists in Qiscus Helpdesk. Each view filters tickets by the conditions you set (status, assignee, division, requester, and many more) and shows the columns that matter to your work — so the most relevant tickets are always one click away from the dashboard sidebar.
This release introduces the List view type — a sortable table view that you can configure with your own columns, ordering, and access scope.
All internal users (Owner, Admin, Supervisor, Agent) can use ticket views. Creating, editing, reordering, and deleting Shared views is restricted to Owner and Admin. Any user can create their own Personal views.
A. Benefits of Using Custom Ticket Views
- Focus on what matters. Build views that surface only the tickets relevant to your role or team, instead of scanning the full ticket list.
- Tailored columns and order. Show the fields you actually use and order tickets by ID, status, priority, request date, or last update — Ascending or Descending.
- Shared workspace, personal space. Share views across all agents or specific divisions, or keep them private to yourself.
- Quick switching from the sidebar. All your active views appear in the dashboard sidebar with live ticket counters, so you can jump between contexts without re-applying filters.
- Consistent permissions. View visibility and the tickets each agent sees automatically follow your tenant's existing Agent's Ticket Visibility setting.
B. Setting Up a View
You can access the Views configuration from Settings → Views, located under Automation in the Ticketing group.
The page has two tabs:
- Shared — views that are visible to multiple agents. Contains the system default views and any custom shared views.
- Personal — views you create for yourself only. Other users cannot see your personal views.
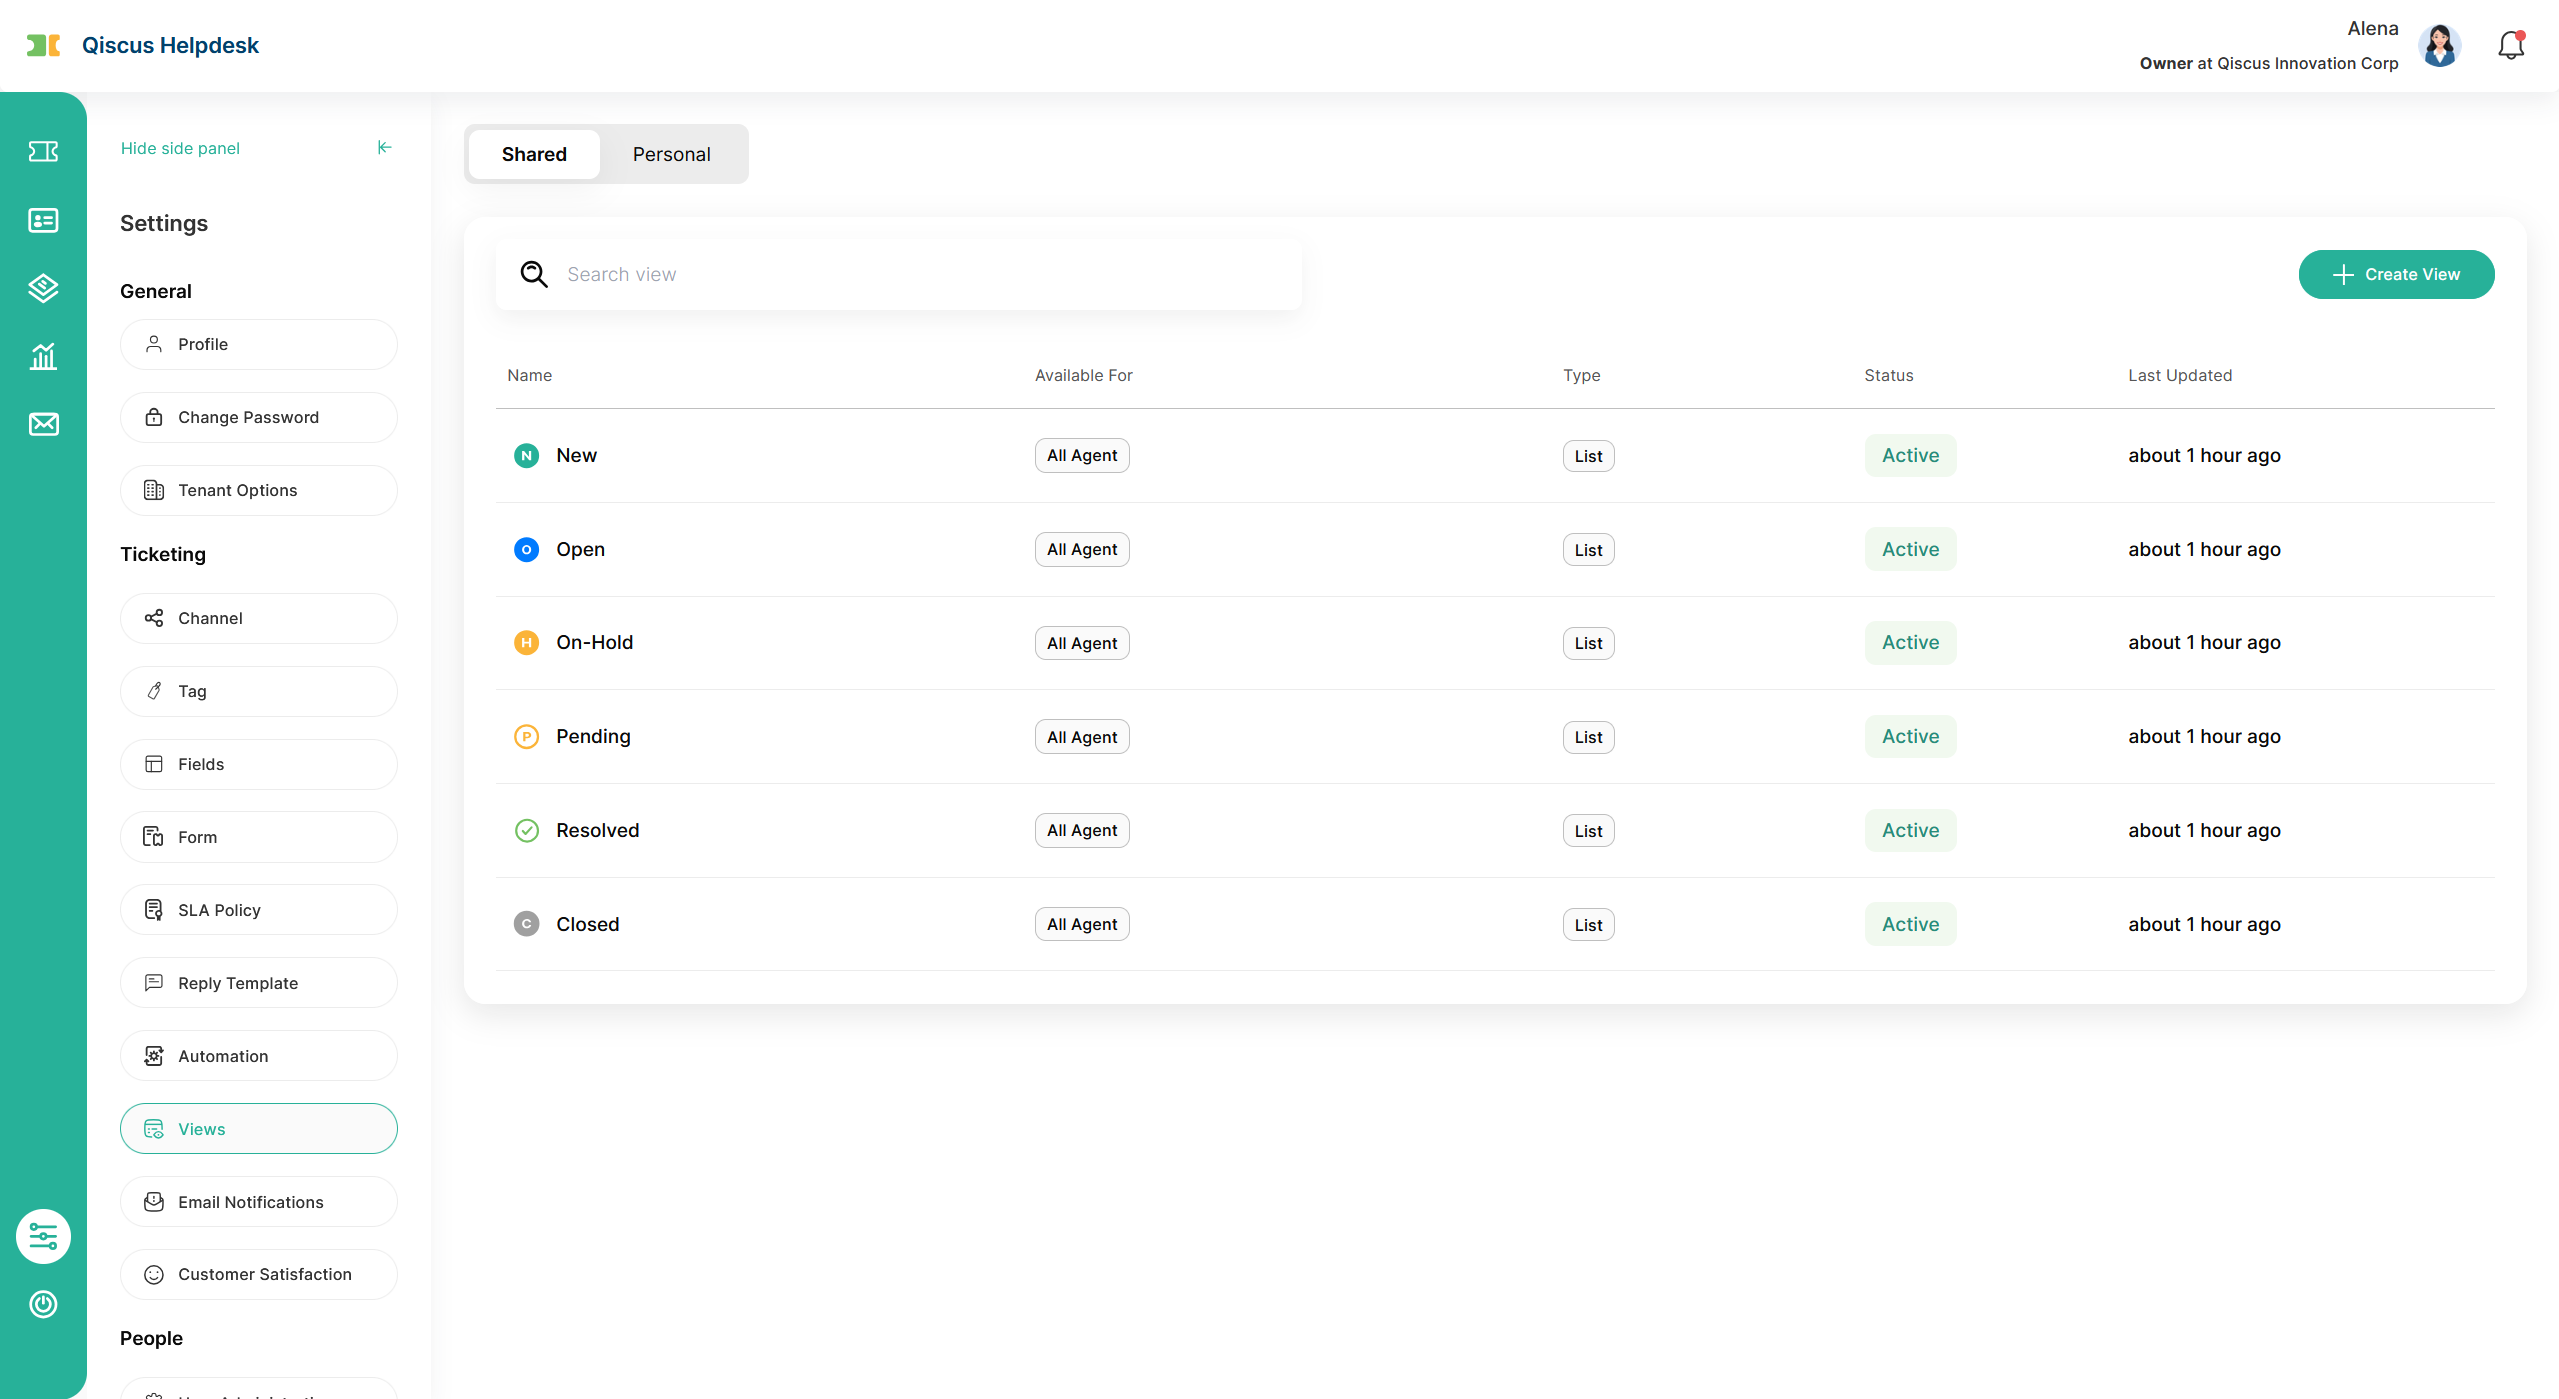
Default Views
When you first open Settings → Views, the Shared tab already contains six default views, one for each ticket status: New, Open, On-Hold, Pending, Resolved, and Closed. They are configured with access level All Agent so every agent in your tenant can see them in the sidebar.
Default views cannot be edited or deleted by anyone. Owners and Admins can still Activate / Deactivate or Reorder them, and any user can Duplicate a default view to create a customized version of it.
Creating a Custom View
Click Create View on the Shared or Personal tab to start the 3-step wizard. Required fields are validated on Next — any empty input shows a red border and the inline message This field is required., which clears as soon as you fill it.
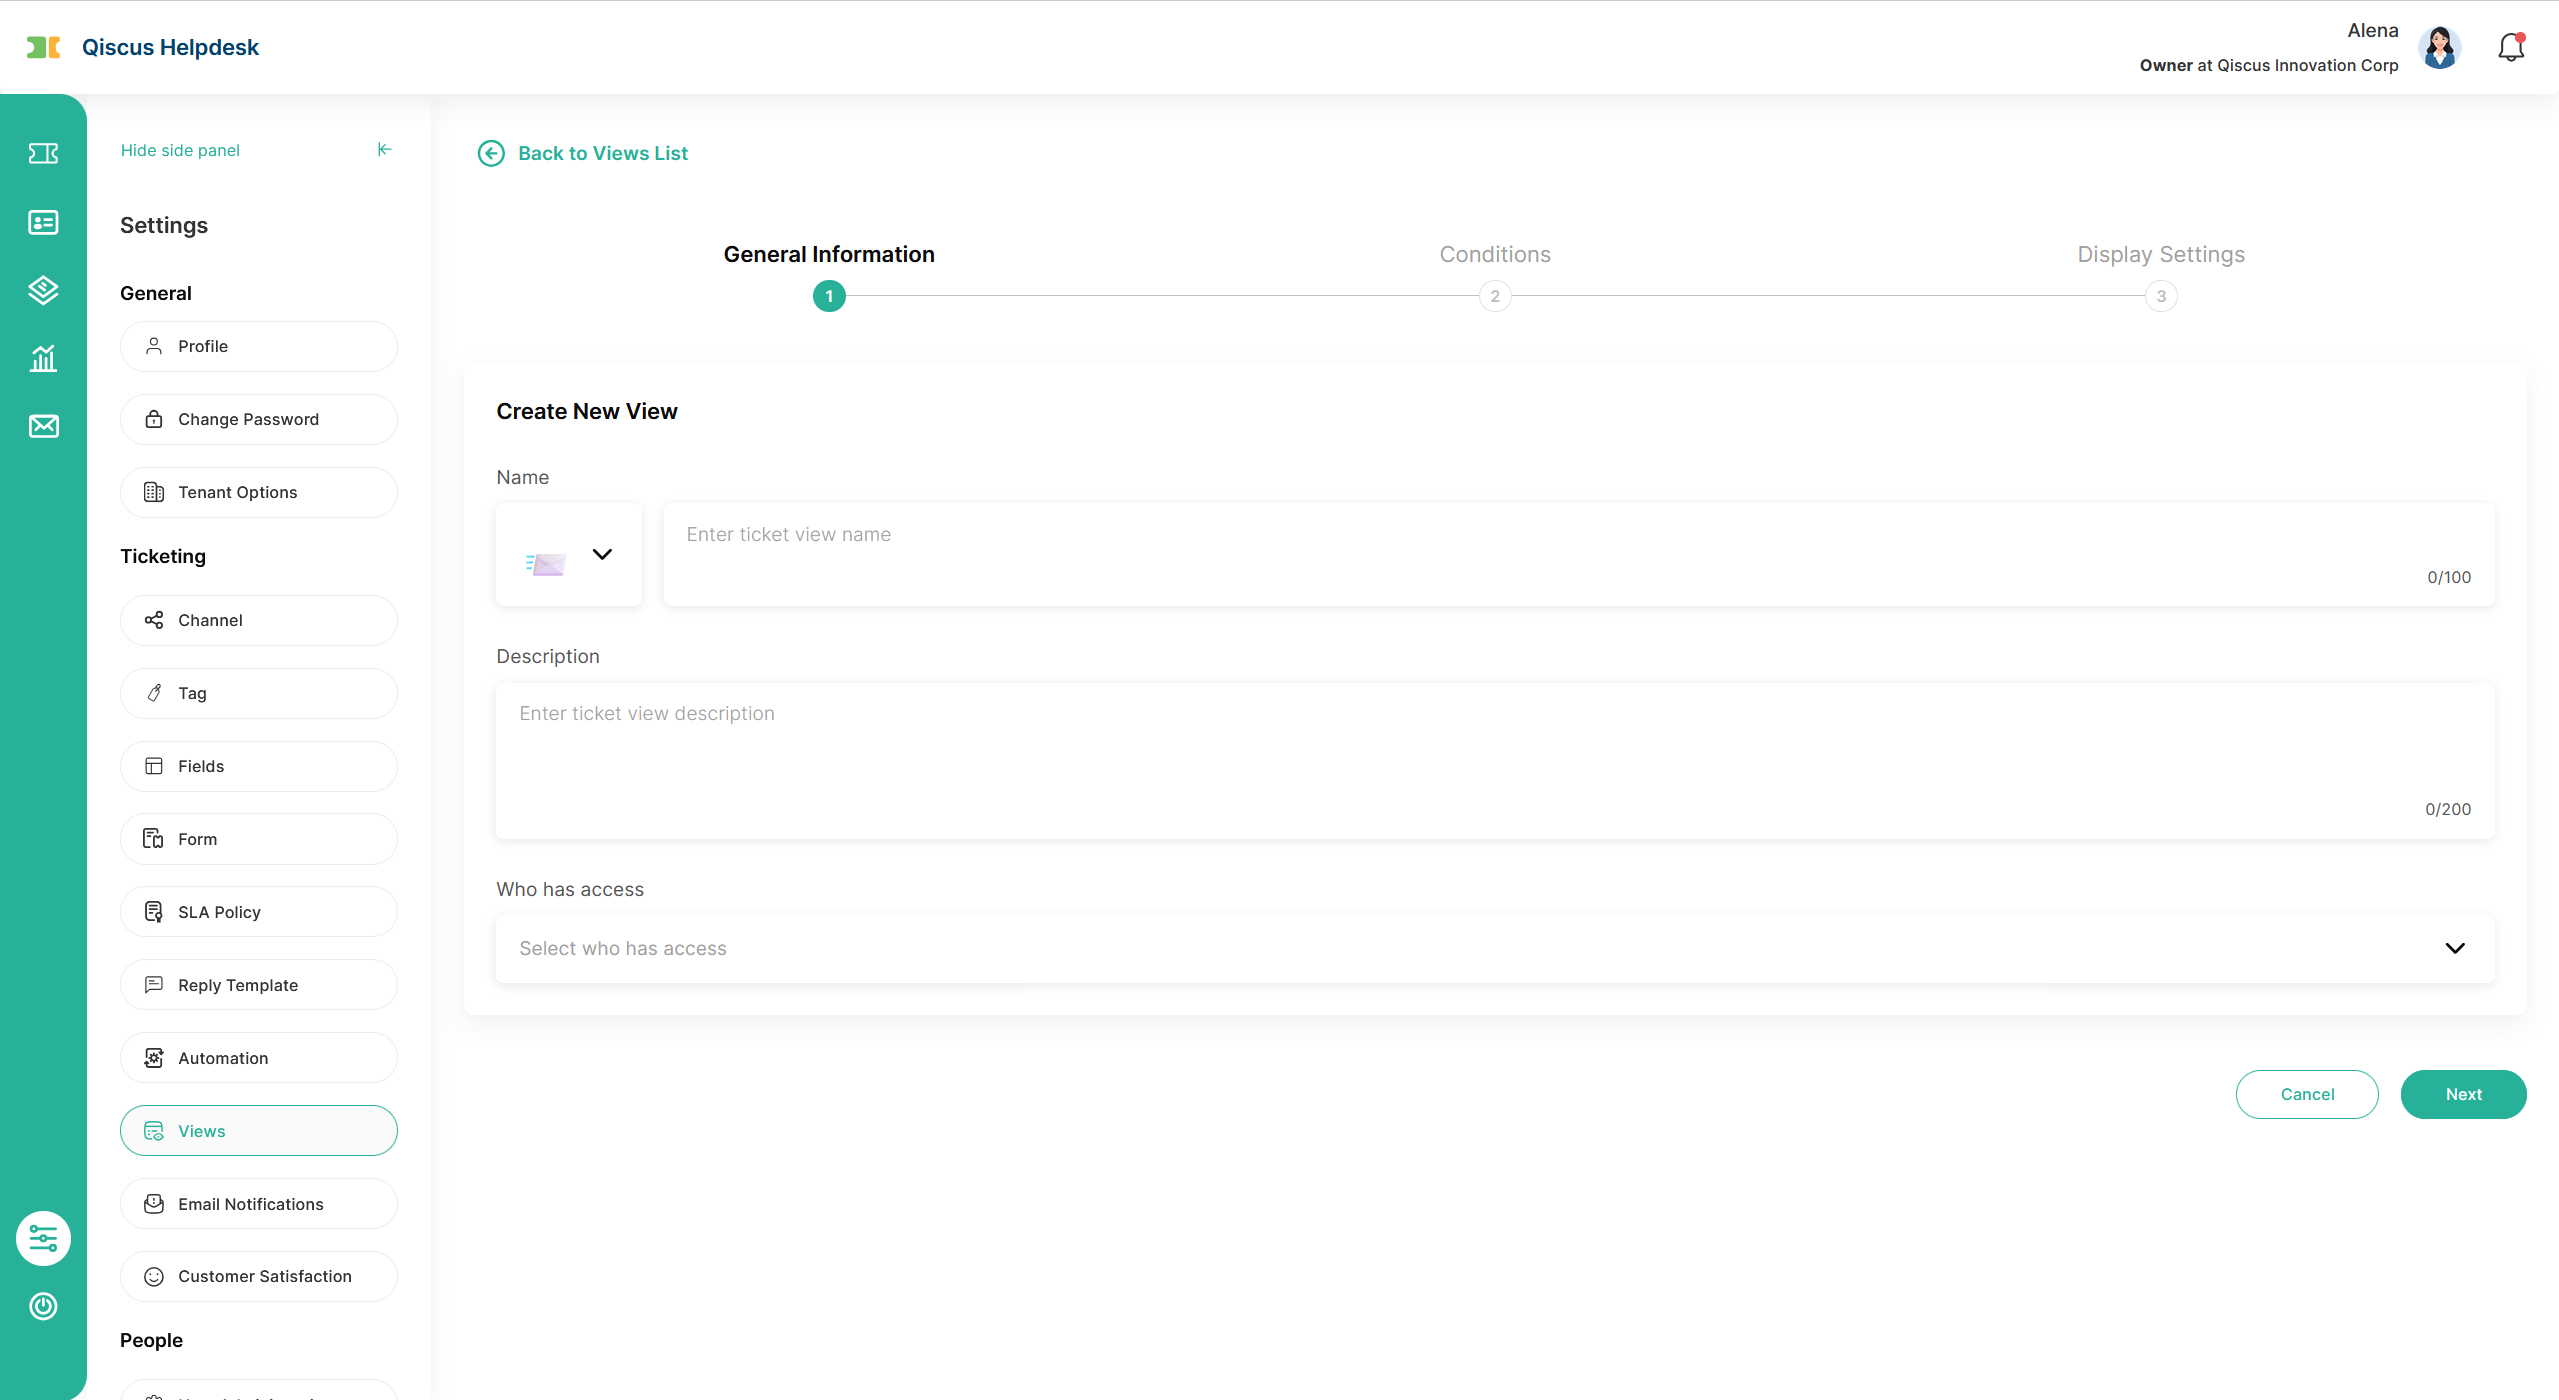
Step 1: General Information
Fill in the identity and access scope of the view:
- Name (required) — pick an emoji from the picker on the left, then type a view name (up to 100 characters). The emoji becomes the view's icon in the sidebar; the name becomes the view's tab title.
- Description (required) — a short note describing what the view is for (up to 200 characters).
- Who has access (required) — controls who can see the view:
- On the Shared tab (Owner/Admin only): choose All Agent to share with everyone, or Agents in specific divisions to pick one or more divisions.
- On the Personal tab: this is automatically set to Only Me and cannot be changed.
When you duplicate an existing view, Step 1 is pre-filled from the source view. Owners and Admins can change the access scope before saving. Supervisors and Agents who duplicate a Shared view will see access locked to Only Me — the resulting view is added to their Personal tab.
Use this image to show Step 1 of the create-view wizard with the emoji picker open, name, description, and Who has access fields.
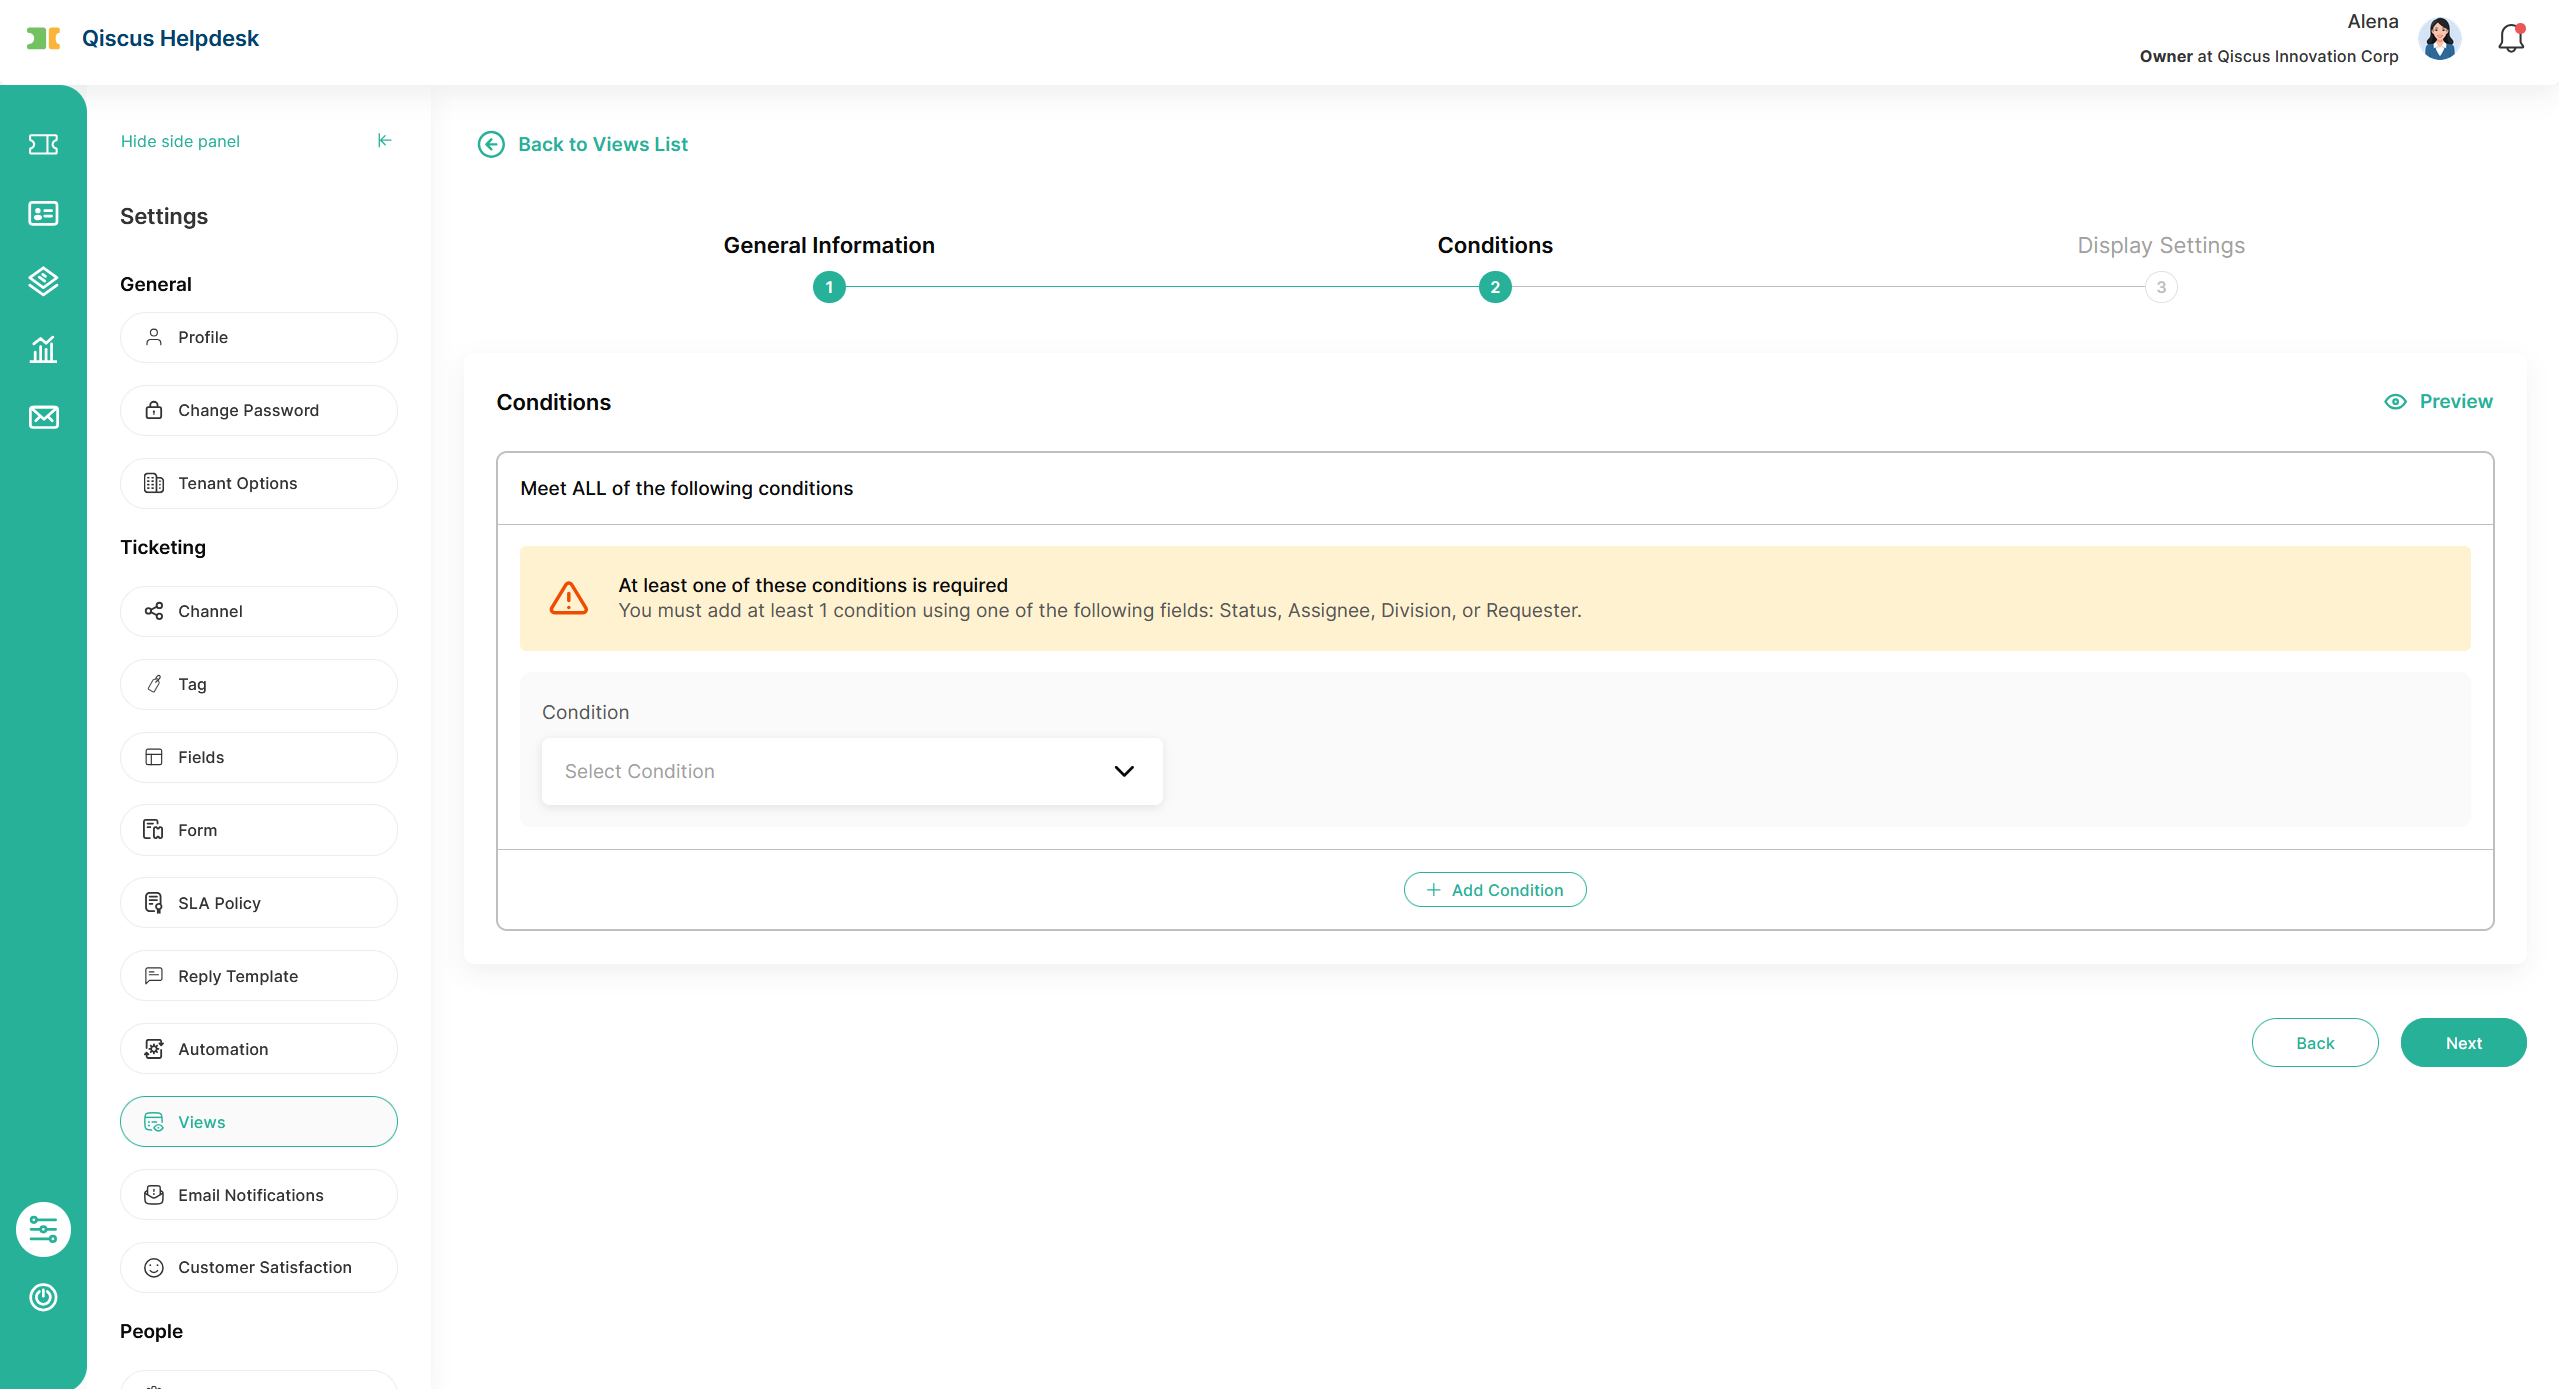
Step 2: Conditions
Define which tickets should appear in this view. Conditions follow an AND rule — a ticket appears only if it matches all conditions you add.
Each condition has three inputs: Condition (the field), Comparison Type (the operator), and Value(s).
At least one condition must use one of these fields: Status, Assignee, Division, or Requester. A warning banner at the top of the Conditions section guides you while this required condition is missing, and disappears as soon as a required field is added.
- Click + Add condition to add as many conditions as you need. The same field can be added more than once (for example, two
Tagsconditions with different values). - Click the trash icon next to a condition to remove it. The trash icon only appears when you have two or more conditions.
- Click Preview at the top-right of the Conditions section to see which existing tickets match your current conditions before saving. The preview opens in a table (ID, Status, Priority, Subject, Requester, Assignee). If any condition still has an empty input, clicking Preview shows the same
This field is required.inline error instead of opening the preview.
Available condition fields include: Assignee, Channel, Division, Followers, Hours-since/Hours-until timing fields (created, open, pending, on-hold, solved, closed, assigned, requester responded, agent responded, response due, ownership due, resolution due), Organization, Priority, Received At (Email), Requester, Status, Subject, Tags, Ticket Form, and any Custom Field of type Dropdown configured in your tenant.
Use this image to show Step 2 with the required-condition banner and at least one condition row filled in.
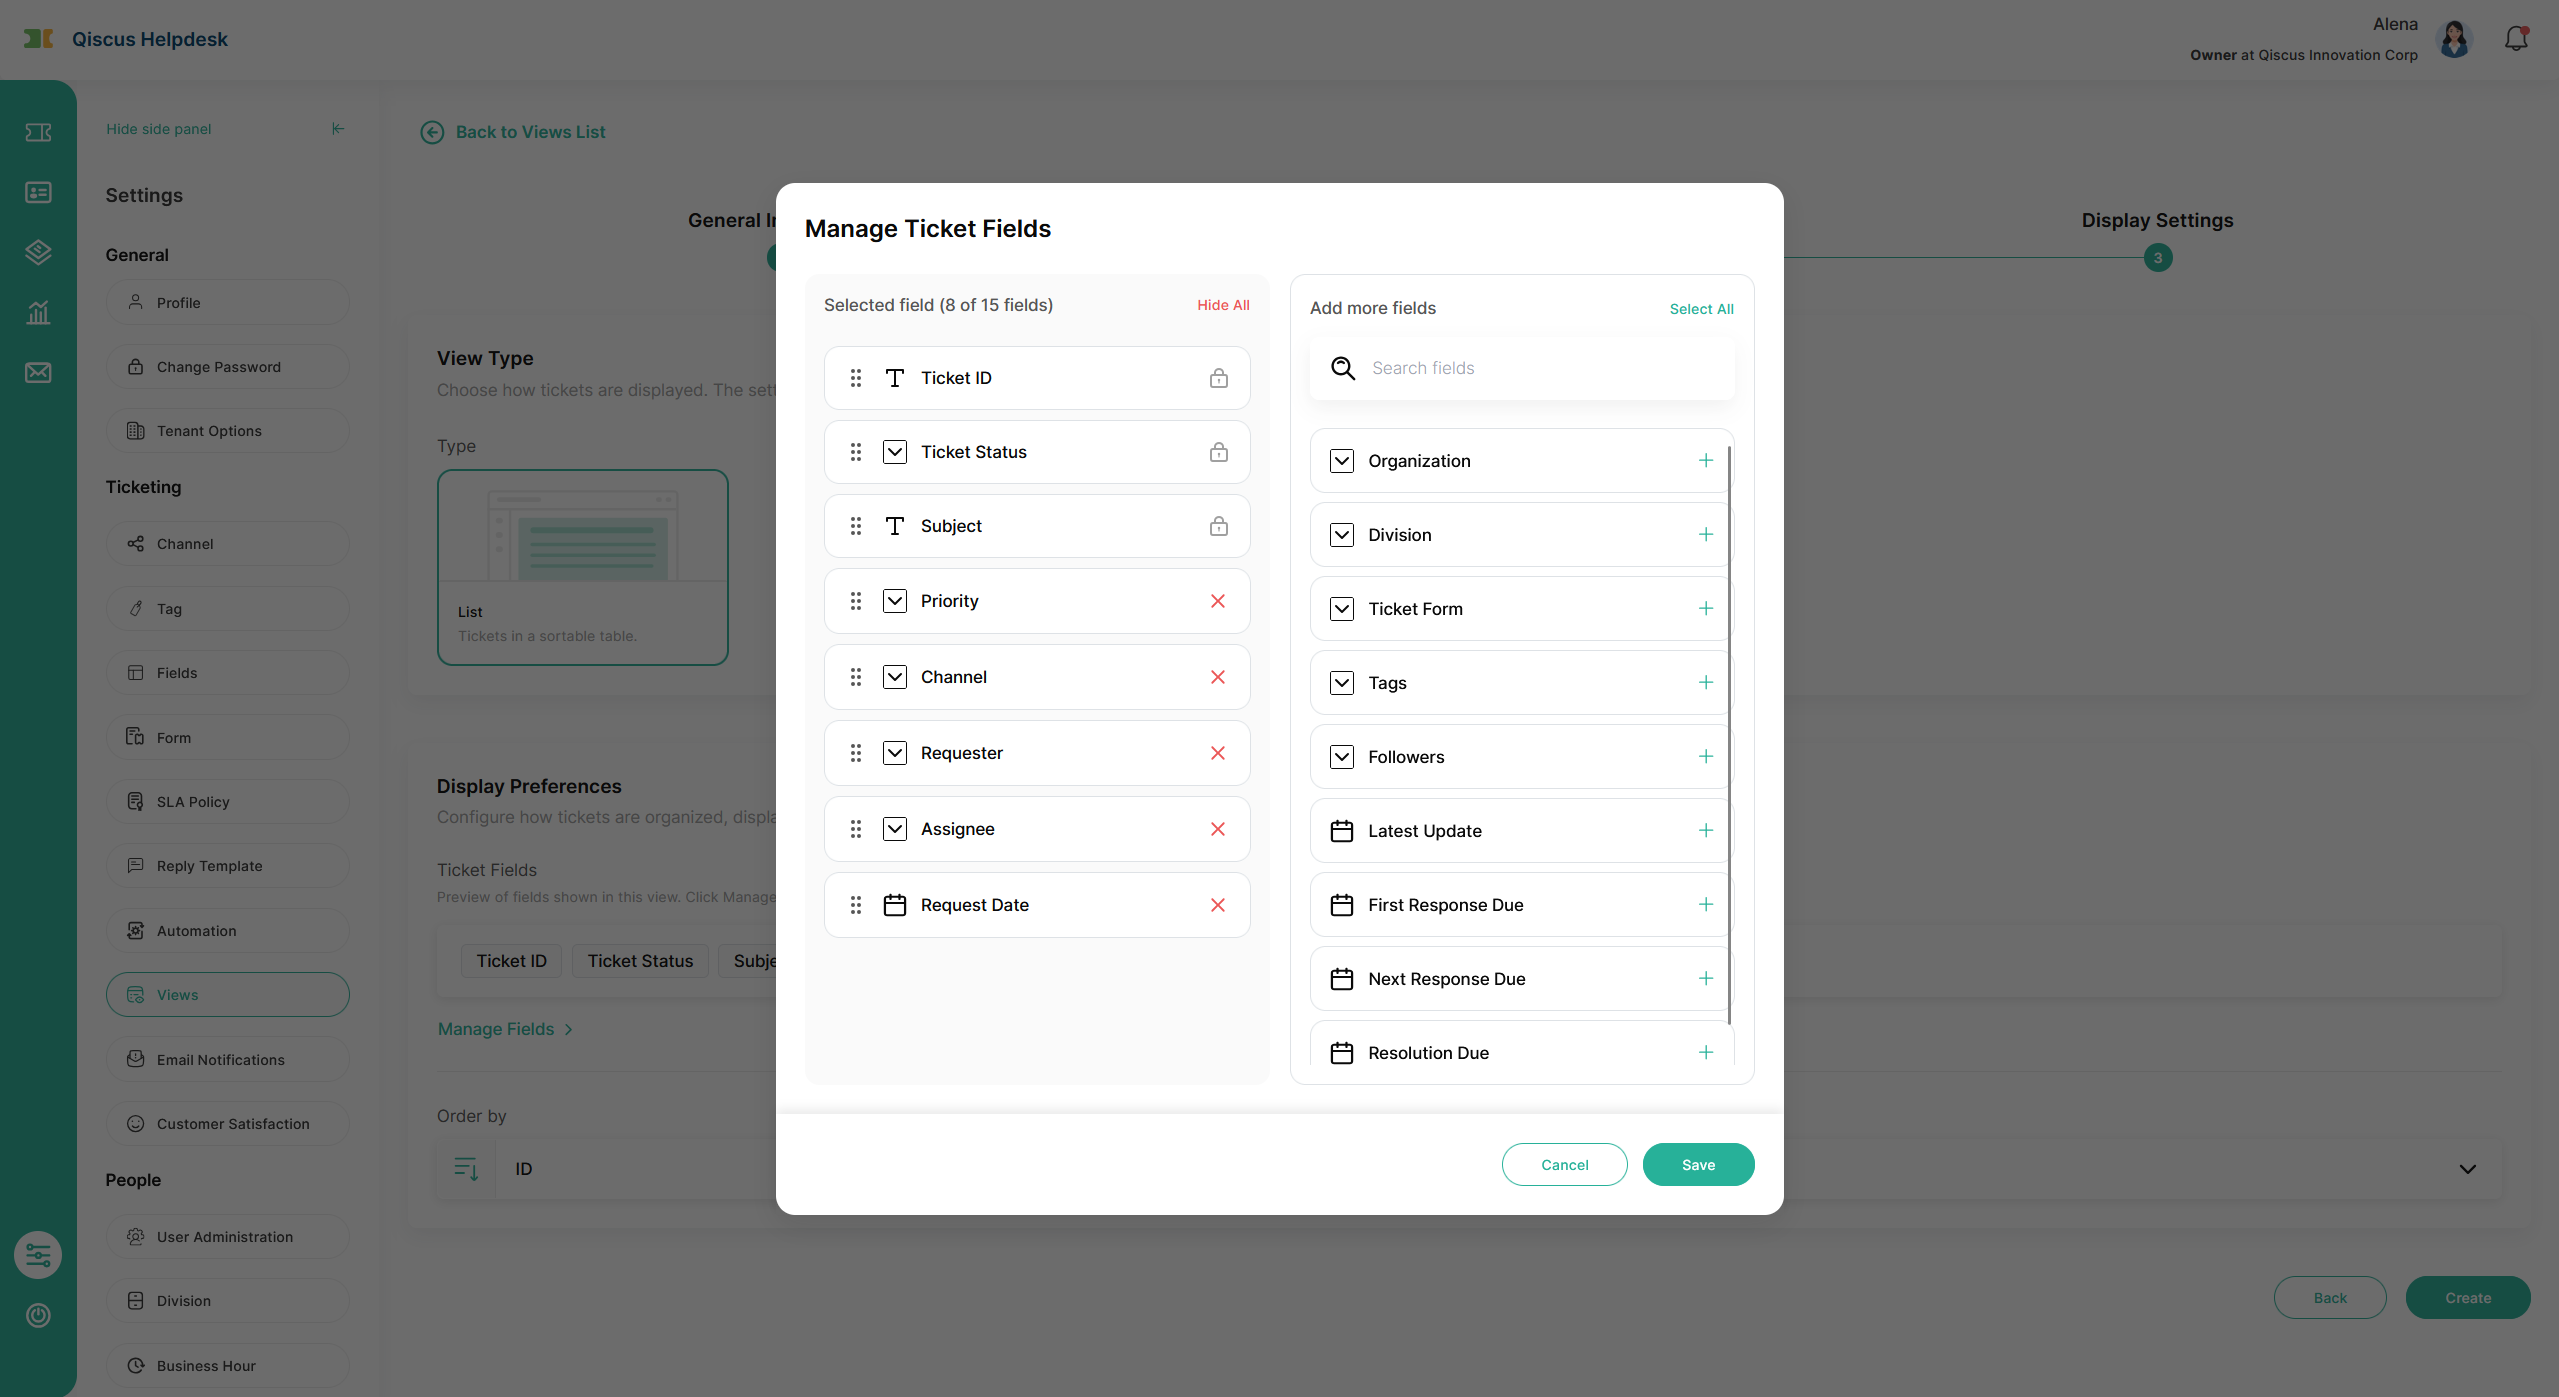
Step 3: Display Settings
Choose how the view looks. This release provides one View Type — List, a sortable table.
Manage Fields. Click Manage Fields to choose which columns appear in the view and in what order. The modal has two panels:
- Selected field ({n} of 15 fields) on the left — the columns that will appear in the view, in order from top to bottom. Drag rows to reorder; click
×on a row to remove it; click Hide all in the panel header to move all removable fields to the right panel at once. - Add more fields on the right — the available fields you haven't added yet. Click
+on a row to add it; type into Search fields to filter the list; click Select all in the panel header to add as many fields as possible up to the 15-field limit.
Ticket ID, Ticket Status, and Subject are mandatory and cannot be removed. They are shown with a lock icon. Default columns when you first open the modal also include Priority, Channel, Requester, Assignee, and Request Date.
Order by. Set the default ticket ordering for the view:
- Order by — pick ID, Status, Priority, Created At, or Latest Update.
- Sort direction — Ascending or Descending. Default is
IDDescending.
When all steps are complete, click Create (or Save when editing an existing view) to save. The view is created with status Active and immediately appears in the views list and — if its access scope includes you — in the dashboard sidebar.
Use this image to show Step 3 with the Manage Fields modal open, showing both the Selected fields panel and the Add more fields panel.
Managing Views After Creation
The Settings → Views list shows your existing views with columns Name, Available For, Type, Status (Active/Inactive), and Last Updated. Use the search bar at the top to find a view by name.
To run an action on a view, find the view in the list and open its action menu, then select the action you want. Available actions are: Edit View, Reorder, Duplicate View, Activate / Deactivate, and Delete. Whether each one appears depends on your role and the tab you're on:
| Tab | Owner / Admin | Supervisor / Agent |
|---|---|---|
| Shared — custom views | Edit, Reorder, Duplicate, Activate / Deactivate, Delete | Duplicate only |
| Shared — default views | Duplicate, Activate / Deactivate, Reorder | Duplicate only |
| Personal — your own views | Edit, Reorder, Duplicate, Activate / Deactivate, Delete | Edit, Reorder, Duplicate, Activate / Deactivate, Delete |
| Create View button | Visible on both tabs | Visible on Personal tab only |
C. Custom Ticket Views Implementation
Once a view is Active and its access scope includes you, it appears in the dashboard sidebar and is ready to use.
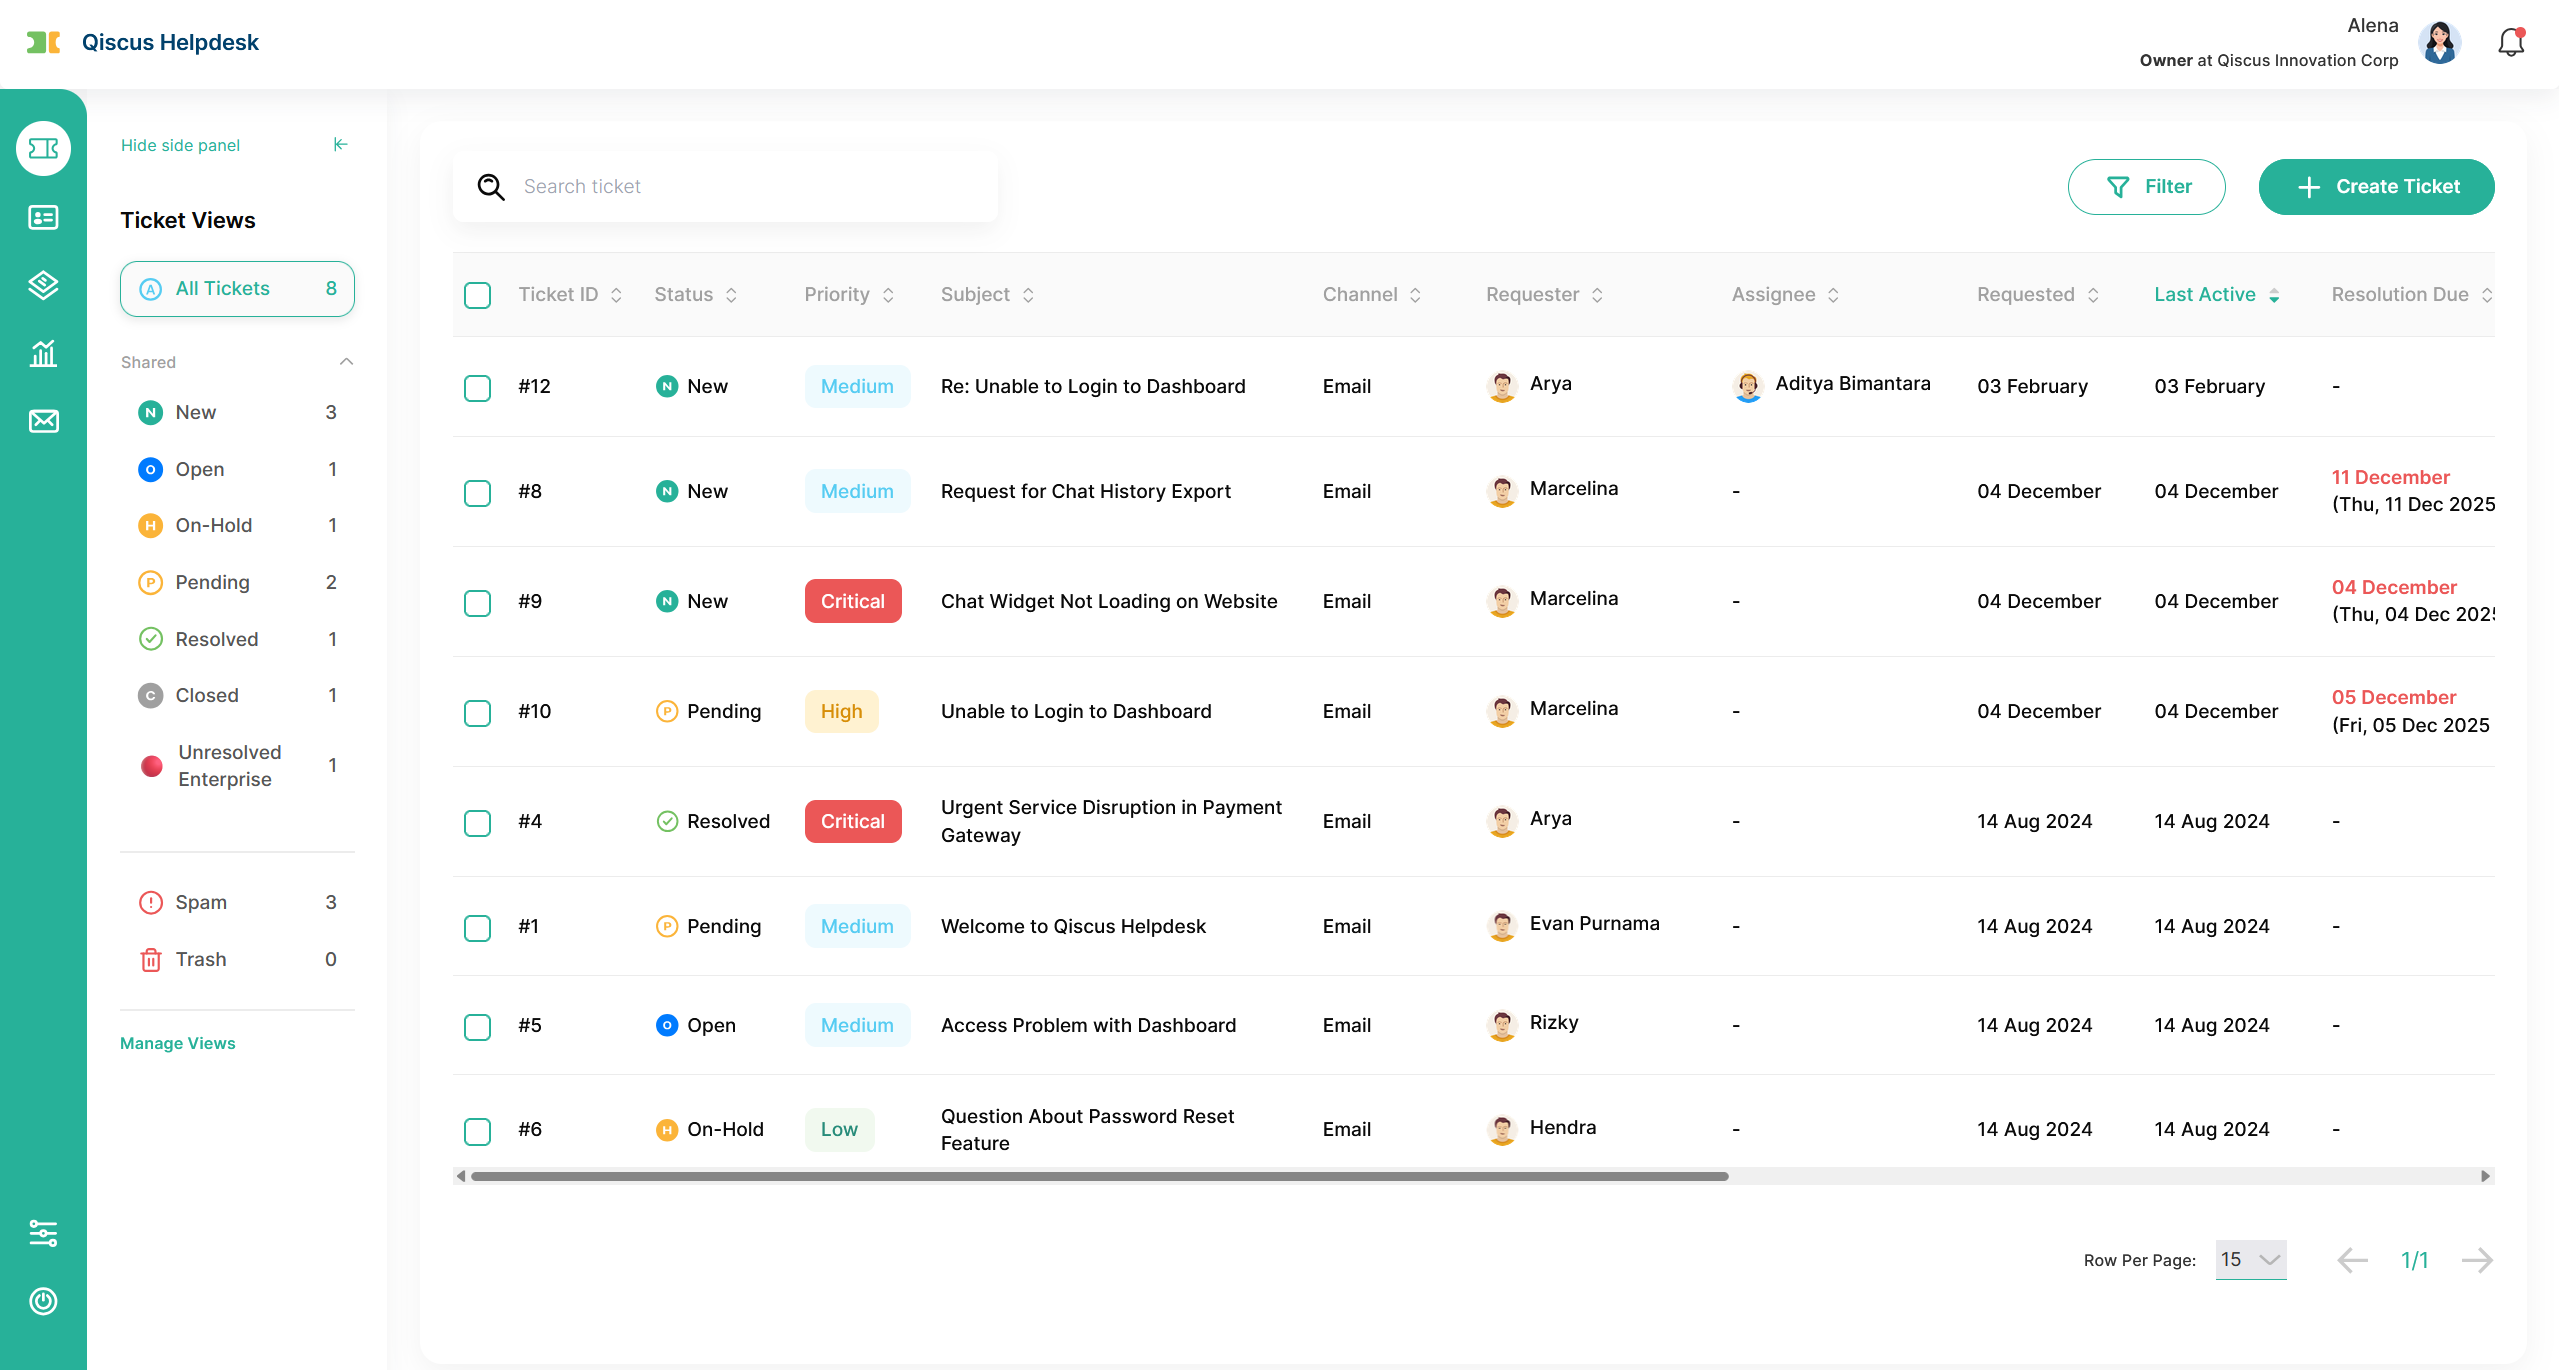
Sidebar Layout
The dashboard sidebar lists ticket entries in this order:
- All Tickets — the default entry at the top. Shows every ticket, no view filter applied. The counter on the right shows the total.
- Shared group — active views with access
All AgentorAgents in specific divisions. Owners and Admins see every active shared view; Supervisors and Agents see default views plus the custom shared views they have access to. The group hides itself if no active shared view applies to you. - Personal group — active personal views you created. The group hides itself if you don't have any active personal view.
- Spam — tickets marked as spam. Counter shows the spam count.
- Trash — tickets that were deleted. Counter shows the trash count.
- Manage Views — shortcut at the bottom that opens Settings → Views.
Each row in the Shared and Personal groups shows the view's emoji icon, name, and a live counter of matching tickets.
To keep the realtime ticket counter performant, the sidebar shows up to 20 active custom shared views and 10 active personal views. Default views are always shown and do not count against this limit. If you have more active views than the limit, only the first 20 (Shared) and first 10 (Personal) by reorder position appear in the sidebar; the rest stay accessible in Settings → Views. To surface a view to the sidebar, reorder it into the top 20 / top 10, or deactivate one that currently is.
Counters display the exact number up to 99. Anything above shows as 99+.
A long view name wraps over up to three lines in the sidebar; anything longer is truncated with ... at the end of the third line. Hovering the row shows the full name in a tooltip — whether the name is truncated or not.
The currently selected entry is highlighted with a colored outline border so you always know which view is open.
Use this image to show the dashboard sidebar with All Tickets, a Shared group with several views, a Personal group, and Spam/Trash/Manage Views entries.
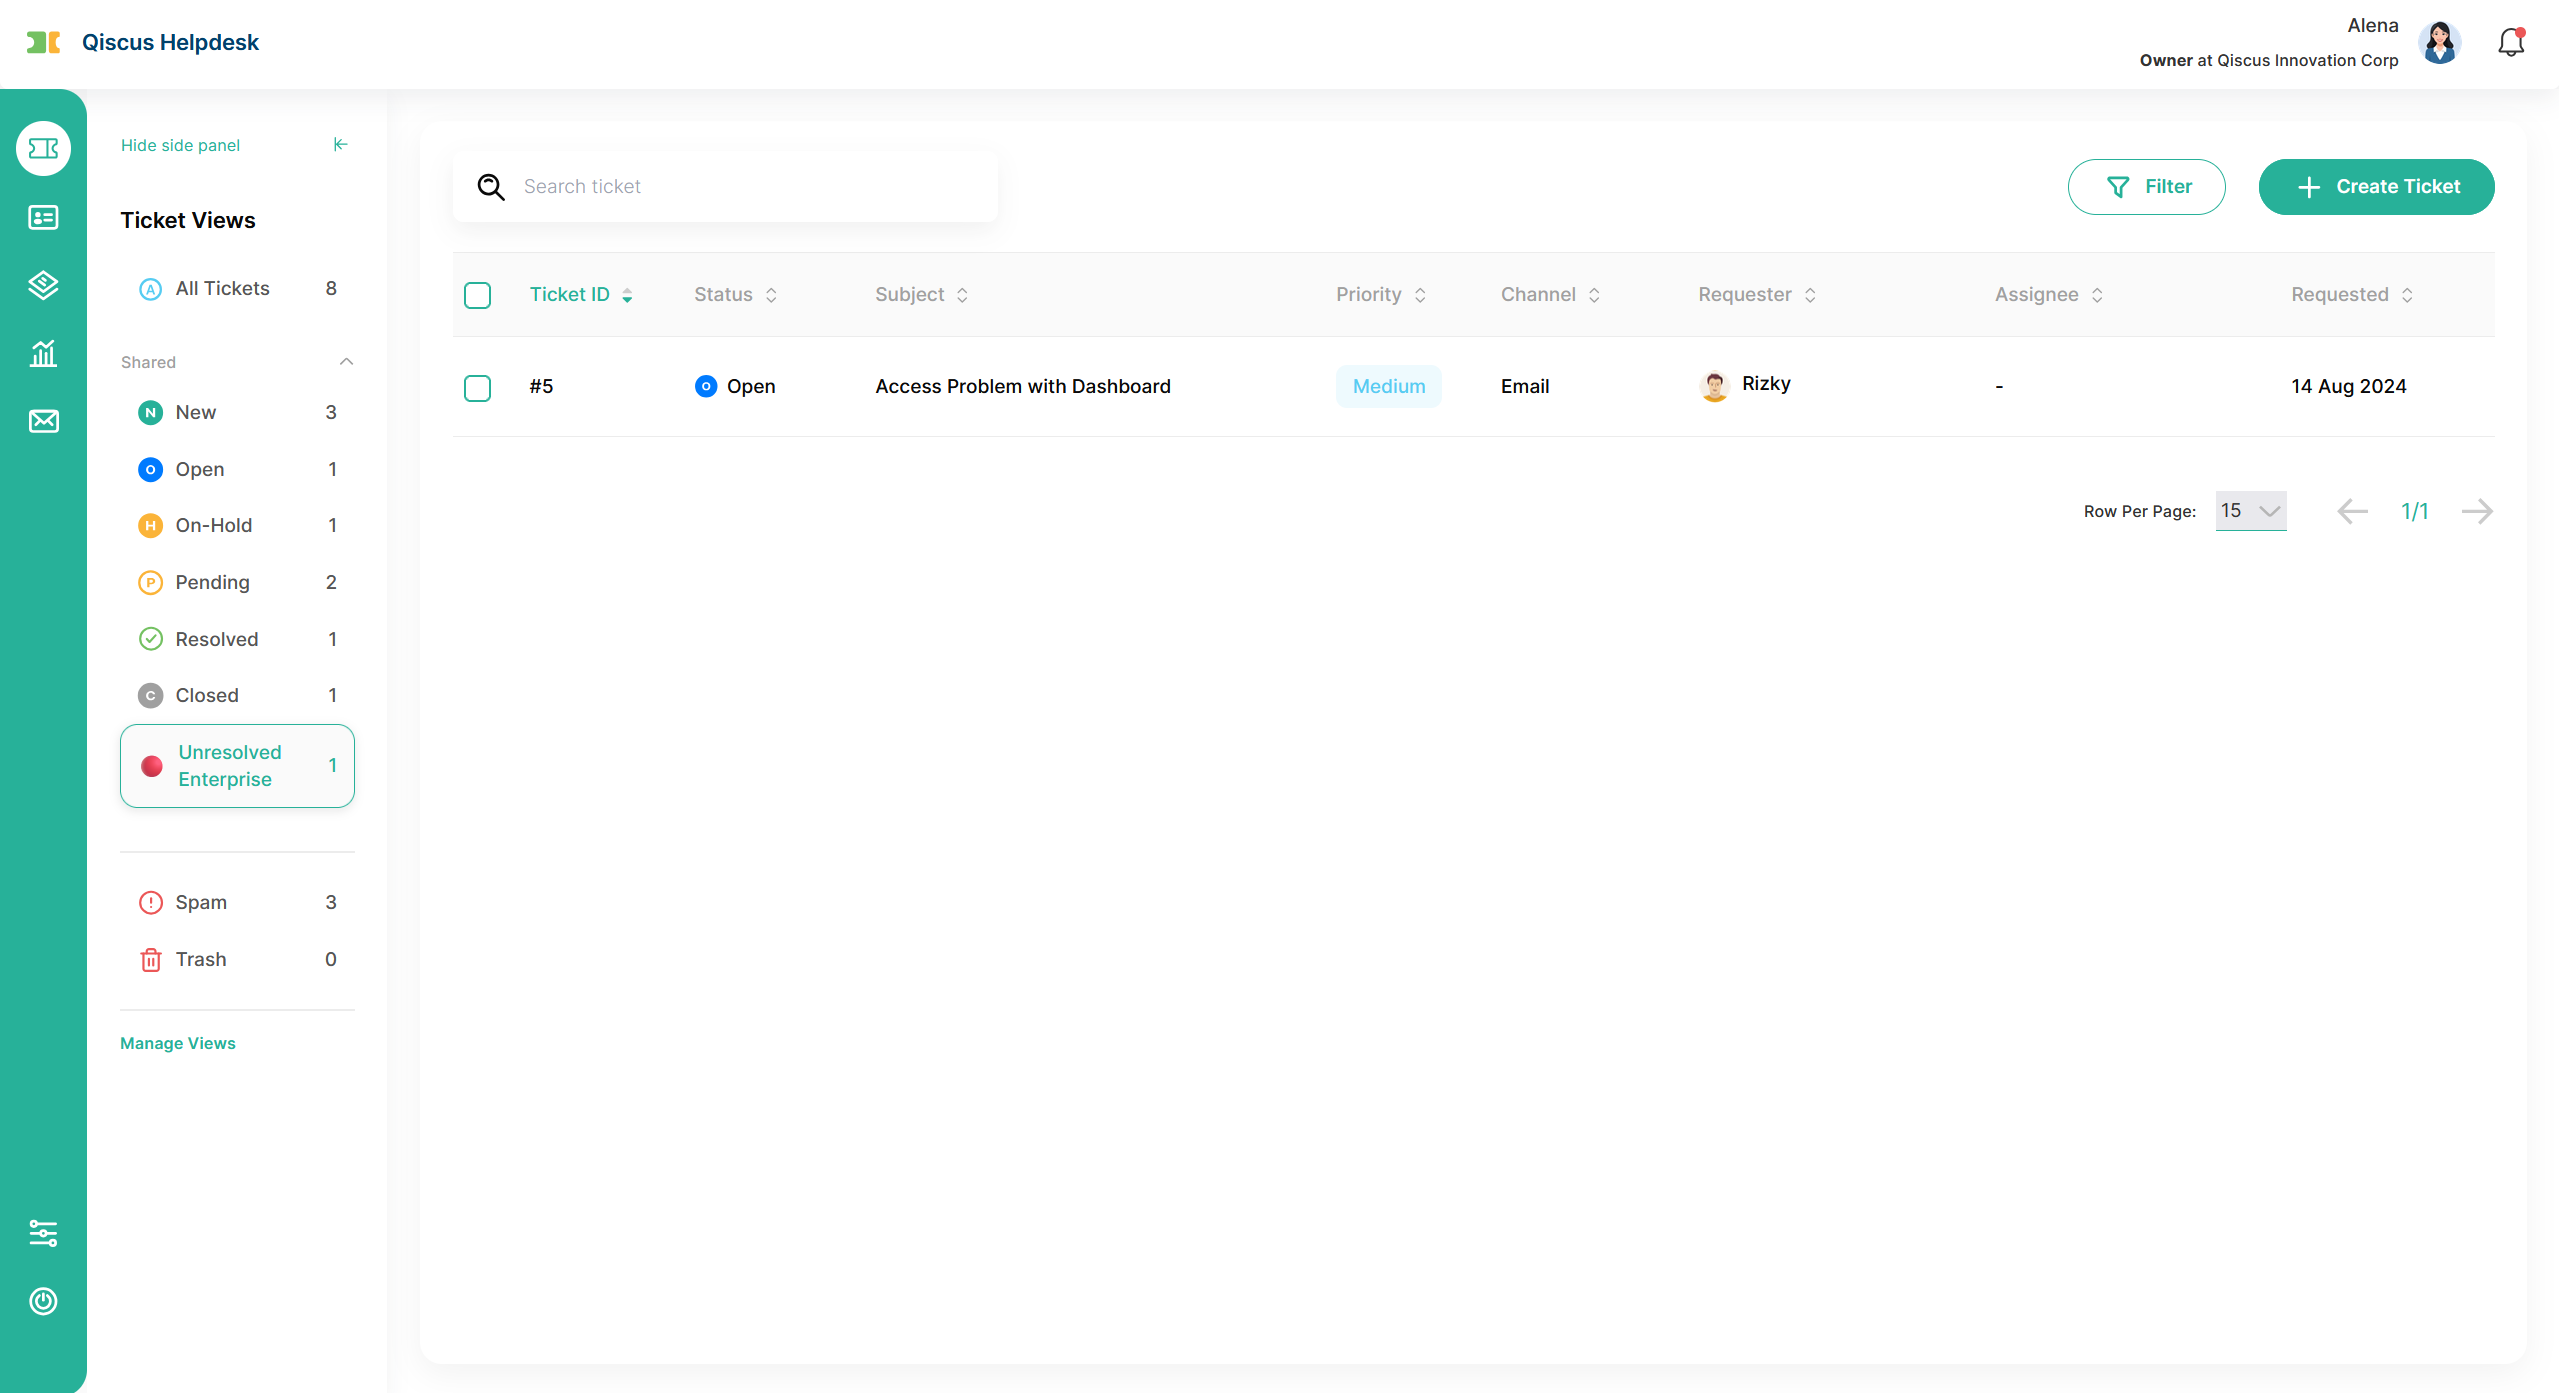
Rendering a List View
Clicking a view in the sidebar renders the matching tickets in a table:
- Columns and order follow your Manage Fields configuration for that view.
- Tickets are sorted by your Order by + Ascending/Descending setting.
- Empty state appears when no ticket matches the view's conditions.
If a condition in the view references a value that has been deleted from the system (for example a tag, division, agent, organization, ticket form, or custom field option that no longer exists), the condition cannot be evaluated and the view returns an empty result. To restore the view, edit it and replace or remove the affected condition.
Filtering Tickets in a View
Each view has a Filter button that opens the standard ticket filter panel. Filtering narrows the tickets that are already in the view — it does not bring in tickets that don't match the view's conditions. If no ticket matches the combination, a no-found state is shown.
The filter panel contains the default filters plus a filter for each Custom Field of type Dropdown that you included in Manage Fields when creating or editing the view. To add a custom field filter to a view, edit the view and add that field through Manage Fields.
Custom field filter labels that are long (up to 100 characters) wrap up to two lines, then truncate with .... Hovering shows the full label in a tooltip.
Use this image to show a List view rendered in the dashboard with sortable columns and a few tickets.
Visibility per Tenant and Role
The tickets each agent sees inside a view always respect your tenant's existing Agent's Ticket Visibility setting (Settings → Tenant Options):
- Owner / Admin / Supervisor — see every ticket that matches the view's conditions, regardless of the tenant option.
- Agent — follows the configured behavior:
- Only able to view ticket that assigned to them — only tickets where the Agent is the Assignee.
- Allow Agent to see all ticket in their division — all tickets within the Agent's division.
The ticket counter shown next to each view in the sidebar is also calculated against the post-visibility scope. The number you see is what you can actually open.
D. Limitations and Expected Behaviors
- Default views are read-only. New, Open, On-Hold, Pending, Resolved, and Closed cannot be edited or deleted by anyone, including Owners. To customize one, use Duplicate to create your own copy.
- Field limit. A view can show up to 15 columns. Three of them — Ticket ID, Ticket Status, Subject — are mandatory.
- Required condition. A view must include at least one condition using Status, Assignee, Division, or Requester.
- Personal views are private. No one else (including Owners and Admins) can see another user's personal views.
- Supervisor / Agent duplicates. When a Supervisor or Agent duplicates a Shared view, the resulting view is always a Personal view with Who has access = Only Me. The role does not have permission to create Shared views.
- Deactivated views. A deactivated view is removed from the dashboard sidebar but remains in Settings → Views. Re-activate it to bring it back.
- Deleted reference values. If a condition references a value that's been deleted (tag, division, agent, etc.), the view returns an empty result until you edit the condition.
- Sidebar display limit. The dashboard sidebar shows up to 20 active custom shared views and 10 active personal views (default views are always shown and don't count toward the limit). Active views beyond the limit stay accessible in Settings → Views but aren't rendered in the sidebar.
E. Summary
Custom Ticket Views give your team a flexible, role-aware way to surface the right tickets fast. Default views work out of the box for the common ticket statuses; custom views let each team — and each individual — tailor what they see, how they see it, and who else gets to see it. Combined with sticky filtering and the live sidebar counters, it cuts down the time spent navigating between contexts so agents can spend more of their time handling tickets.