
Introduction
We're introducing Intent-based Engine, a new feature that gives businesses more advanced control over their chatbot setup. Built natively within Qiscus AgentLabs, Intent-based Engine brings intent-driven conversation design directly into your workflow.
As an intent-based chatbot engine, this feature helps you build rule-driven conversations using intents, entities, and flows. With faster setup, native Omnichannel integration, and centralized management, Intent-based Engine gives you full control over conversation flow, designed and engineered for your business.
Key Features
Intent-based Engine introduces three features designed to make chatbot conversations more flexible, less repetitive, and easier to manage operationally.
Flexible Smart Follow Up
Bots can take automated actions after inactivity or based on conversation state, with seconds-level precision and multiple actions per flow. Supported actions: Send Message, Resolve Room, and API Call, ideal for reminders, inactivity handling, escalation workflows, and system integrations.Random Response Variants
Multiple response variations can be set for a single intent and automatically selected by the system, making conversations feel more natural and dynamic without complex logic.Easier Integration & Operational Control
Features and integrations are managed within the same ecosystem, enabling faster maintenance, quicker troubleshooting, better monitoring, and more consistent operational management.Intent Visual Builder
Intent Visual Builder provides a no-code interface for designing, managing, and visualizing chatbot intents, making intent configuration accessible to both technical and non-technical teams. The builder consolidates all intents and their relationships within a single canvas, complete with visual markers indicating which intents include Fulfillment, Custom API, or pending configuration enabling teams to identify gaps and broken connections at a glance.
Building a conversation Intent-based Engine flow
To design and configure your bot's conversation logic, open the App Center menu and start building your Intent-based Engine conversation flow.
In the Your Installed Apps section, search for “Intent-based Engine - Agentlabs”
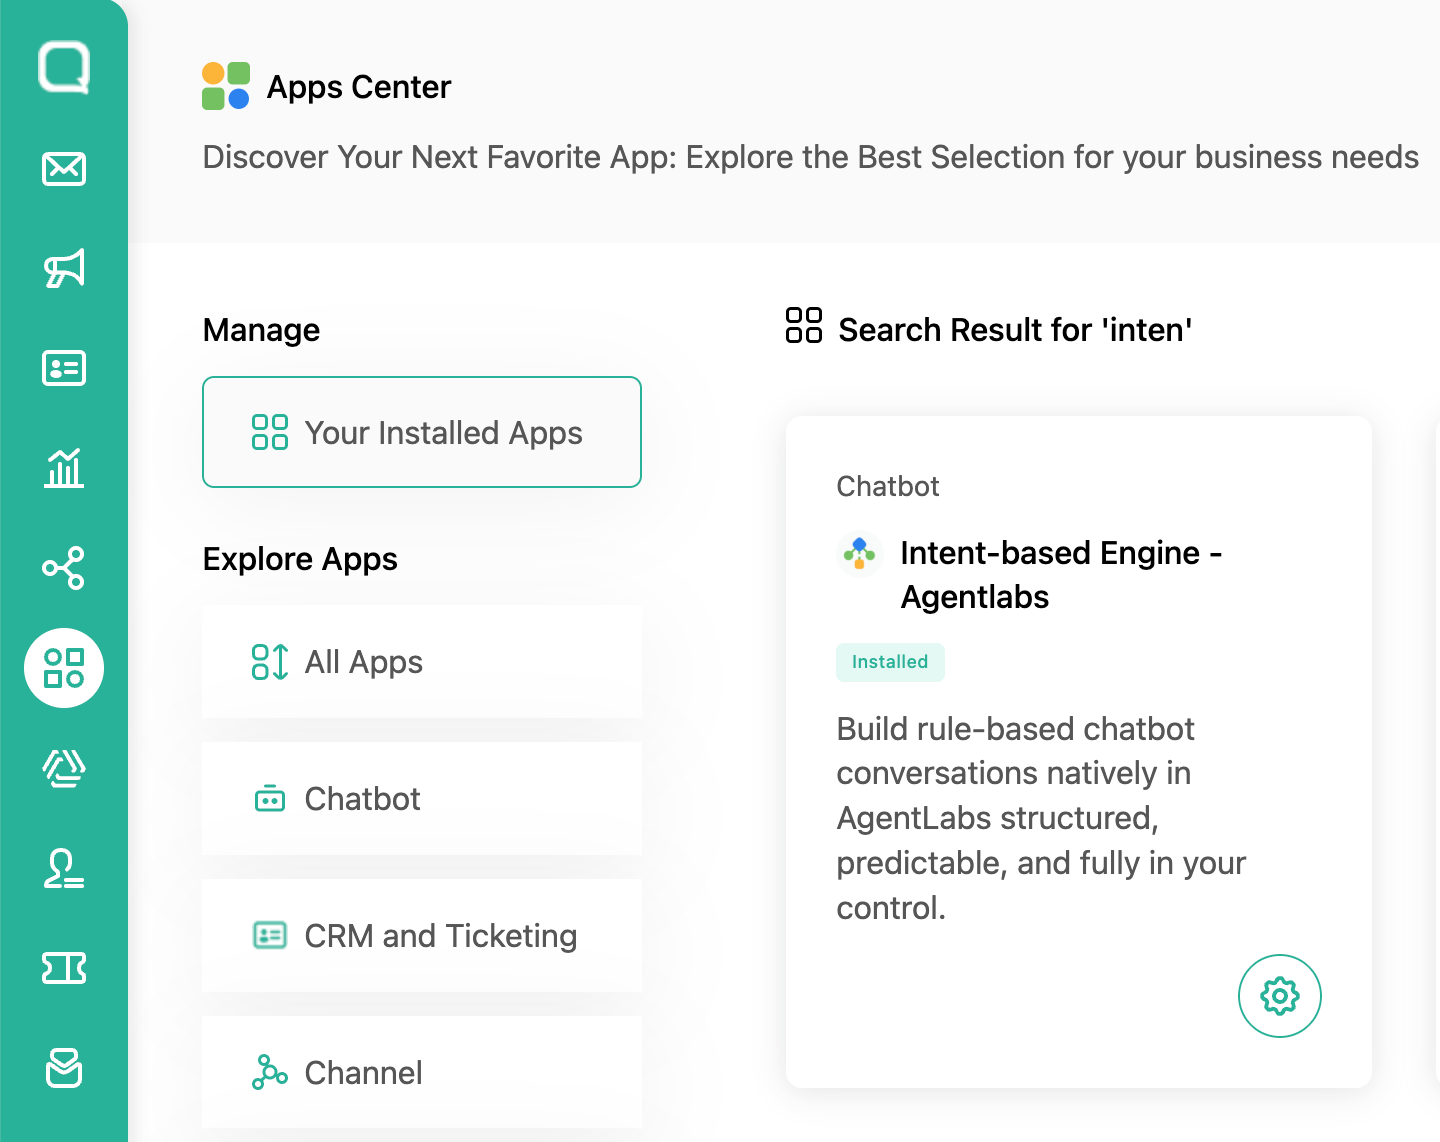
Click Addon Setting
You will be redirected to the Intent-based home page, which shows the list of bot projects you have created before (if any).
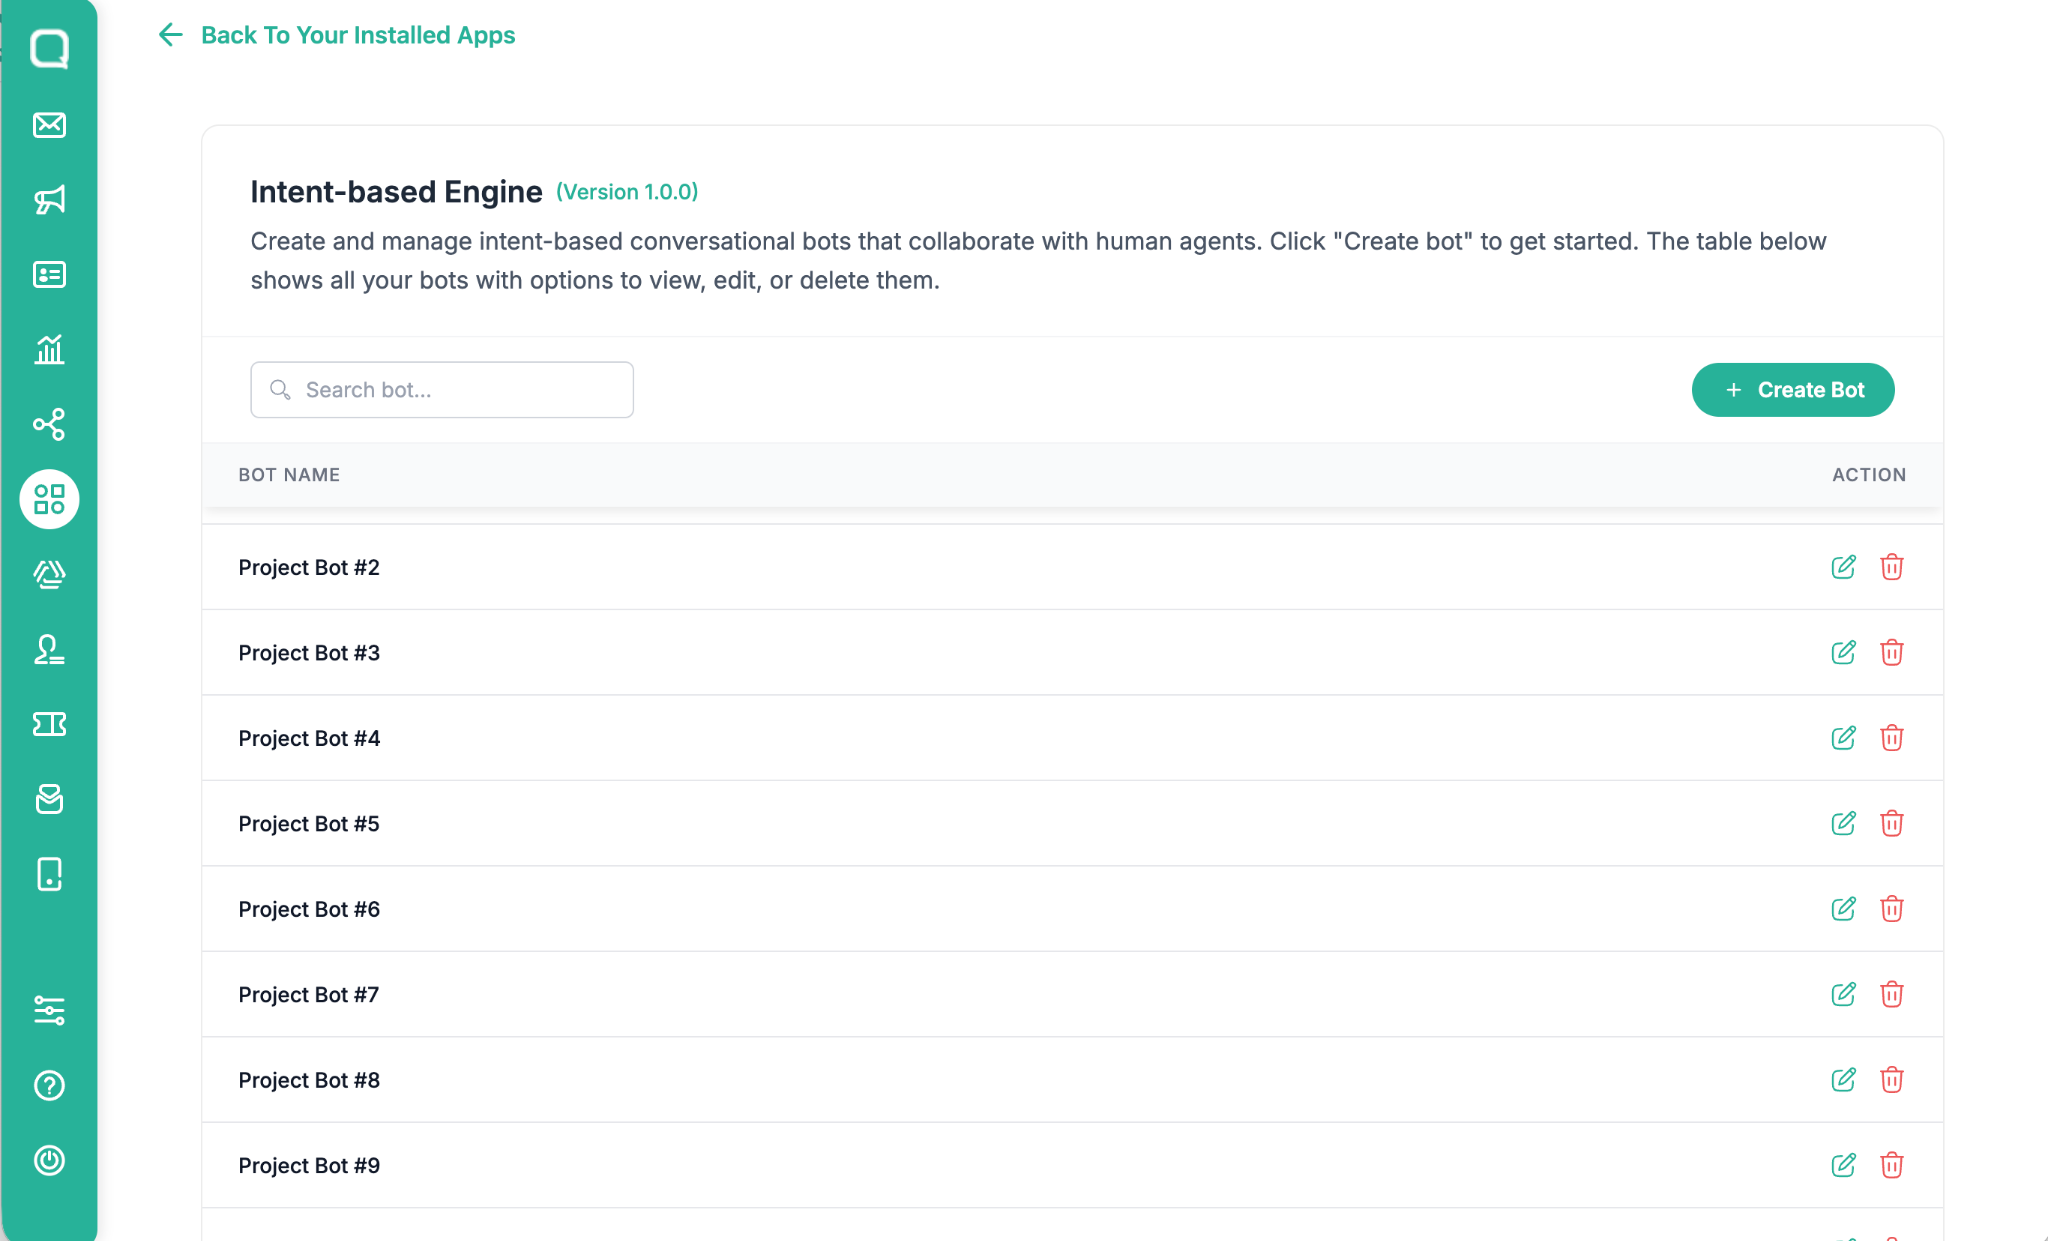
Click Create Bot to create a new project
Redirected to Bot creation wizard
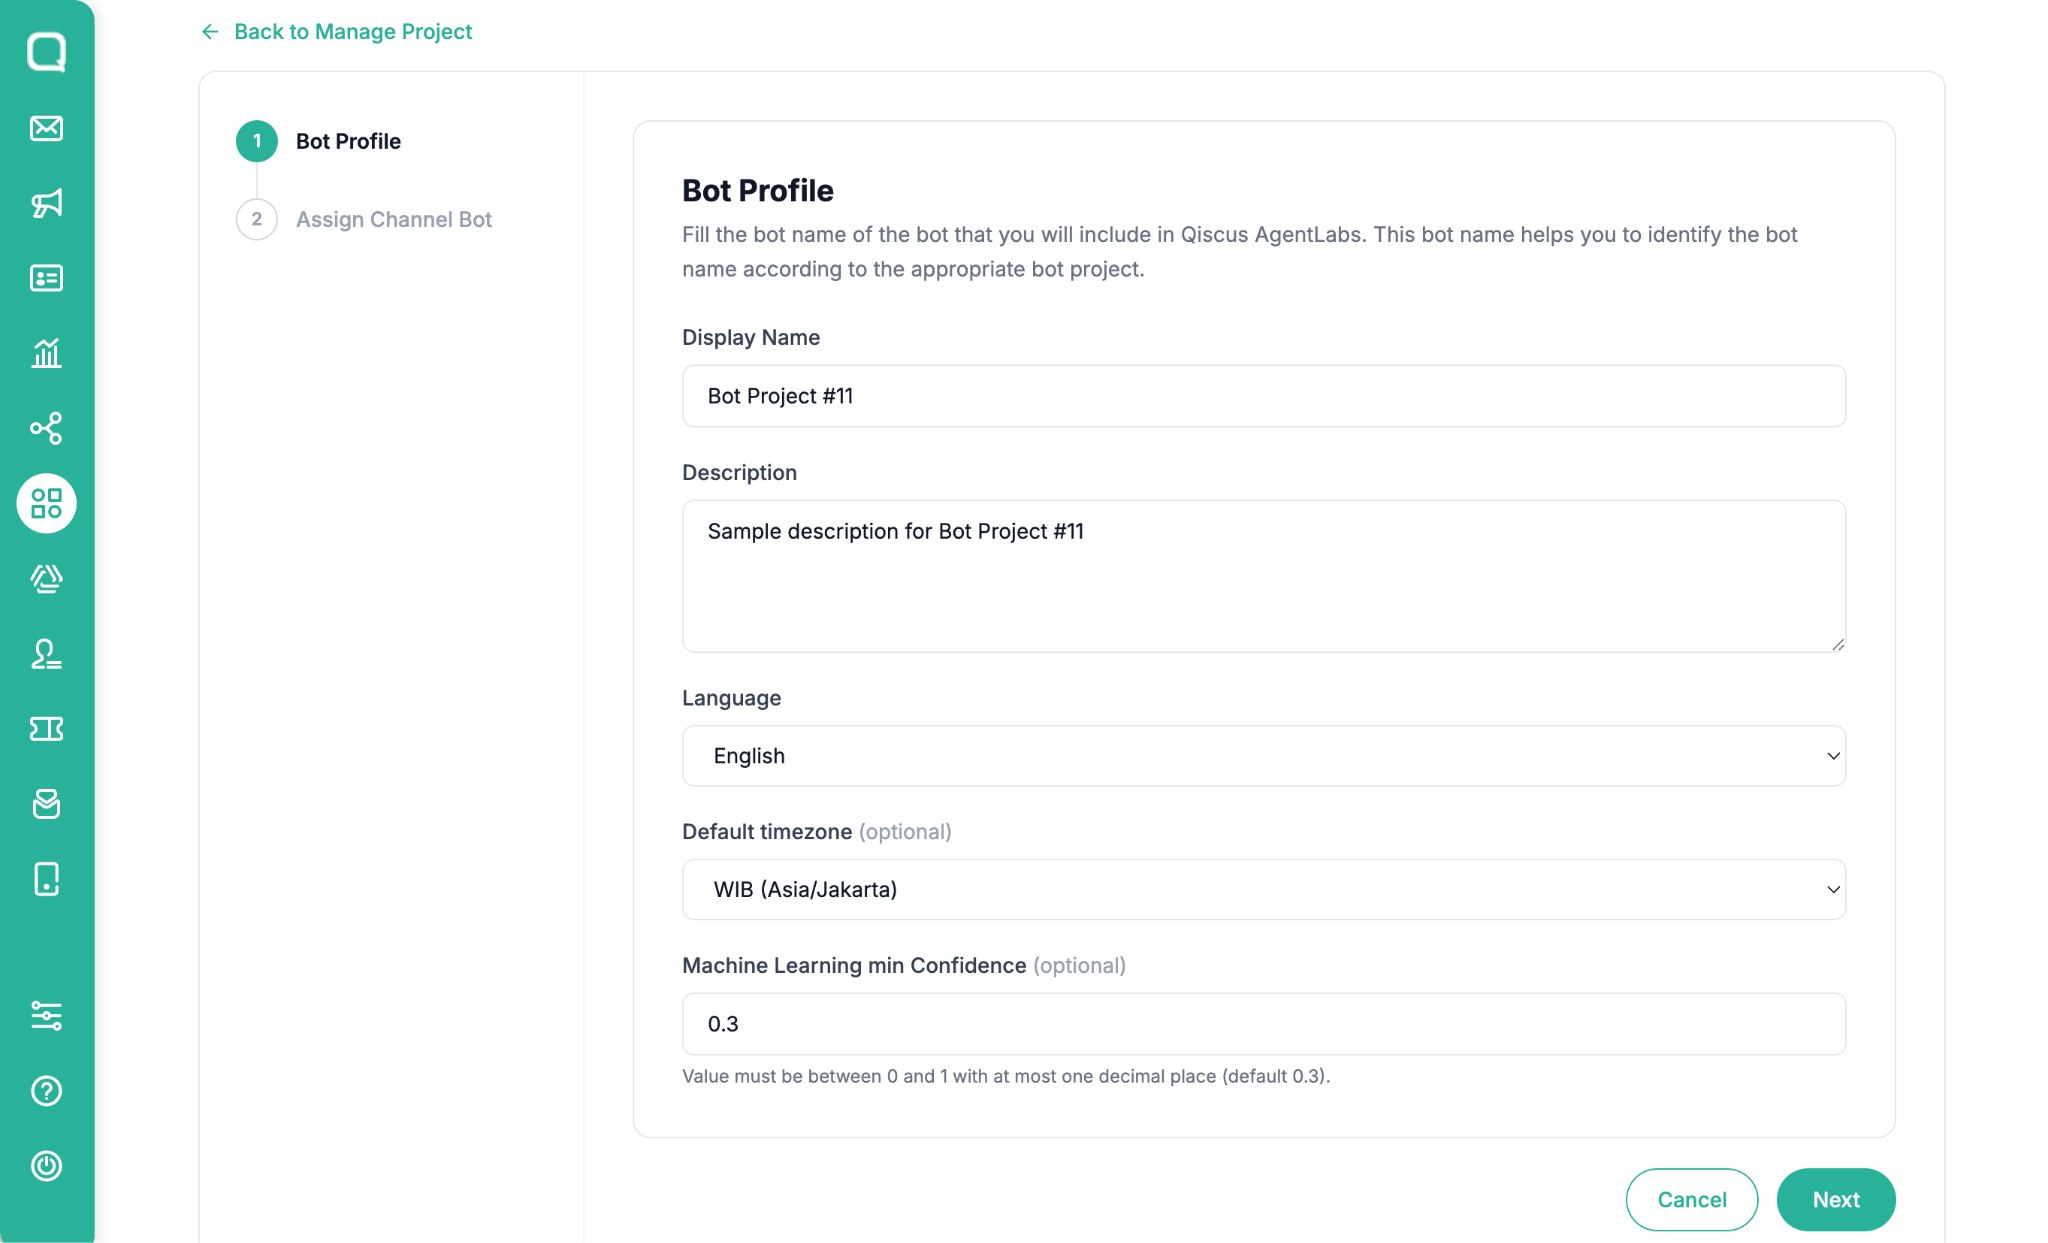
Fill out the Bot Profile form and then click “Next” to continue
Display Name
Description
Language
Default Timezone
Machine Learning min Confidence
Assign the Bot to a Channel (optional); for this session, you can skip this and click Create. You will then be redirected to the Bot detail page, and you will finally have a new Bot project.
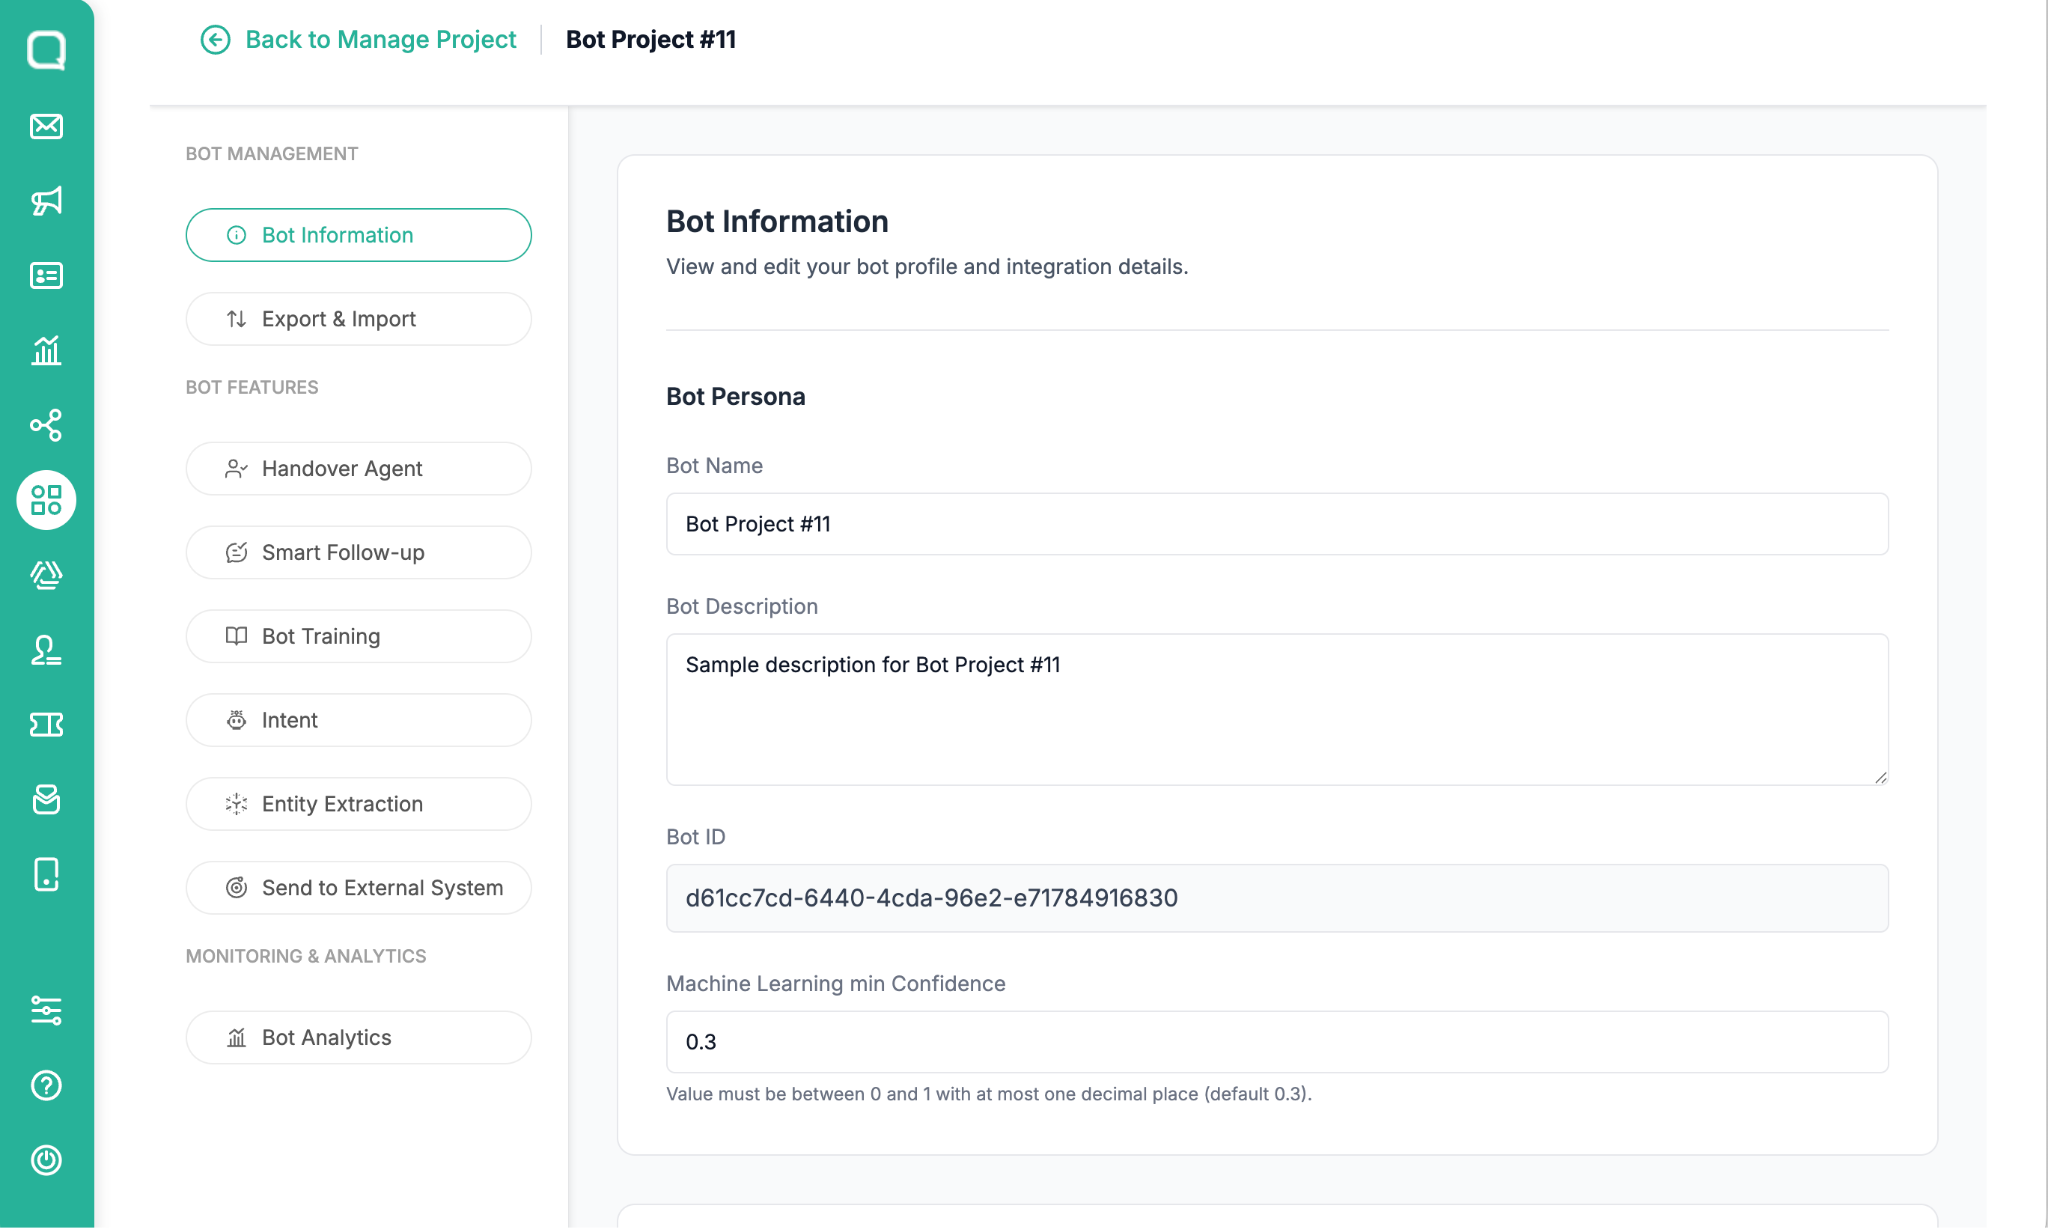
But, to have a conversation with the bot you need to scroll down on the Bot detail page to get the Webhook URL
Go to the Agentlabs menu, then click button Create Project at the top right of the Dashboard
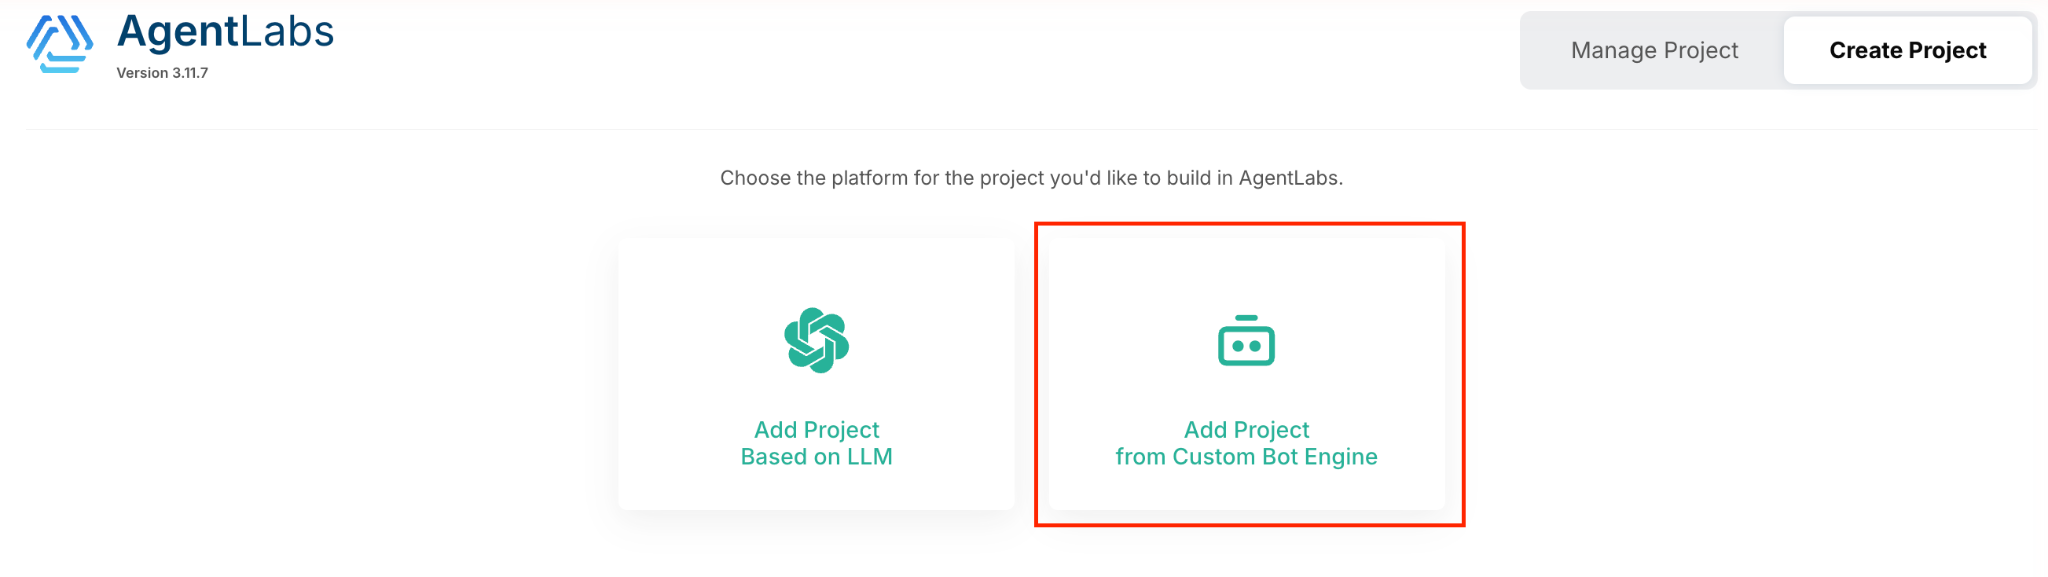
Choose Custom Bot engine, and you will be redirected to Bot creation wizard in Agentlabs Dashboard
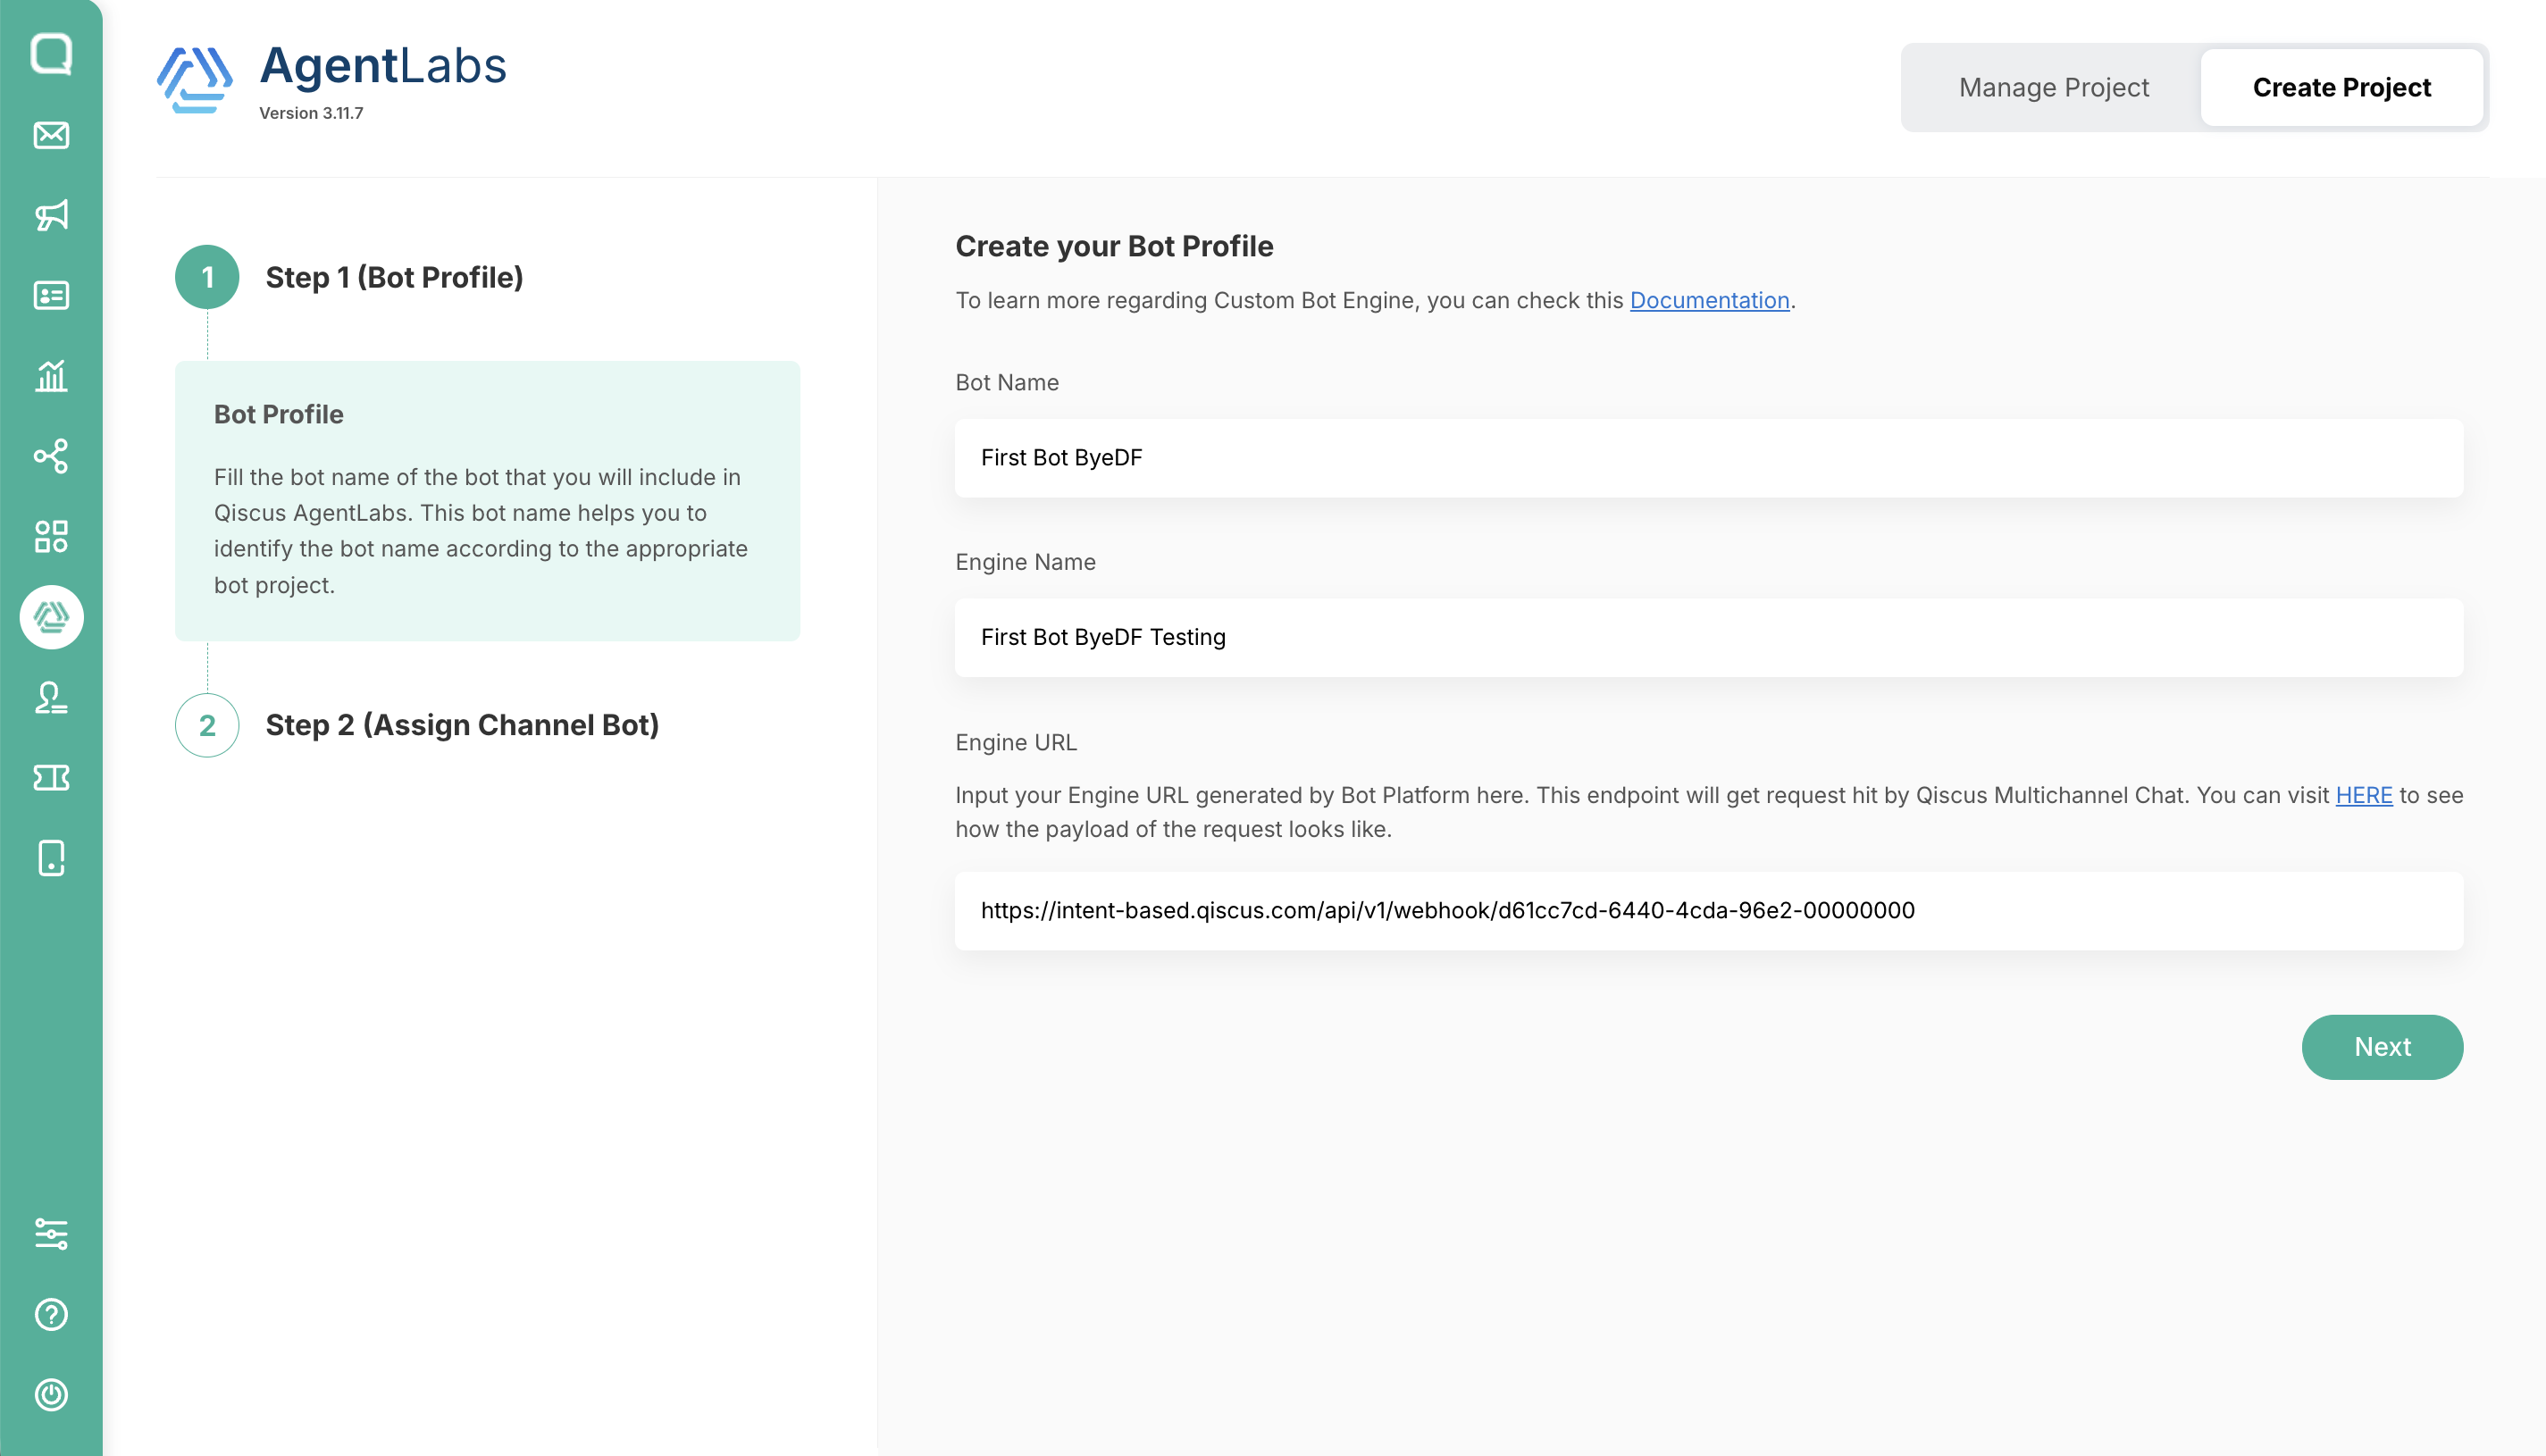
Note: Before proceeding, ensure the Activate AgentLabs Integration toggle is enabled on the Project Management page.
Paste the Engine URL from Intent-based Engine addon, then click Next
Assign the bot to your preferred channel.
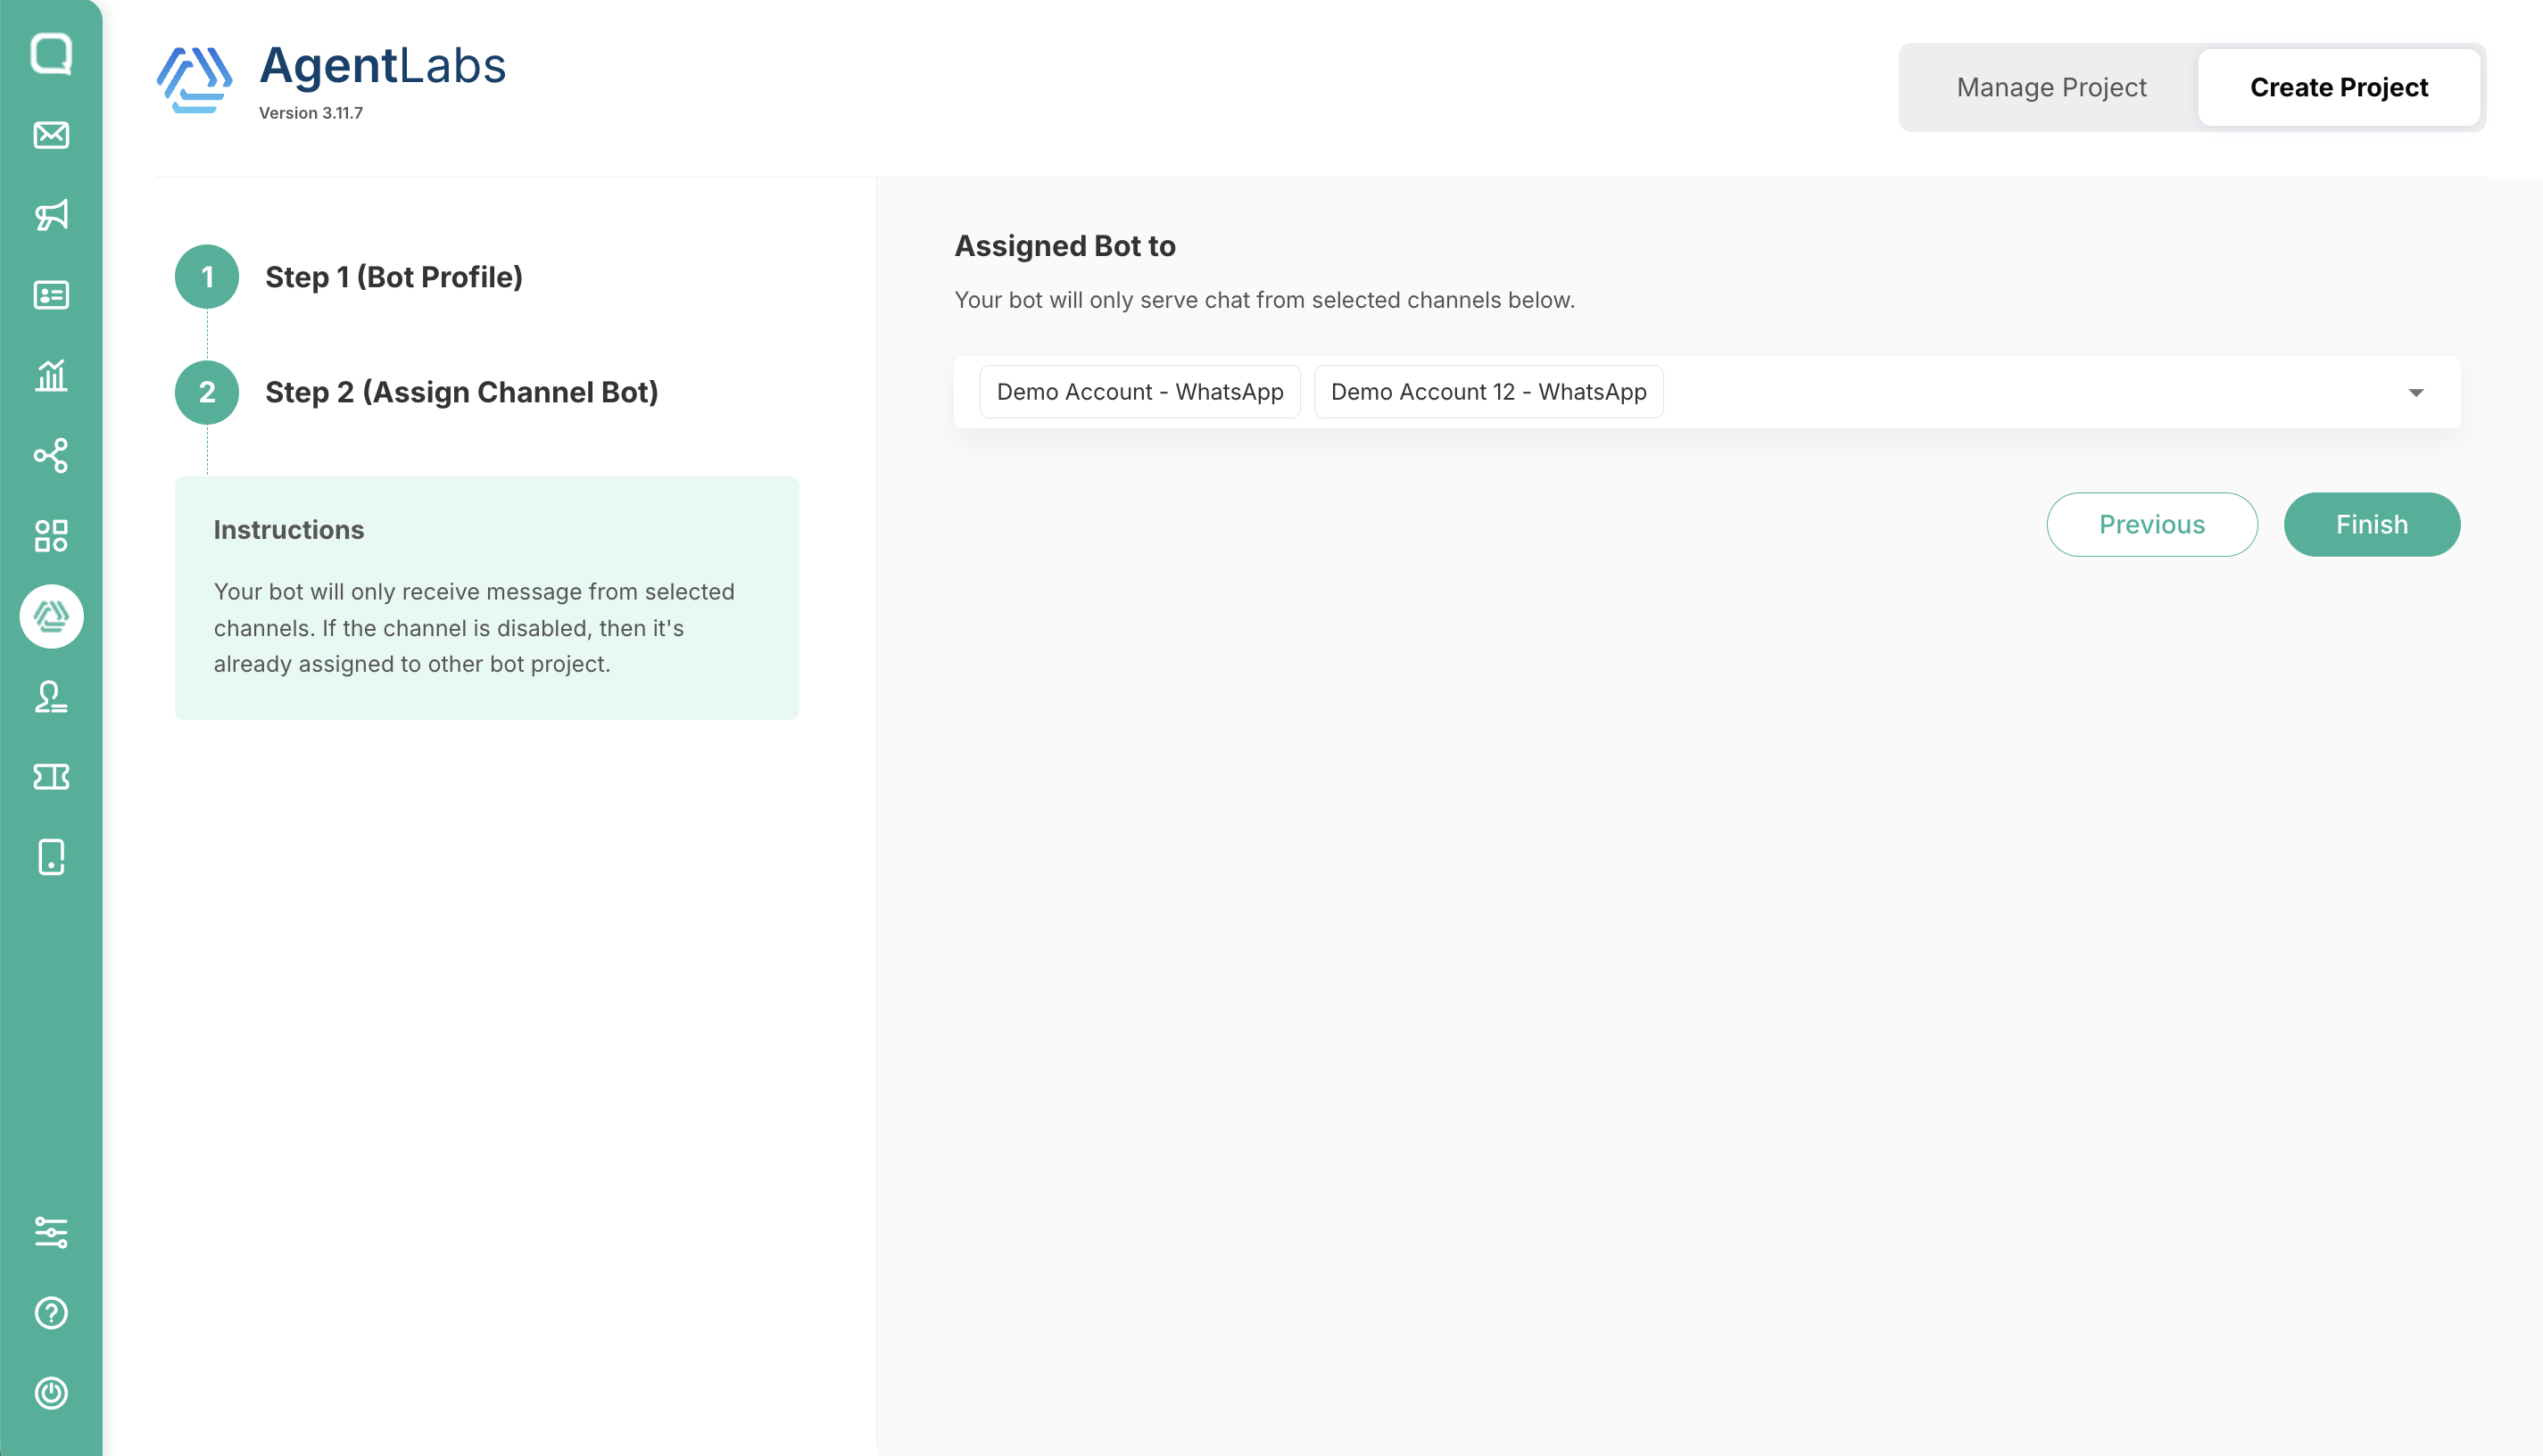
Click the Finish button
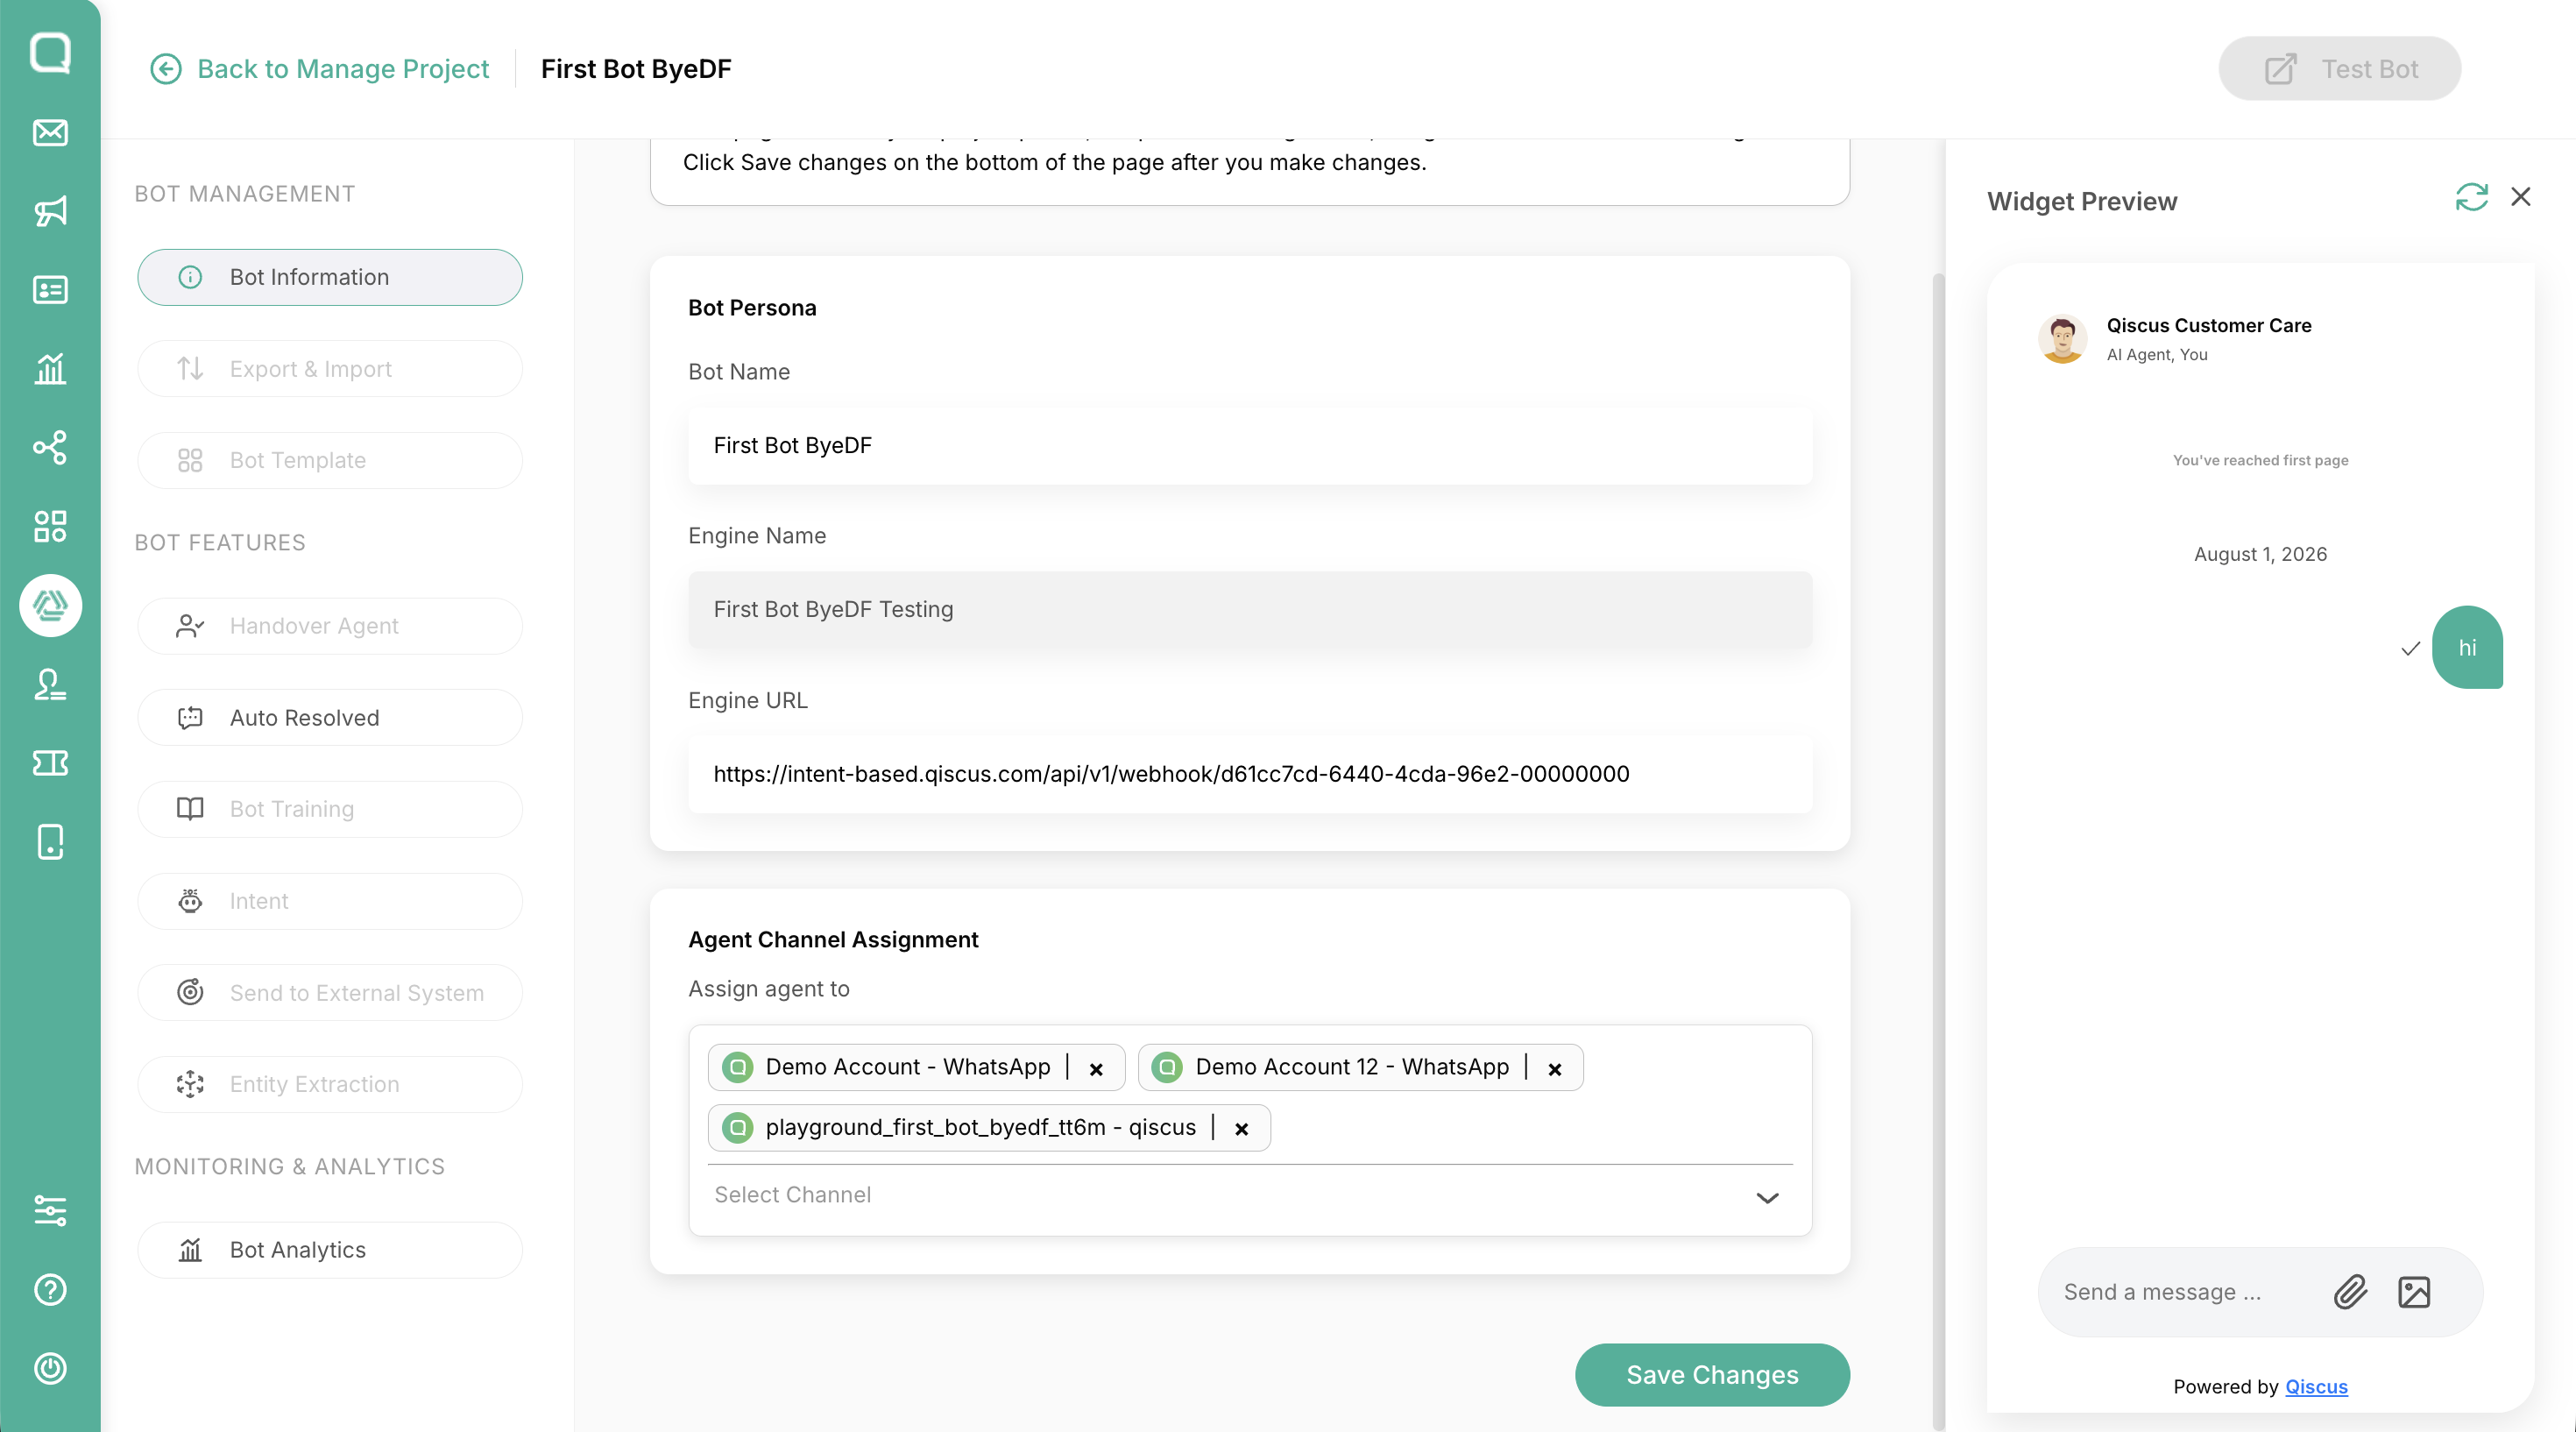
To test your bot, use the Test Bot located at the top right of the page on Agentlabs Dashboard.
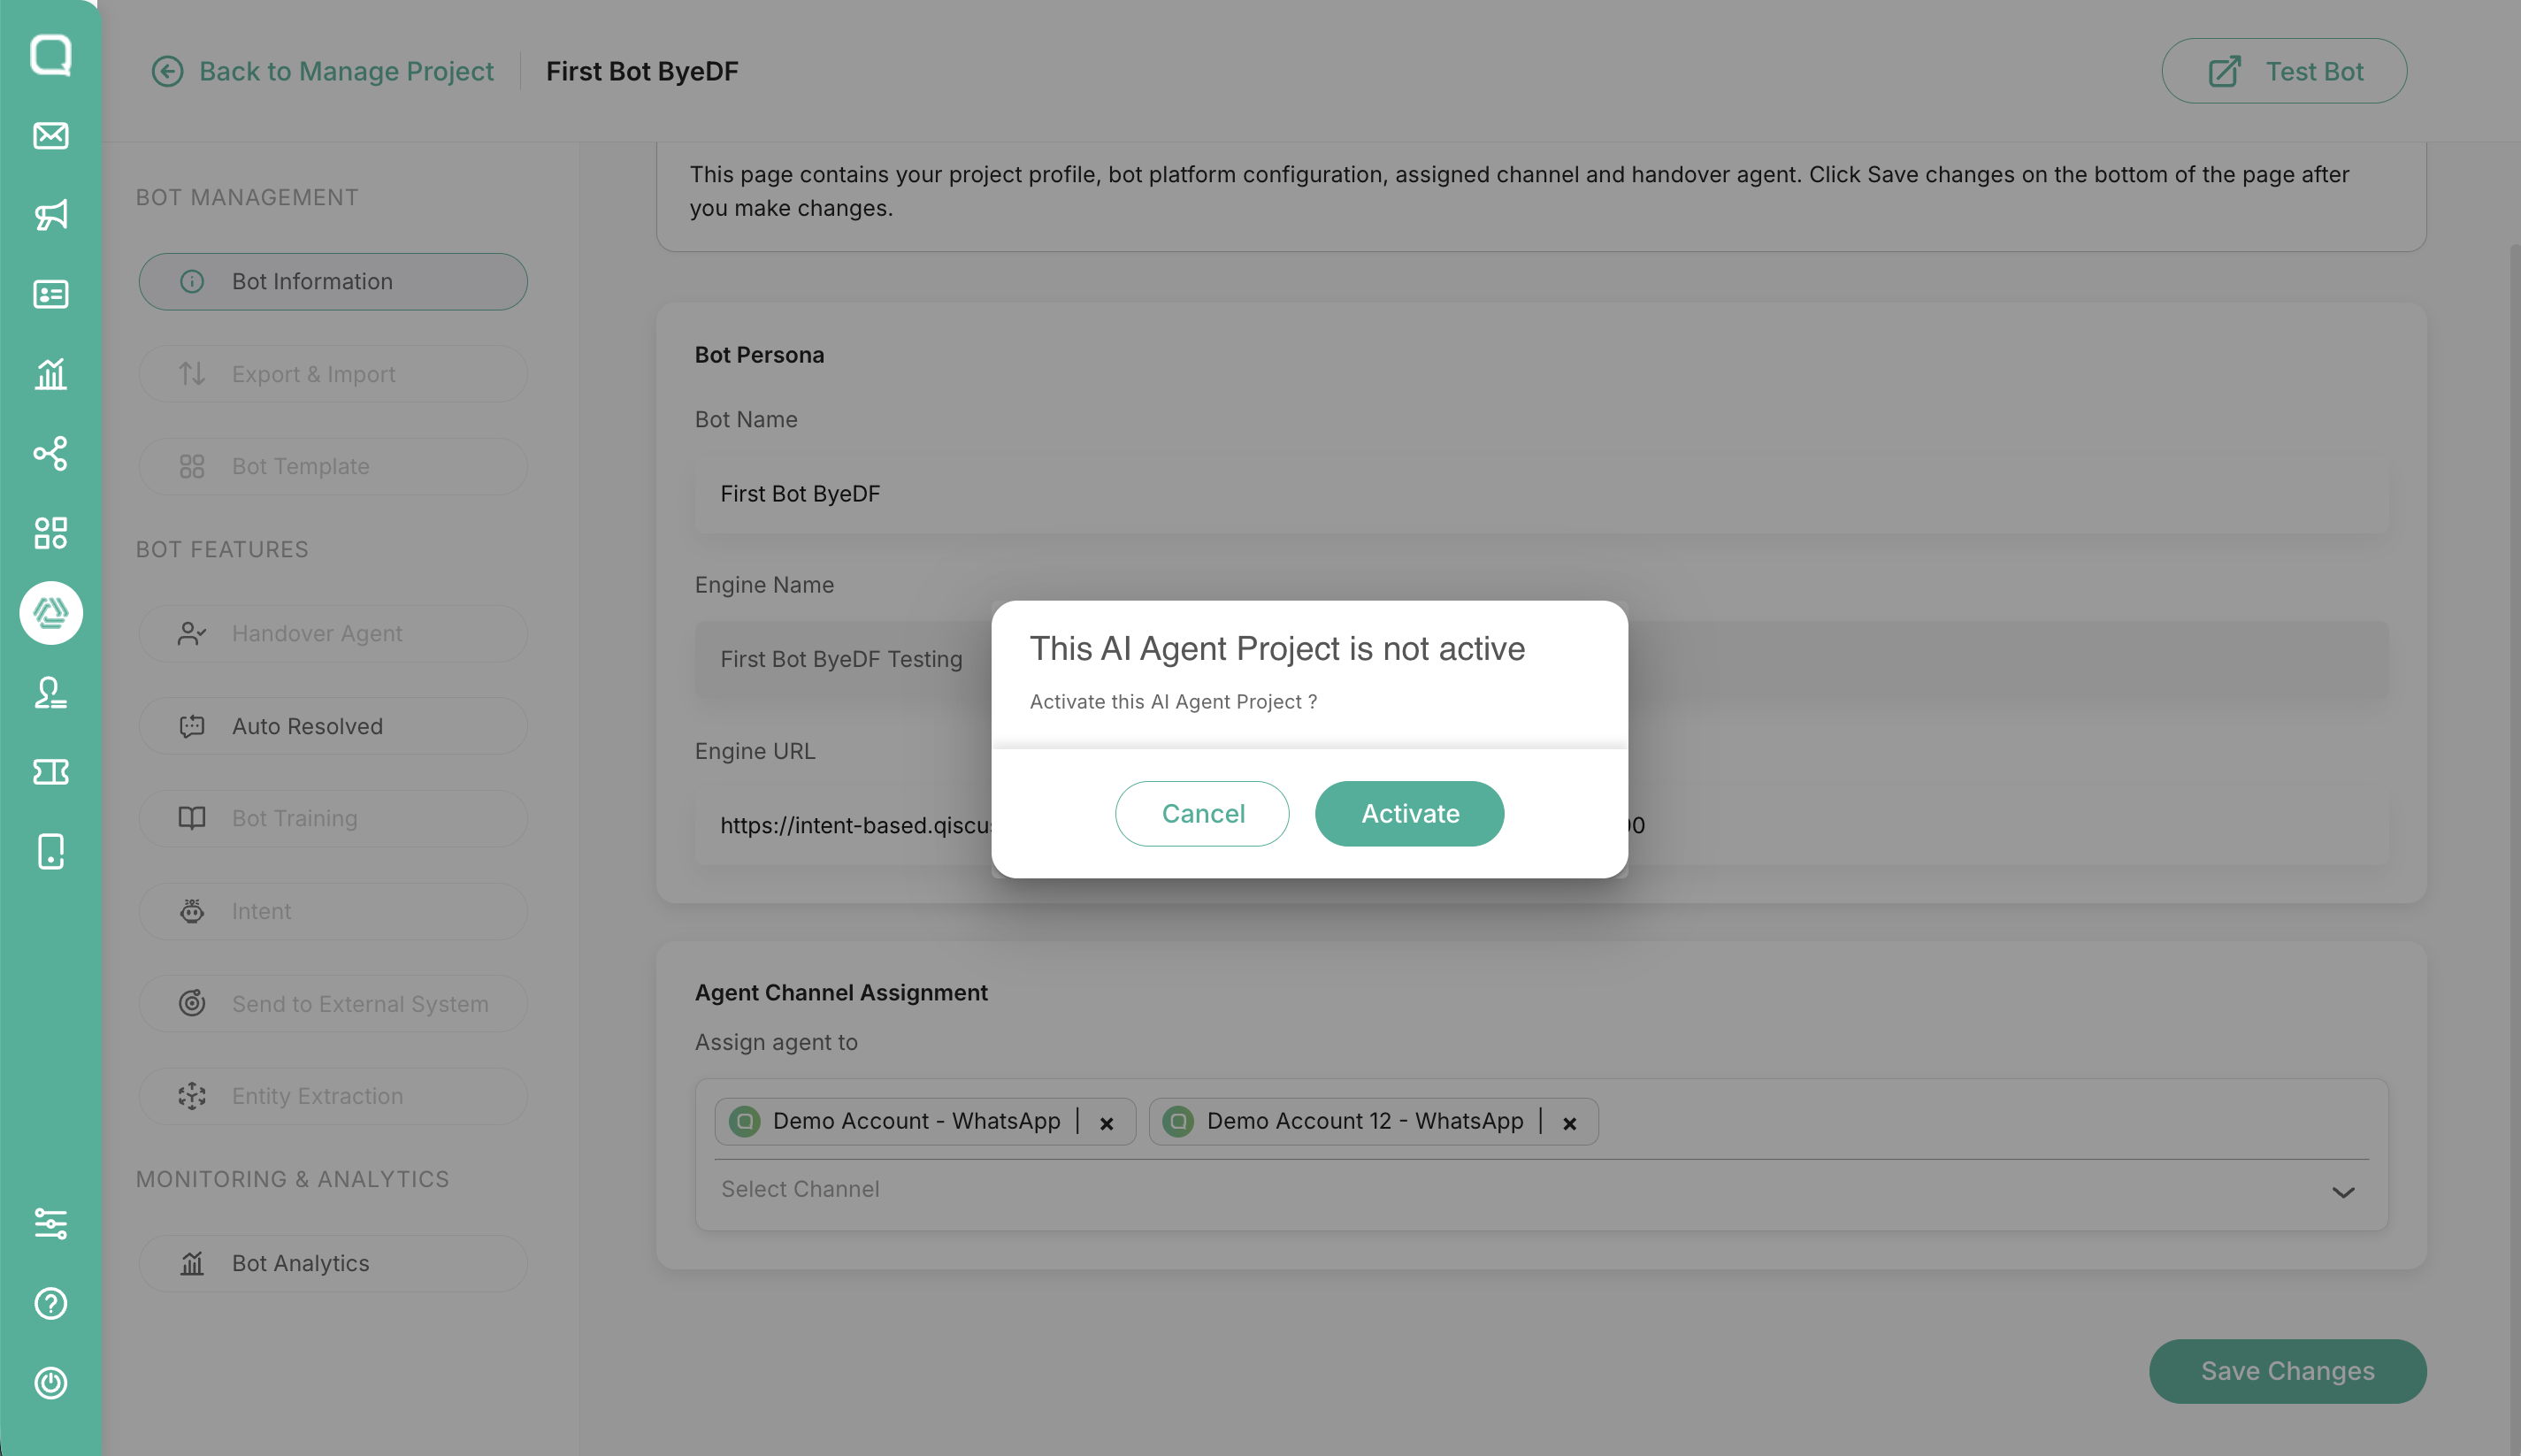
Click Activate to enable the Test Bot Widget.
Your bot is now integrated
Managing Intent-based Engine
The Managing Intent-based Engine section gives you full control over your bot configuration. To ensure your bot responds according to your intended flow, training is required before deployment.
Intents
An Intent represents the goal behind a user's message. Intent-based Engine matches each message to the most relevant intent, which defines how the chatbot responds.
Components of an Intent
Each intent is made up of several key components:
Training Phrases
Examples of user messages used to train the chatbot to recognize the intent.
Action
A label or identifier that defines what should happen when the intent is triggered (often used for integrations).
Parameters
Variables that store important data extracted from user messages (e.g., name, date, product).
Response
The reply that the chatbot sends when the intent is matched.
This can include text, buttons, lists, and more.
Context (Input / Output)
Controls the flow of conversation:
Input Context: When this intent is allowed to trigger
Output Context: What state is activated after the intent runs
Relationship Between Intents
Intents are not always standalone. They can be connected to create structured conversation flows.
Follow-up Intent
Defines the next step in a conversation after a previous intent is triggered.
Learn more: Follow-up Intent
Parent–Child Intent
Organizes intents in a hierarchical structure.
Learn more: Child & Parent Intent
Export & Import
The Export & Import feature allows users to transfer chatbot configurations between projects or platforms. This feature is useful for backing up chatbot data, duplicating bot configurations, or migrating existing chatbot setups into Intent-based Engine.
Using Export & Import helps users maintain chatbot configurations more efficiently and simplifies the migration process between supported platforms.
Export Bot
The Export Bot feature allows users to download the chatbot configuration currently used in the Intent-based Engine project.
To import your .JSON file, please follow these steps:
Open the Export section, Click Export as JSON. The system will automatically generate and download the bot configuration file in .JSON format
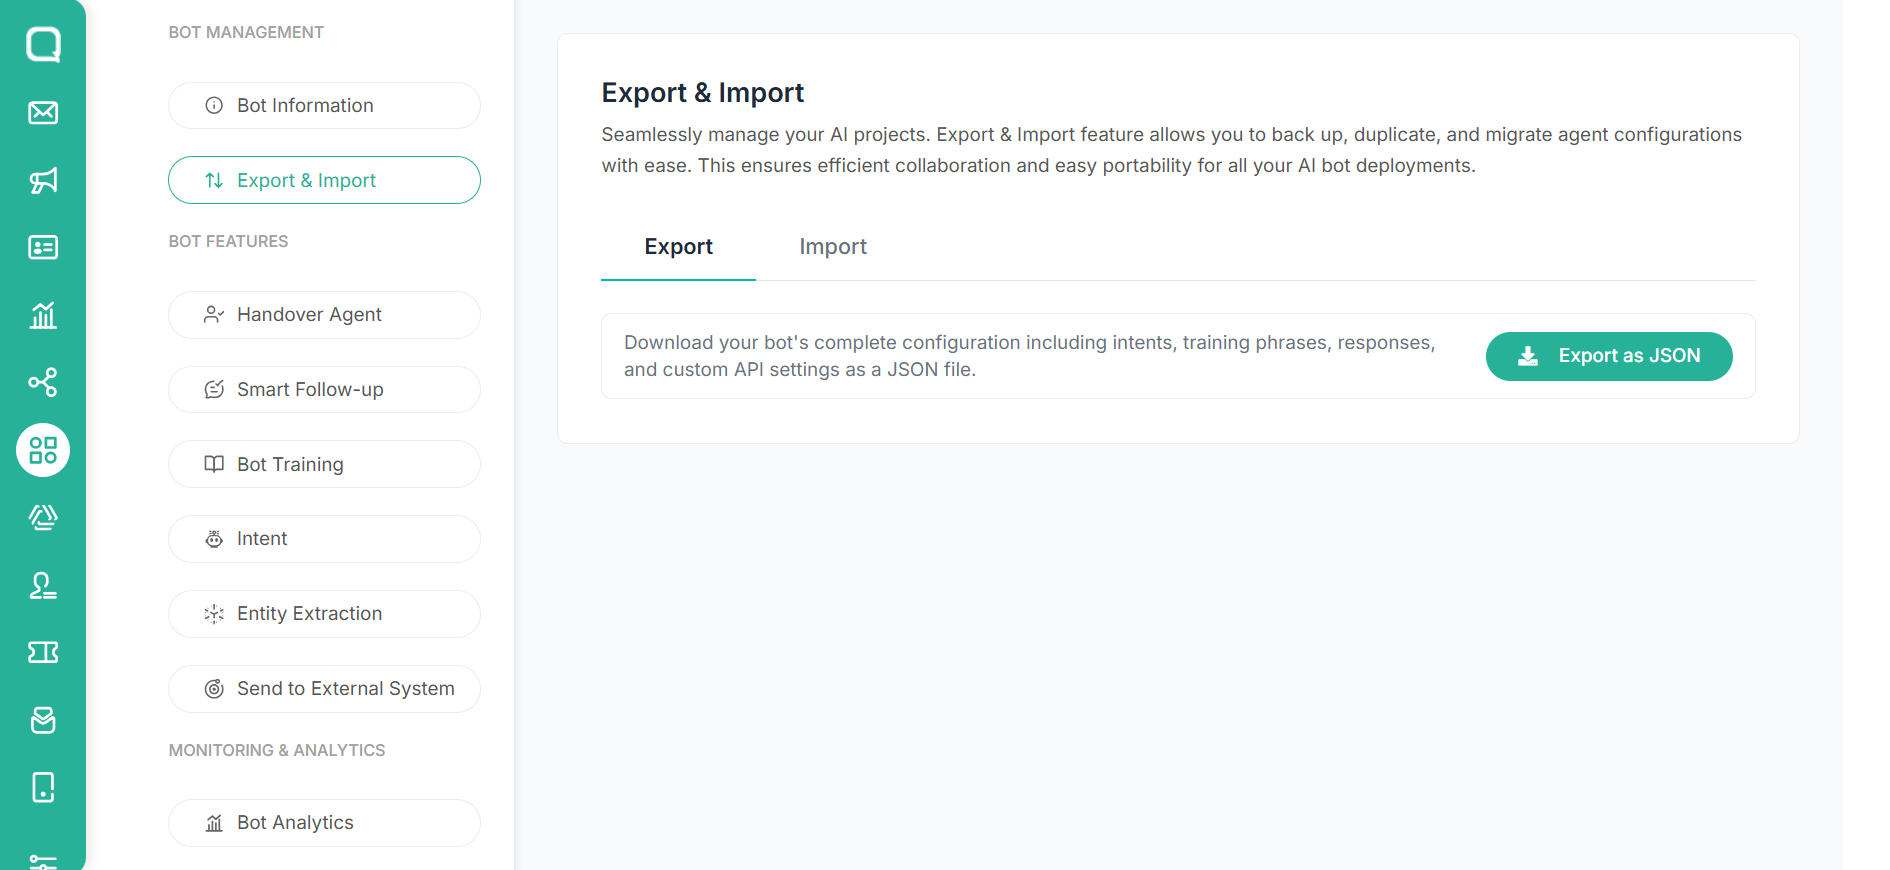
It is recommended to export the bot before performing major updates or imports to avoid losing important configurations.
Import Bot
The Import Bot feature allows users to upload chatbot configurations into the current Intent-based Engine project.
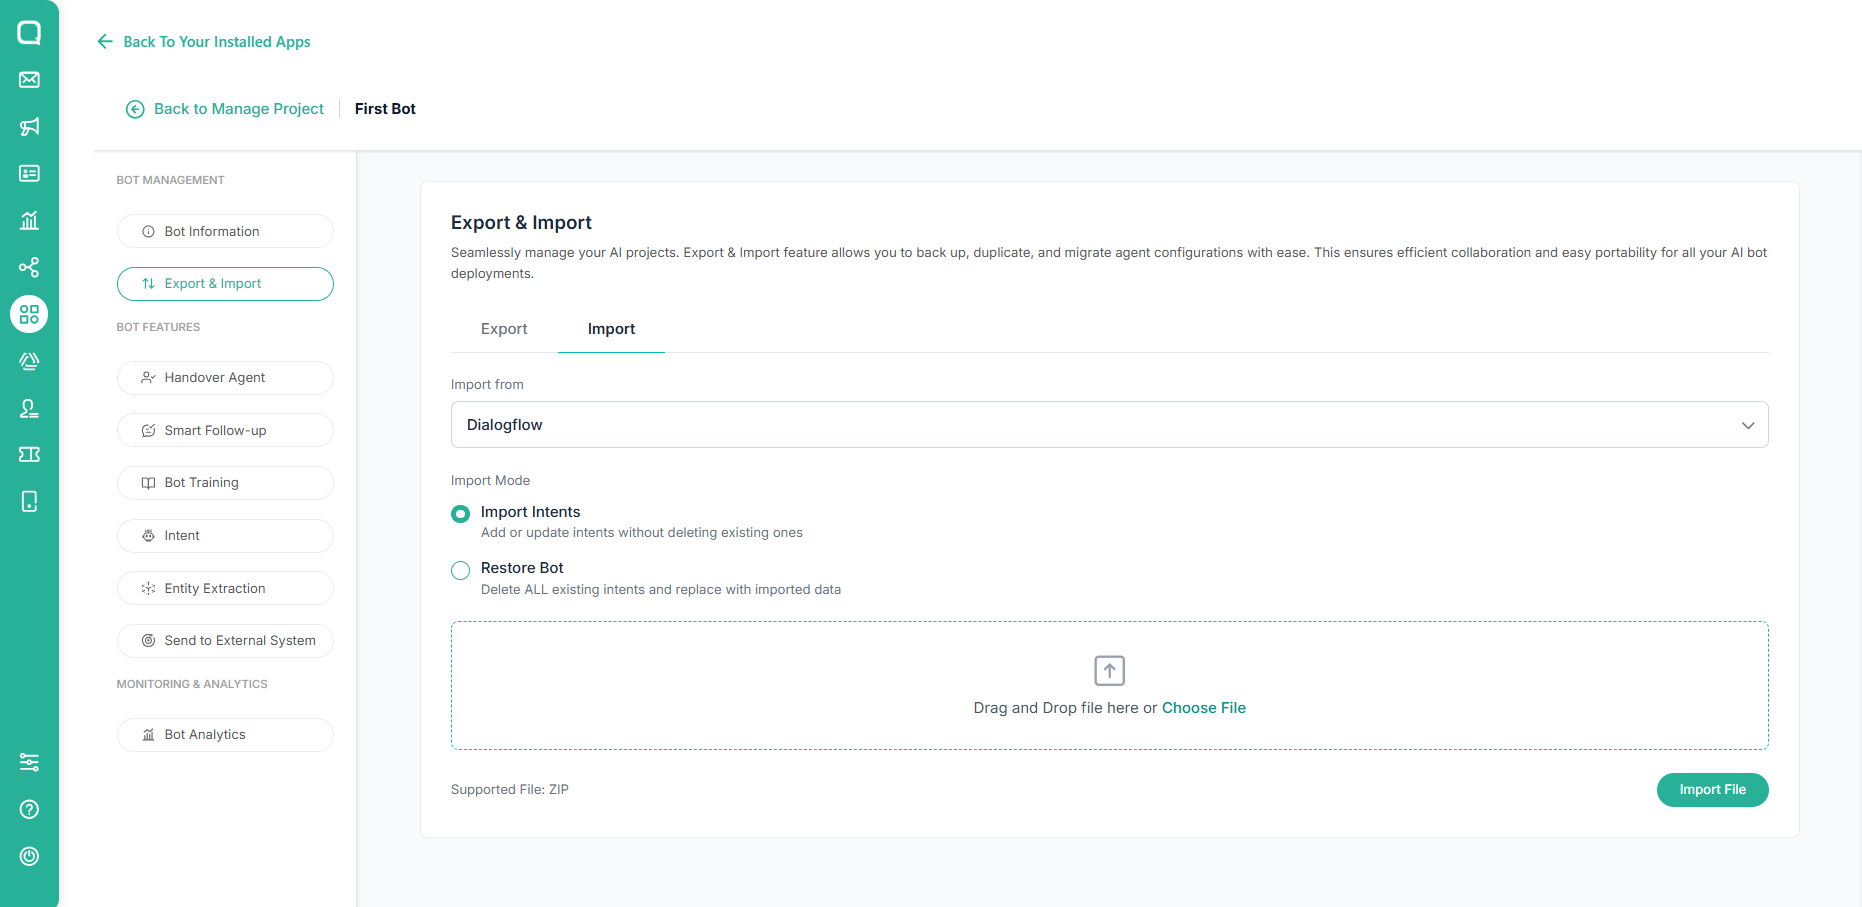
Intent-based Engine supports importing chatbot configurations from multiple sources to simplify migration and bot replication.
Import Form
Intent-based Engine supports importing chatbot configurations from multiple sources to simplify migration and bot replication.
Dialogflow (.zip): migrate configurations to Intent-based Engine
AgentLabs (.xlsx): import from AgentLabs export
Intent-based Engine (.JSON): import from another Intent-based Engine project
Import Modes
For Dialogflow and Intent-based Engine imports, two modes are available:
Import Intents adds new intents, updates existing ones, and preserves unaffected bot data. Recommended for merging or updating configurations.
Restore Bot deletes all existing intents and replaces them with the imported configuration. Recommended only for complete chatbot replacement.
⚠️ Warning: Restore Bot deletes all existing intents. This action cannot be undone.
Important Notes:
It is strongly recommended to export the current bot configuration before importing new data.
Restore Bot mode will permanently replace all existing intents.
Imported configurations should follow the supported file structure and format.
After the import process is completed, users should review intents, responses, entities, and flows to ensure everything works correctly.
Imported bots can be tested directly using the Test Bot Widget after migration is complete.
Create Intent
Basic Setting
To create a new intent, click Create Intent.
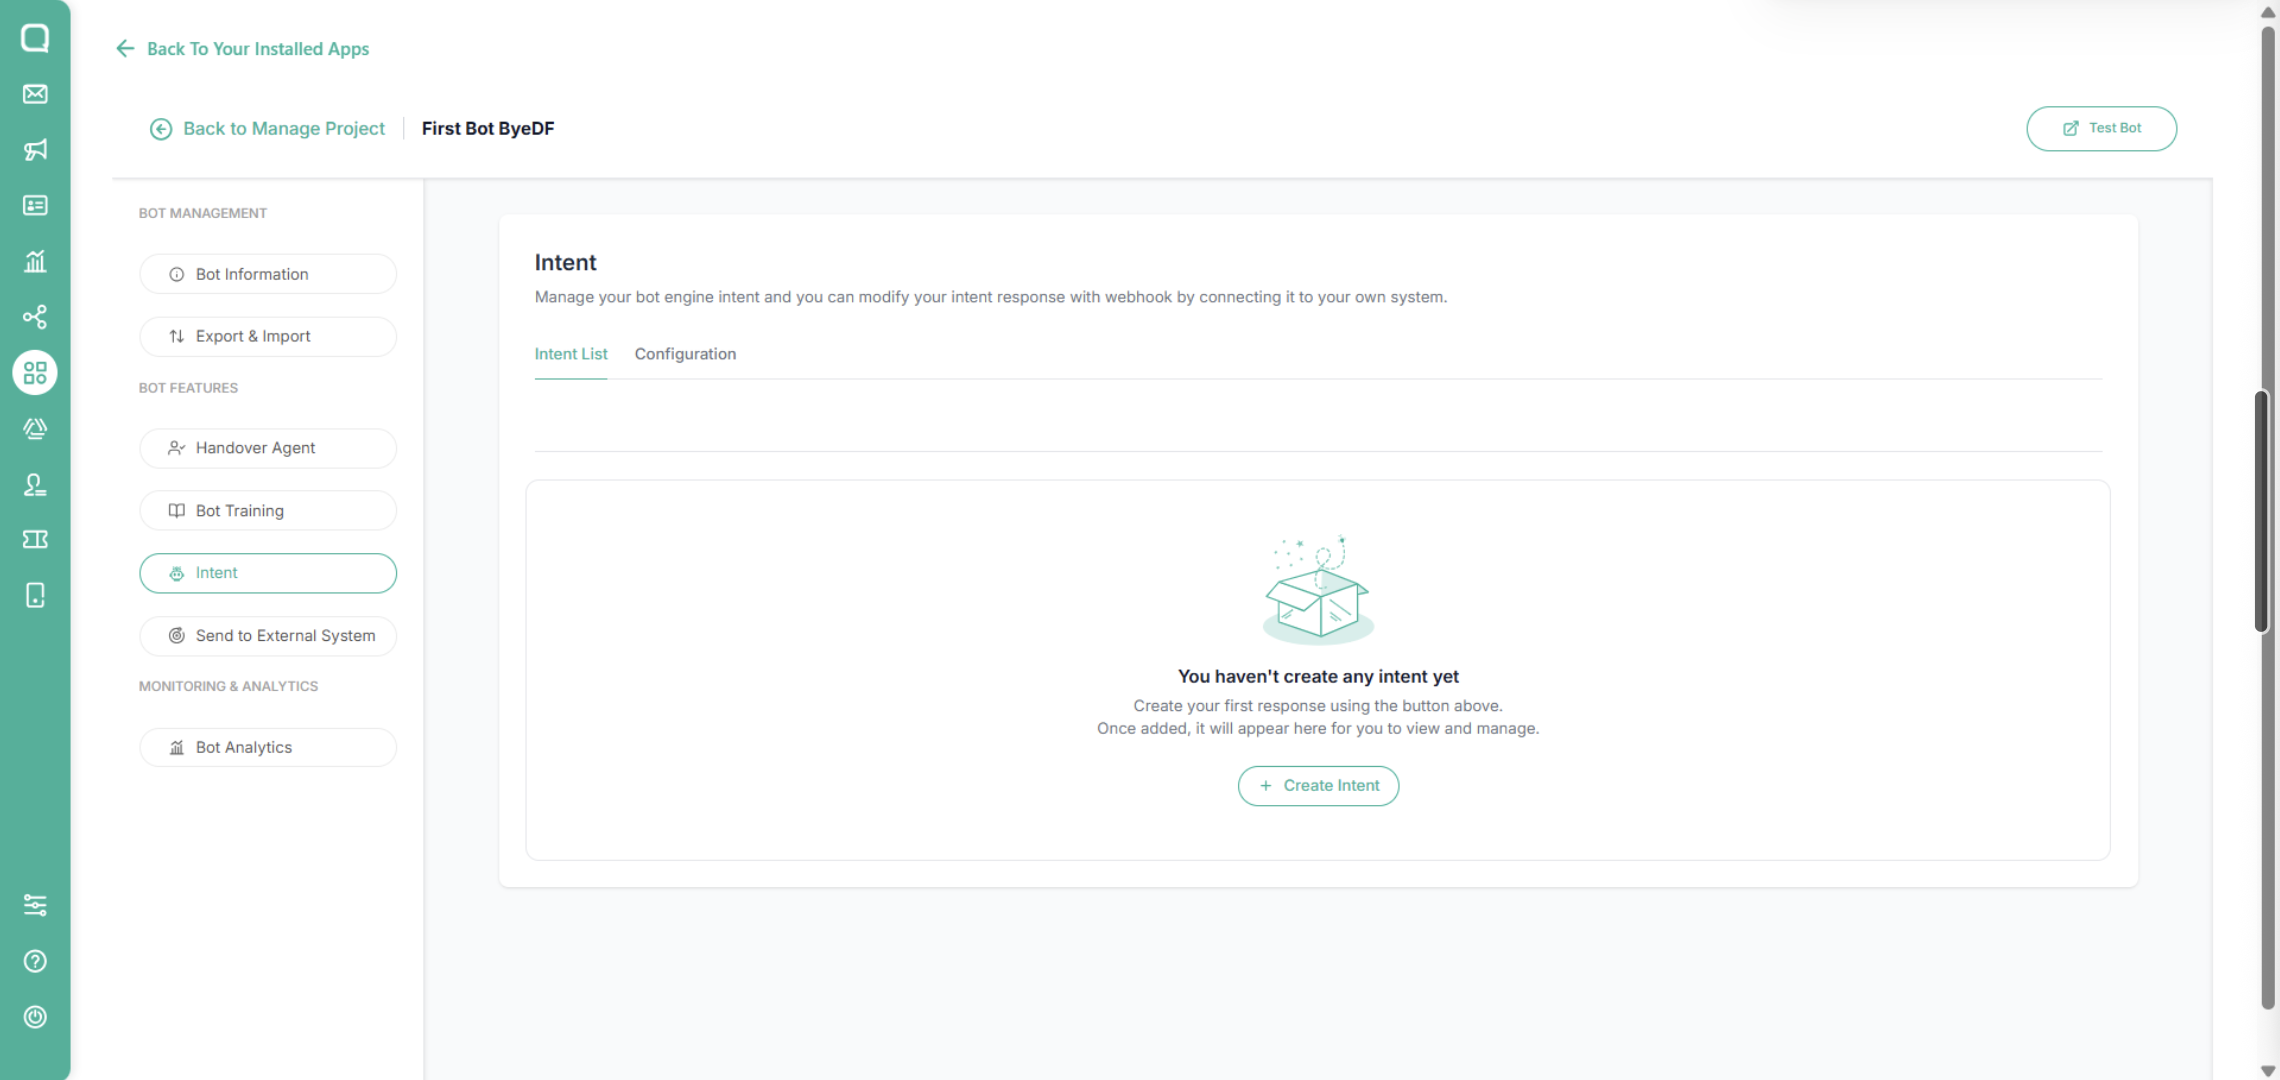
A form will appear where you can configure the intent details.
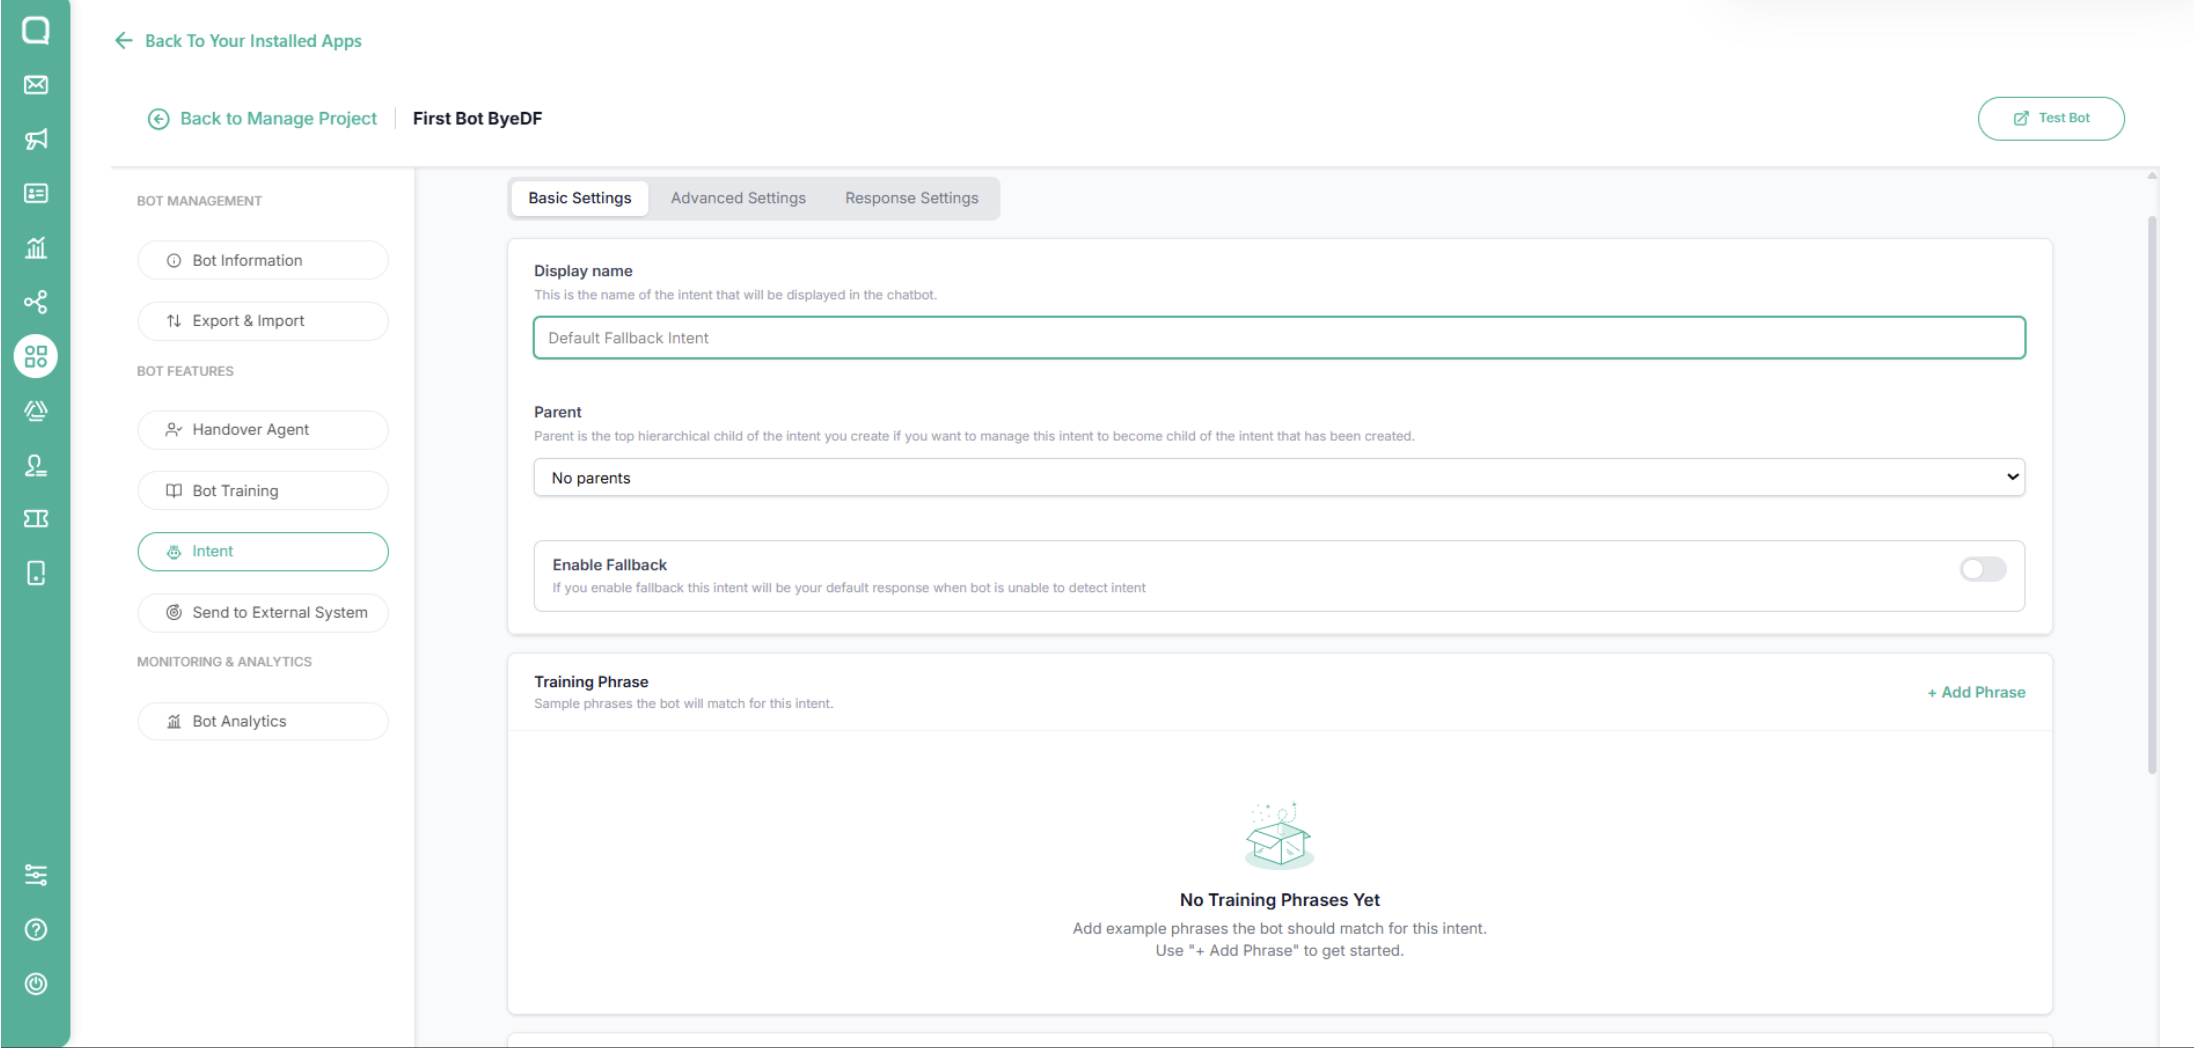
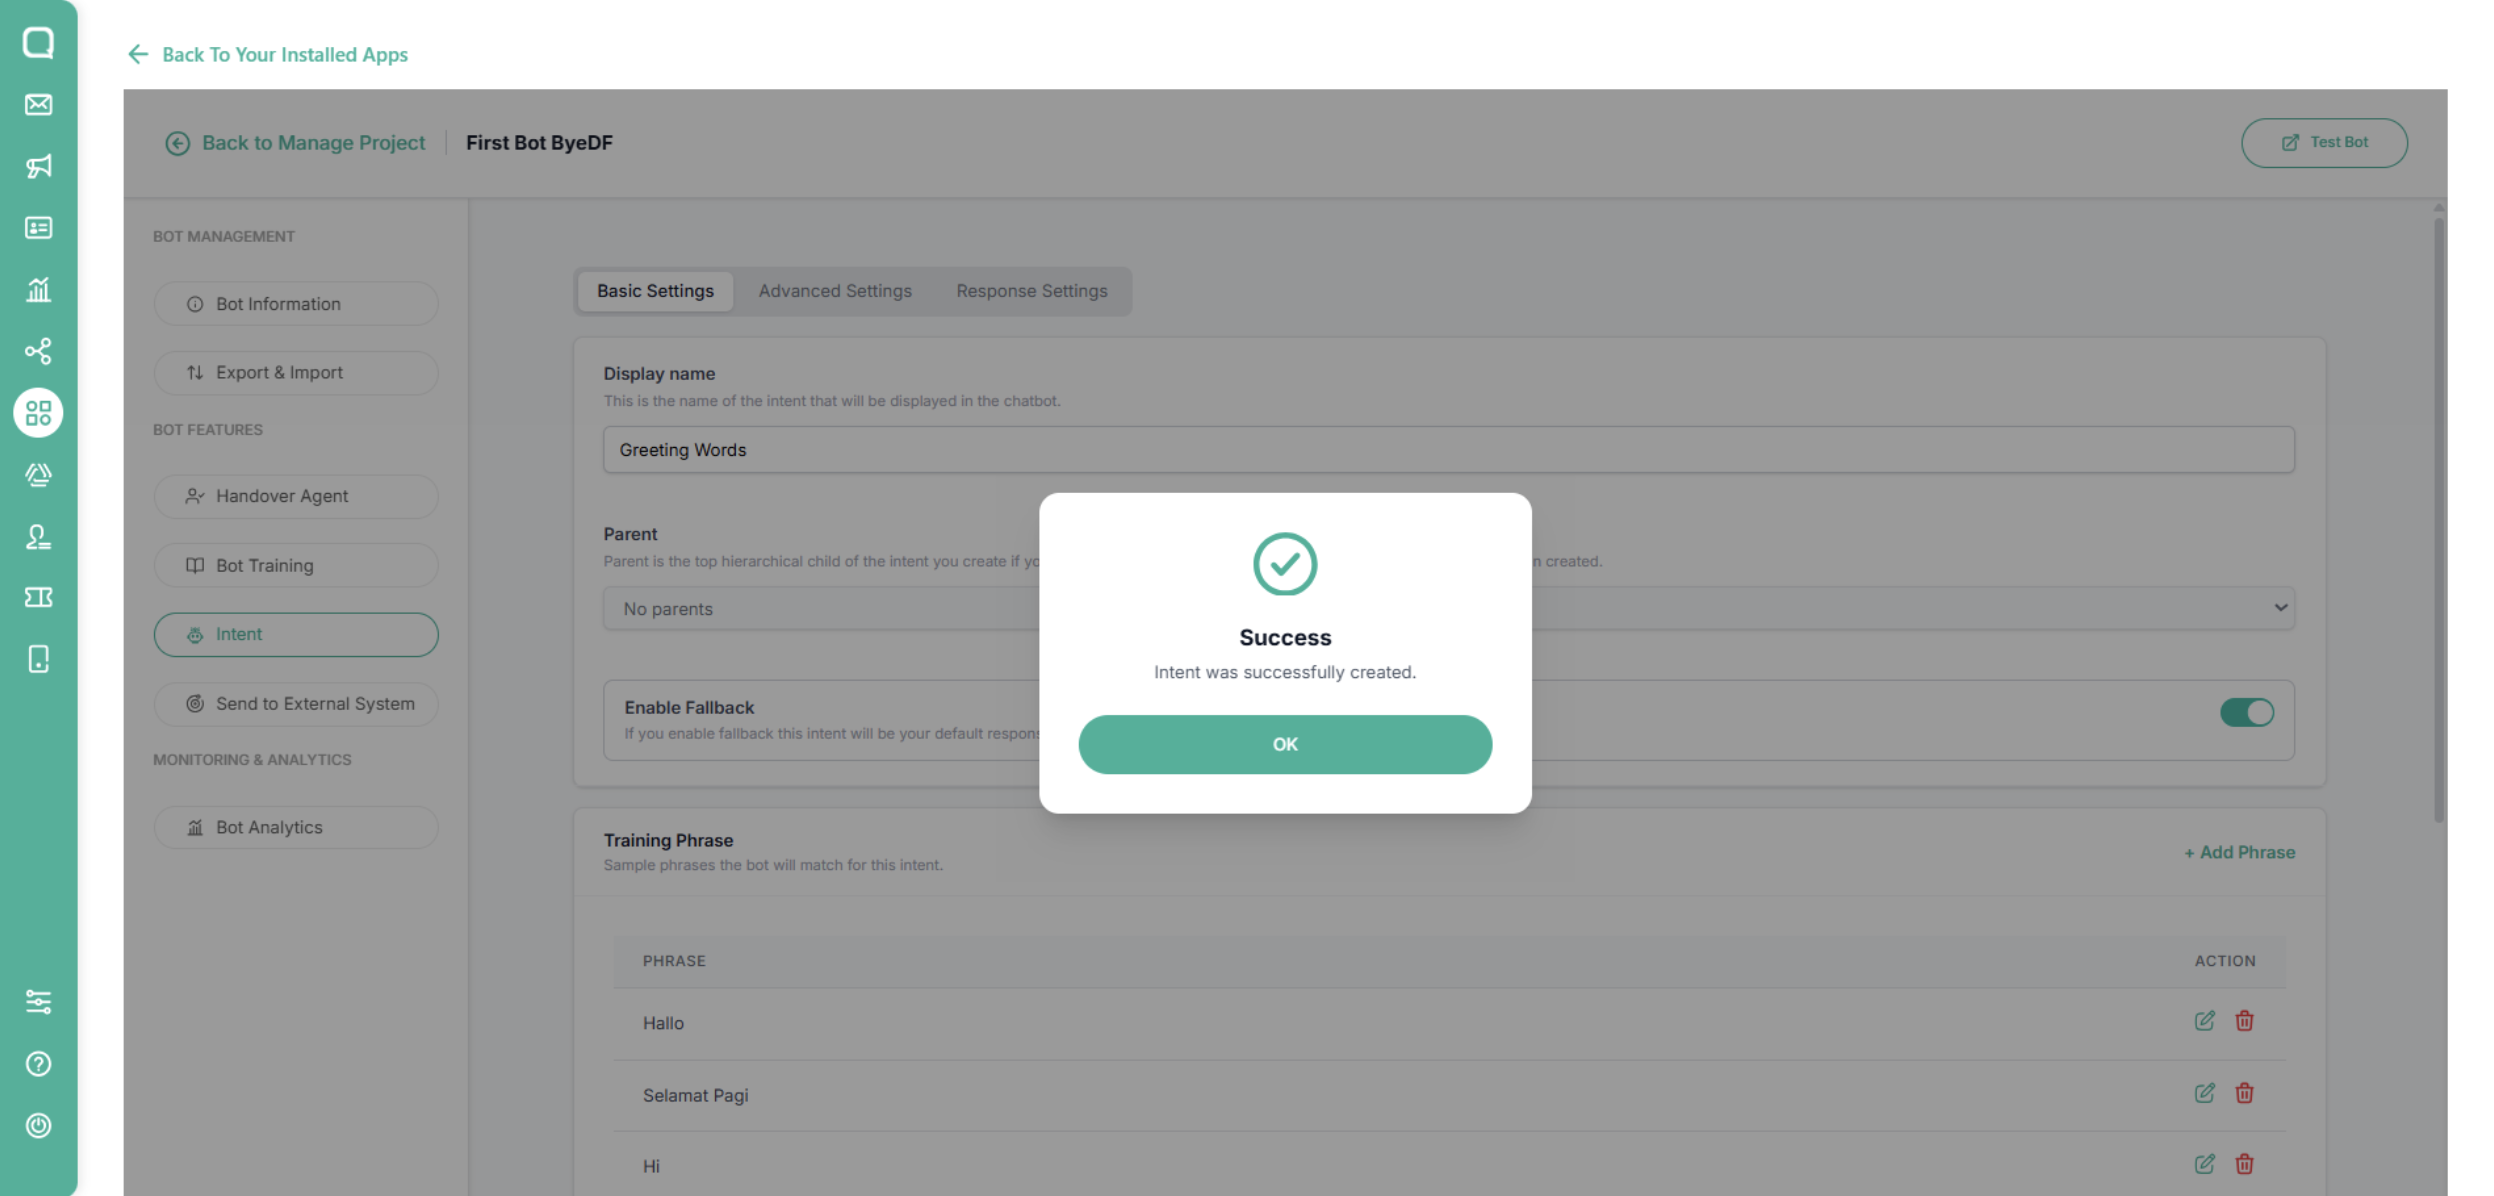
When you enable the Enable Fallback toggle, this intent will respond to any message that doesn't match other configured intents.
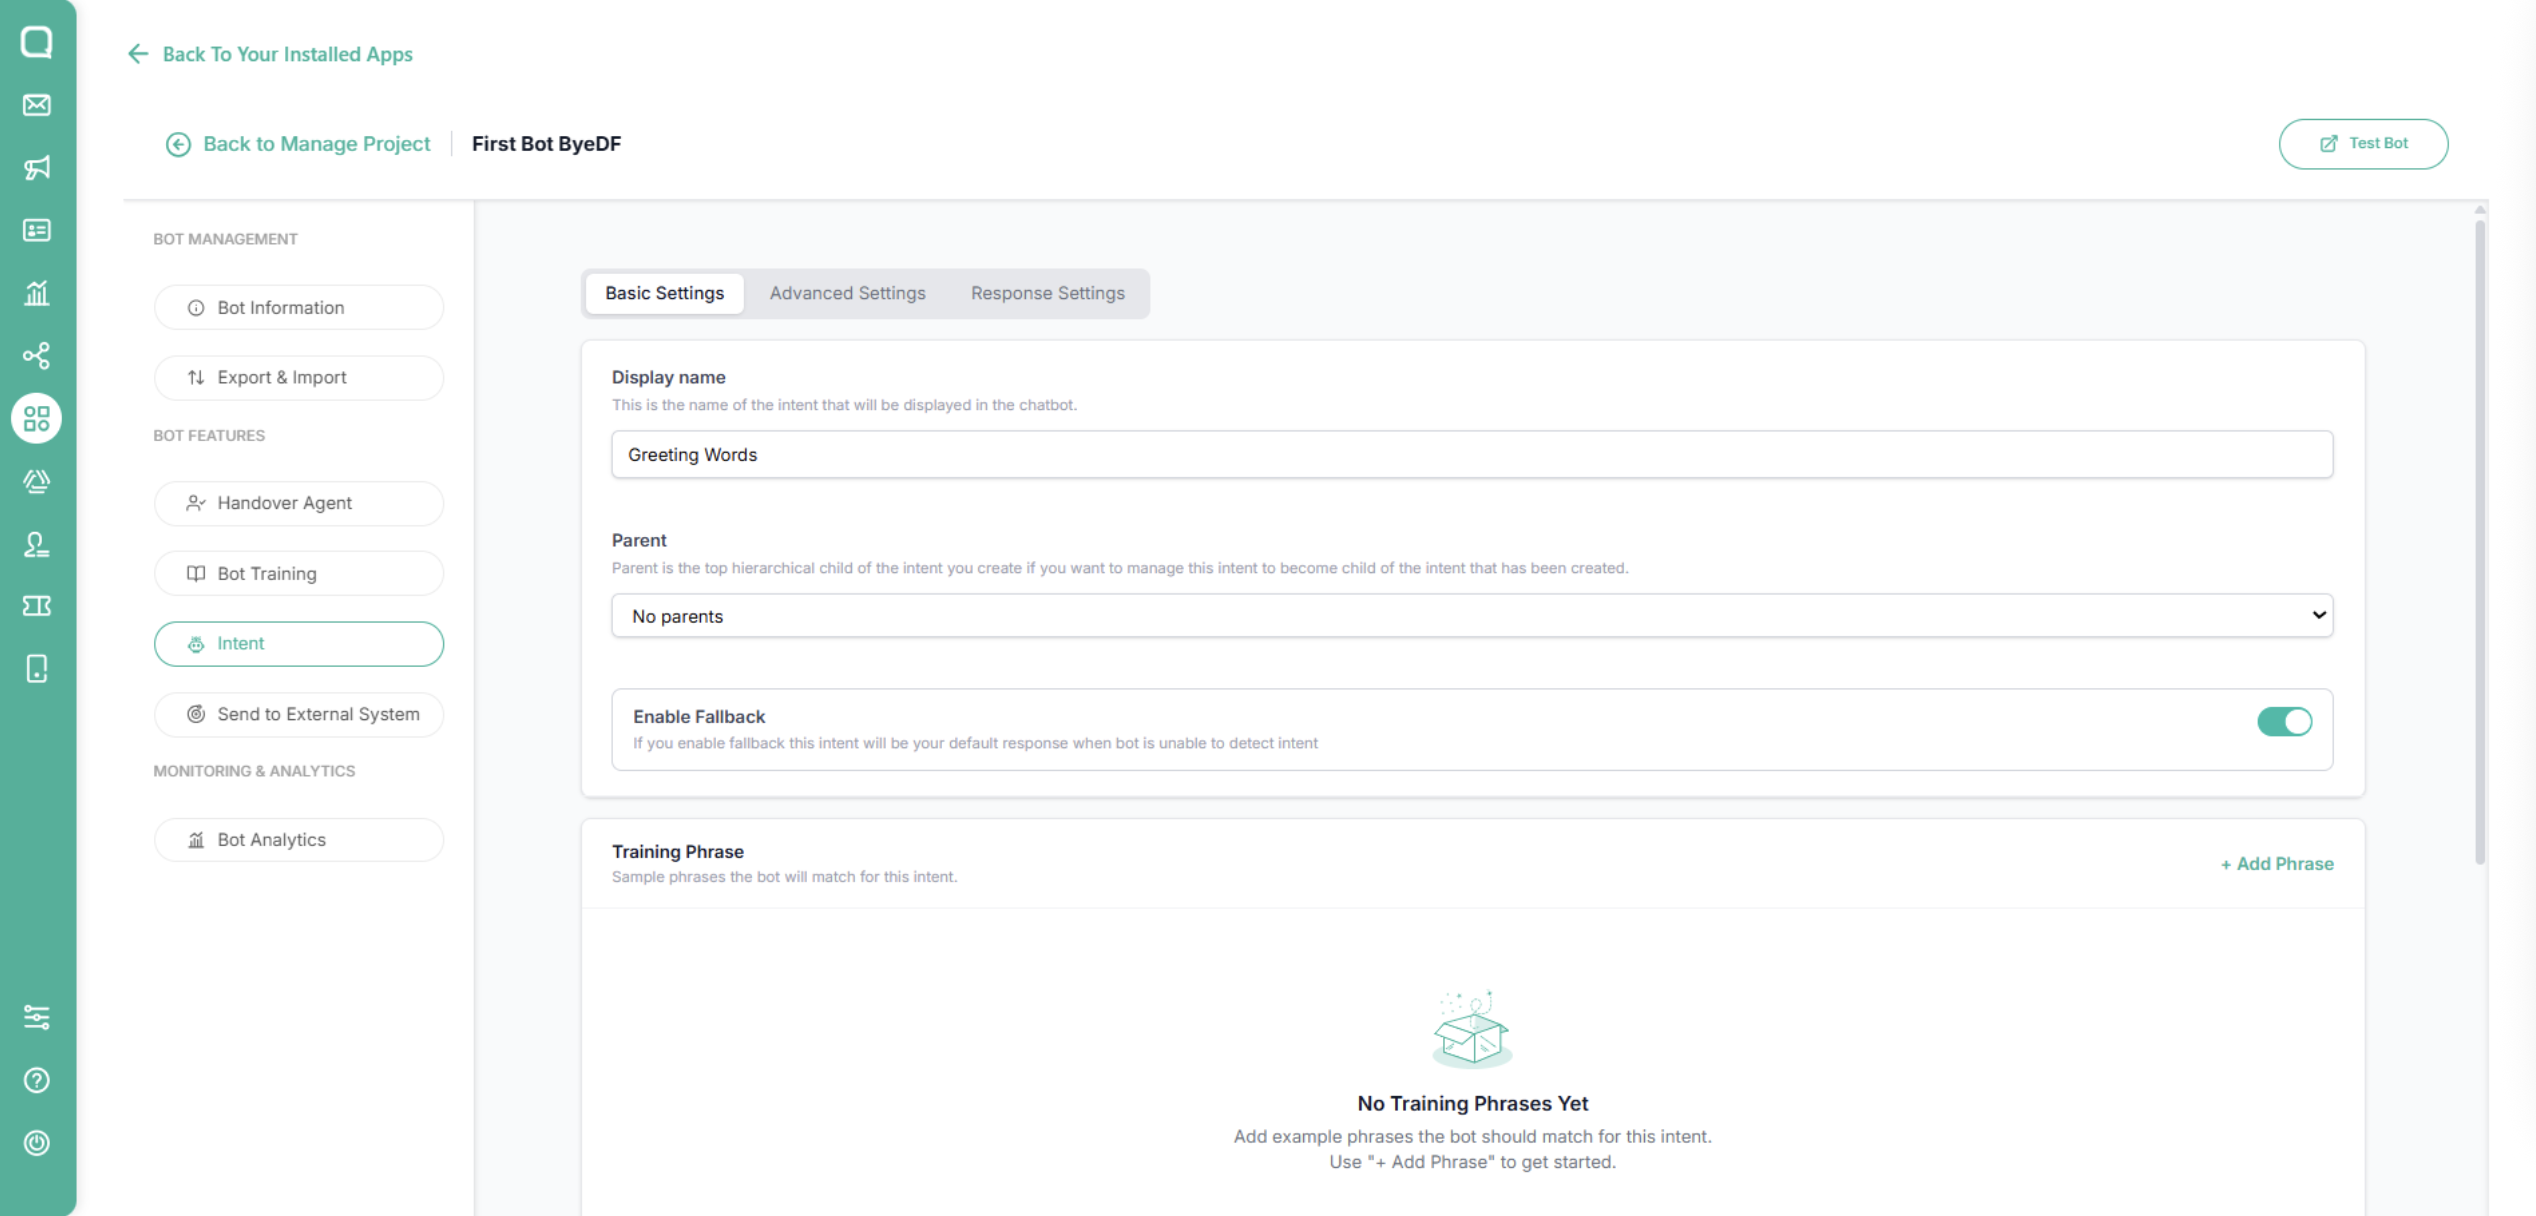
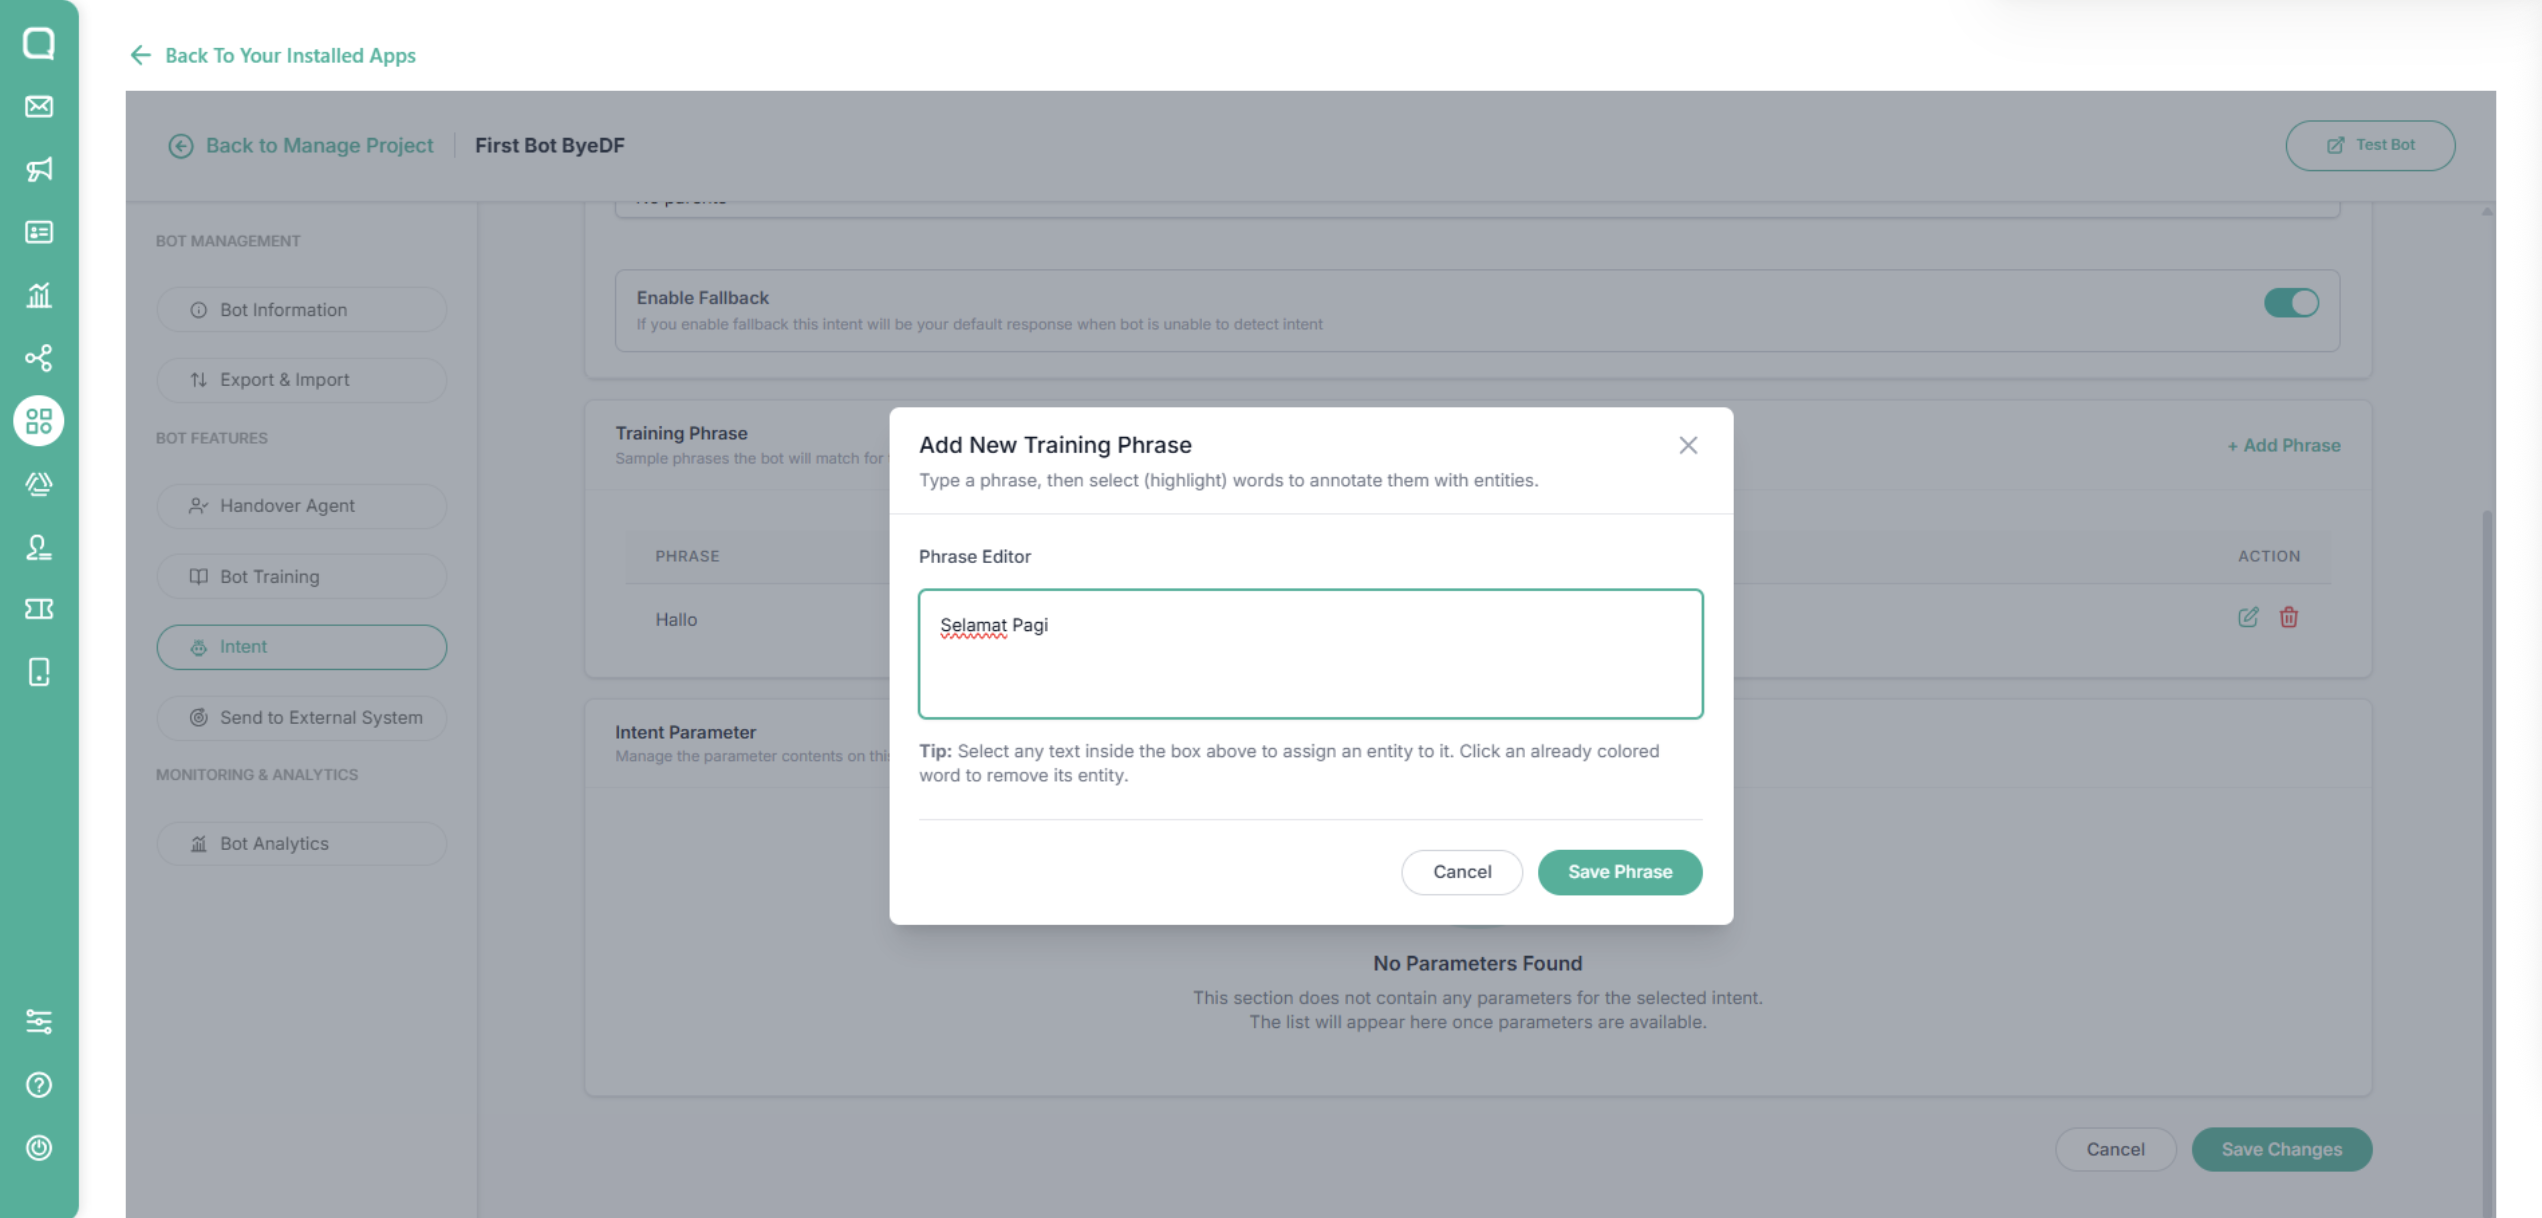
Click Add Phrase. A text field will appear where you can enter phrases that will trigger this intent.
Click Save Changes to save the intent.
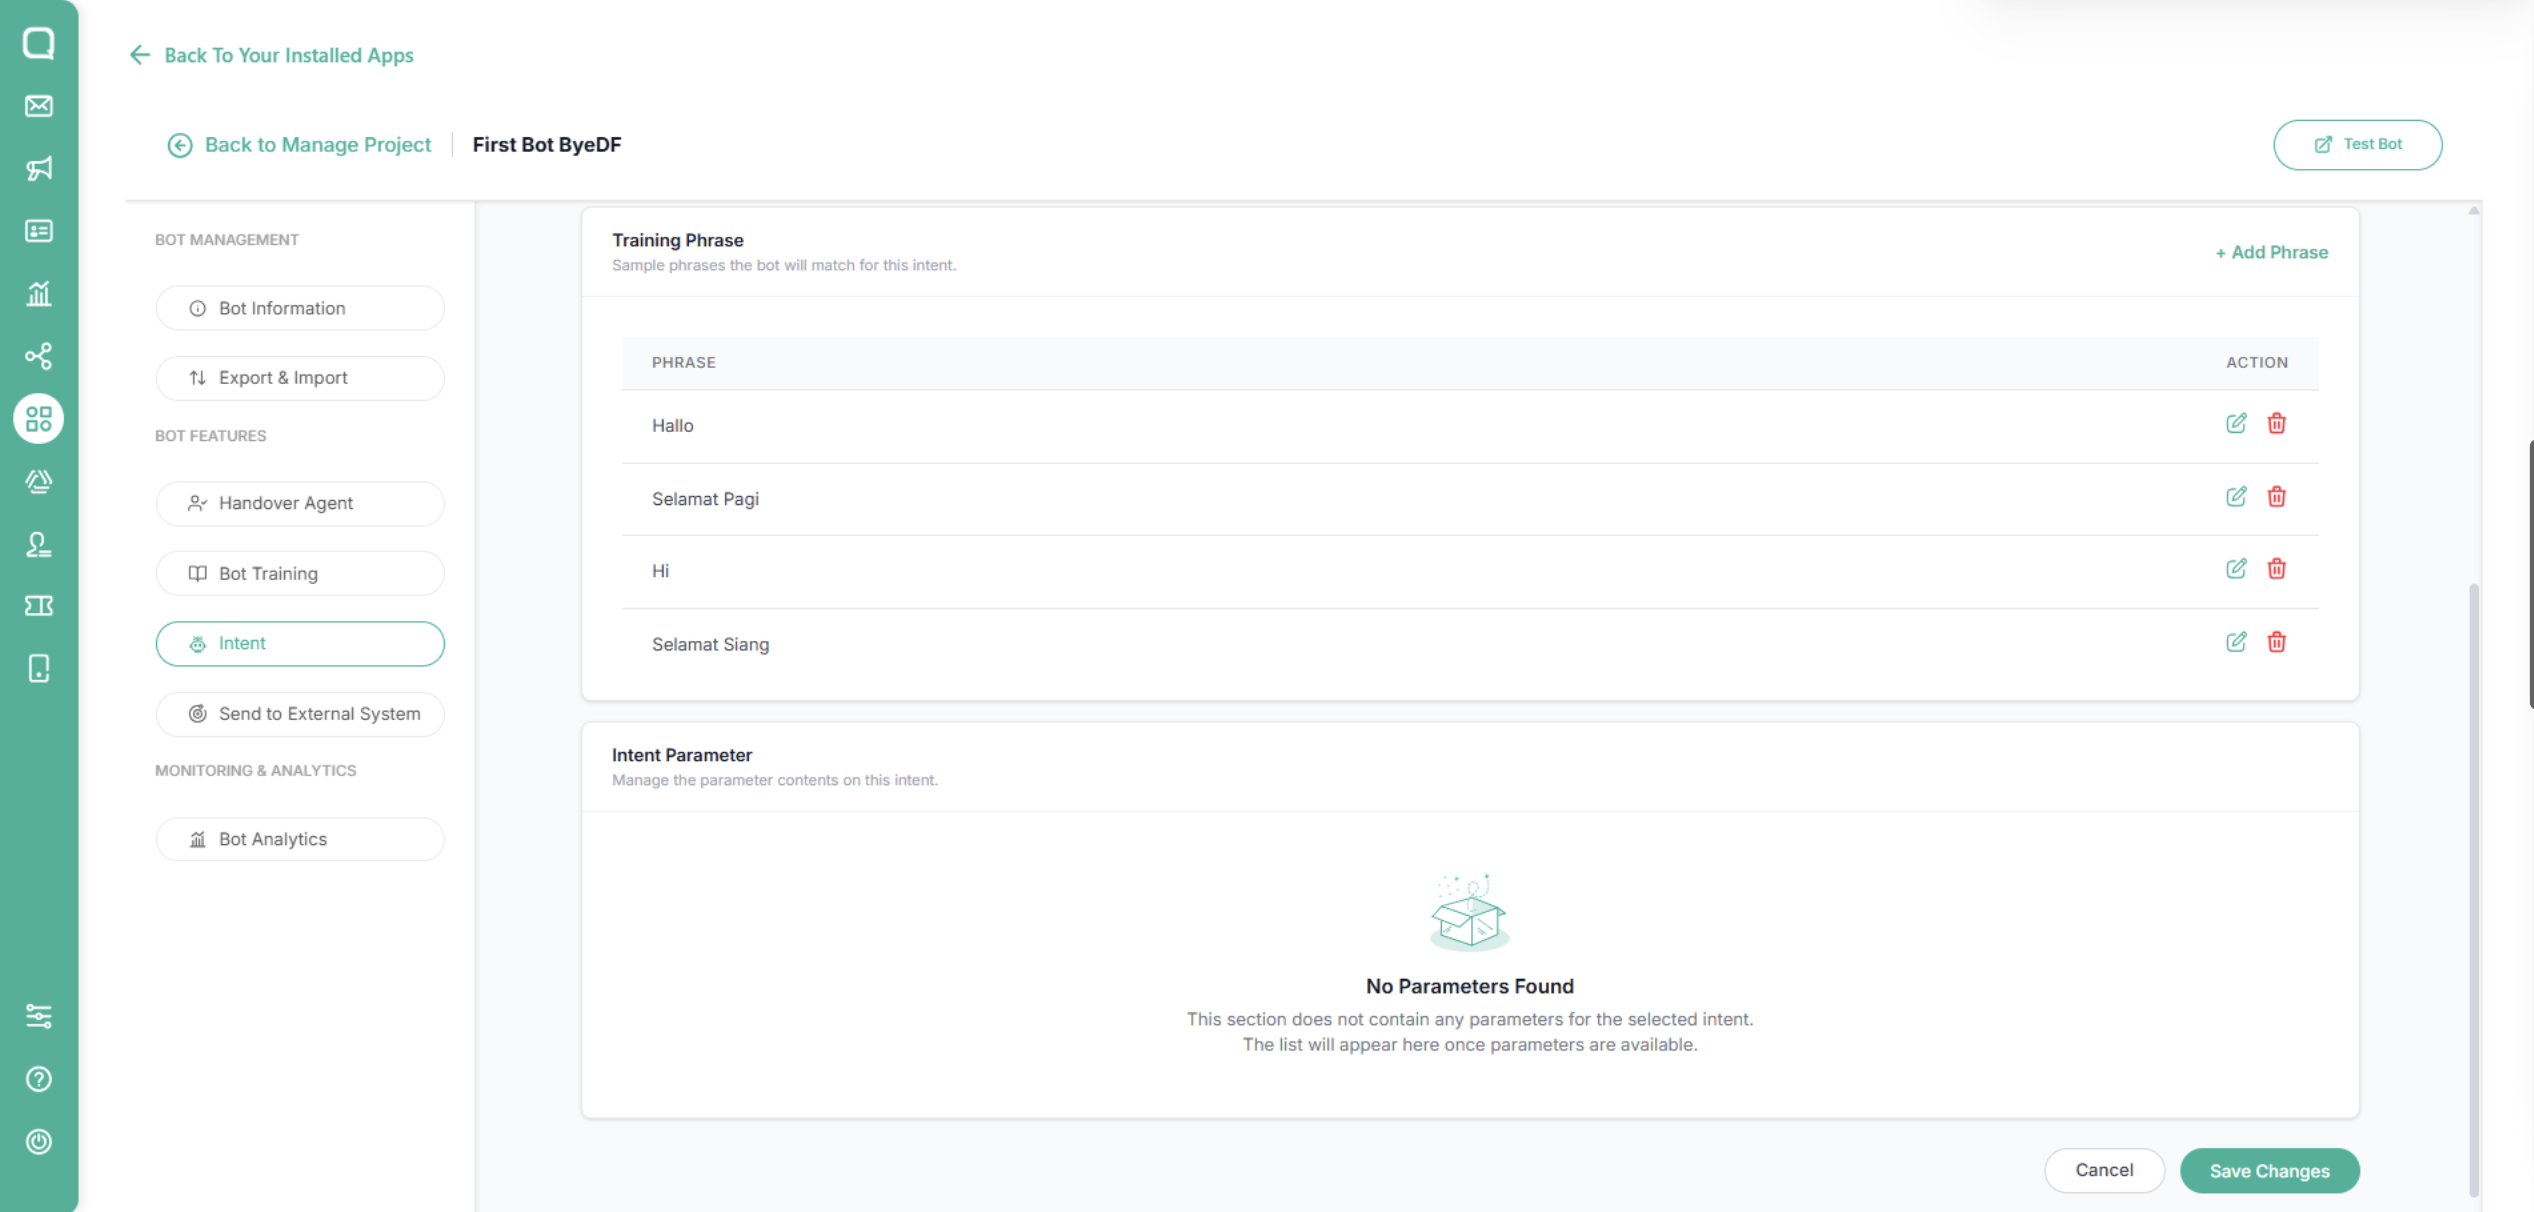
Your intent has been successfully created. Click OK to close this popup.
Advance Settings
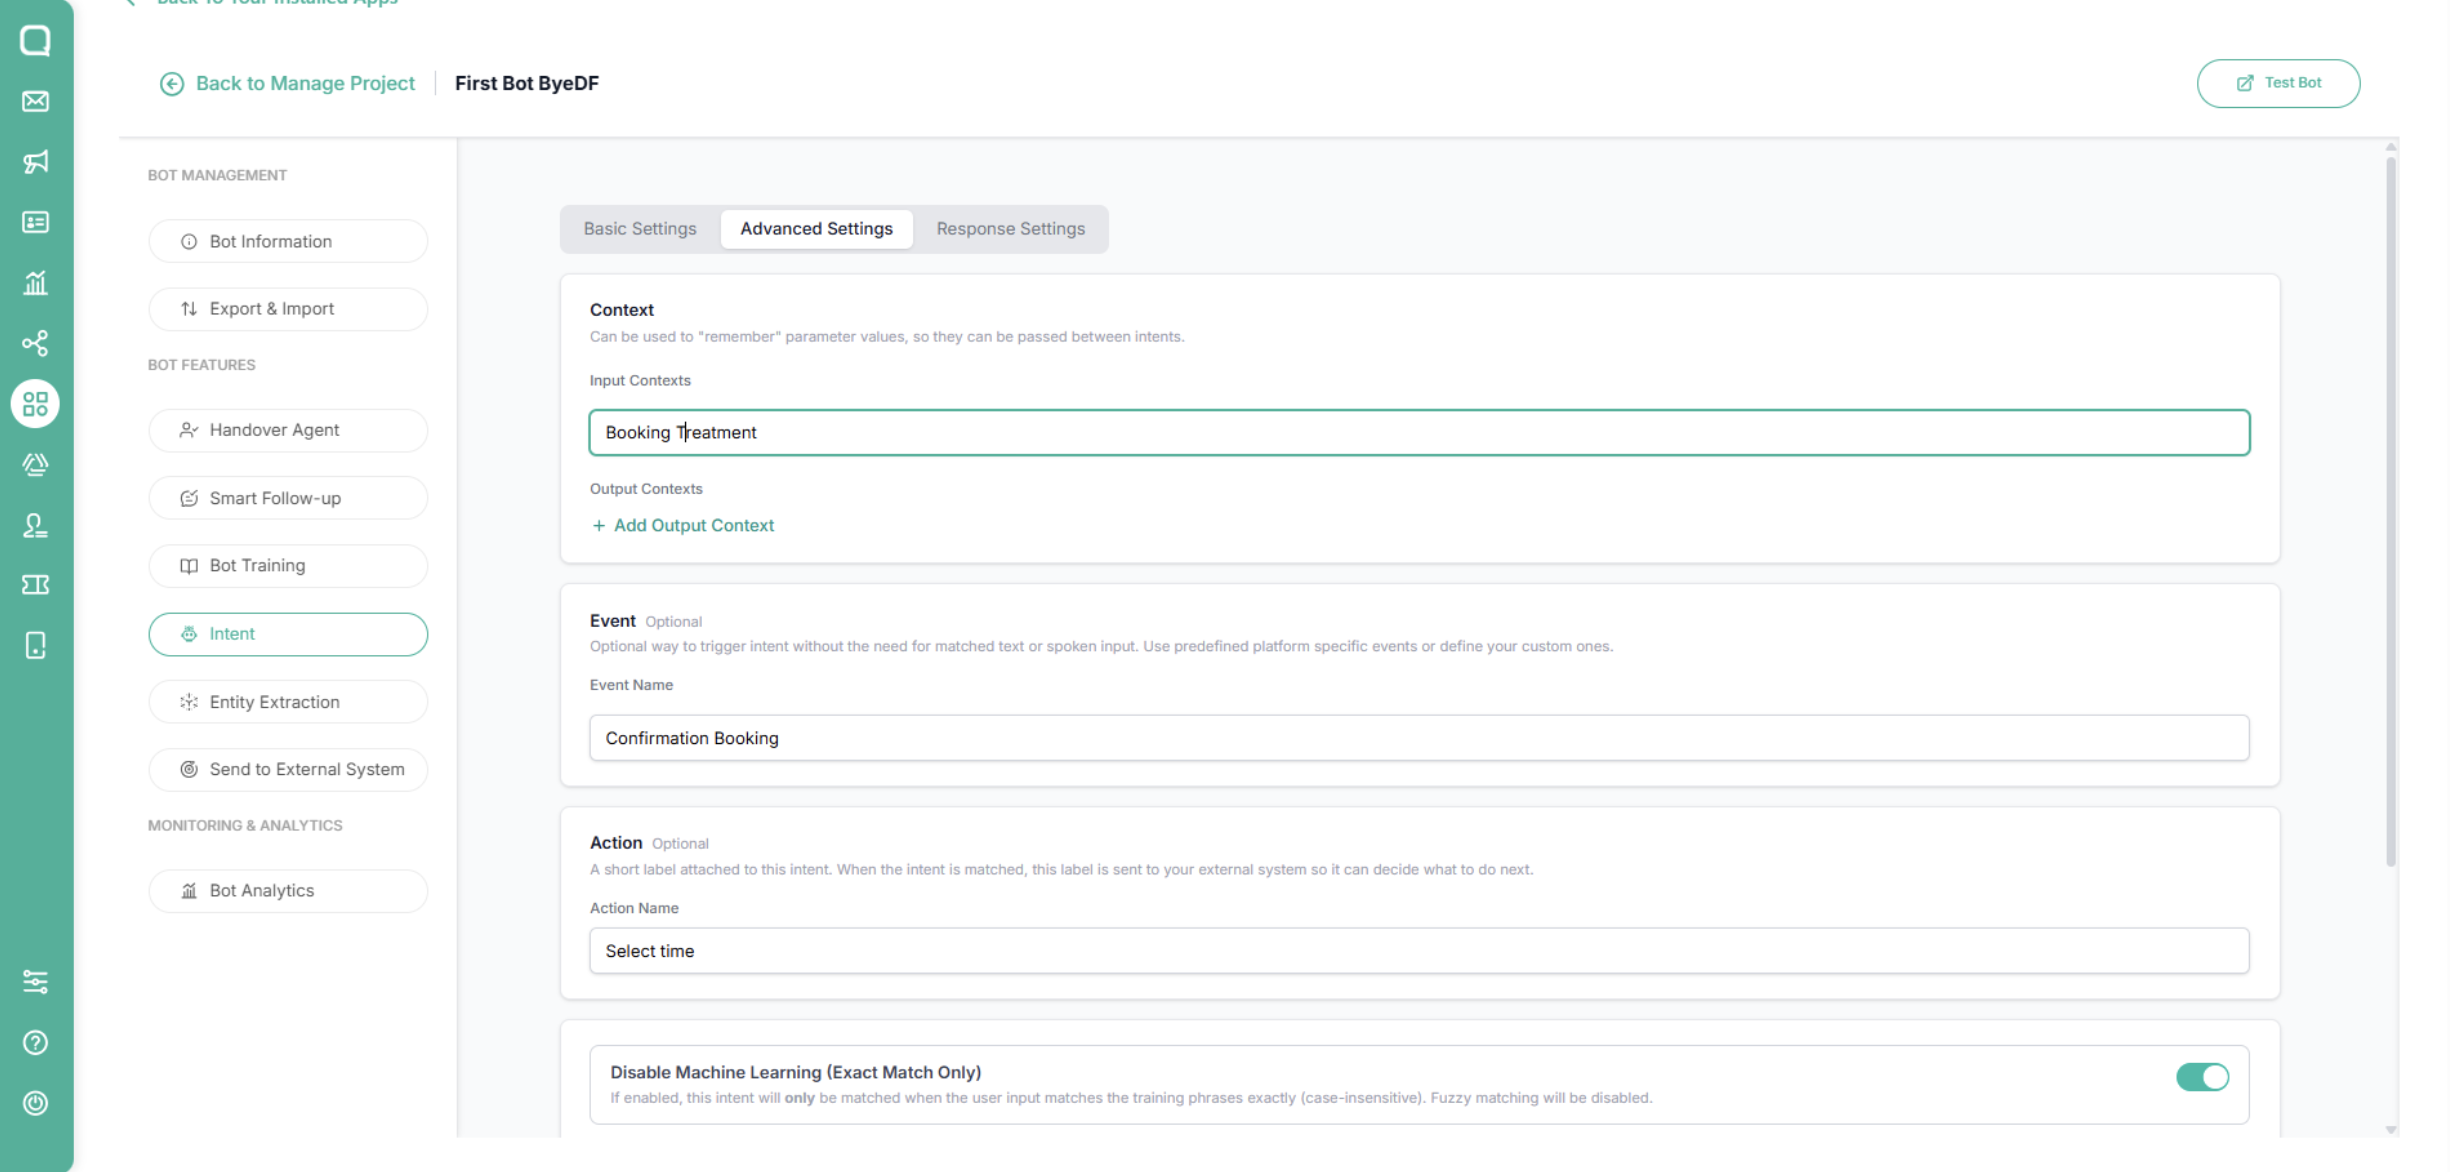
Open the Advanced Settings section and fill in the fields according to your needs.
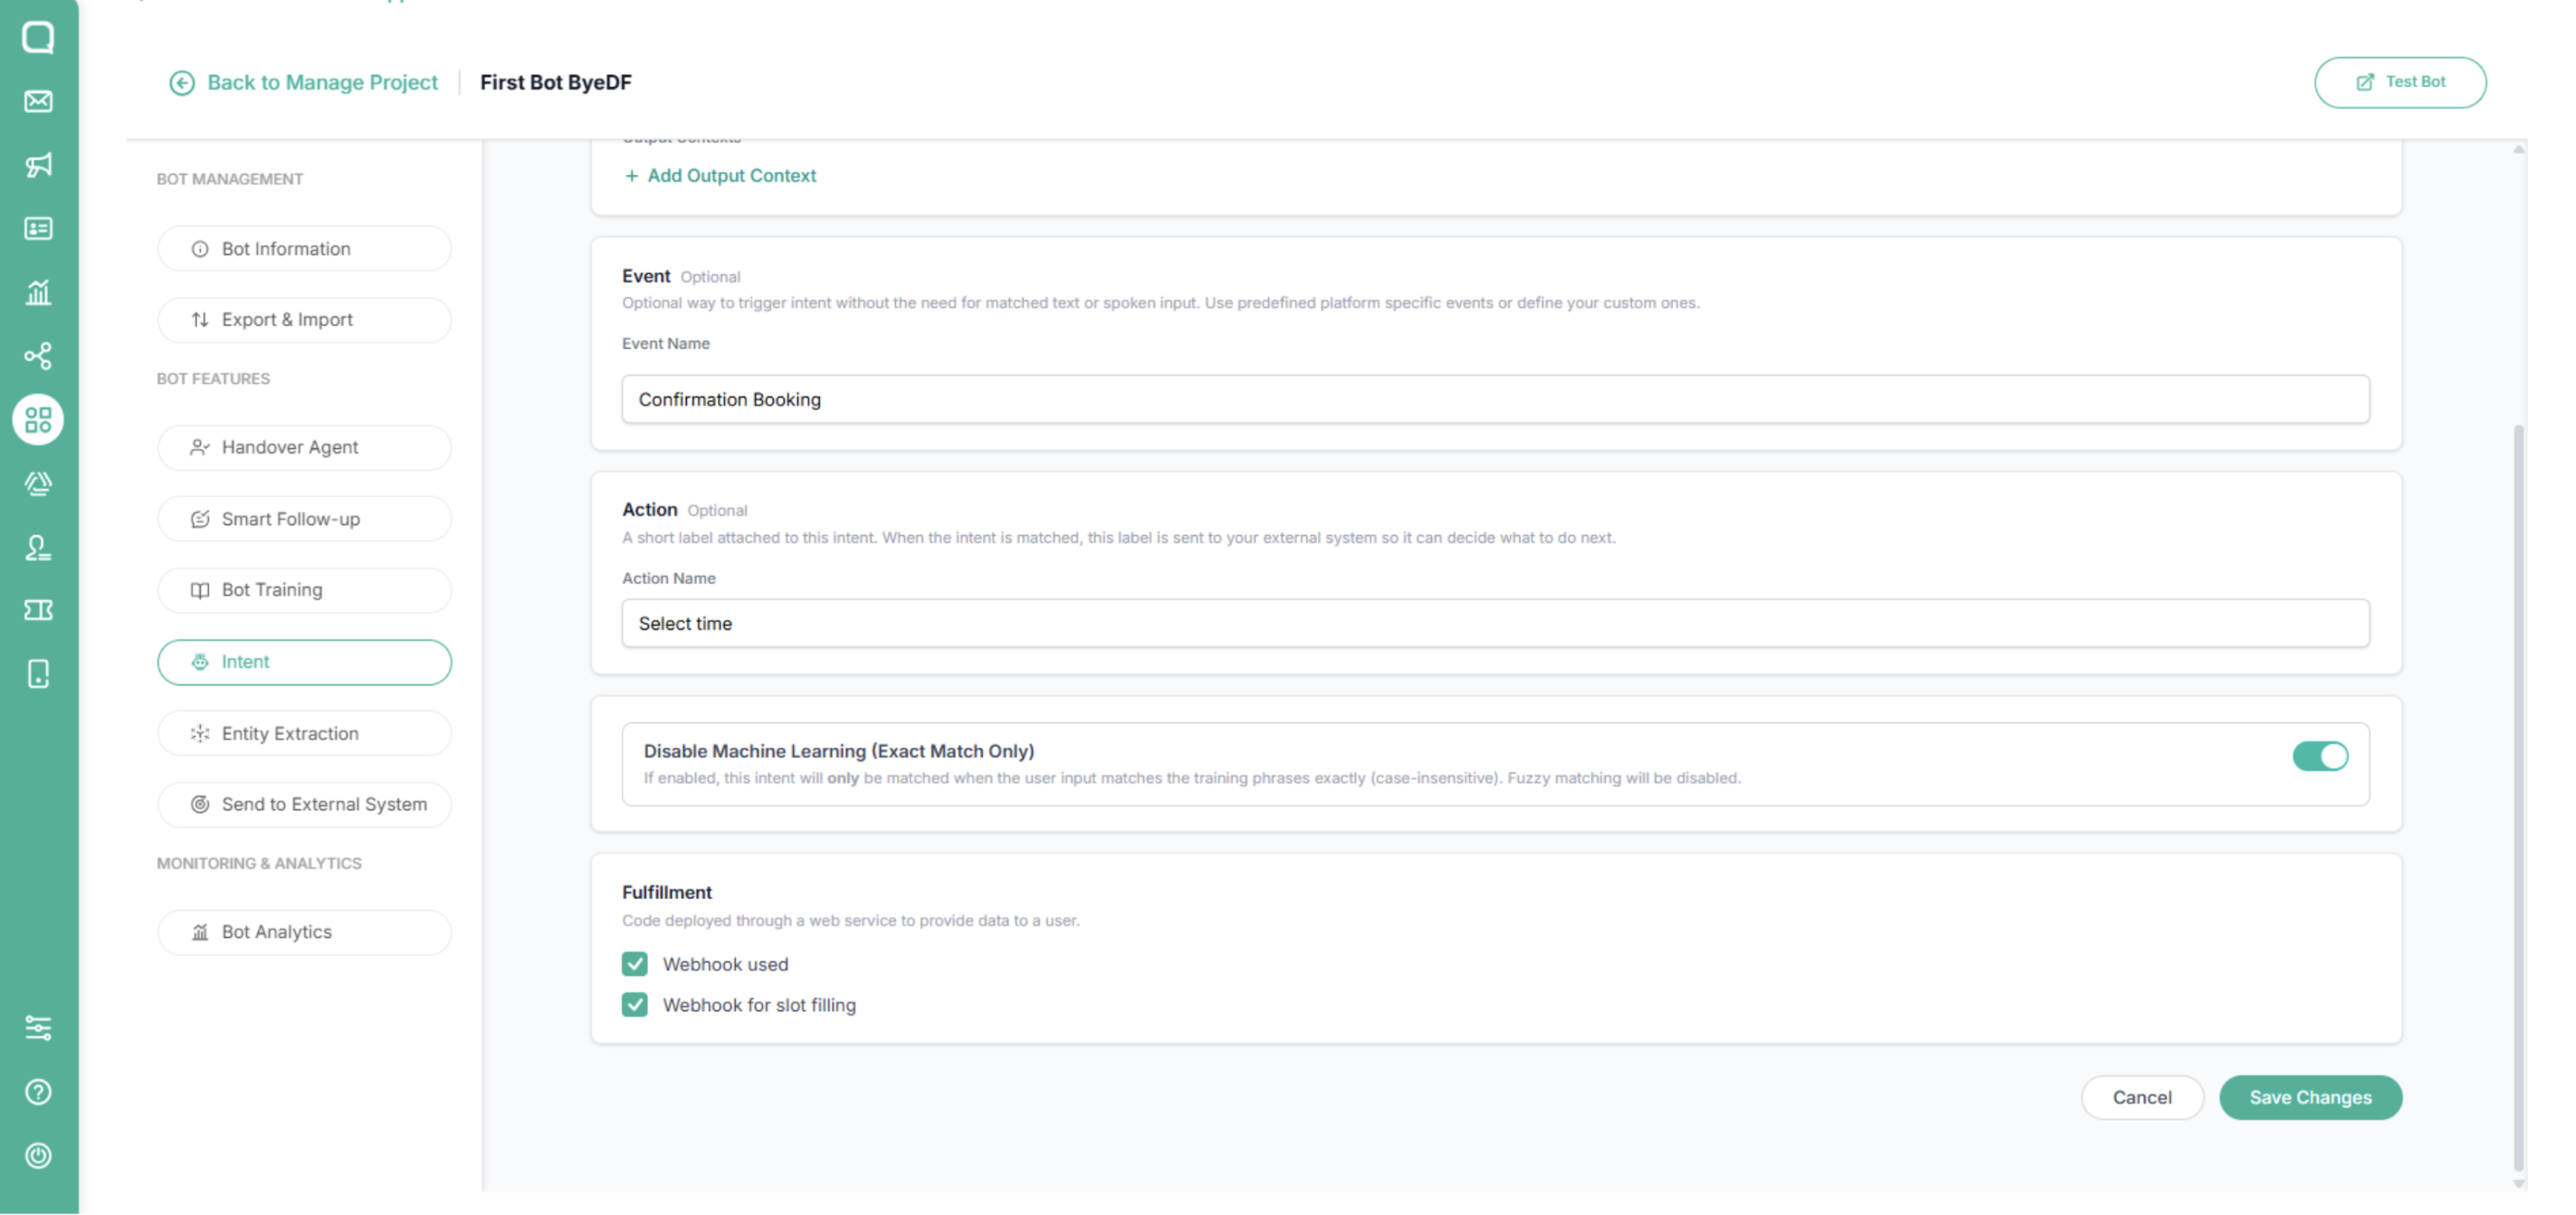
In this setting, you can fill in the check box for service requirements that require Webhooks. Then click Save Changes
Response Setting
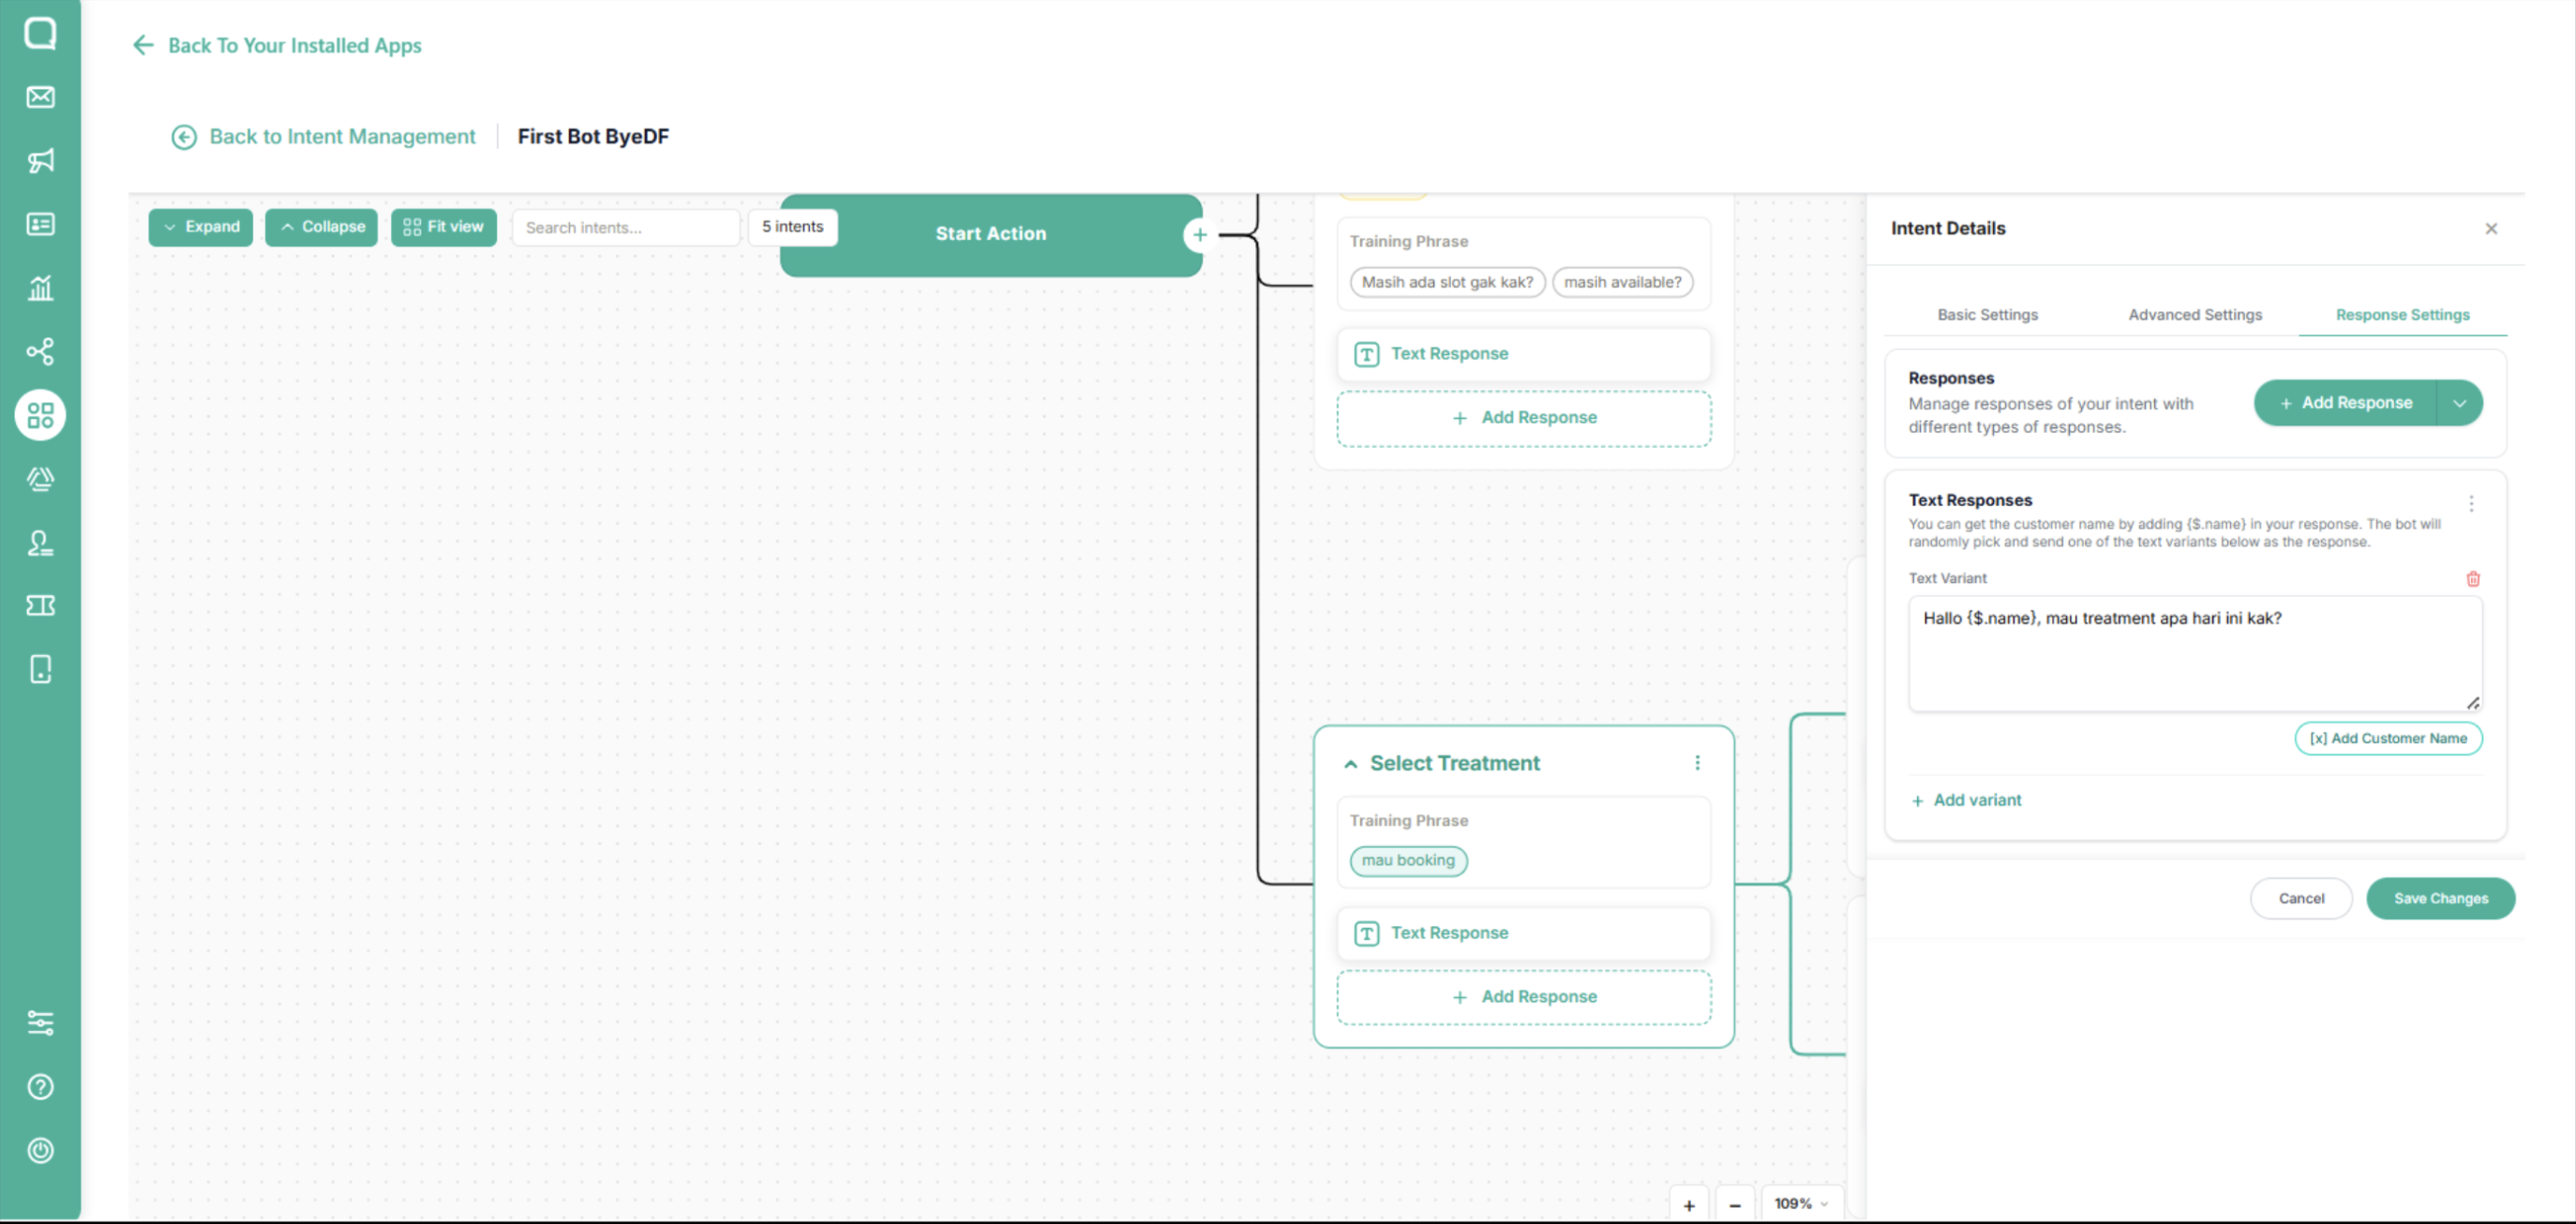
To add a new Response, click Add Response.
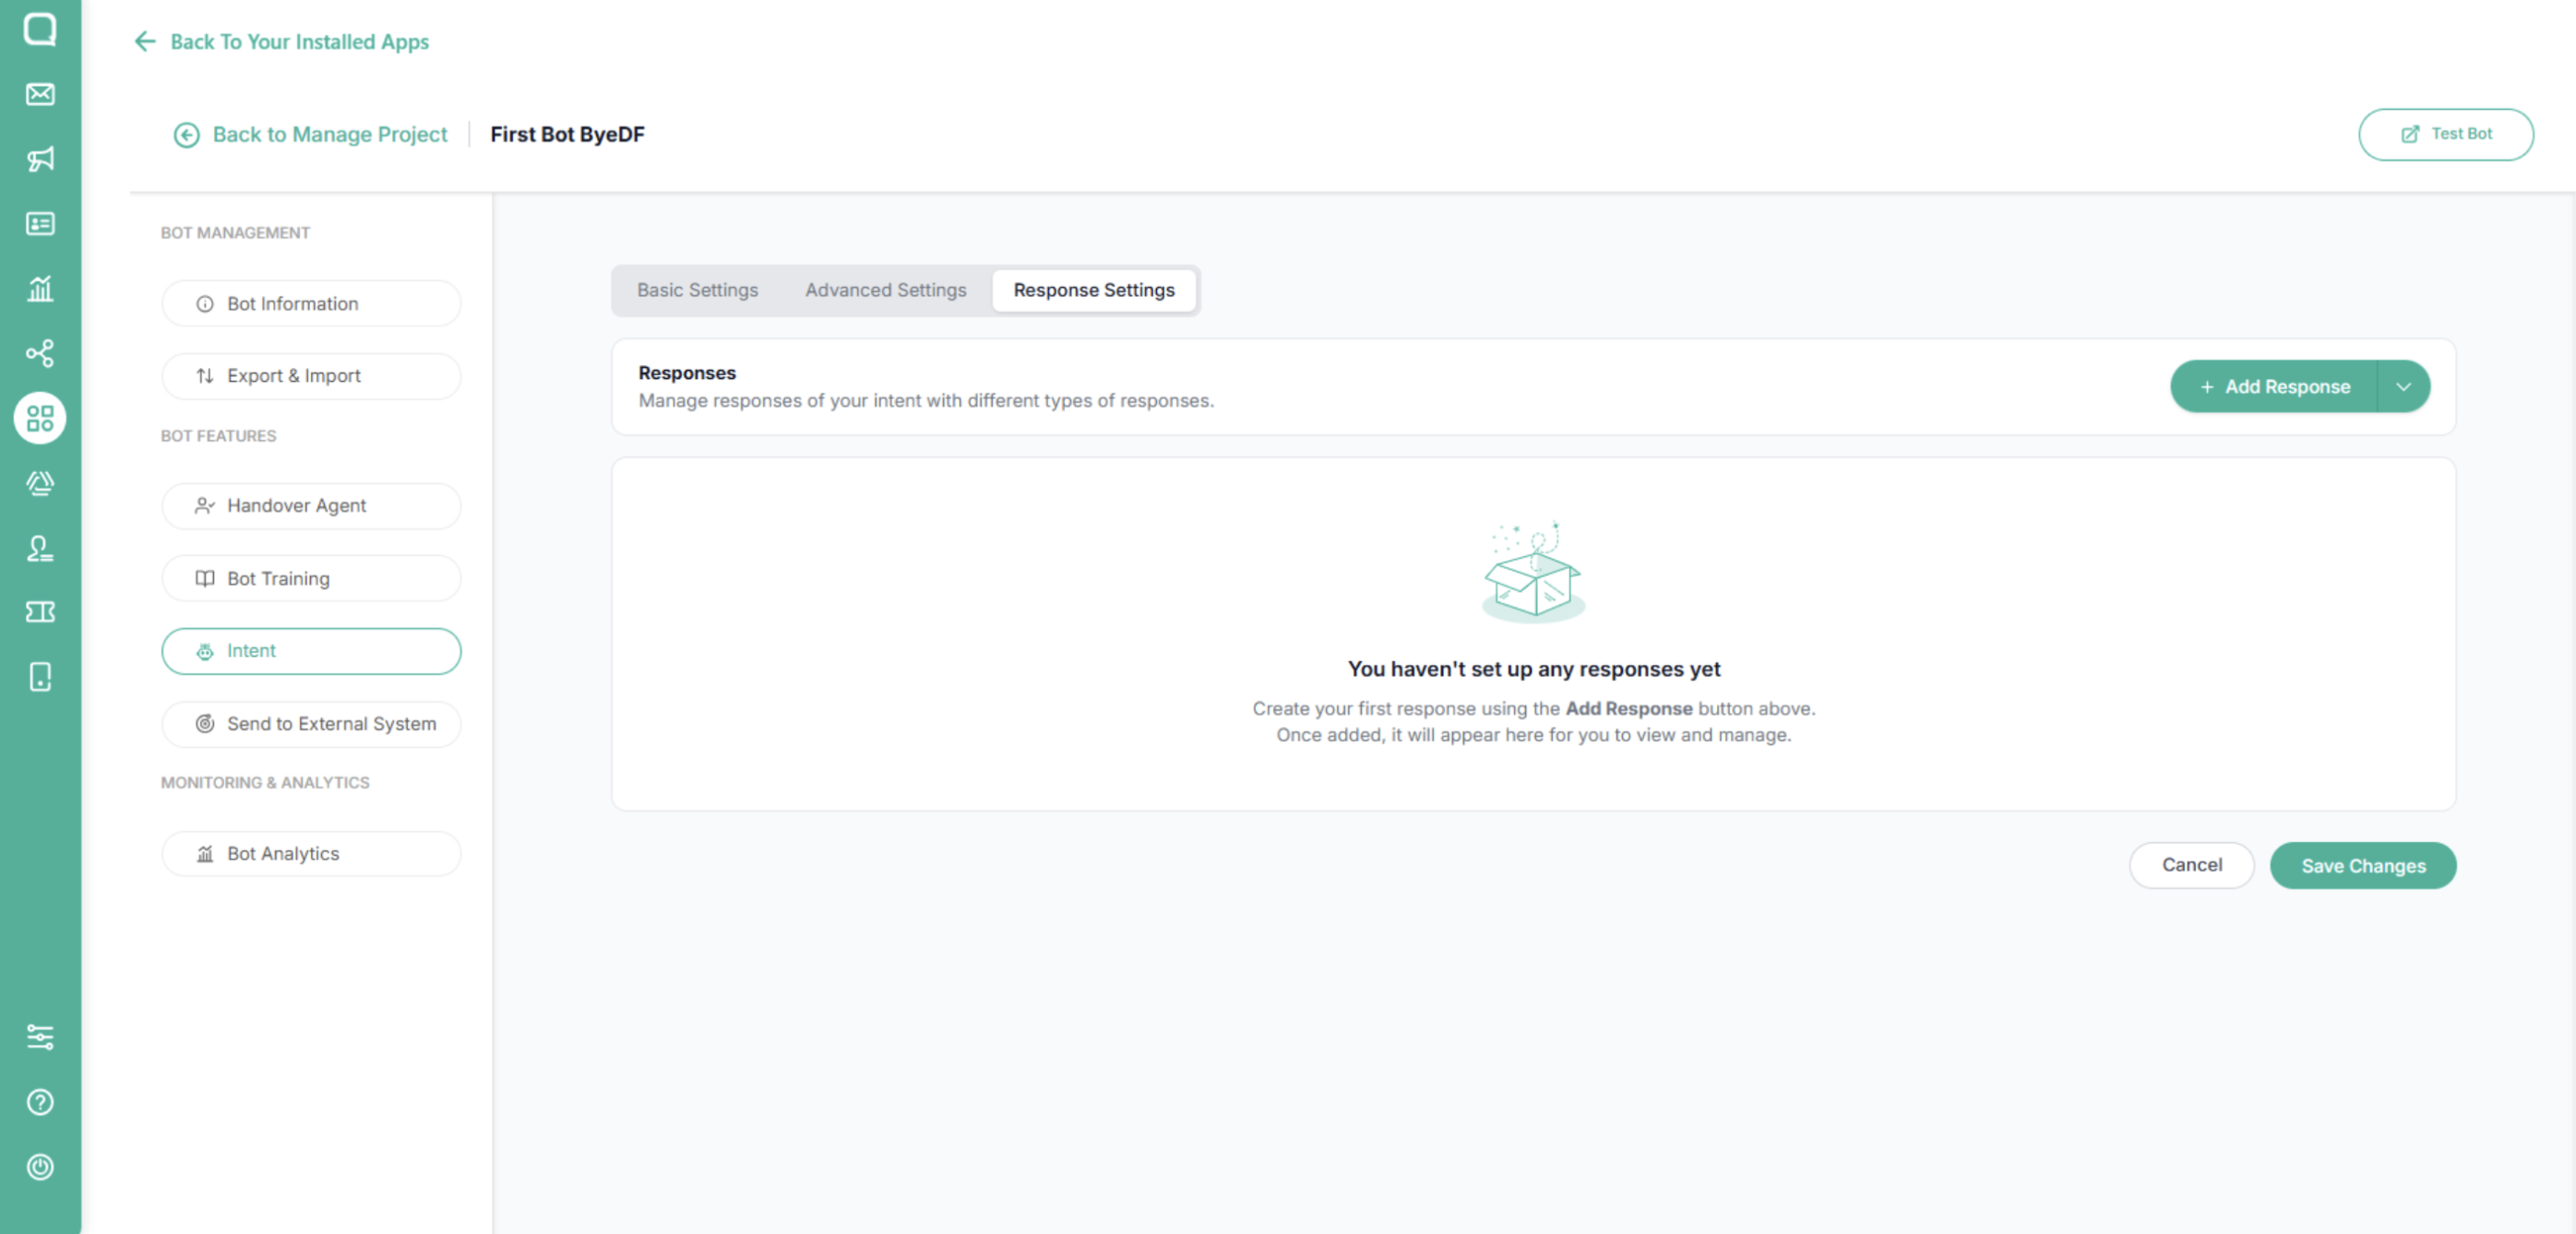
Write the message you want your bot to reply with.
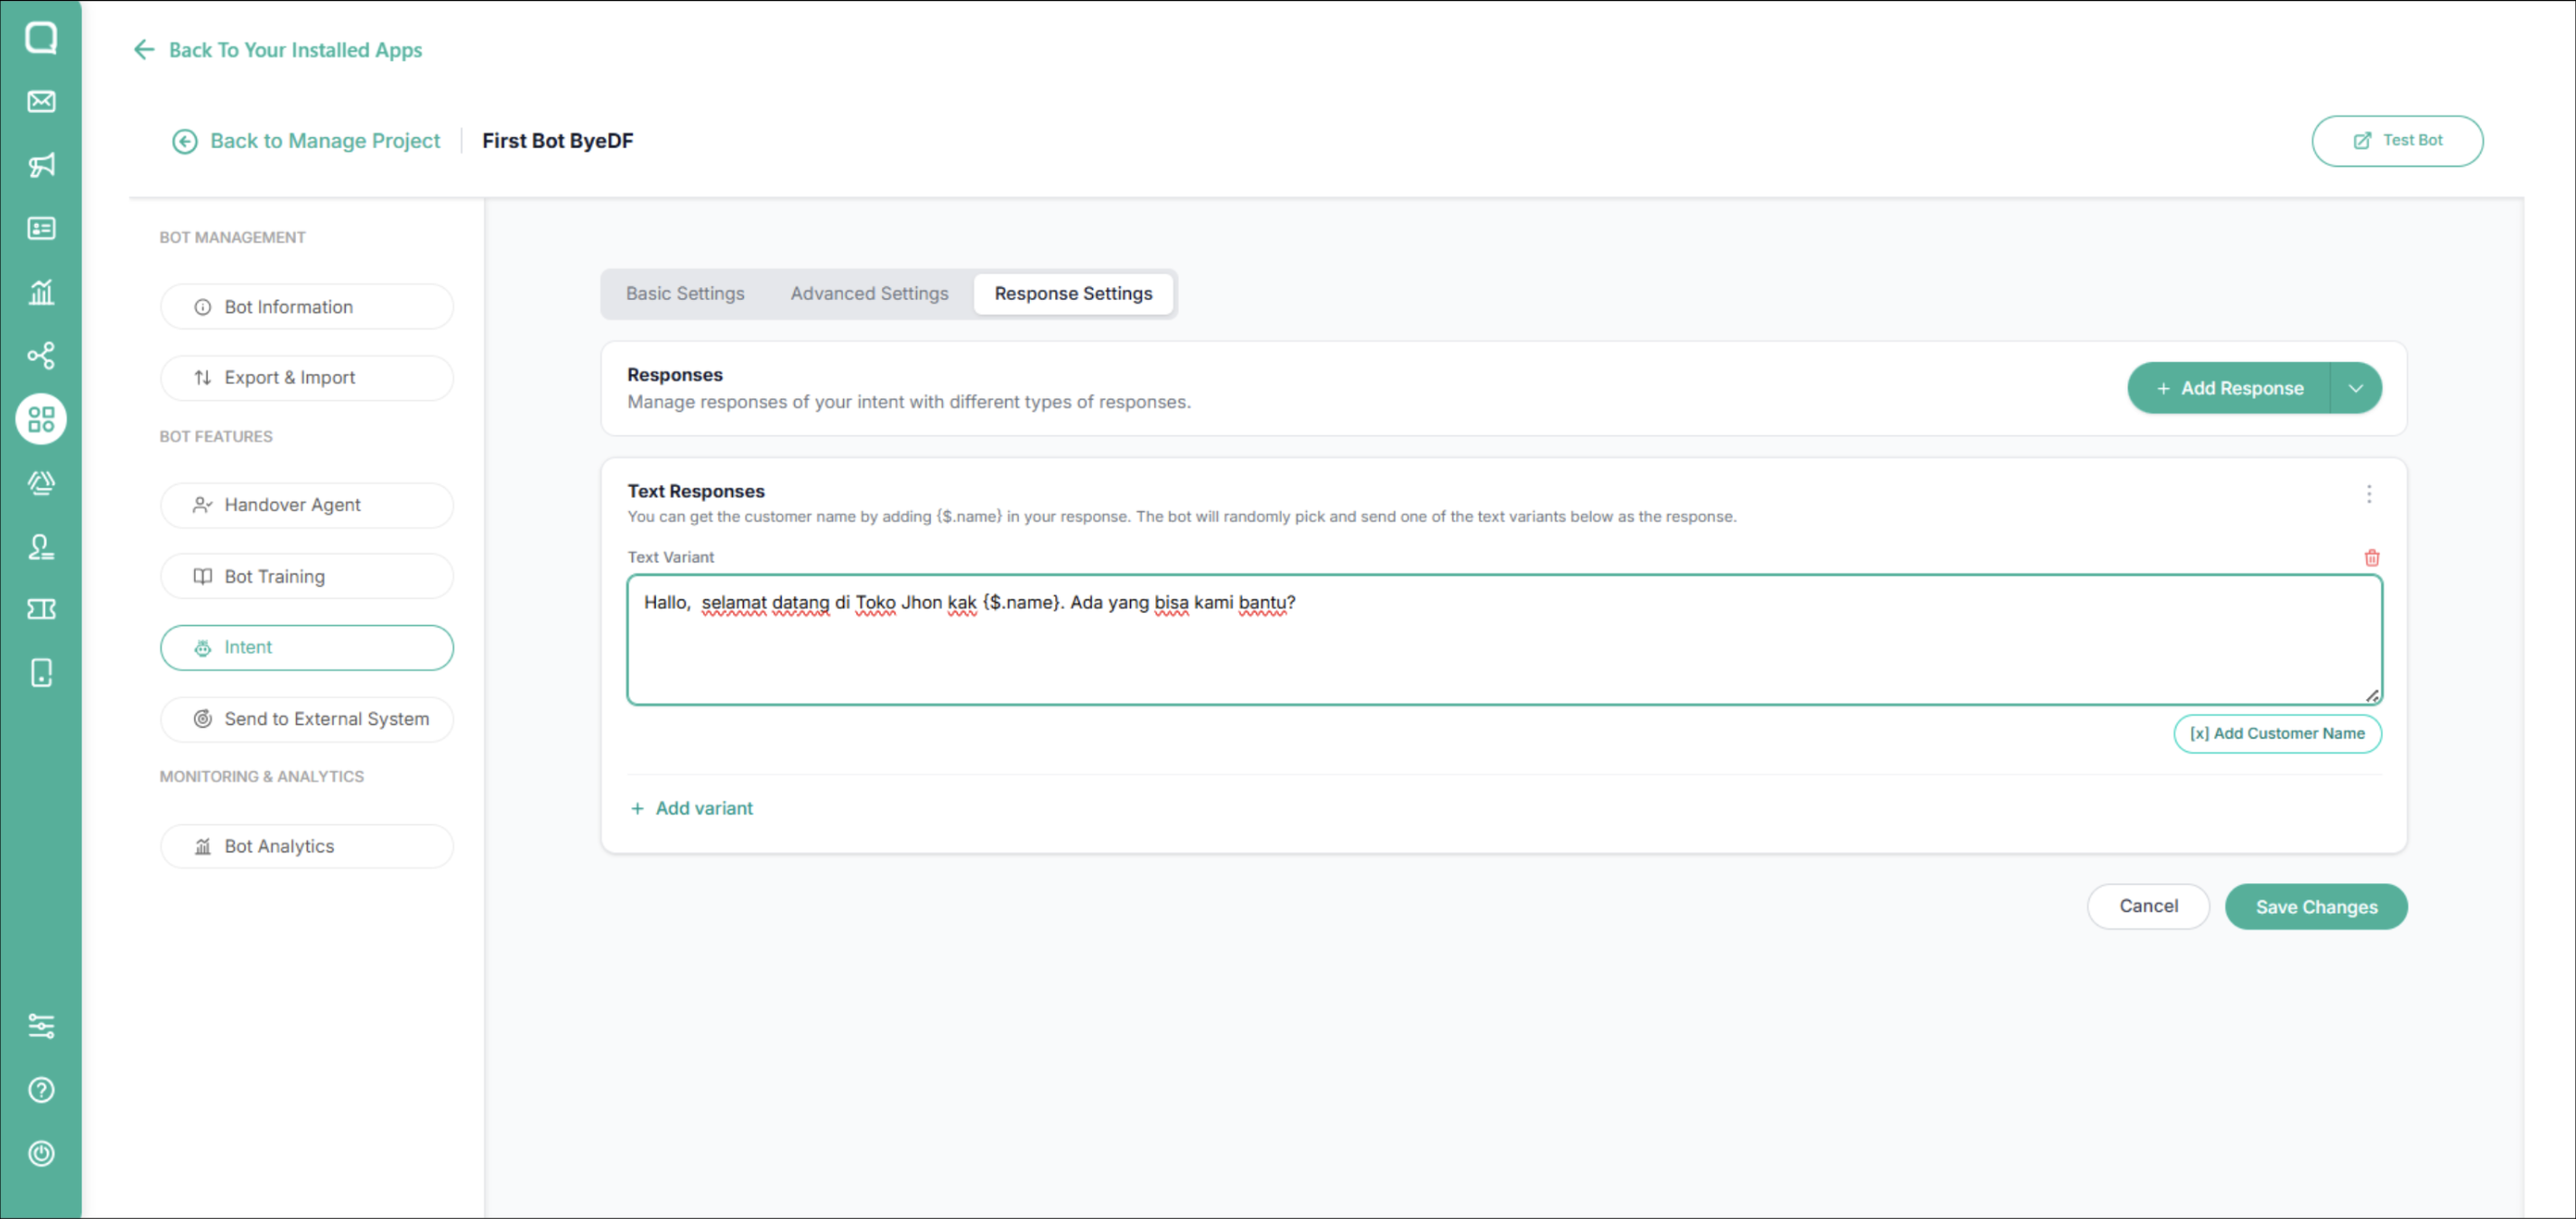
The intents you create will appear on the Intent page, where you can edit or delete them as needed.
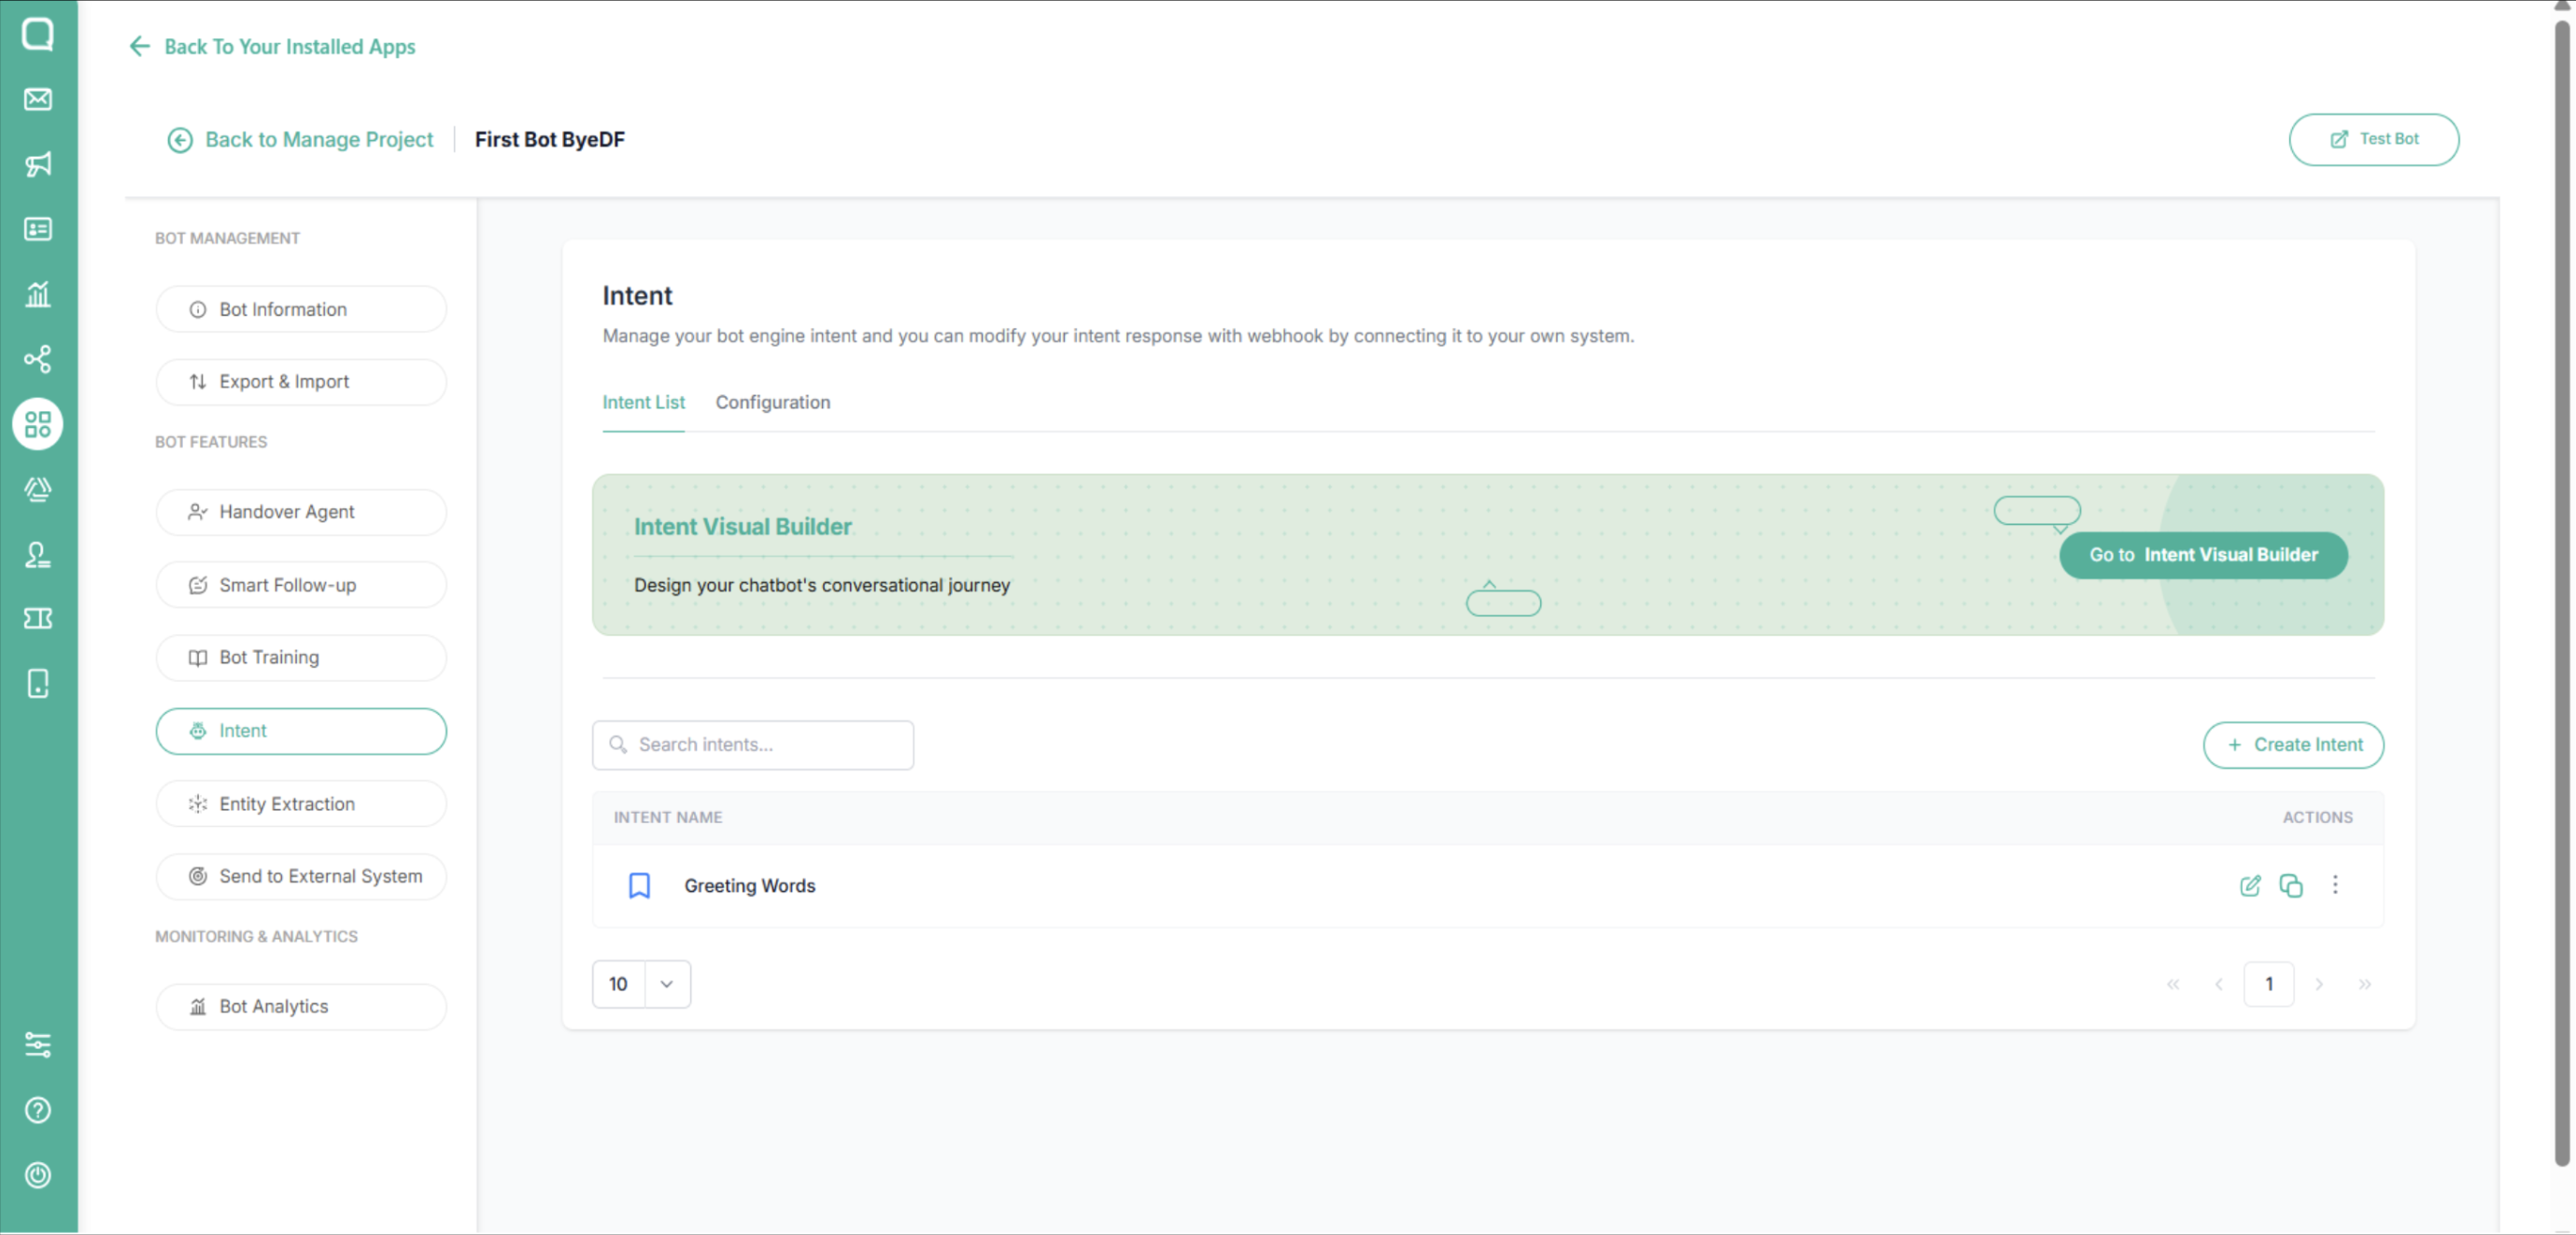
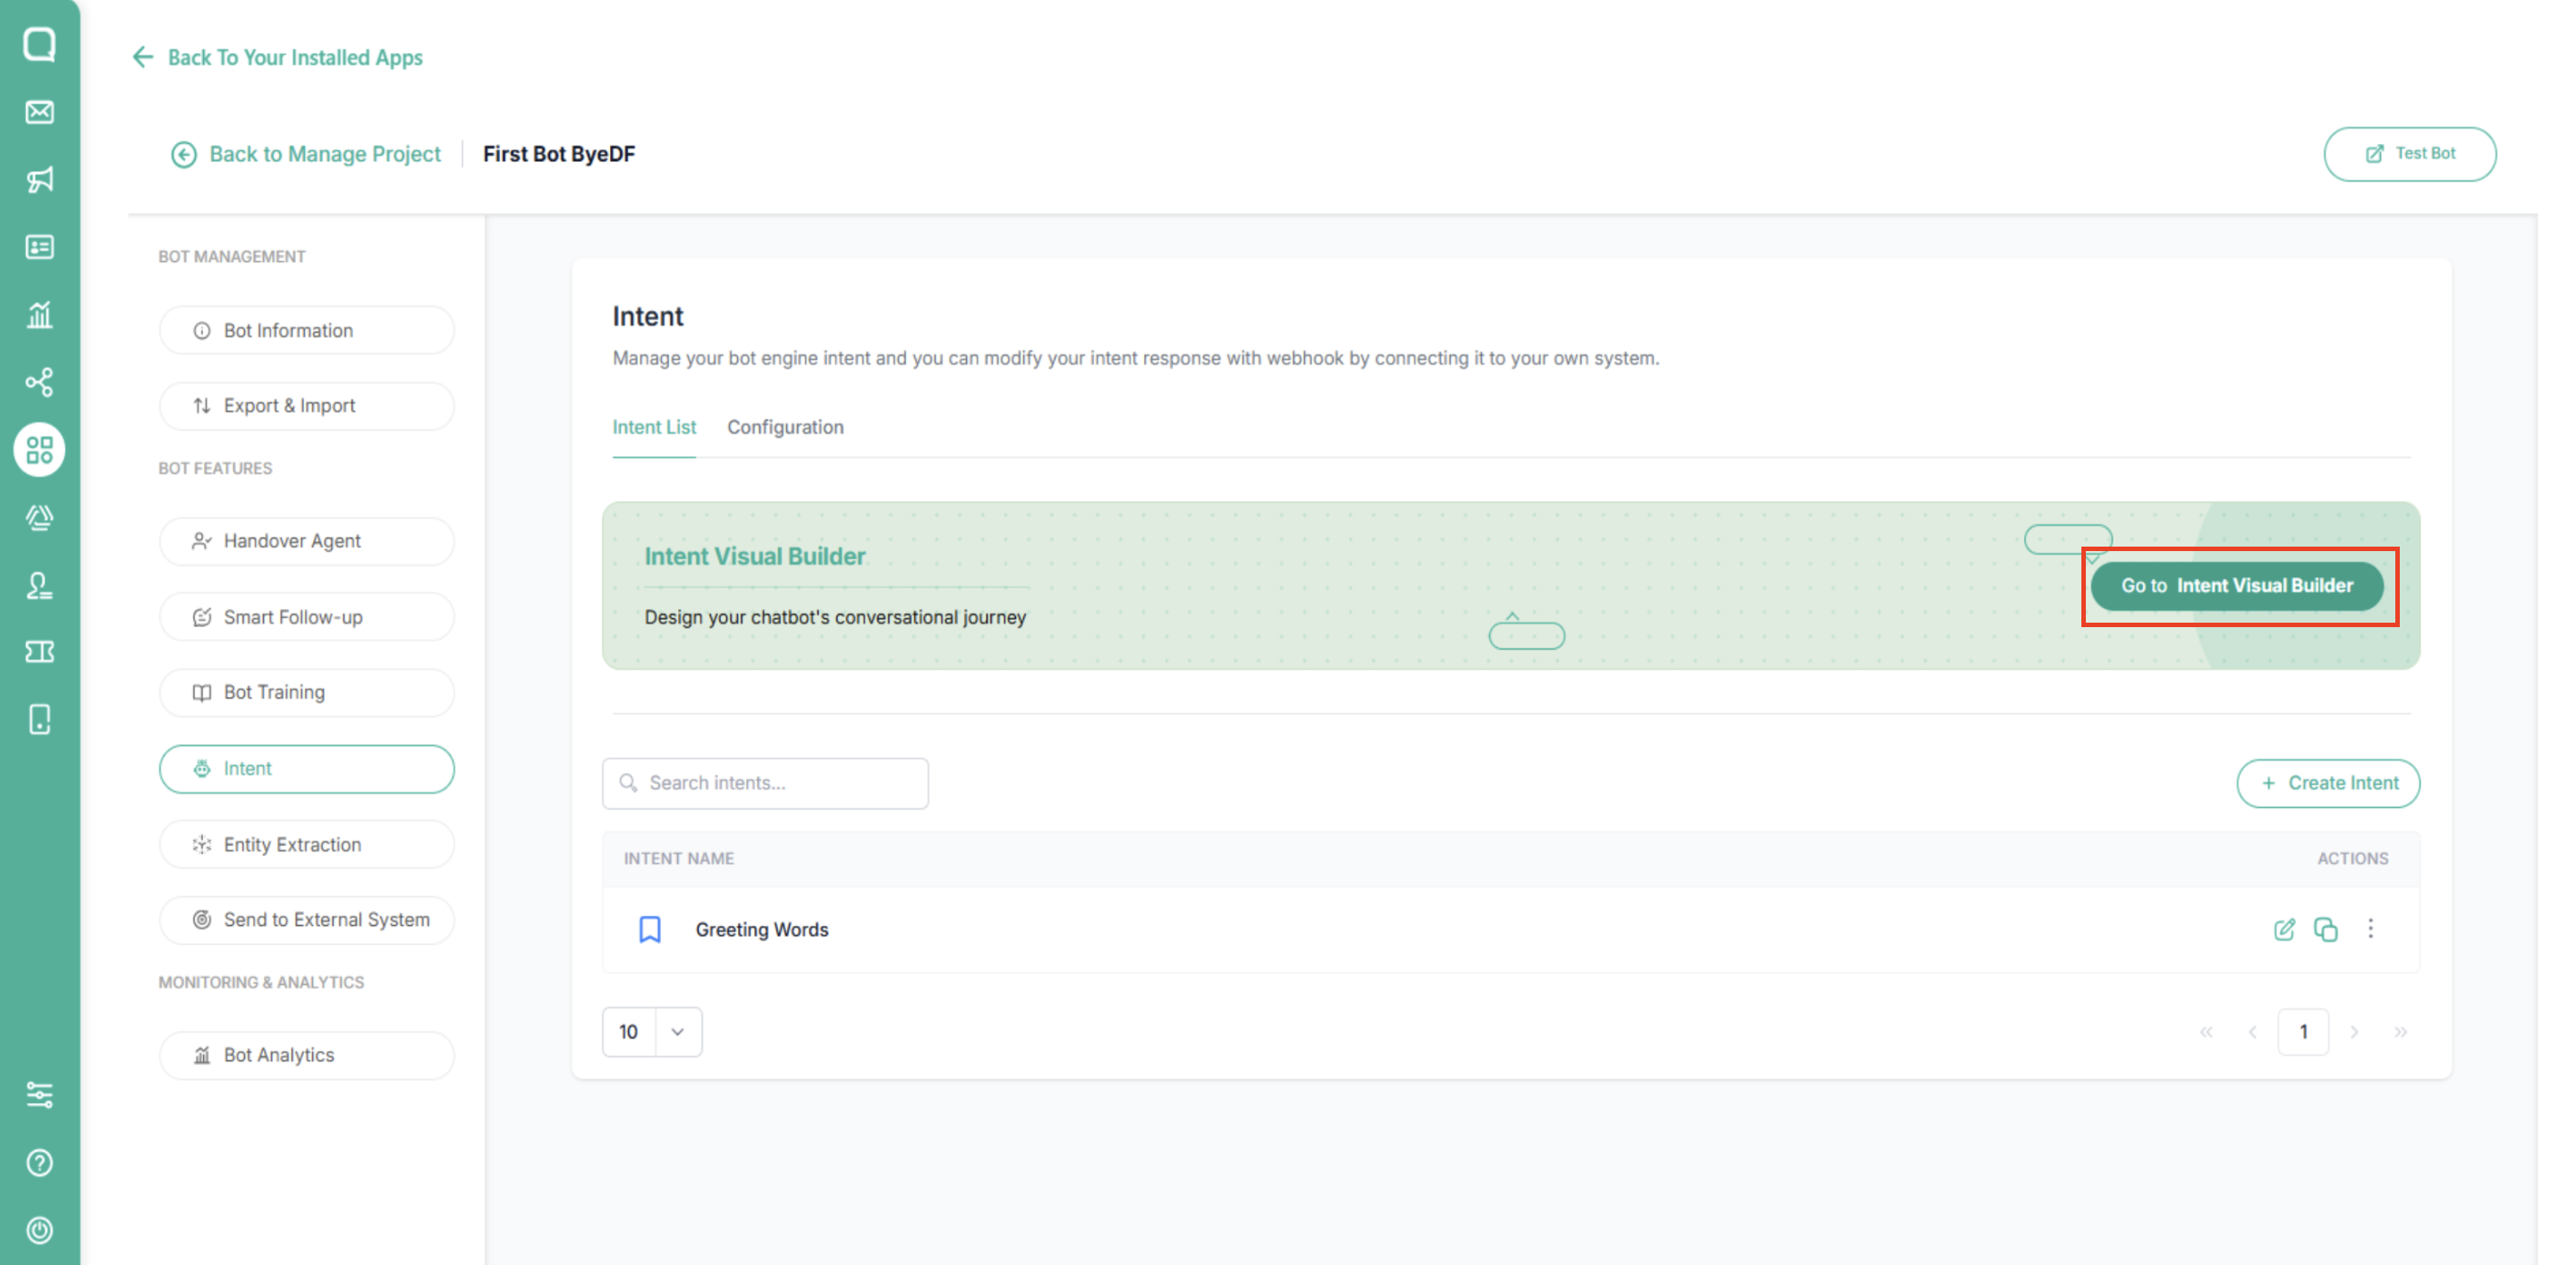
Create Intent with Intent Visual Builder
You can use the Intent Visual Builder to view your conversation flow mapping by click Go to Intent Visual Builder
To add intent, click the + sign and click on an intent in the canvas to open its configuration panel.
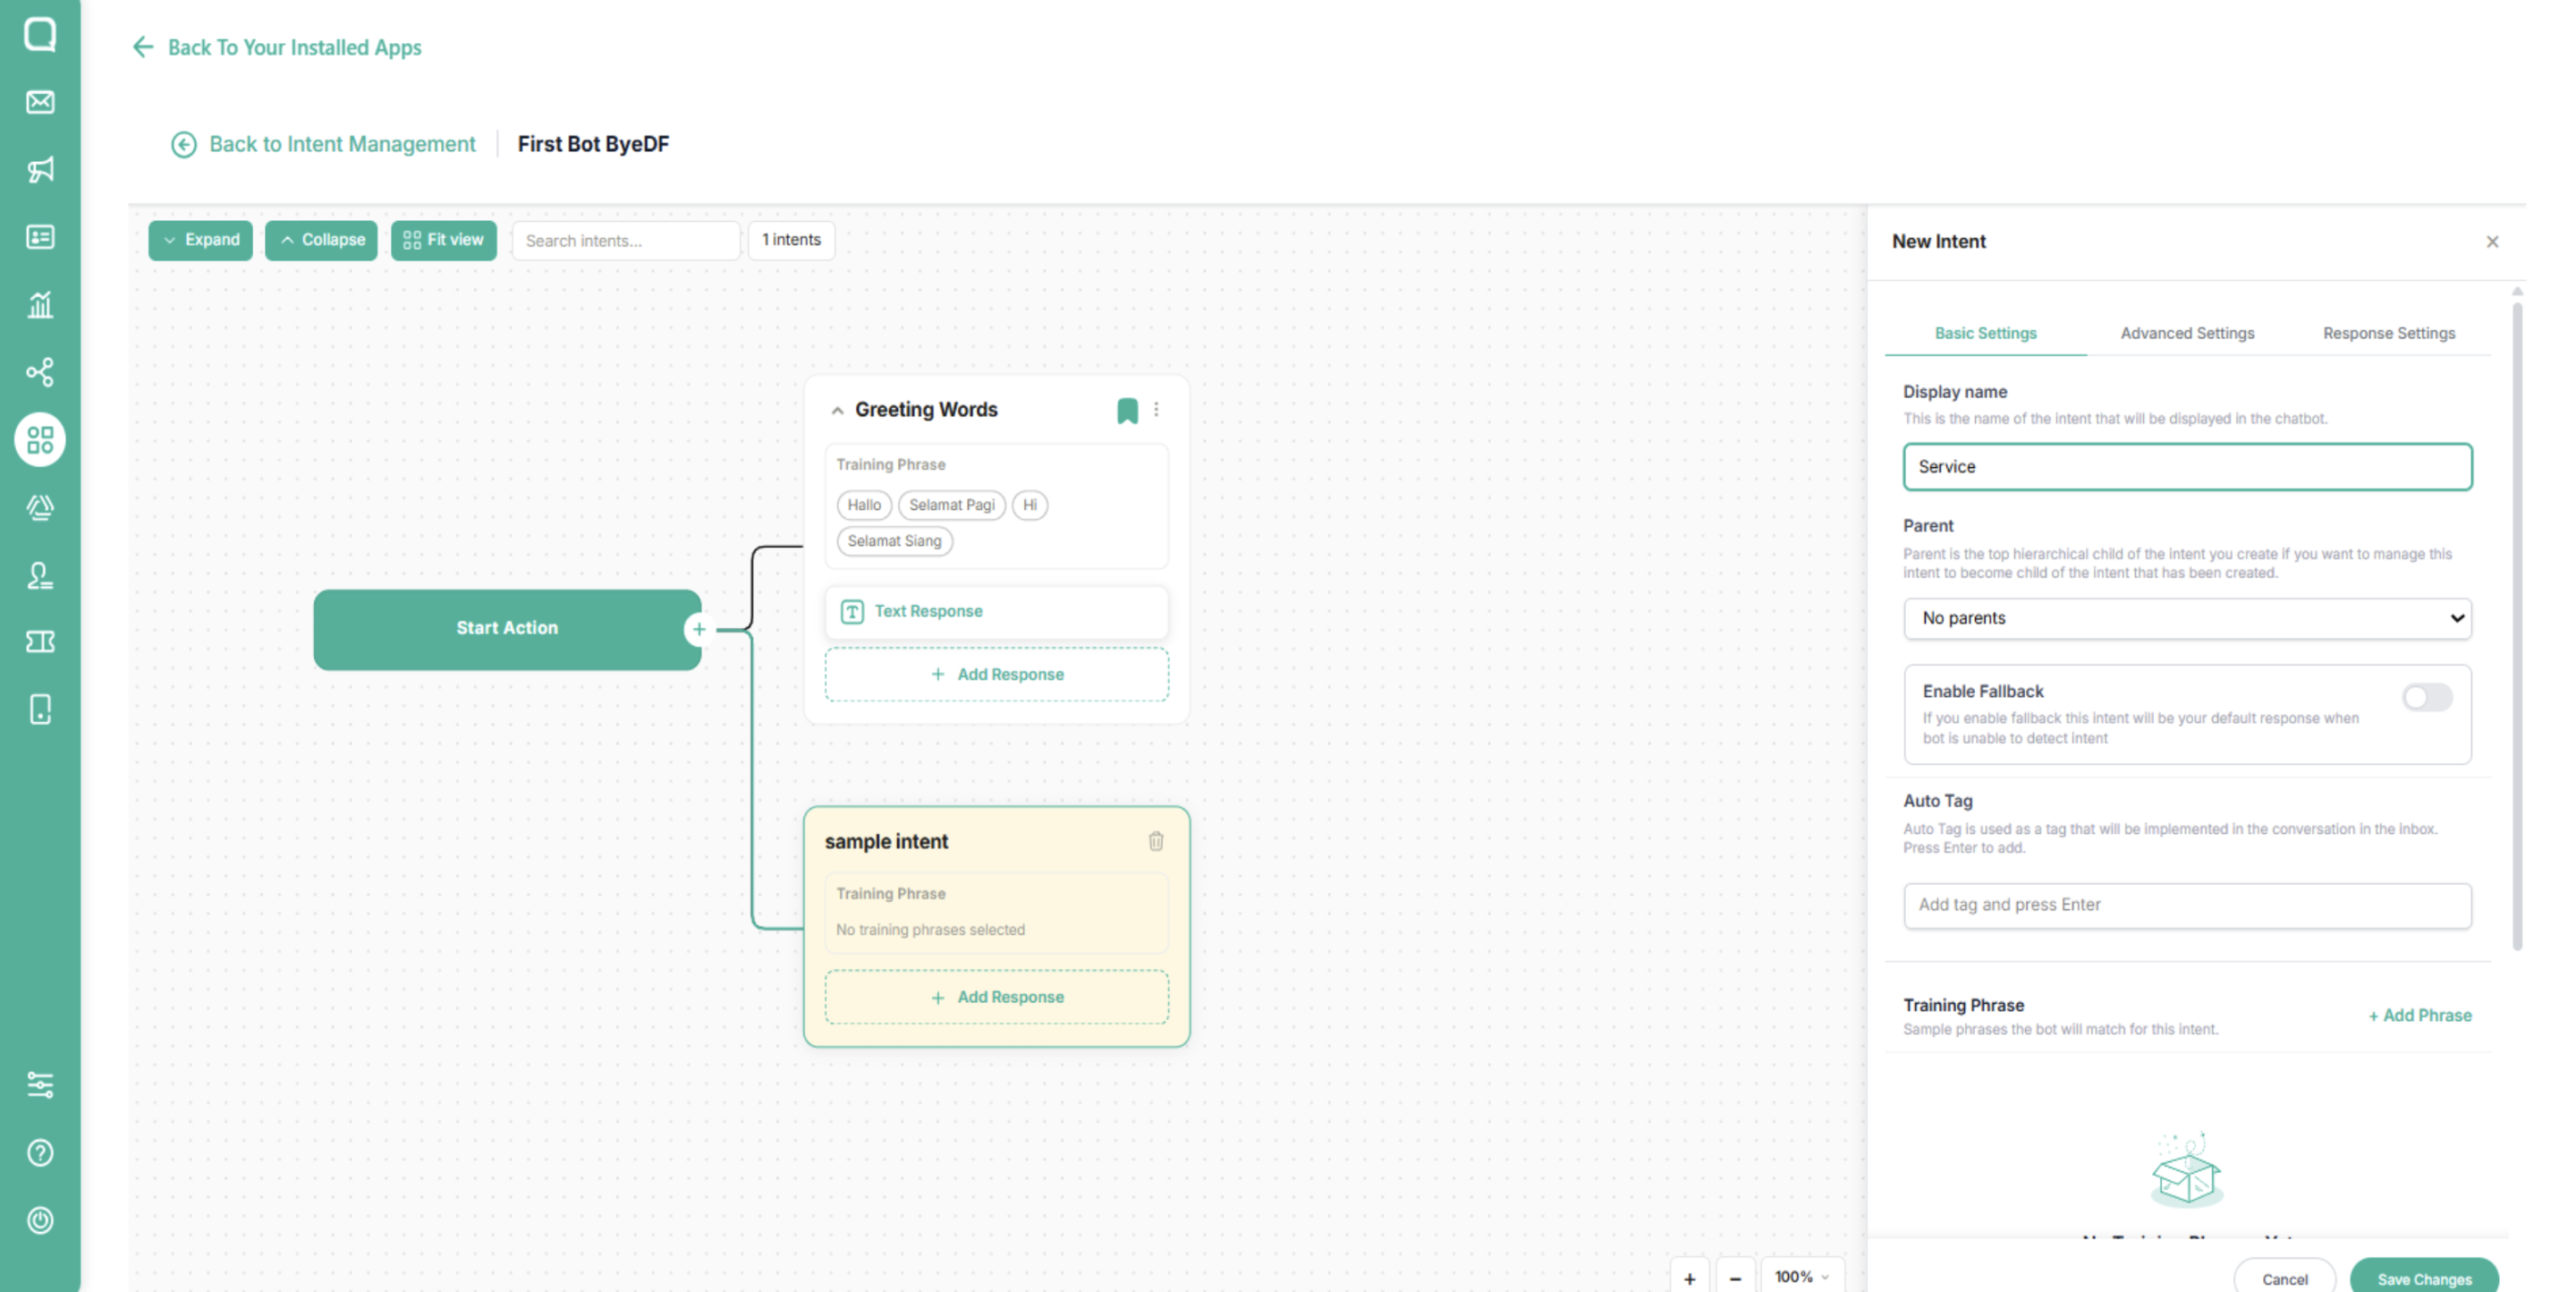
Enter the phrases that will trigger this intent.
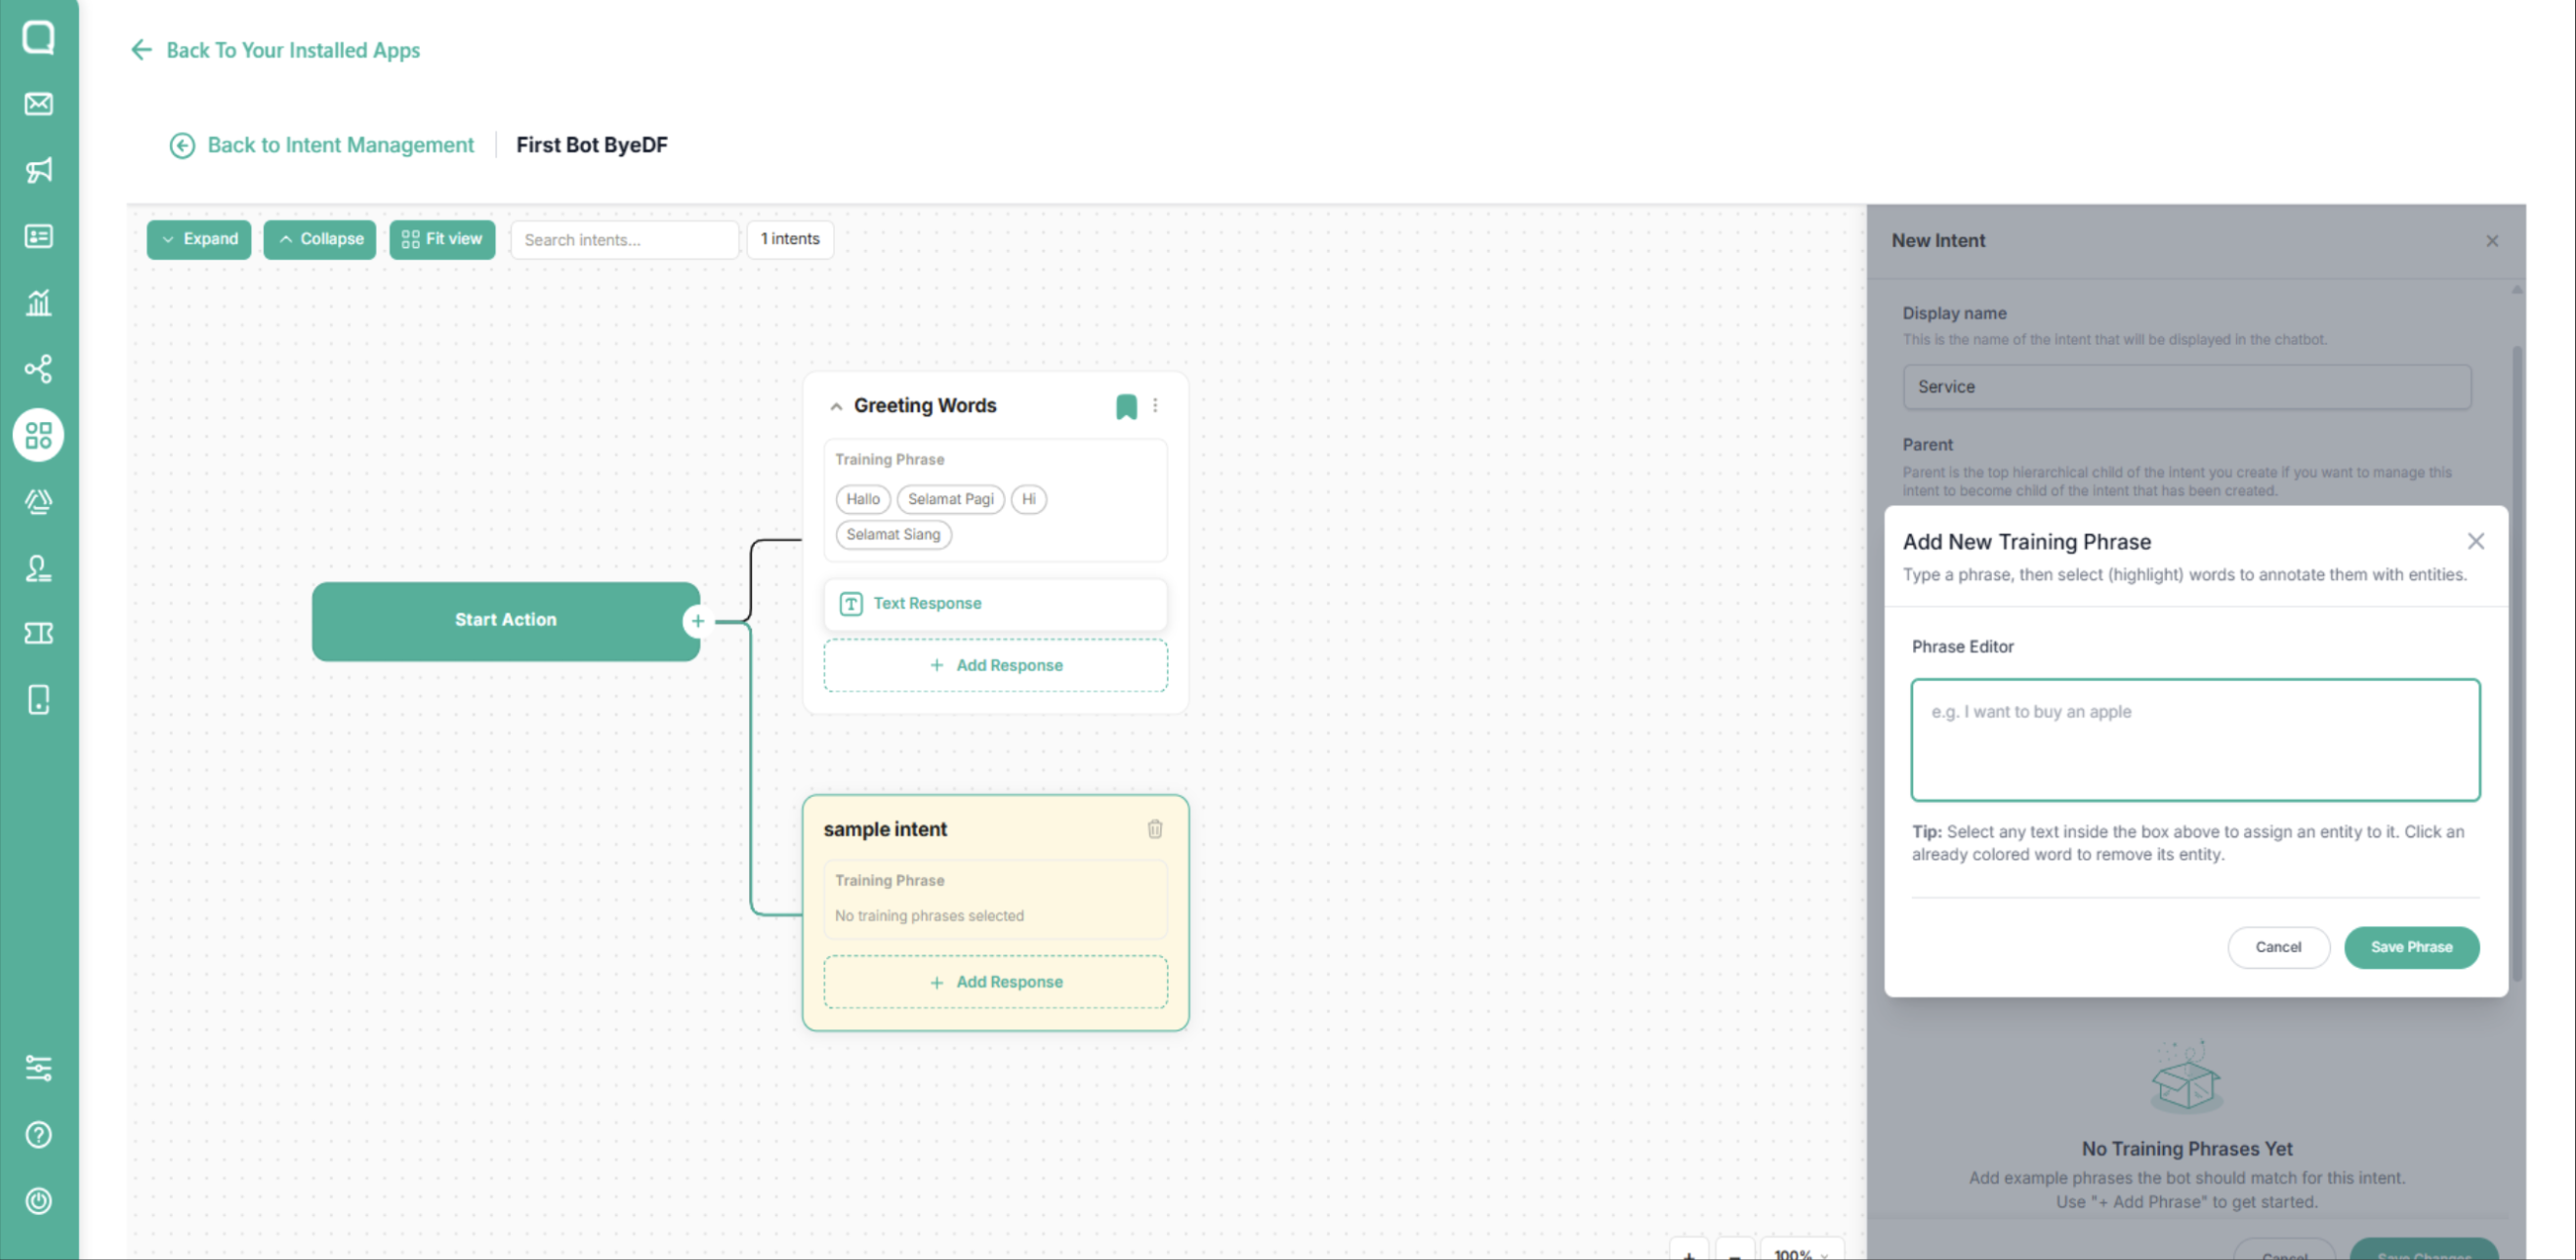
Click Save Changes
add bot response in Response Settings section and click Save Changes
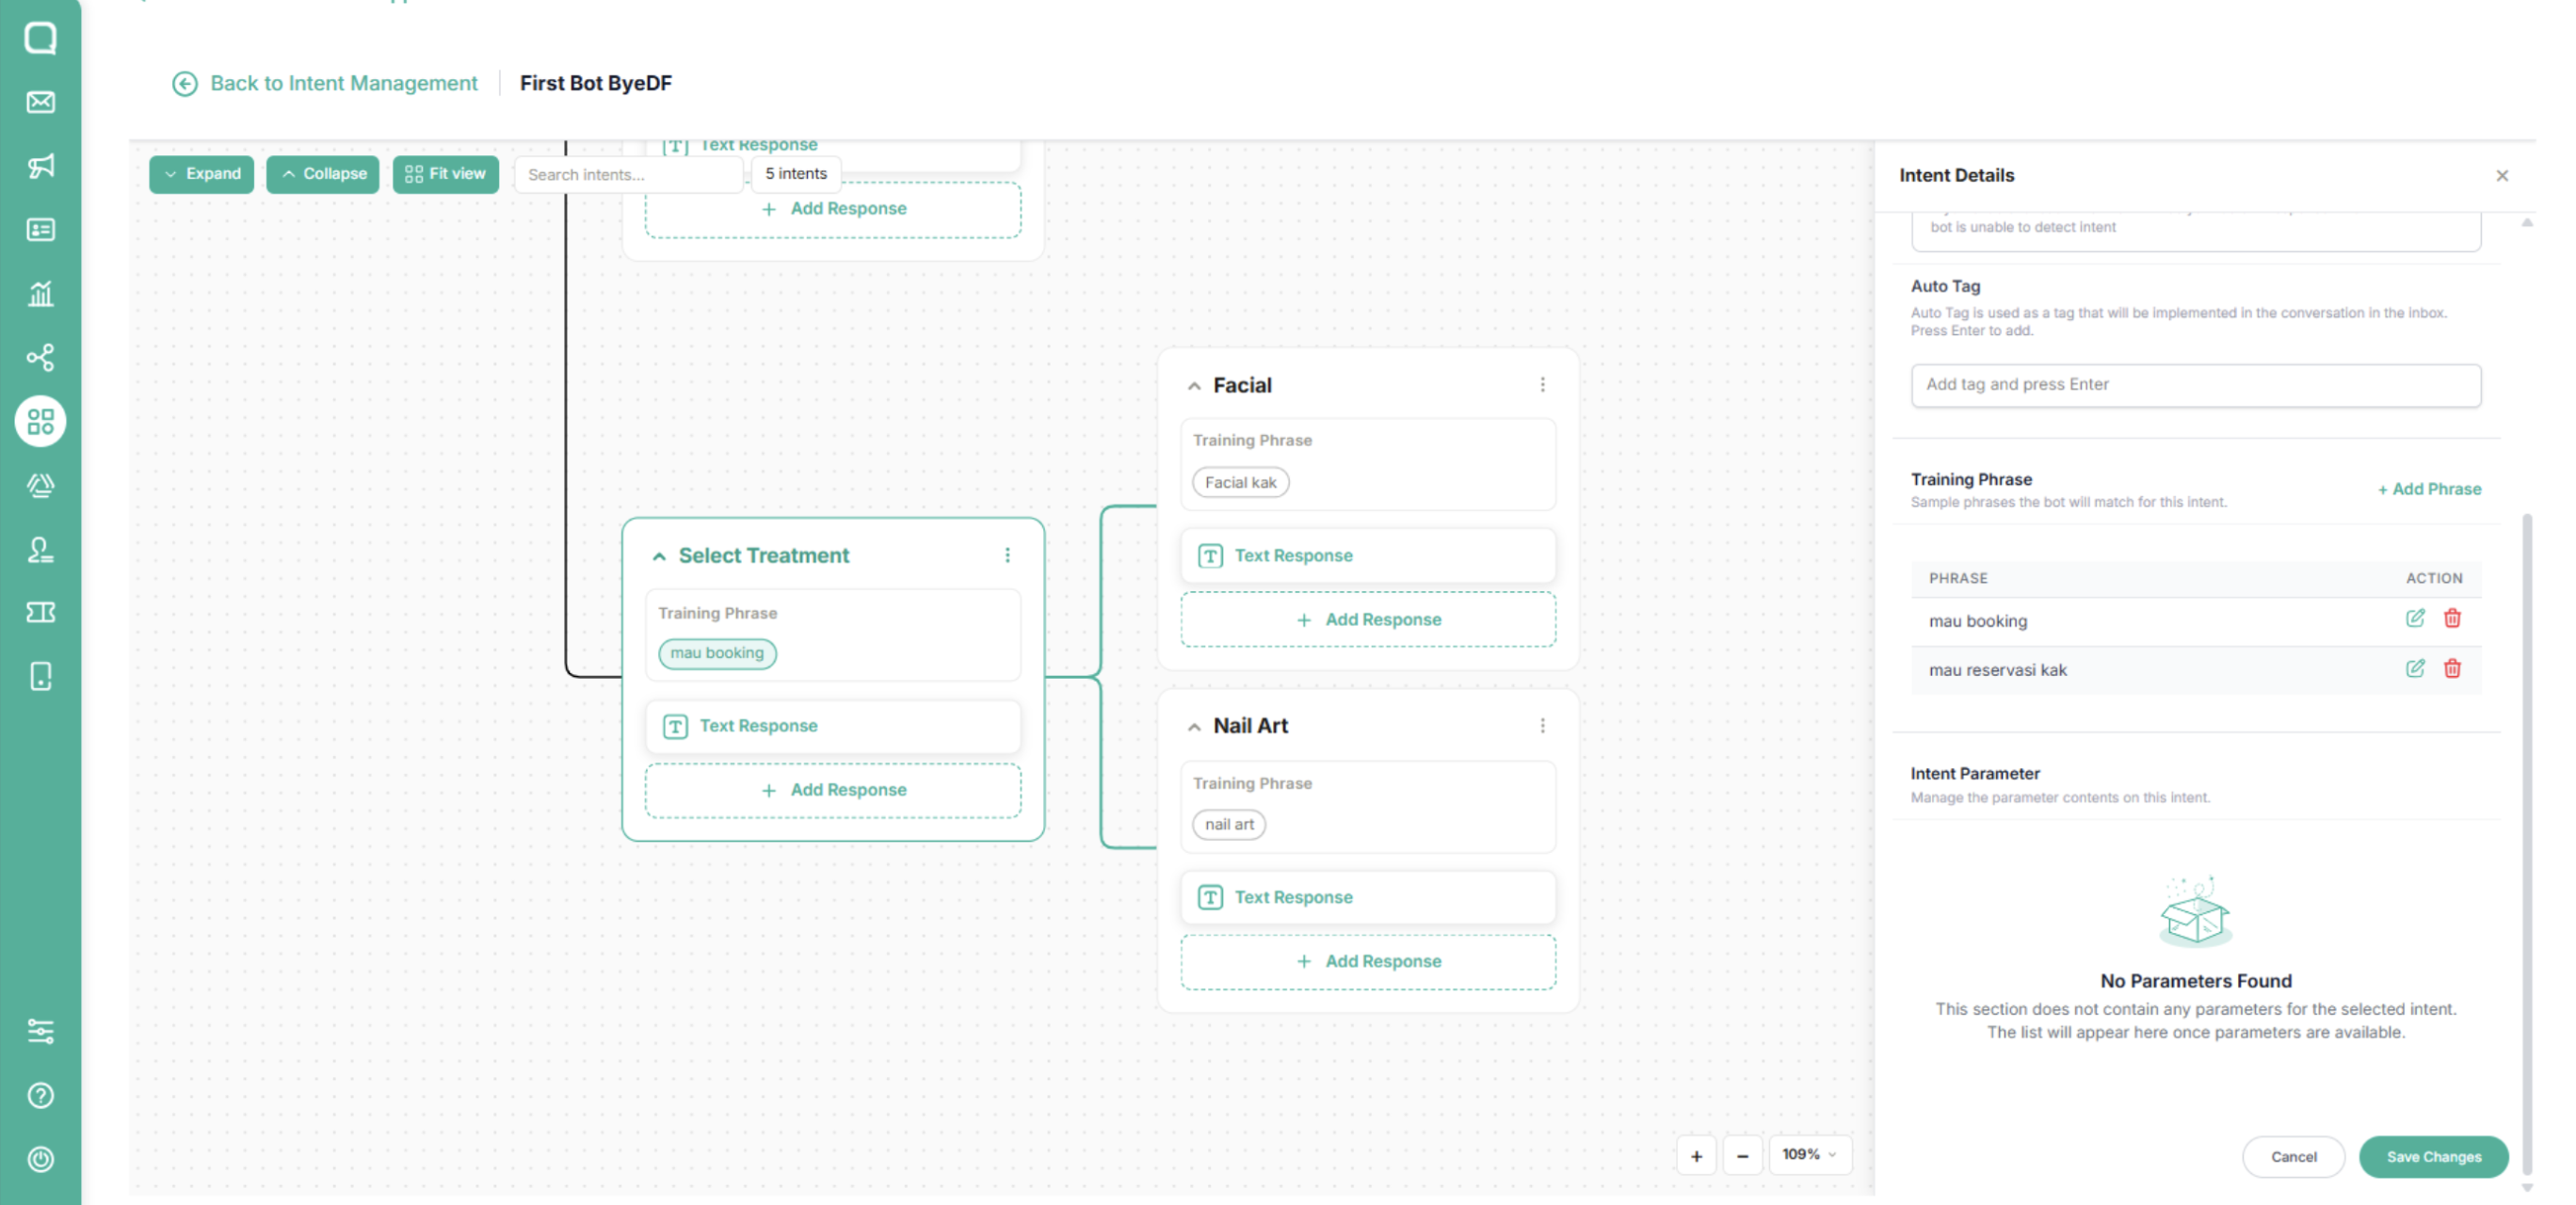
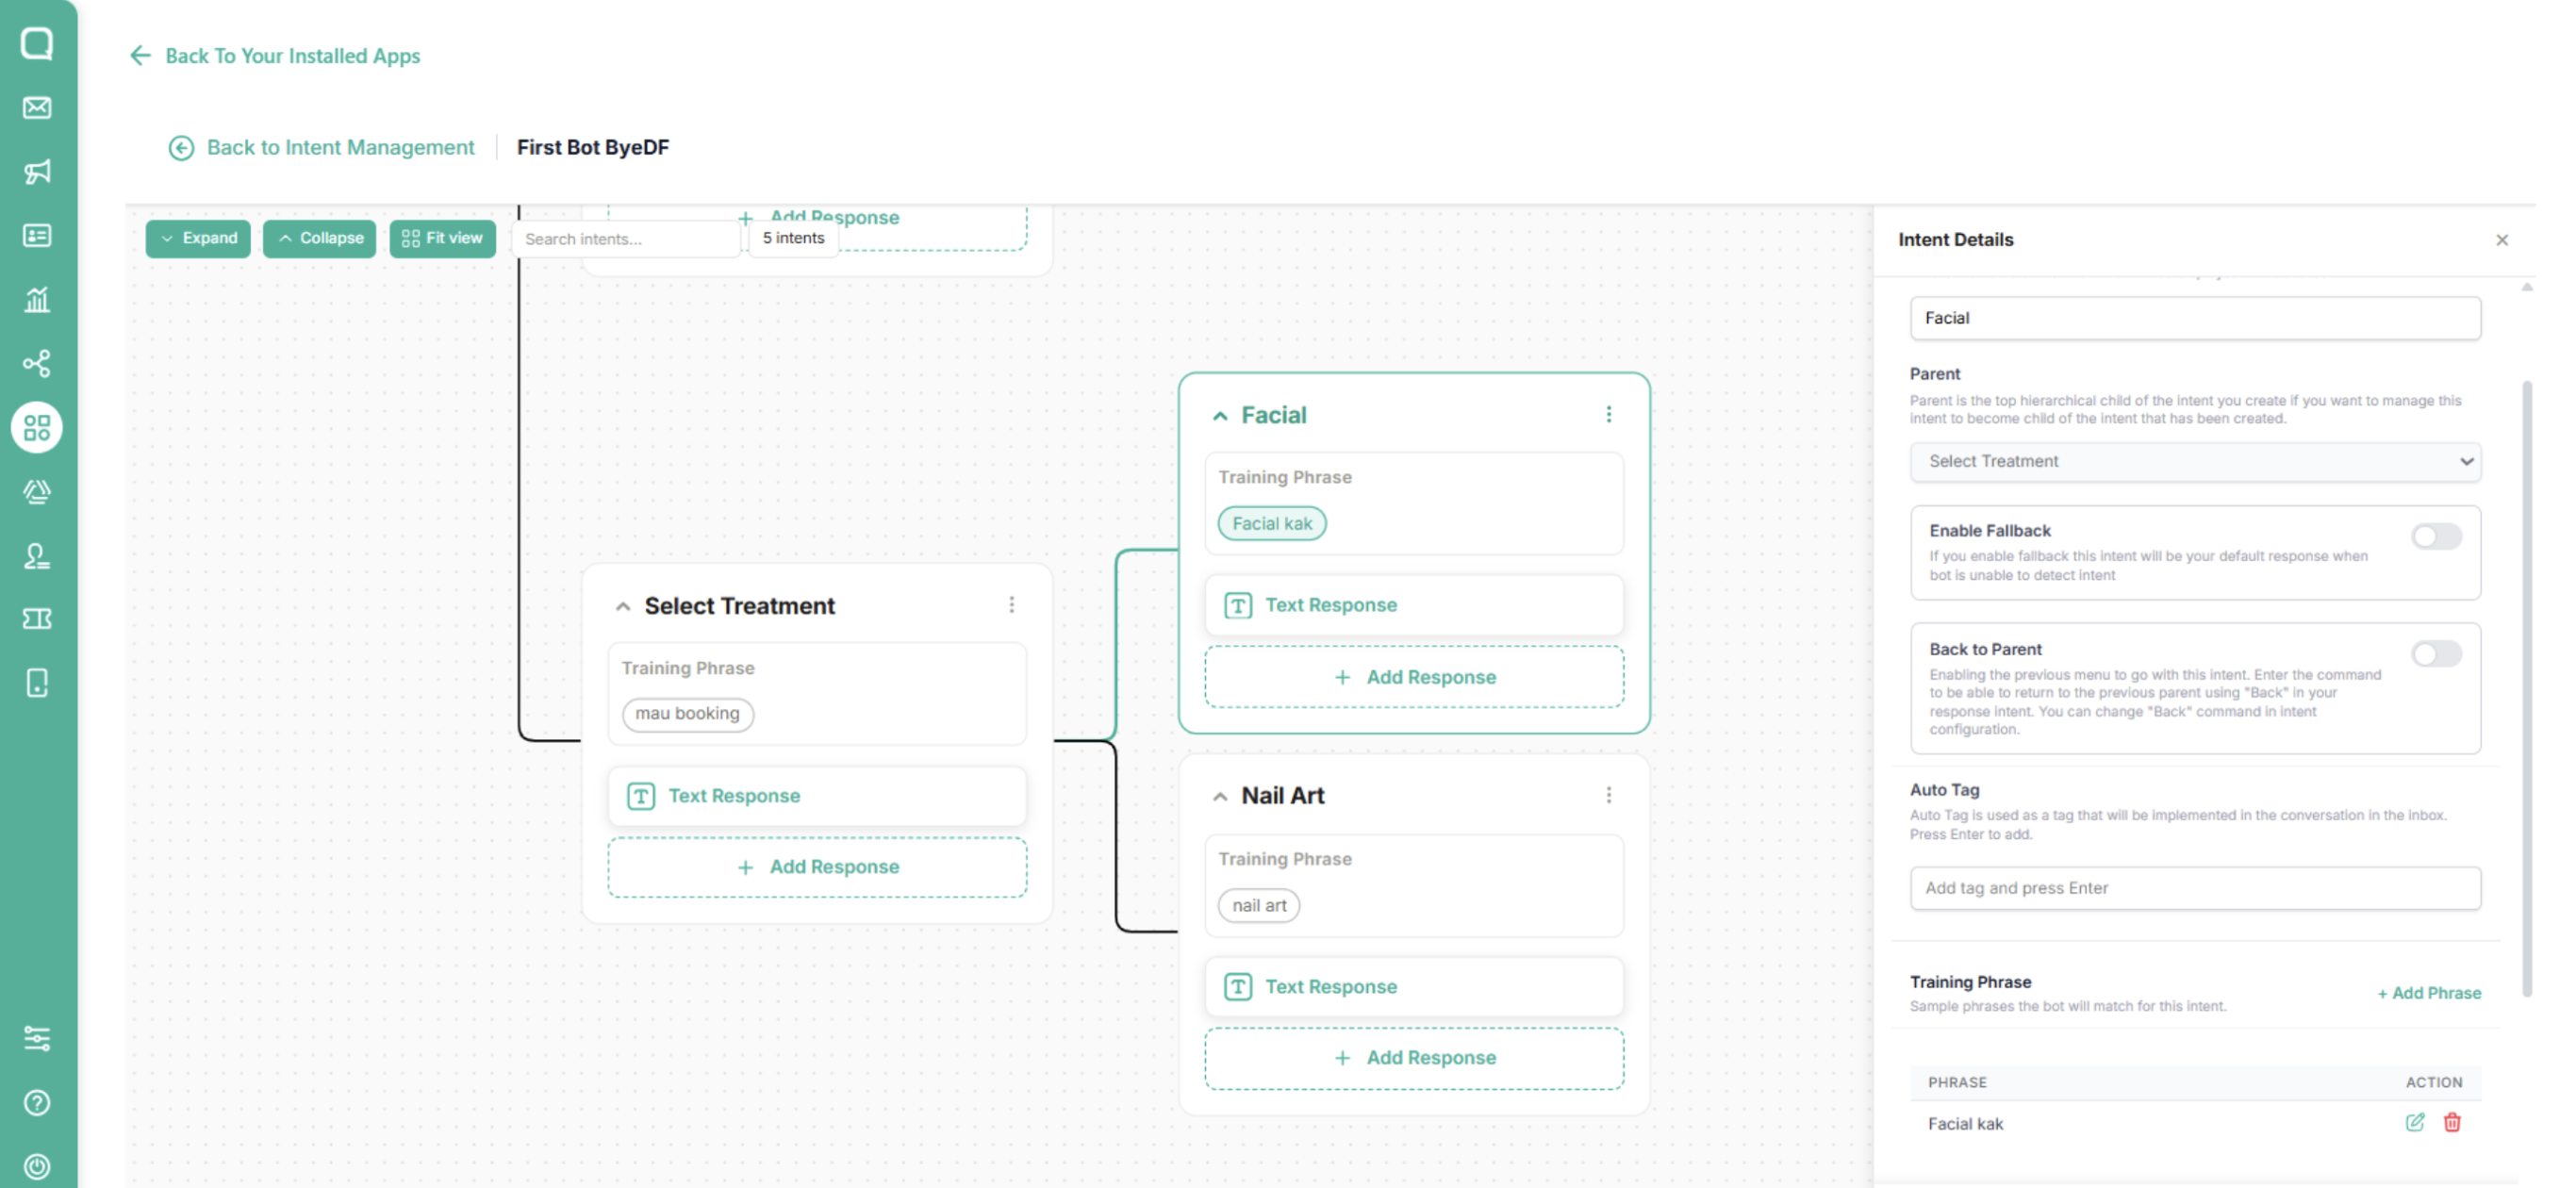
The child intent will follow its parent in the conversation flow, allowing you to build structured, multi-level dialogue paths.
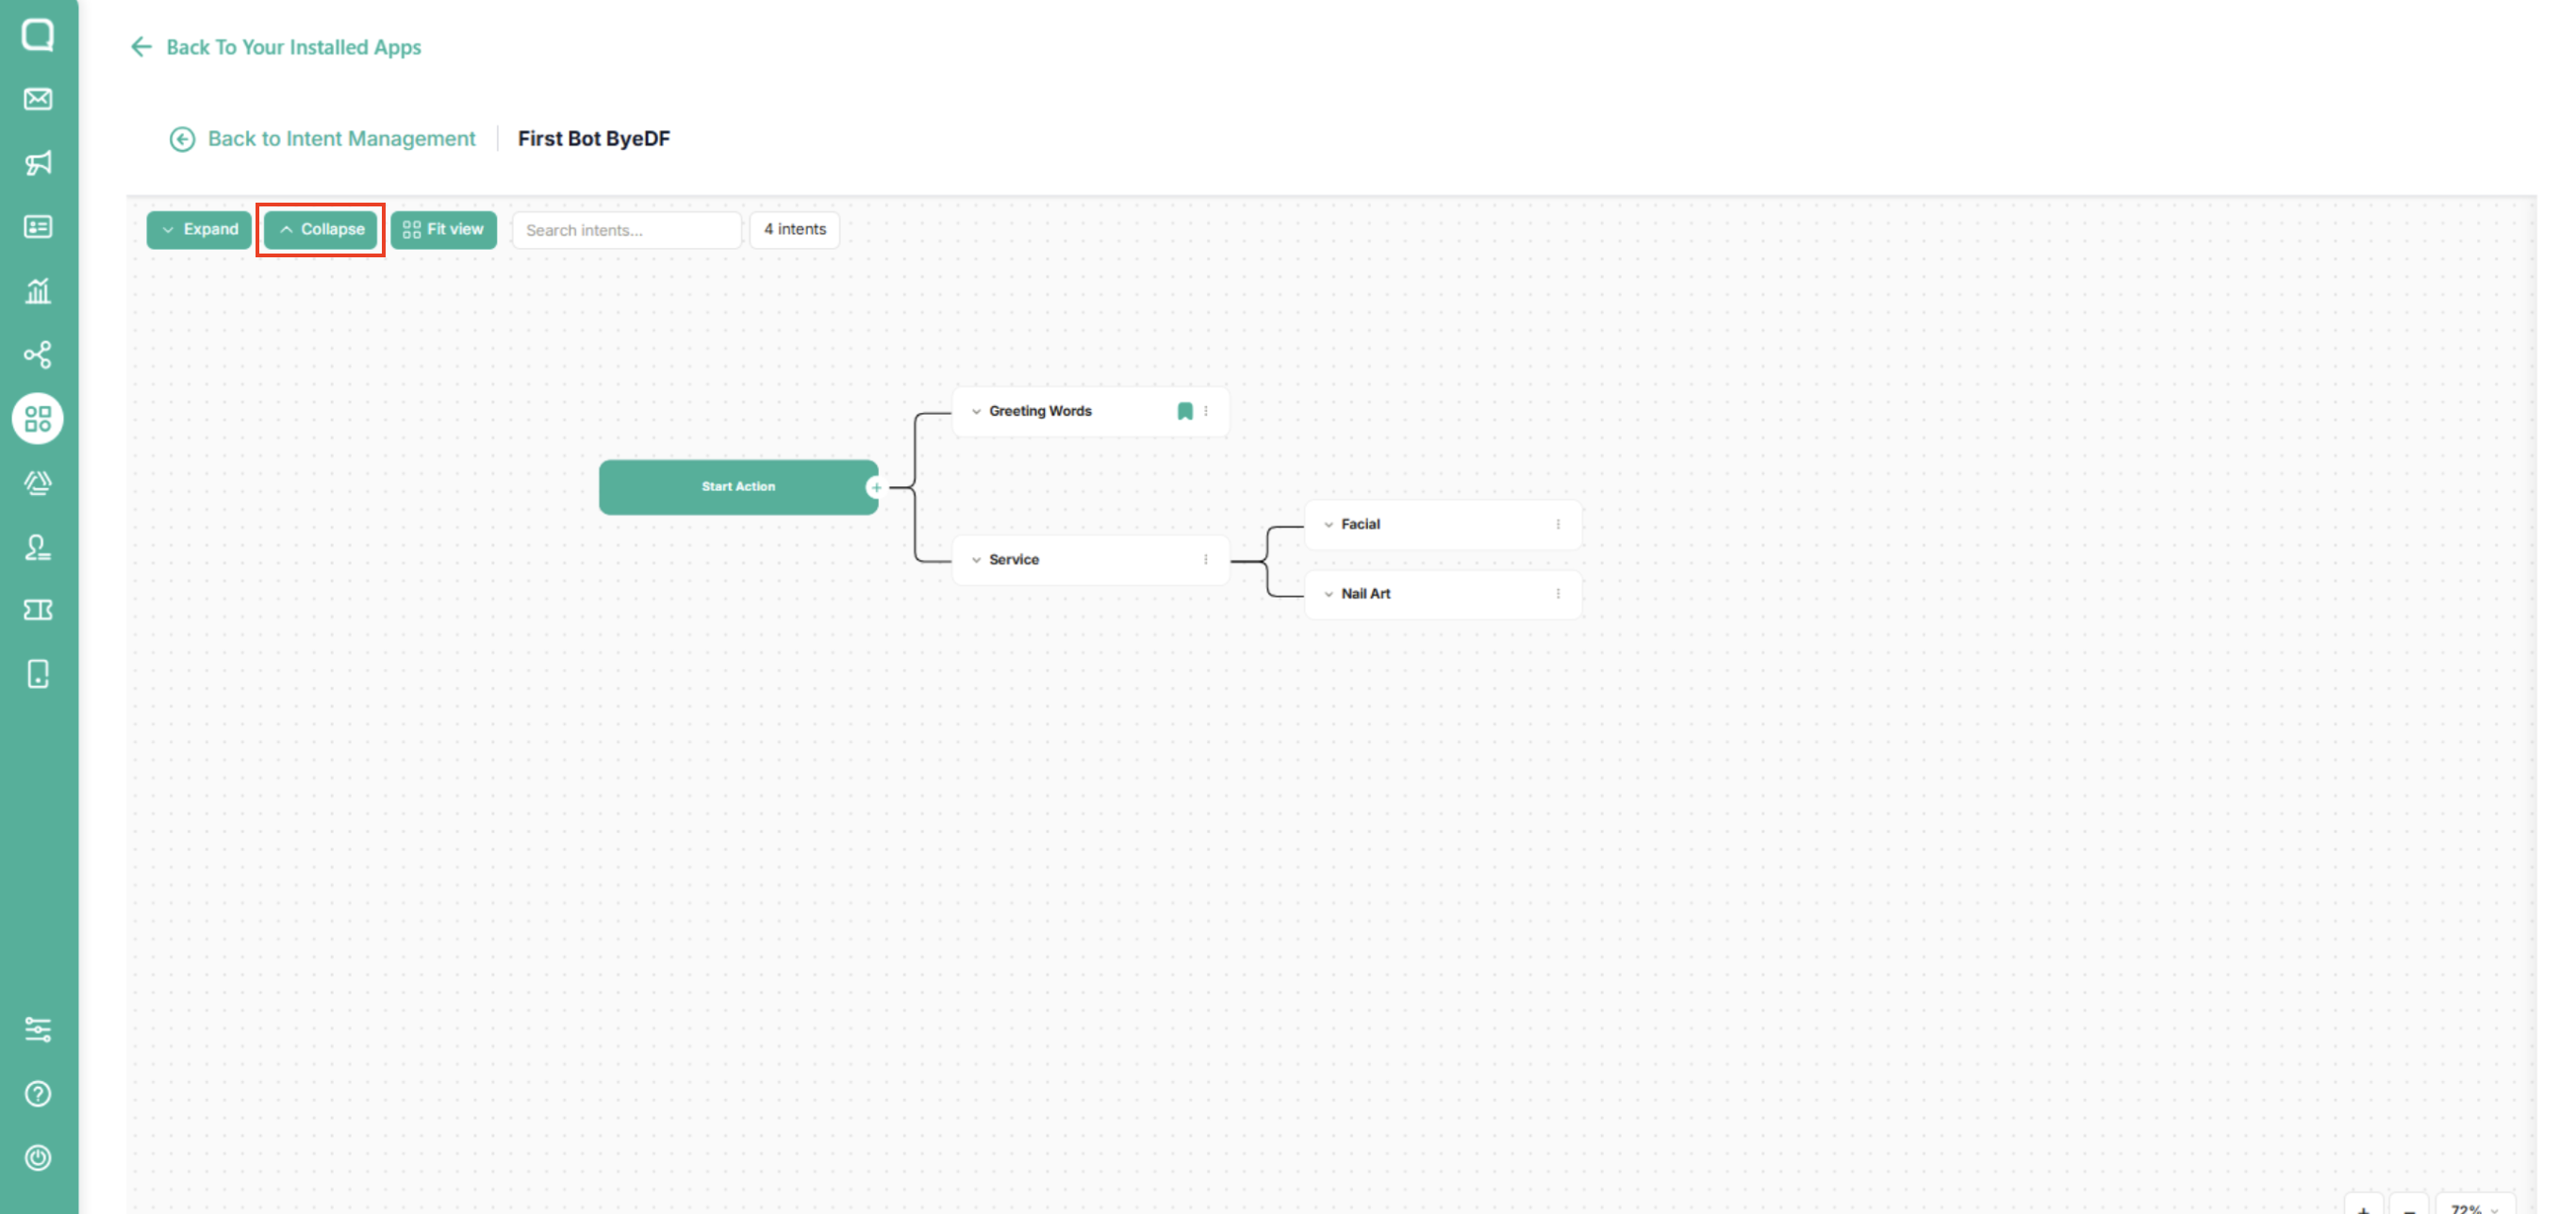
Click the Collapse button to minimize the intent list.
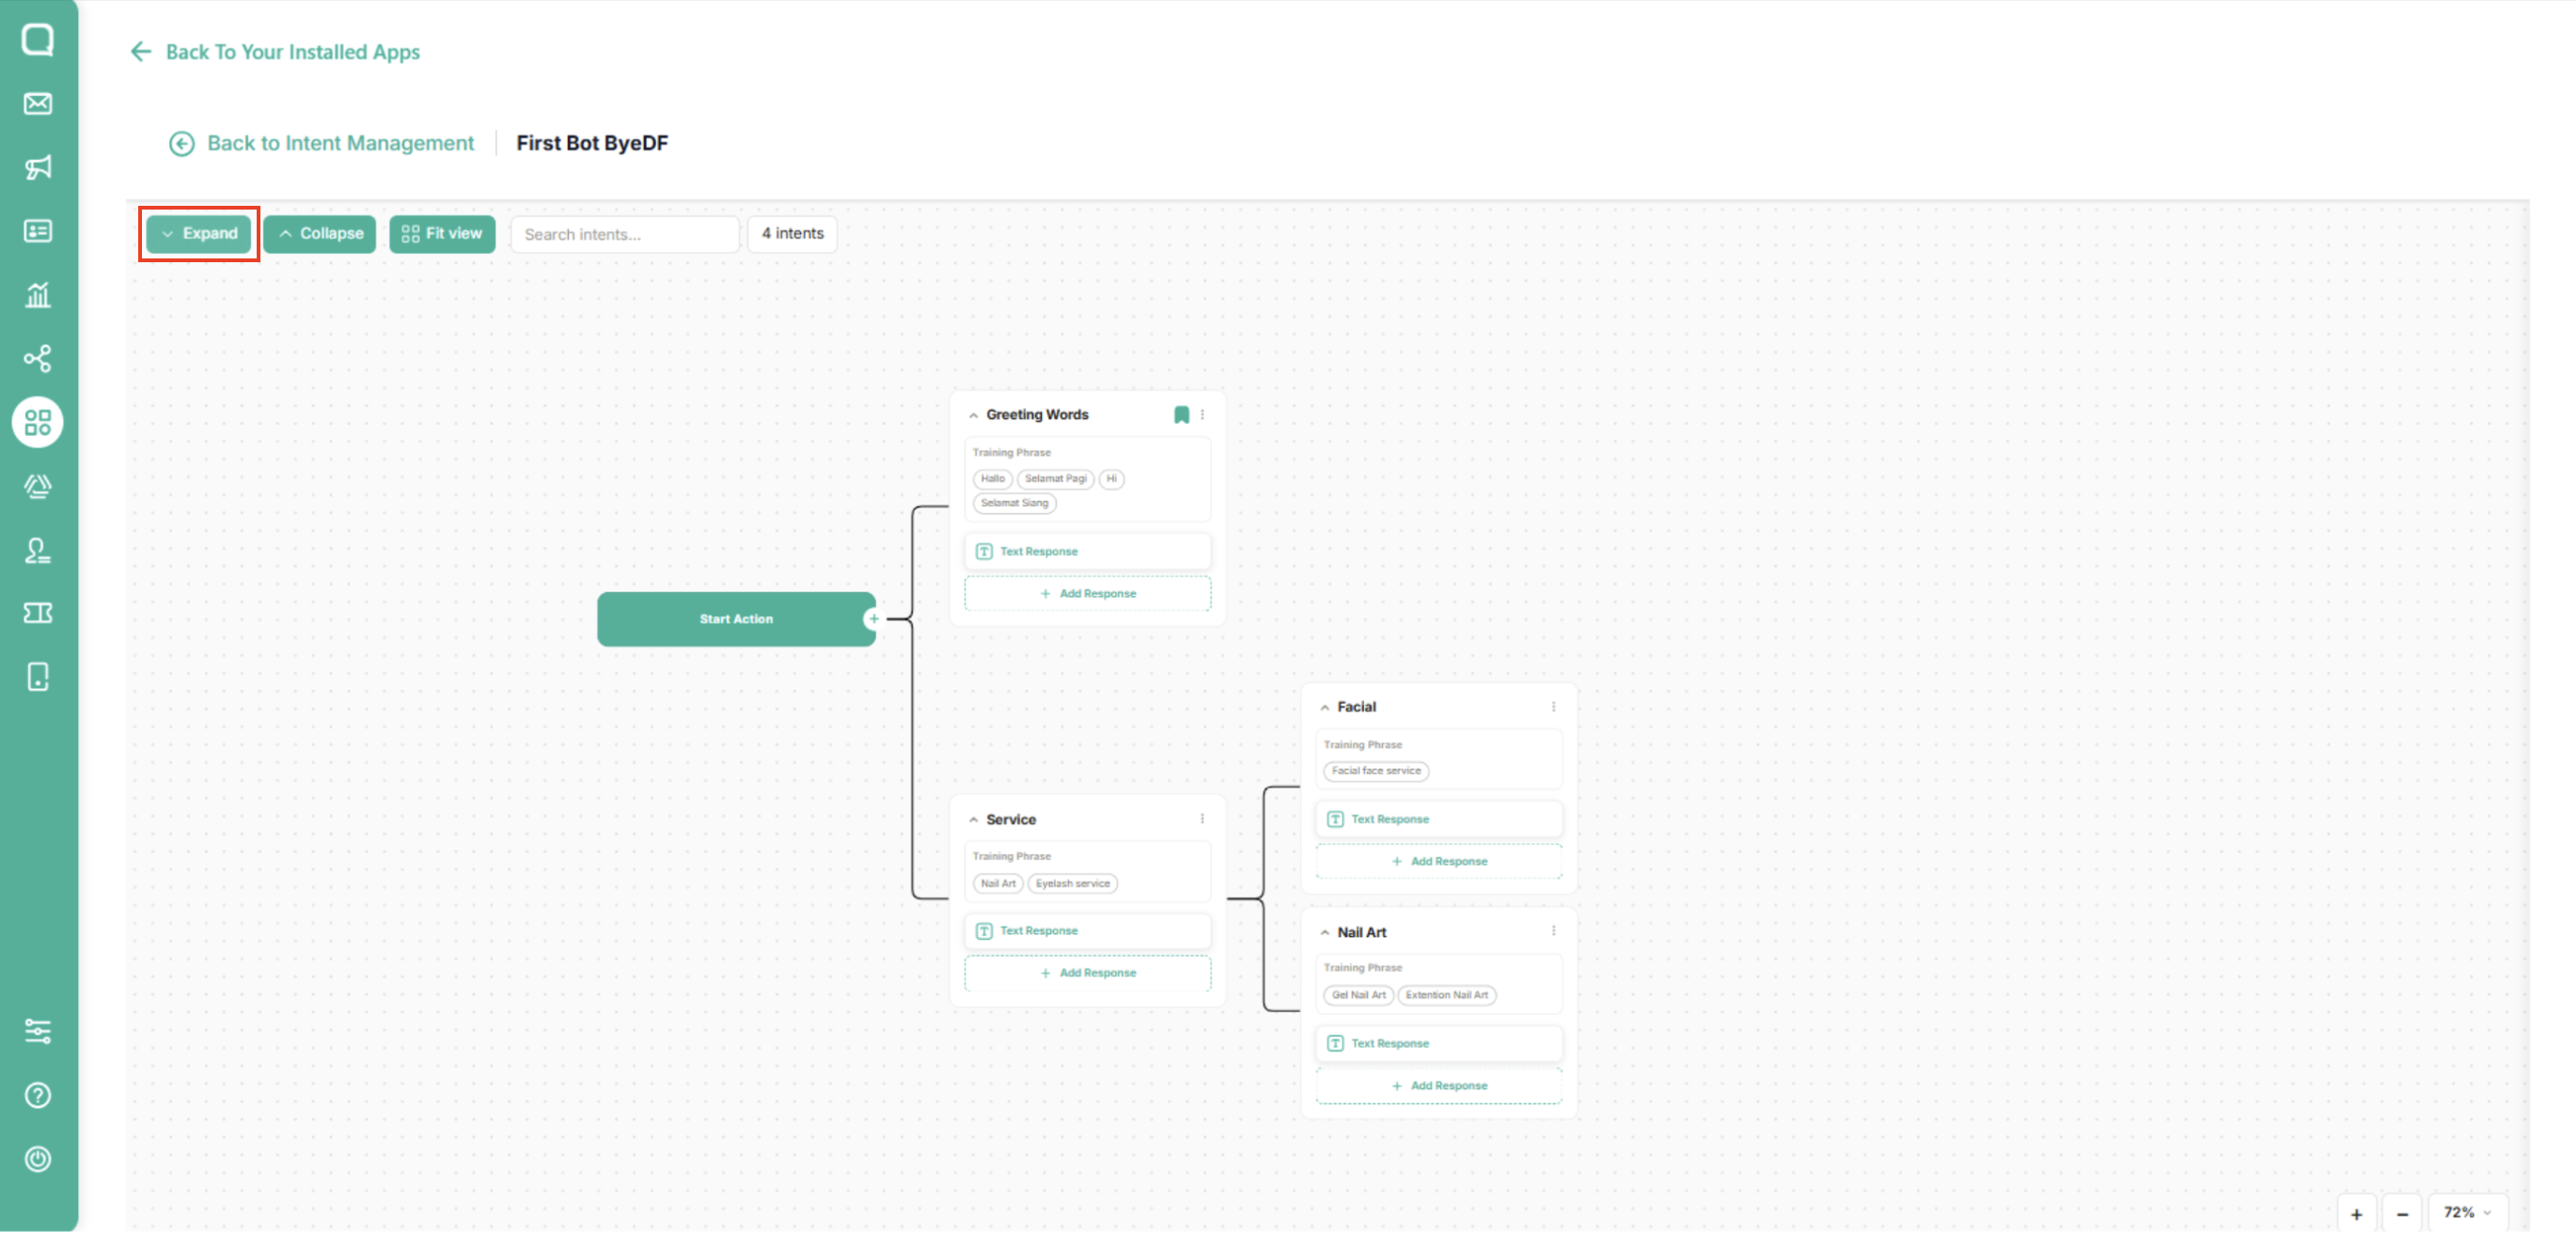
Click the Expand button to view the full intent list.
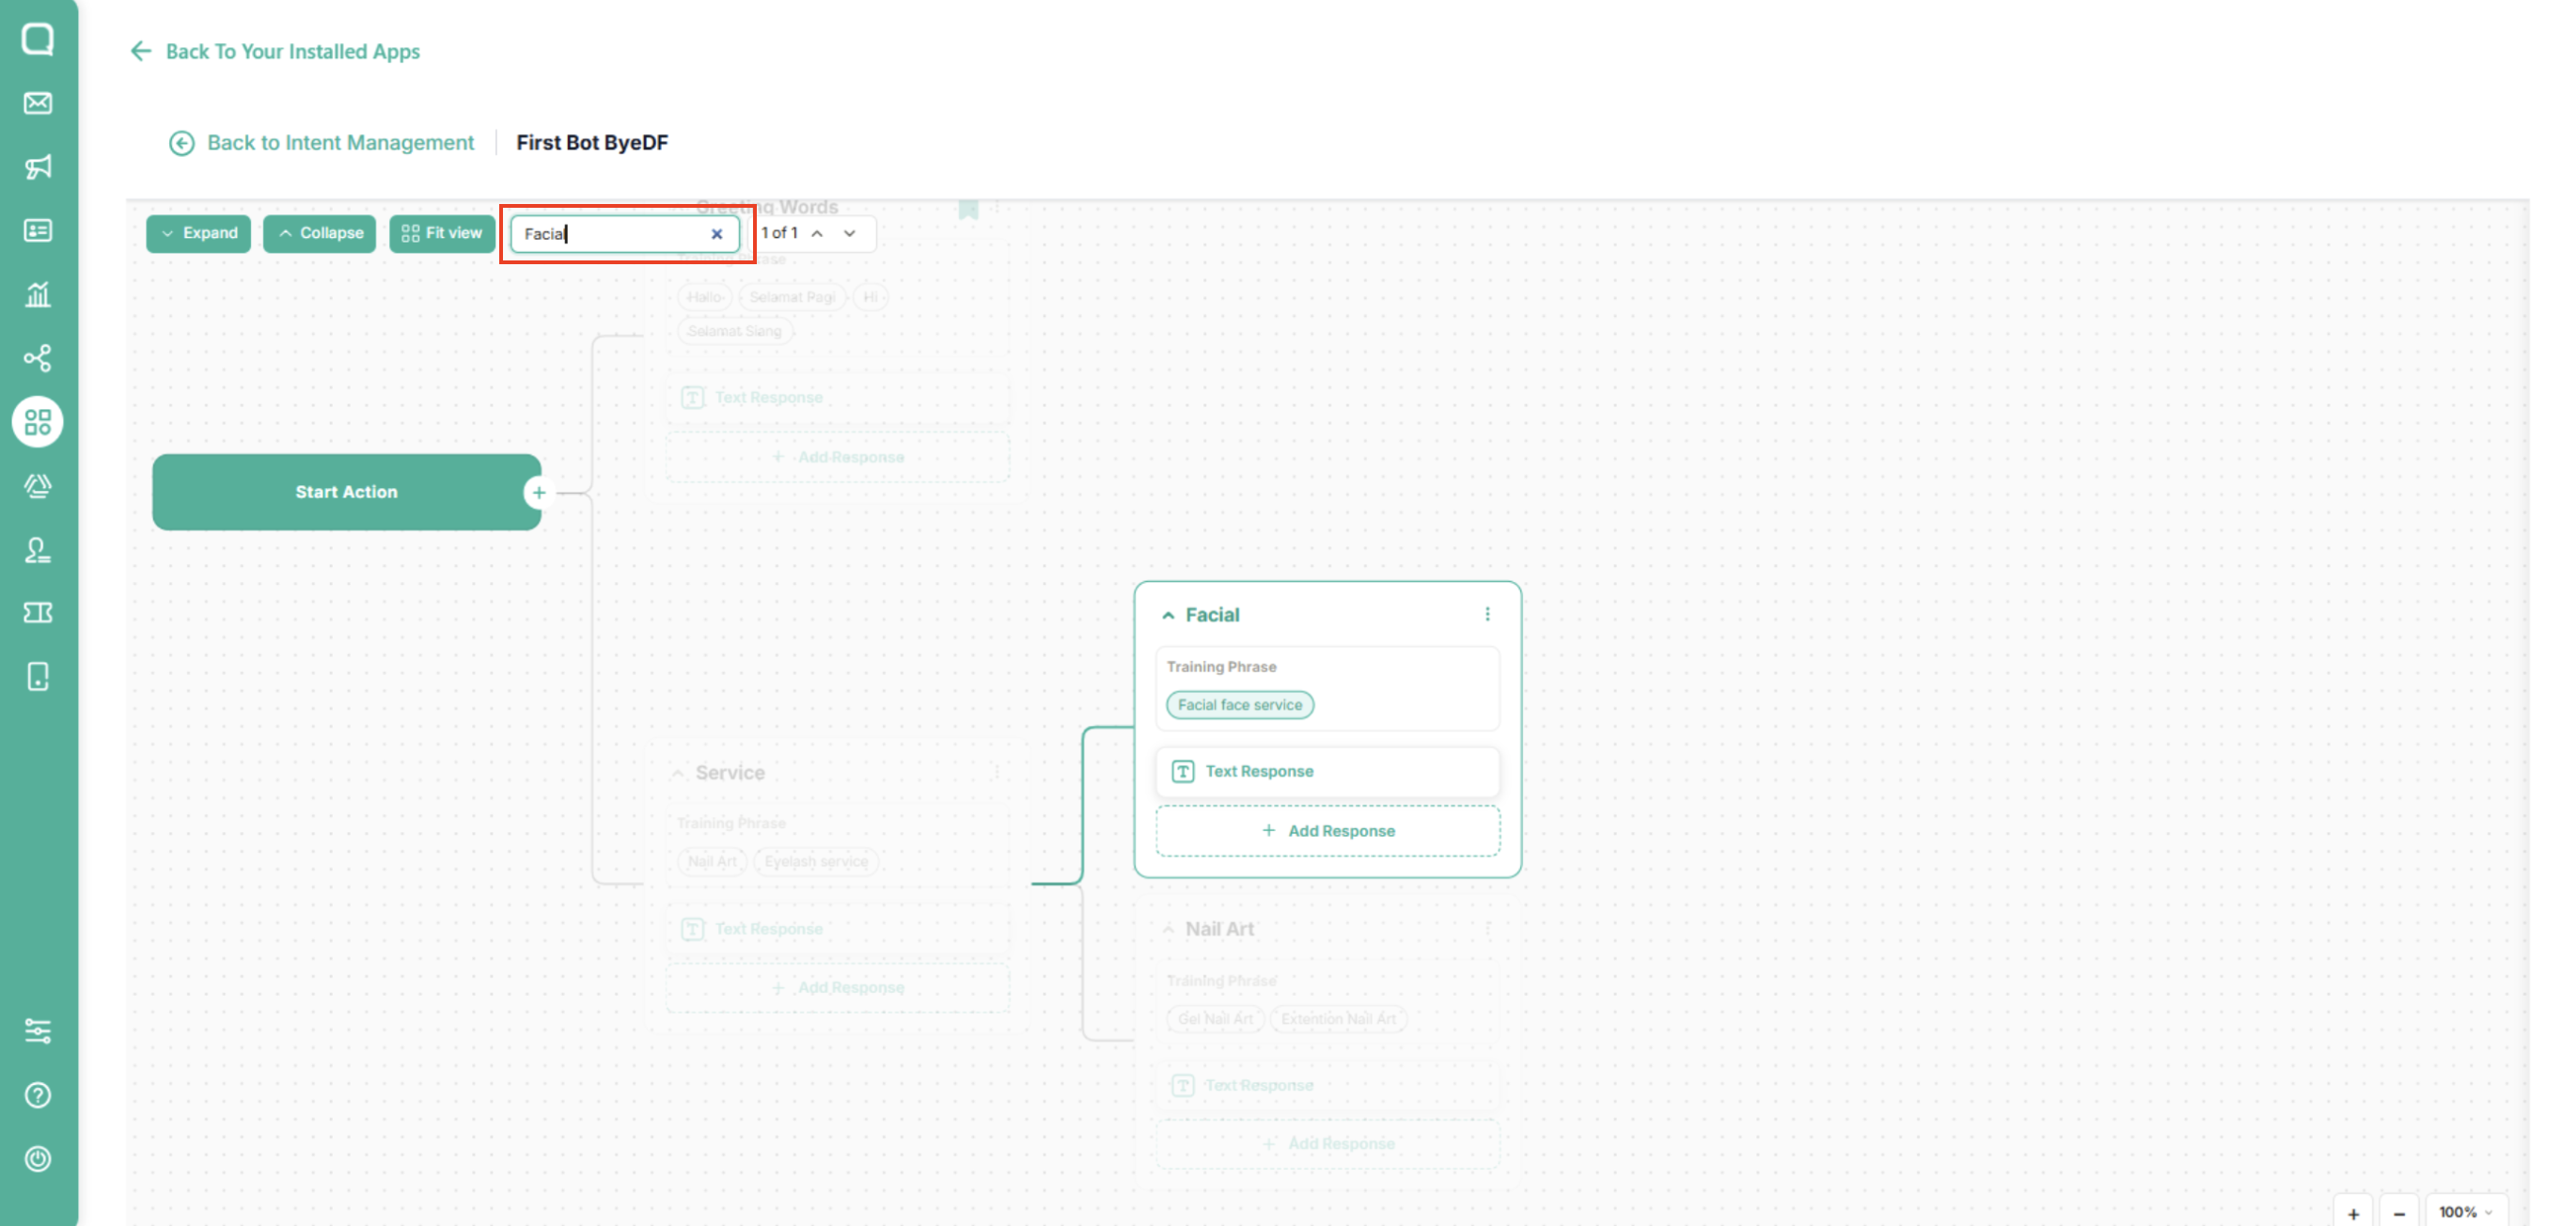
Use the search field to find a specific intent.
Entities
What is a System Entity
System Entities are predefined (built-in) entities provided by Intent-based Engine to automatically recognize common types of data from user input.
Instead of creating entities manually, you can directly use system entities to extract structured information such as dates, numbers, email addresses, or phone numbers. This helps speed up development and ensures consistent extraction.
On the entity extraction page there are two sections, namely custom and system
Custom Entities
Examples of Custom Entity use cases include:
Product names or merchandise categories.
City names, branch locations, or specific service coverage areas.
Promo codes, transaction IDs, or tracking numbers.
Specific terms or jargon unique to your industry.
How to Use Custom Entities
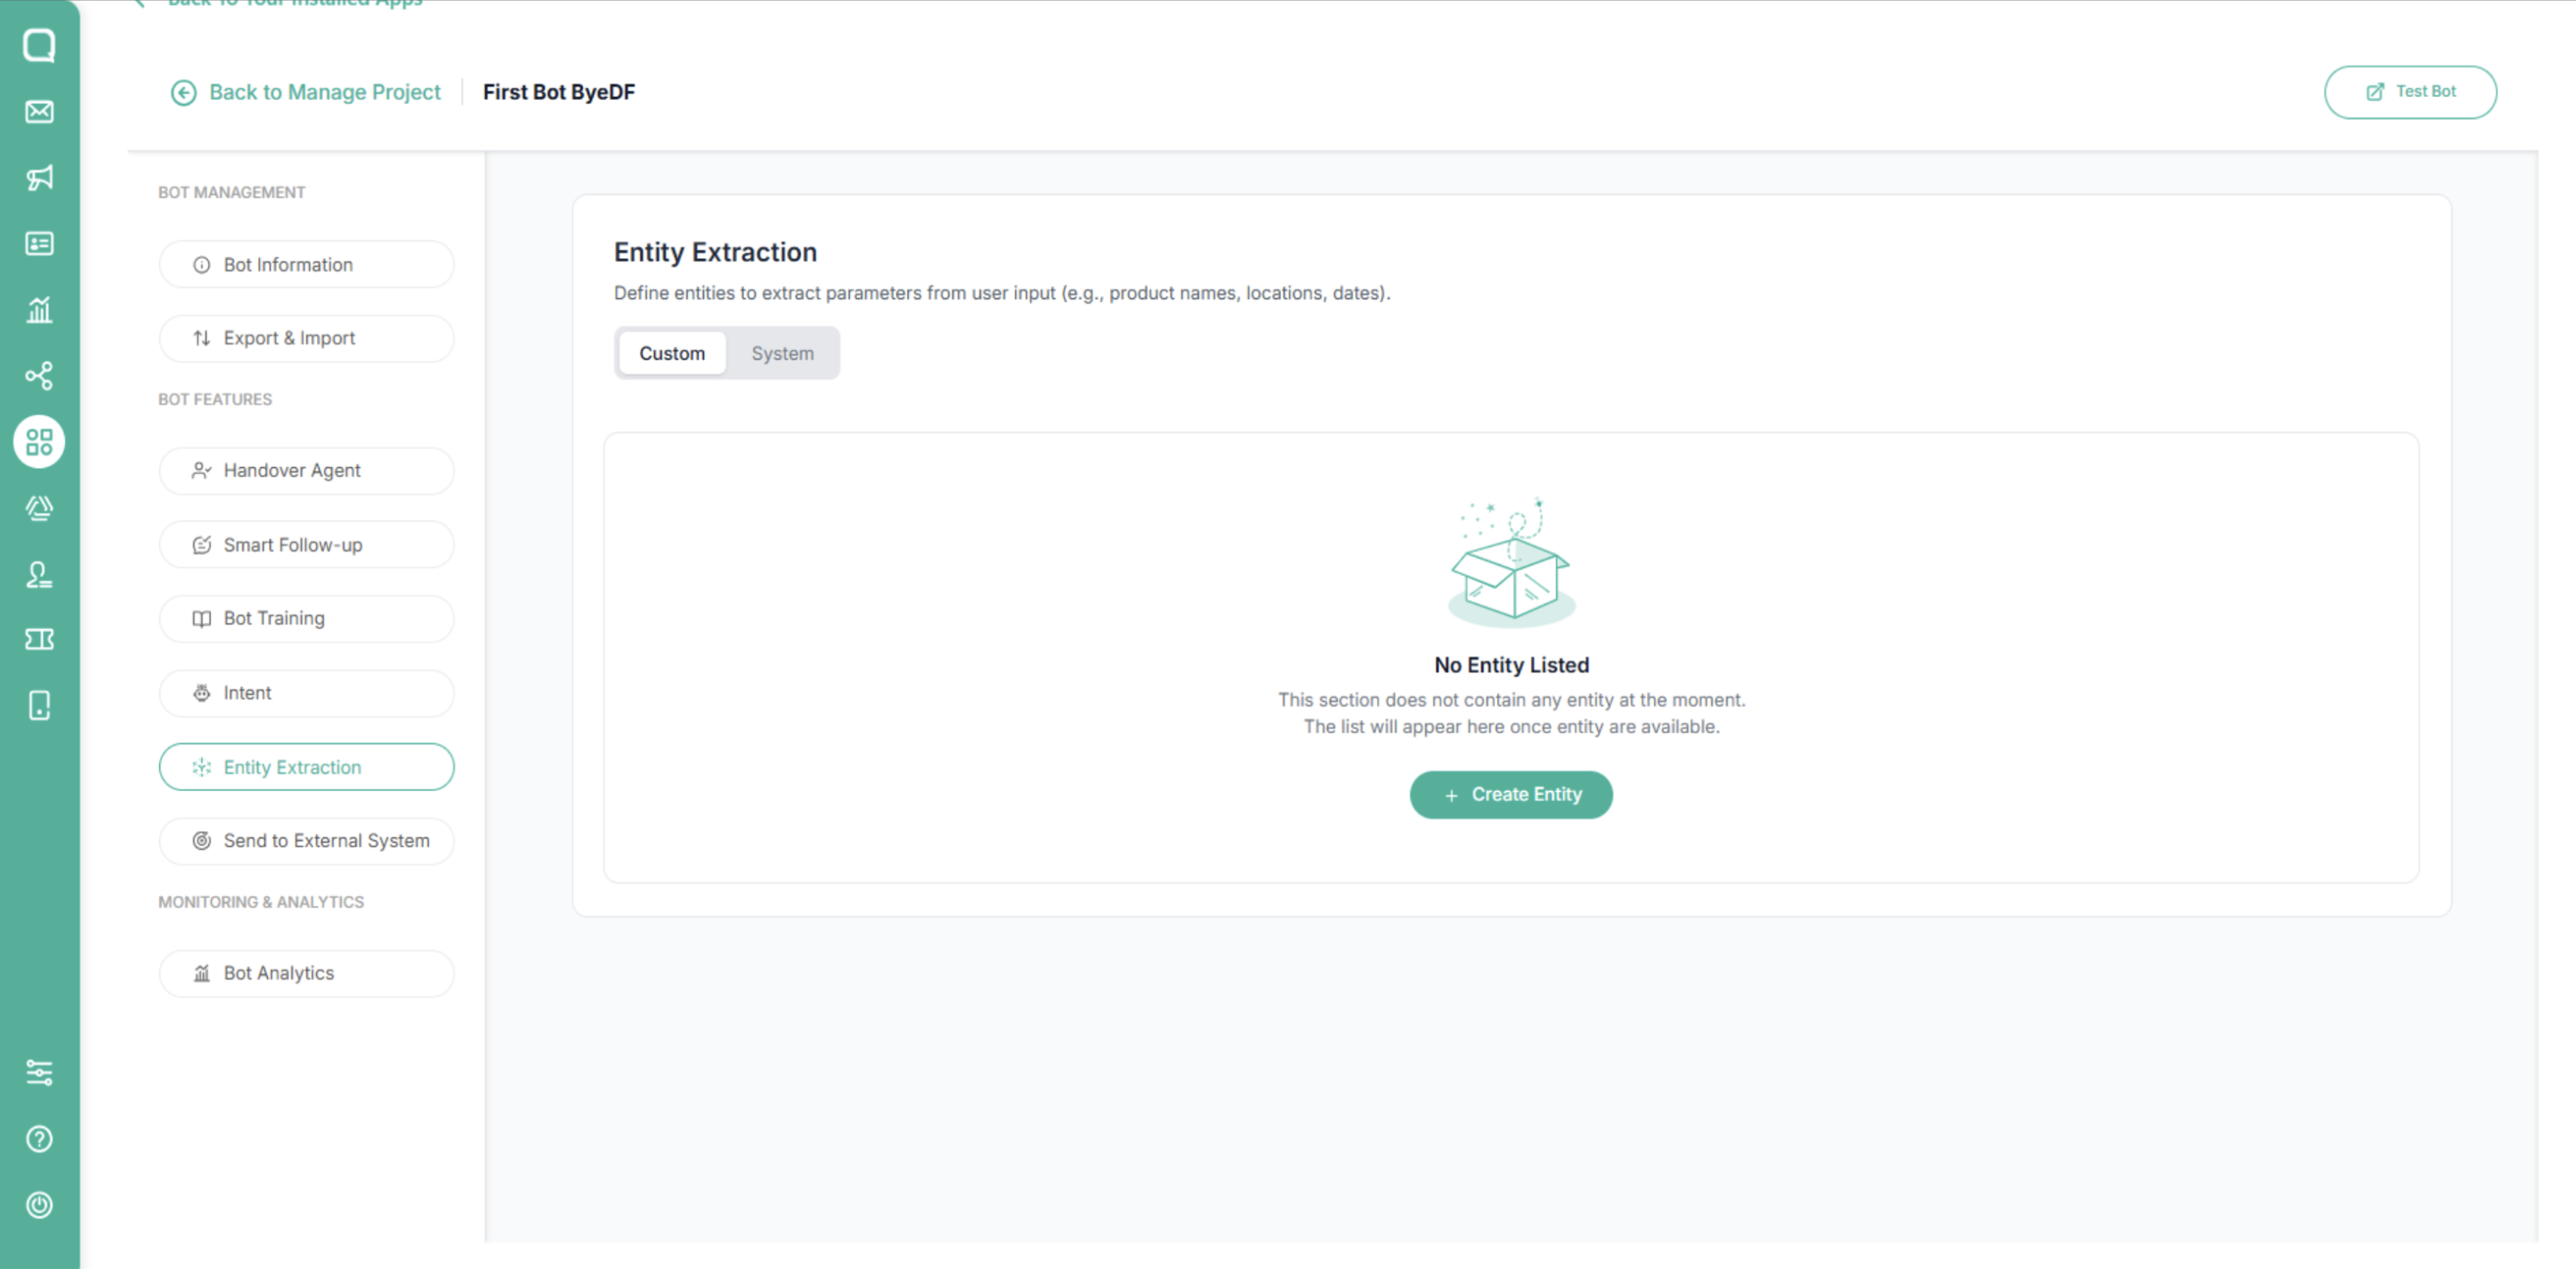
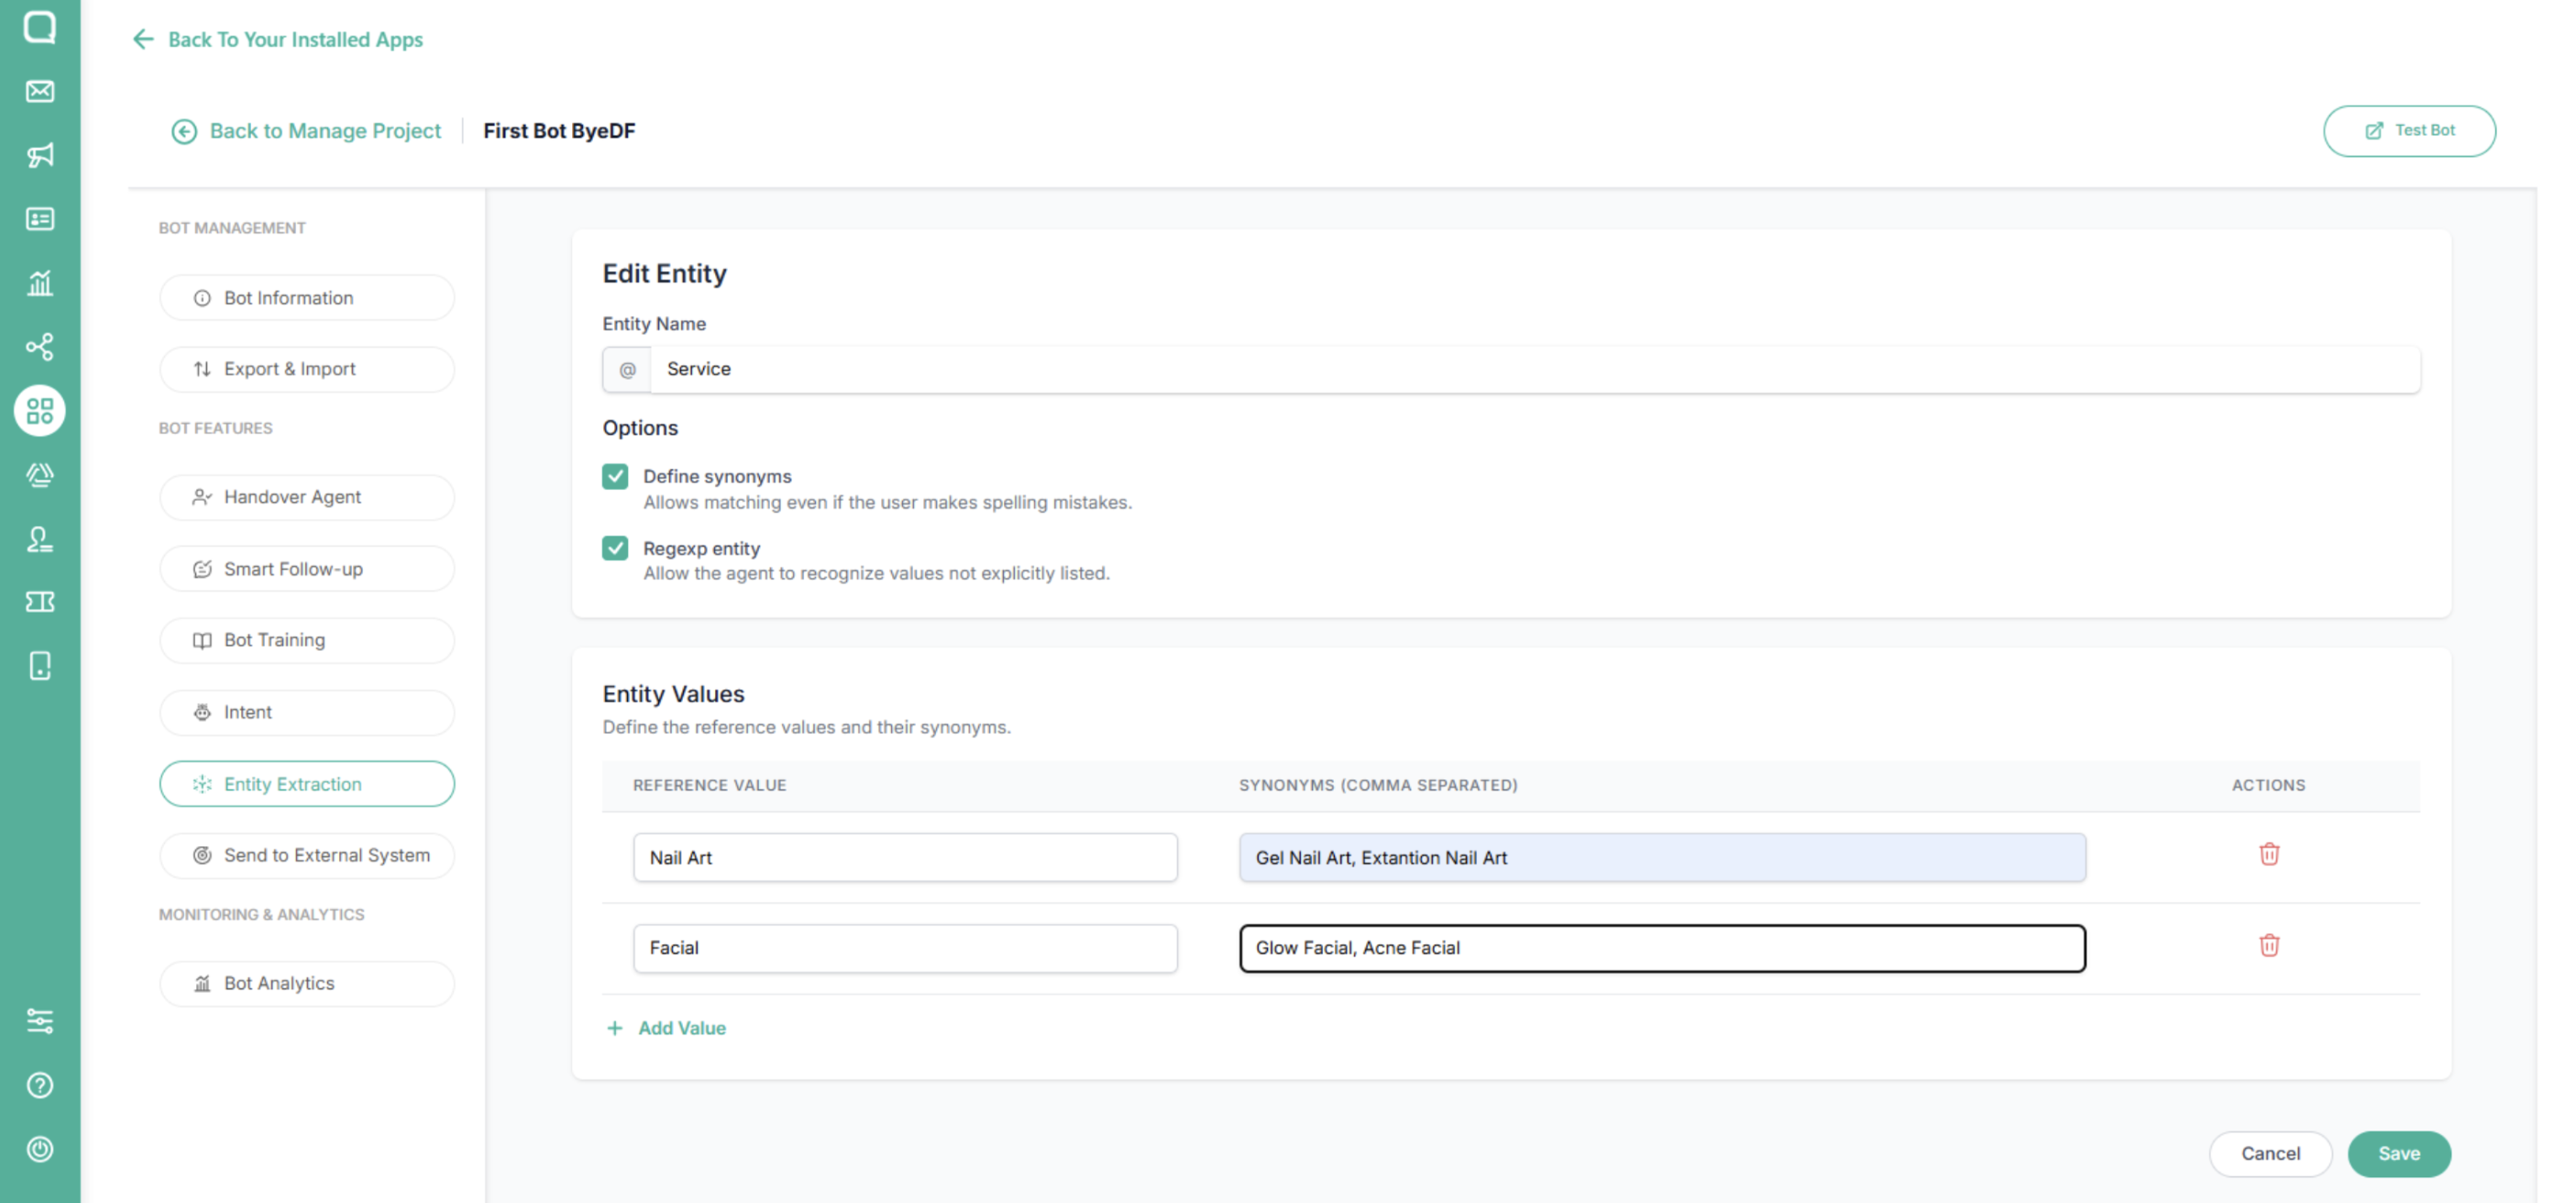
Select the Entity Extraction menu, in the Custom section, click the Create Entity button
fill in the fields according to your needs
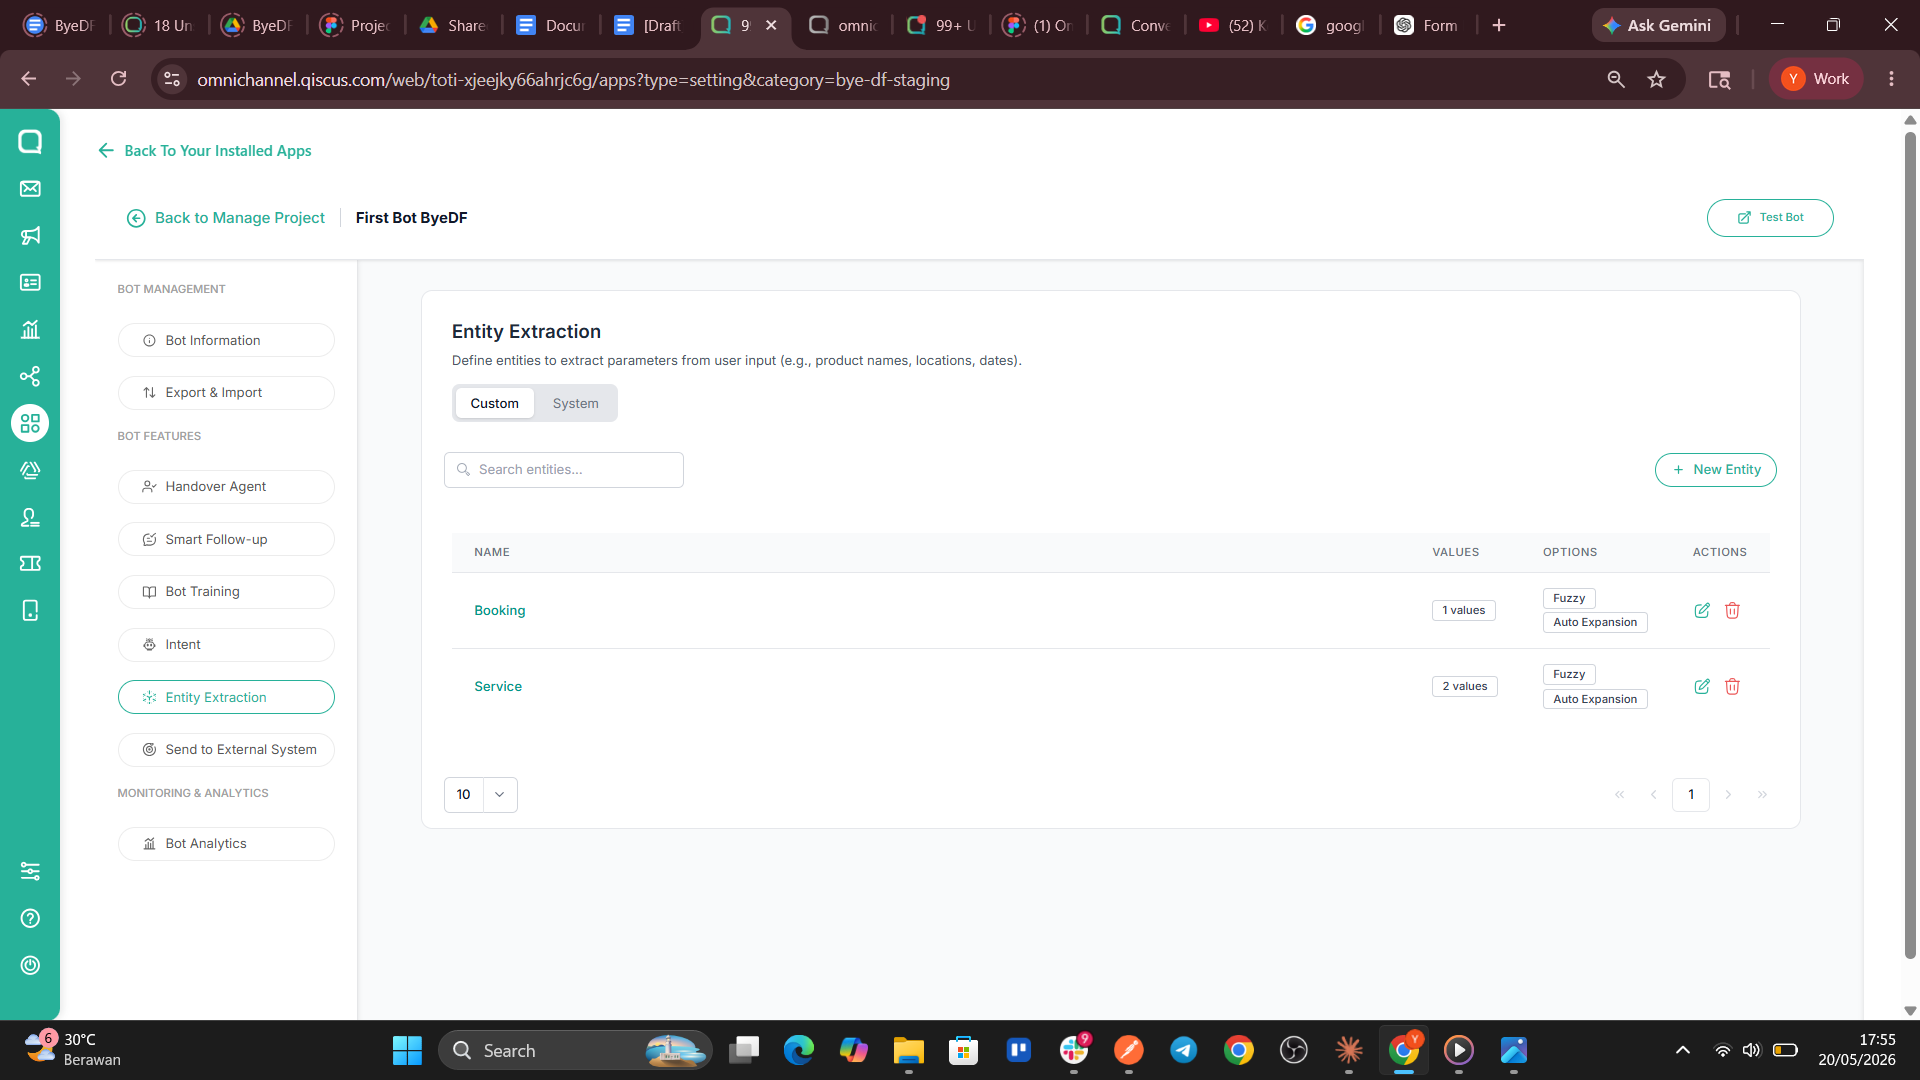
Entity created successfully
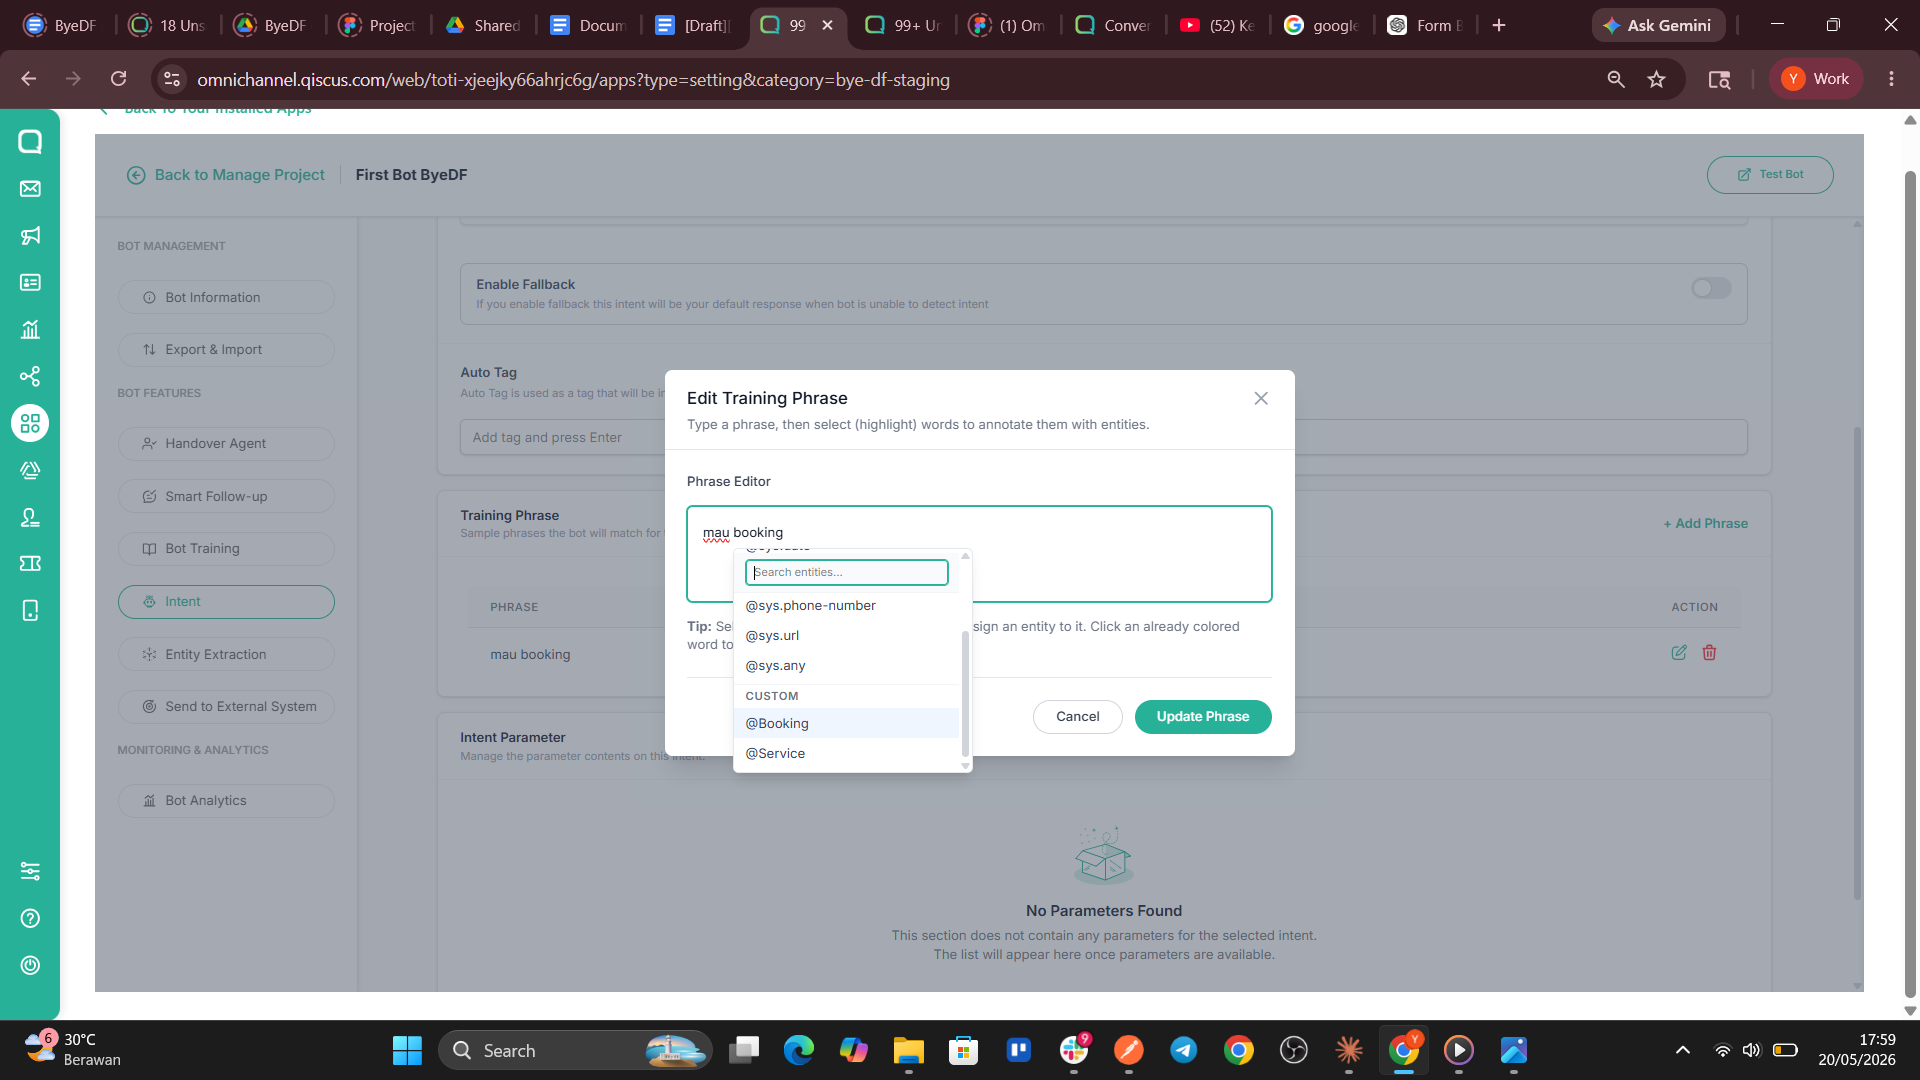
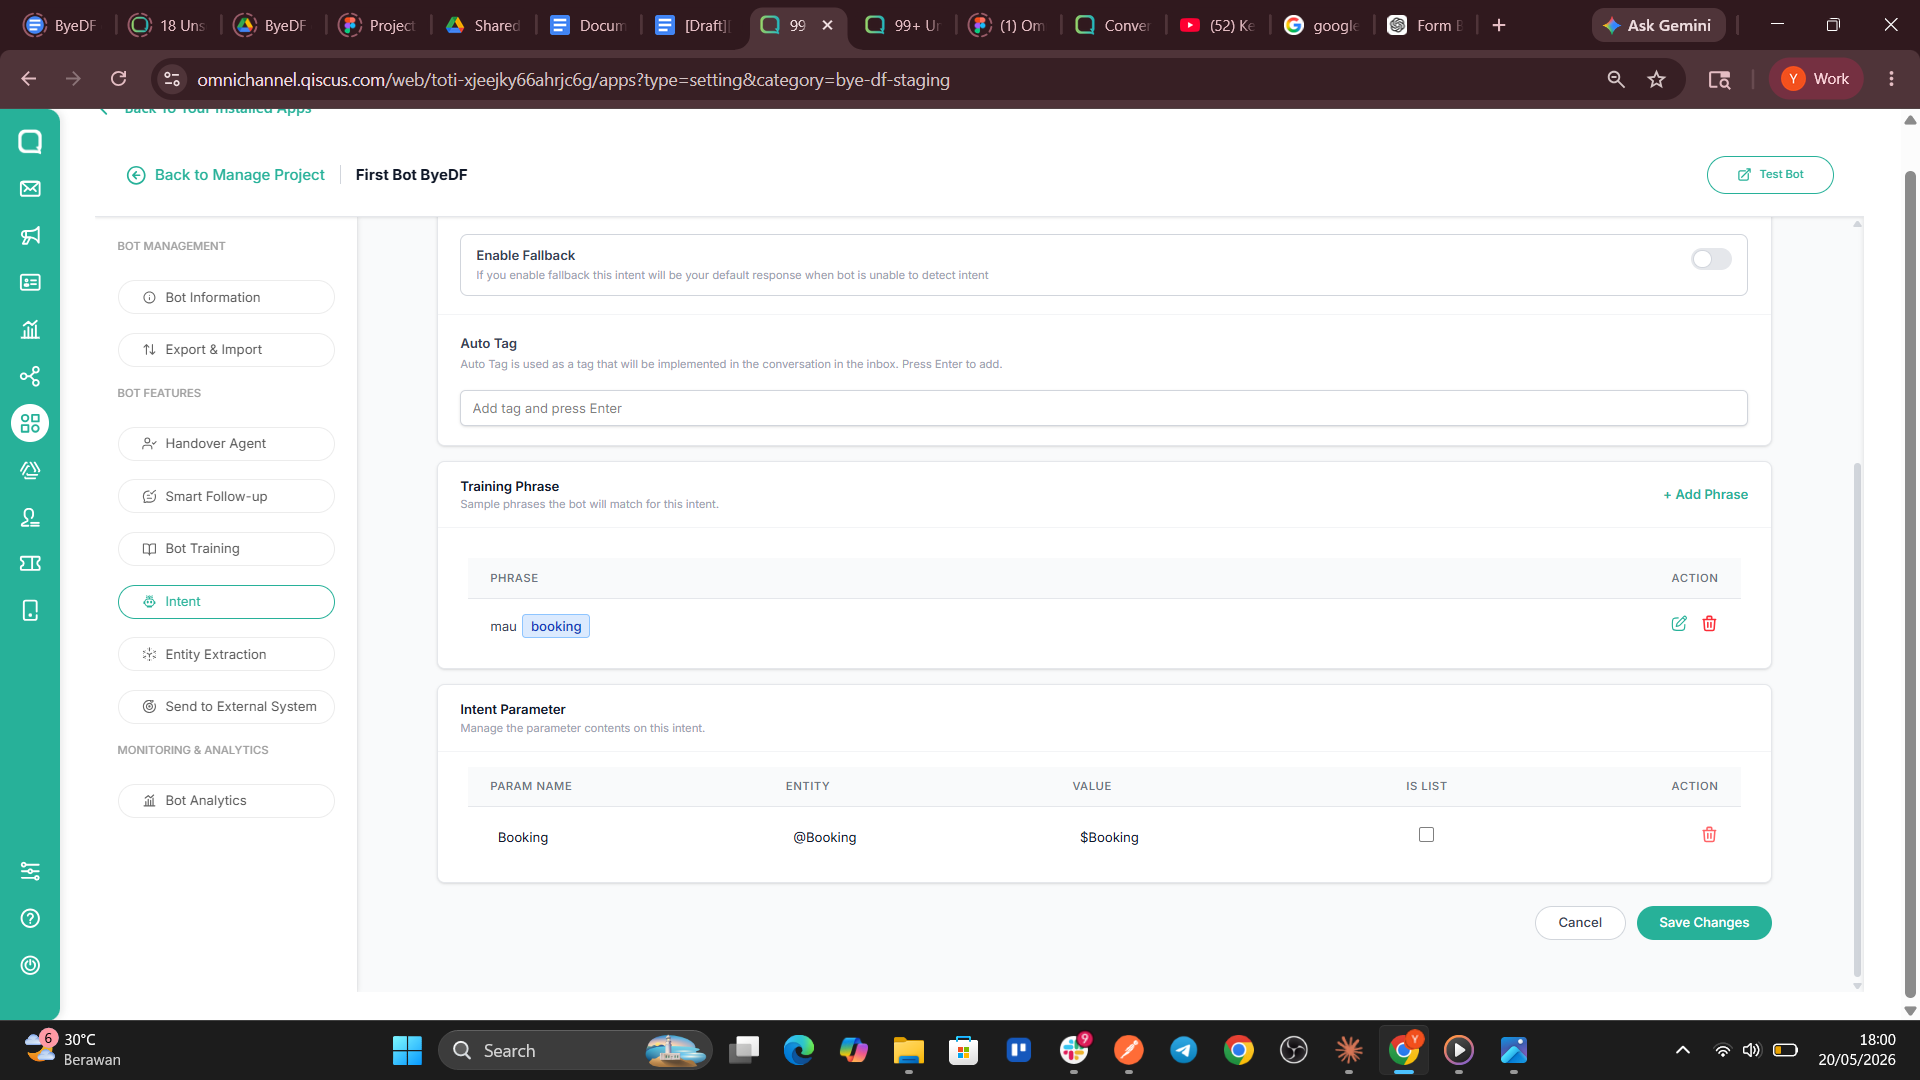
Once the entity is created, go to the Intent page and double-click the related word. Select the appropriate custom entity
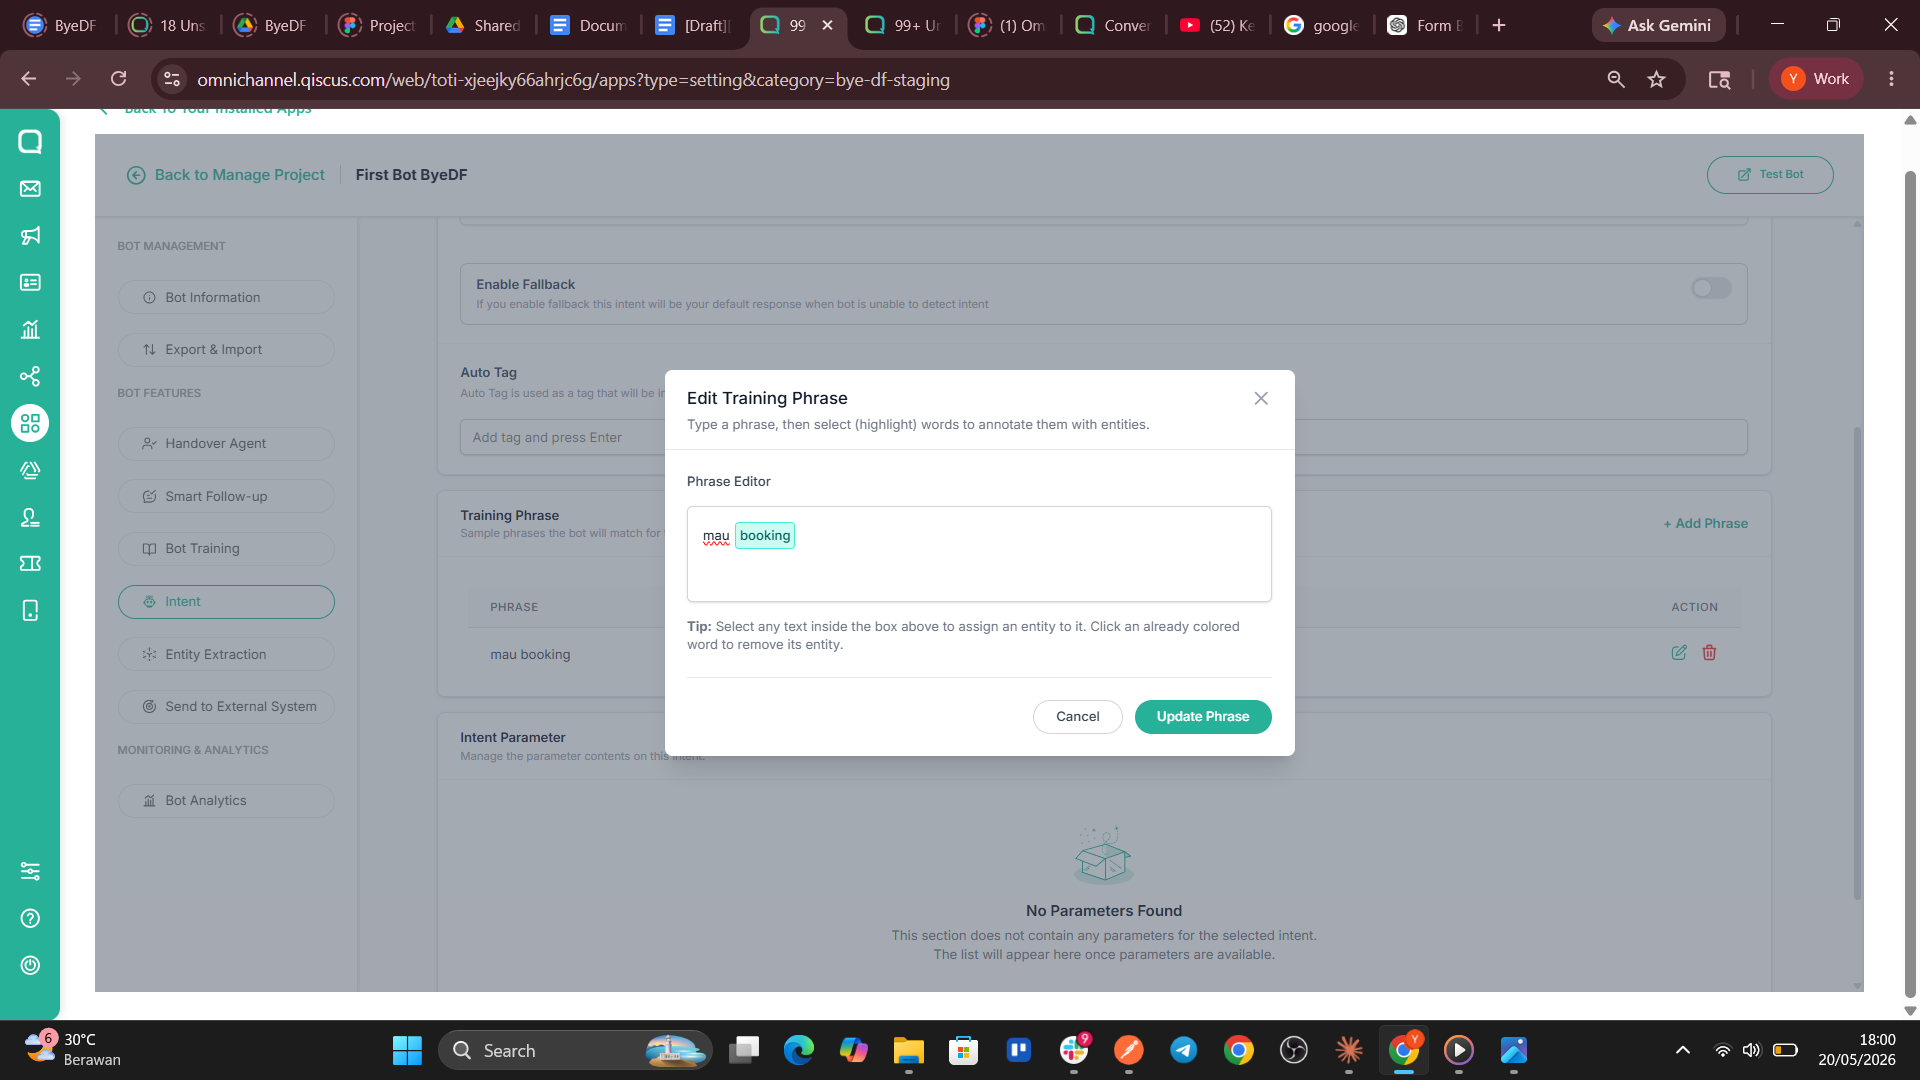
The selected word will be highlighted as a marker and click Update Phrase to save
The custom entity has been successfully created and will be recorded in the intent parameter section.
System Entities
When you annotate a word, a dropdown list will appear showing the various available entity options. Here is a list of available entities (including both system and custom):
Entity Name | Data Type | Example Input | Example Output |
Date | "tomorrow", "August 17" | 2026-08-17 | |
@sys.time | Time | "2 pm", "14:00" | 14:00:00 |
@sys.date-time | Date & Time | "tomorrow at 2 pm" | 2026-08-17T14:00:00 |
@sys.number | Number | "five", "100" | 5, 100 |
Email Address | |||
@sys.phone-number | Phone Number | "081234567890" | 081234567890 |
@sys.any | Free Text (Catch-all) | "any text here" | any text here |
[Custom Entity Name] | Specific Data (Custom) | "green onion" (Synonym) | scallion (Reference value) |
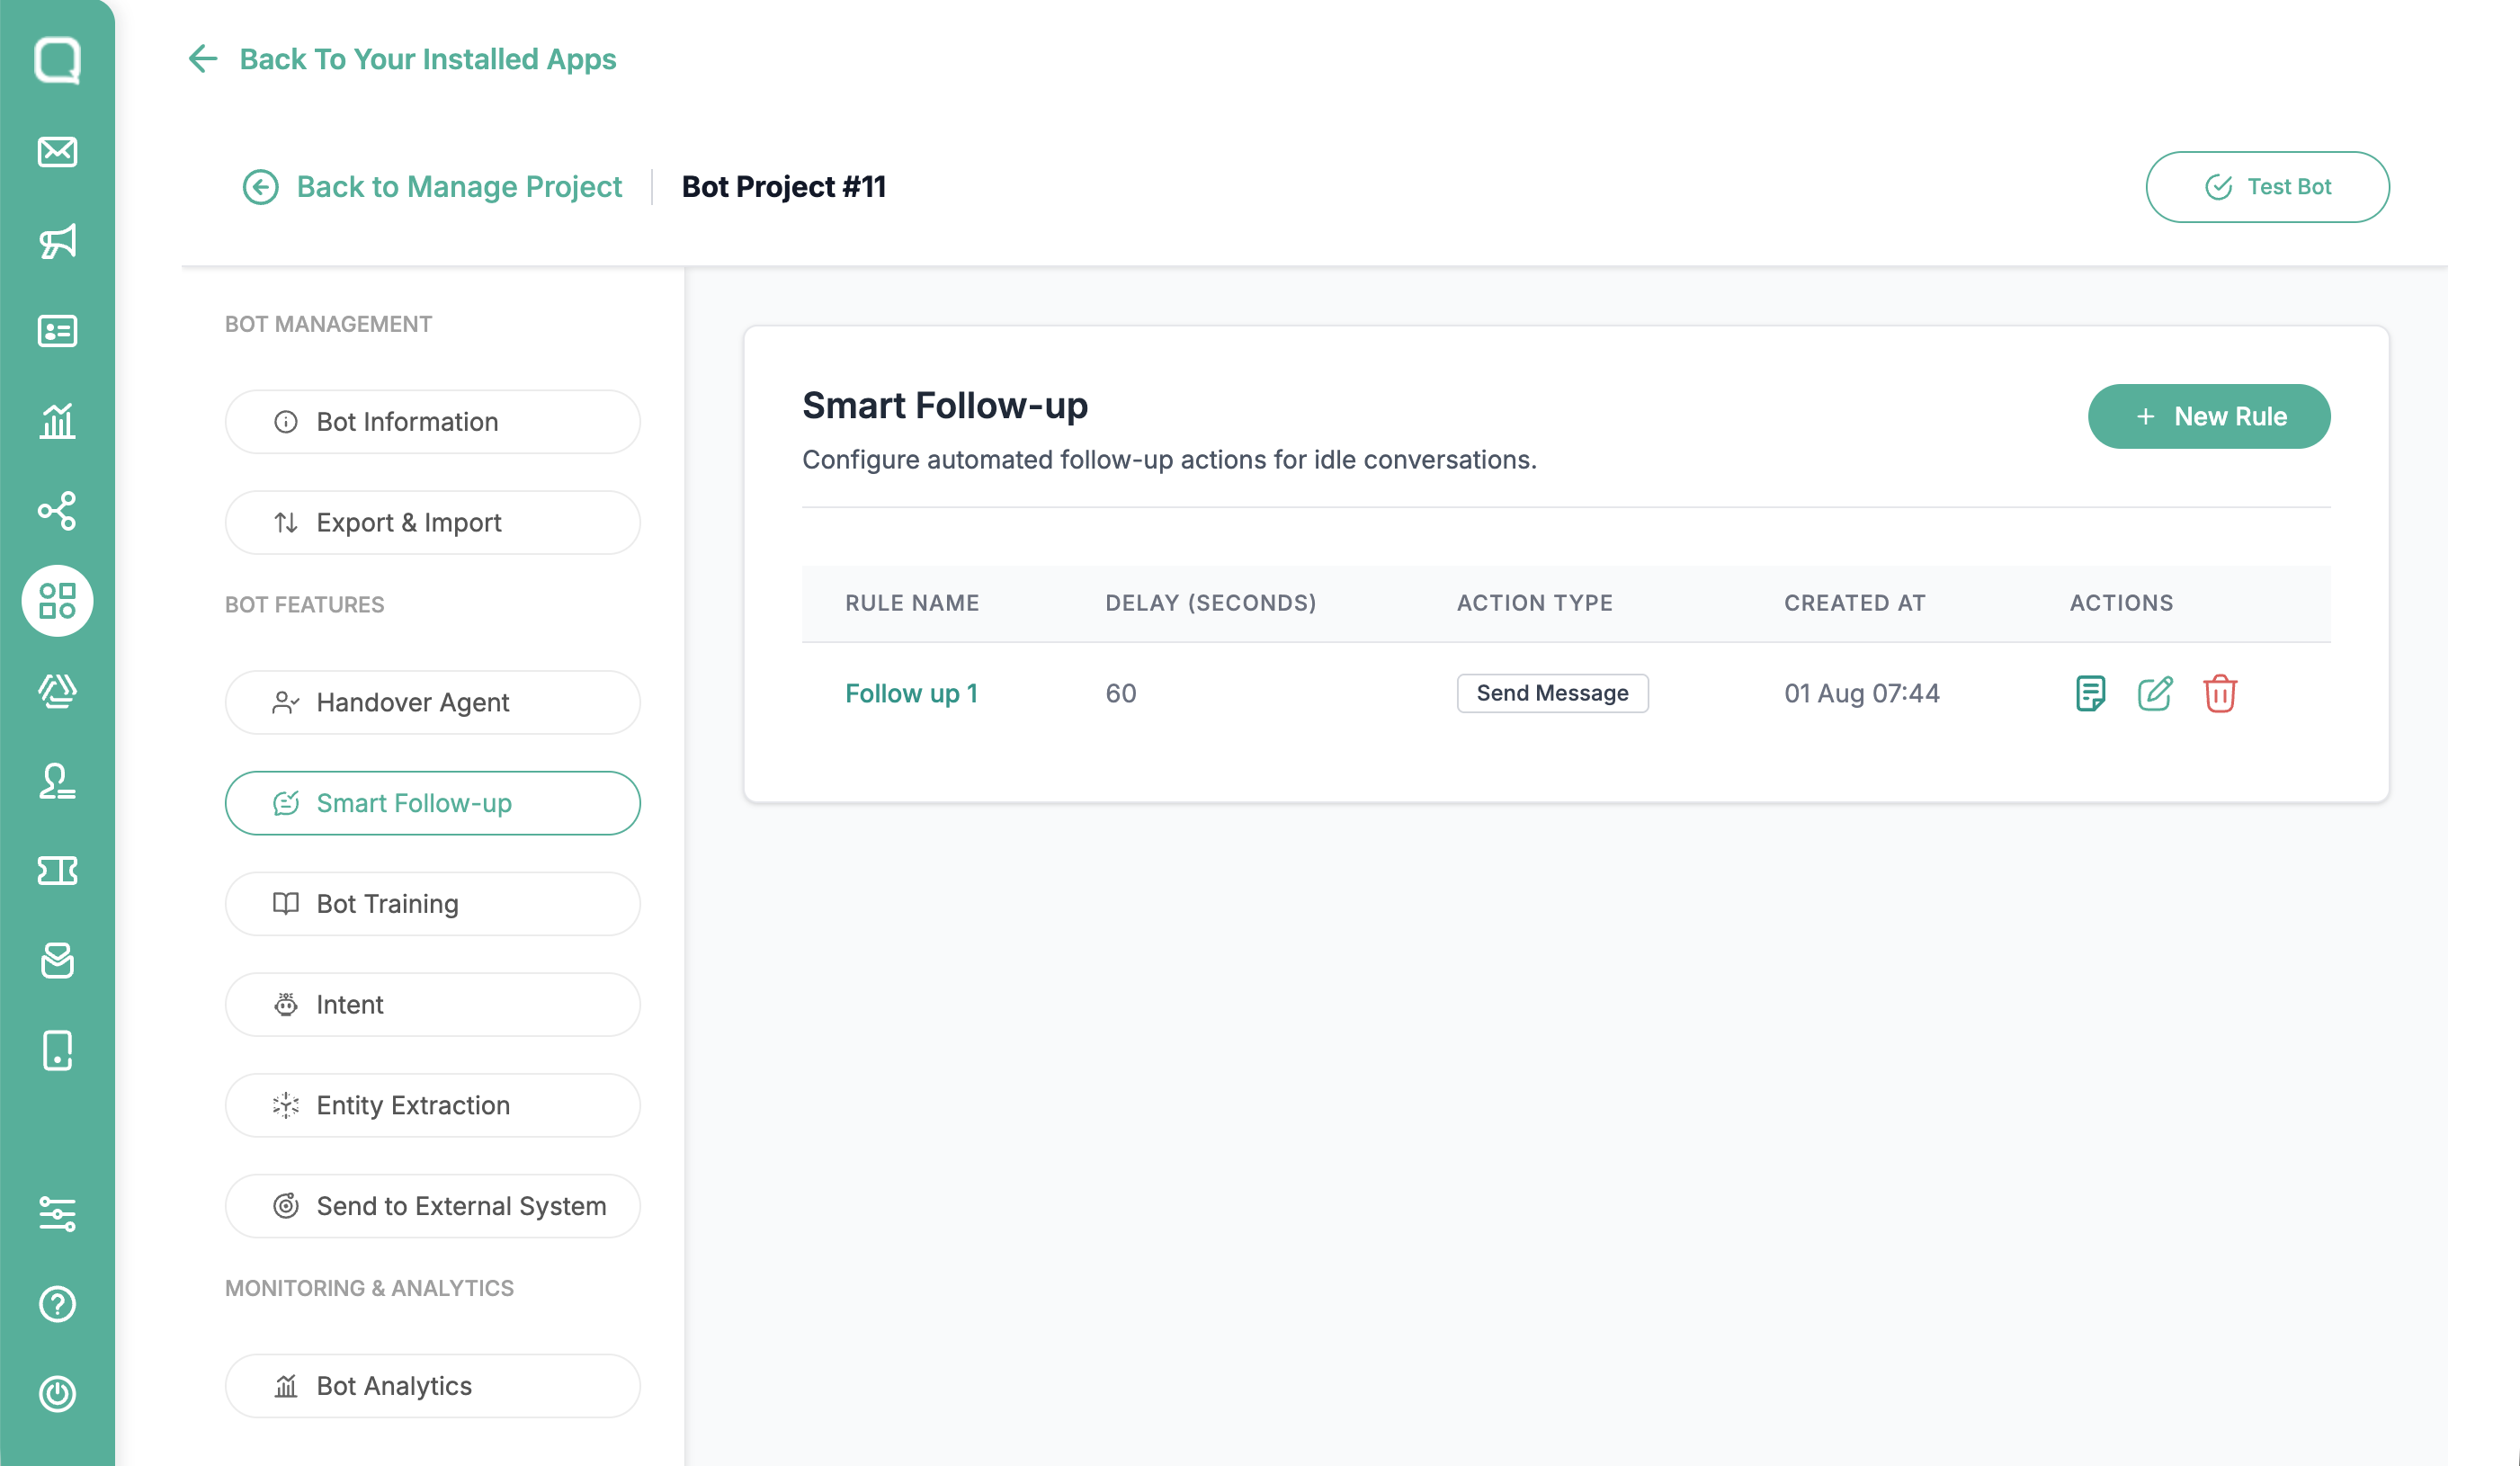
Smart follow-ups
Configure automated follow-up actions for your conversations.
Send Message
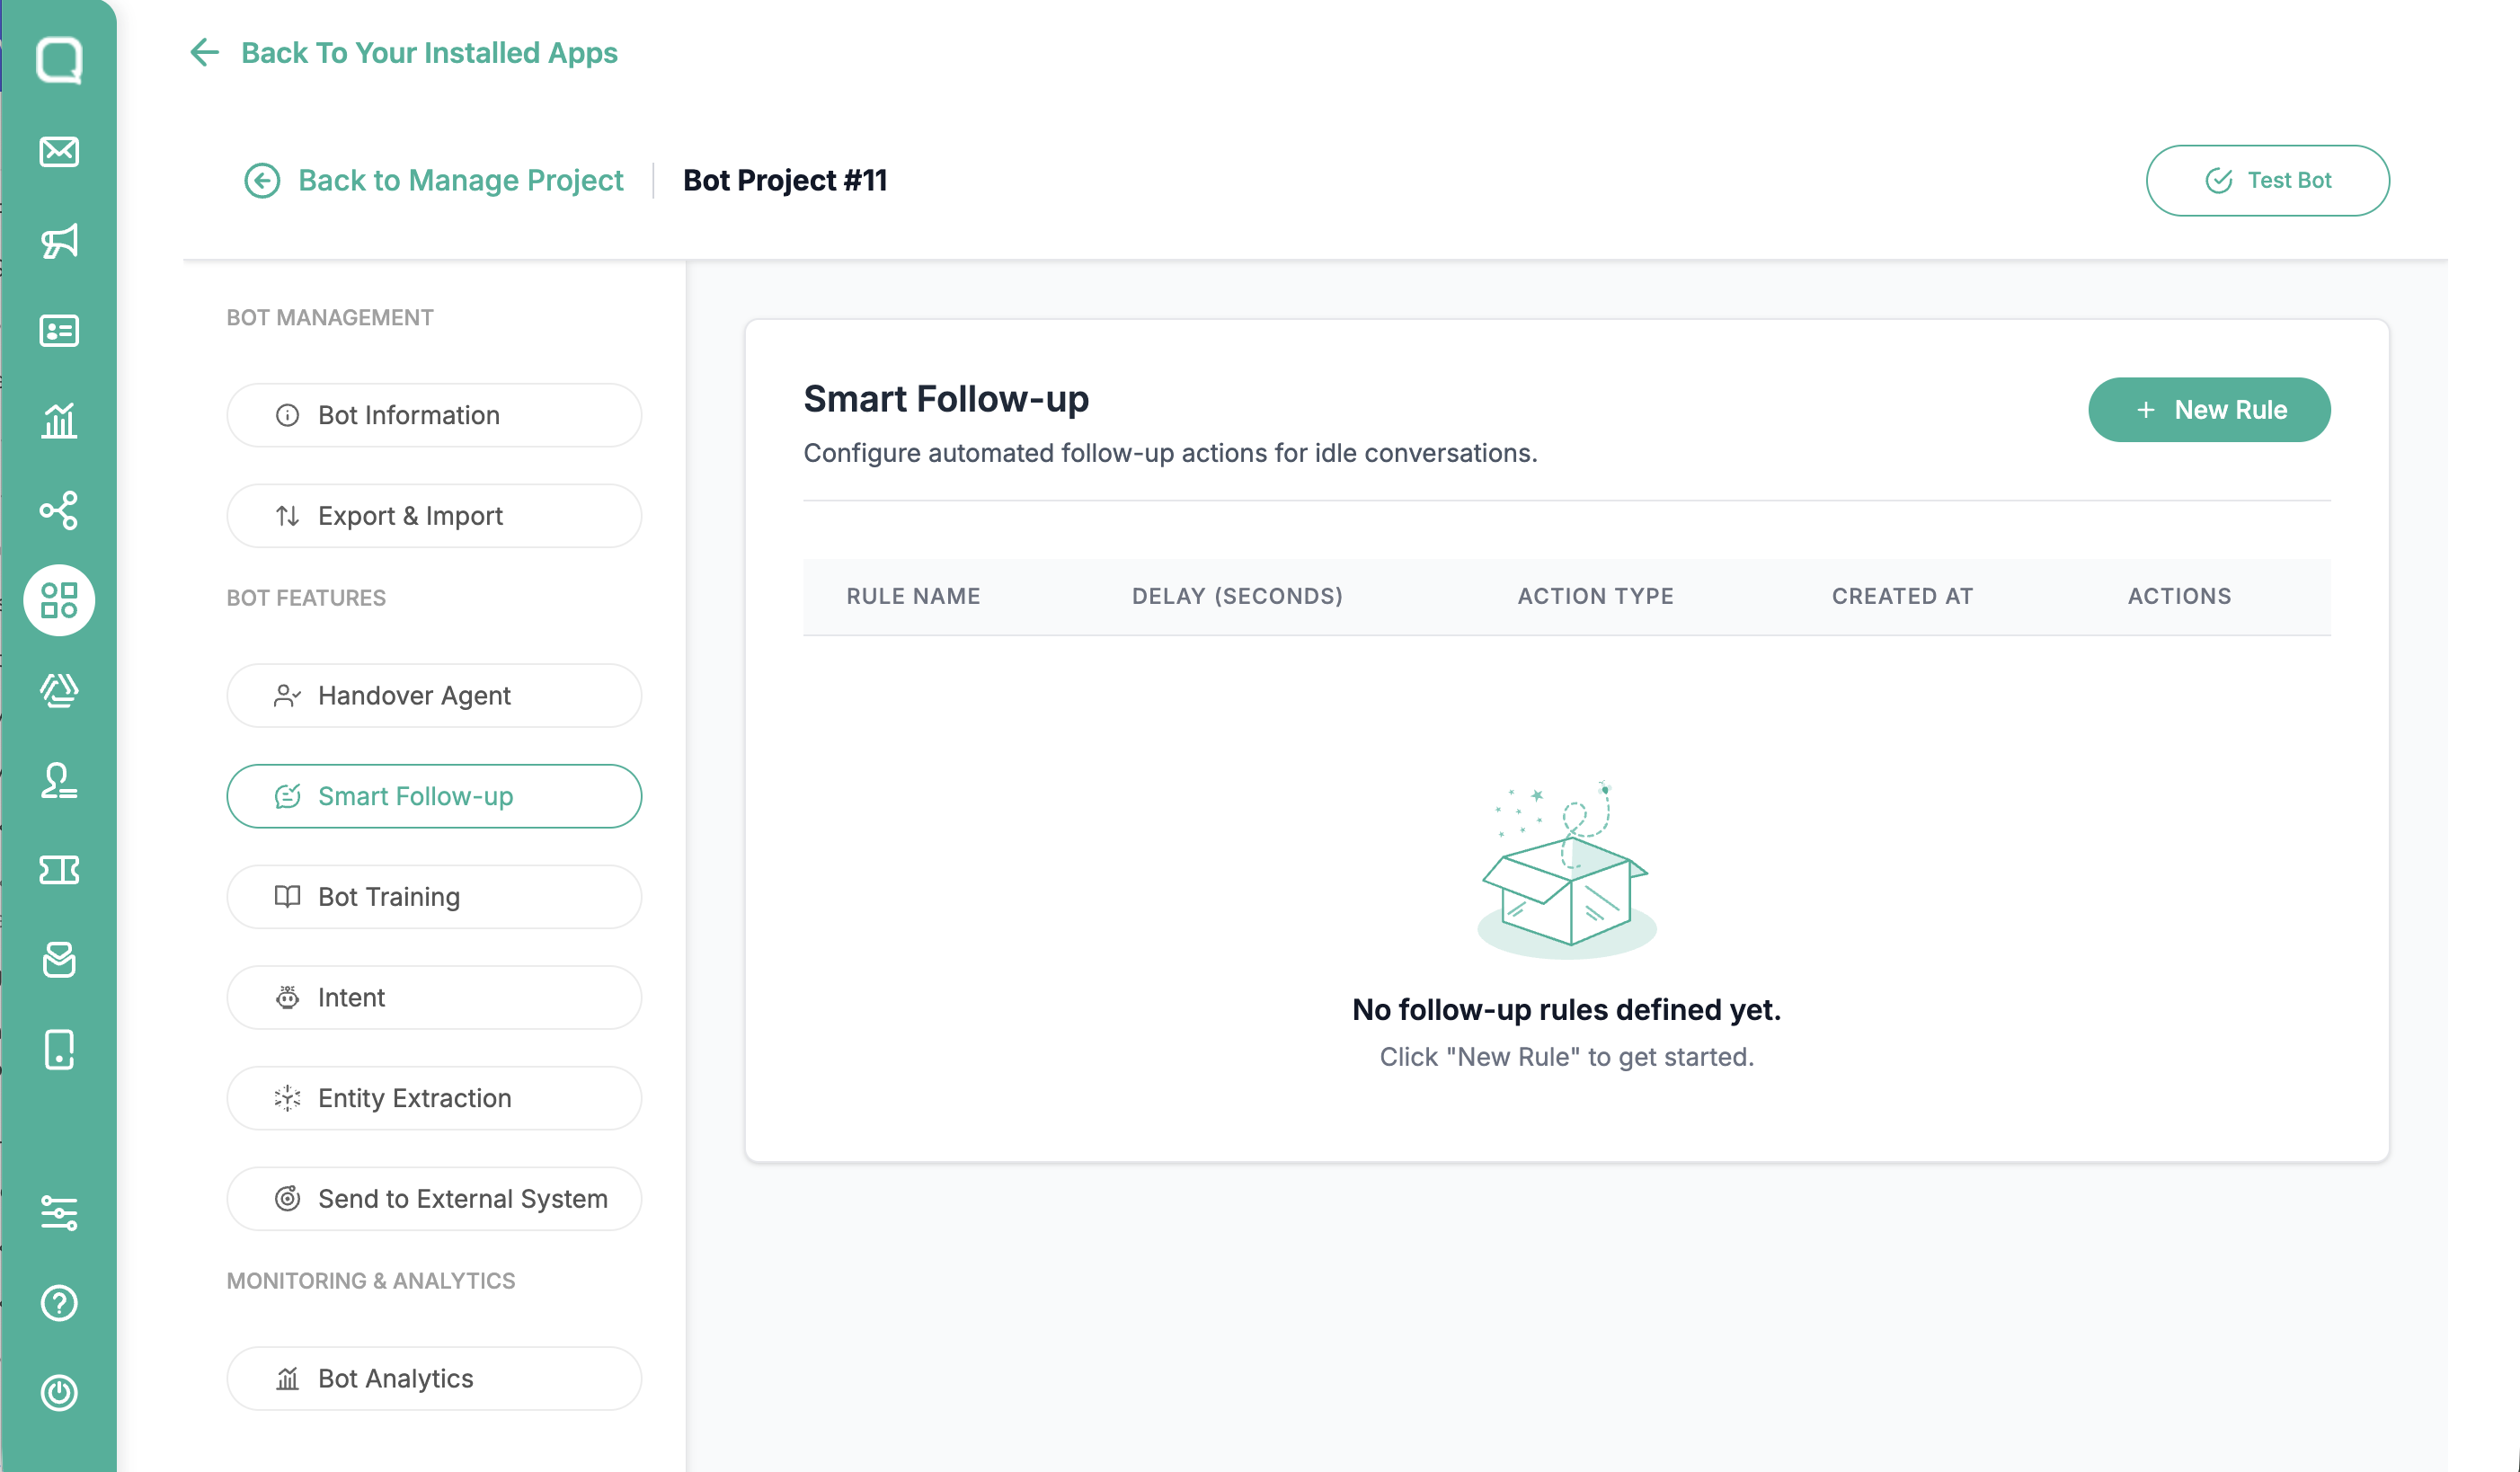
Select the Smart Follow-up menu, then click new rules to create new rules.
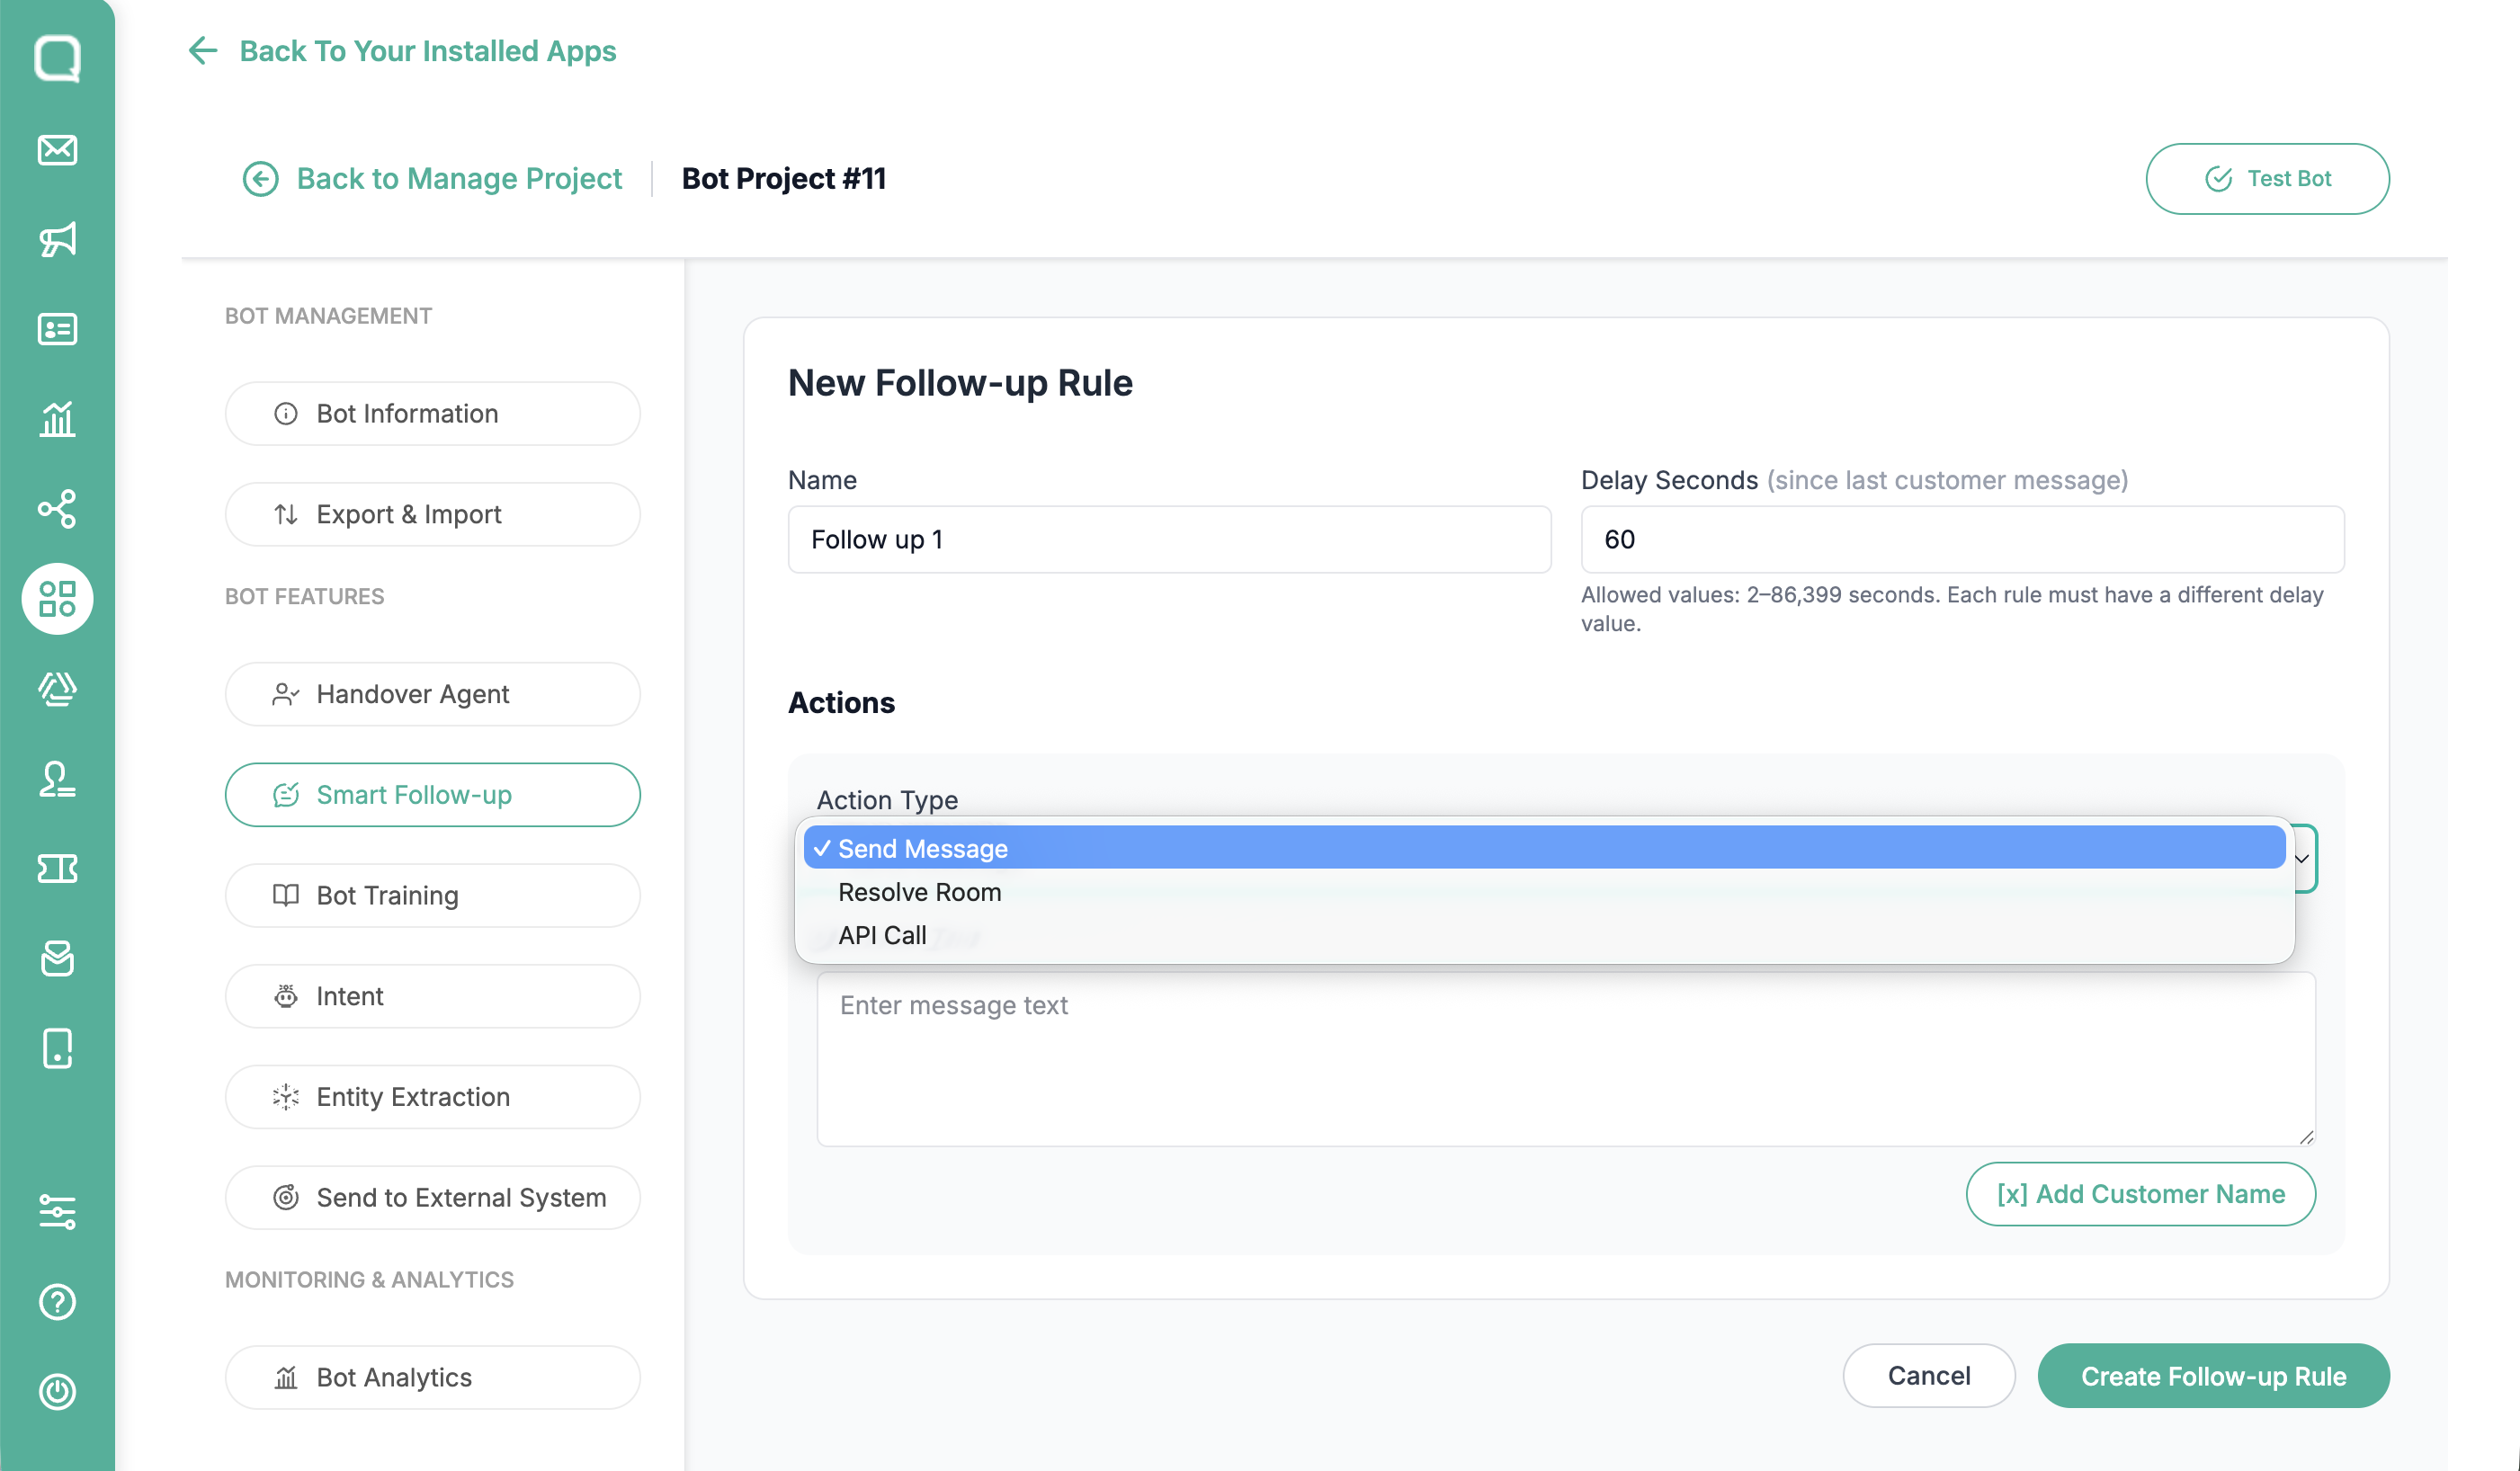
Fill in all fields correctly and select the action type Send Message
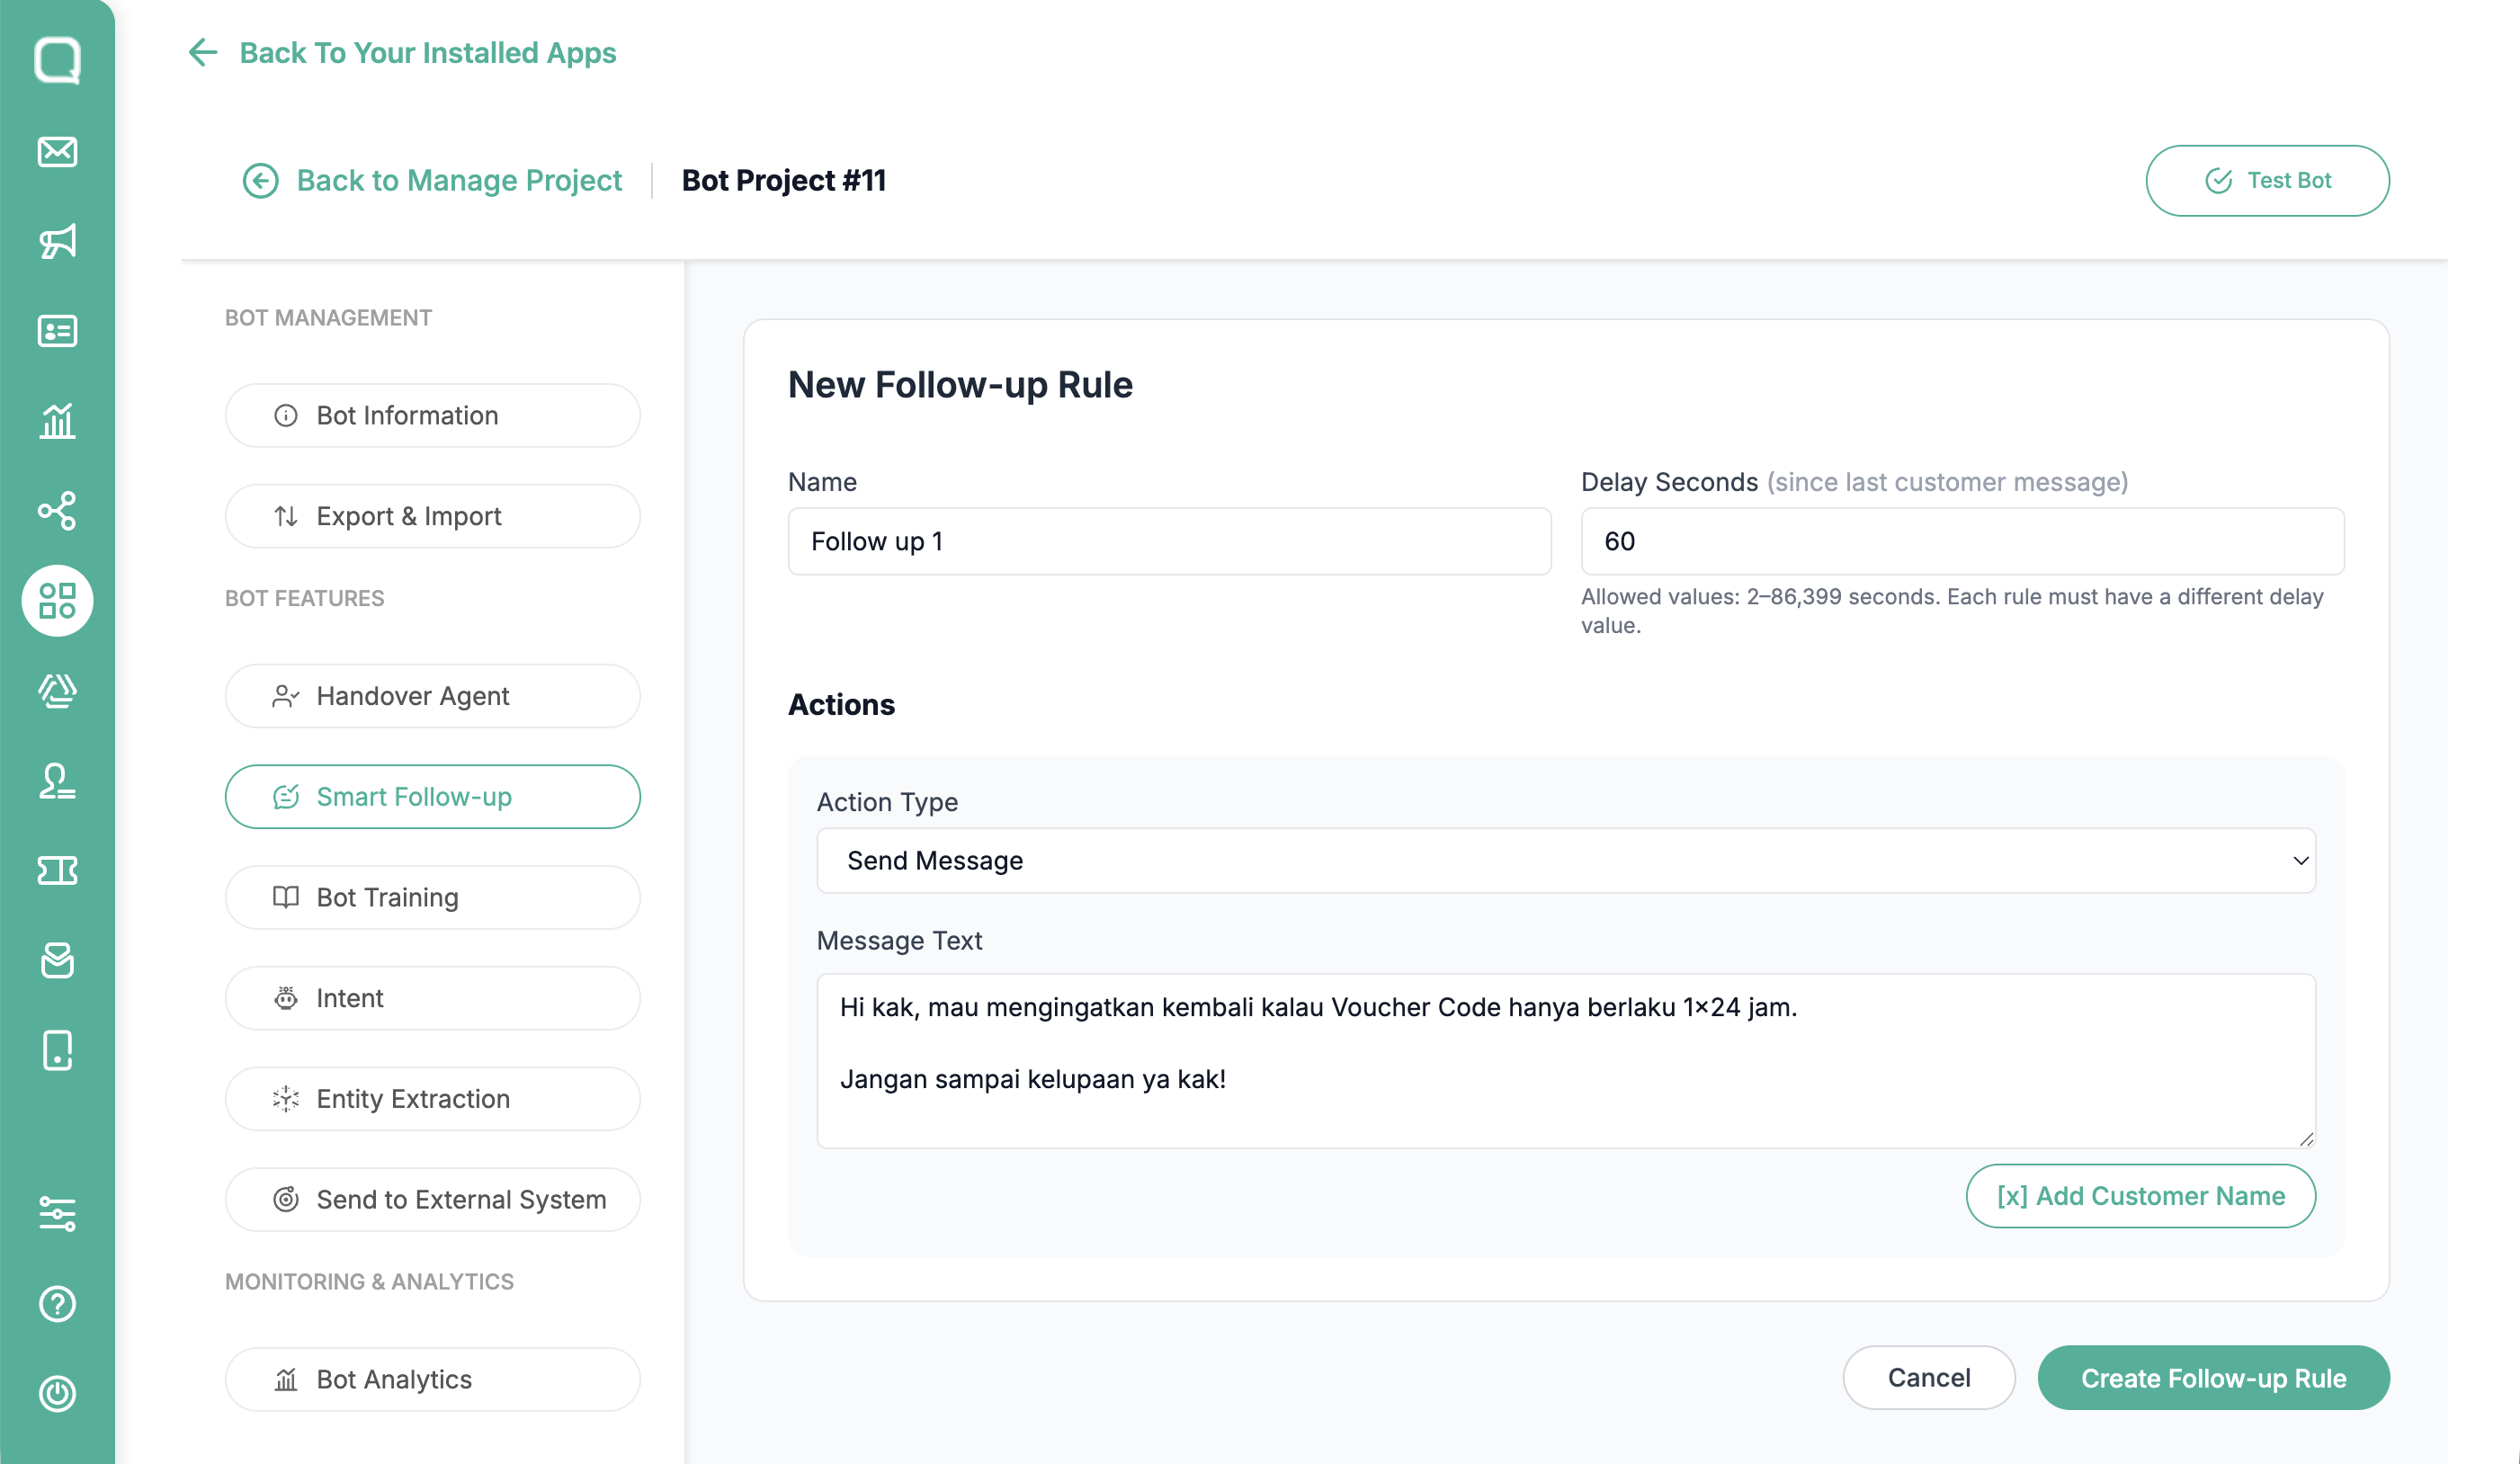
Write a message for the response to be displayed, then click Create Follow-up Rule
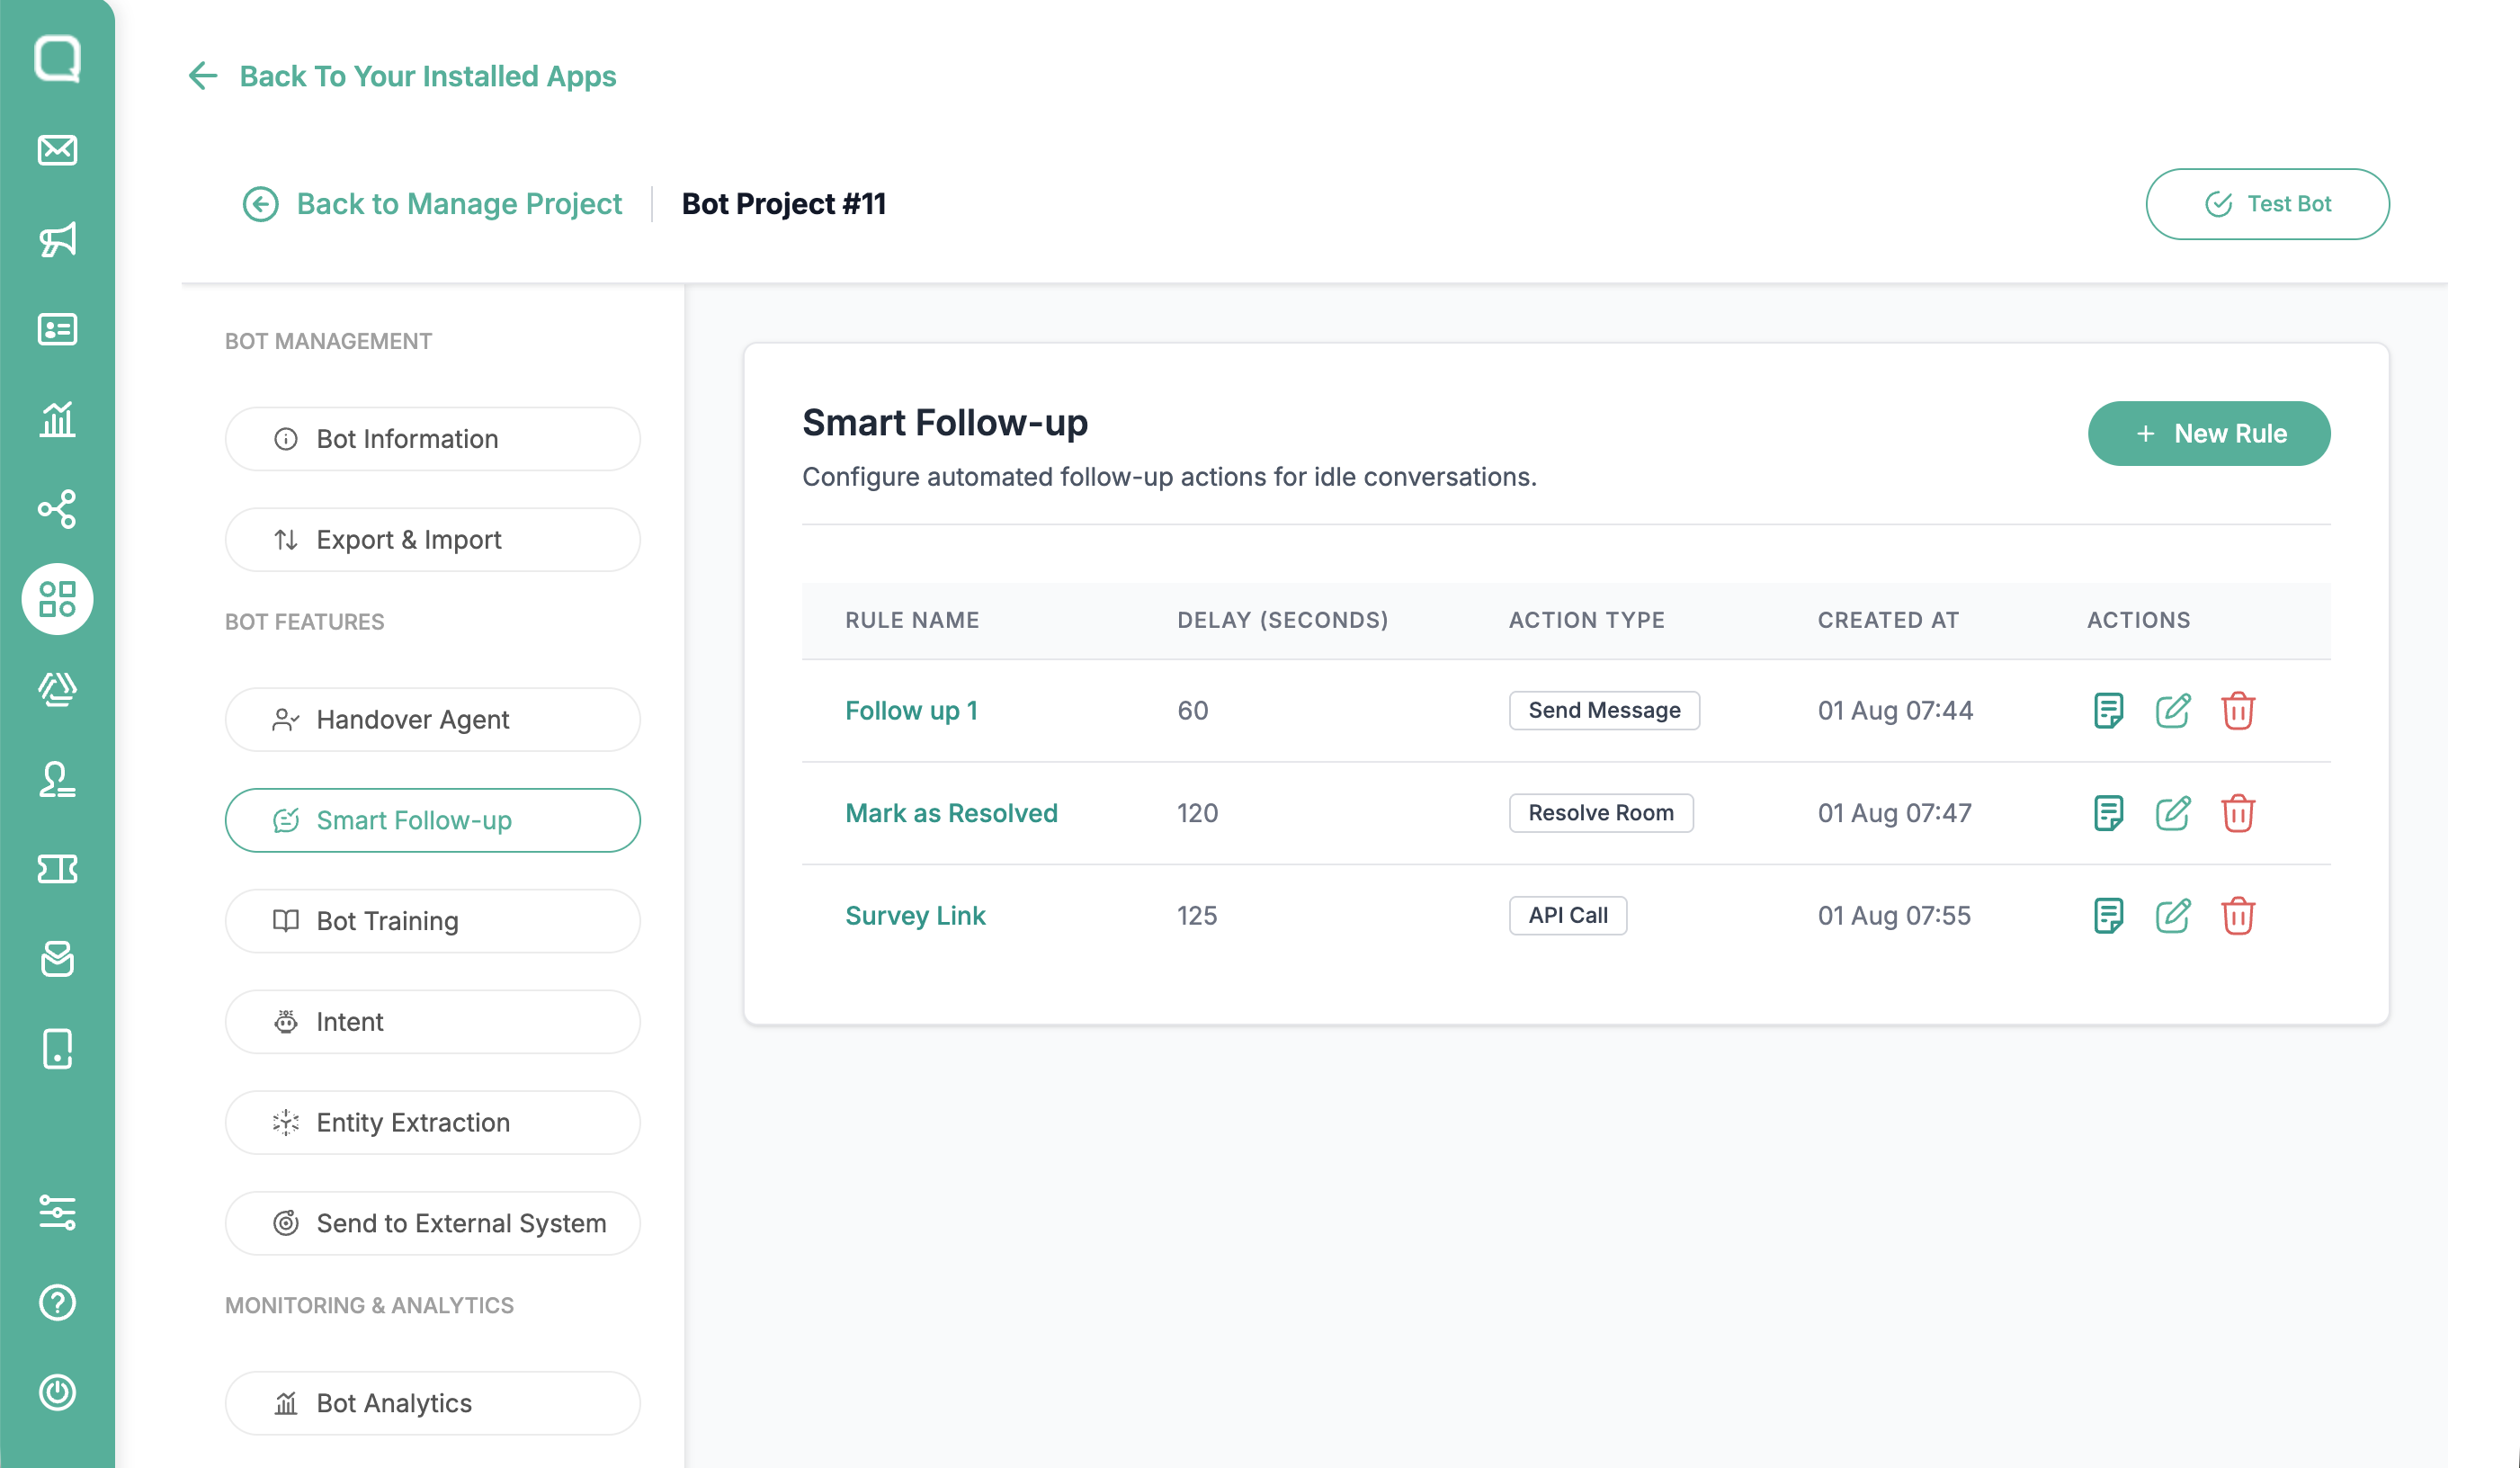
Your smart follow-up message has been successfully created. The message will be displayed in the rules list.
Resolved Message
Select the Smart Follow-up menu, then click new rules to create new rules.
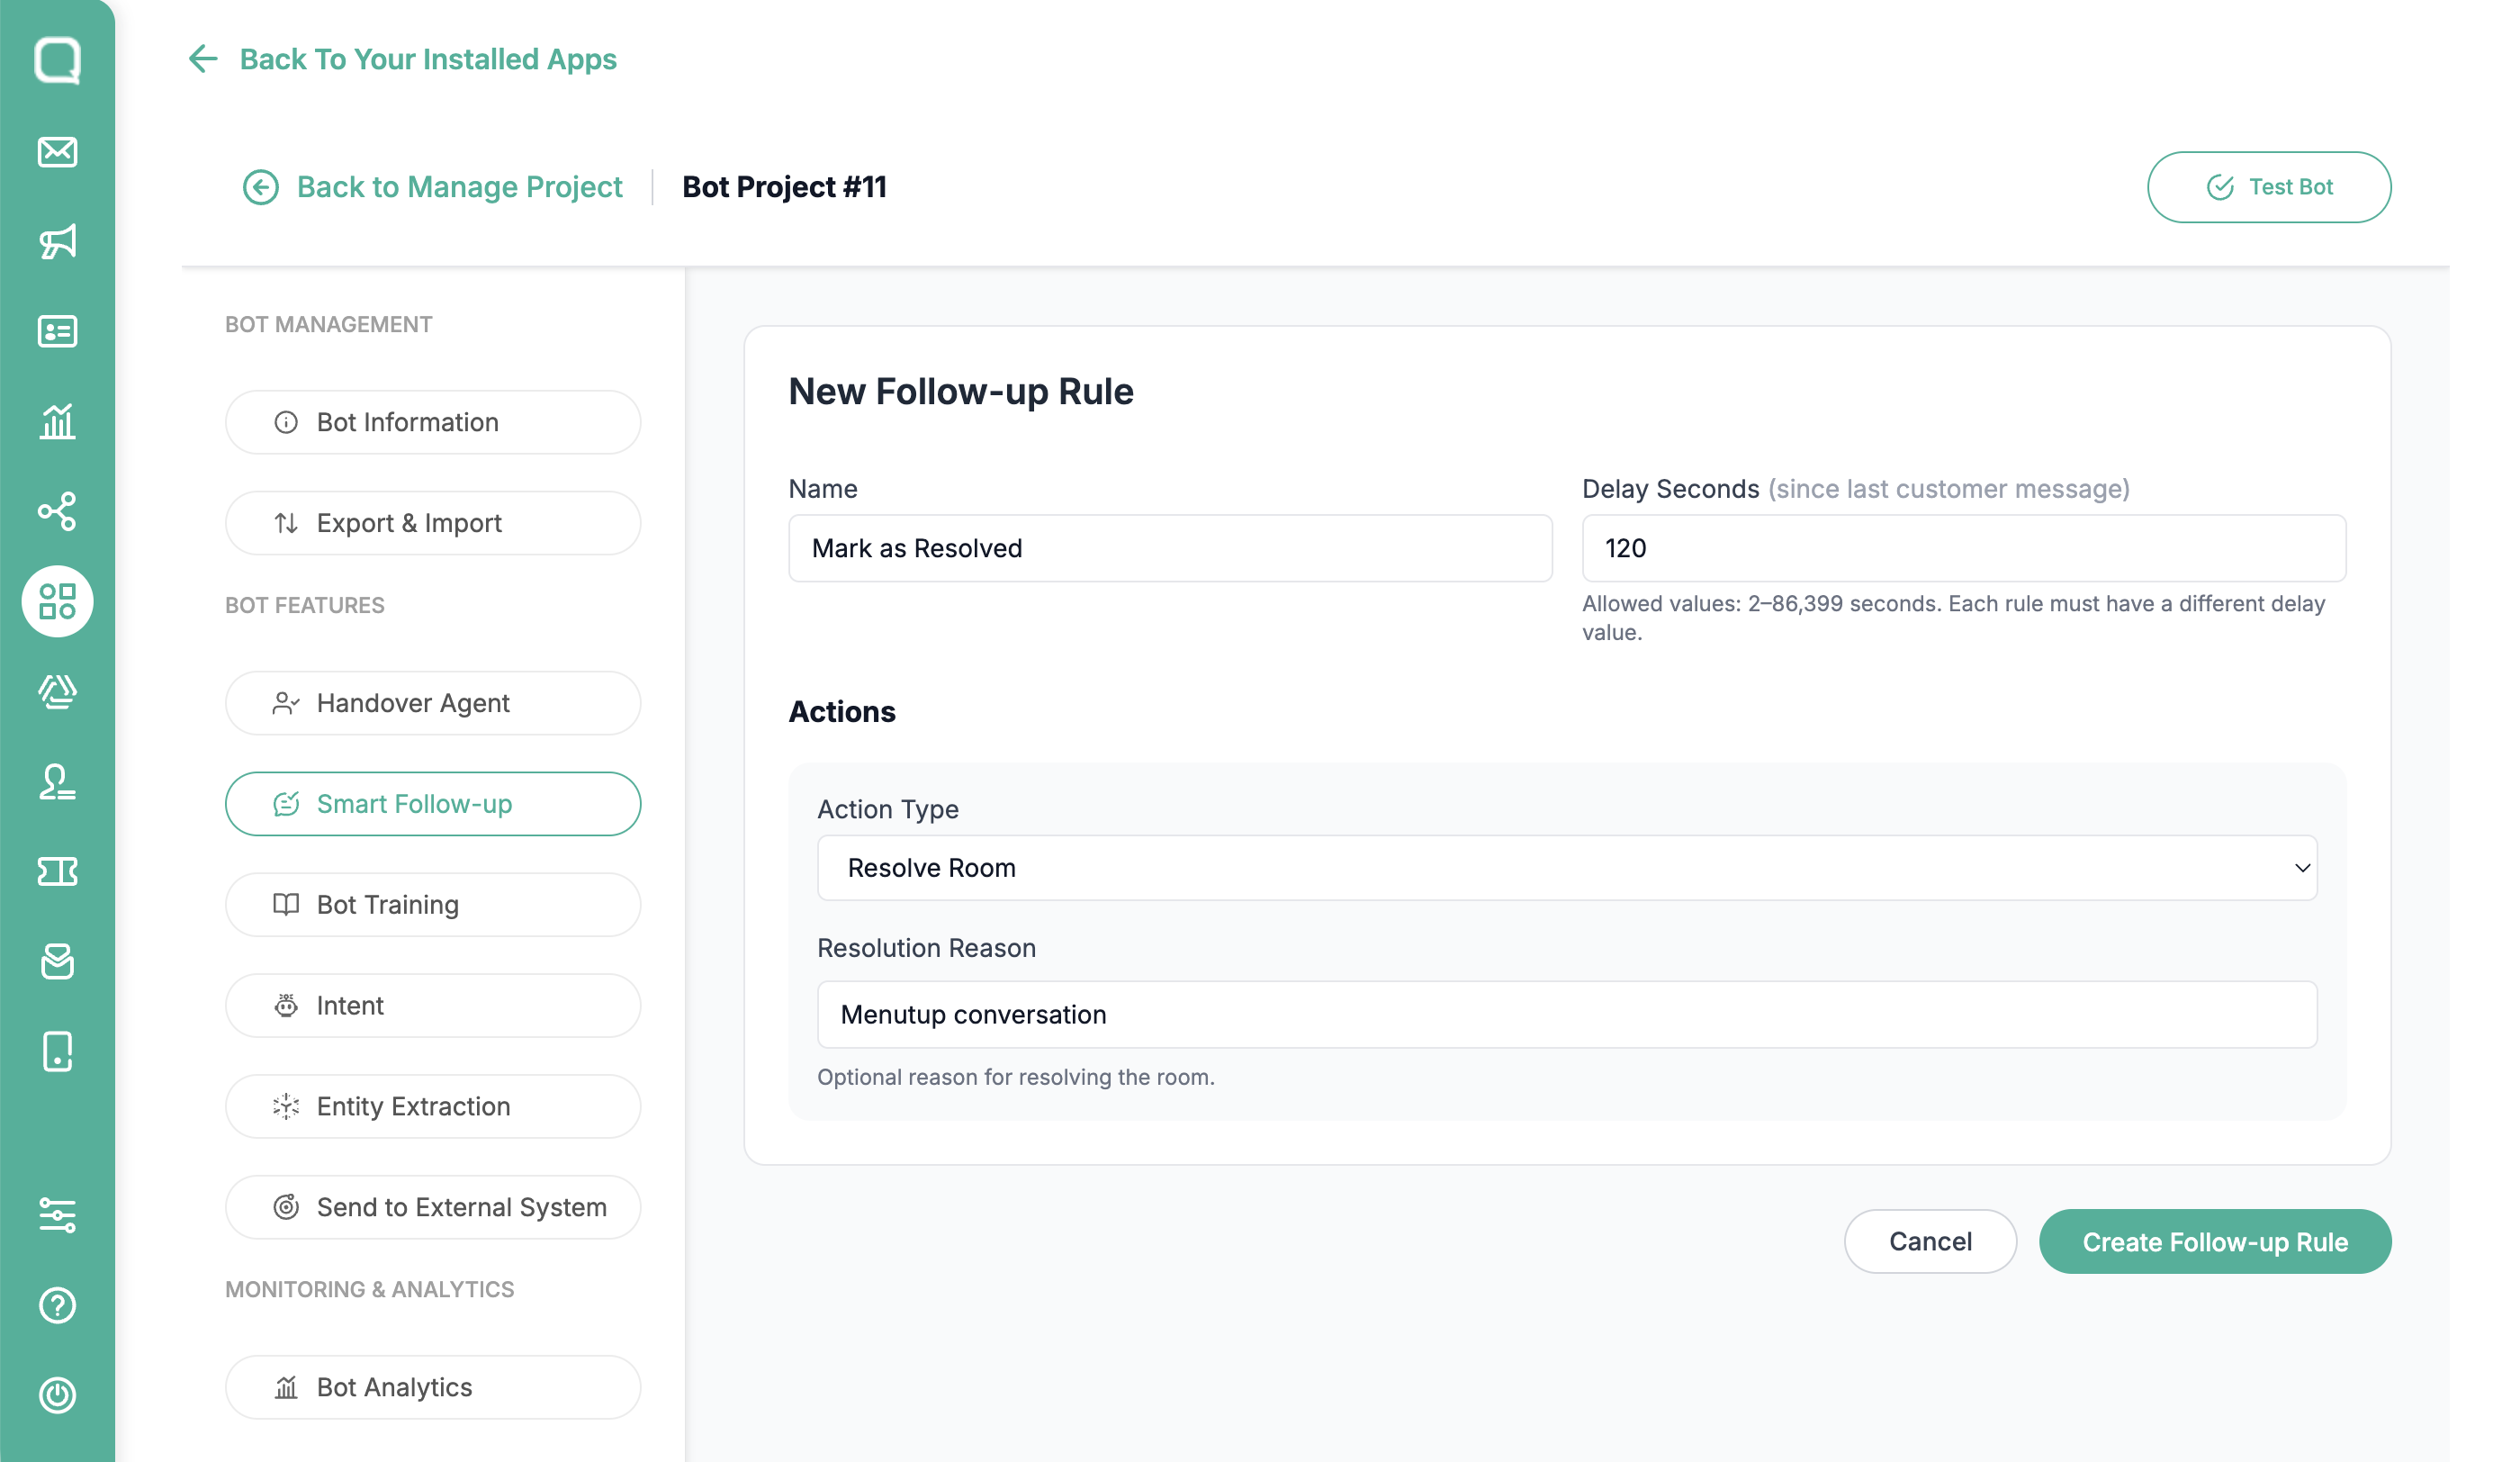
Fill in all fields correctly and select the action type Resolve Room
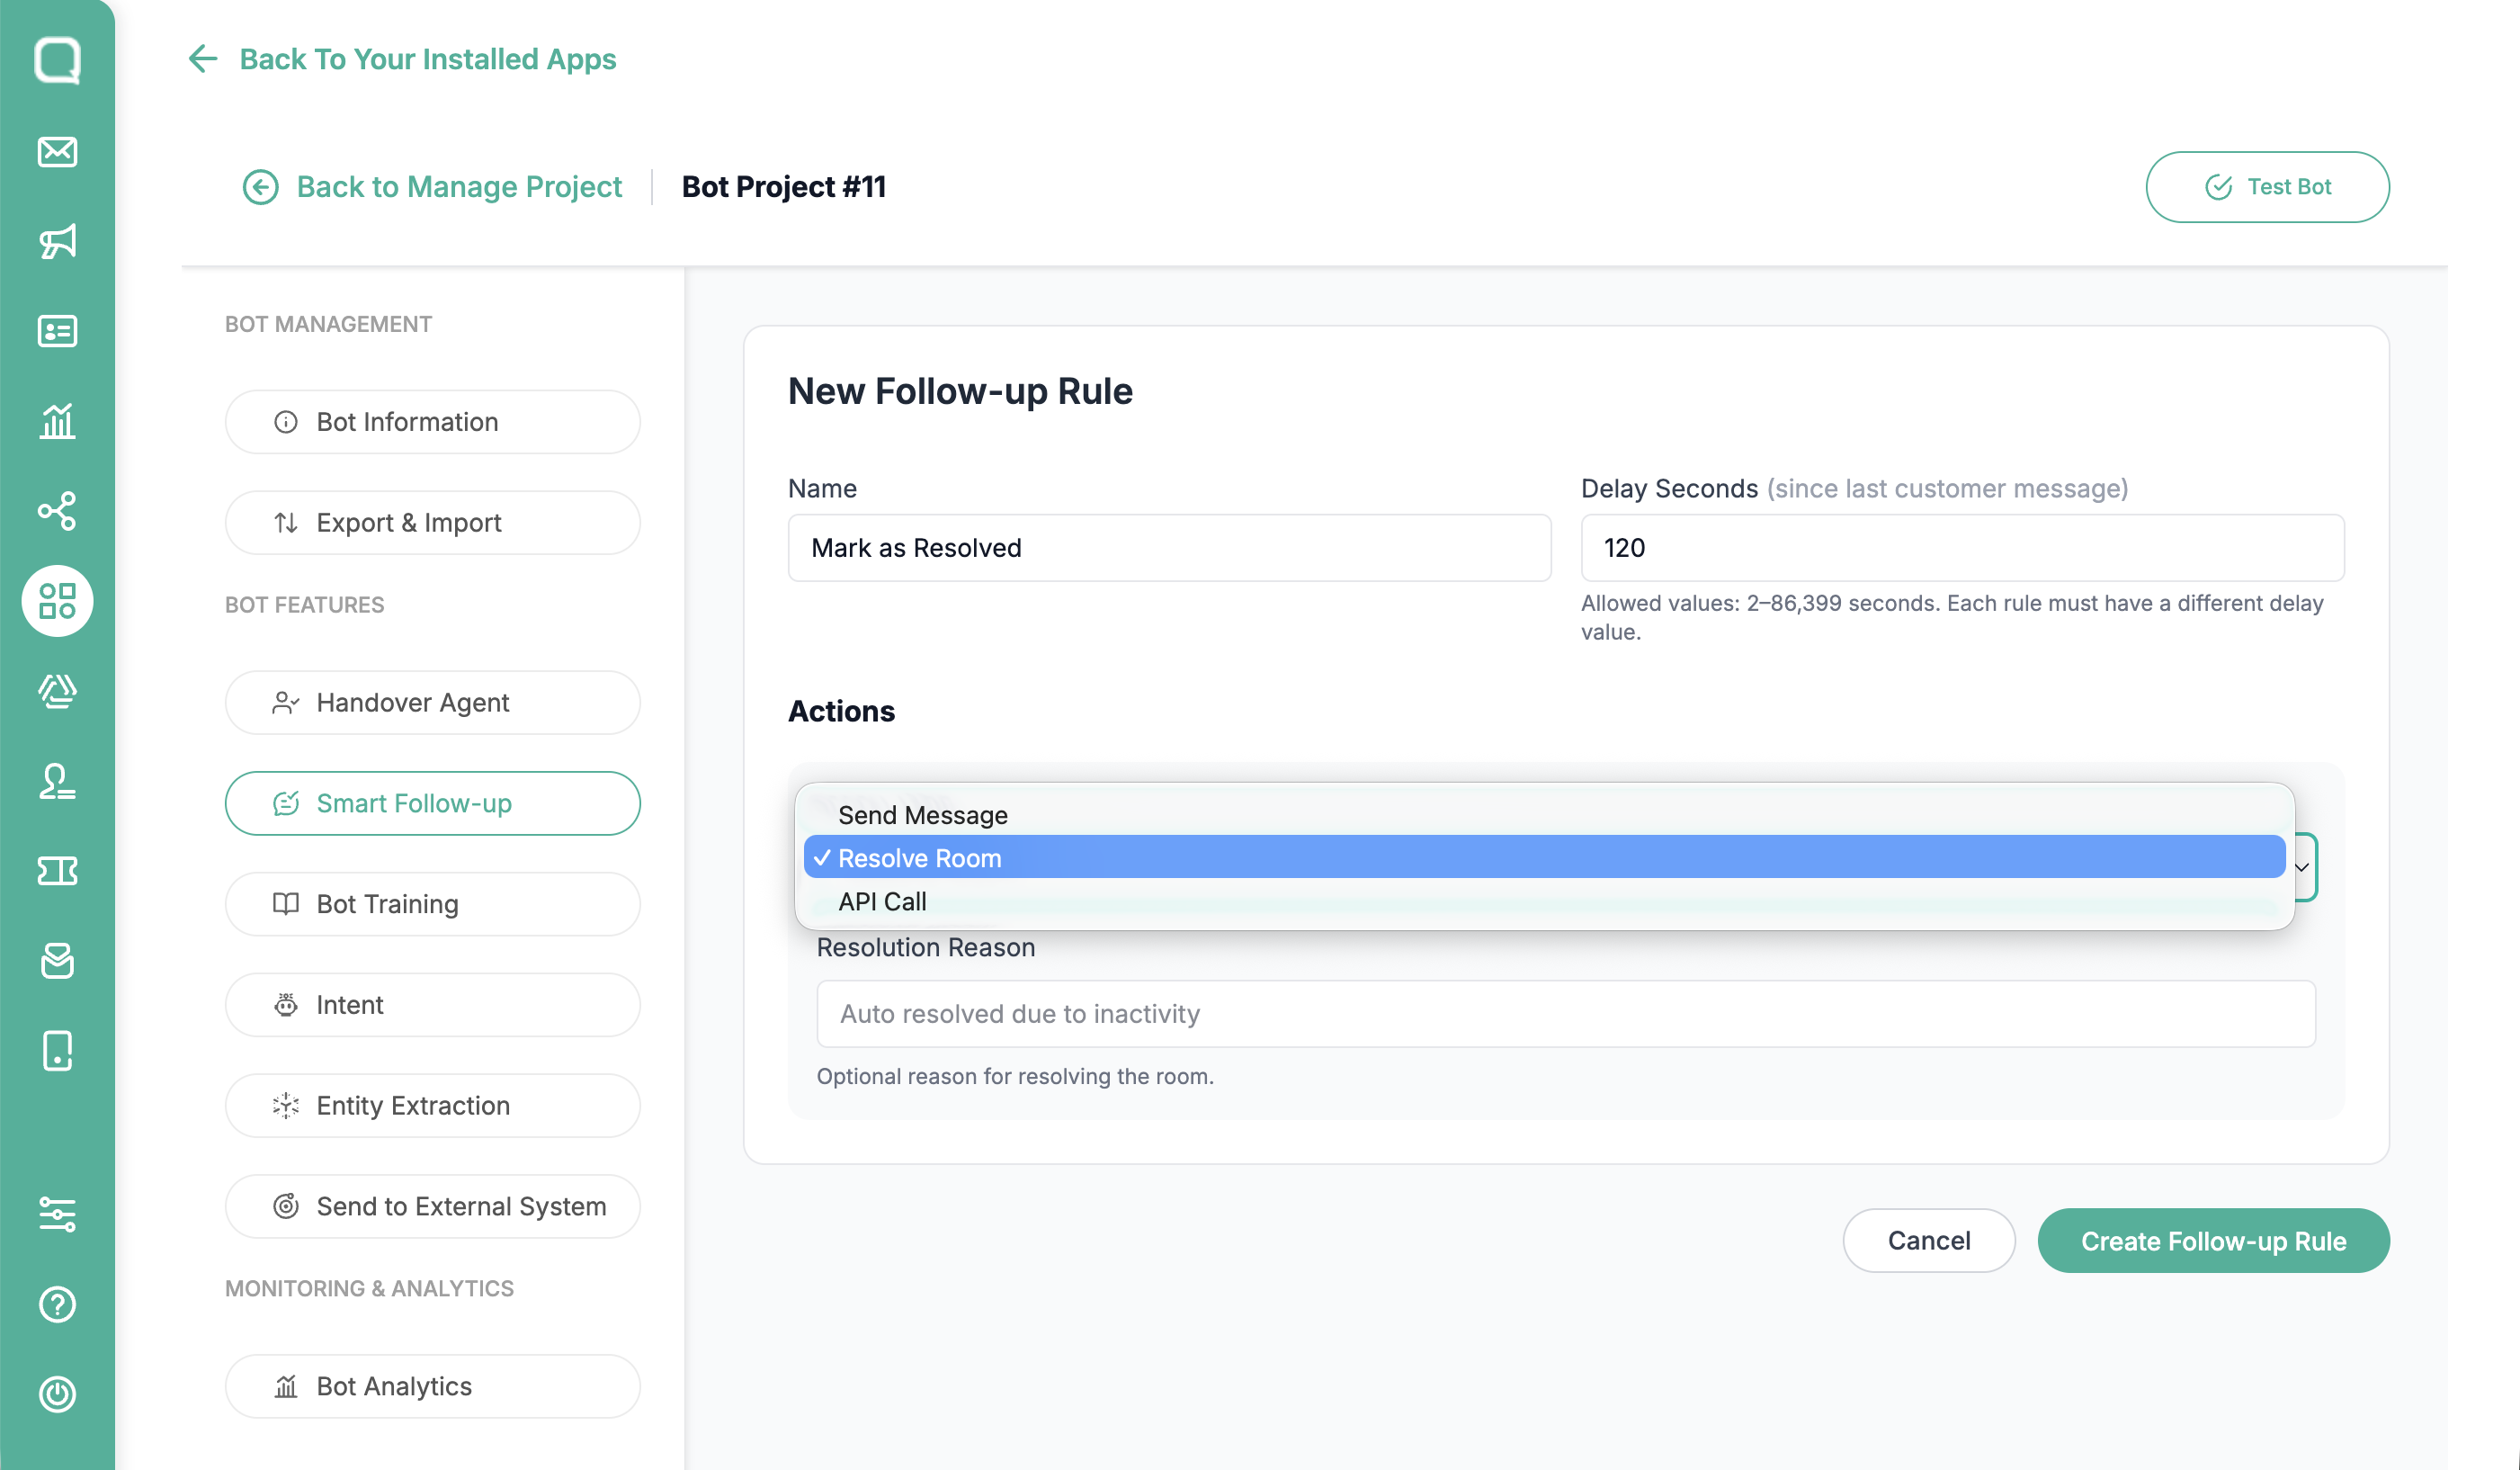
Write a message for the response to be displayed, then click Create Follow-up Rule
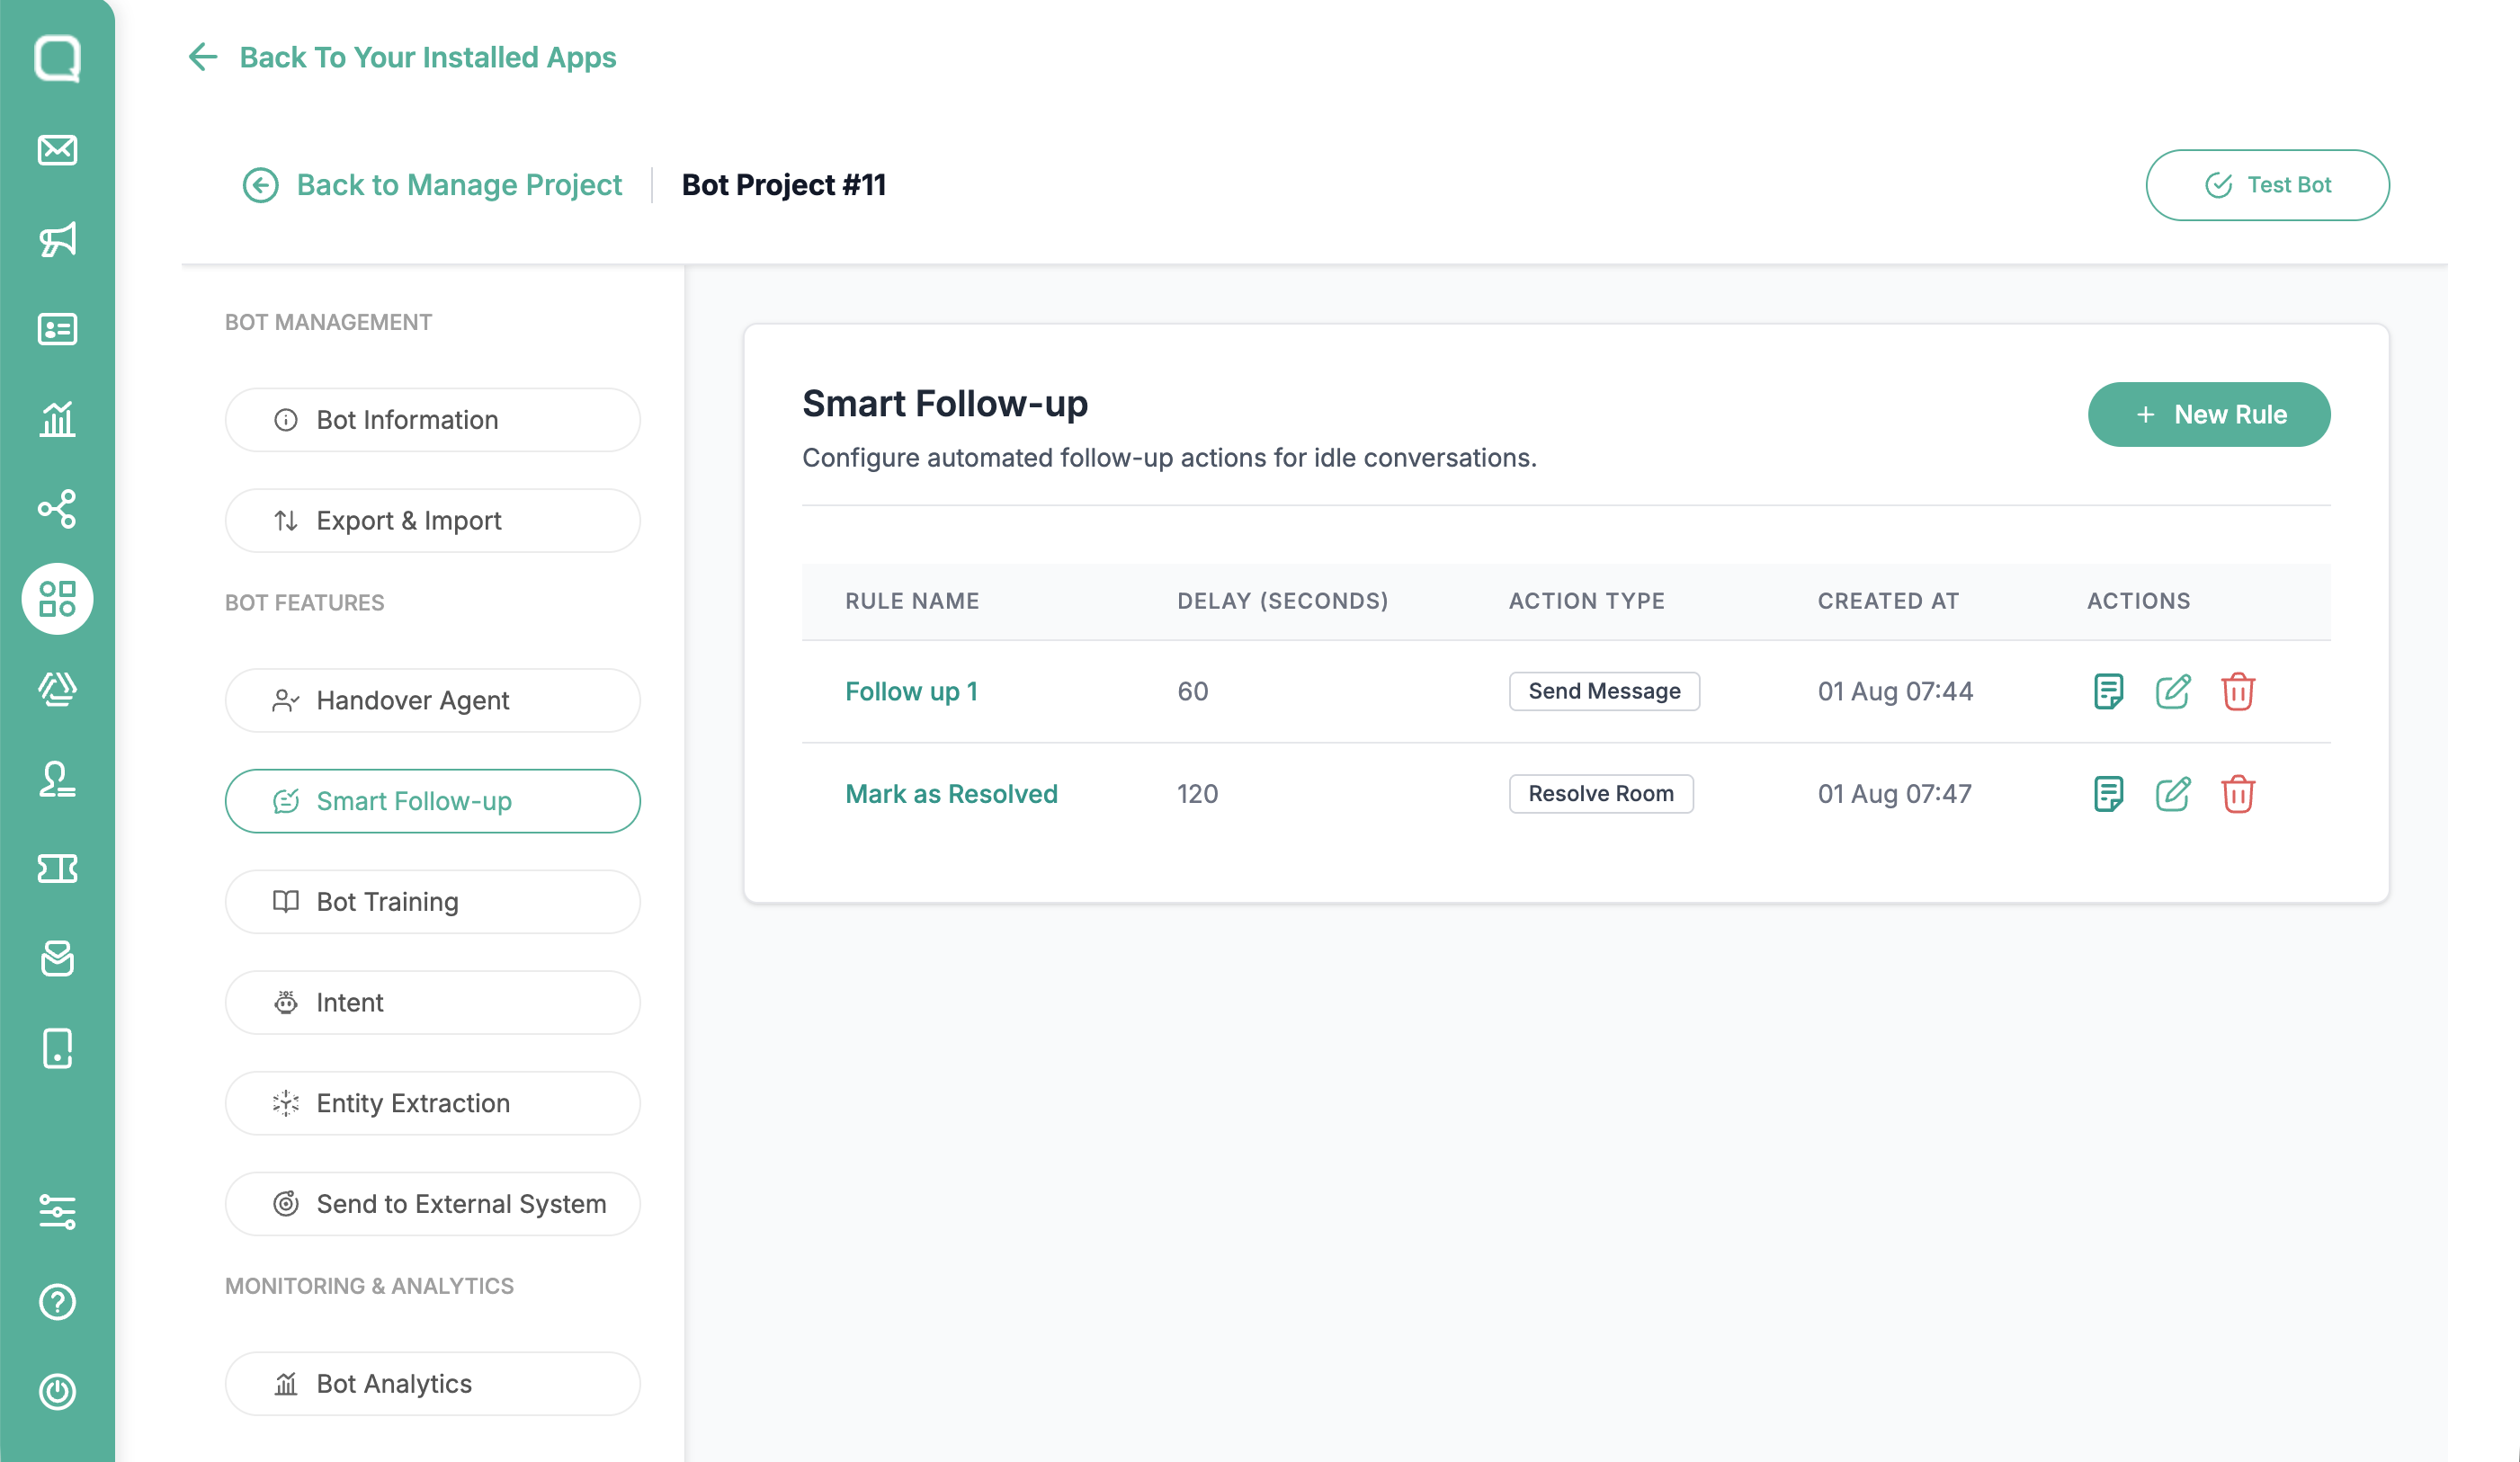
Your smart follow-up message has been successfully created. The message will be displayed in the rules list.
API Call
Select the Smart Follow-up menu, then click new rules to create new rules.
Fill in all fields correctly and select the action type API Call, then click Save Changes
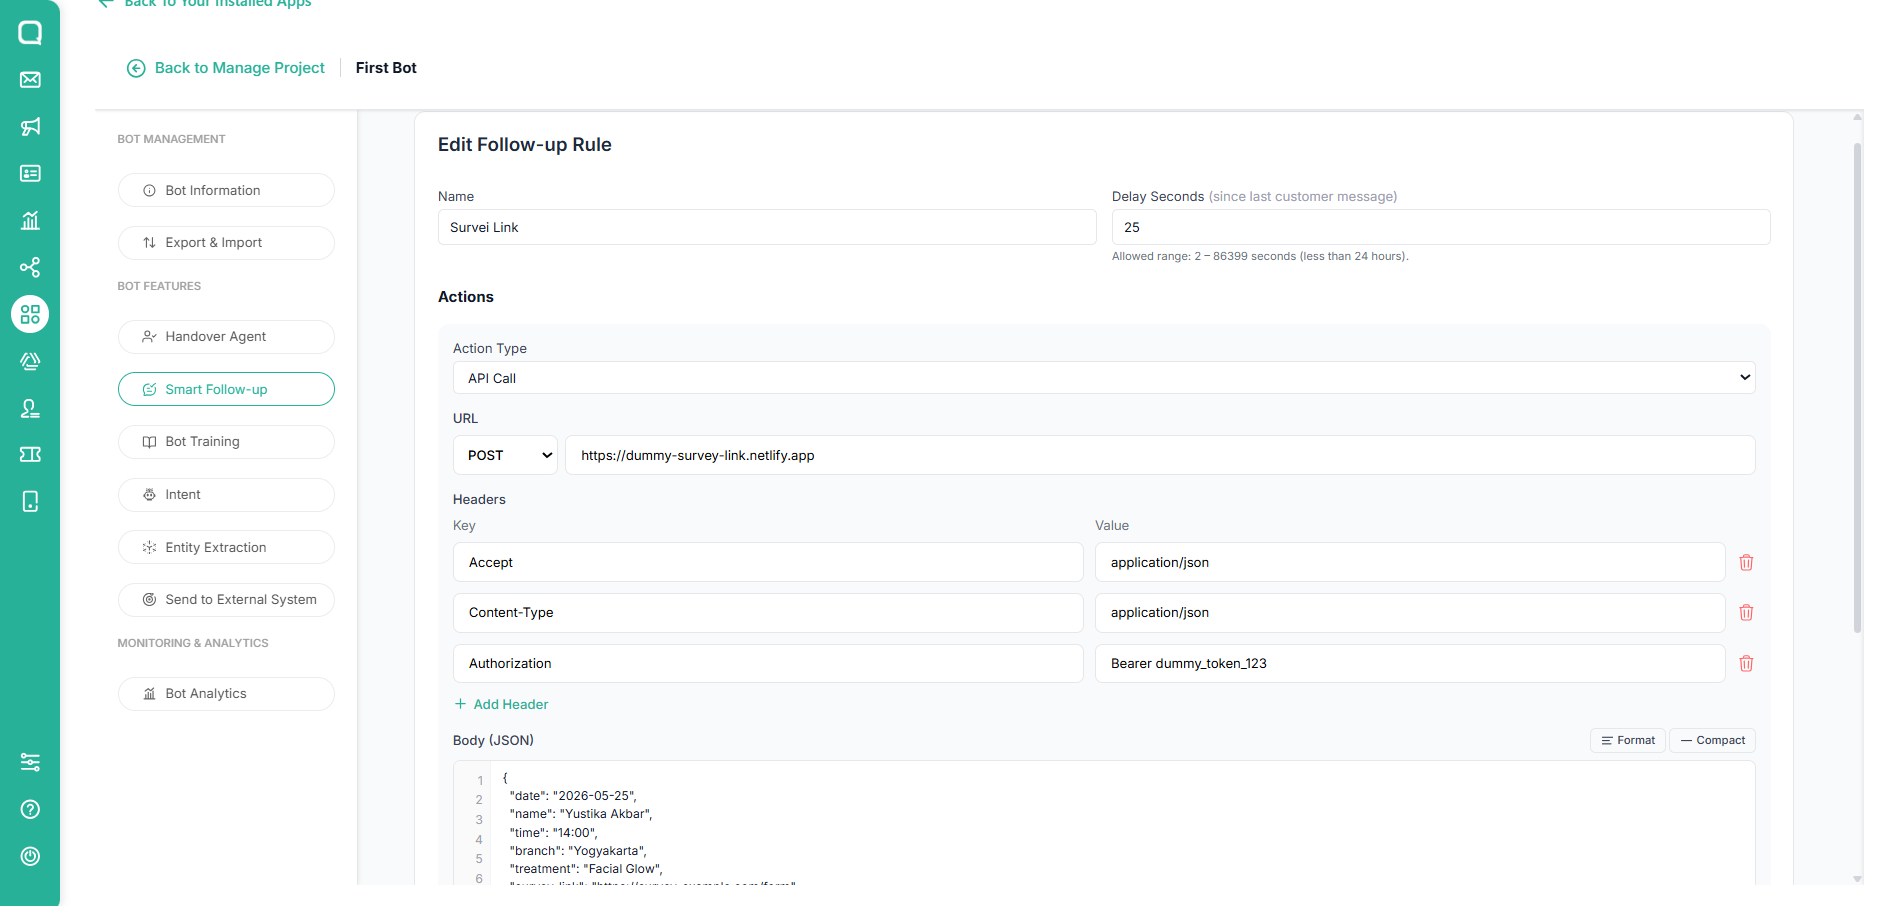
Your smart follow-up message has been successfully created. The message will be displayed in the rules list.
Hand Over Agent
Handover is the process of transferring a conversation from the chatbot to a human agent in Qiscus Omnichannel.
This feature enables collaboration between automation and human support. When a specific intent is triggered, the chatbot can automatically pass the conversation to a human agent so the user can receive more personalized or complex assistance.
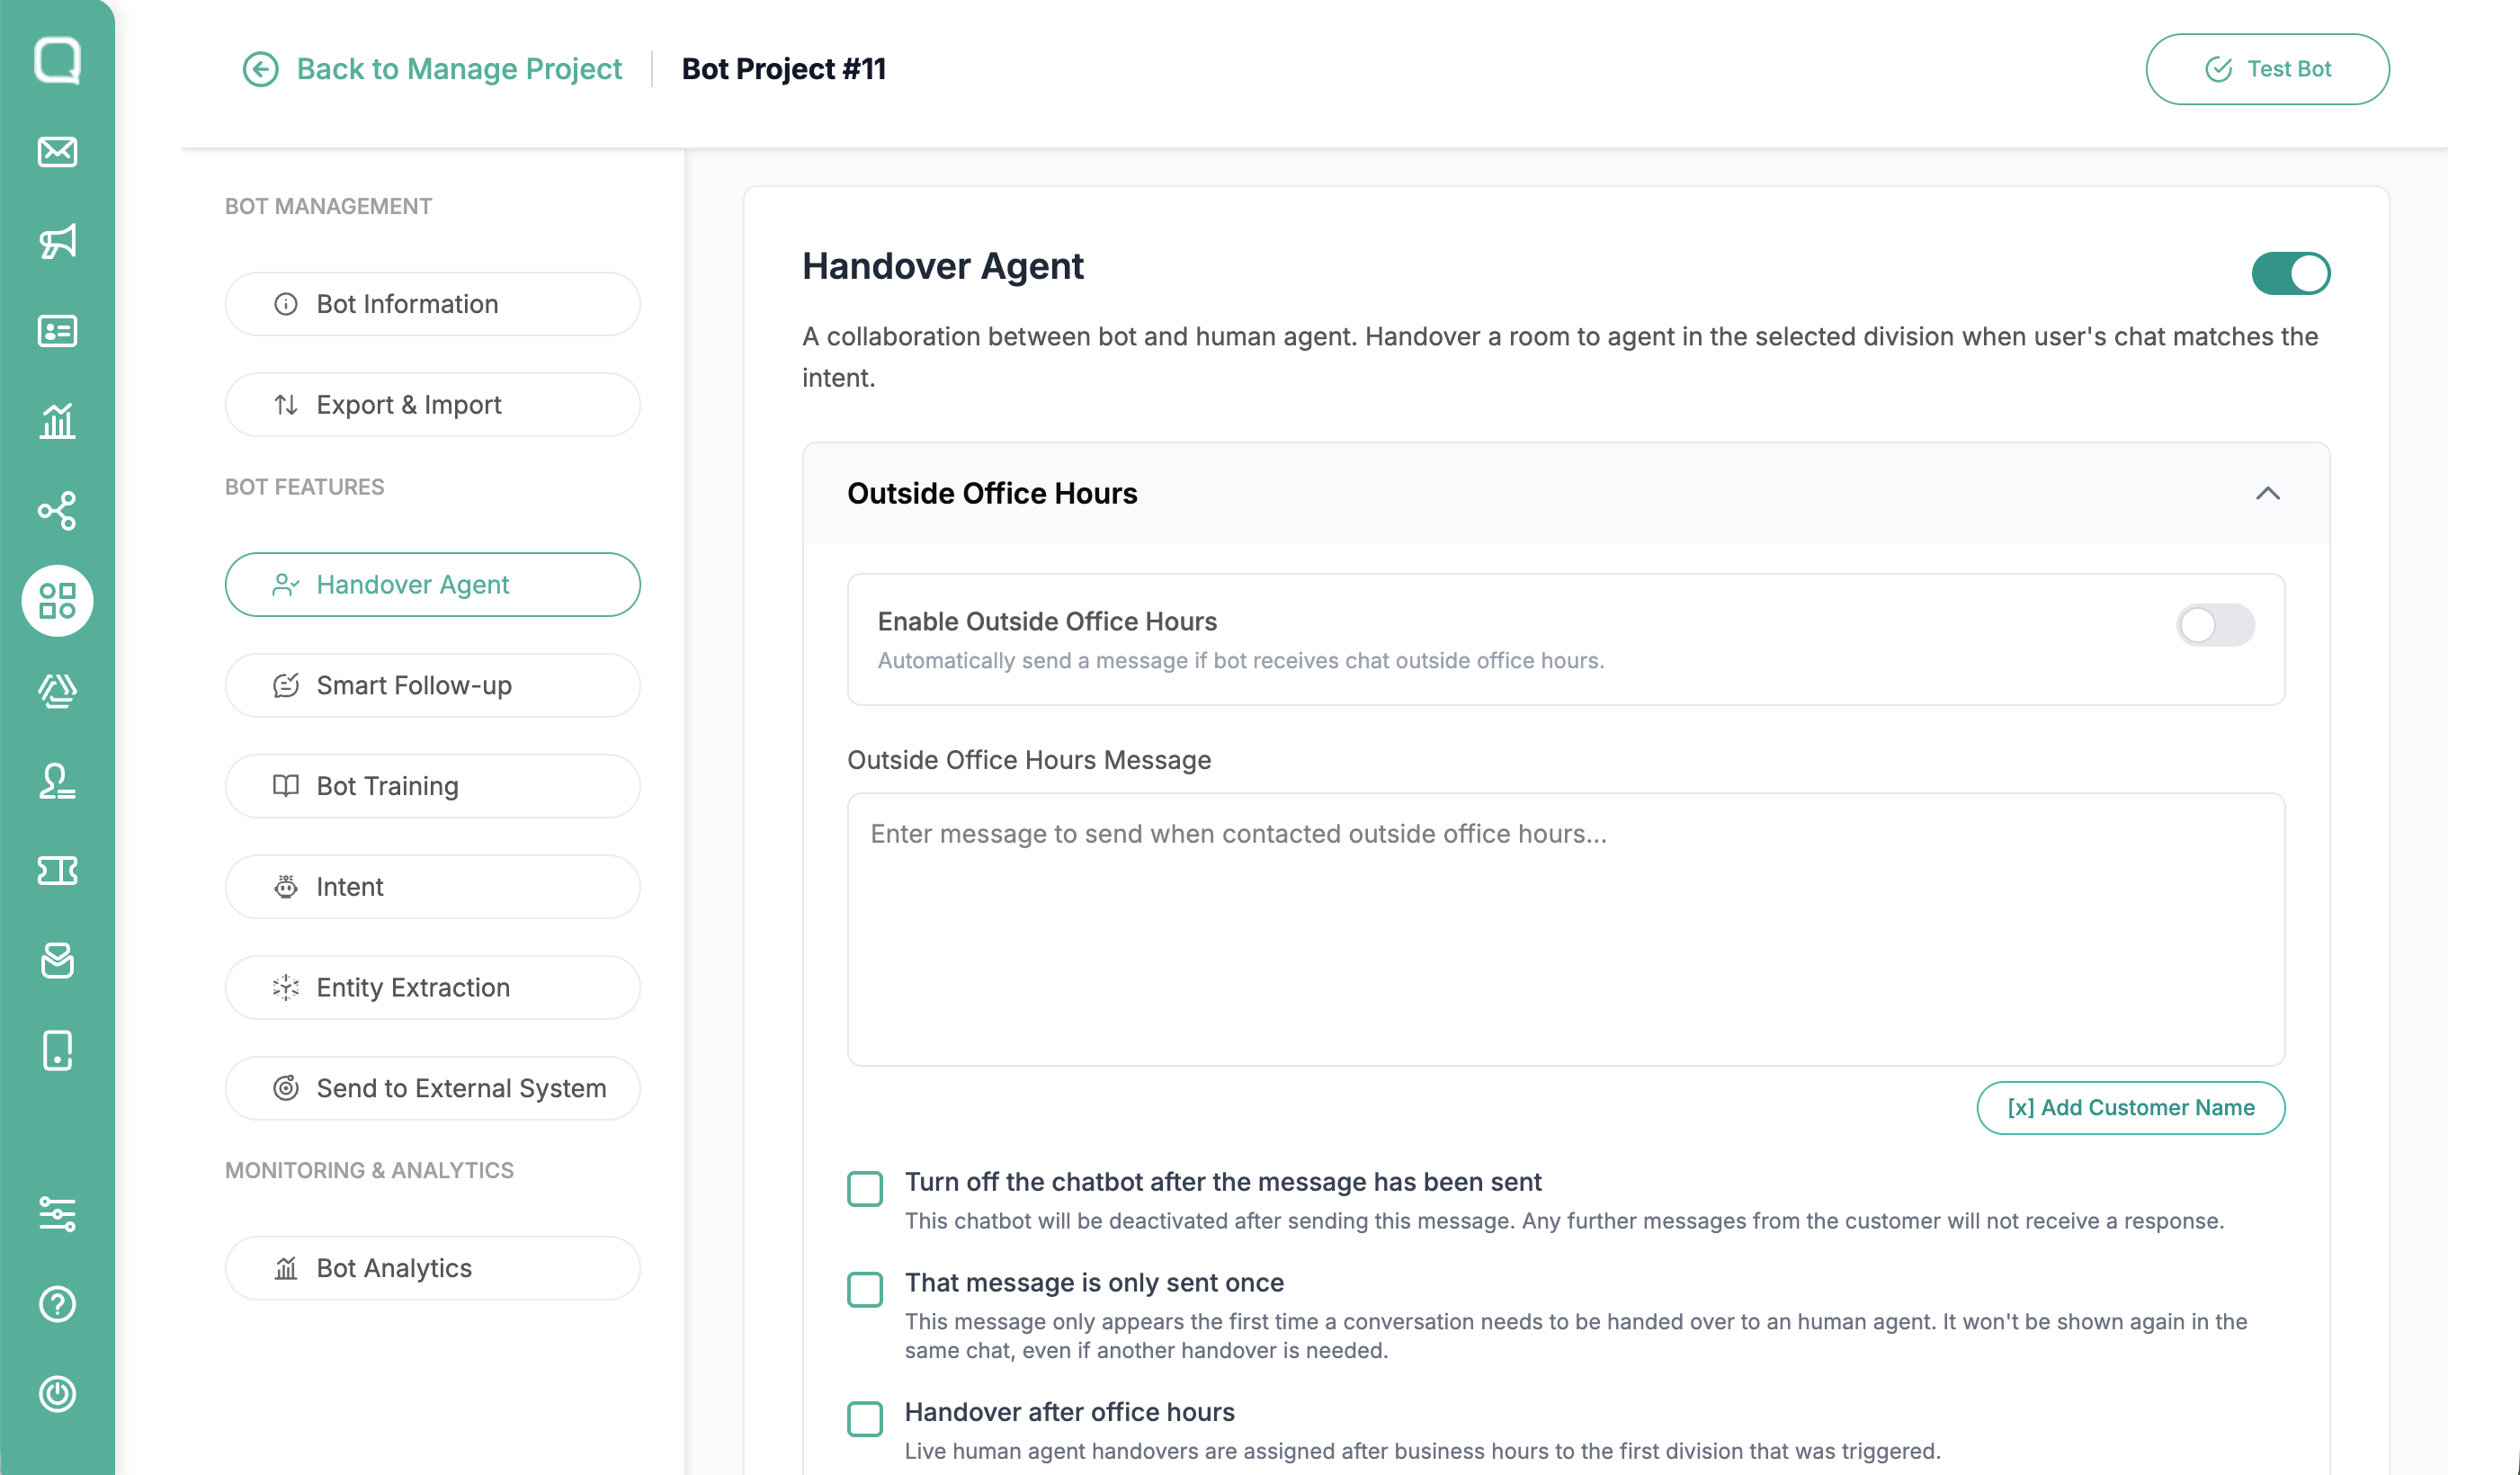
The Agent Handover page offers two configurable services. Enable the toggle for the one you need: Outside Office Hours to handle conversations outside business hours, or Handover Only to Online Agent that to route only to available agents.
How to Use
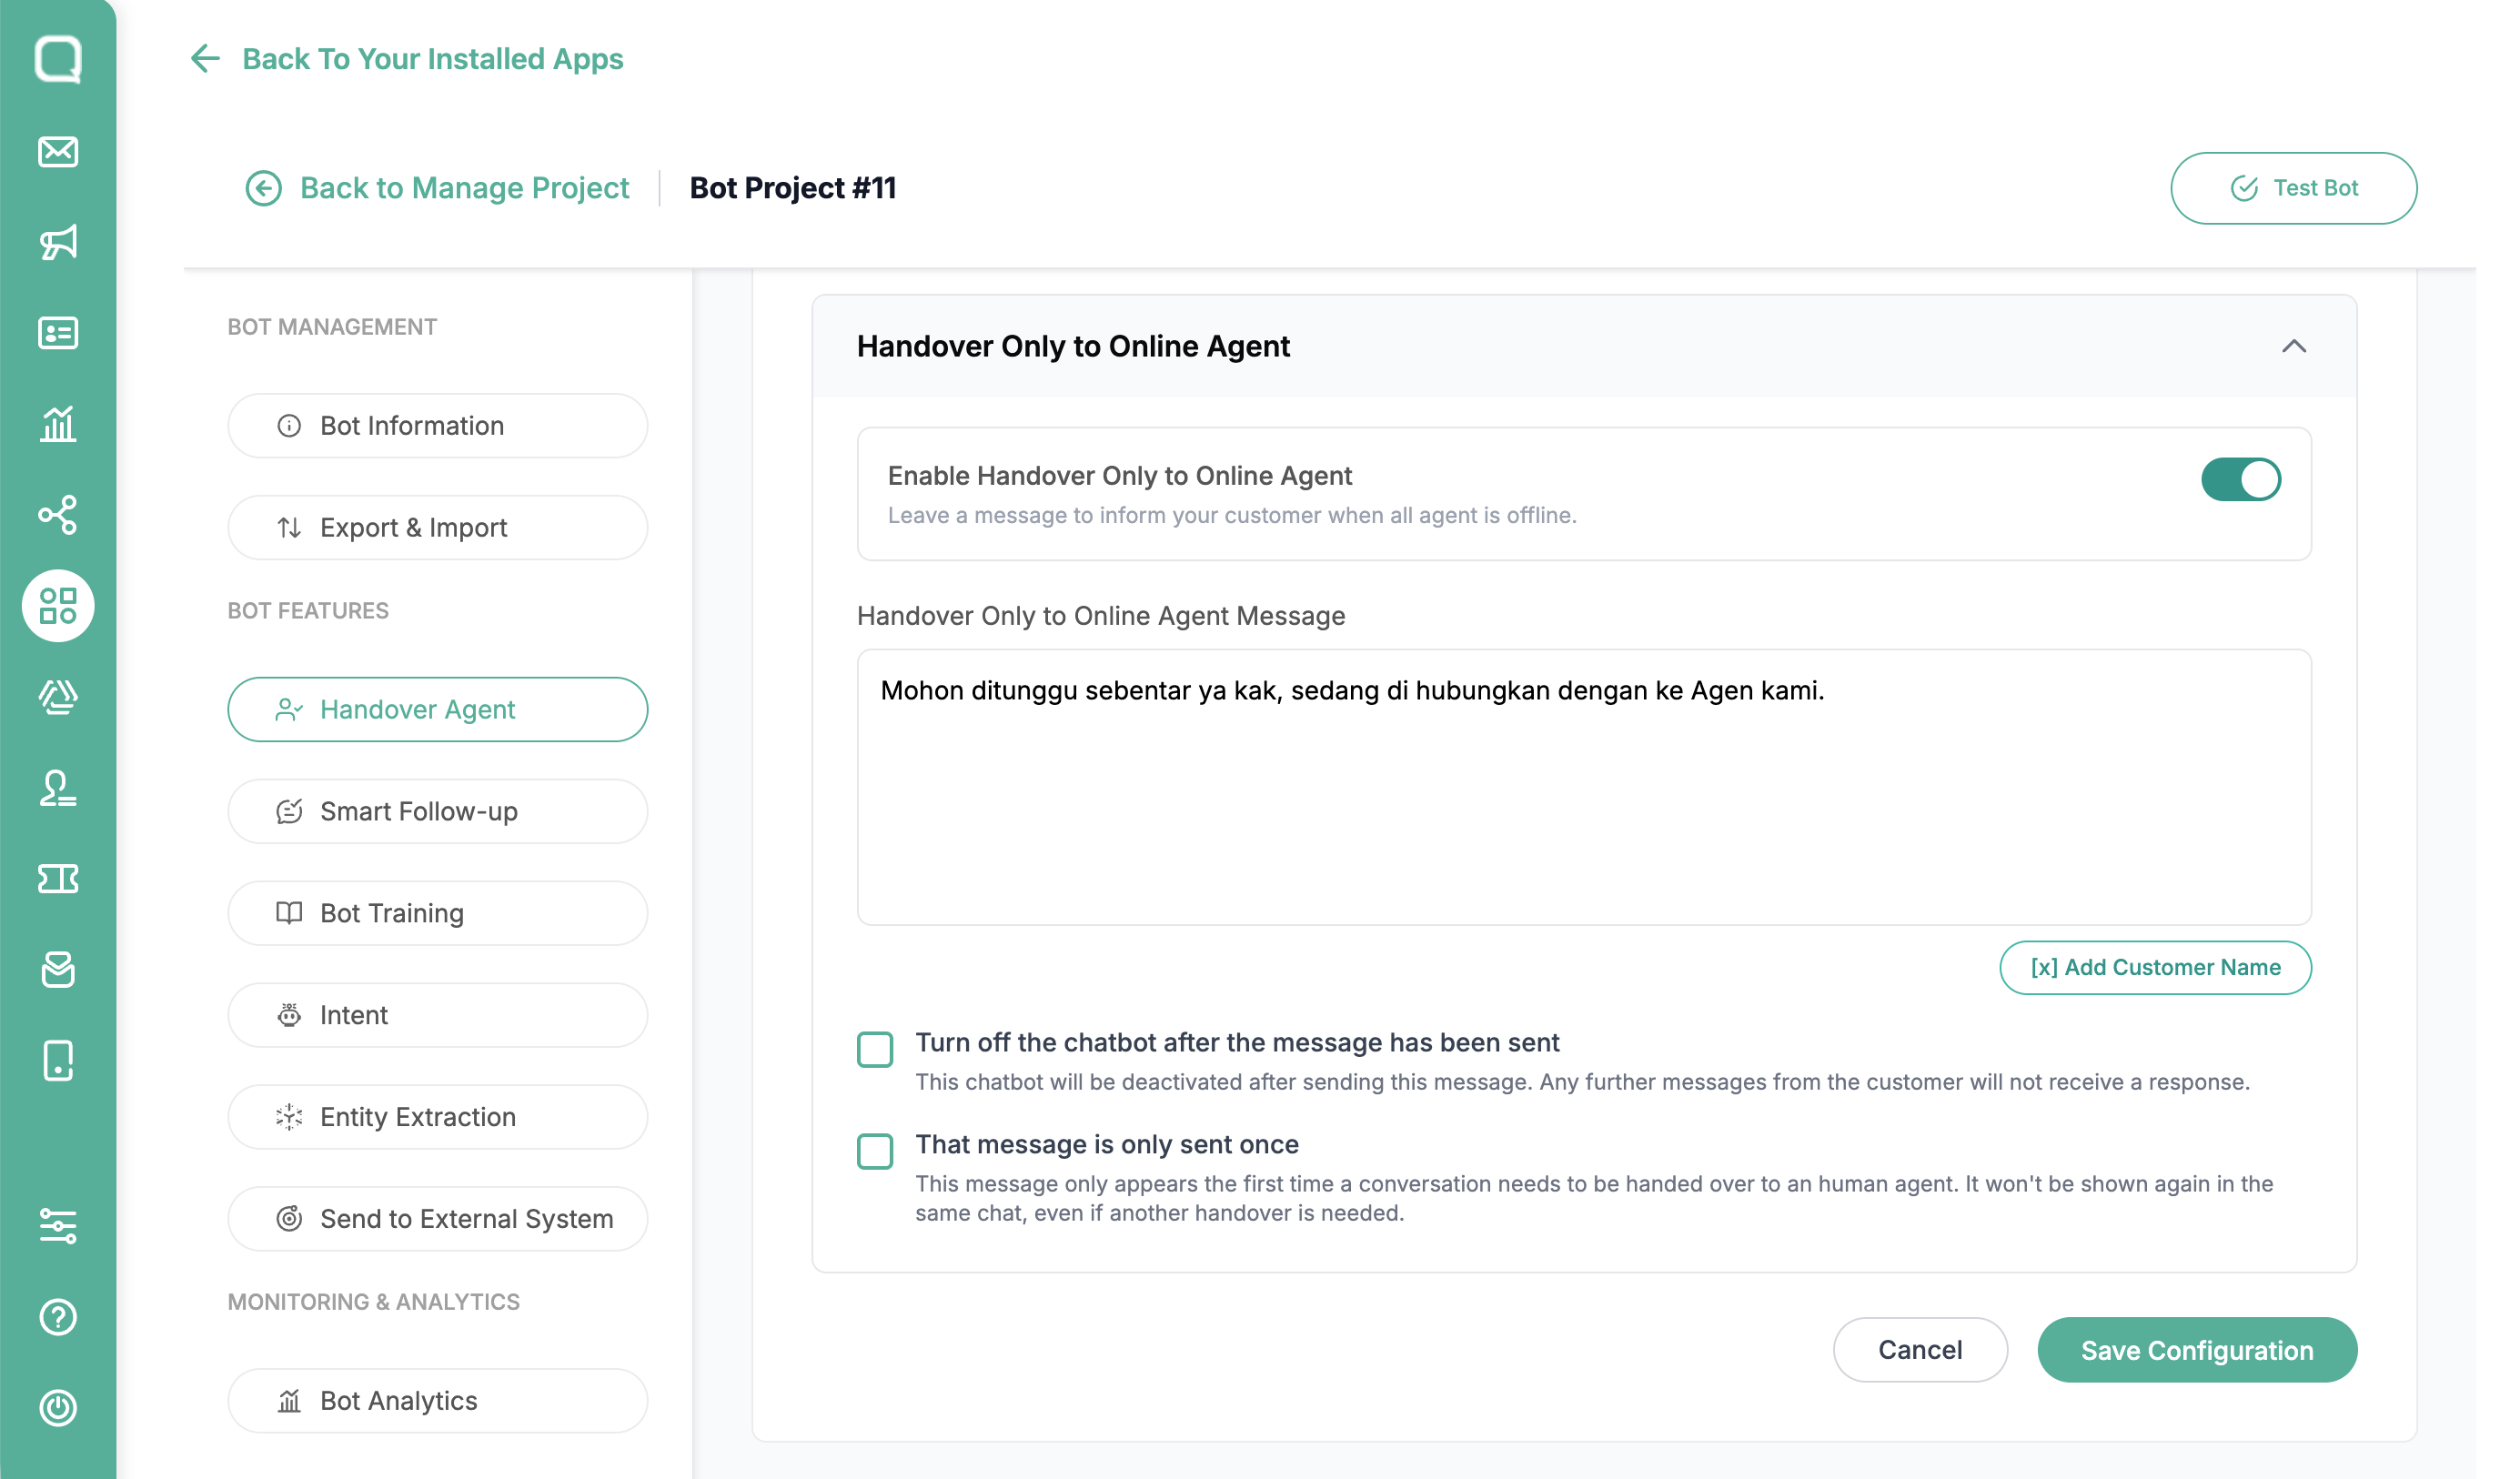
You can follow the steps below to set up the Handover to Online Agent feature:
Open the handover agent menu, then make sure the handover agent toggle is activated before filling in the information fields.
Fill in the handover only for online agent messages, and please check the specification sent method box.
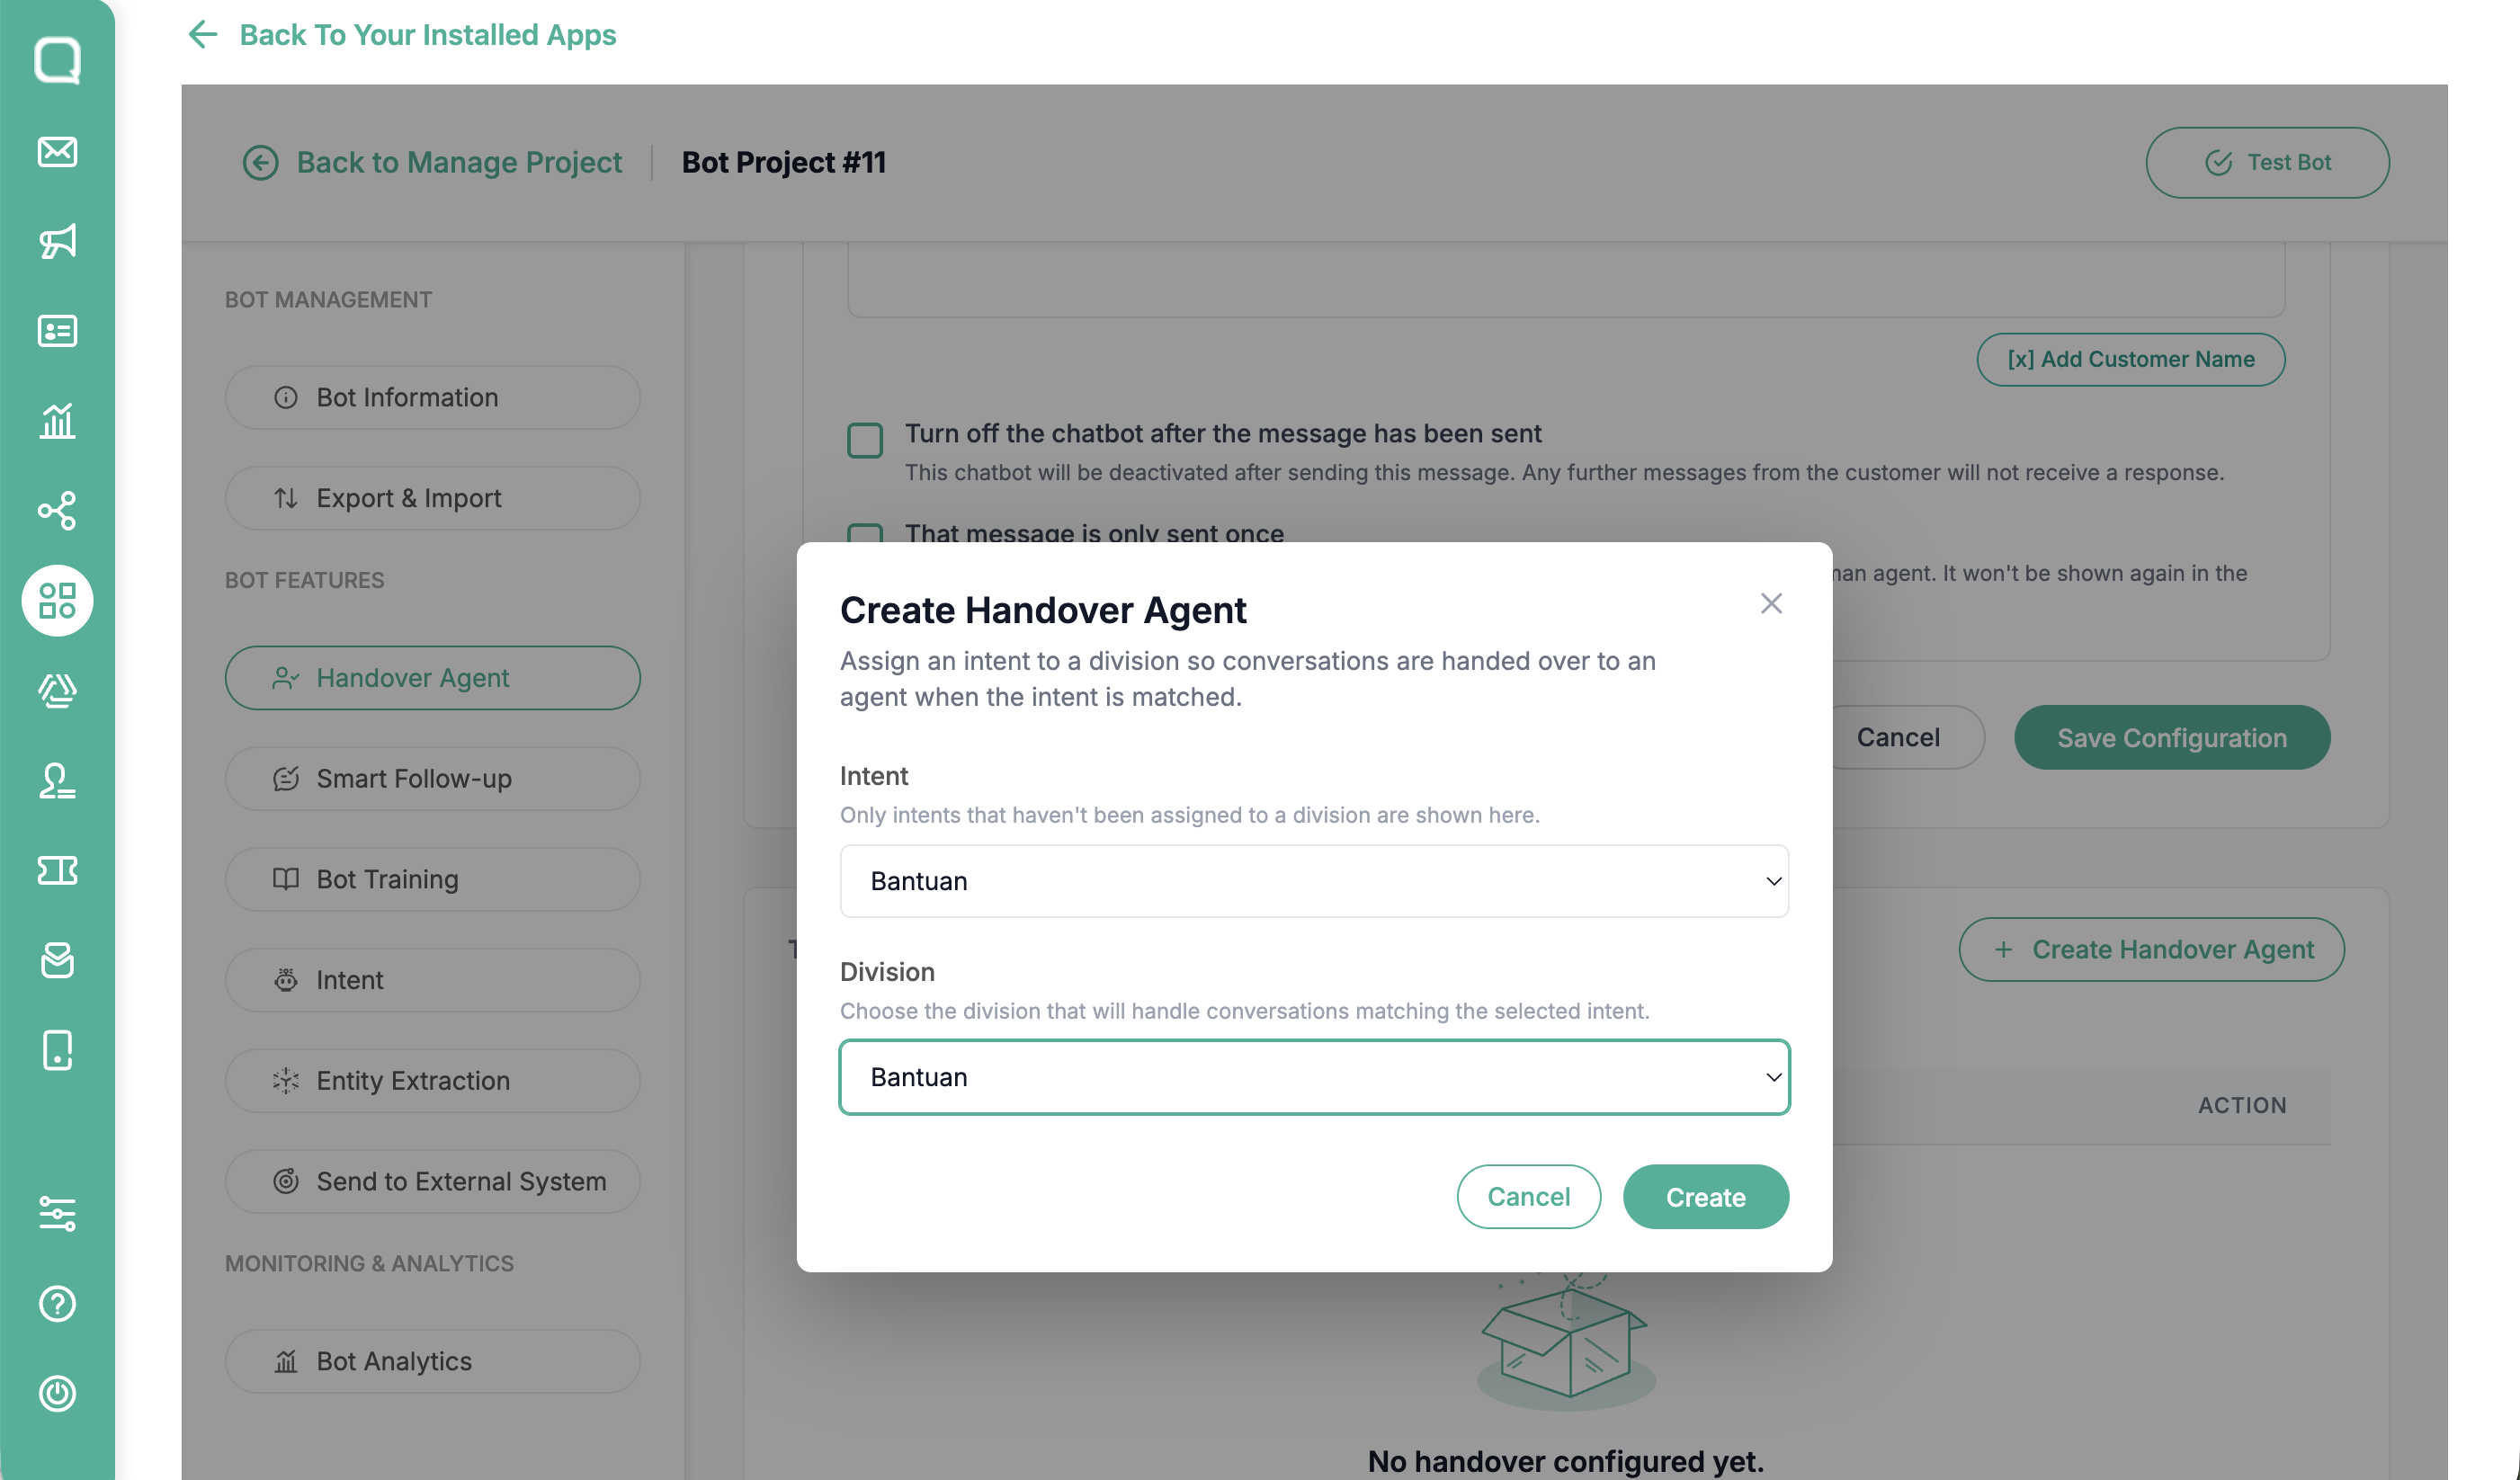
Click the + Create Handover Agent button to make detail division you want to assign
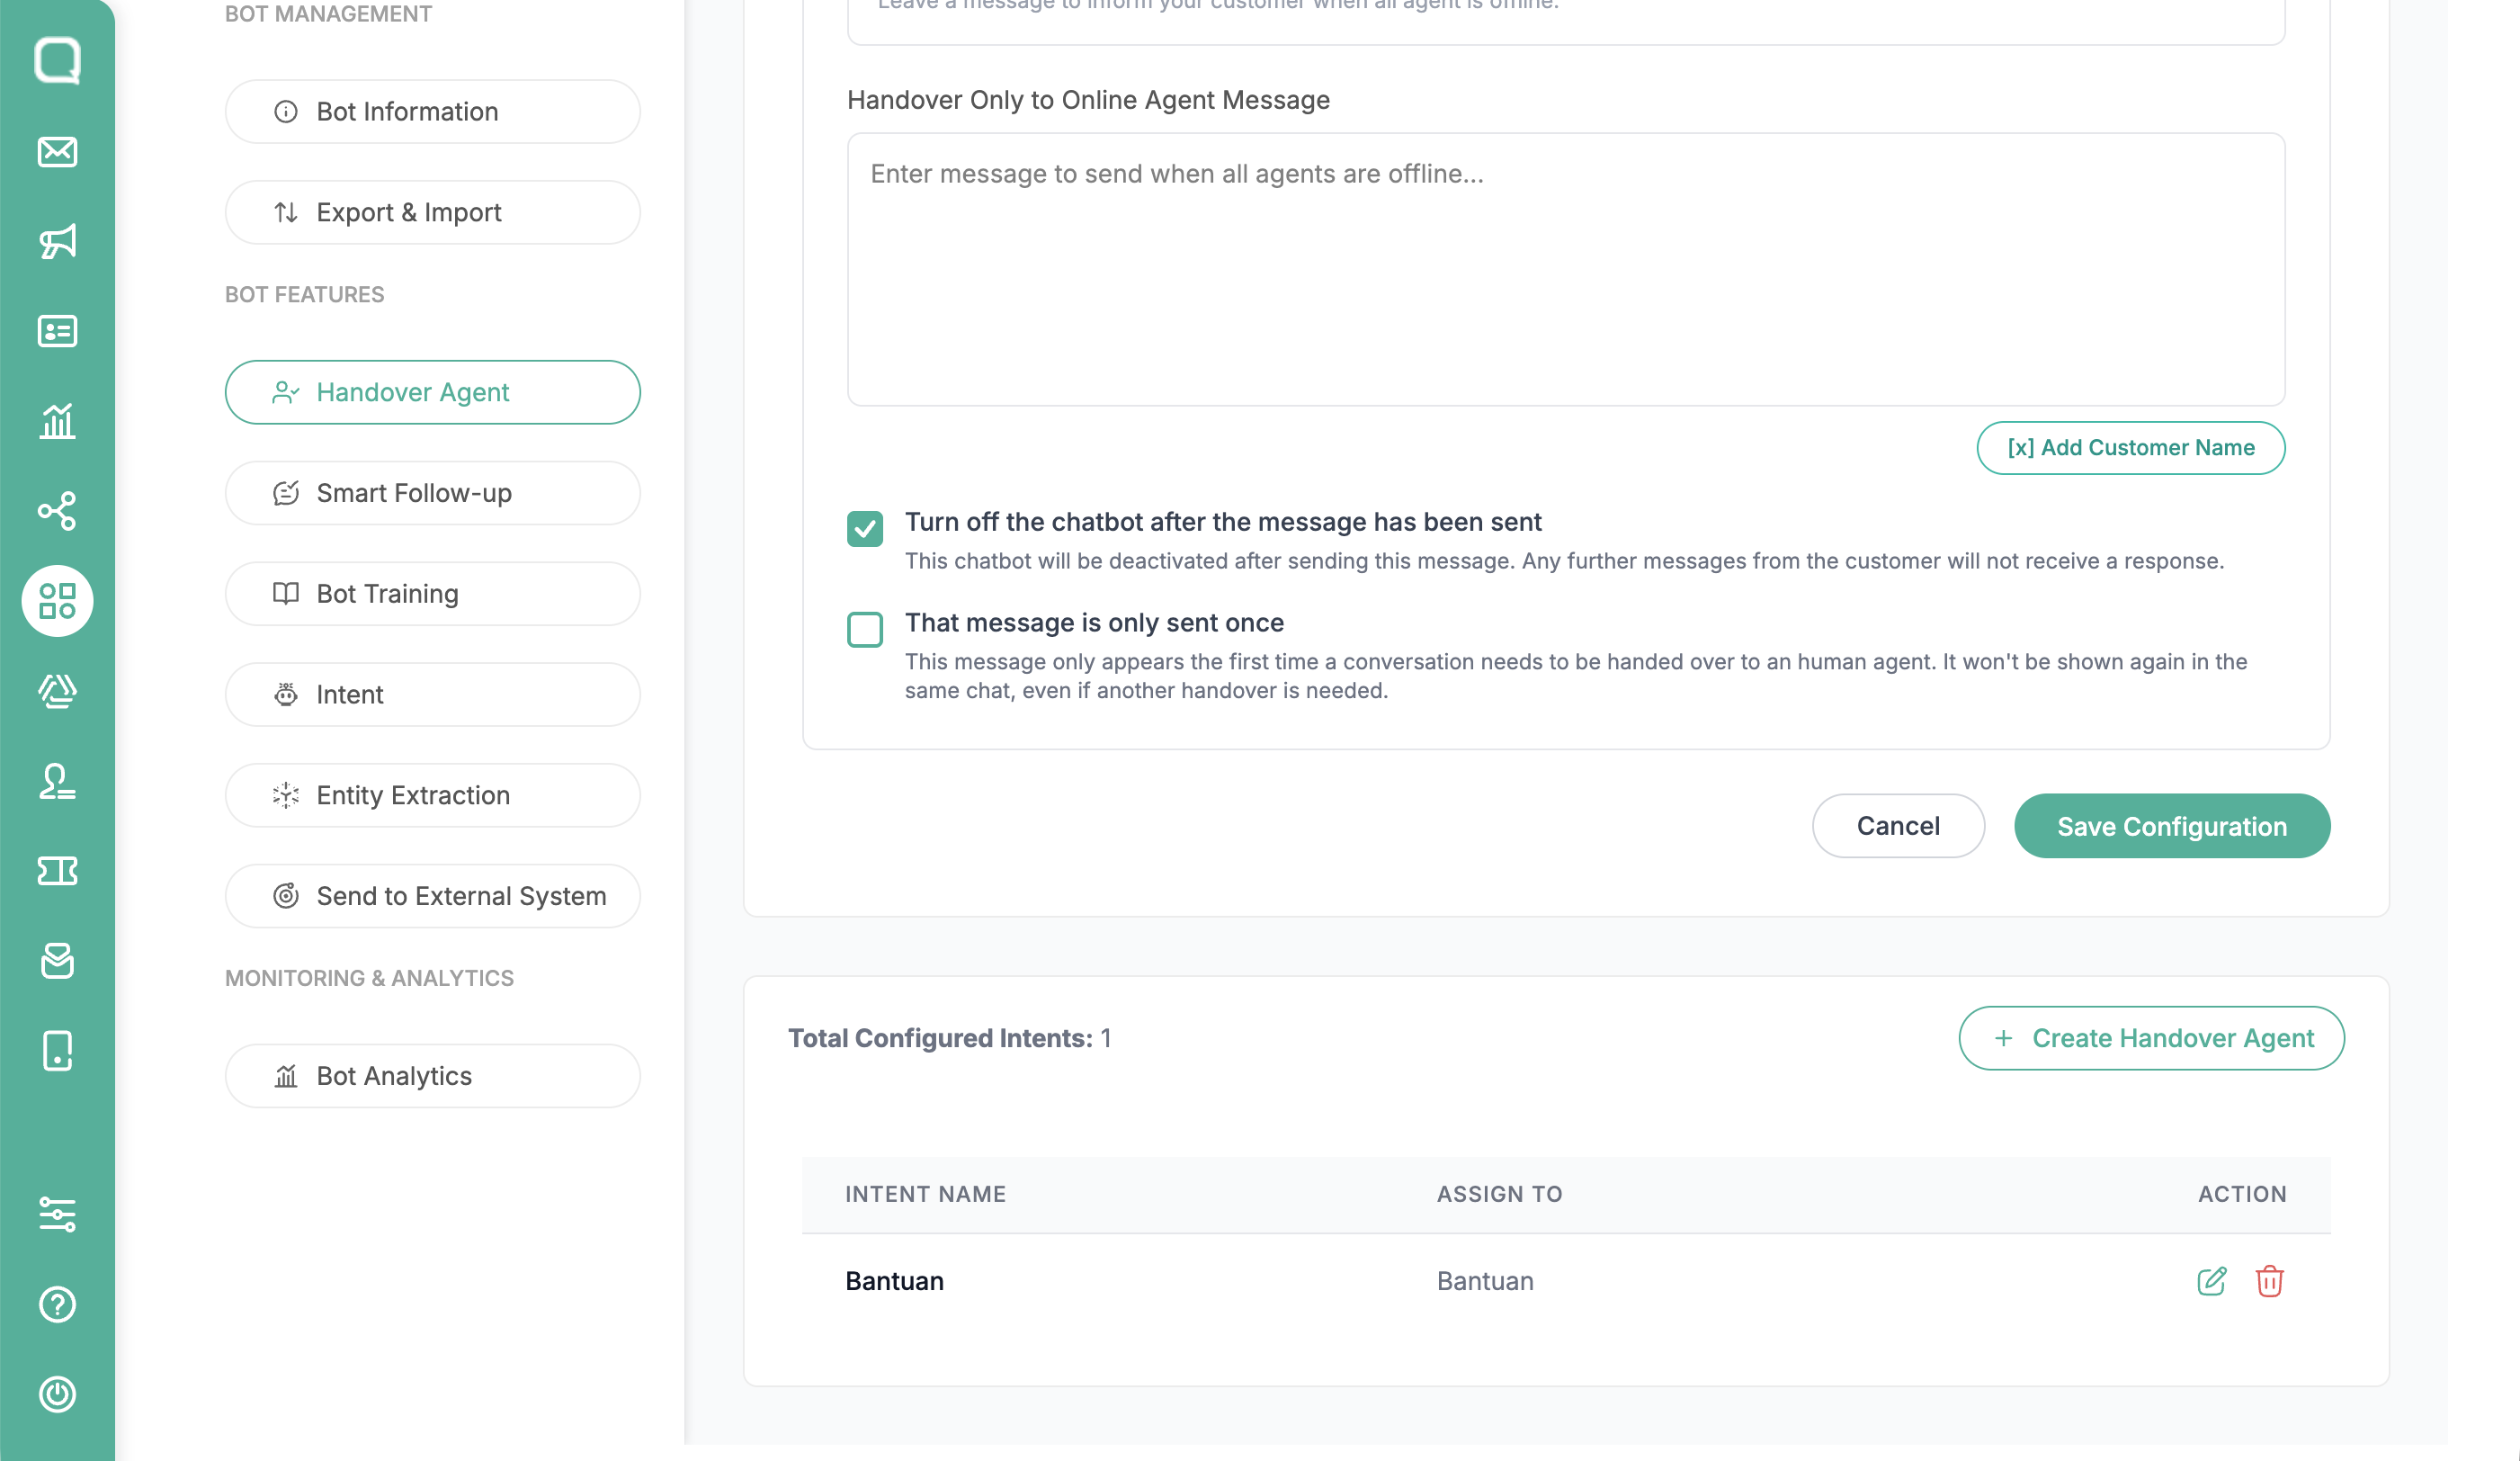
Your handover agent message has been successfully created and will be recorded in the Total Configuration Intent section. You can also edit or delete the information anytime if needed.
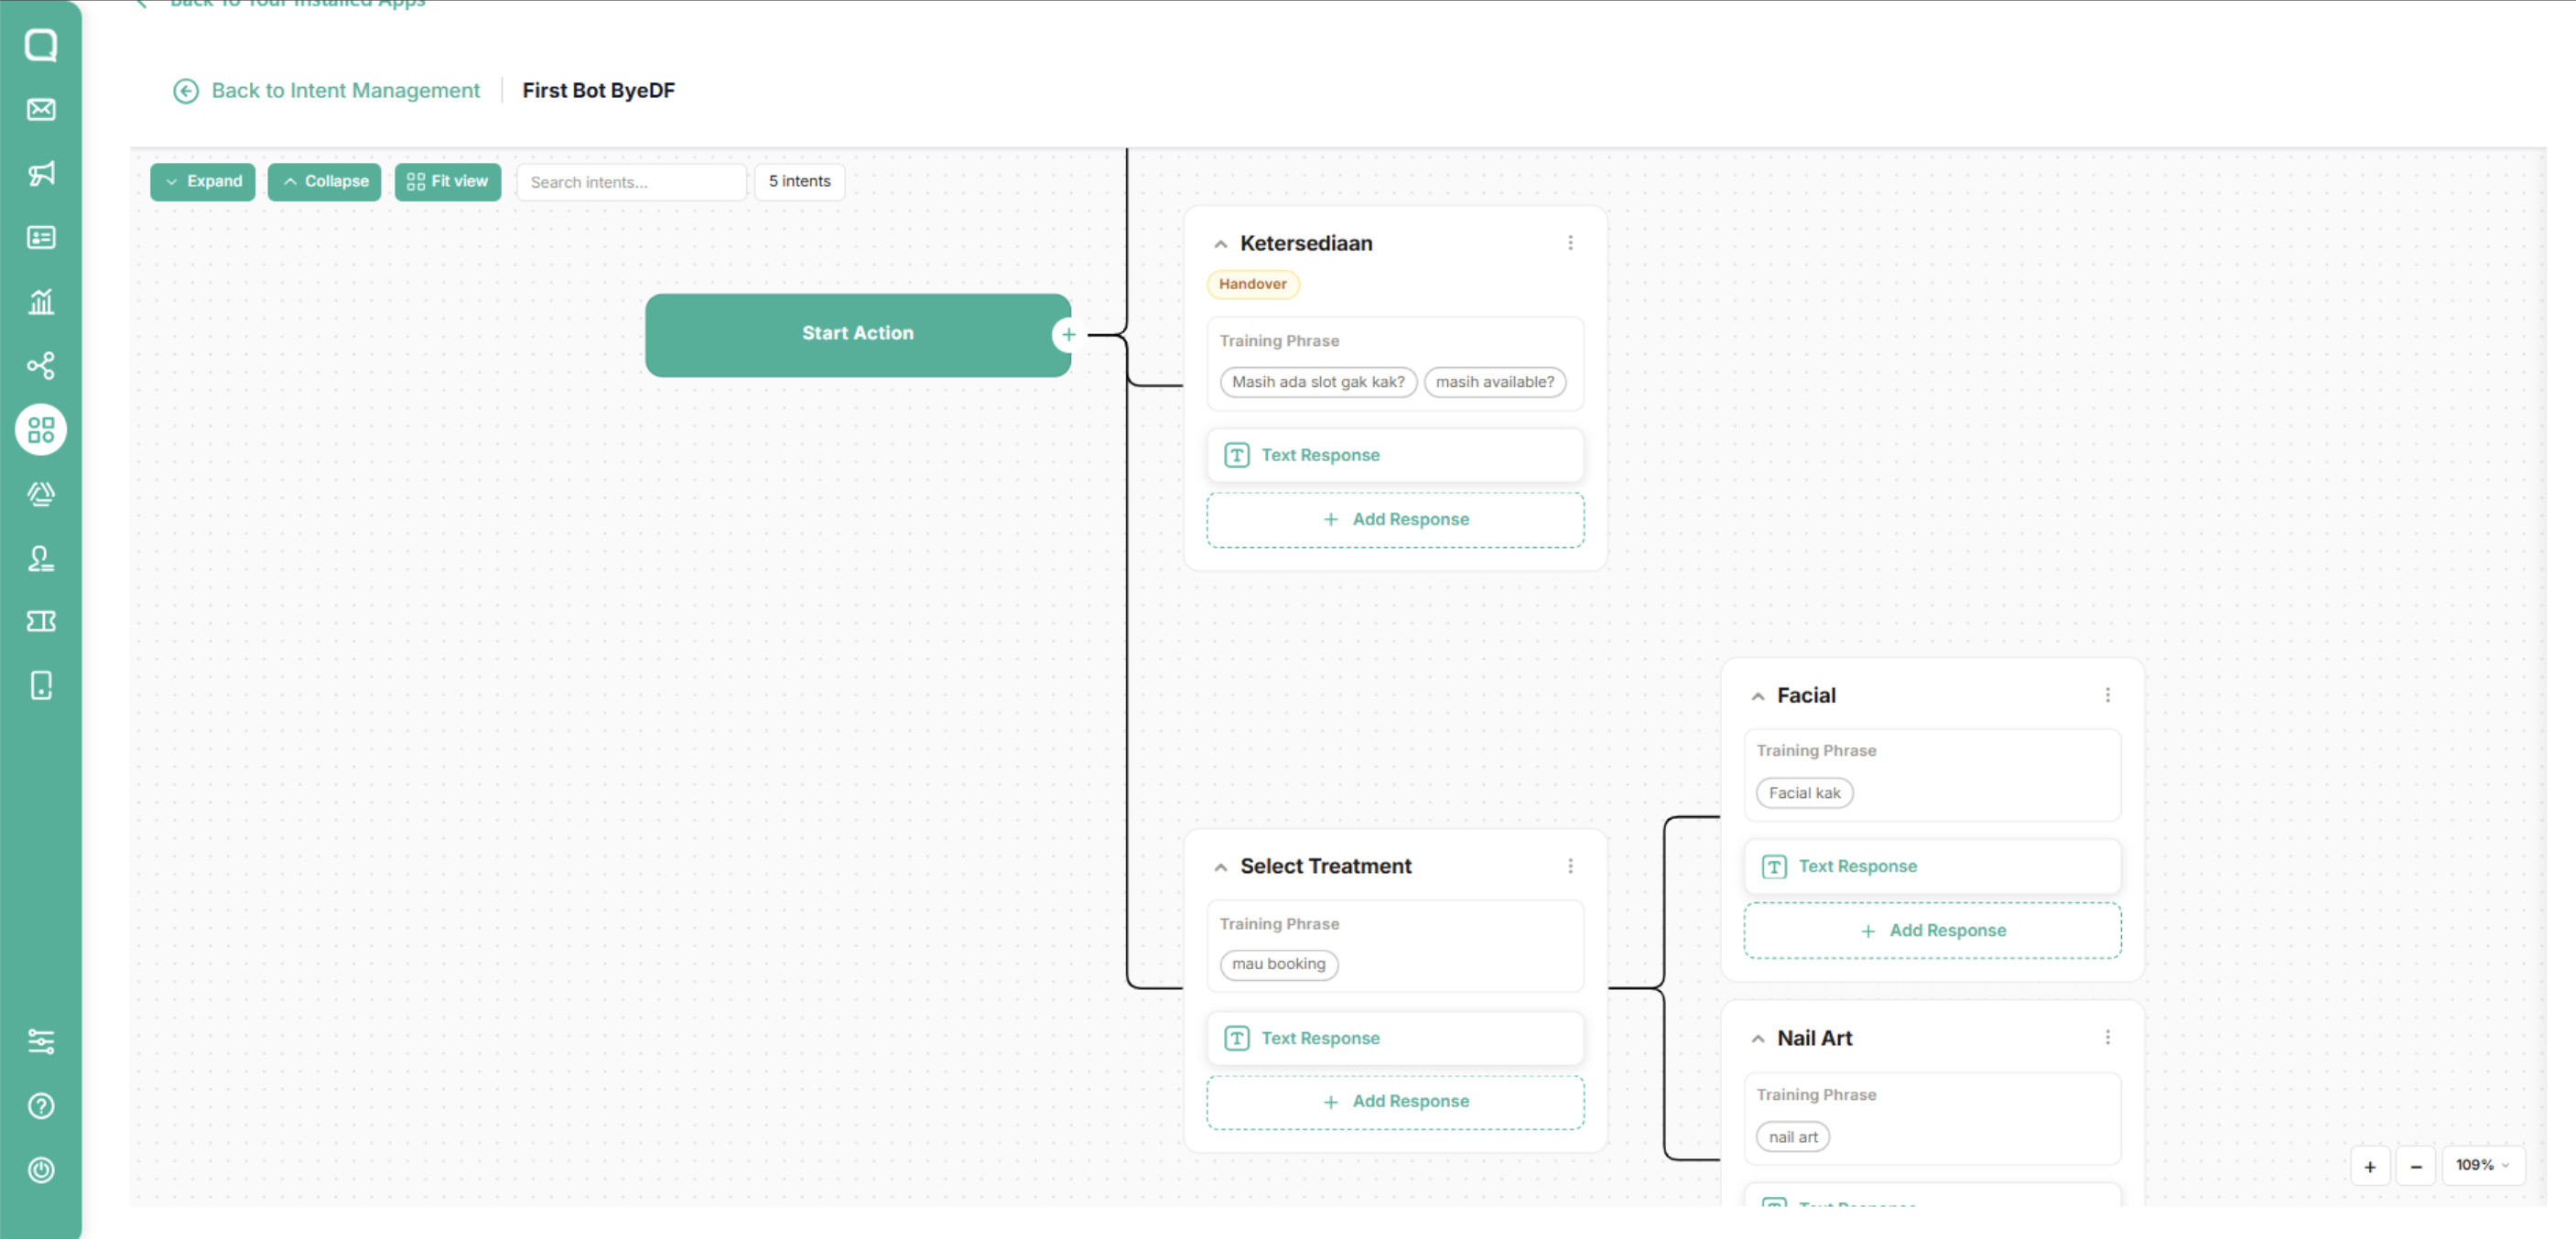
In the Intent Visual Builder, intents configured for agent handover are marked with a visual indicator, making it easy to identify which intents trigger an agent transfer.
Bot Training
The Bot Training feature allows users to improve the chatbot’s ability to understand user messages. By training the bot with new phrases, the system can better match user inputs with the appropriate intents. These features help continuously improve the bot’s Natural Language Understanding (NLU) accuracy.
Intent-based Engine provides two training methods:
Live Training: Train phrases directly from real user conversations.
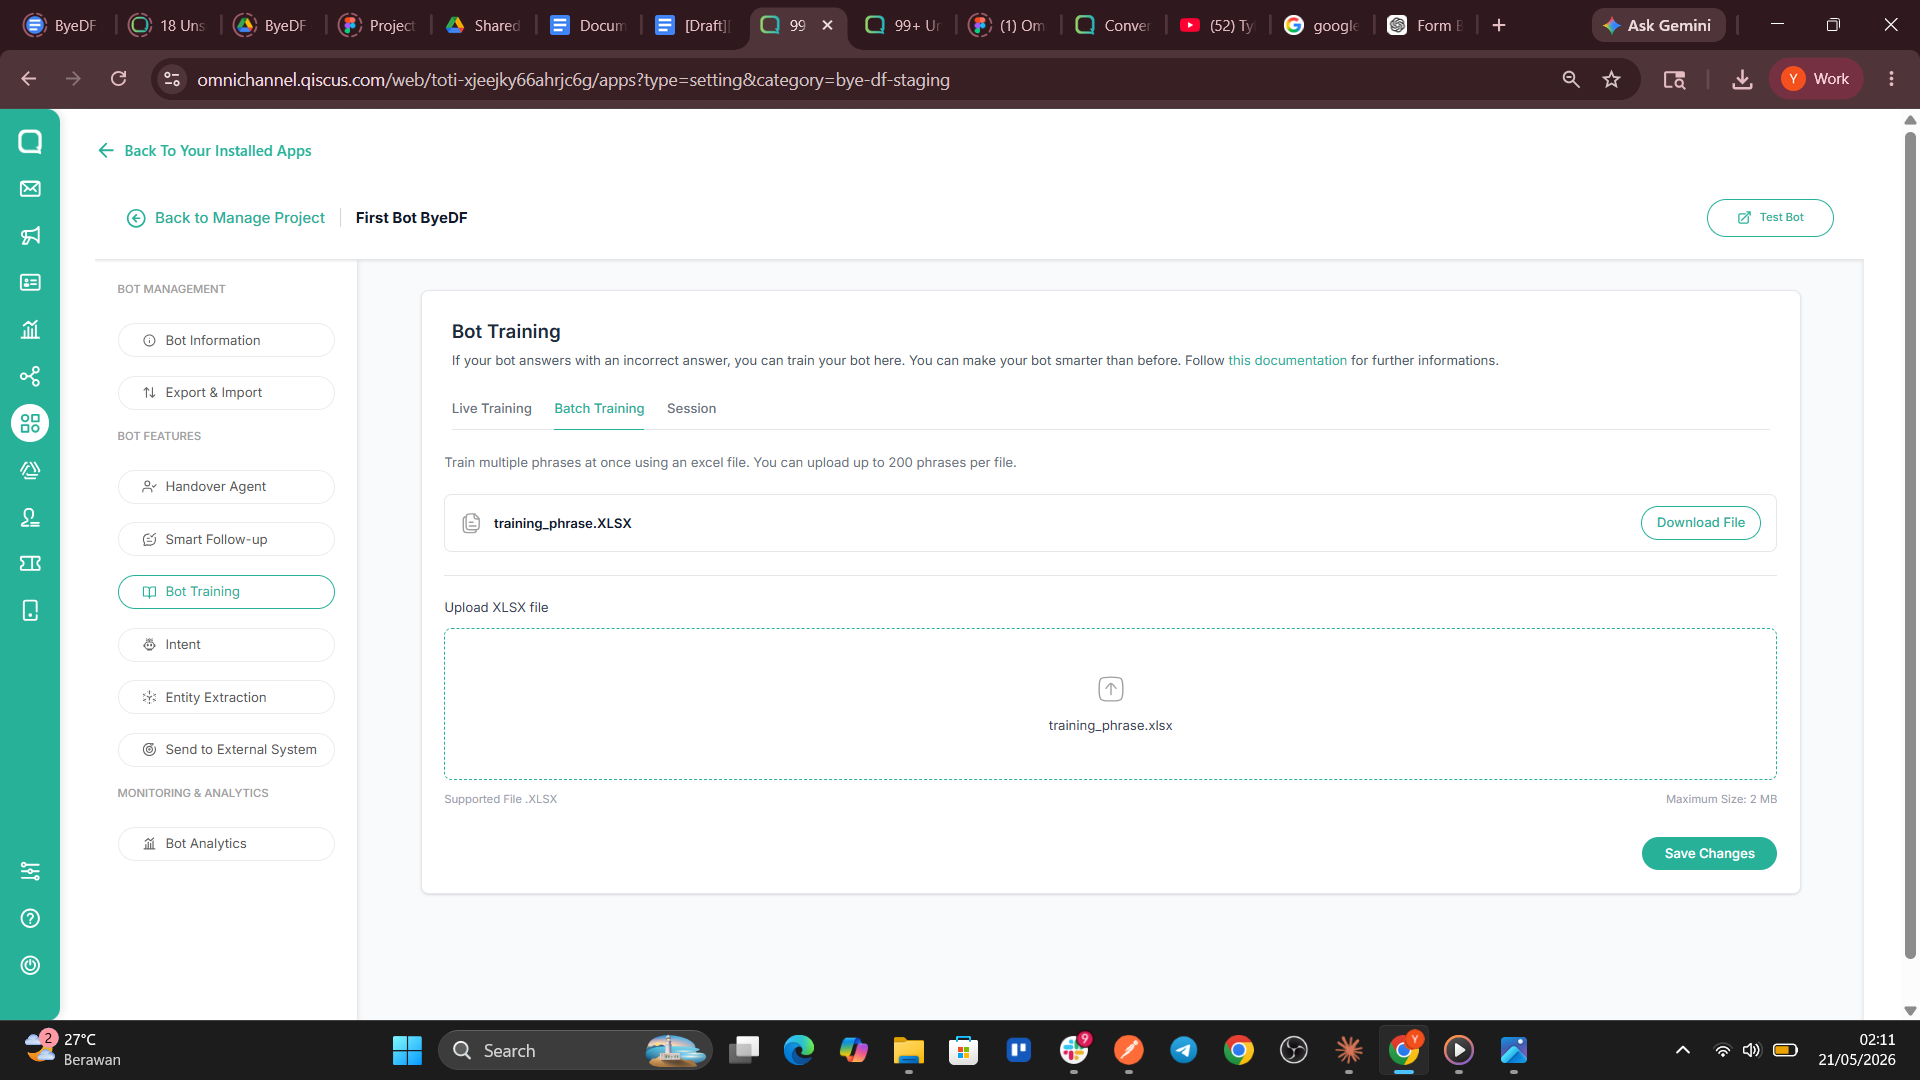
Batch Training: Train multiple phrases at once using a XLSX.file.
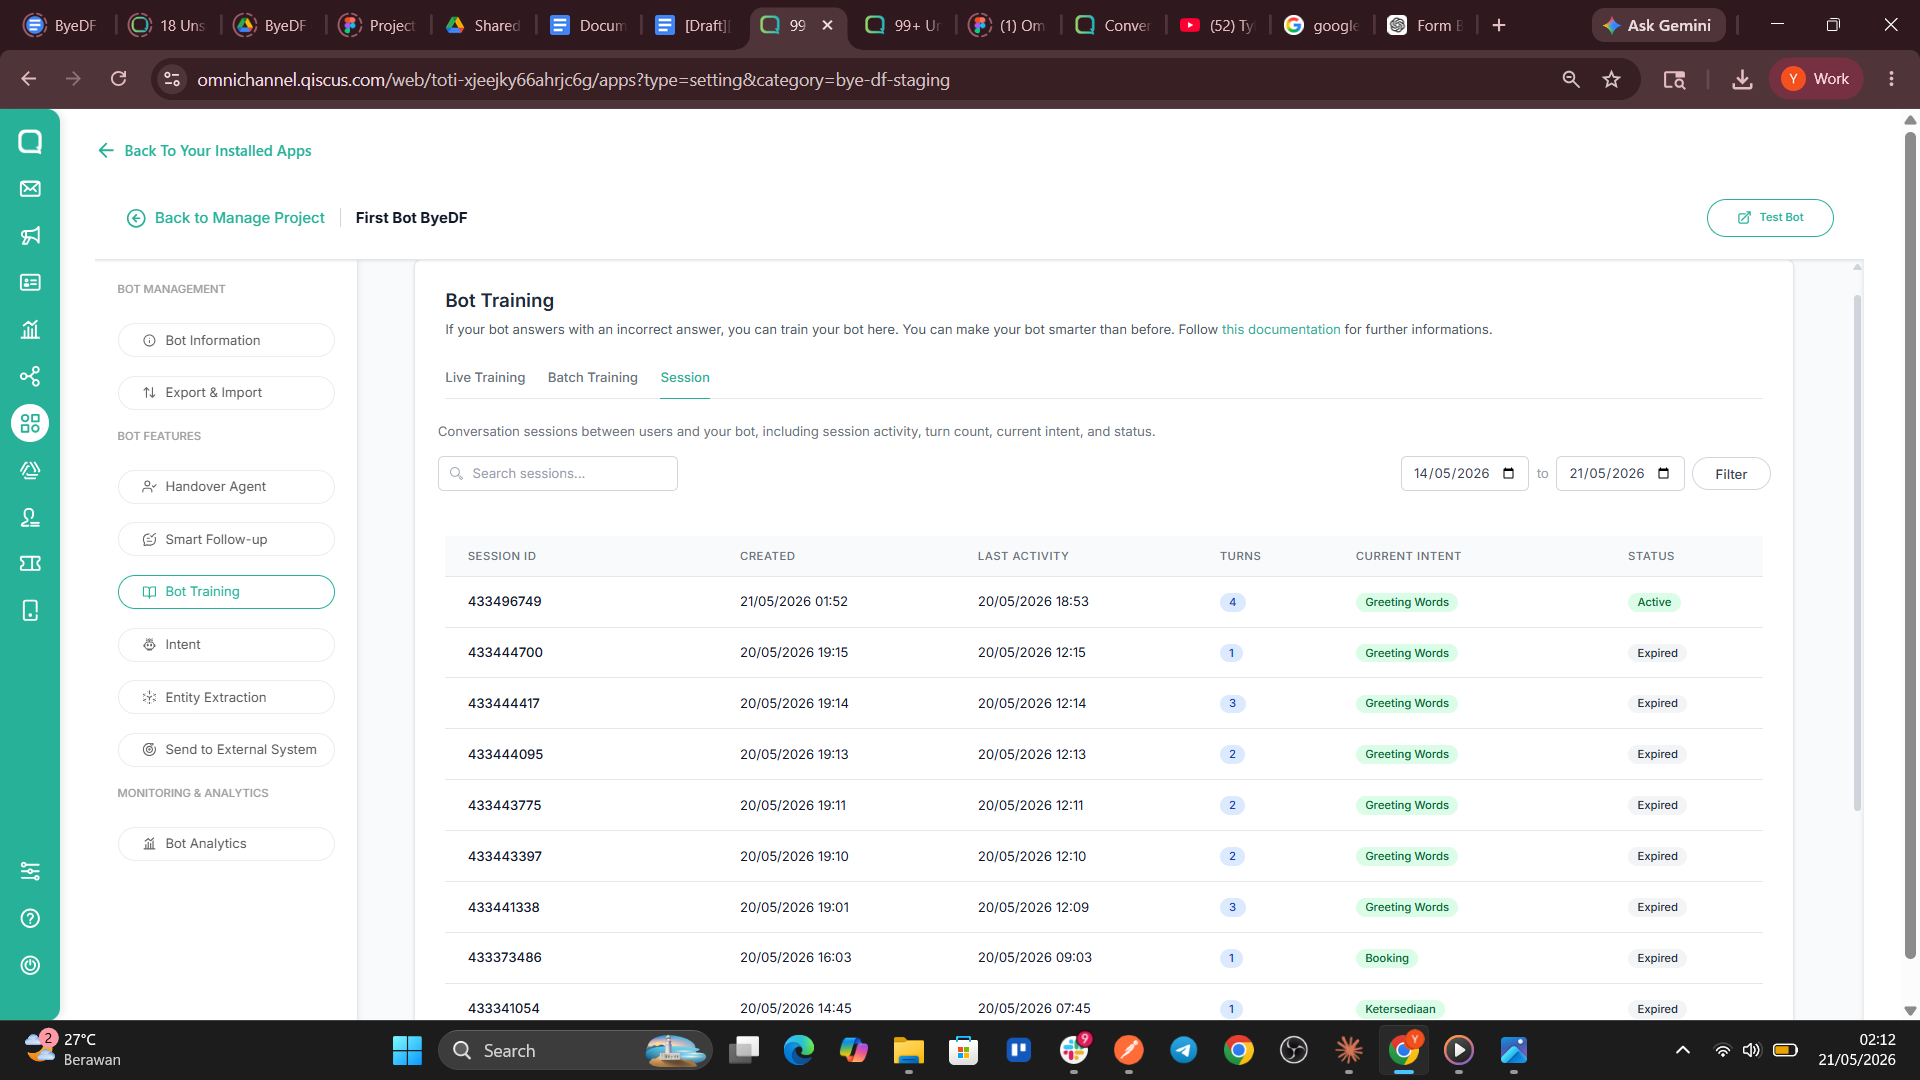
In addition to data records, in the menu Bot Training also includes a Session section that records every conversation between your bot and users. This helps you review past interactions and analyze how your bot performs across different sessions.
Live Training
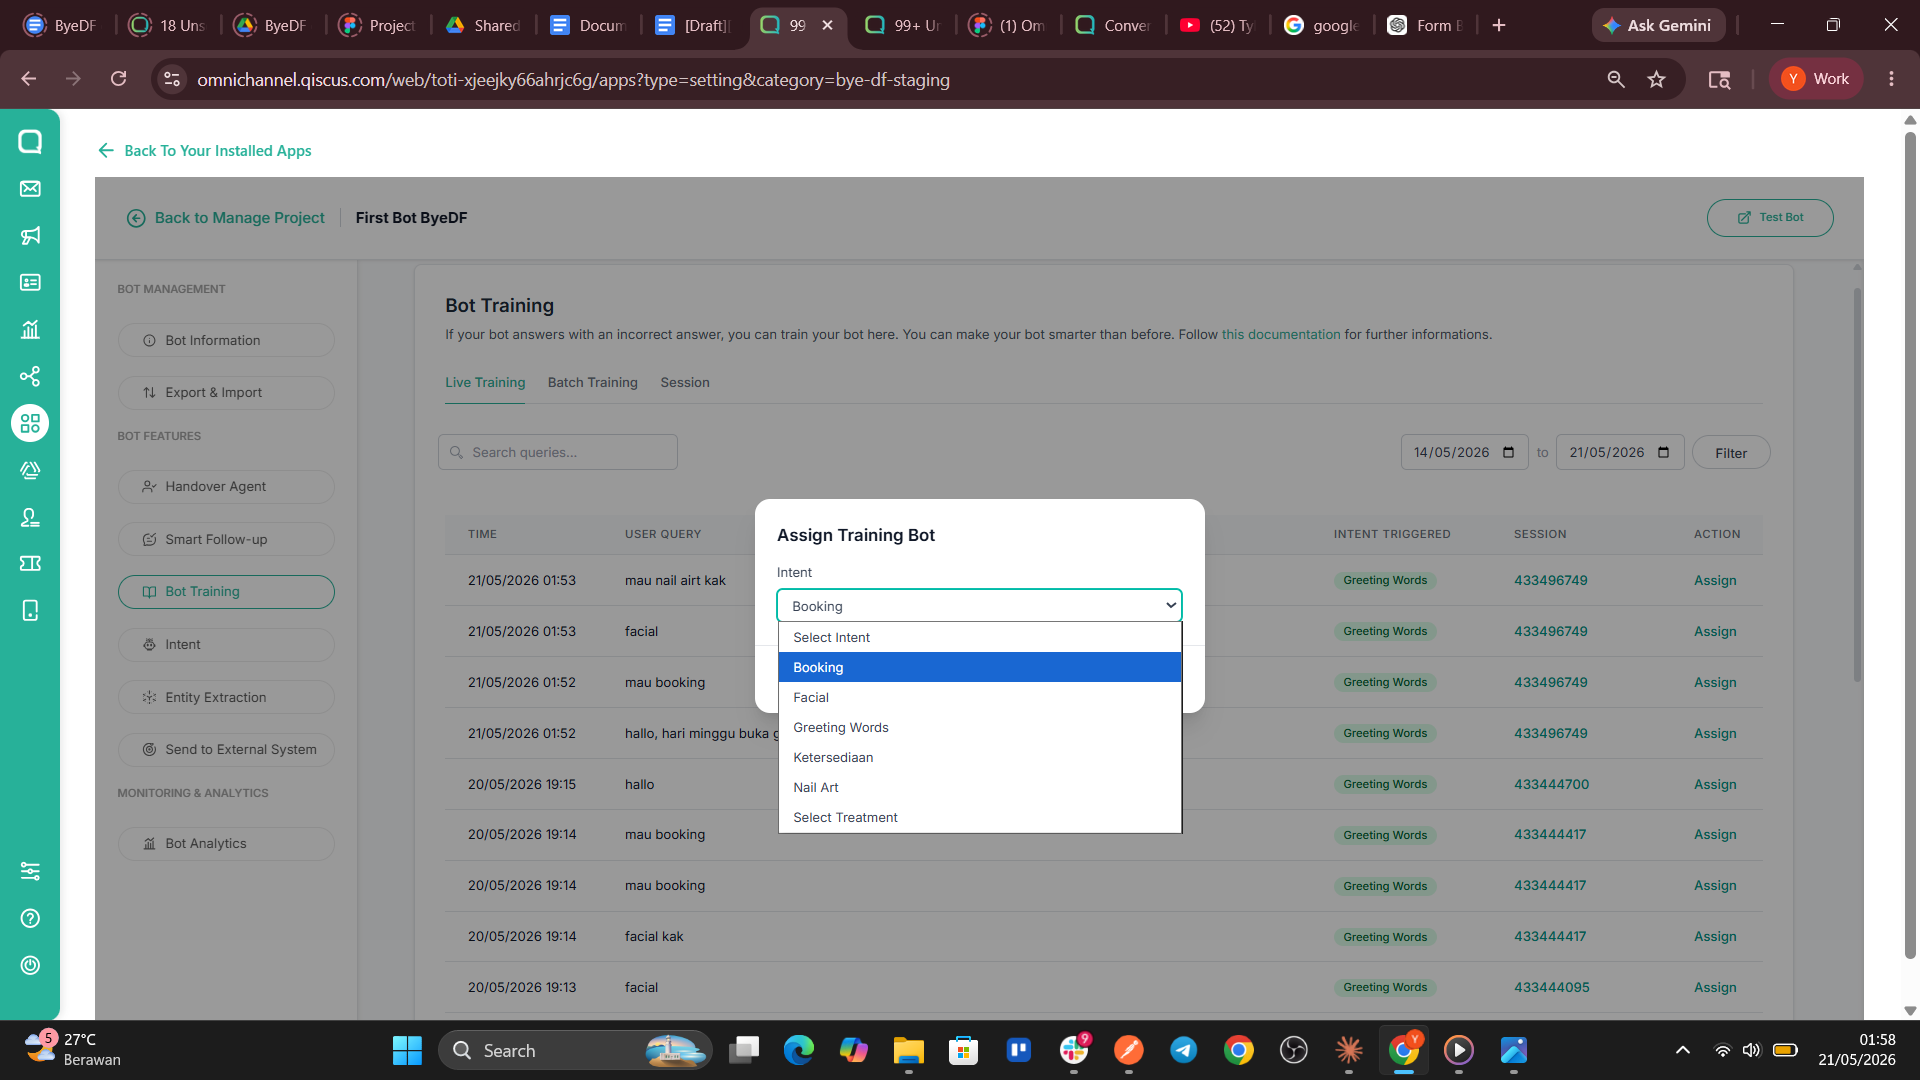
The Live Training feature allows users to review real user messages received by the chatbot and train them into the appropriate intents.
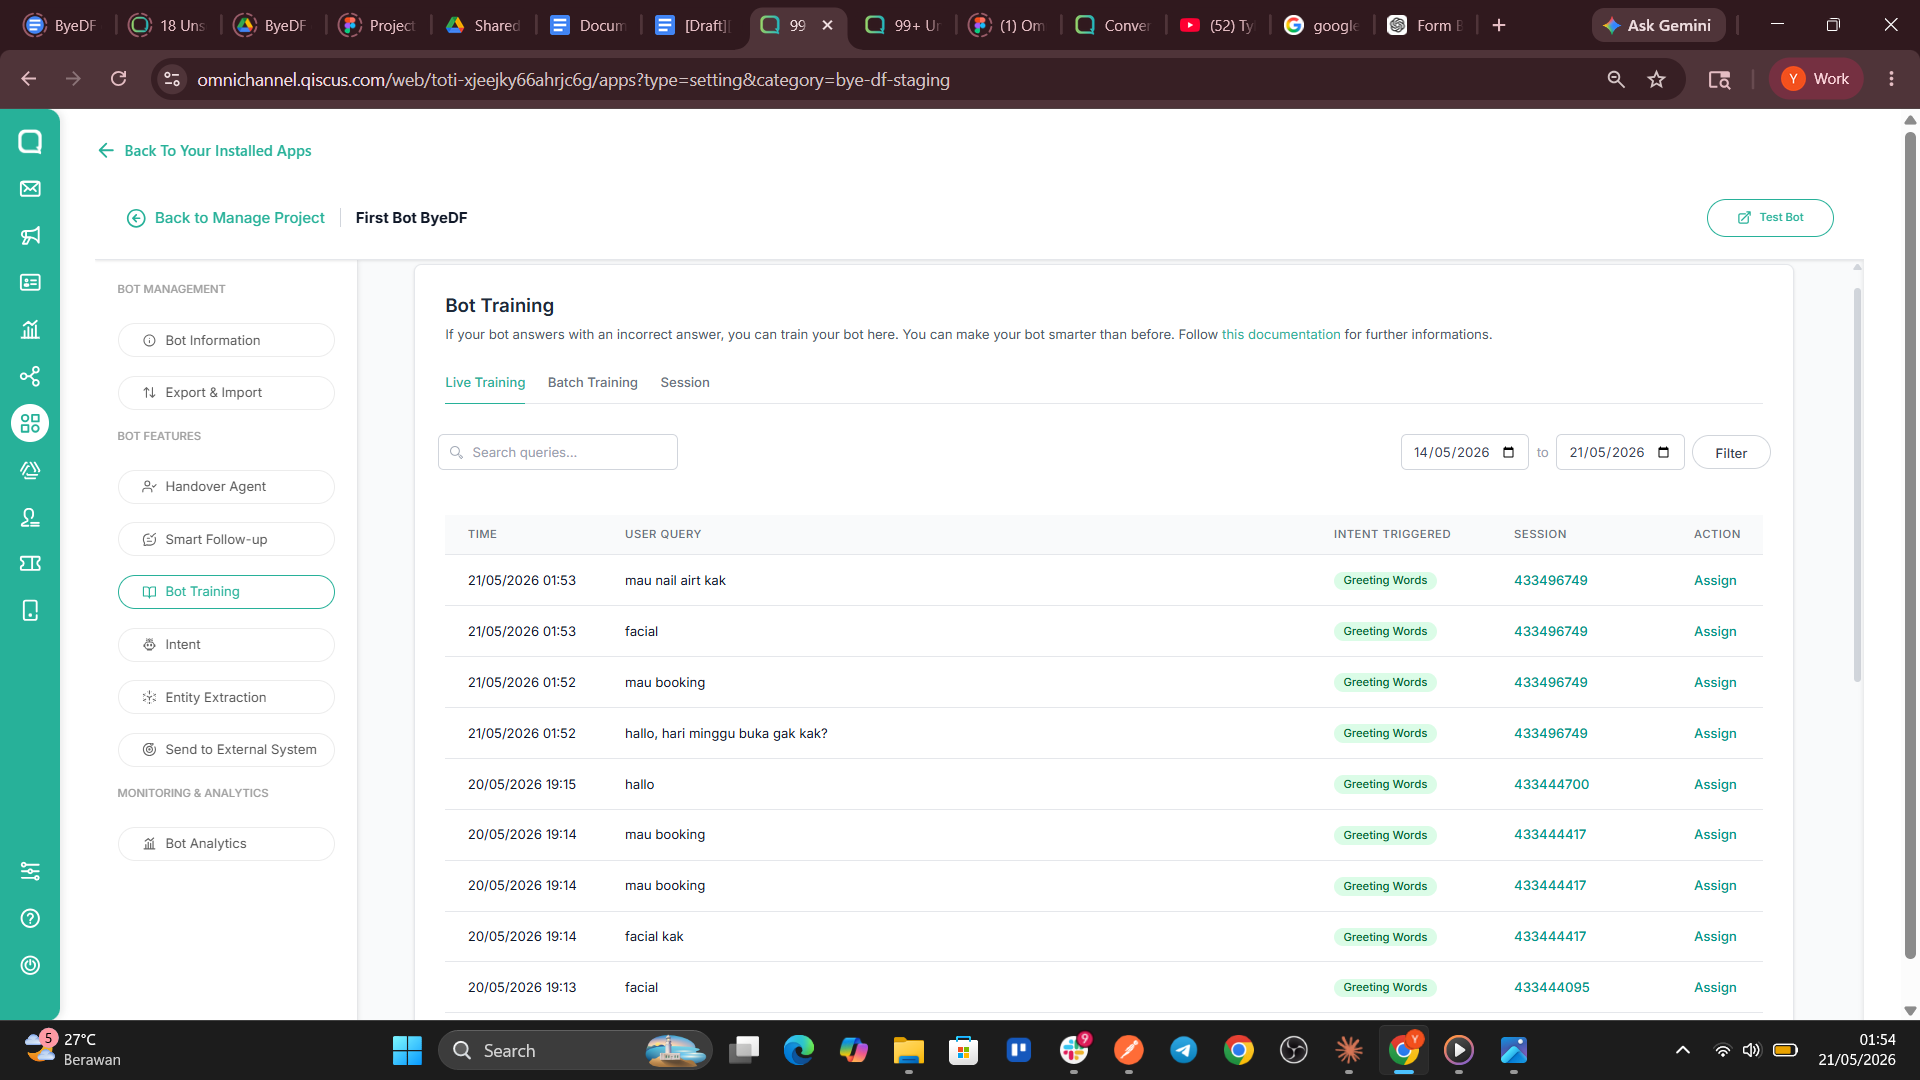
You can classify words into categories to help your bot recognize and respond to different types of user input more accurately.
By clicking the Action option in the table, you will open the Assign Training Bot and you will be able to use the dropdown to select the classifications intent. Then click Save.
Batch Training
The Batch Training feature allows users to train multiple phrases at once using a XLSX.file. This method is useful when users need to add many training phrases efficiently without assigning them one by one through Live Training.
Session
The Session section captures every conversation between your bot and users as a complete session log. Each session includes the timestamp, user inputs, bot responses, and the intents triggered throughout the interaction. This makes it easier to review past conversations, evaluate your bot's behavior in different scenarios, and identify opportunities to improve its accuracy and performance.
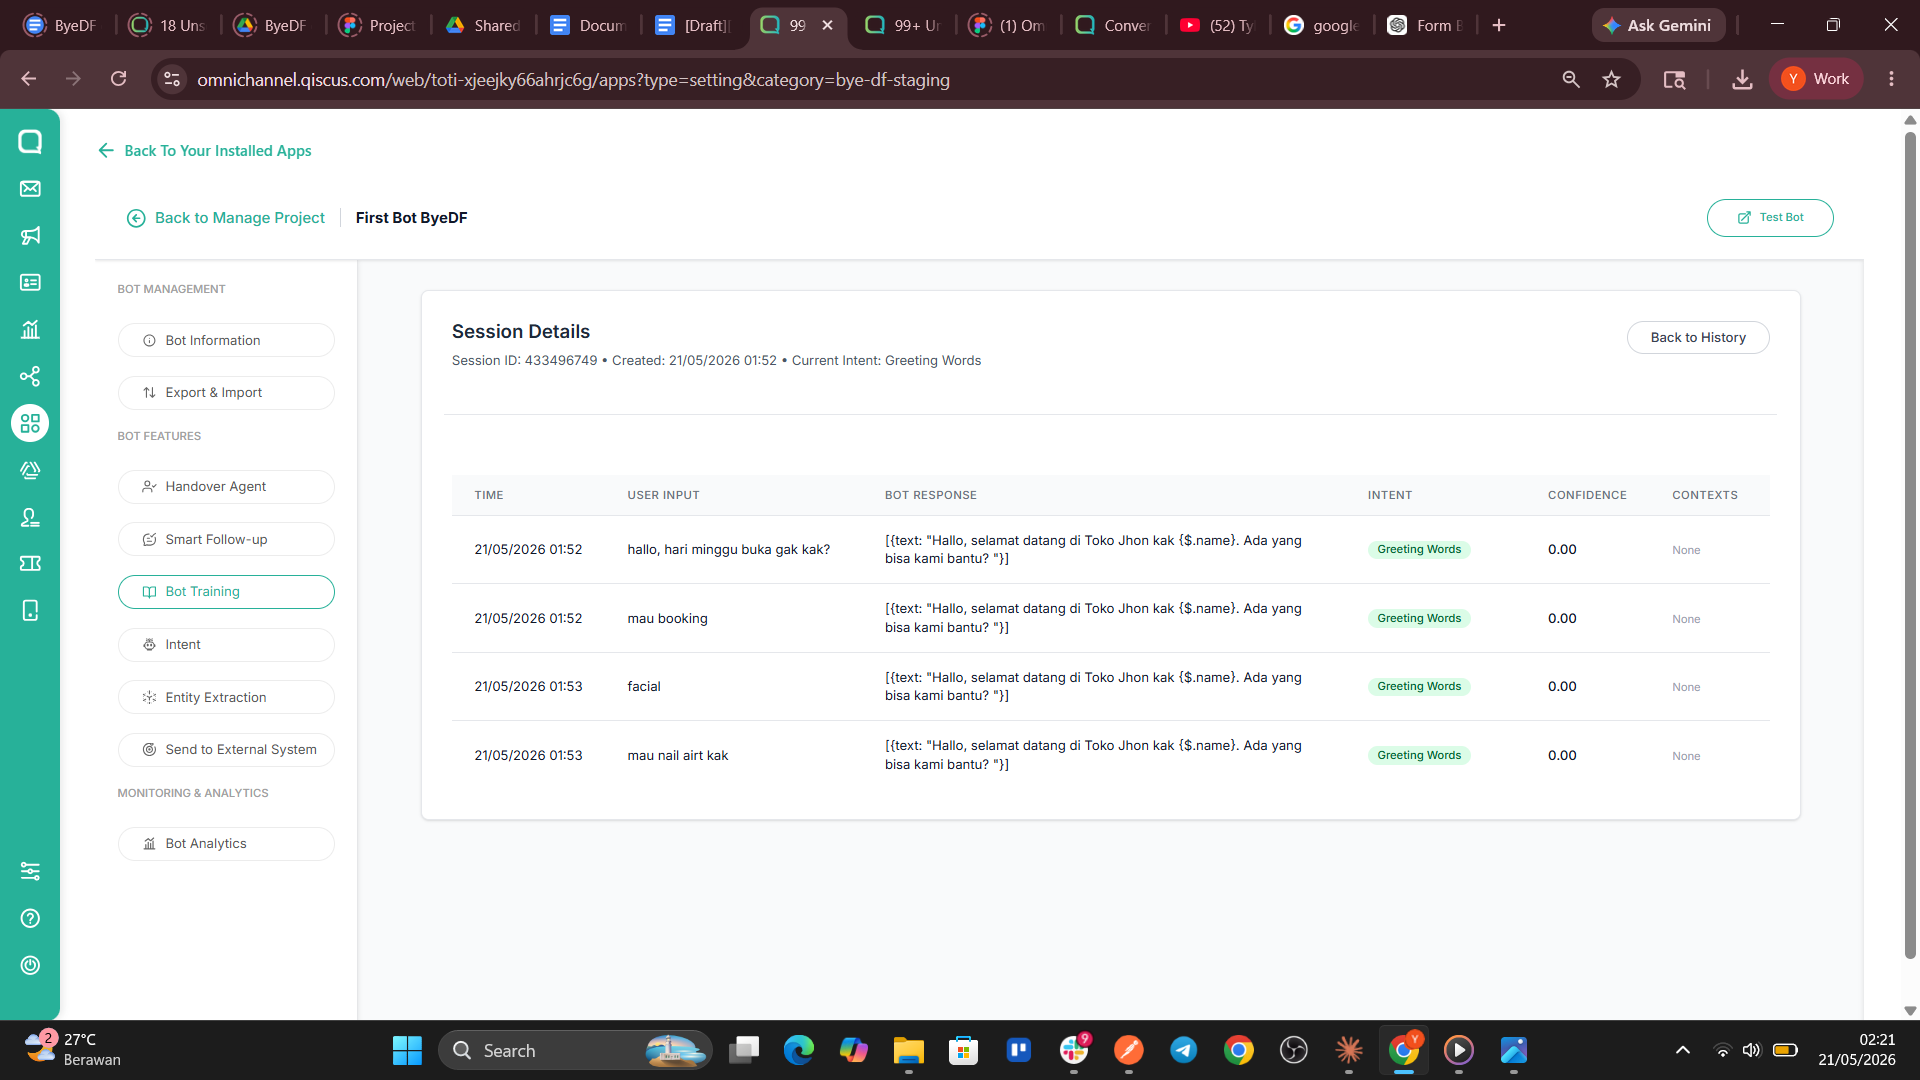
You can also open the session details to view the complete conversation, including timestamps, user inputs, bot responses, triggered intents, confidence scores, and conversation contexts.
Send to External System
Fulfillment
Fulfillment connects detected intents to external systems before the chatbot sends a response. Instead of replying with static text, the bot can request real-time data or trigger backend operations from APIs, databases, CRM platforms, payment systems, and other business services.
When an intent with fulfillment is triggered, Intent-based Engine sends a request to the configured external service. The service processes the request and returns data that the chatbot uses to generate its response.
This enables chatbots to:
Retrieve real-time information
Execute backend operations
Personalize responses
Integrate with third-party systems
Fulfillment Methods in Intent-based Engine
Intent-based Engine supports fulfillment integration through external service connections.
Webhook (External API)
Webhook fulfillment allows the Intent-based Engine to send a request to an external API endpoint whenever a specific intent is triggered. This is the primary fulfillment method — ideal for retrieving real-time data or executing operations through external systems such as databases, CRM platforms, or payment gateways.
Internal Action
Internal Action refers to built-in operations that run directly within the Intent-based Engine, without requiring connection to external APIs or servers. This method is suited for tasks that can be handled internally, such as routing conversations or applying predefined logic.
How to Use Fulfillment
To enable fulfillment, you can choose between two activation methods. The first is through the Visual Intent, and the second is through the Send to External System menu on the dashboard.
If you choose to activate fulfillment through the Send to External System menu, follow the steps below:
Select Send to External System from the Dashboard menu, choose Fulfillment Webhook, then enable the toggle.
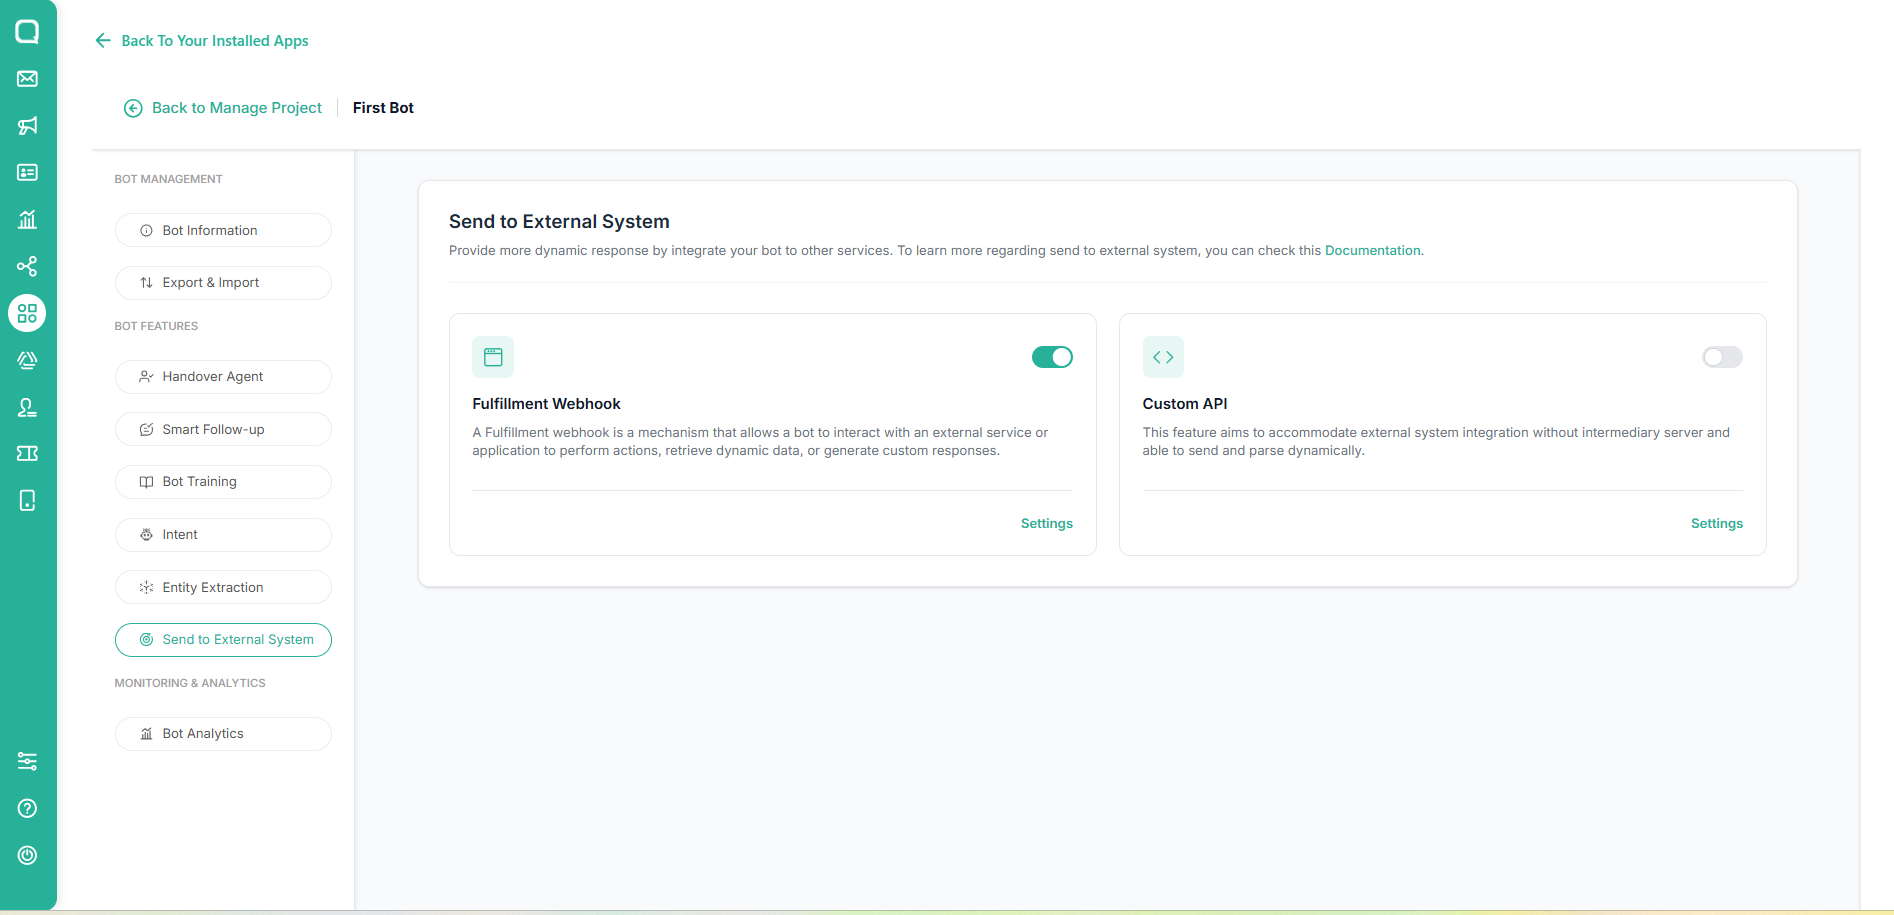
Click Settings to customize your webhook configuration.
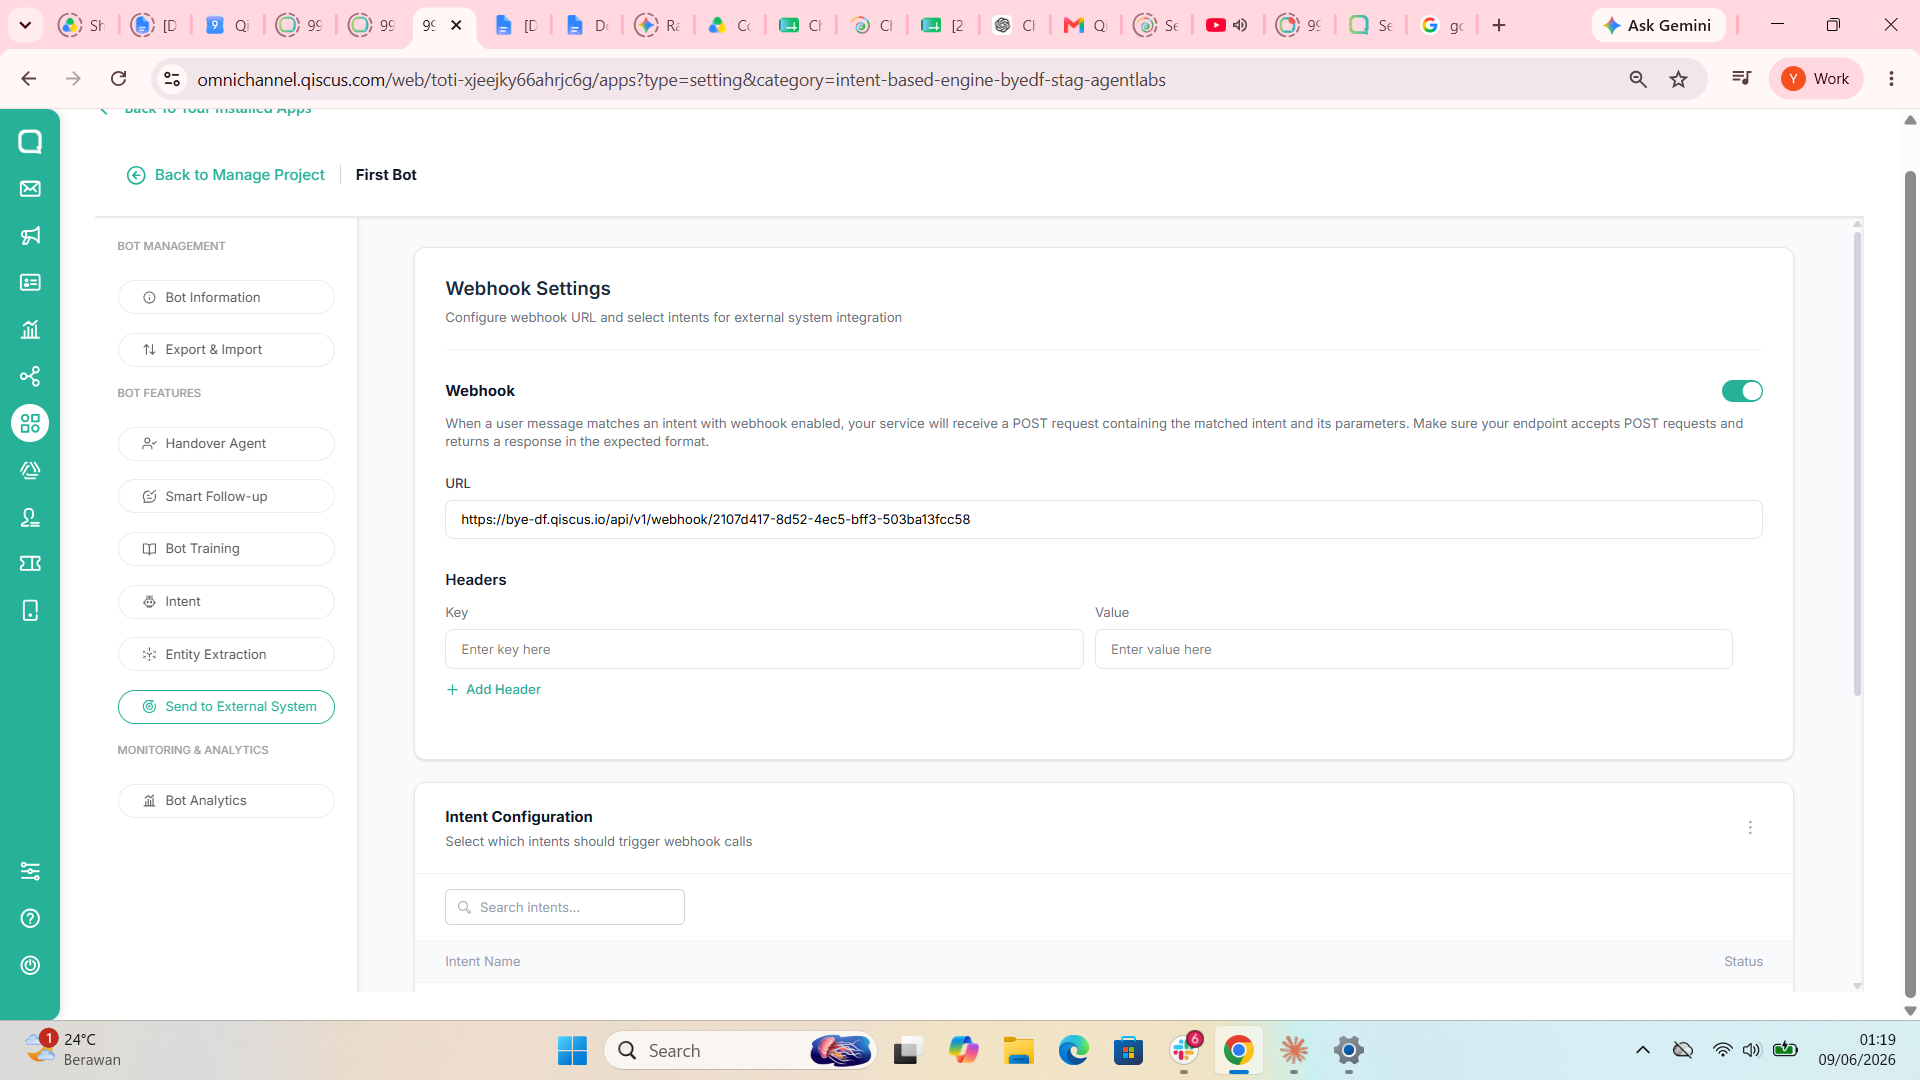
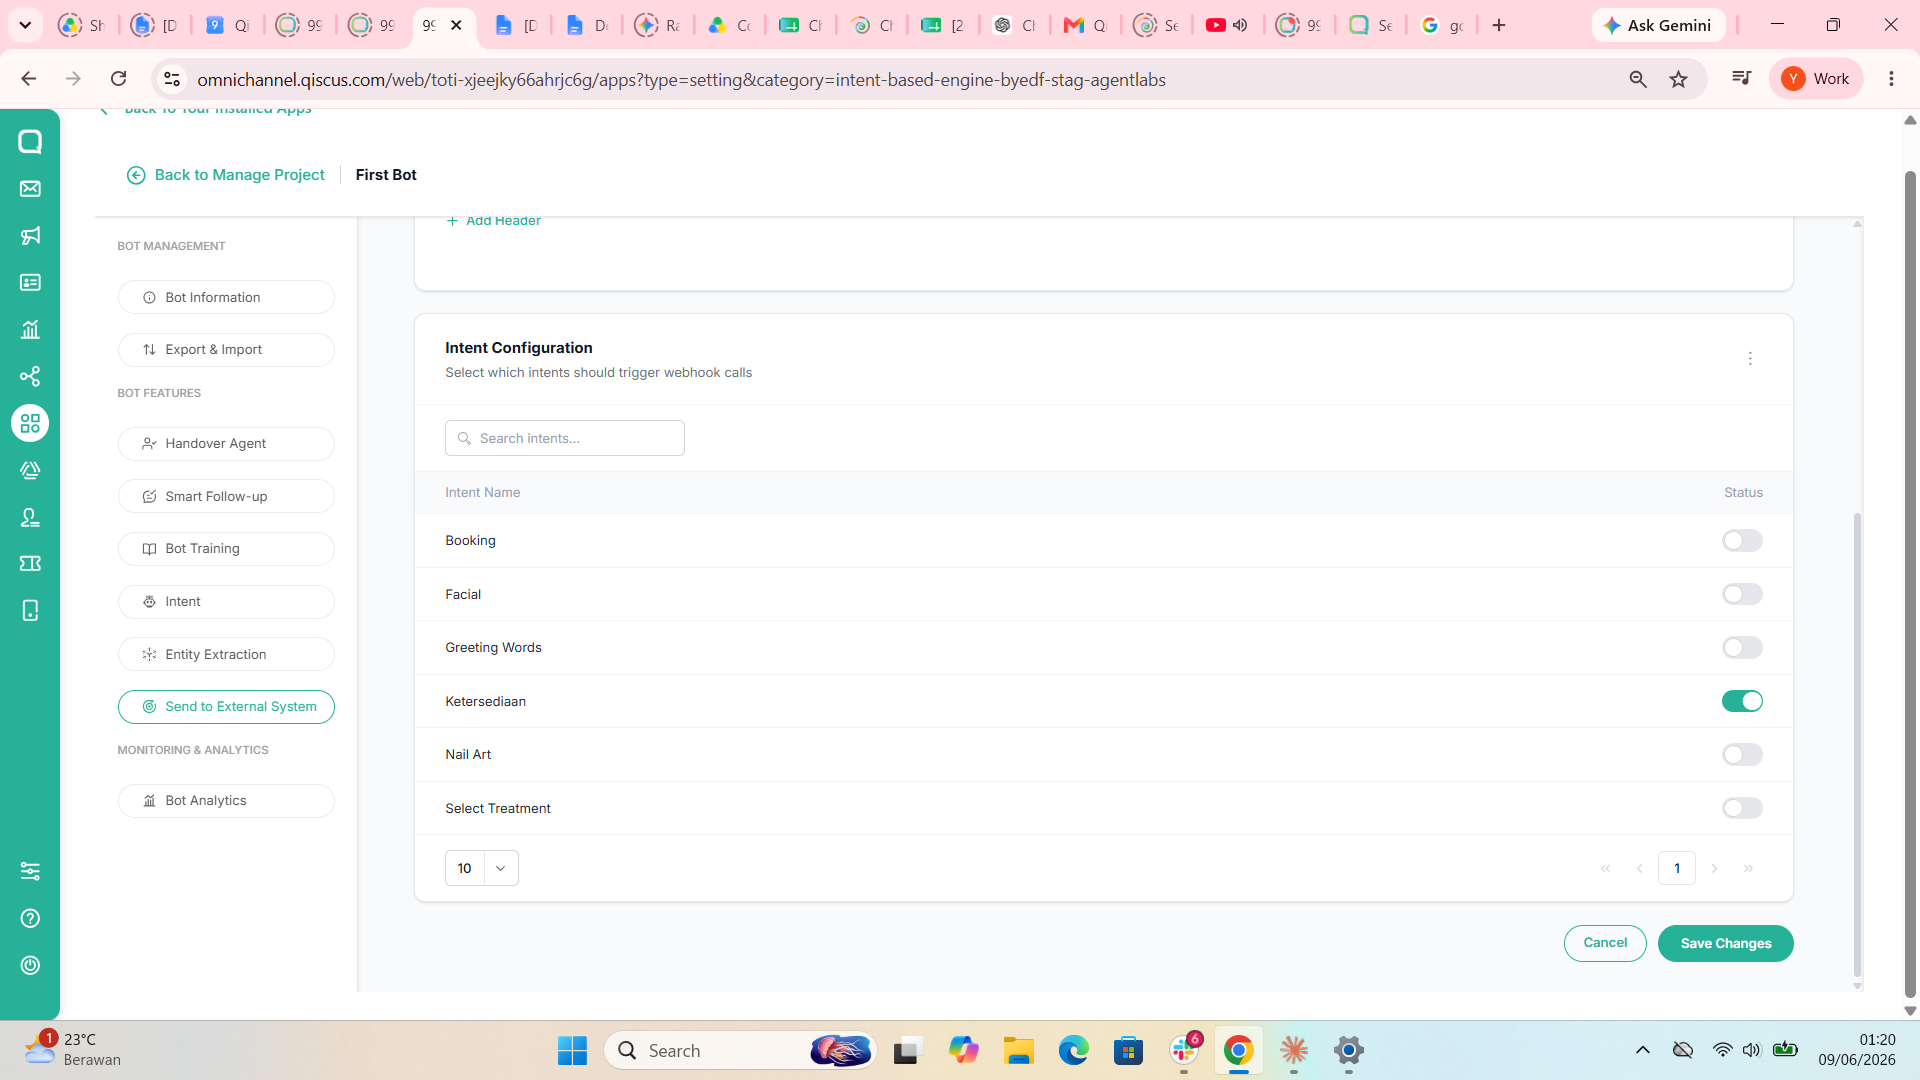
You can apply the same fulfillment endpoint to all intents or only to a specific intent. Then click Save Changes.
To activate fulfillment via Visual Intent, open the Intent menu and click Go to Intent Visual Builder.
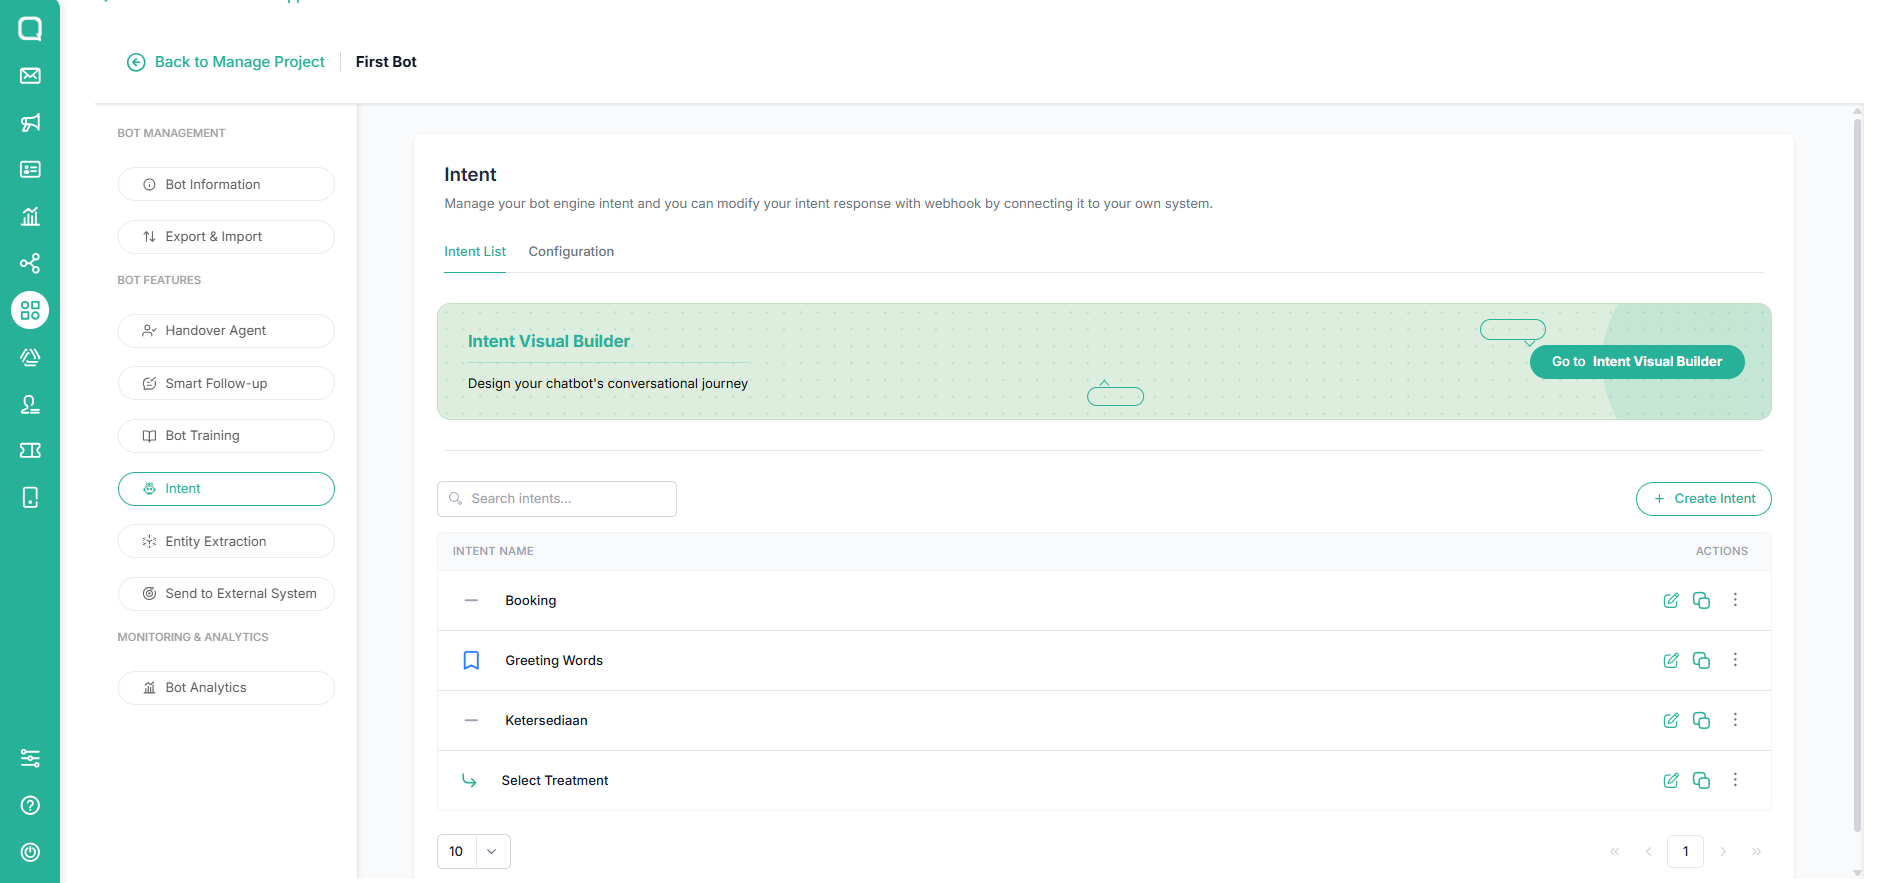
Intents activated through the Send to External System menu are marked with a Fulfillment indicator.
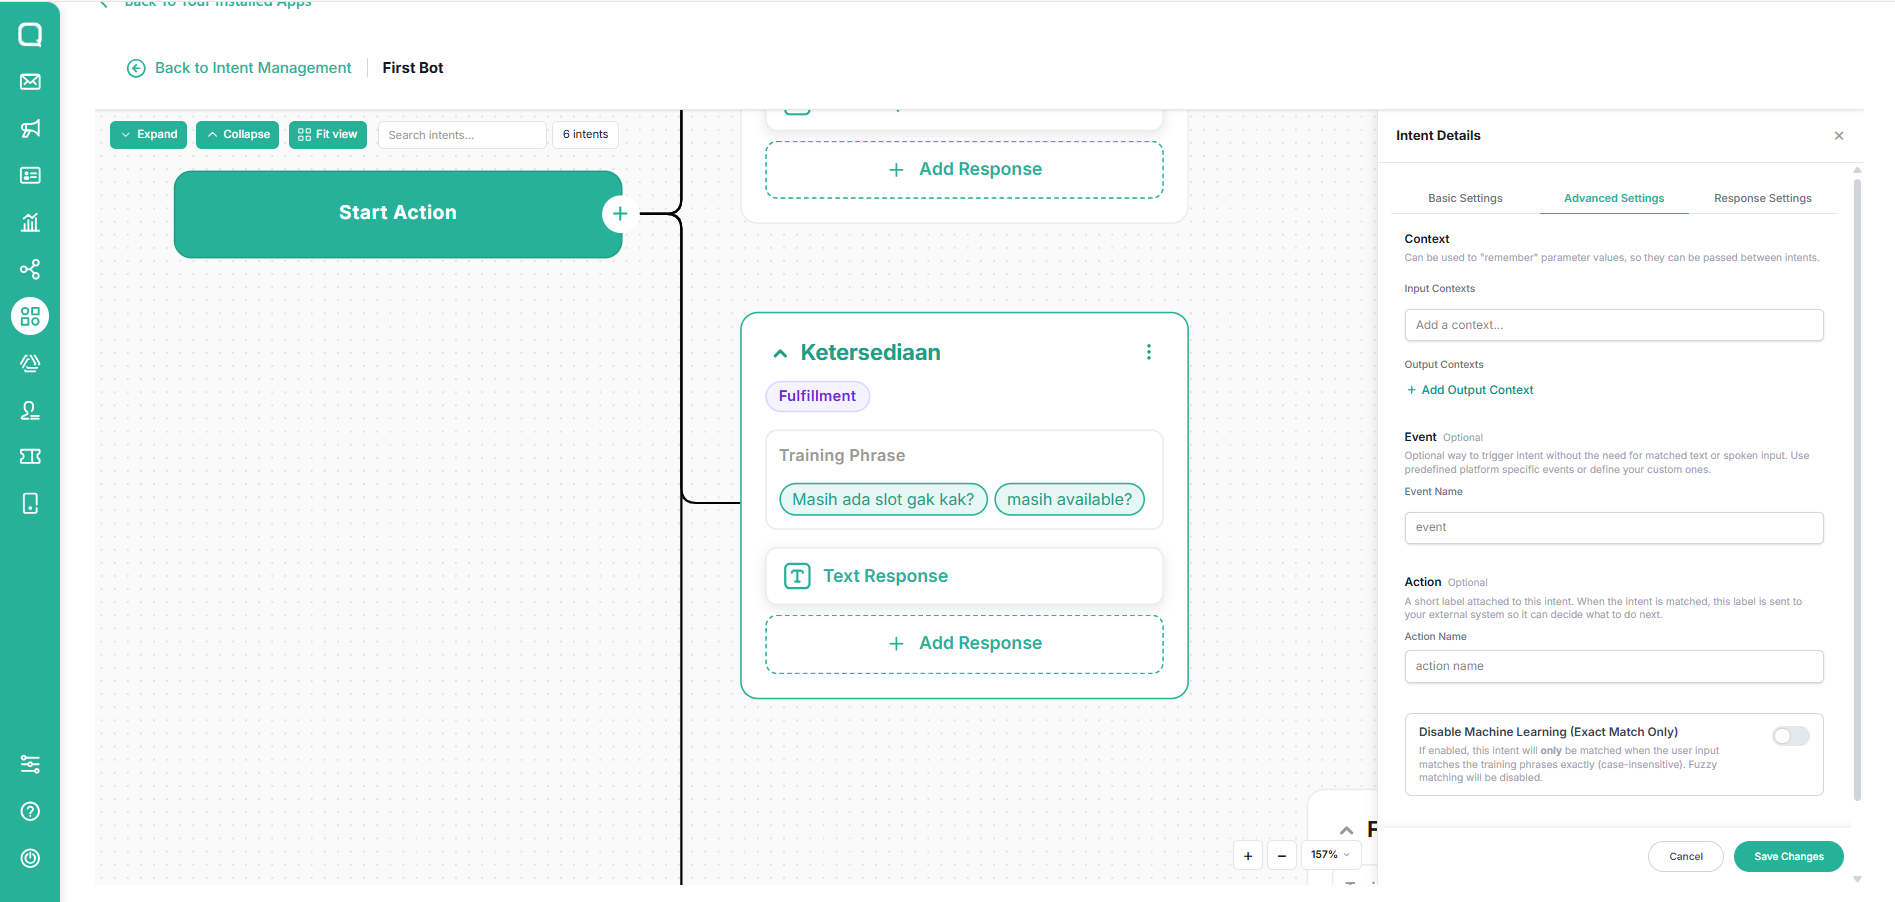
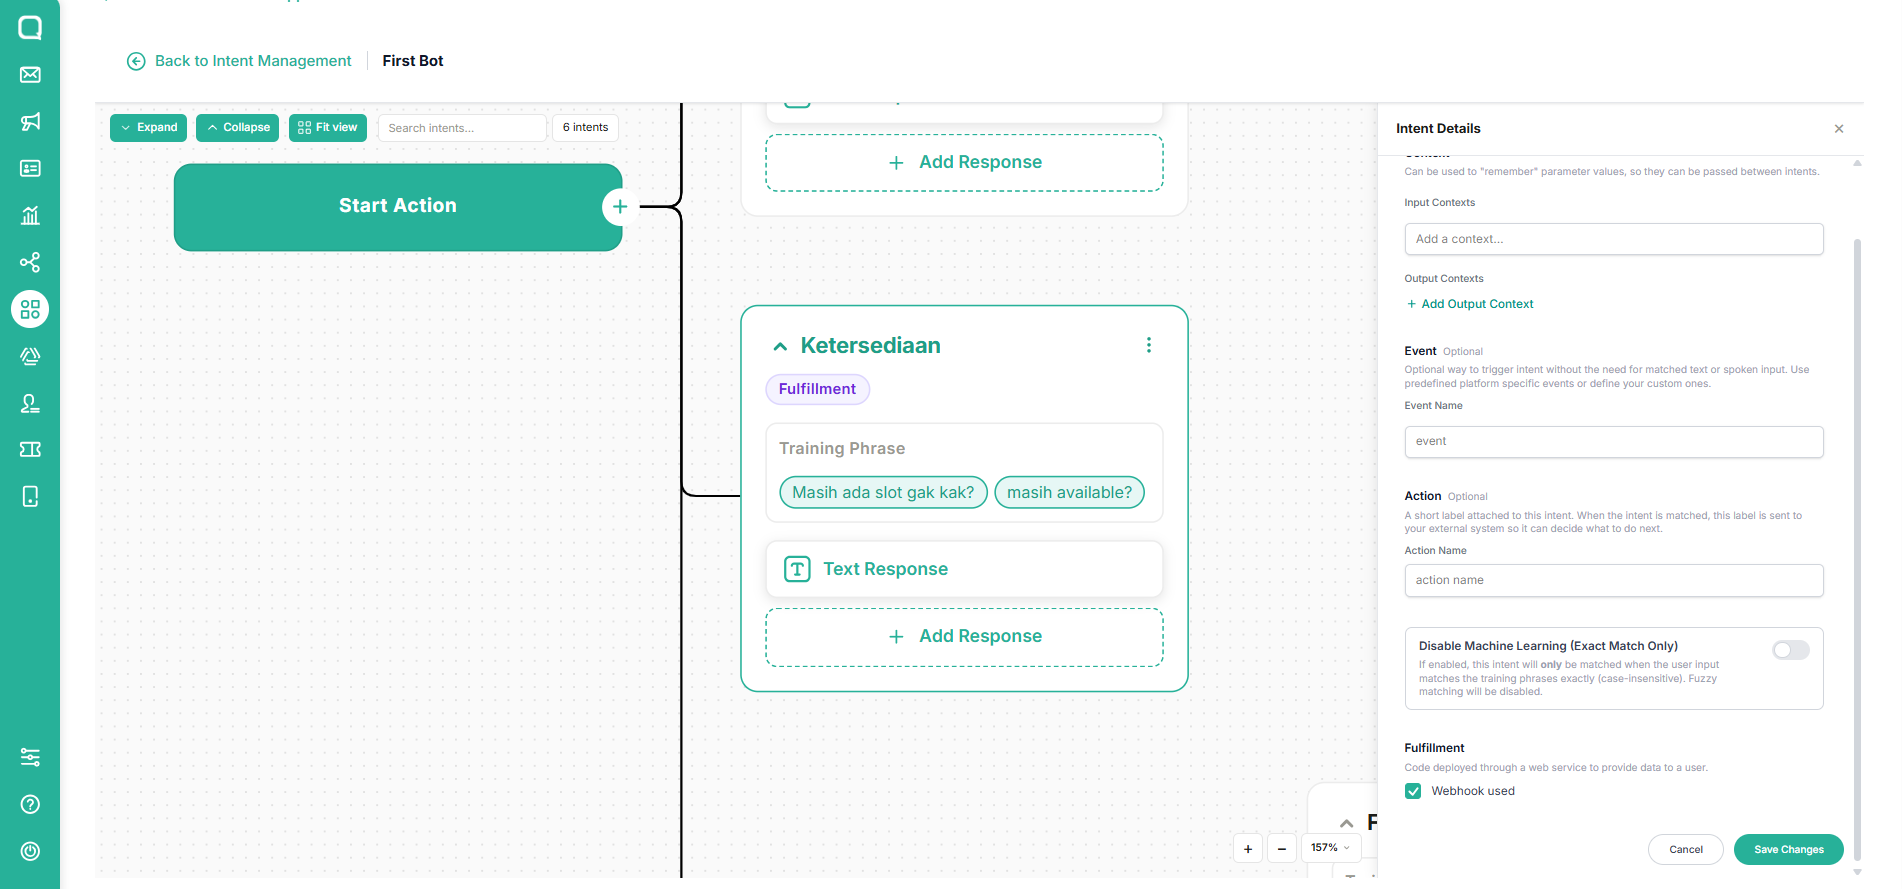
For a new intent, open Advanced Settings, scroll down to the Fulfillment section, then check the Webhook Used checkbox and click Save Changes. Your intent will be automatically marked as a fulfillment intent.
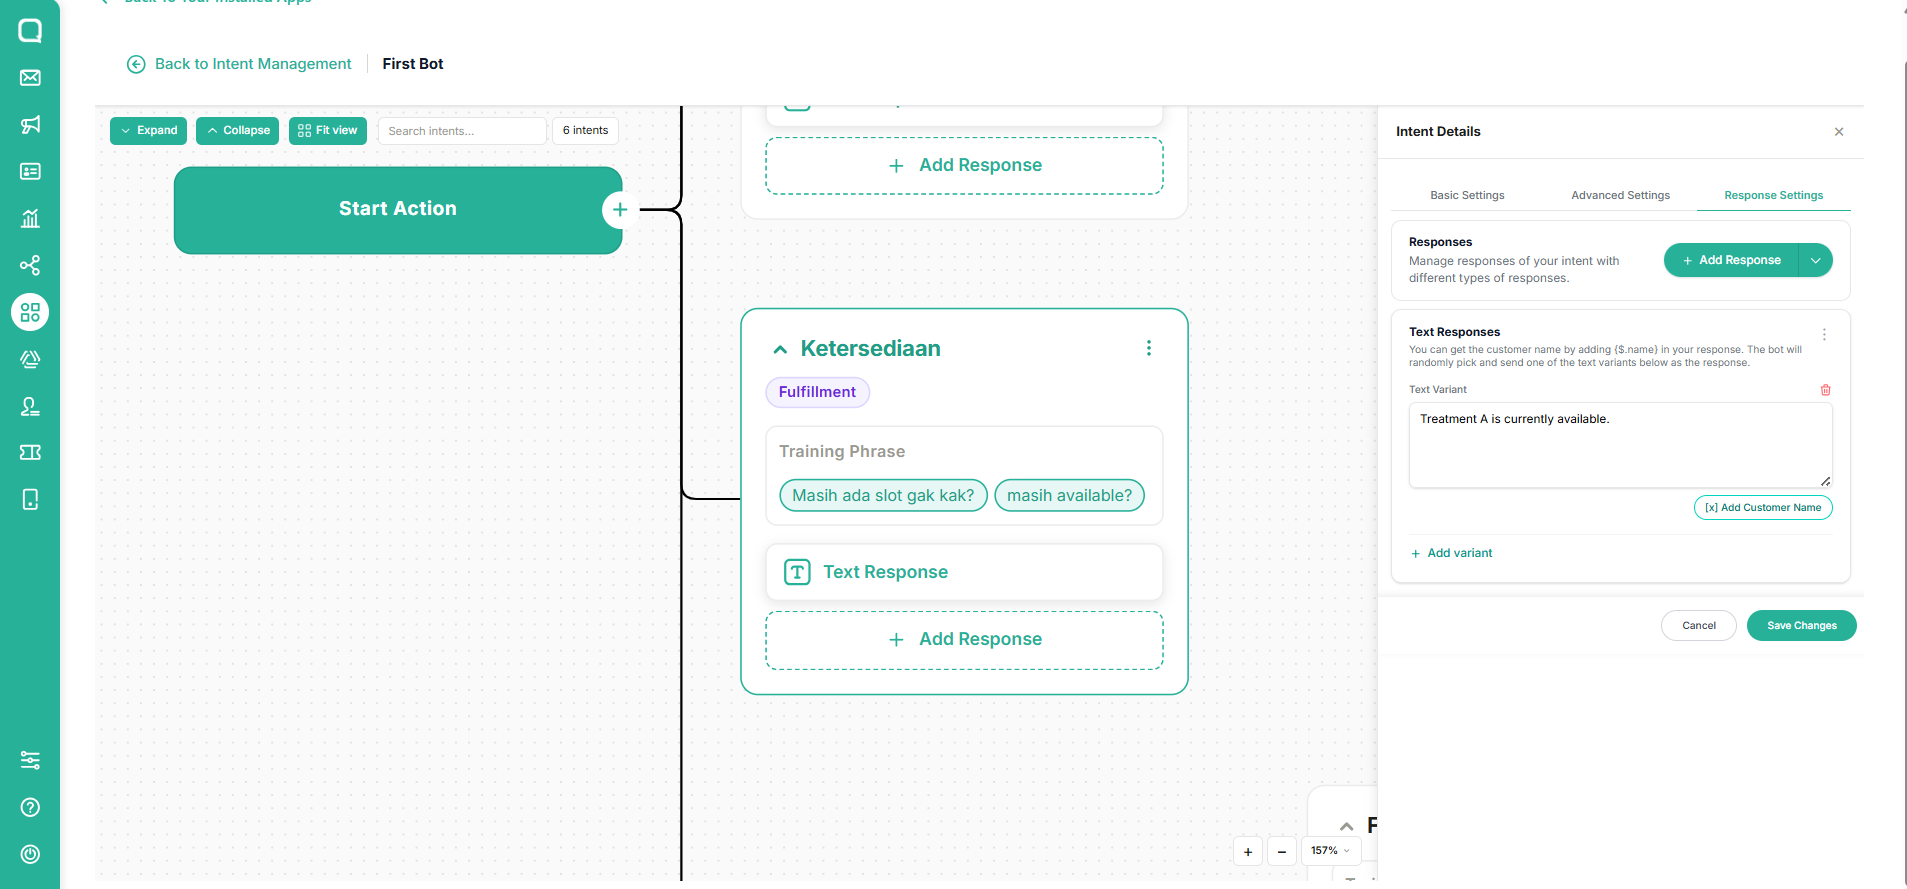
On the response settings, write the bot response message, then click Save Changes.
Custom API
A Custom API (Webhook) is an HTTP endpoint provided by your own system that Intent-based Engine calls automatically whenever a specific intent is triggered. It acts as a bridge between the chatbot and your external services. enabling real-time data retrieval and backend operations based on user input.
When an intent with a configured webhook is triggered, Intent-based Engine sends a request to your endpoint containing relevant context such as the intent name, extracted parameters, and the user's message. Your system processes this request and returns a structured response, which Intent-based Engine then uses to generate the chatbot reply.
This approach gives you full control over how the chatbot responds, allowing integration with databases, CRM platforms, payment gateways, or any internal business service through a familiar API pattern.
Request Format Sent by Intent-based Engine
When an intent with webhook integration is triggered, Intent-based Engine sends a request to the configured endpoint.
Example request payload:
The external API should return a valid JSON response that can be processed by Intent-based Engine.
Example response:
Example chatbot-oriented response:
How to Use Custom API
In the Custom API settings, the configured endpoint offers greater flexibility than static responses. It enables the chatbot to send dynamic responses based on data returned from the API, populate parameters within the bot's reply using response values, continue conversation flow by triggering subsequent intents, and trigger additional logic such as cascading webhooks. With these capabilities, a single endpoint can orchestrate multiple aspects of the interaction between your chatbot and external systems within one request-response cycle.
If you choose to activate Custom API through the Send to External System menu, follow the steps below:
Select Send to External System from the Dashboard menu, choose Custom API, then enable the toggle.
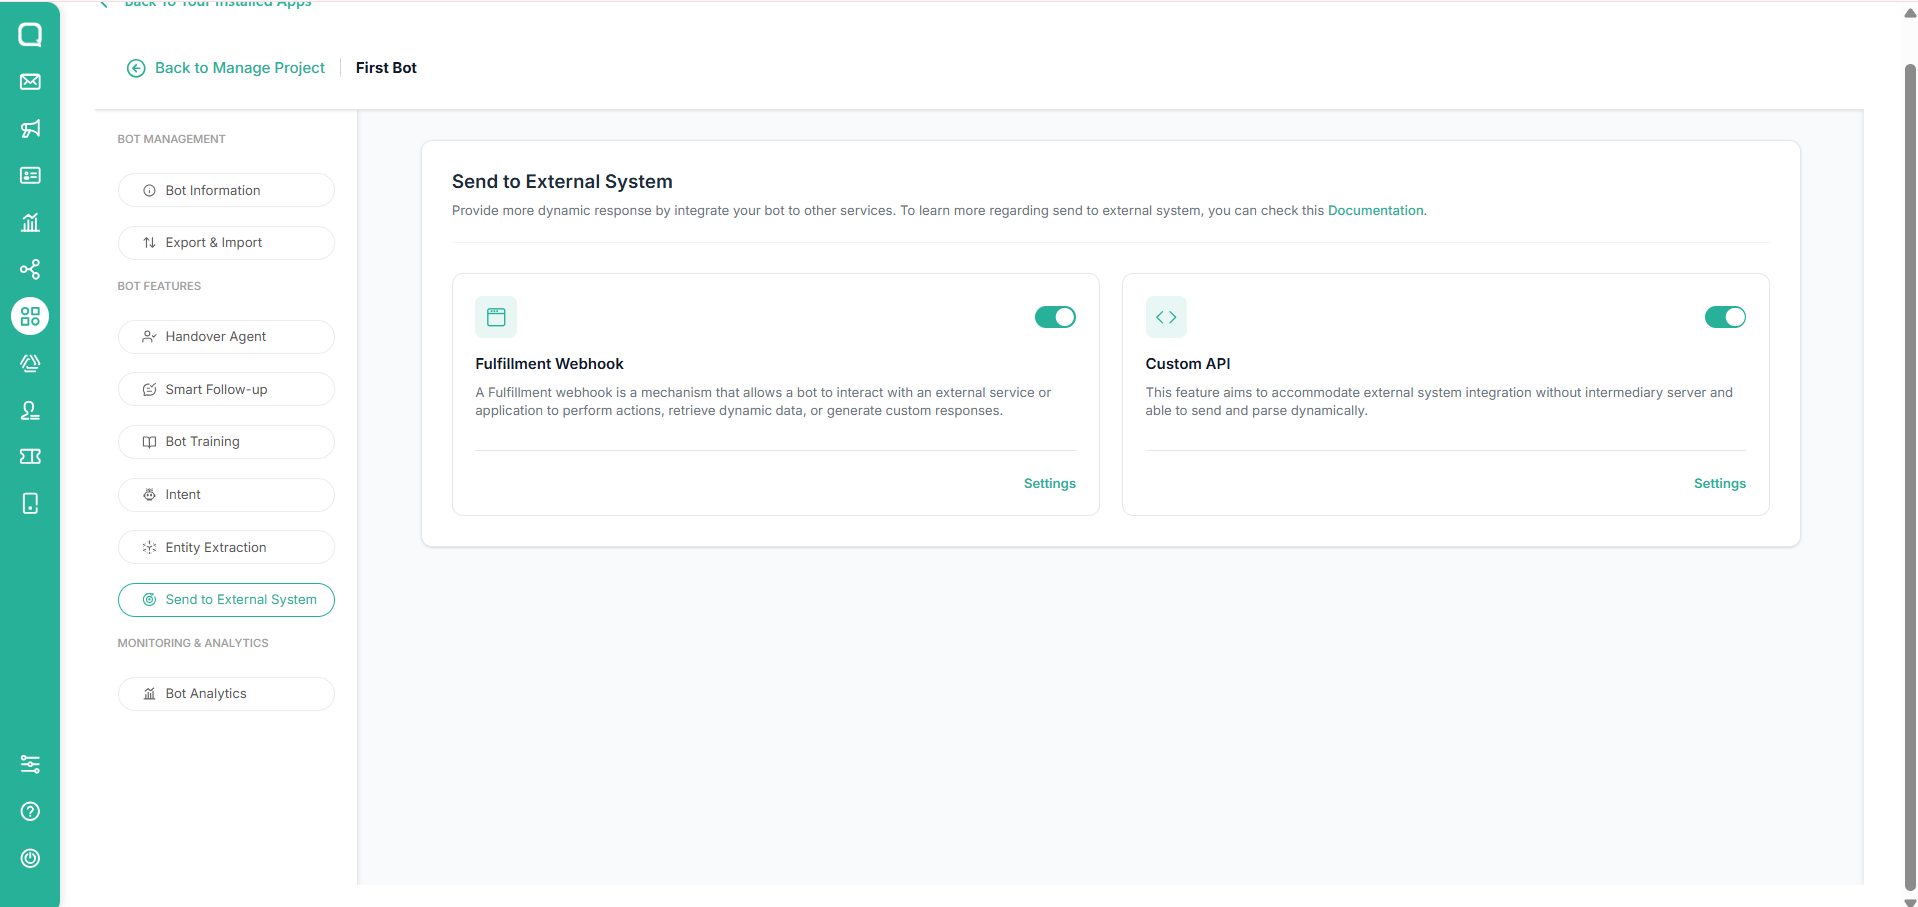
Click Settings to, and click + Add Custom API.
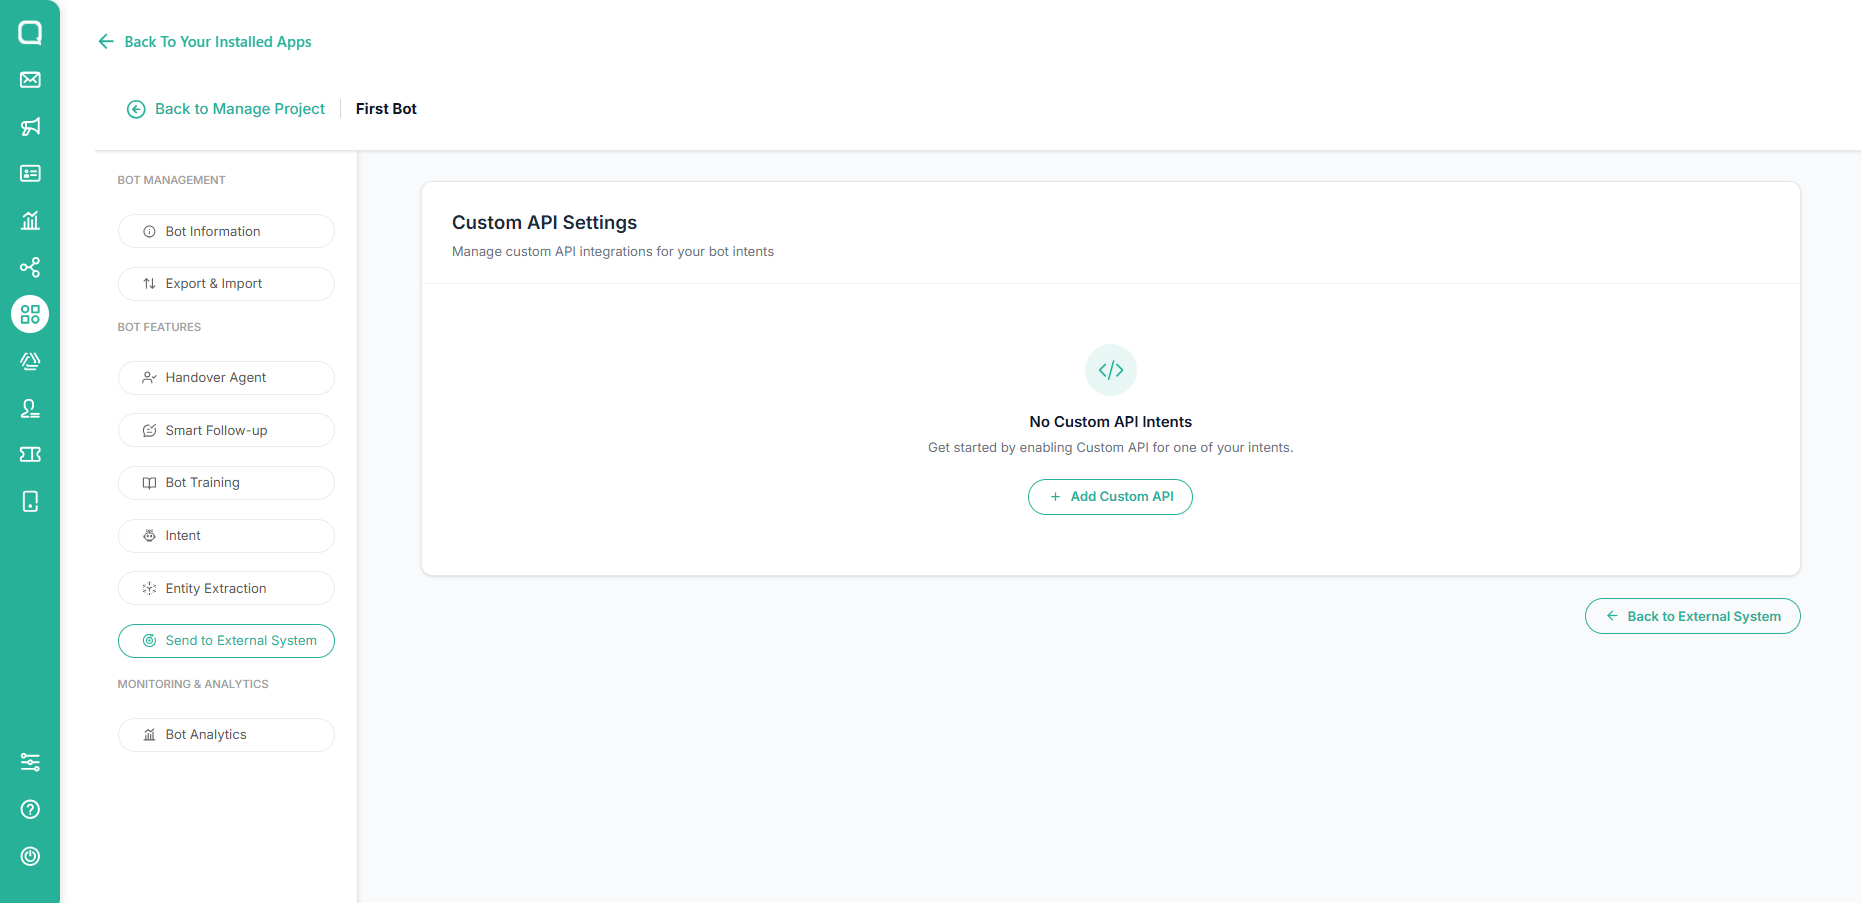
A modal will appear. Select an intent from the dropdown.
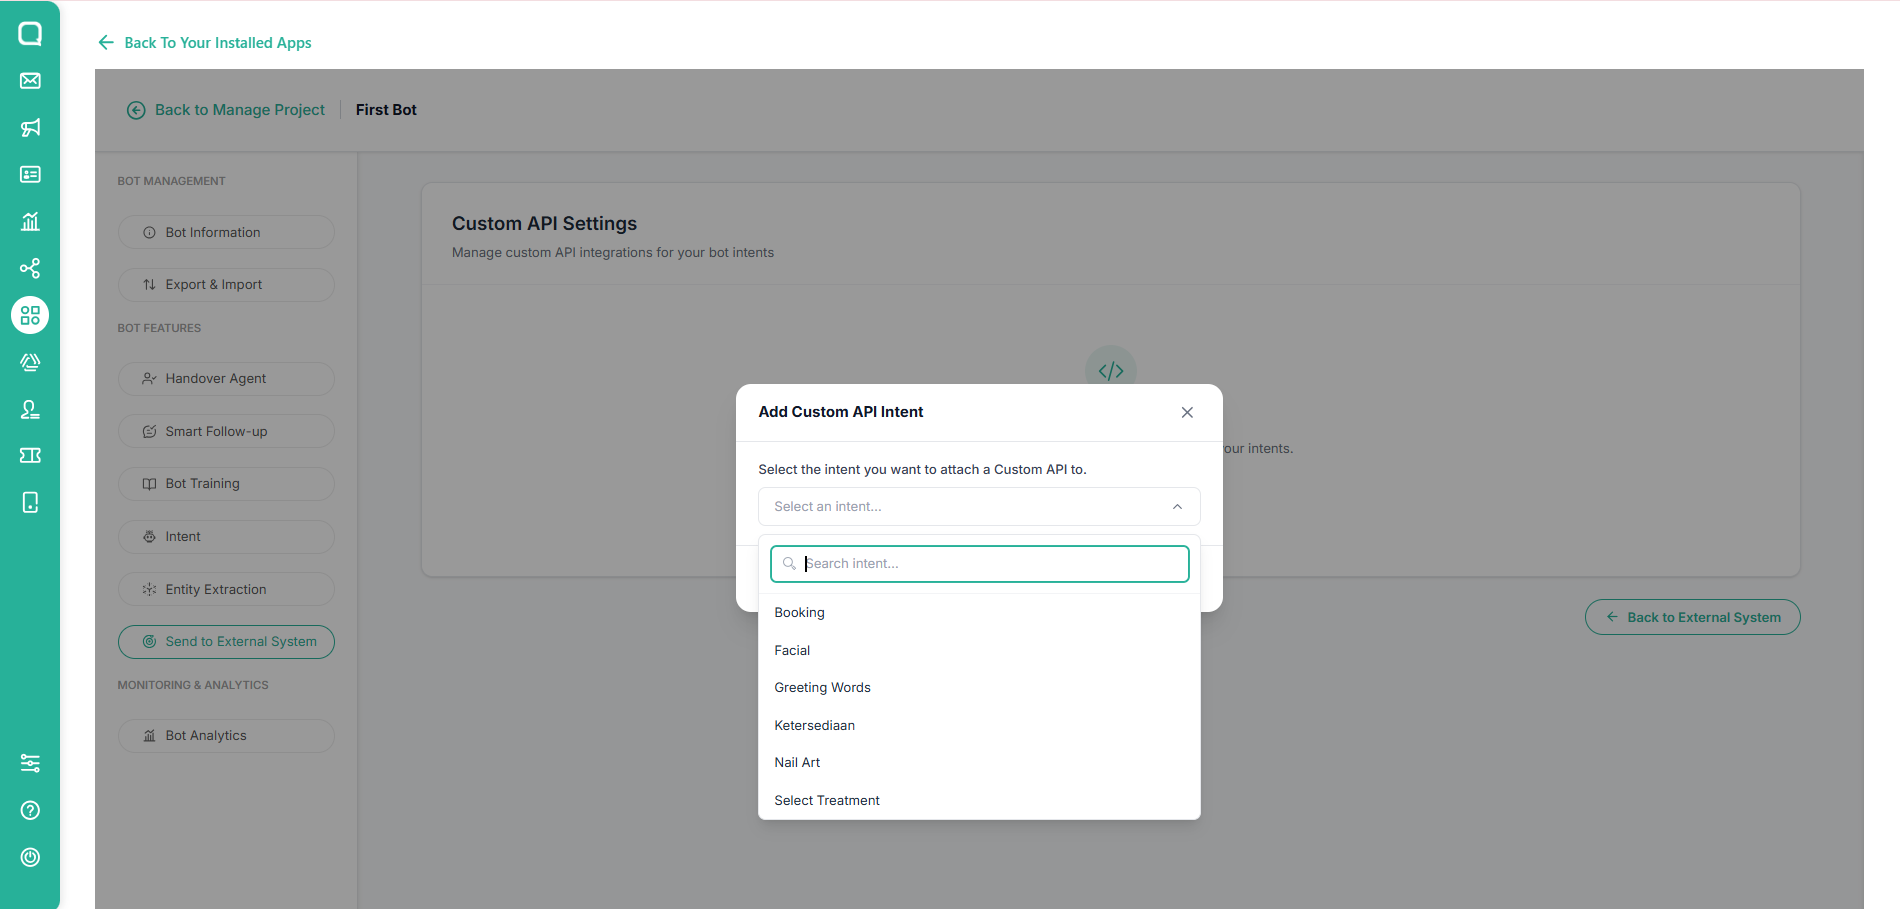
Click Add Intent to save update
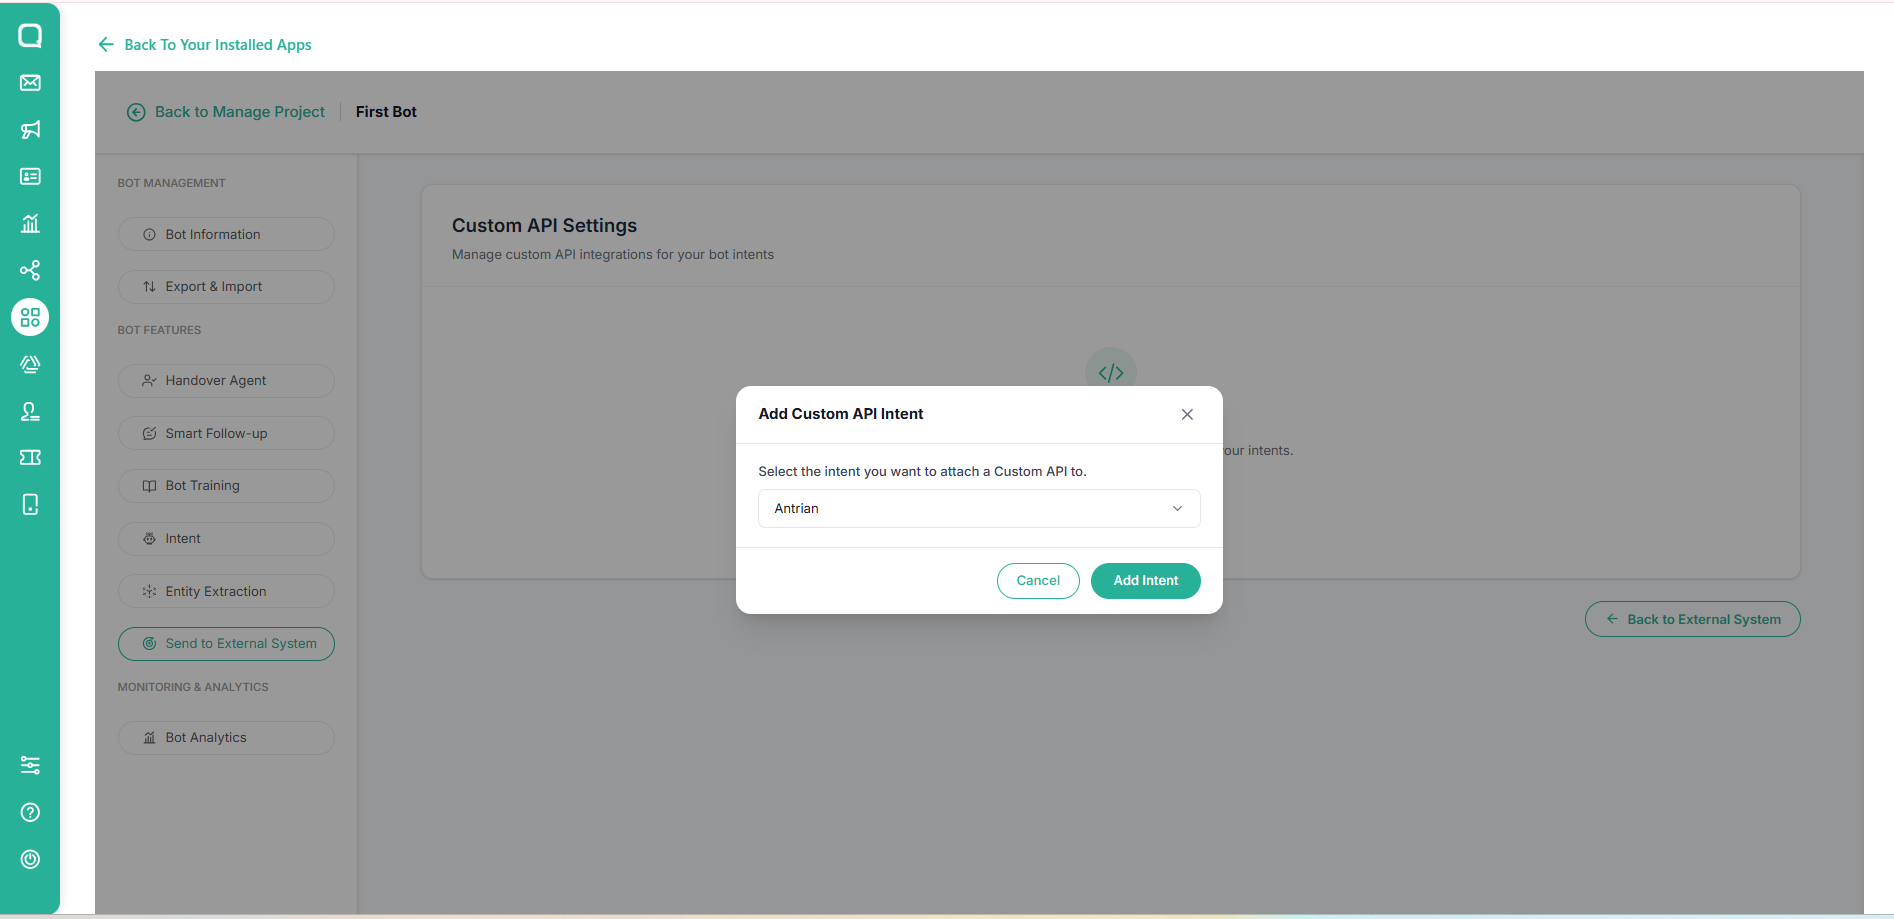
Fill in your URL information and complete the header, query, body and response requirements.
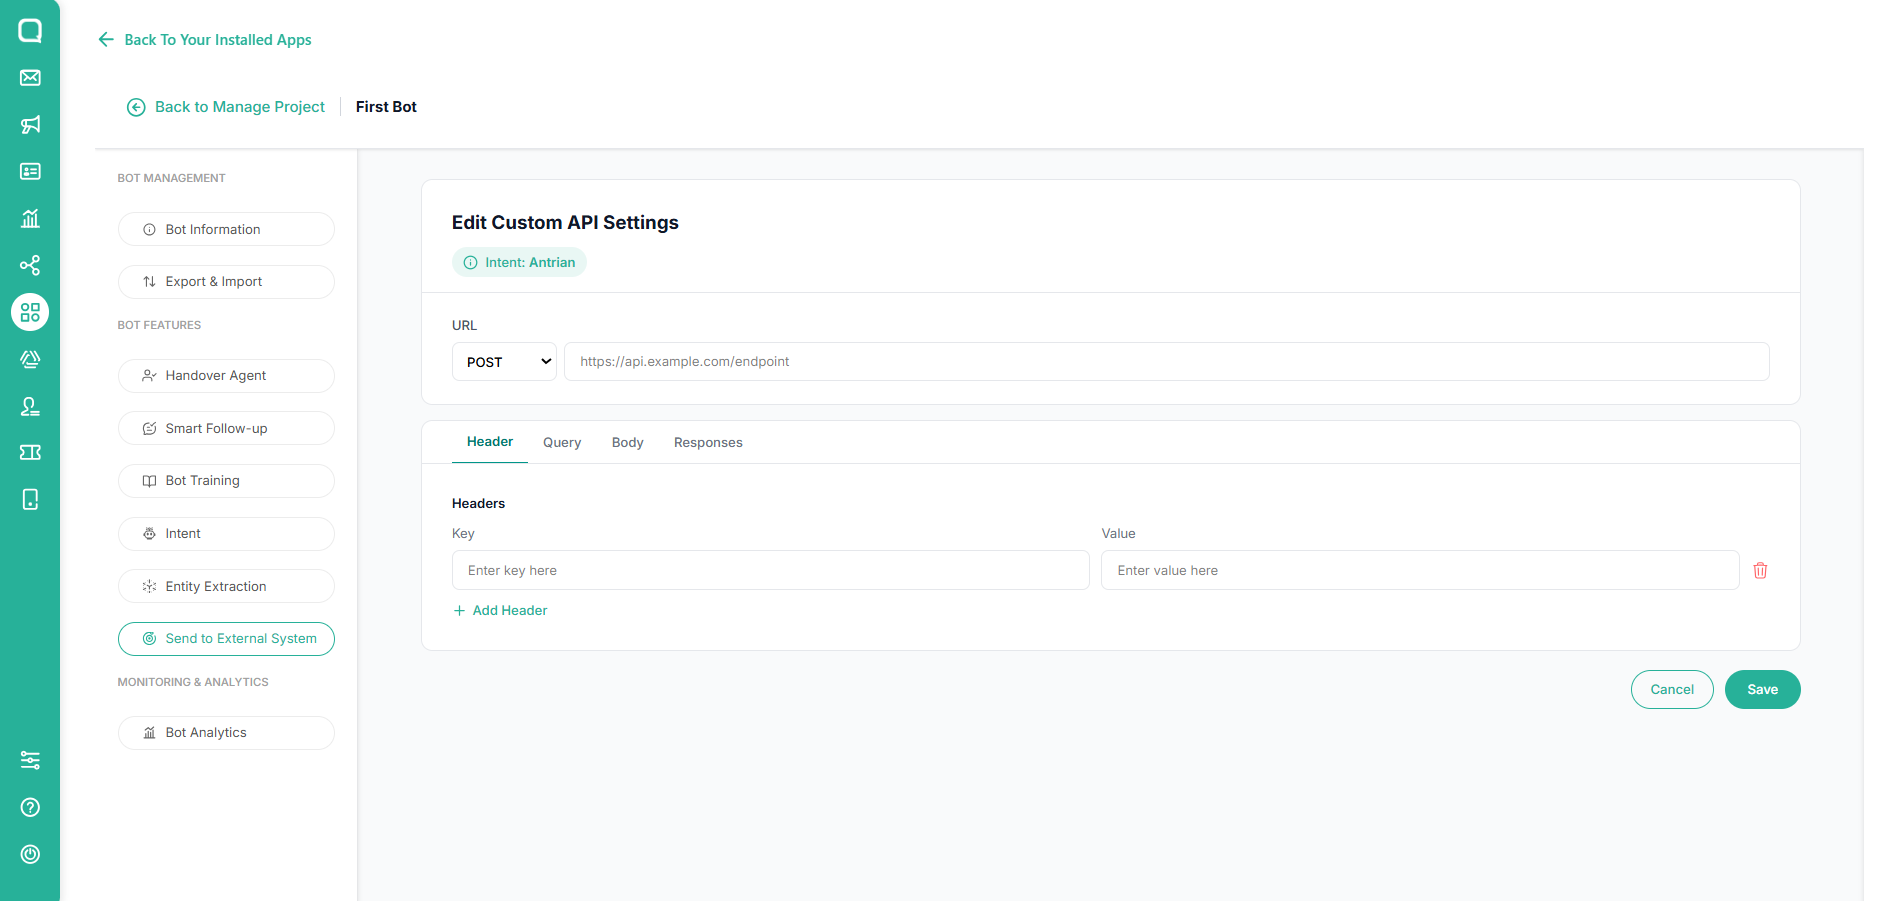
In the header information, fill in the key and value
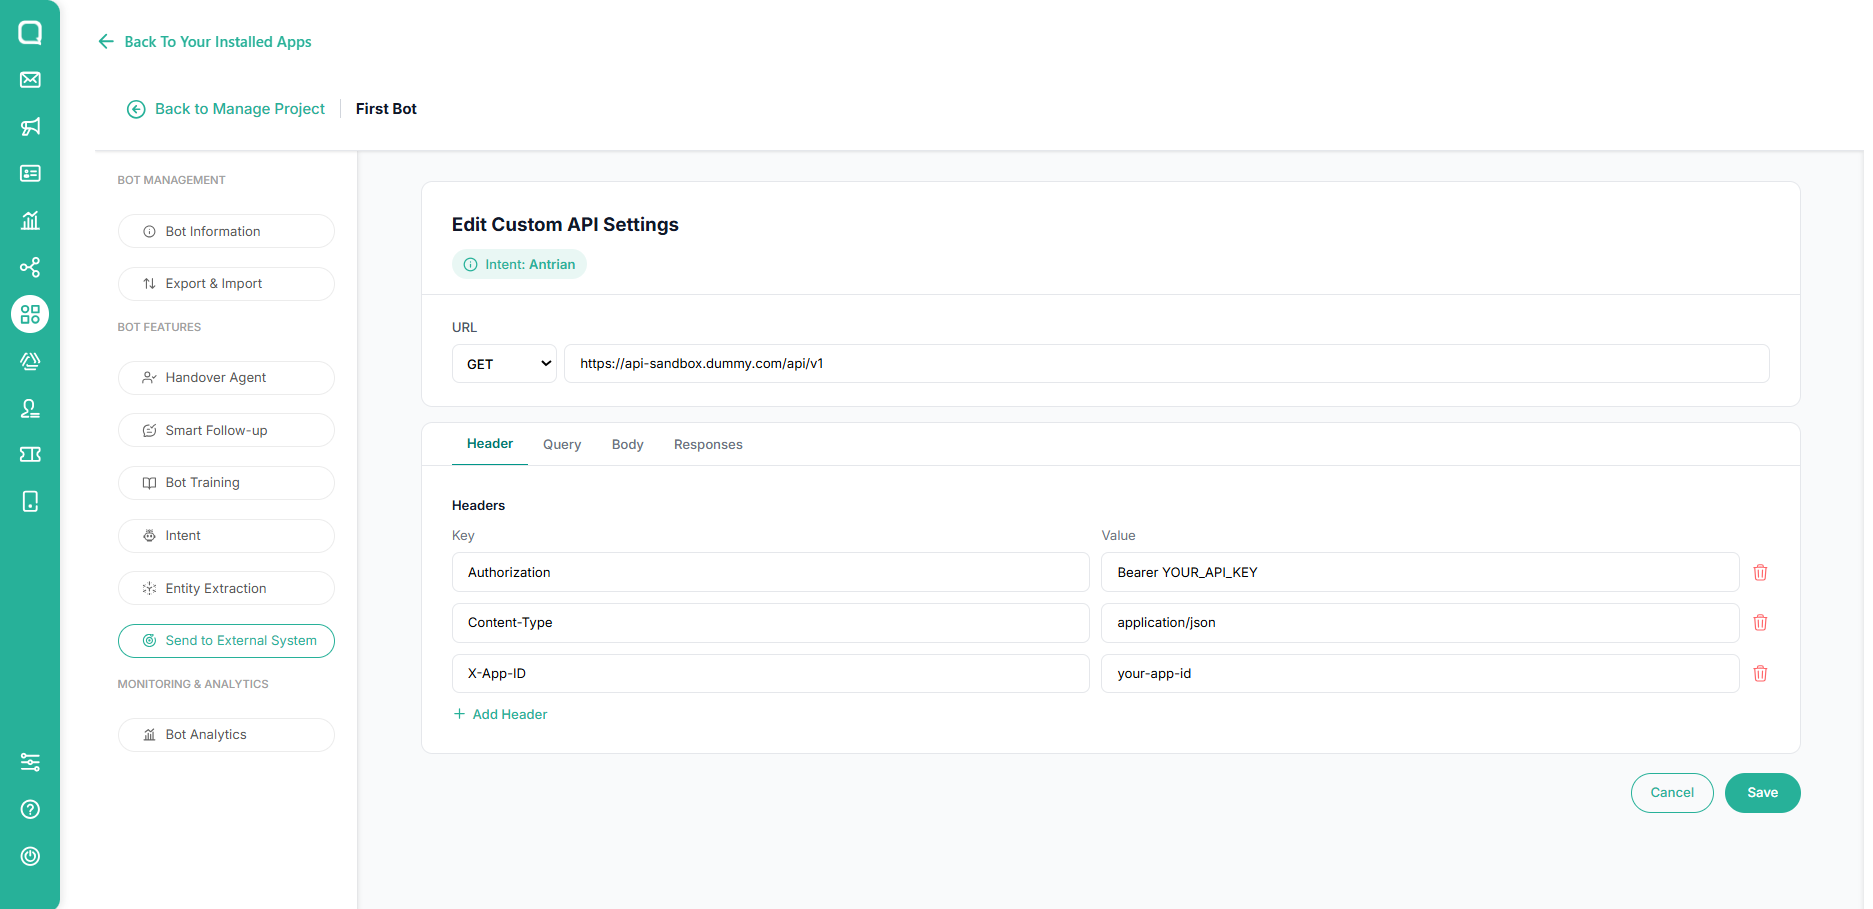
If needed, you can try your API by clicking the Test API button. Click save to save the changes.
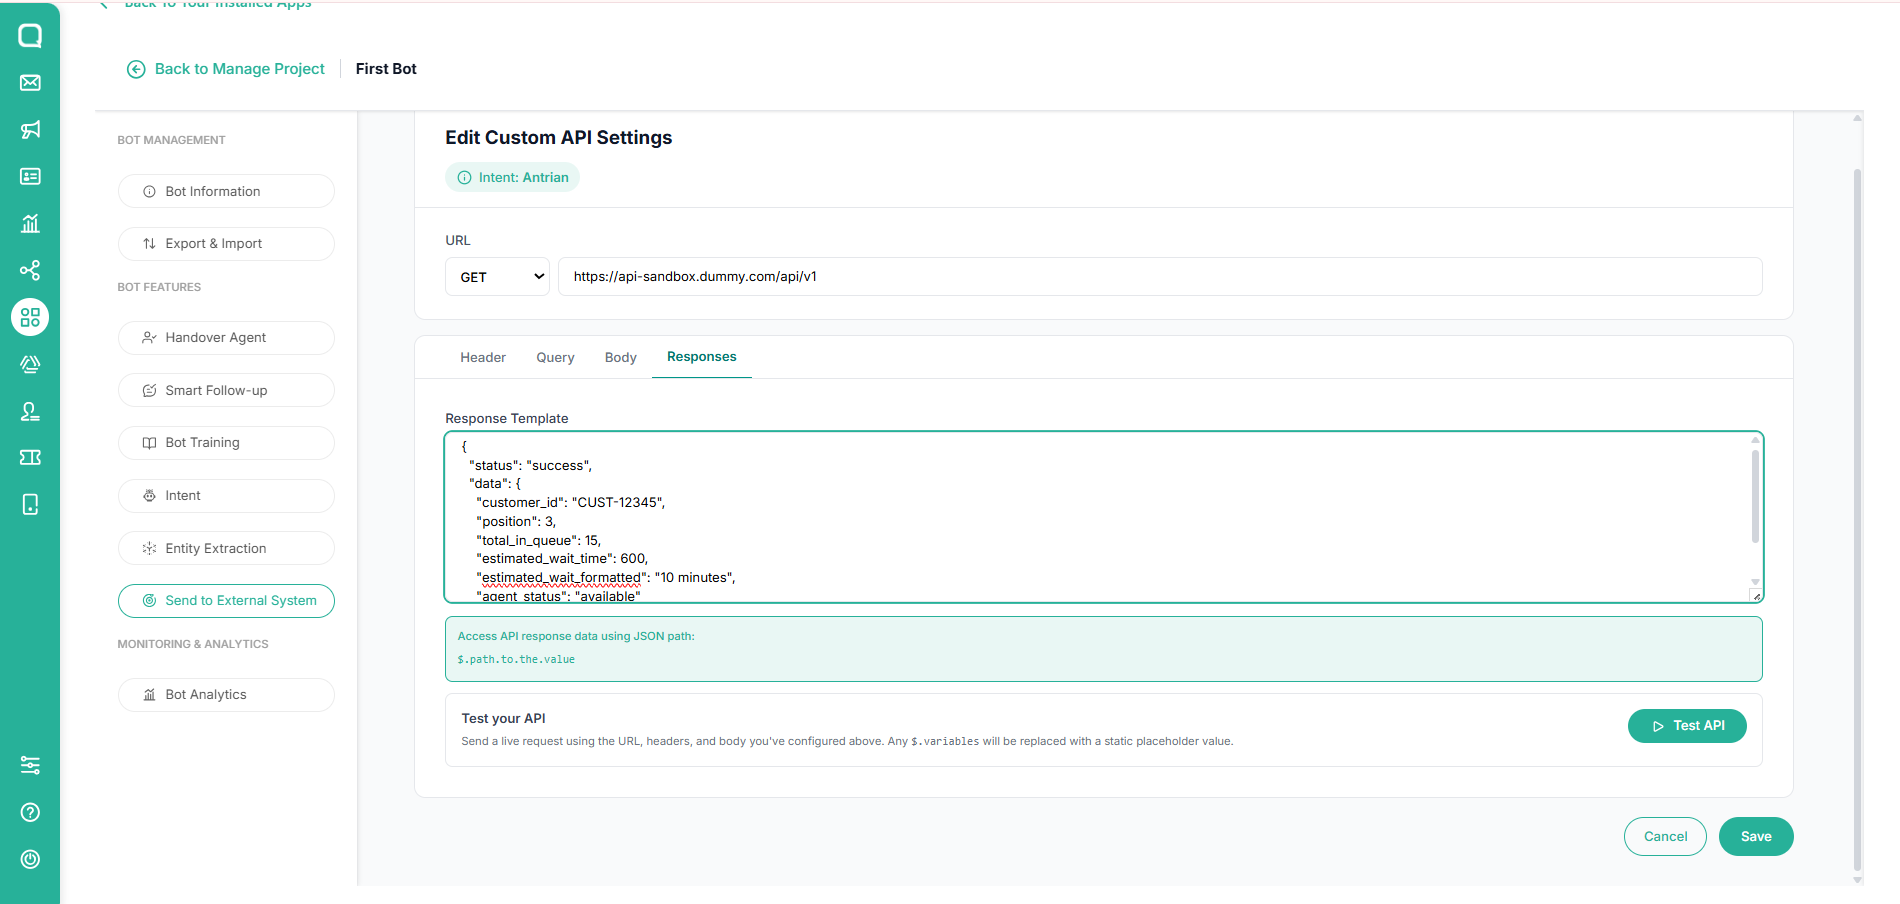
Go to the Intent menu and open the visual builder intent. Click on the intent marked with custom API and select response settings. Customize your API response with the response that will be displayed to the client. Then click the Save Changes button.
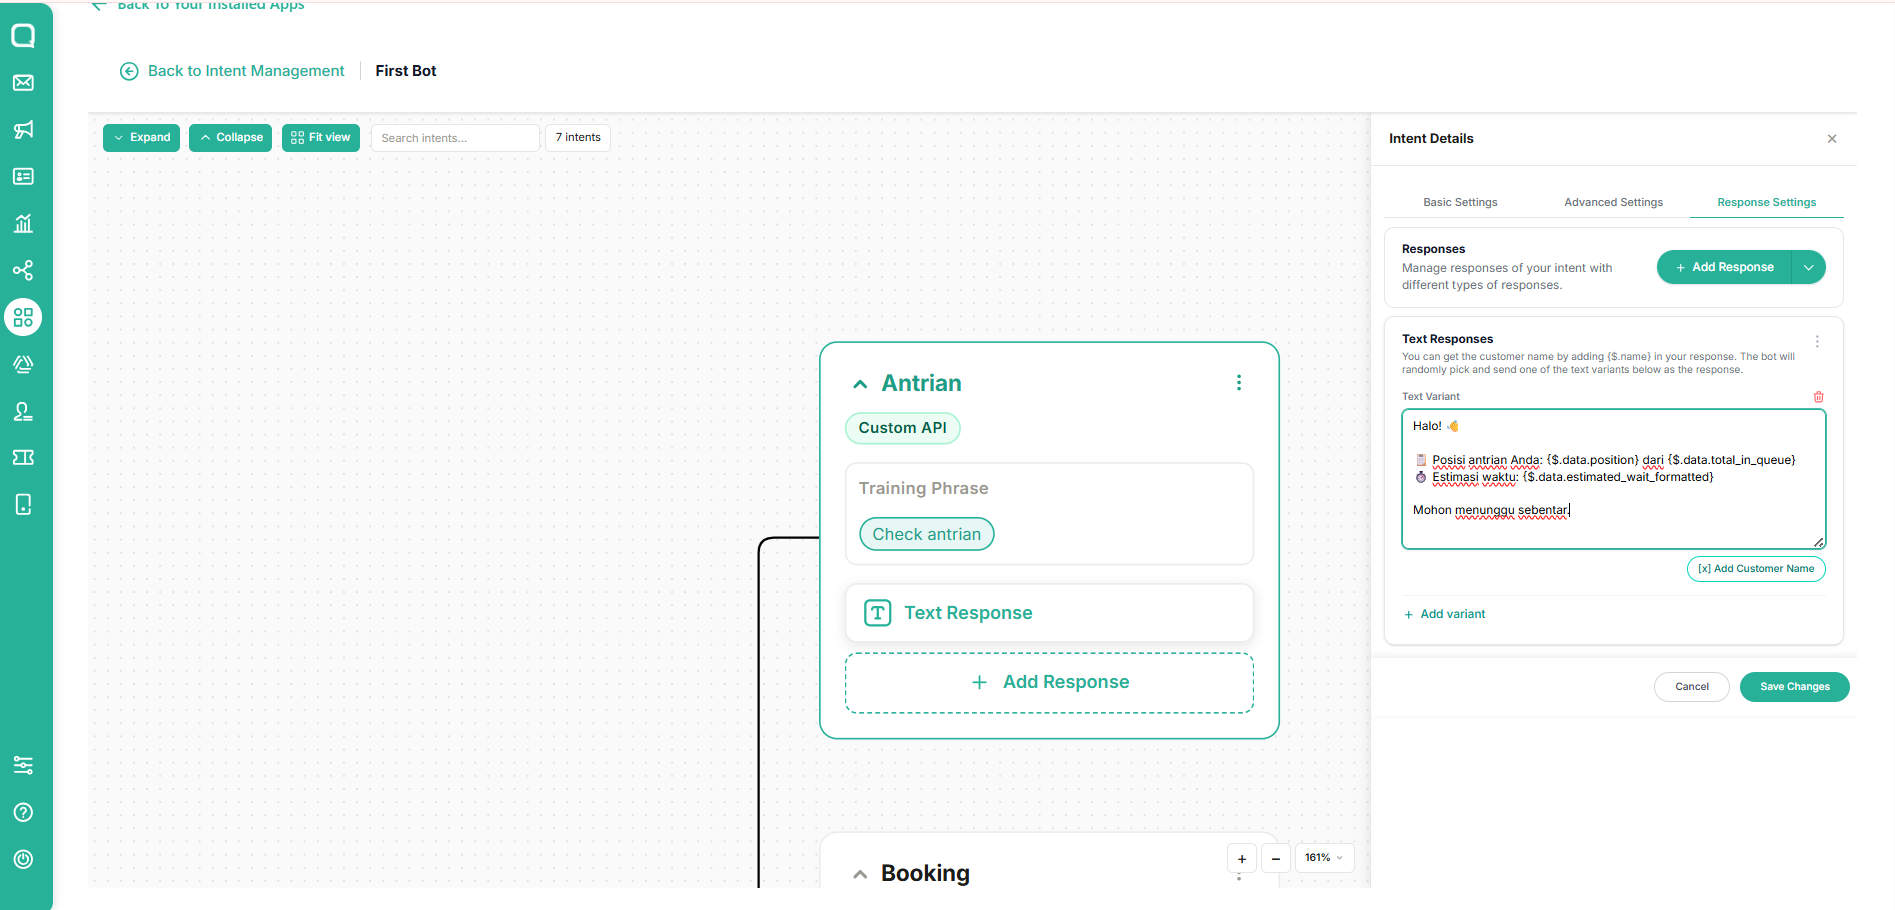
Note: fill in the dynamic value with the formula {$.data.position}
Widget Test Bot
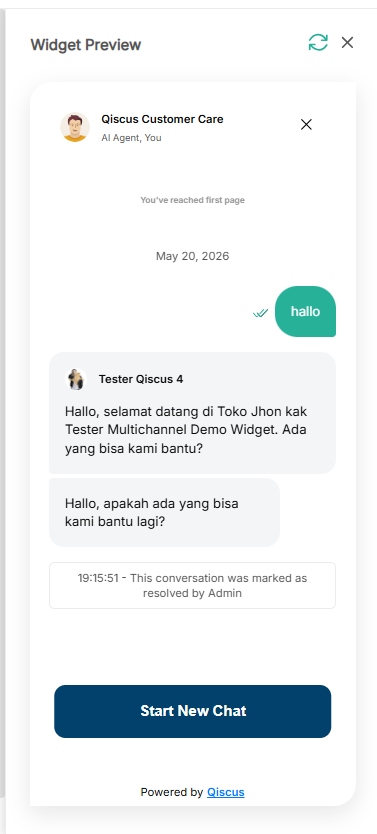
Test Bot Widget is a built-in chat interface in the Intent-based Engine dashboard that lets you test chatbot behavior in real time before deploying it to channels like WhatsApp, Instagram, LINE, or Web Chat. Use it to:
Validate responses and conversation flow
Verify intent detection and entity extraction
Simulate real user conversations
All test conversations also appear in Bot Training, helping you review and improve the bot using real interaction data.
FAQ
What is Intent-based Engine?
Intent-based Engine is an intent-based chatbot engine built natively within Qiscus AgentLabs. It helps you create rule-driven conversations using intents, entities, and conversation flows.
Do I need coding skills to use Intent-based Engine?
No. Intent-based Engine is designed as a no-code platform with a visual interface, including an Intent Visual Builder for designing conversation flows.
How do I access Intent-based Engine?
Open the AgentLabs feature from your Qiscus dashboard, then select Intent-based Engine from the available features.
What's the difference between Intent, Entity, and Response?
An Intent represents the goal behind a user's message, an Entity is specific data extracted from the message, and a Response is the message your bot sends back once the intent is matched.
What is a fallback intent?
A fallback intent is triggered whenever a user's message doesn't match any other configured intent. Enable it through the Enable Fallback toggle to ensure your bot always responds.
Can I test my bot before deploying it?
Yes. The Test Bot Widget in the Intent-based Engine dashboard lets you simulate conversations and verify your bot's responses, intent detection, and entity extraction before deployment.
Can I import an existing chatbot configuration?
Yes. Intent-based Engine supports imports from three sources: Dialogflow (.zip), AgentLabs (.xlsx), and another Intent-based Engine project (.JSON).
Does Intent-based Engine work across multiple channels?
Yes. Intent-based Engine is fully integrated with Qiscus Omnichannel, allowing your bot to operate across WhatsApp, Instagram, LINE, Web Chat, and other channels from a single platform.
How can I monitor bot performance?
The Monitoring & Analytics dashboard displays key metrics total conversations, messages sent, handovers, and resolved cases. Along with daily activity charts. Reports can be filtered by date range and exported as PDF.
Can my bot transfer conversations to a human agent?
Yes. The Agent Handover feature lets your bot transfer conversations to a human agent based on conditions such as outside office hours or when only online agents are available.