
Meta Ads Tracker allows you to integrate your Facebook Account to see your Ads general data and convert Click To WhatsApp ads.
Activation
Follow the instructions step on the Getting Started pages and try to activate Meta Ads Tracker Add-on.
Integration
First order would be to add your Facebook Account . Make sure the related Facebook Account have Business Accounts , with Ads Accounts under them
The Facebook account you log in with must have access to both the Facebook Page and the Ad Account you want to integrate.
Meta gives access per asset. Access to an Ad Account does not give access to a Page, and full access to a Business Portfolio only covers the assets that portfolio owns, not assets shared in from a partner. See Meta: business portfolio and asset permissions.
Step 4 only lists the Pages your account is assigned to. A Page you cannot see there cannot be integrated.
Step 6 (Set up your data) is where Meta creates the event dataset for the Page. Meta allows one dataset per Page, owned by the Business Portfolio that owns the Page. Ads Tracker reads the Page's existing dataset and never creates one for you. See Meta: Conversions API for Business Messaging.
Connecting through an agency's Business Portfolio: if the Page is only shared with the agency portfolio, Meta may not be able to create the dataset at step 6. Prefer connecting with an account from the Business Portfolio that owns the Page. Otherwise, ask the Page owner to create the dataset in Events Manager and share it with the agency portfolio first (Events Manager → Data sources → the dataset → Settings → Share with a business), then connect again.
1. Open Integration menu, Click Create New FB App integration

Click Continue with Facebook

Choose appropriate Business Account

Choose what Facebook pages will be integrated.

After that, select the Ad Accounts to be integrated into Ads Tracker, you can choose multiple

Input the Event Data to contain your Conversion Events

See the summary, and click Save and Got It in the next page to finish Facebook Setup

After finishing Facebook Setup, click Create button below

Wait until integration succeed

You will have integrated your account like below, also please make sure to toggle the webhook in the corner.

If the Facebook setup fails
The Facebook window is Meta's, so an error at steps 3 to 7 happens before any data reaches Qiscus.
The window shows "Error performing query", or returns to Set up your data after you click Create: your account cannot create a dataset for that Page, usually because the Page belongs to another Business Portfolio or already has a dataset. Connect with an account from the Business Portfolio that owns the Page, or ask the Page owner to share the existing dataset with your portfolio, then try again.
The Page is not listed at step 4: your account is not assigned to that Page. Ask the Page owner to assign your account to the Page in the Business Portfolio settings. To check this without Qiscus, open Meta Events Manager → Connect data → Messaging and see whether the Page appears.
Ads Performance
The Insights menu contains data and leads from your Meta Campaigns .Here you can choose Ad Accounts , search Campaigns, filter data by Date, and enter Campaign Detail

Campaign Detail
In this page, you can see key stats and insights of an individual Campaign

On bottom, you can see the list of Ad Sets this Campaign have. You can click on individual Ad Set to open Ad Set Detail

Ad Set Detail
In this page, you can see key stats and insights of an individual Ad Set

On bottom, you can see the list of Ads this Ad Set has. You can click on individual Ad to open Ad Detail

Ad Detail
In this page, you can see key stats and insights of an individual Ad

Conversion
There are two kinds of conversion
To update conversion data into Meta Ads Manager, here are the steps.
1.When there is a bubble that comes from Meta Ads, click to Ads Tracker addon Button below

2.There will be options of what Ad will be converted. Select appropriate one and click next

3.At this step, you can choose whether it's in Lead Stage or Purchase Stage

4.If you choose Purchase, input the appropriate amount of purchase done , if Lead is chosen then just click Convert Ads.


5.Wait until the system finishes converting.
6.The changes will be reflected in Ads Tracker Leads List

Conversion Rules
Conversion Rules report conversions to Meta automatically. Instead of an agent converting each lead by hand, you set a rule once, for example when an agent sends the booking confirmation, send Purchase, and Ads Tracker sends that event for every chat that came from a Click to WhatsApp ad.
Conversion Rules is off by default. If the page shows Conversion rules are not turned on for this app yet, ask Qiscus support to turn it on for your app. You can prepare rules before that, but they don't run. Conversion Rules is currently available on the Indonesia server.
1. Open Conversion Rules
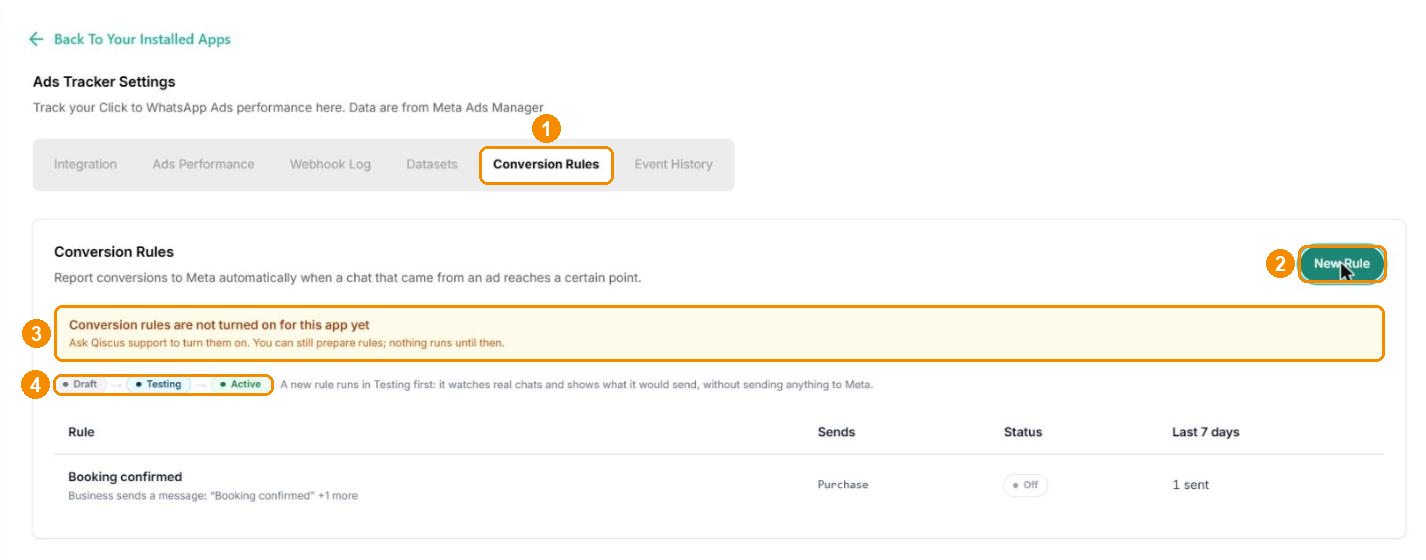
Open Ads Tracker Settings and select the Conversion Rules tab.
Click New Rule to create a rule.
This banner shows while Conversion Rules is not turned on for your app.
Every rule goes through Draft → Testing → Active. A new rule runs in Testing first.
2. Pick a template
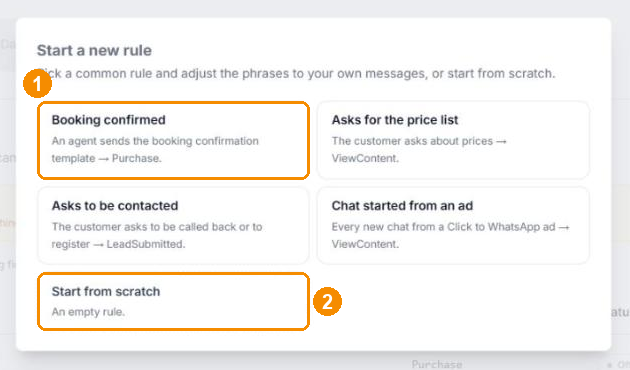
Pick a ready-made rule and adjust the phrases to your own messages:
Booking confirmed: an agent sends the booking confirmation template → Purchase
Asks for the price list: the customer asks about prices → ViewContent
Asks to be contacted: the customer asks to be called back or to register → LeadSubmitted
Chat started from an ad: every new chat from a Click to WhatsApp ad → ViewContent
Or choose Start from scratch for an empty rule.
3. Choose when the rule fires
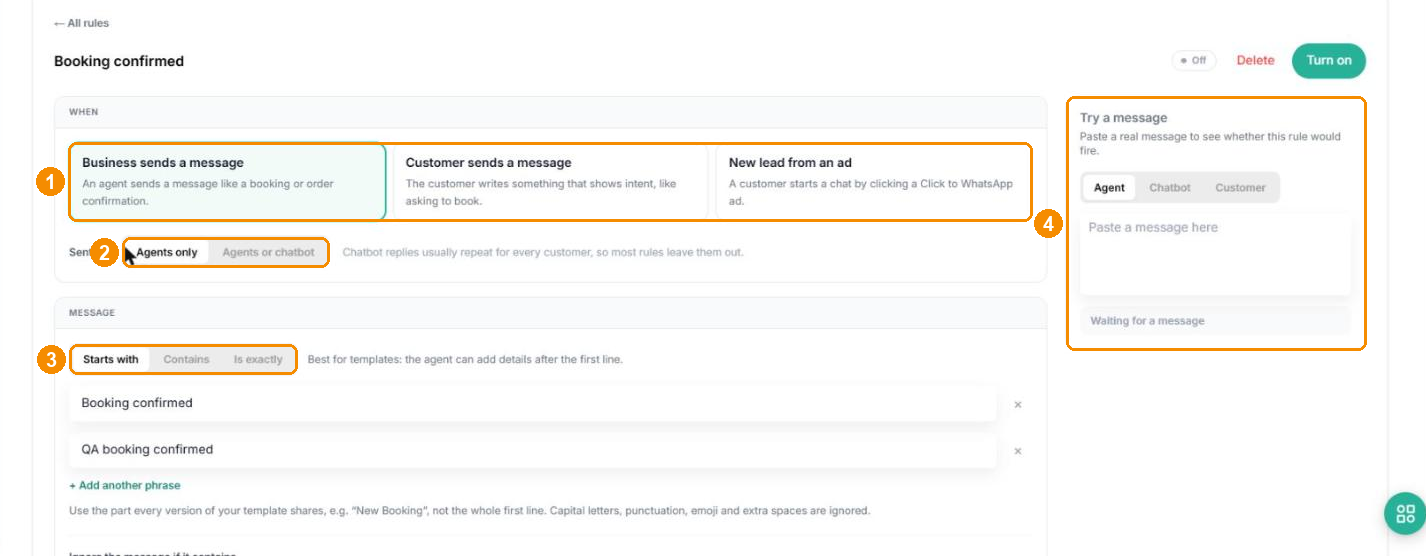
Under When, choose the trigger:
Business sends a message: an agent sends a message, such as a booking or order confirmation
Customer sends a message: the customer writes something that shows intent, such as asking to book
New lead from an ad: a customer starts a chat by clicking a Click to WhatsApp ad. This fires once per chat and has no message to match
For Business sends a message, choose Sent by: Agents only or Agents or chatbot. Chatbot replies usually repeat for every customer, so most rules leave them out.
Under Message, choose how the phrase is matched (see step 4).
Try a message on the right lets you test the rule while you edit it (see step 5).
4. Set the message and the event
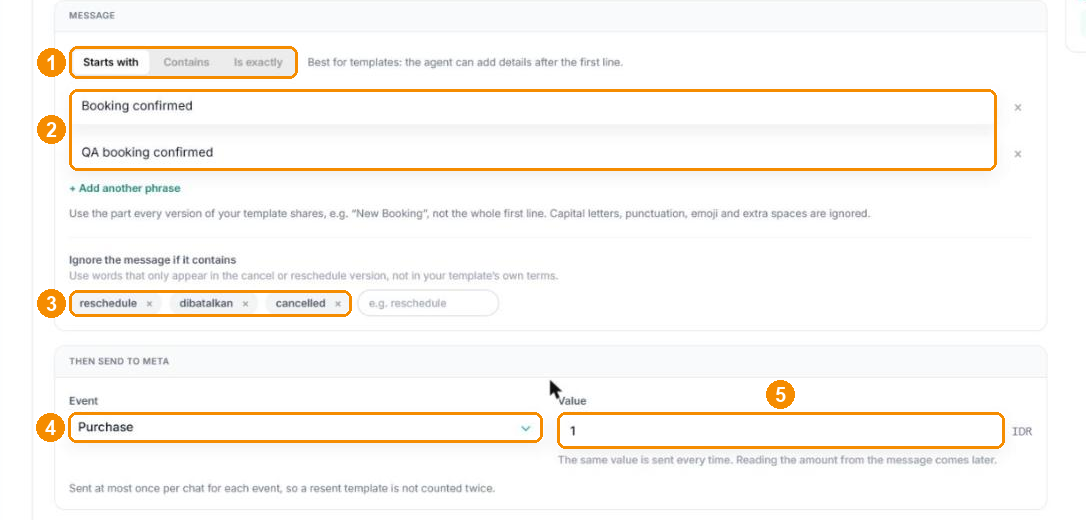
Choose how to match:
Starts with: best for templates, because the agent can add details after the first line
Contains: matches the words anywhere in the message
Is exactly: the whole message must be identical, so it fails as soon as anything is added
Enter one or more phrases. Use the part every version of your template shares, for example "New Booking", not the whole first line. Capital letters, punctuation, emoji and extra spaces are ignored.
Under Ignore the message if it contains, add words that only appear in the cancel or reschedule version of the template, for example "reschedule".
Under Then send to Meta, choose the Event.
Enter the Value if the event needs one (for example Purchase). The same value is sent every time.
Choose the Currency of the value:
Auto (the default for new rules): uses the currency of the ad account that the customer's ad belongs to. If that ad account's currency isn't known yet, the rule uses another ad account connected to your app, or IDR if there is none. The editor warns you when no ad account is connected.
A specific currency, for example MYR: every event from this rule is sent in that currency, whatever the ad account uses. Use this only to override.
Each event is sent at most once per chat, so a template that is sent again is not counted twice.
These rules were saved with IDR instead of Auto. If your ad account uses another currency, open the rule, click Turn off, set Currency to Auto, then turn the rule on again.
5. Test the rule
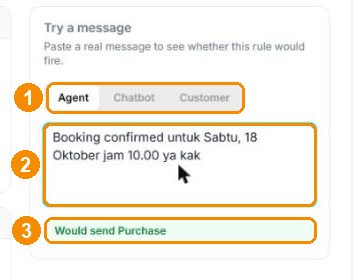
Choose who sent the message: Agent, Chatbot, or Customer.
Paste a real message.
The result shows straight away, for example Would send Purchase, or why the rule would not fire (wrong sender, no matching phrase, or an ignore word).
6. Start testing, then turn the rule on
Click Start testing. In Testing, the rule watches real chats and records what it would send, but sends nothing to Meta.
When the results look right, click Turn on. From then on, every matching chat sends the event to Meta. Events already sent stay as they are.
An active rule is locked. To edit it, click Turn off first.
Chats that a rule matched while it was in Testing are not sent again after the rule is turned on.
Events are reported only for chats that came from a Click to WhatsApp ad, and only within 7 days of the ad click. Follow-up messages are linked to the customer's latest ad click.
If a customer comes back after their conversation was resolved, the new conversation is not linked to the earlier ad click.
Event History
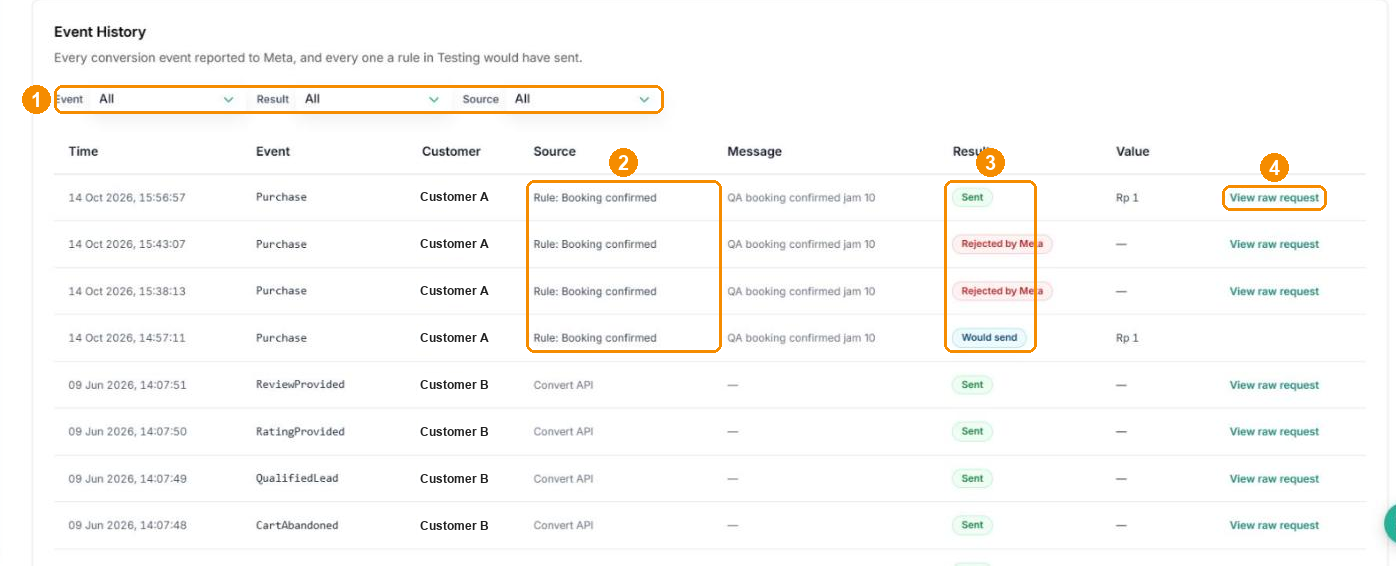
Event History lists every conversion event reported to Meta, and every event a rule in Testing would have sent.
Filter by Event, Result, and Source.
Source shows where the event came from: Rule: (rule name), Sent by agent, Convert API, or Meta automatic event.
Result shows what happened:
Sent: Meta accepted the event
Would send: the rule is in Testing, so nothing was sent
Already sent: this event was already sent for this chat
Chat too old: the chat started more than 7 days ago, so it is not reported
Daily limit: the rule reached its daily limit
Rejected by Meta / Failed: open the raw request to see why
Click View raw request to see the exact request sent to Meta.
Important Reminders
There are several things to take note regarding Meta Ads Tracker.
Disable any kind of Adblocker when using this Add On, because Adblocker will risk Network Error.
If you disable your Ads in Meta Ads Manager, then any Conversion events taken during that won't be counted.
If you convert a lead after a certain duration, the Conversion event will not be counted. The duration is currently 1 week, so we suggest to convert a lead directly.
Conversion from Click to WhatsApp Ads currently cannot be used as remarketing target in segmenting in Meta Ads Manager
Your business Account need to have Ads Account under it, like screenshot below.
The Facebook account you connect with needs access to both the Page and the Ad Account. See Before you connect under Integration.

Meta Ads Tracker Update
We are excited to introduce the Smart Detection API in the Meta Ads Tracker. The Smart Detections API provides Meta Business Messaging Partners the tools to help businesses automatically detect outcomes such as purchase events and lead events within their messaging threads. Detected outcomes represent high confidence events recognized by a combination of regex, NLP, and vision recognition
Key Features
Purchase Events: Detects when a customer completes a purchase.
Lead Events: Identifies when a customer submits lead information.
Getting Started
Before using this feature, ensure you have enabled the required permissions in Facebook Business Manager (Only an admin can enable this permission):
Navigate to Settings > Account > WhatsApp Account.
Enable "Automatically detect order/leads from conversation in this account".

For existing client, to enable this feature simply toggle the Webhook URL off and then turn it back on.

How to Trigger Events
Trigger a Purchase Event
Send a message such as "Your tracking numbers are AB123456789BR and AA000000000US"

Trigger a Lead Event
Customers should message "I am interested in learning more about this product."

Once these messages are exchanged between the business and the customer, you can monitor the results in the Leads Acquired section of your Meta Ads Tracker
If the Purchase Event is successfully detected, the Event column in the Leads Acquired table will display "Purchase"
If the Lead Event is successfully detected, the Event column will display "Lead Submitted"
