A website is an important part of a business’s presence. Therefore, it is essential to make it easy for customers to interact with your business through Qiscus Live Chat. This feature enables you to create more touchpoints by adding various channels as live chat options.
In addition to providing snippets for embedding on a website, you can also integrate the widget into your Android or iOS app. For detailed guidance on embedding this widget in Android, refer to the Android Customization section; for iOS, you can refer to iOS Customization.
Important notes:
- To use Qiscus Live Chat, you need to have a website.
- You can add up to six channels. If you need more, please contact our team.
- Channels added to Live Chat are not directly linked to the existing channels in Live Chat.
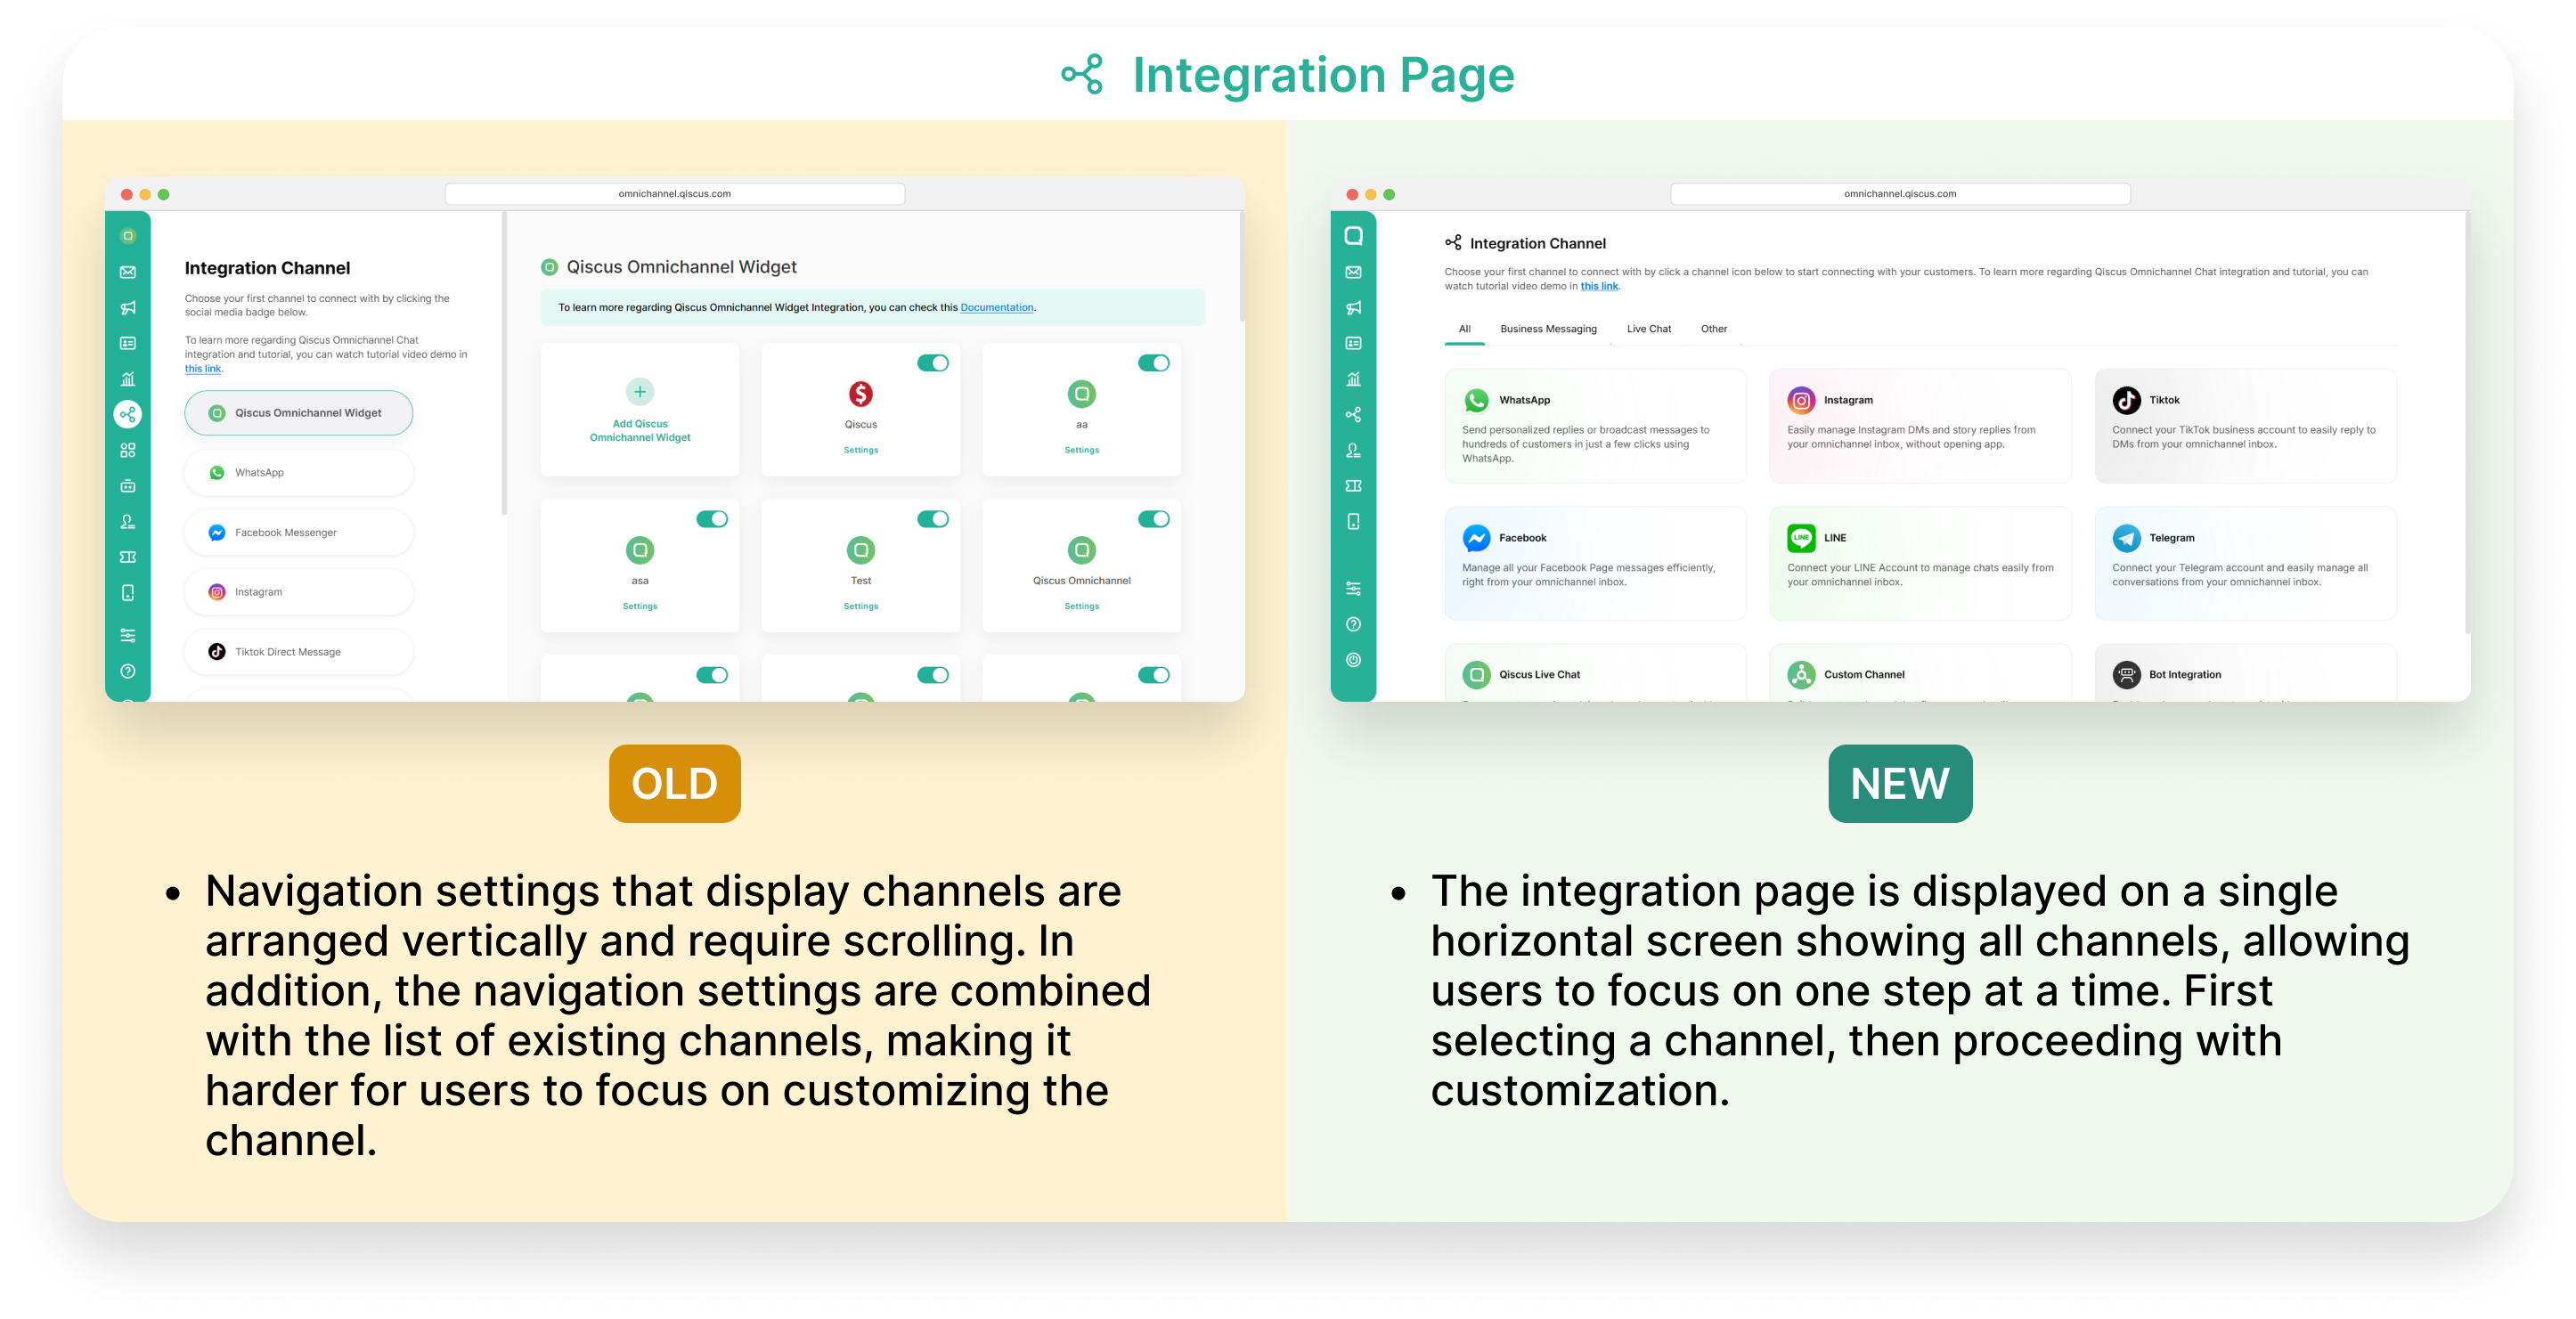
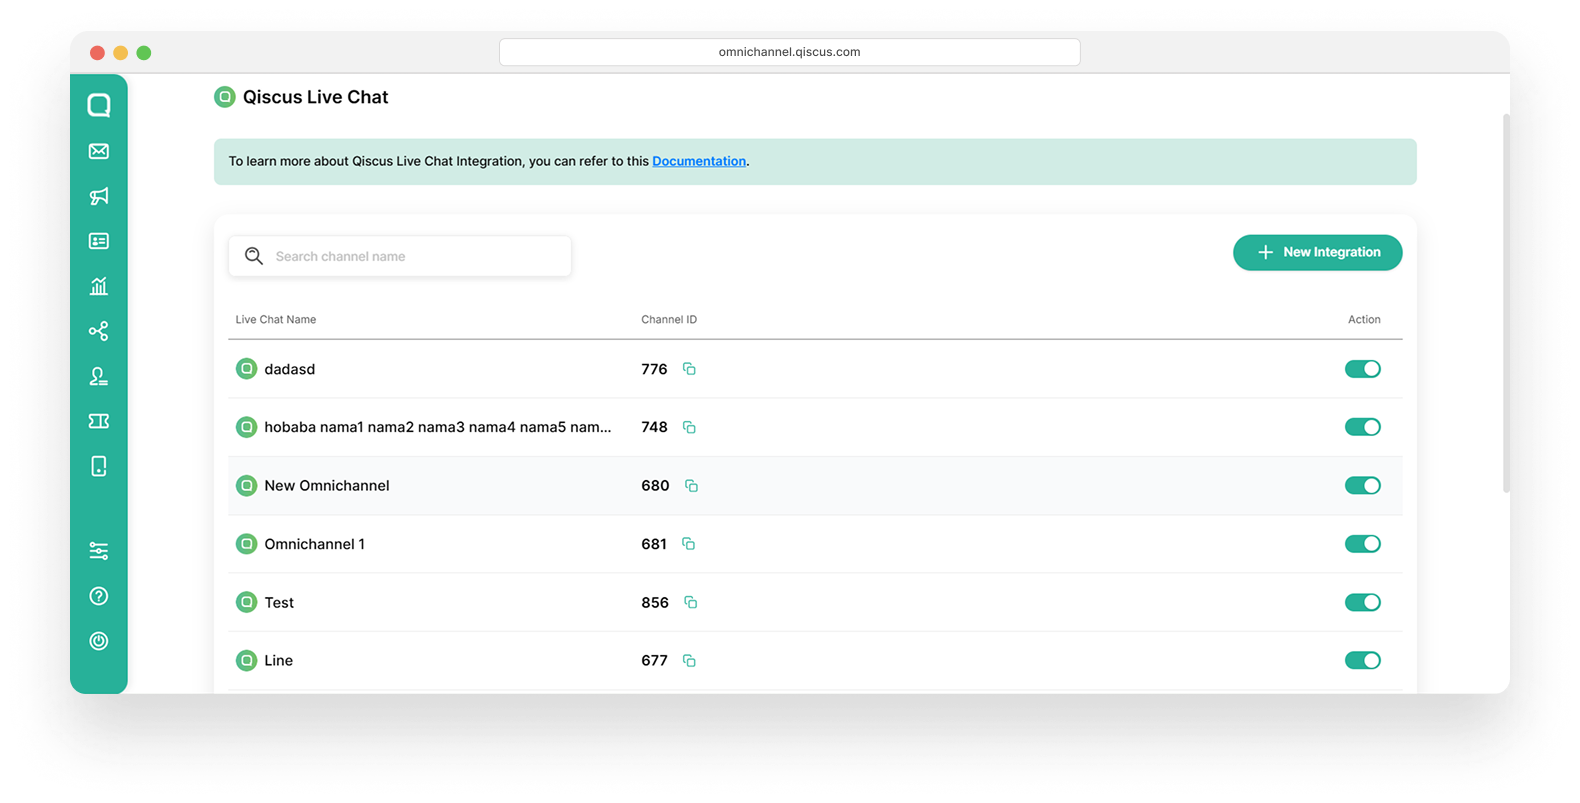
Add a Qiscus Live Chat
Follow these steps to add Qiscus Live Chat:
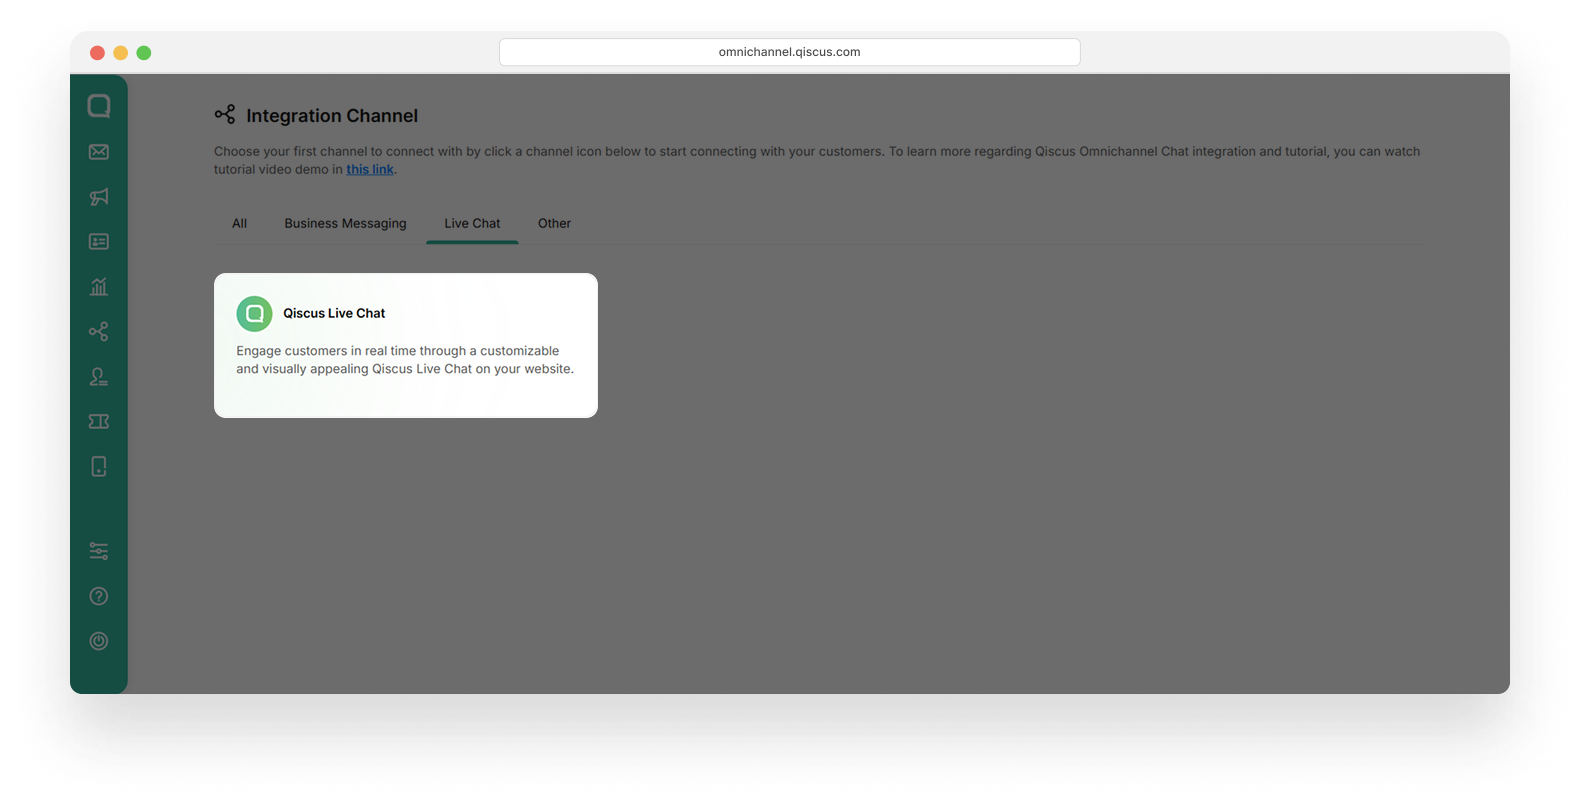
- Click Integration, then click the Live Chat tab
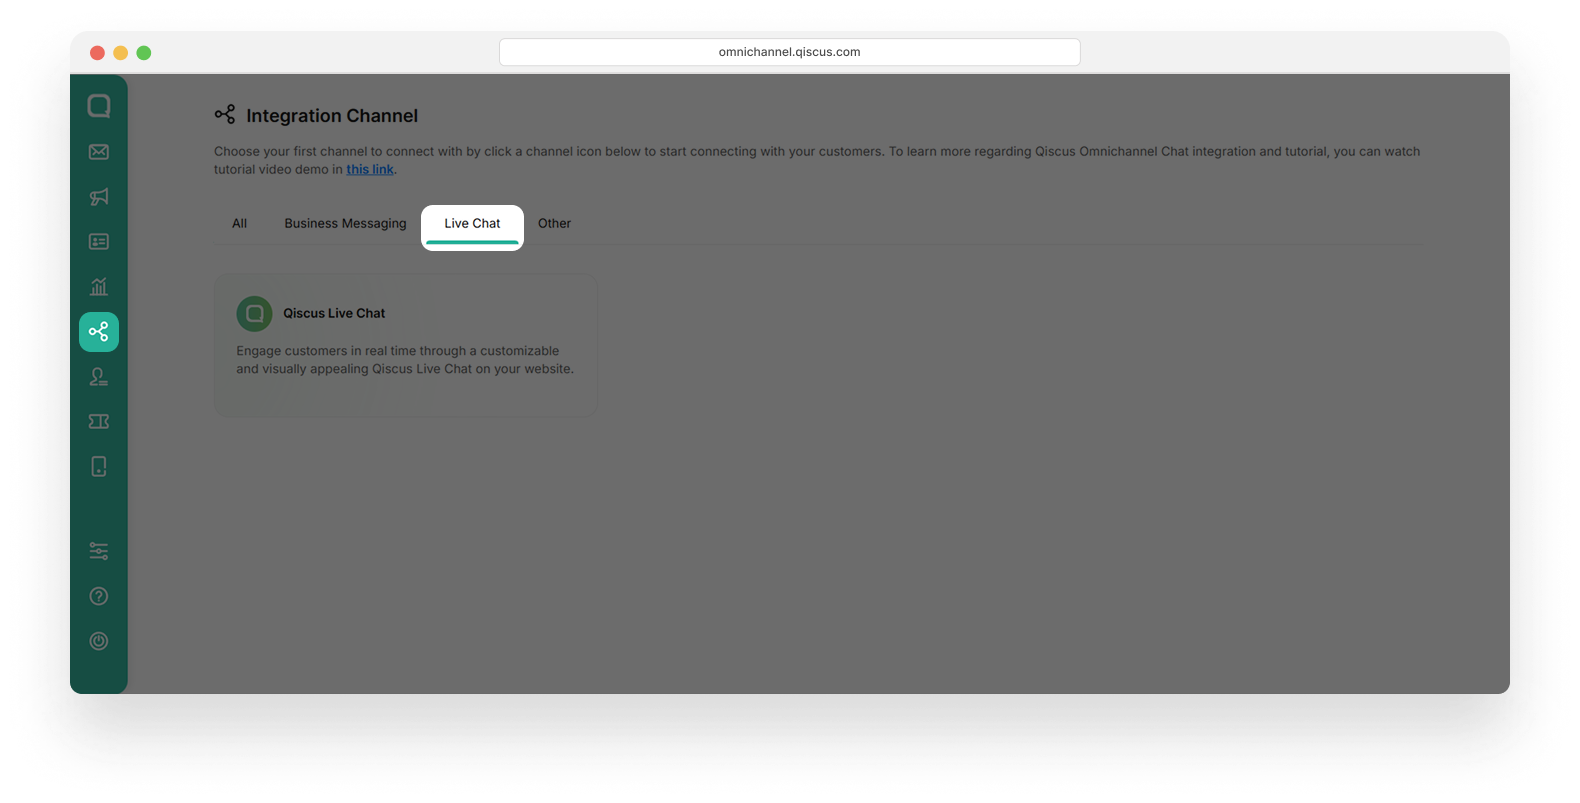
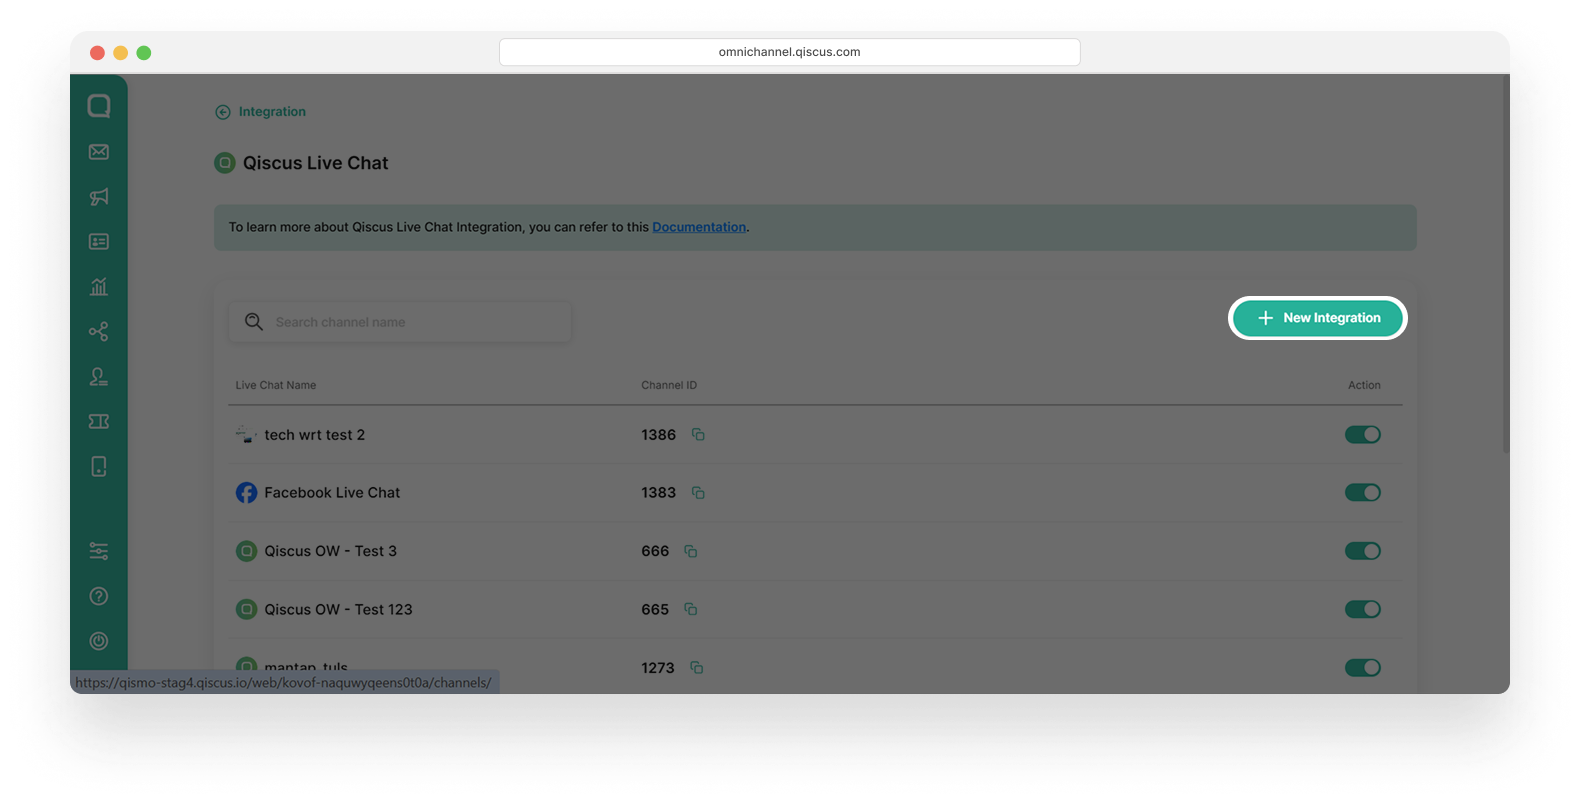
- Click the Qiscus Live Chat card. You will be directed to the Qiscus Live Chat page.
- On the Qiscus Live Chat page, click the New Integration button
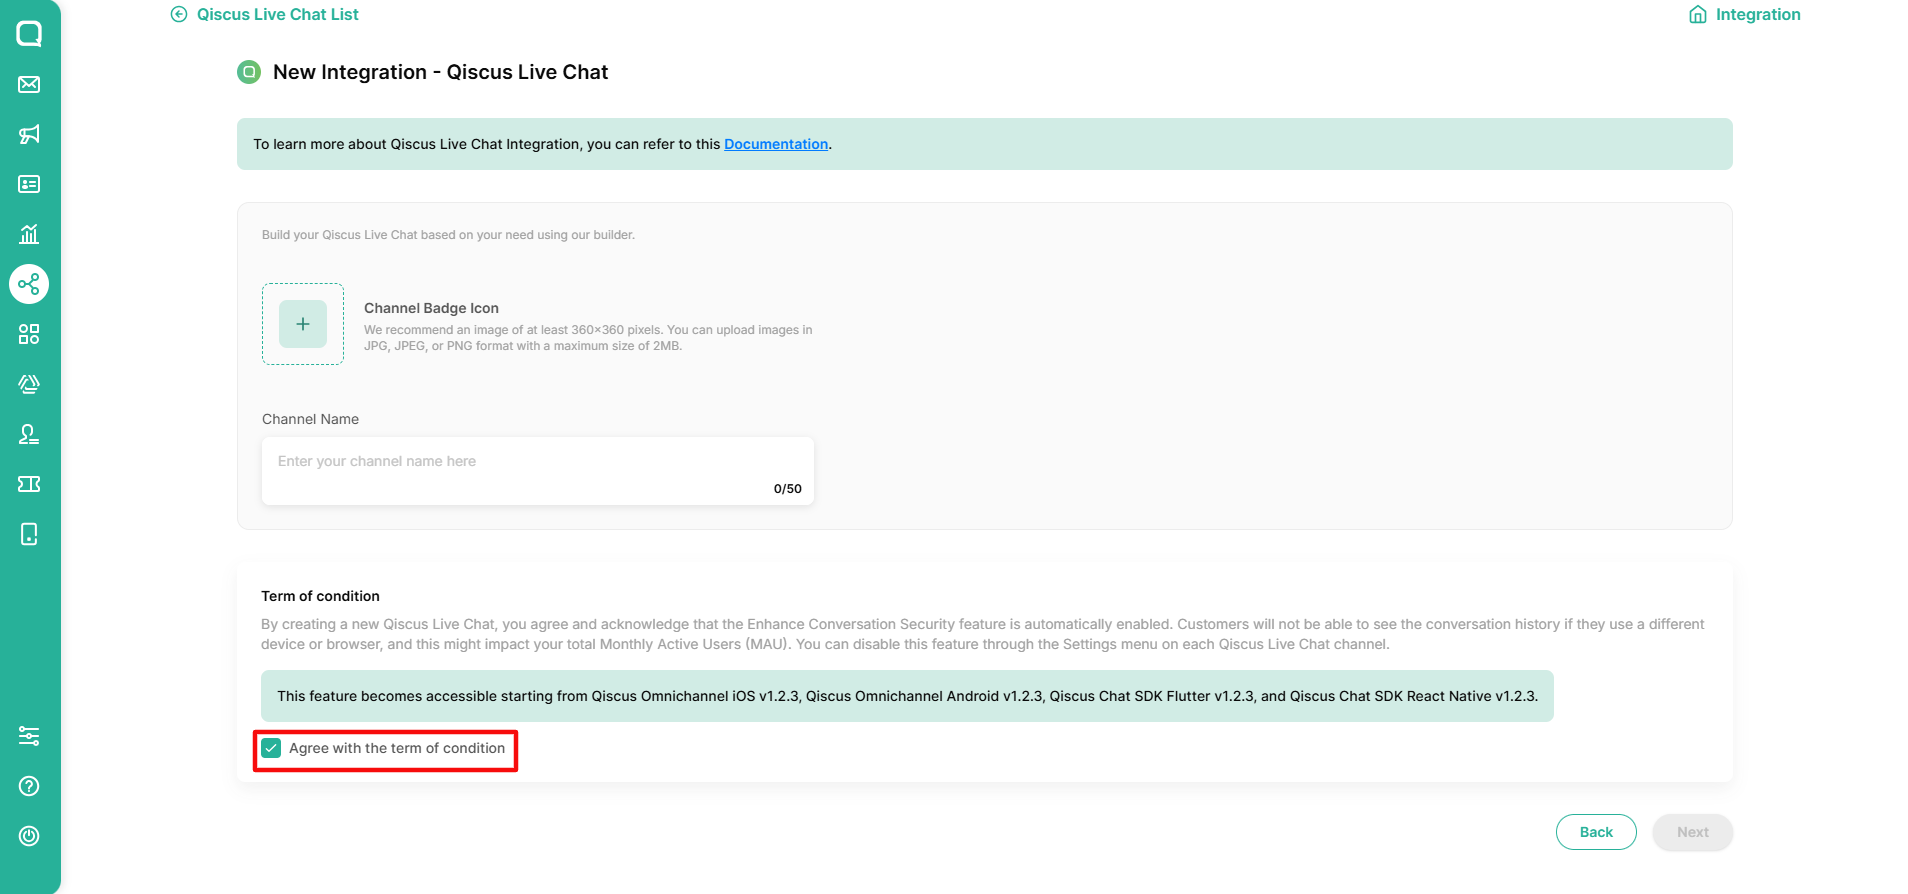
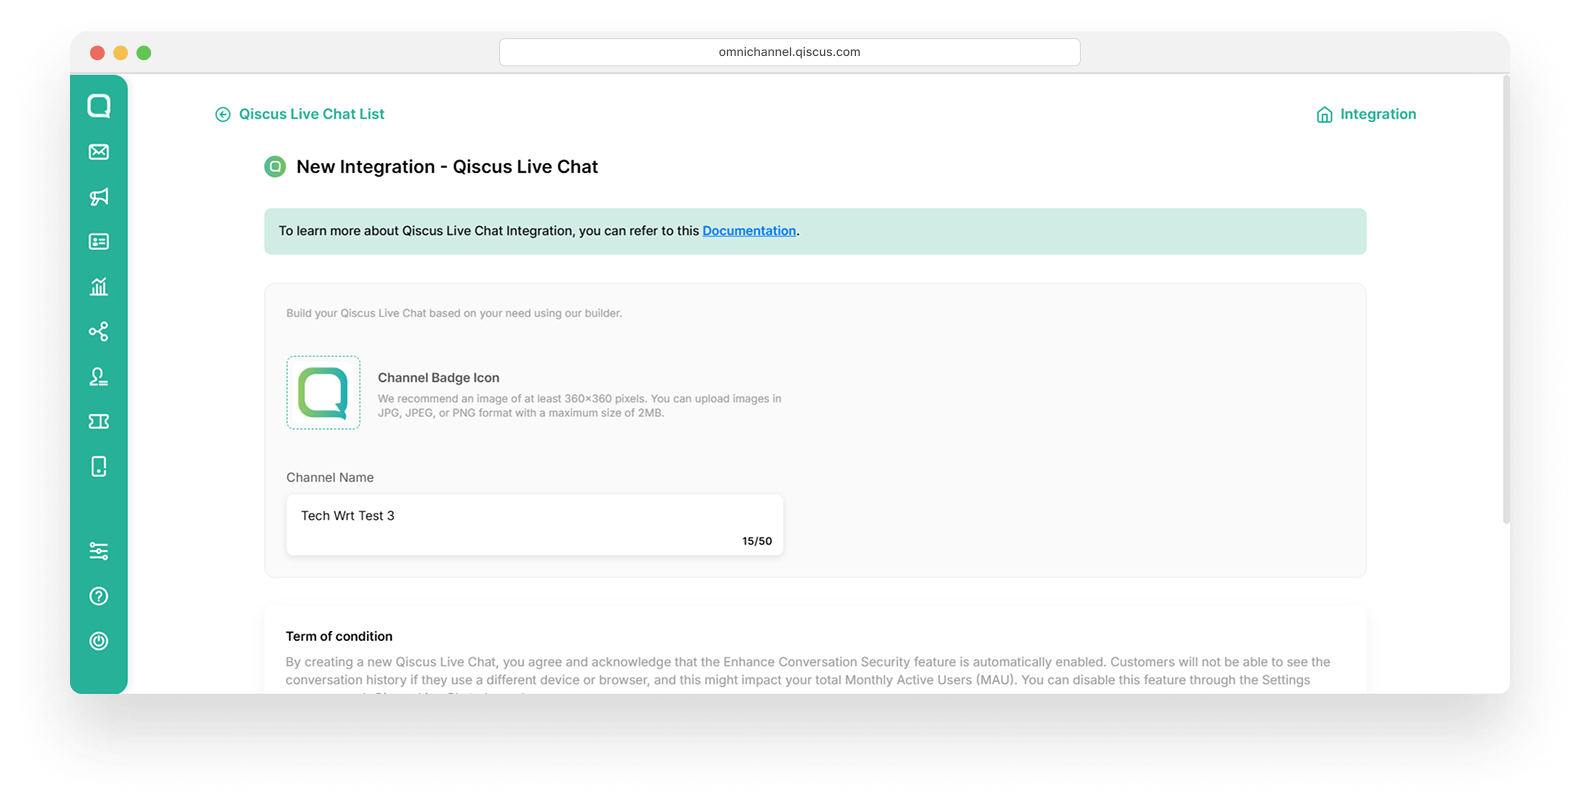
- Click the + icon in the channel badge, then upload your channel’s badge icon. After that, enter your channel name.
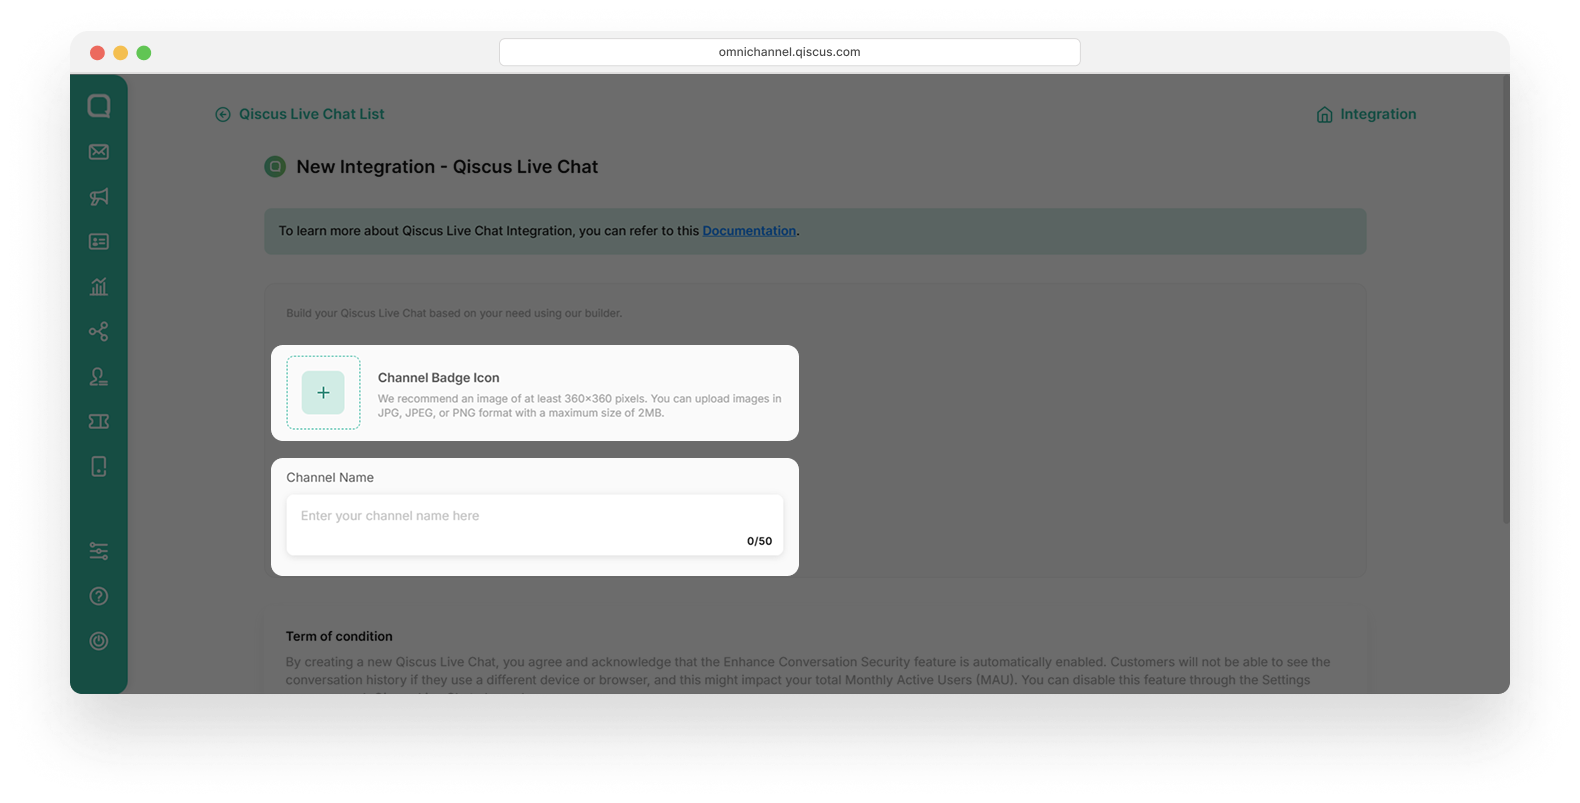
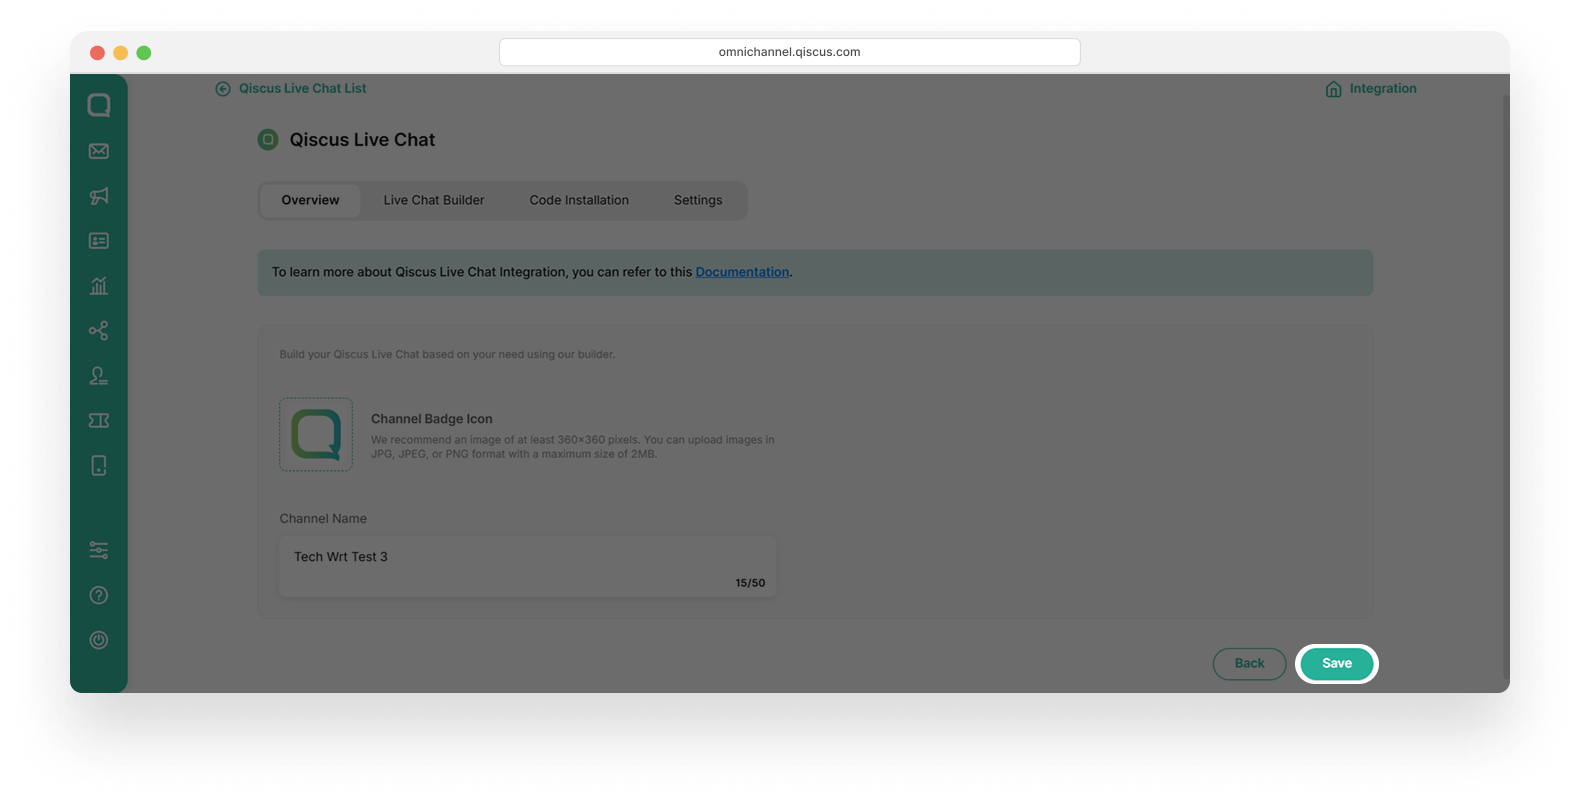
- Your channel badge icon and channel name are now ready, as shown in the example below.
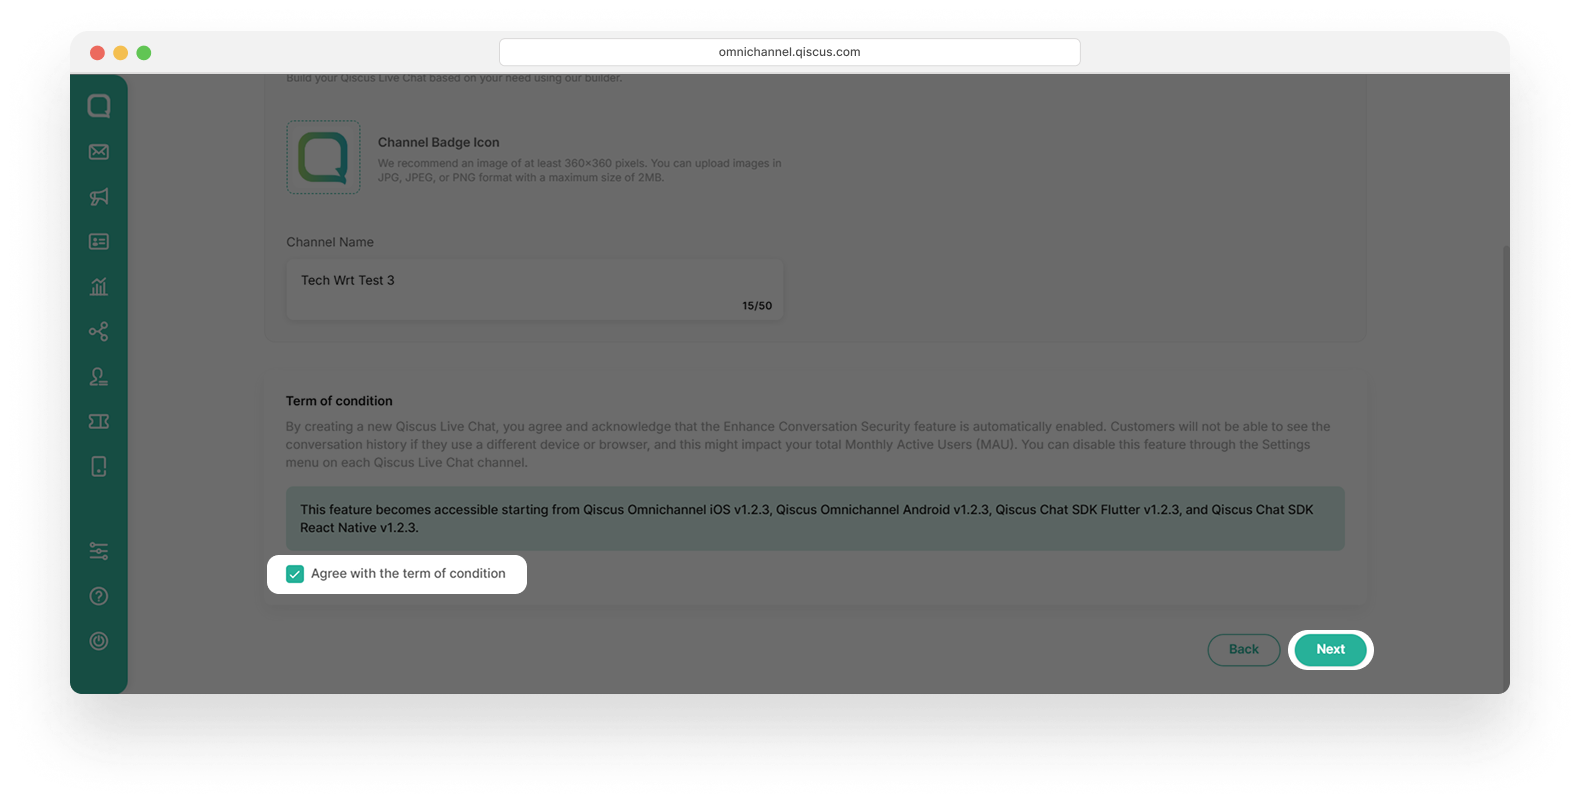
- Scroll down slightly, select the “Agree with the Terms and Conditions” checkbox, and then click the Next button.
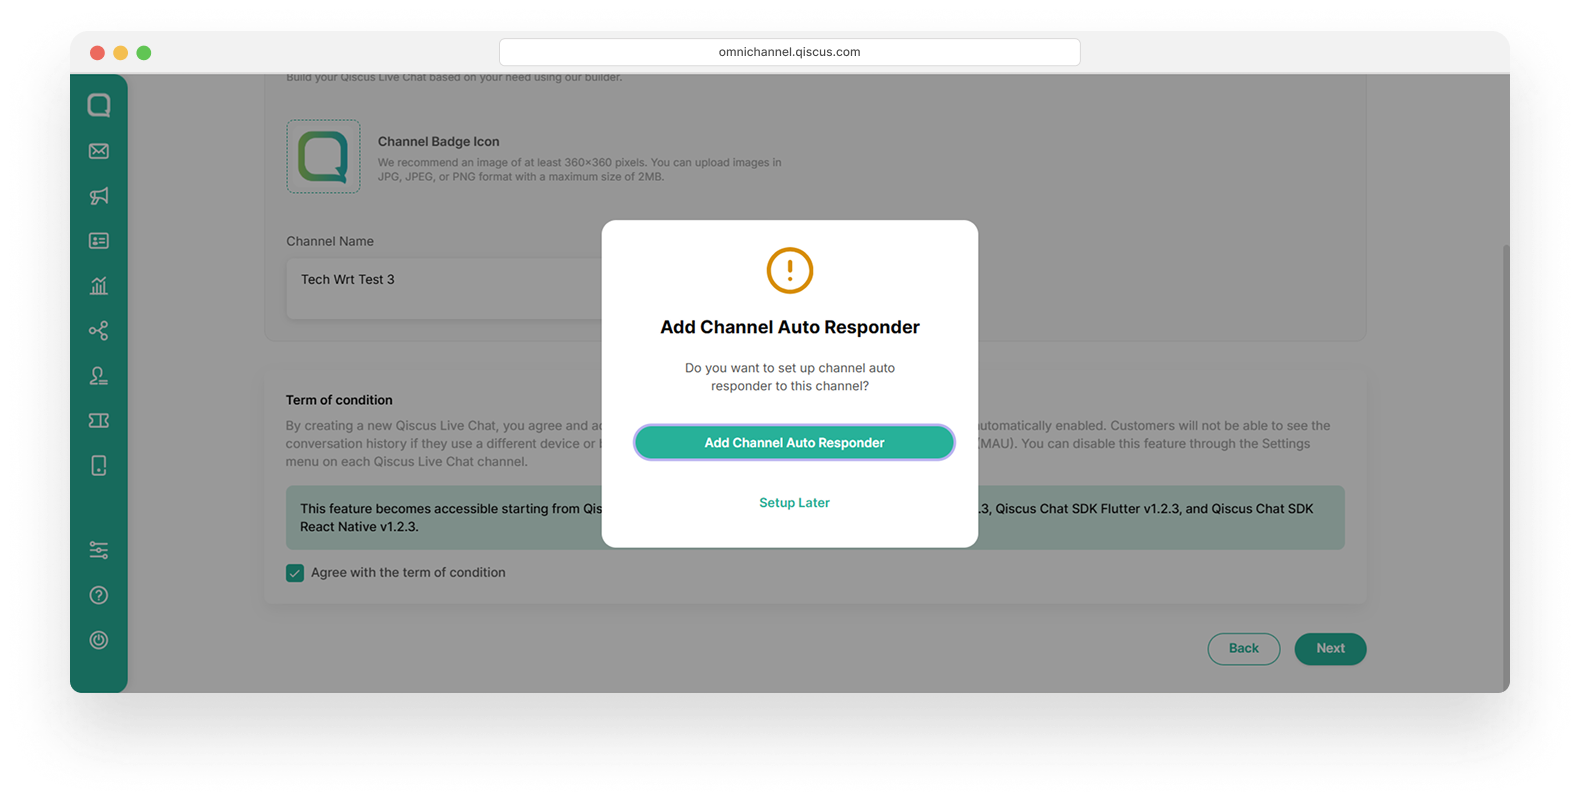
- Click the Setup Later link. If you want to set up a Channel Auto Responder, click Add Channel Auto Responder. You can see the details in this section.
- Click Save at the bottom of the page, then click the Okay button on the confirmation page.
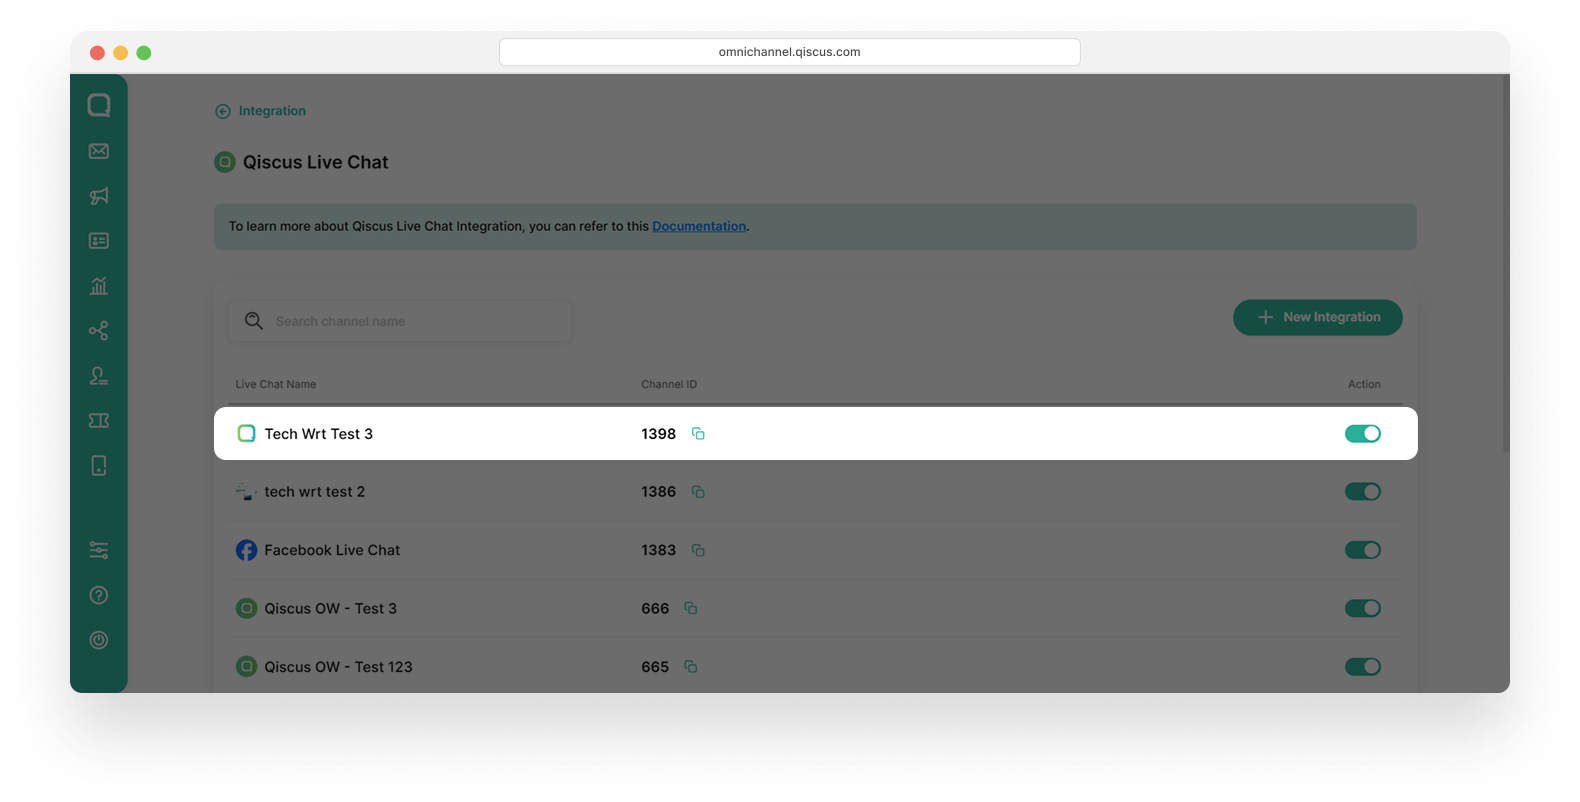
- Your Qiscus Live Chat is ready to use and has been moved to the Qiscus Live Chat list.
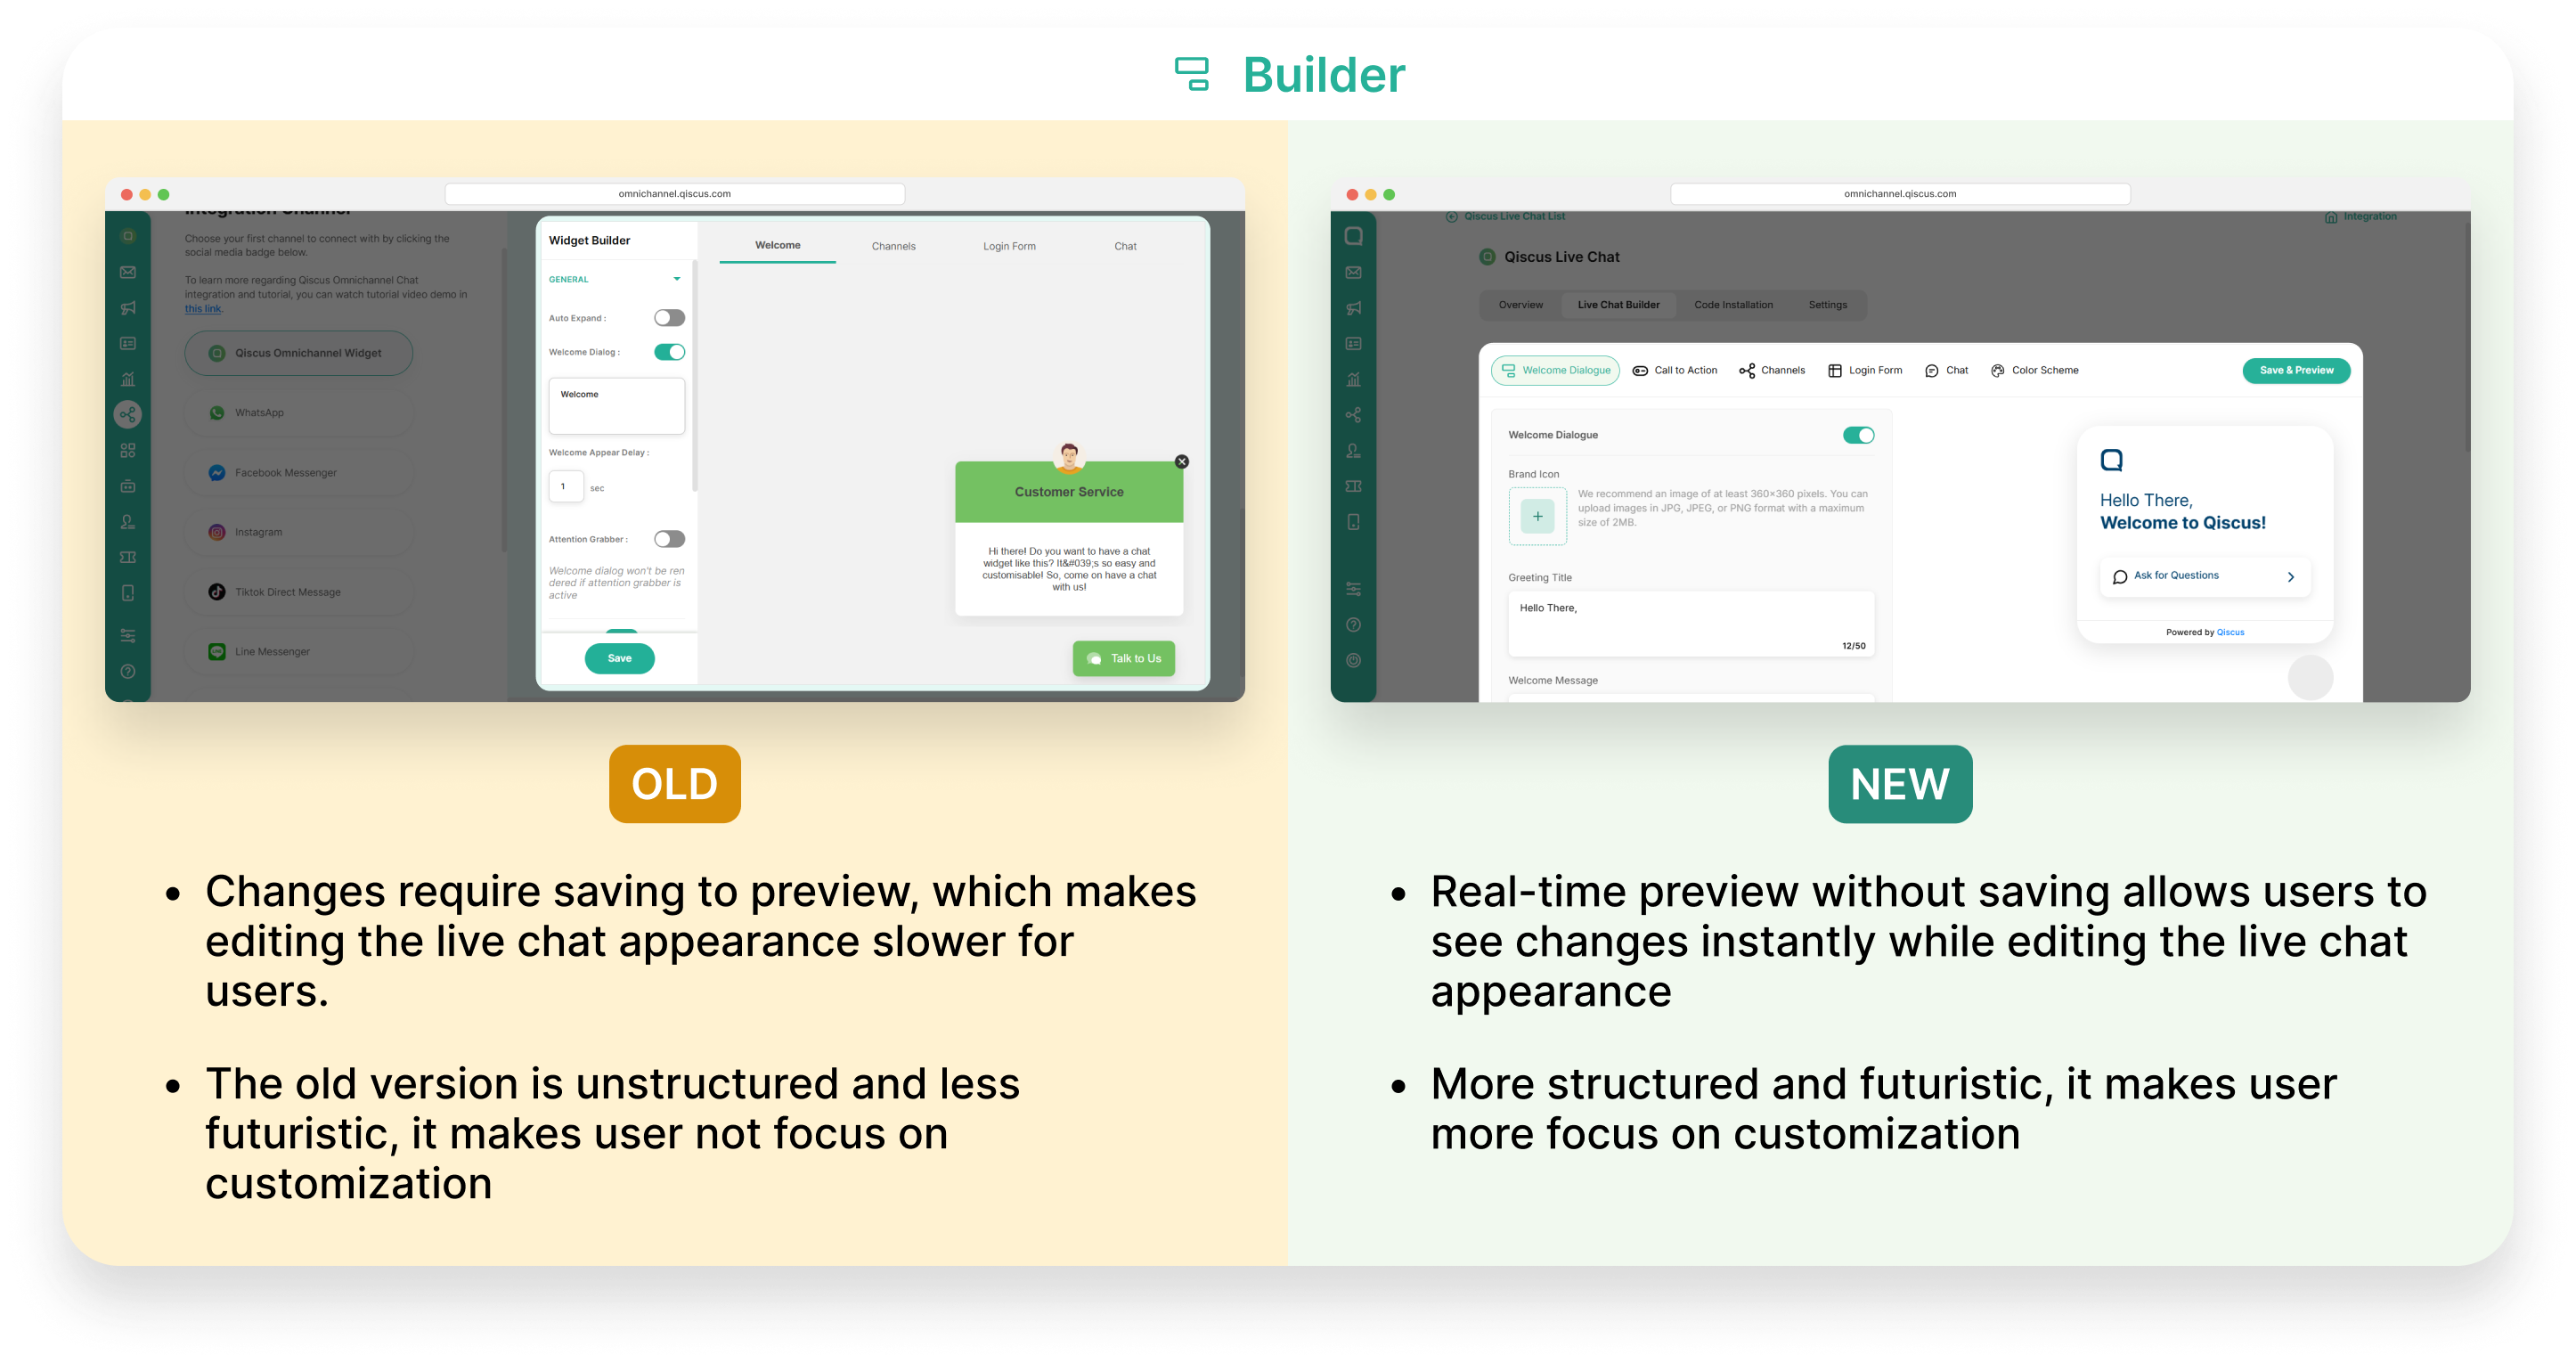
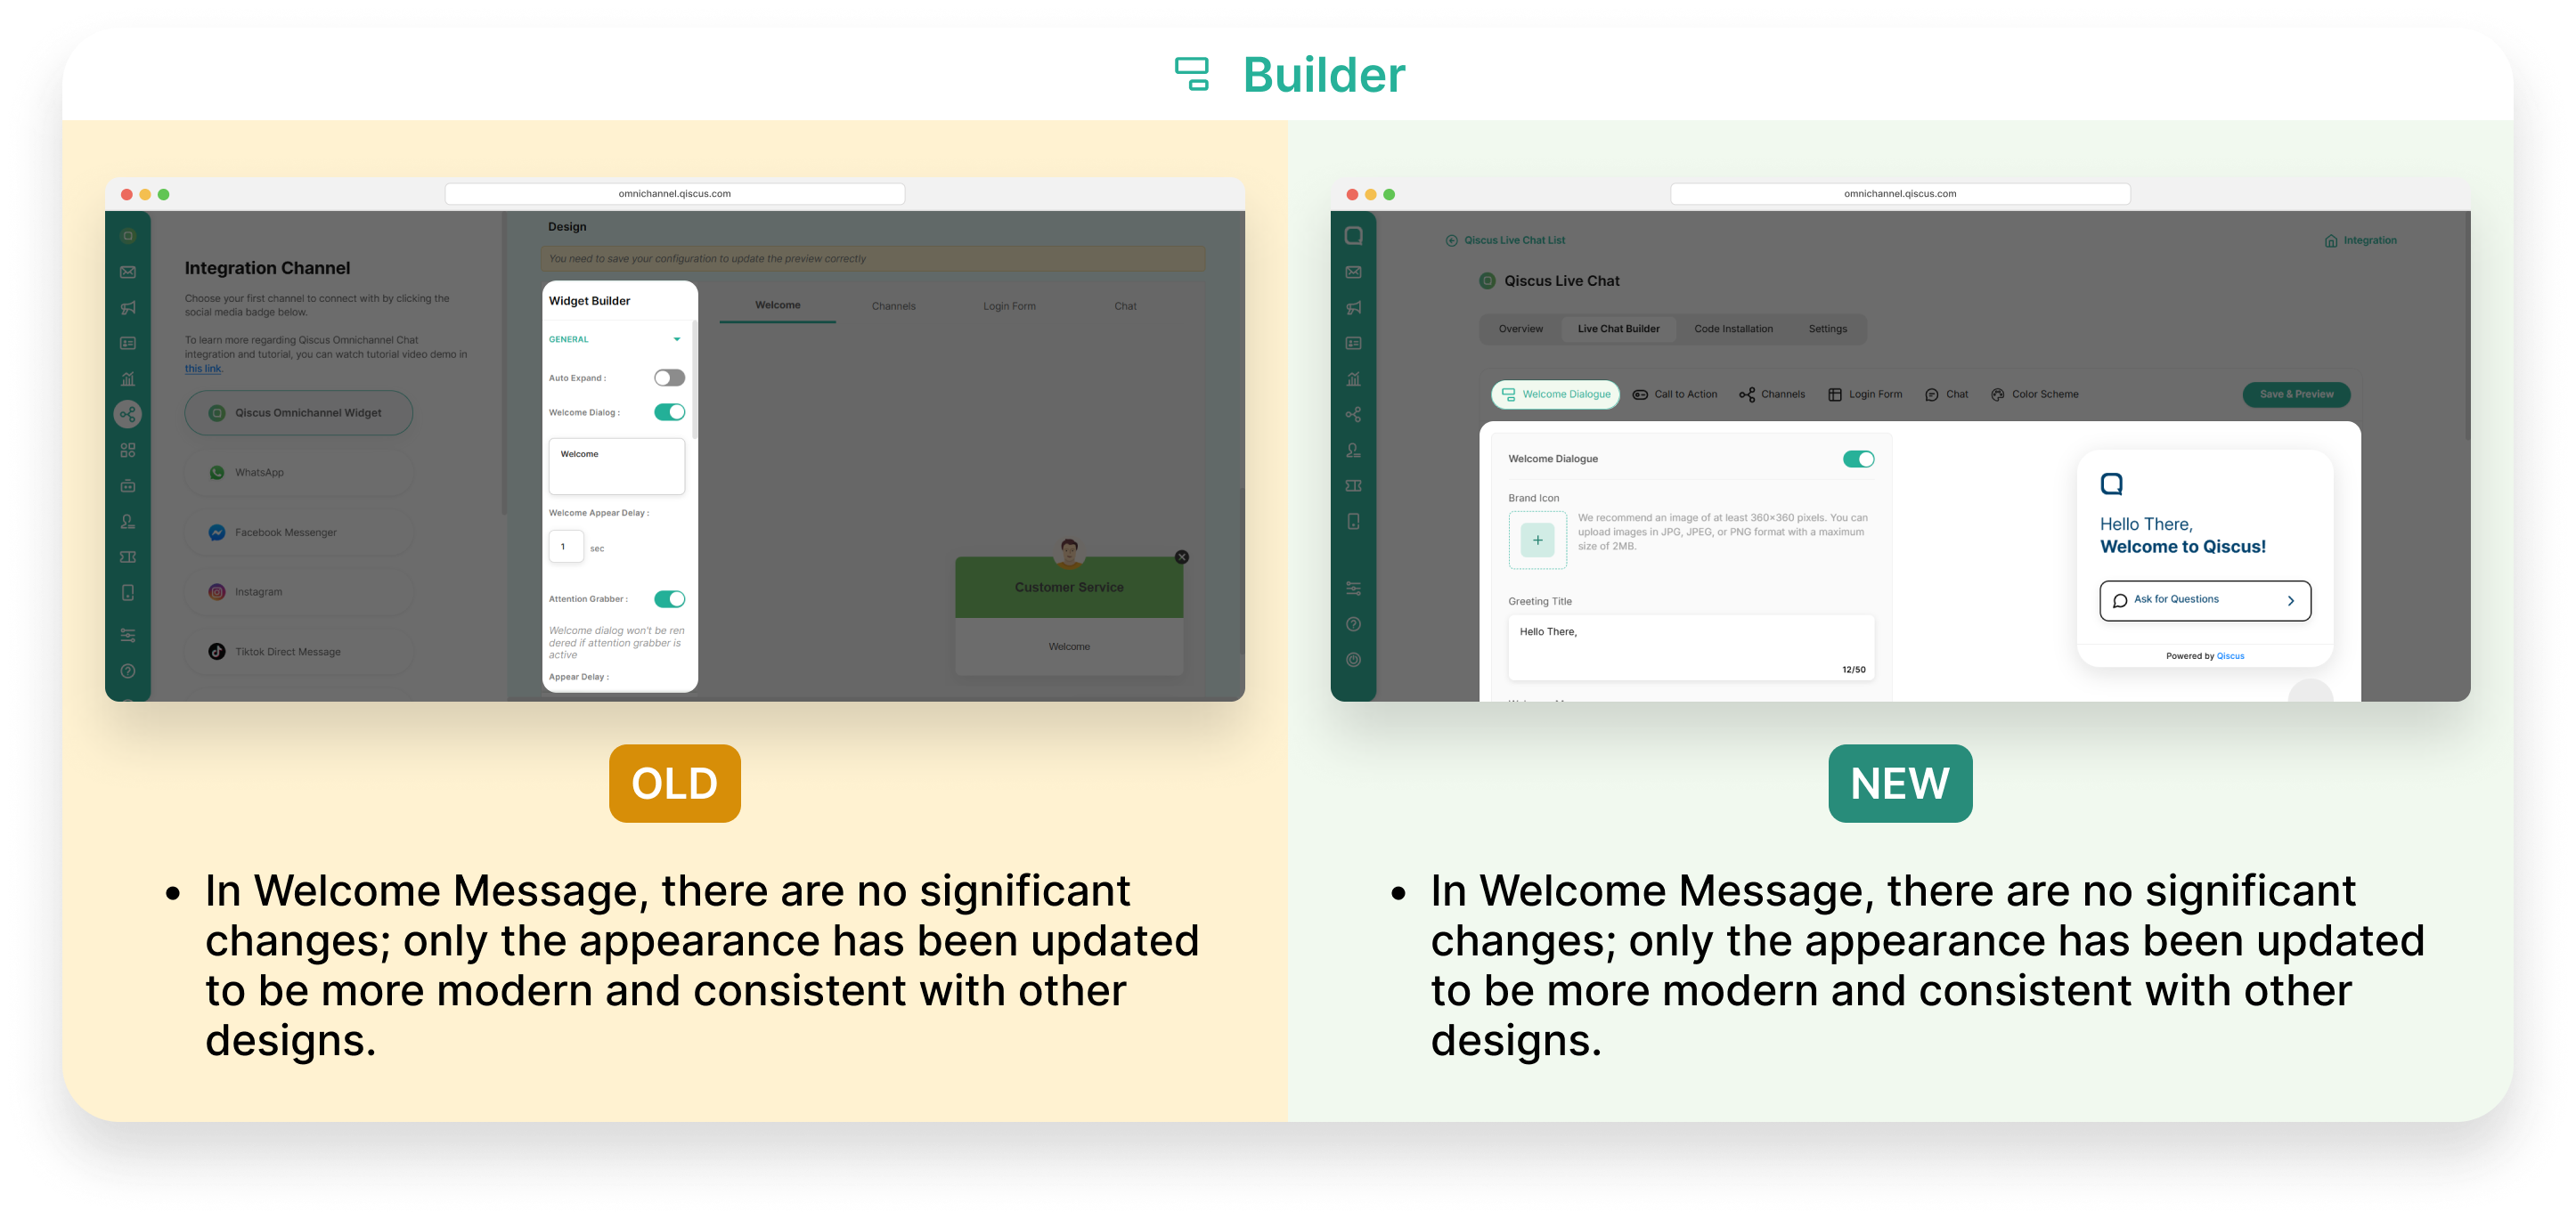
Build and Customize Your Qiscus Live Chat
To build and customize your Qiscus Live Chat, you need the Live Chat Builder to create the chat that will appear on your website. You can customize or personalize your live chat experience to fit your needs using the Live Chat Builder:
- Welcome Dialogue
The Welcome Dialogue allows you to create a welcome message that appears in your live chat. It helps you greet visitors when they open the chat, making the experience friendlier and more engaging.
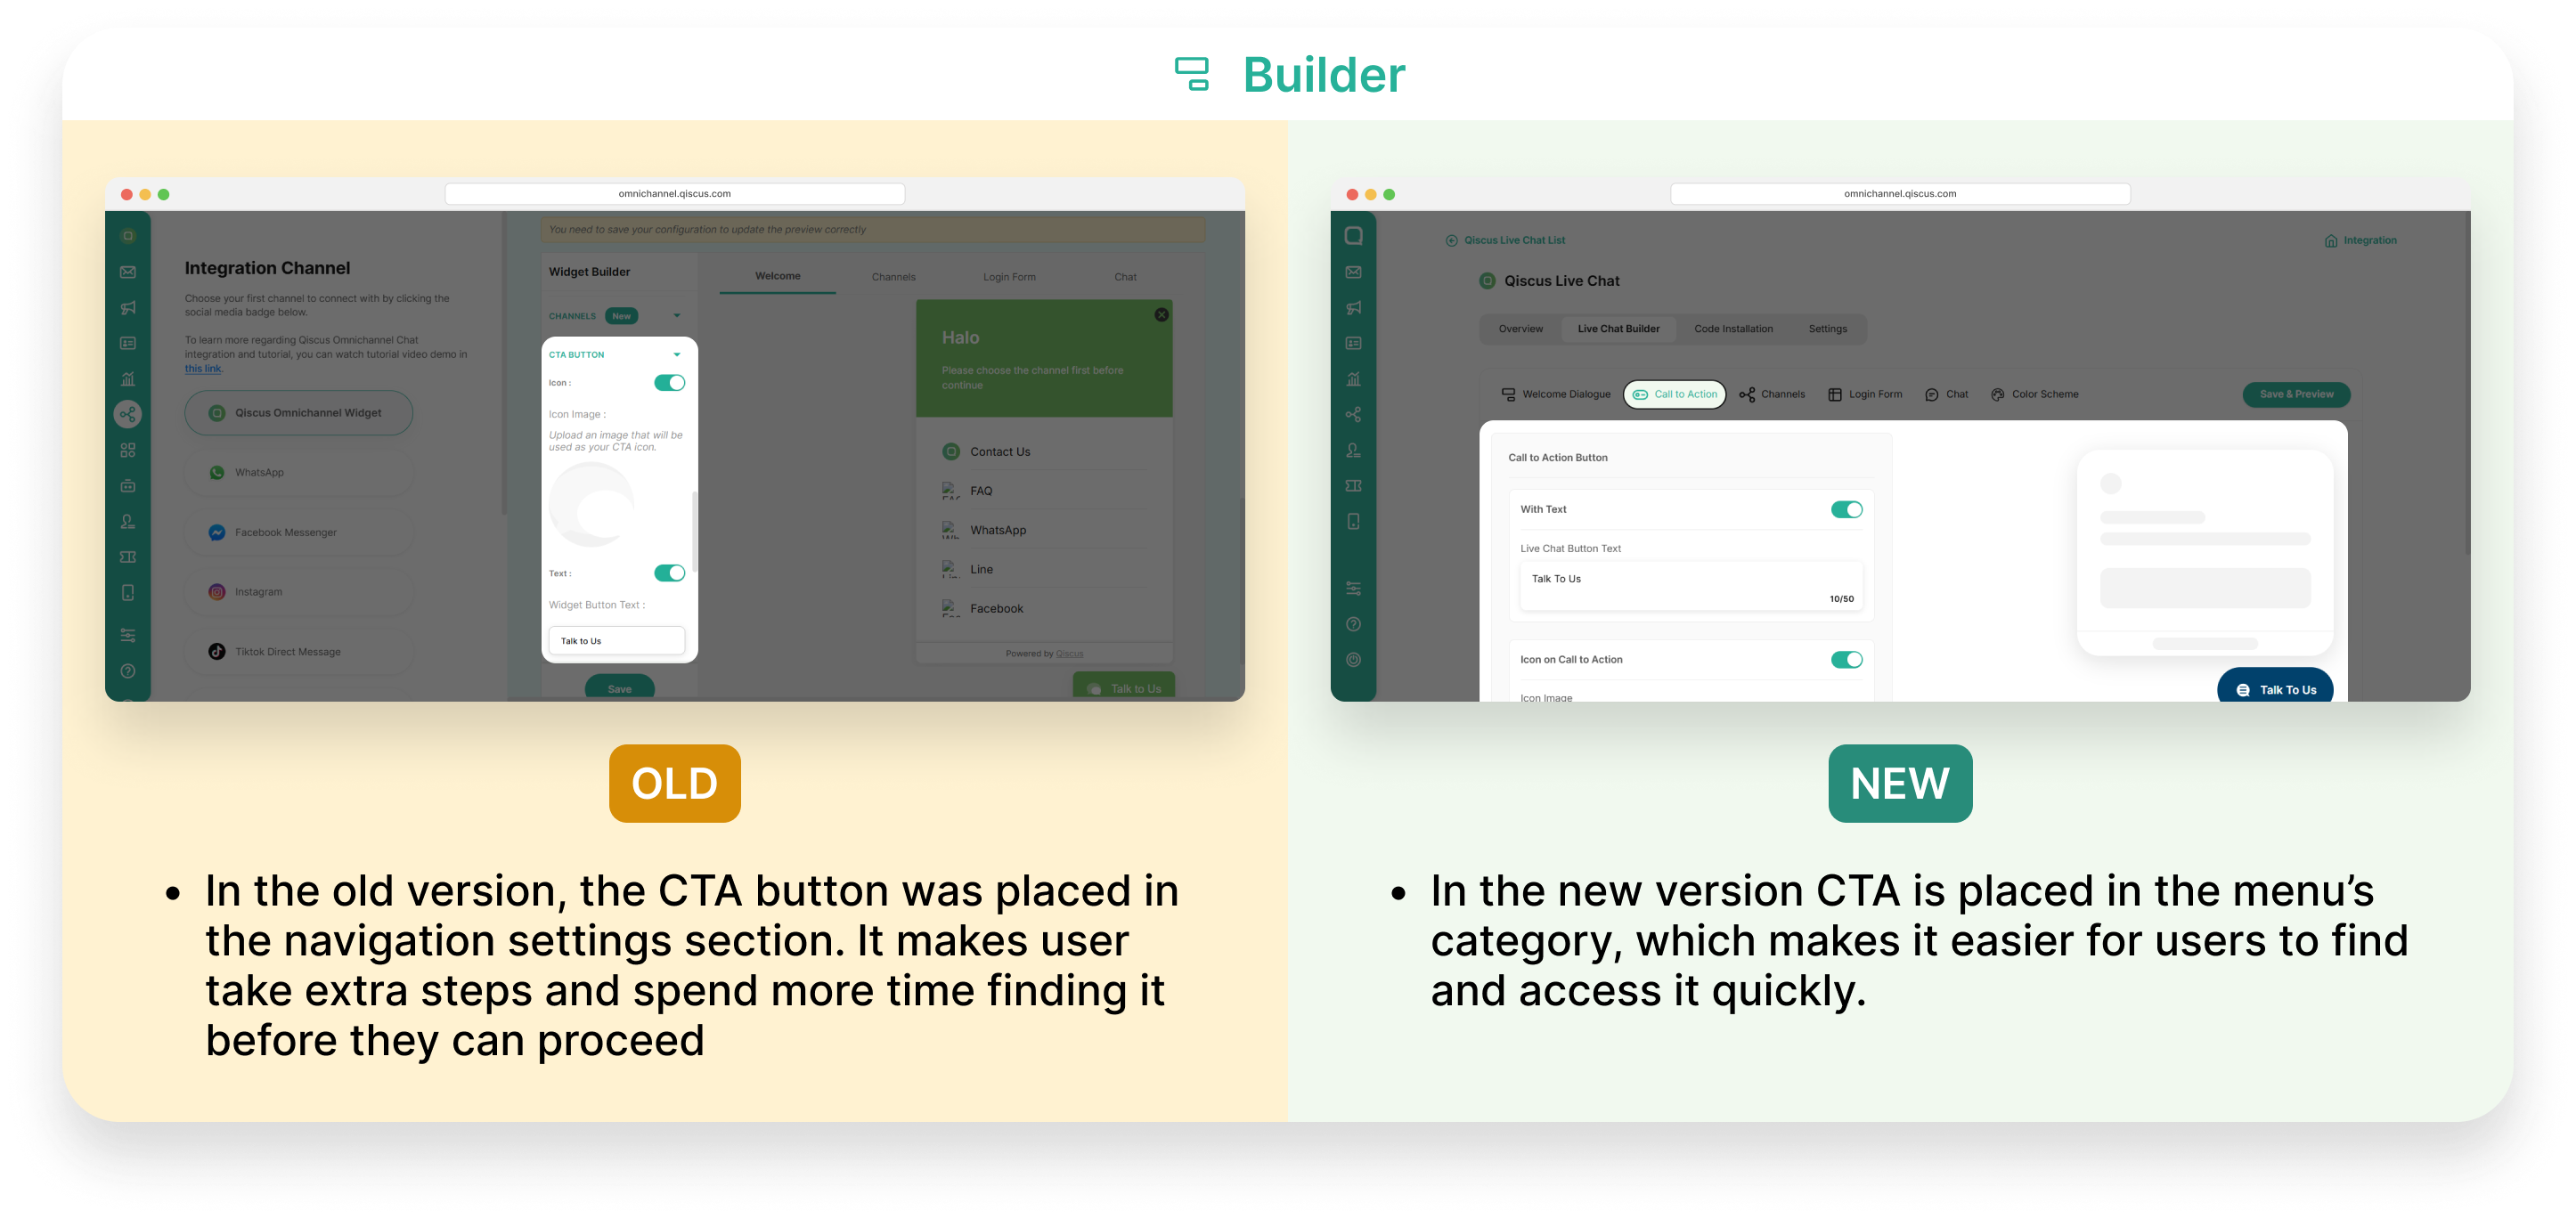
- Call to Action
The Call to Action allows you to create and customize the Call to Action (CTA) button in your Qiscus Live Chat. This button is the main element visitors see on your website to start a live chat. It usually appears in the bottom-right corner and invites users to interact, for example, with text such as “Talk to Us” or “Chat Now.”
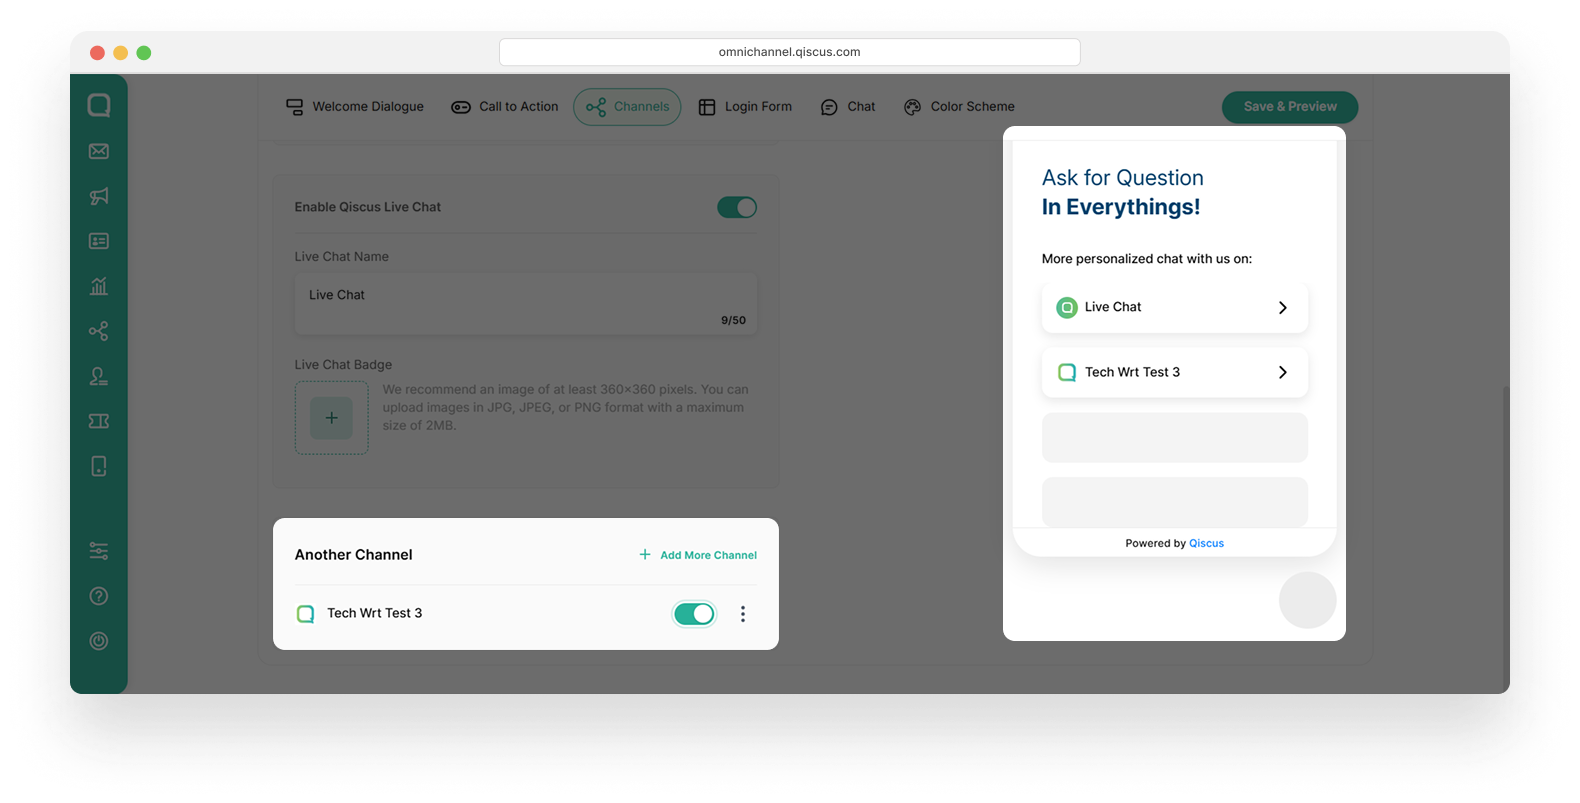
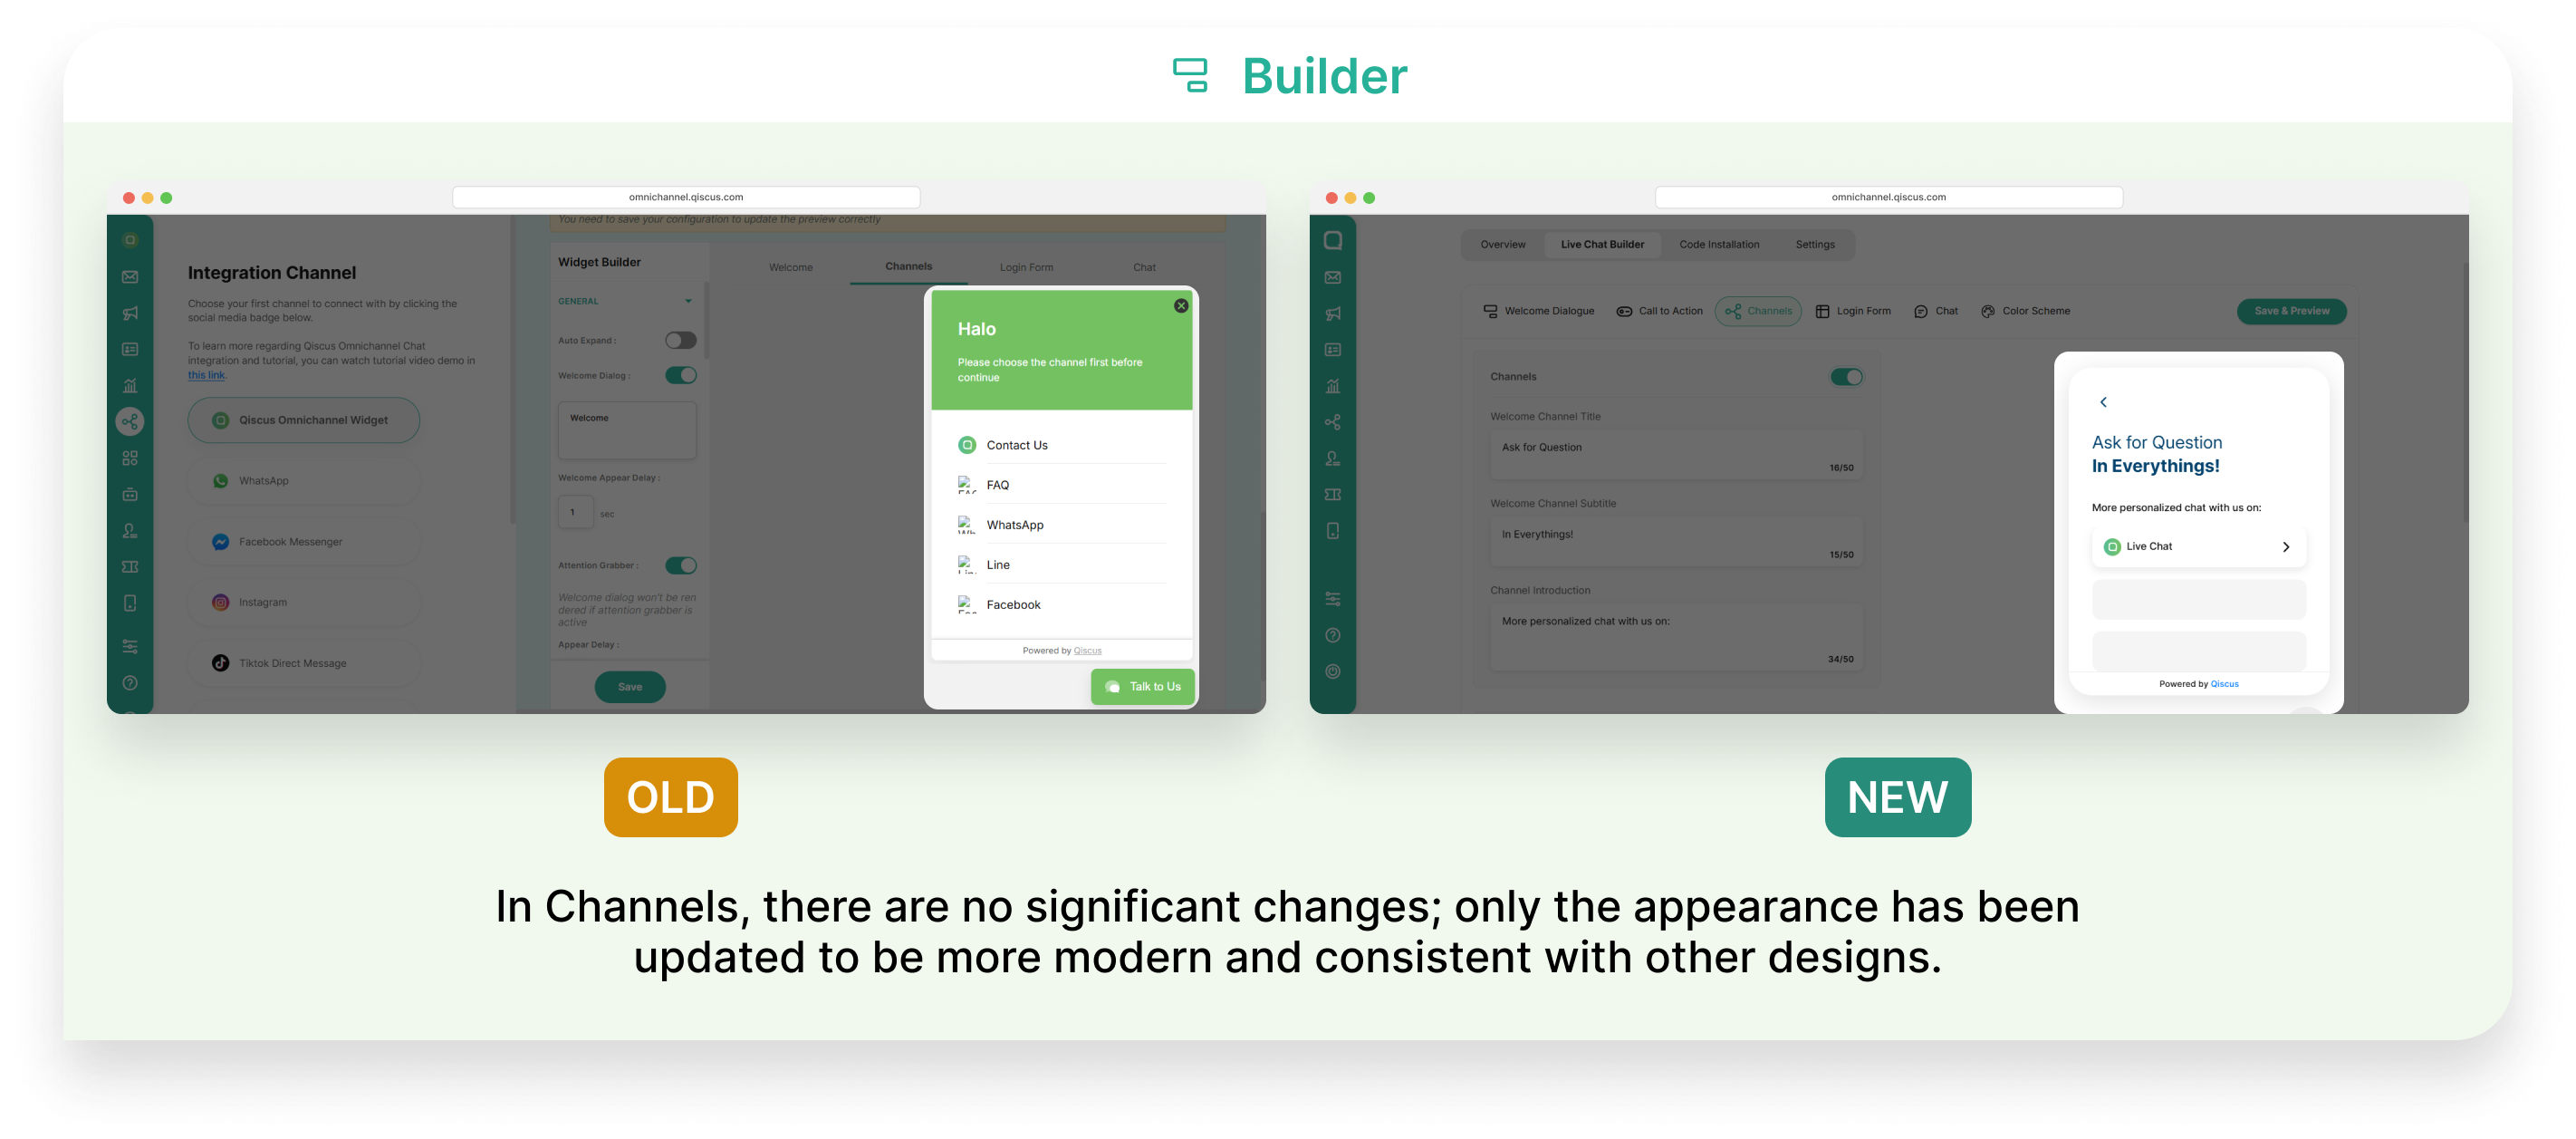
- Channels
The Channels allows you create and customize greetings for users and lets them choose a communication channel (such as Qiscus Live Chat) before starting a conversation.
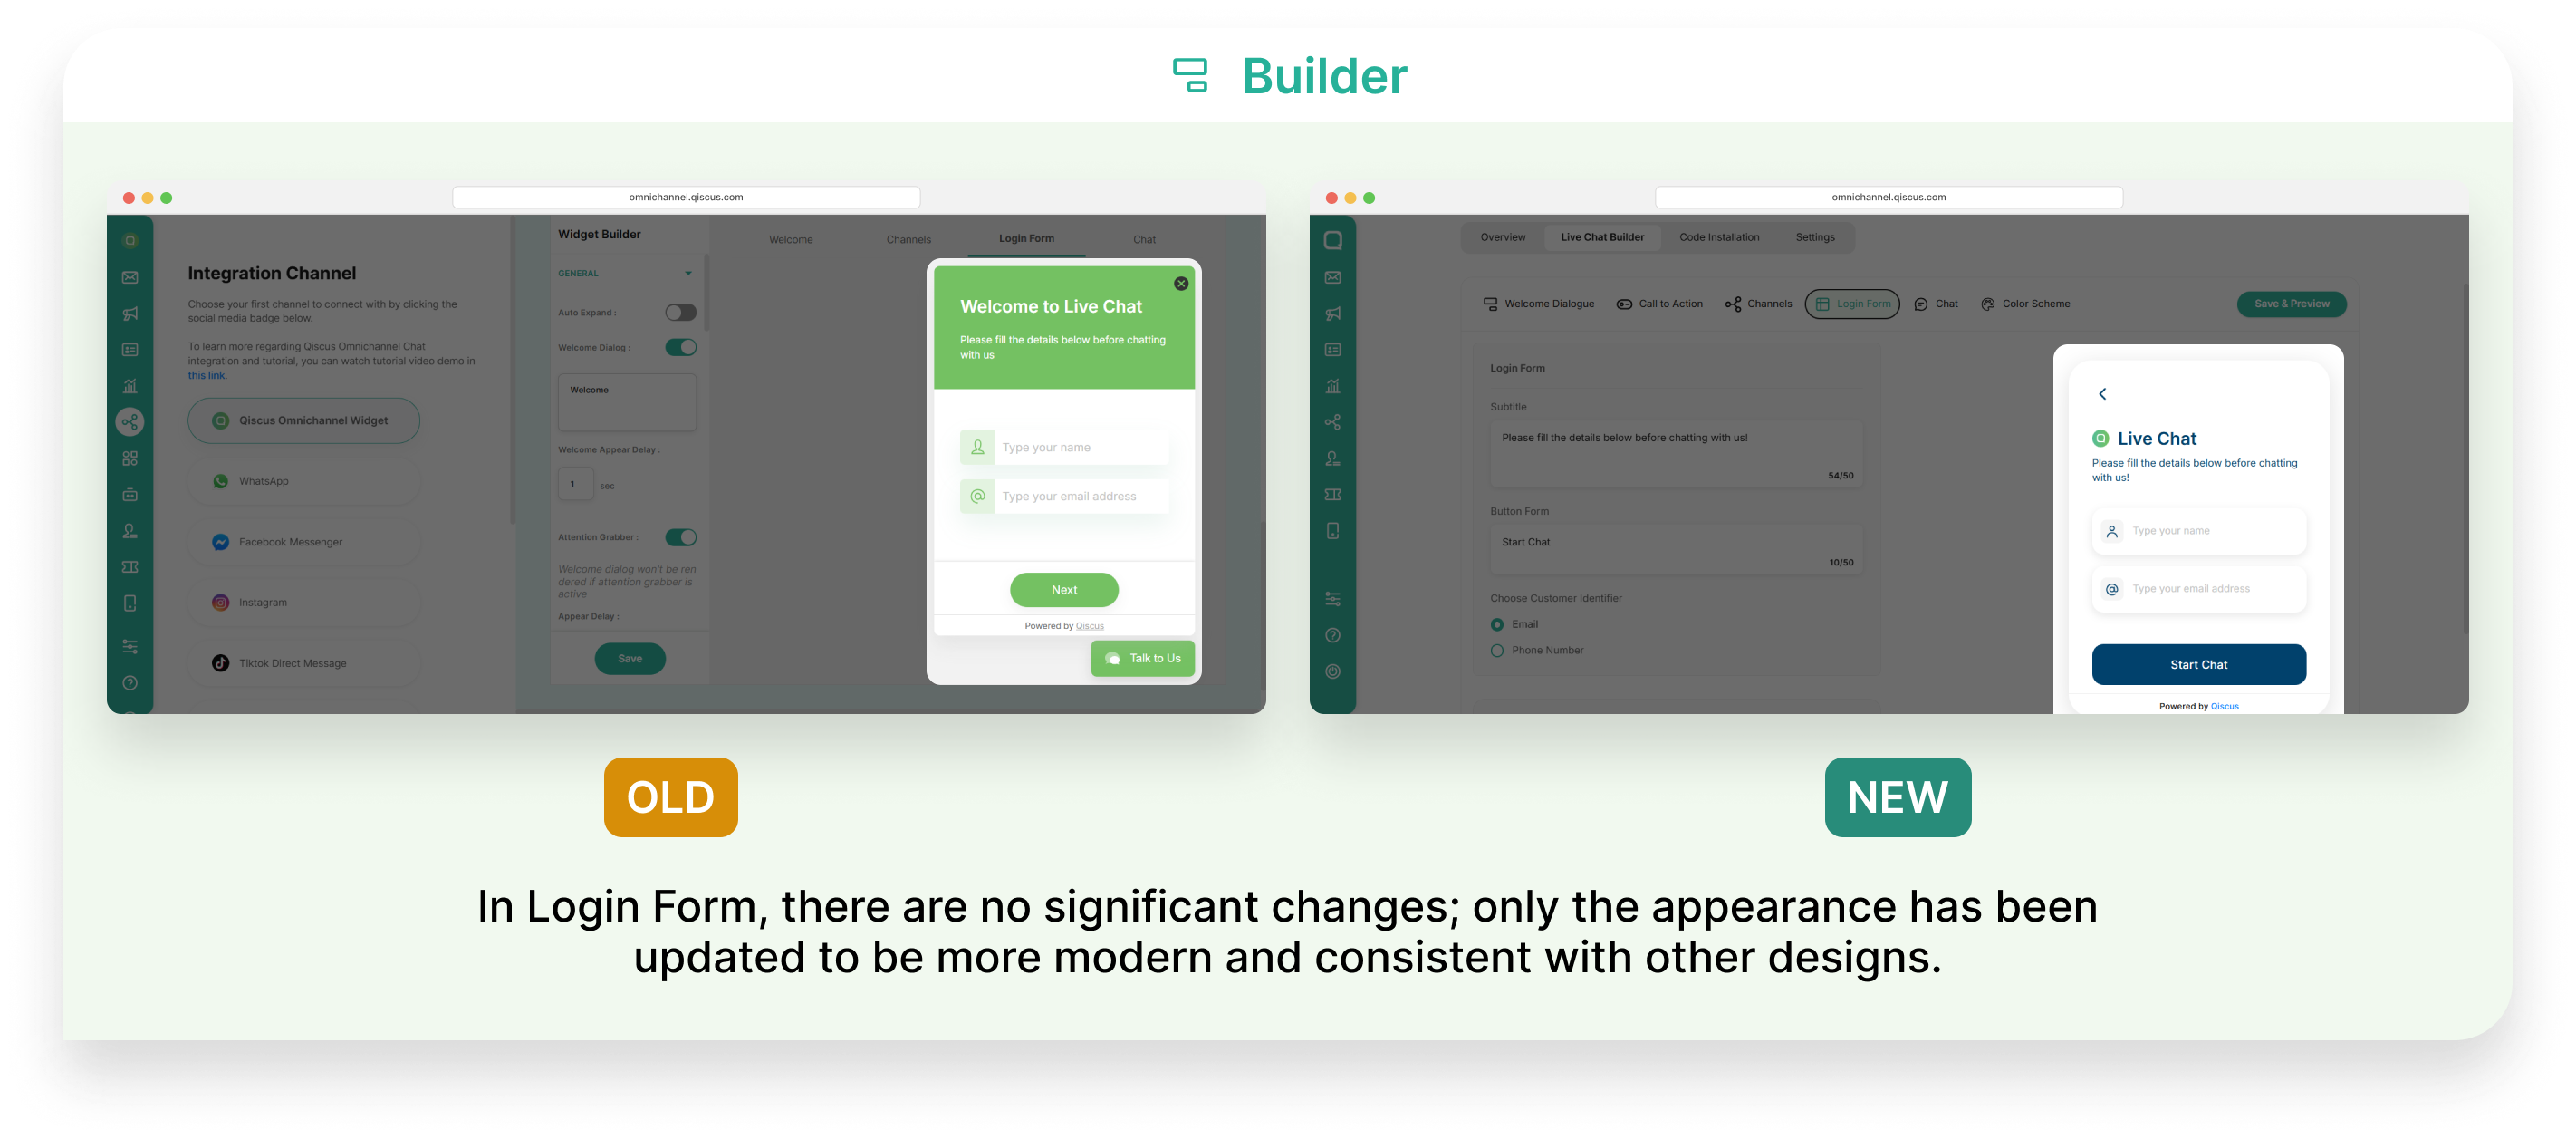
- Login Form
The Login Form allows users to start a conversation by logging in first. It enables you to identify users before chatting, which helps provide a more personalized and secure experience.
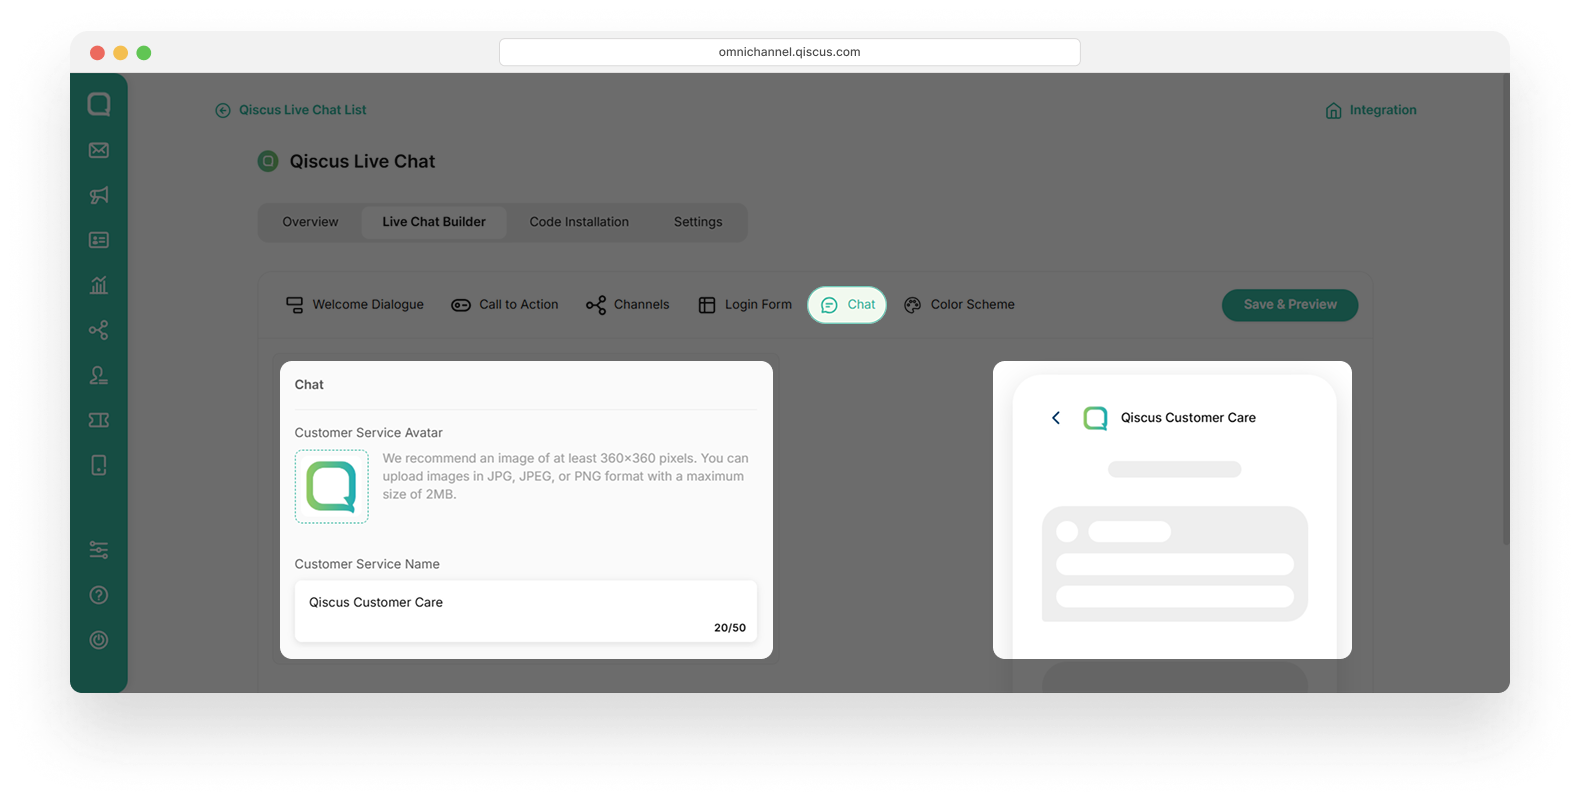
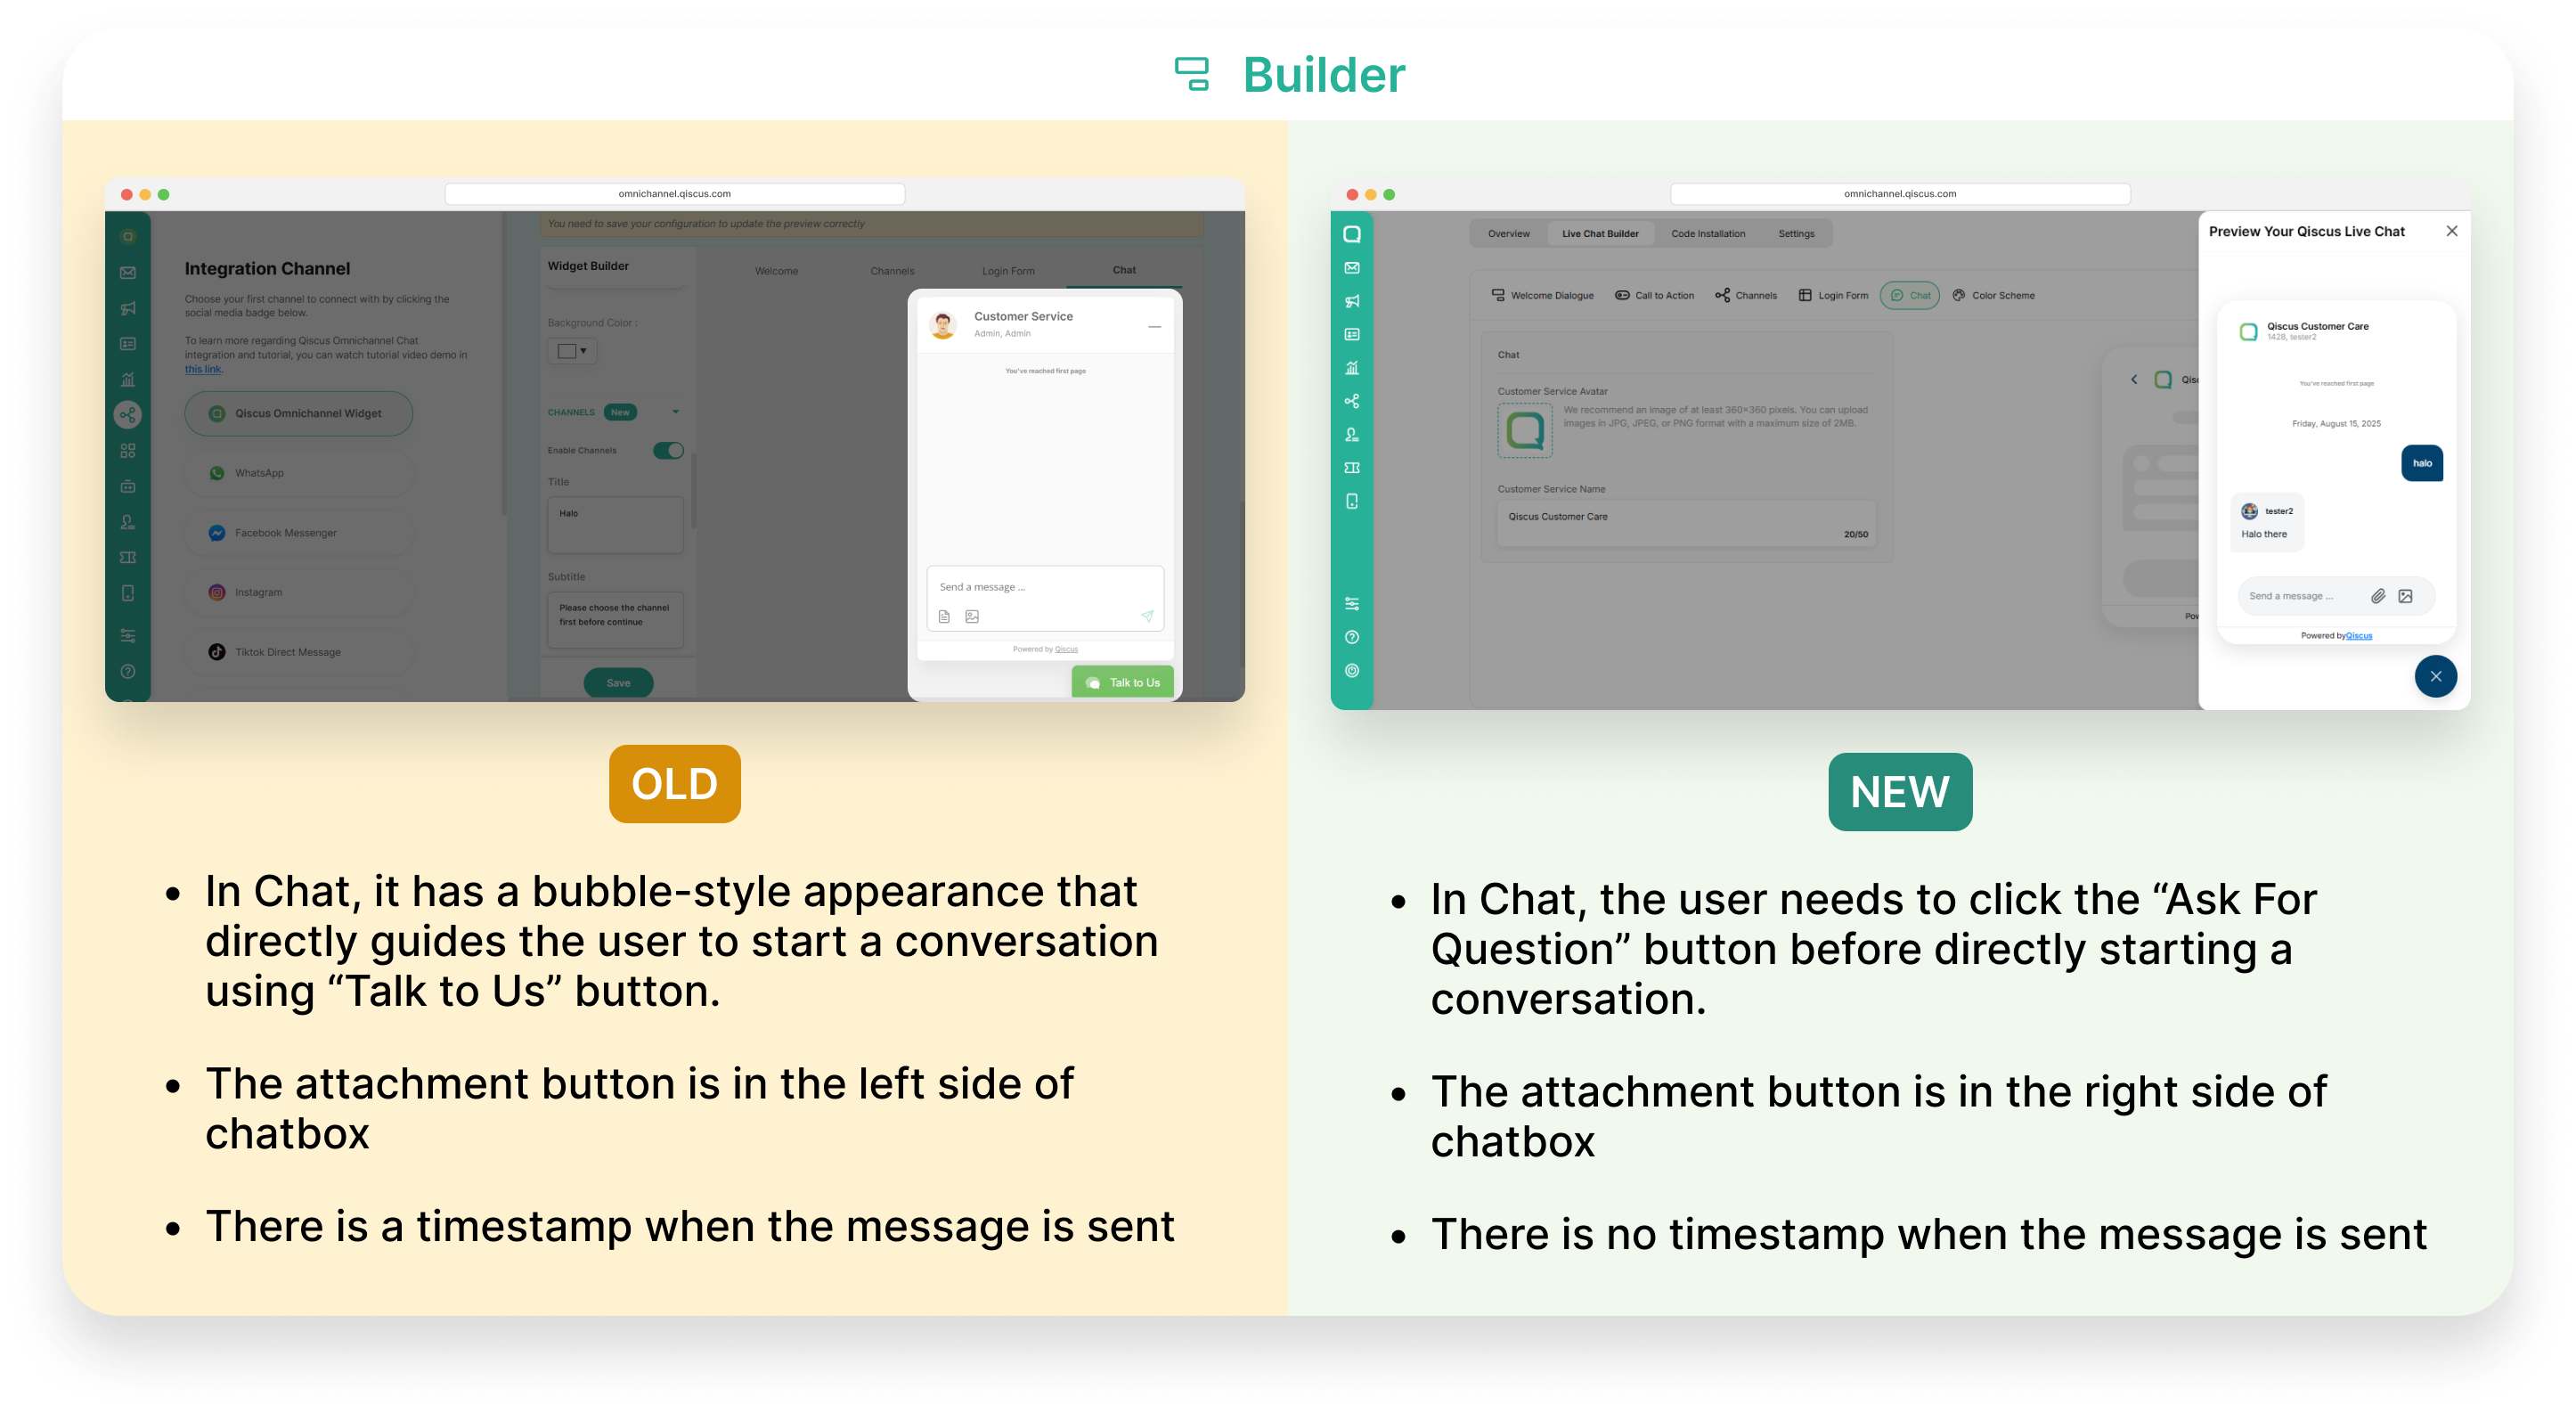
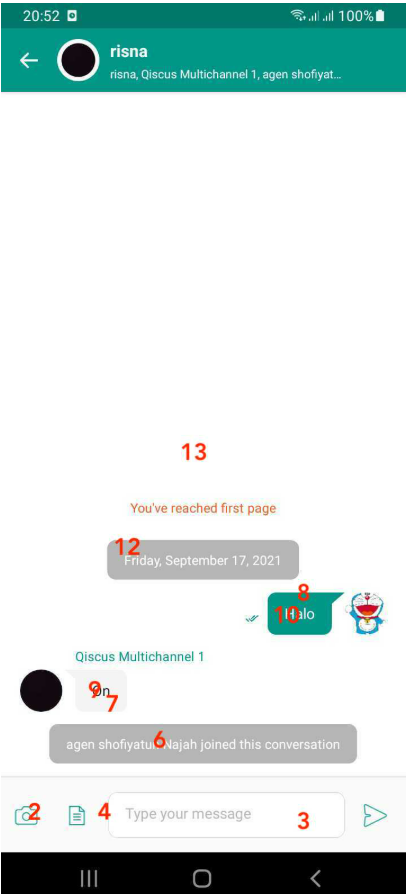
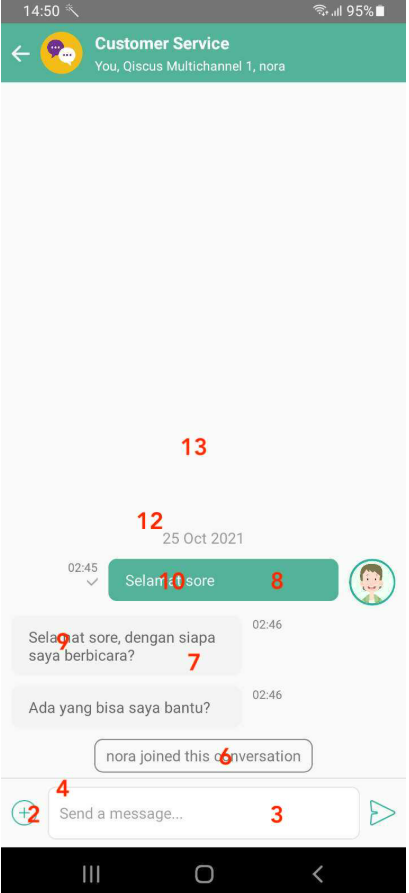
- Chat
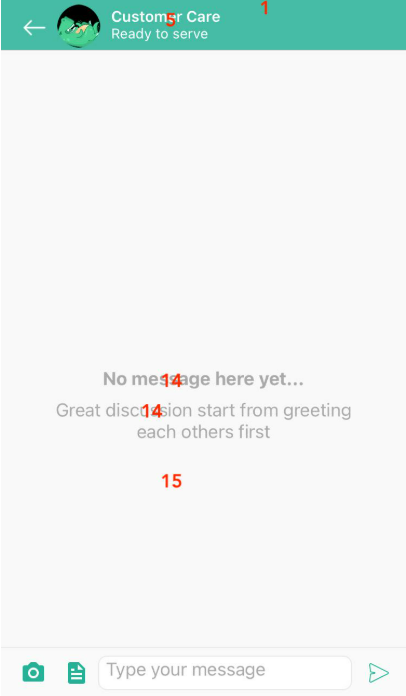
The Chat function allows you to start a conversation with the customer care agent. The grayed-out shapes likely represent placeholder text for messages that have already been sent and received.
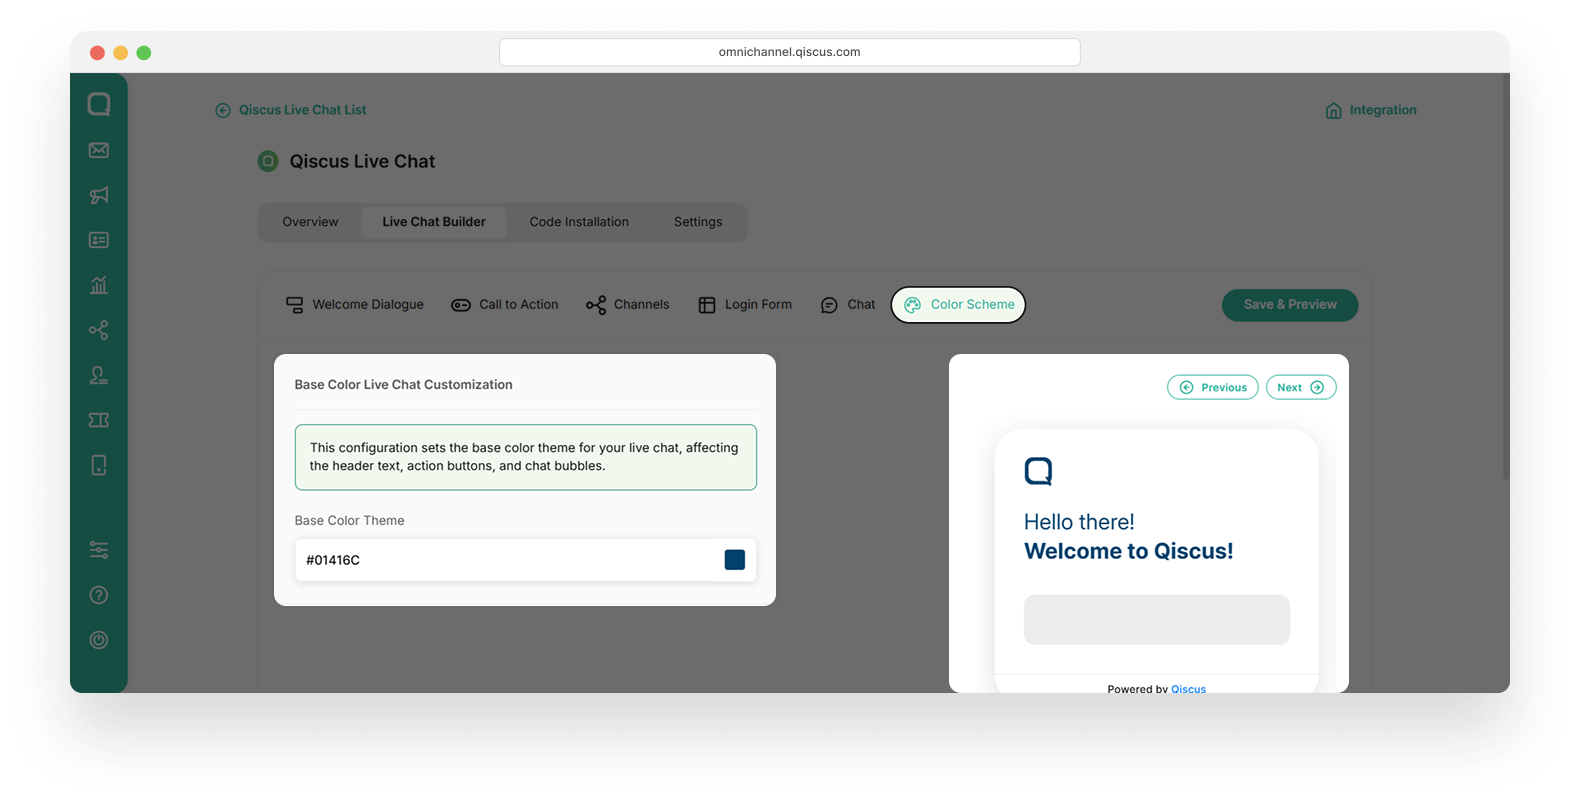
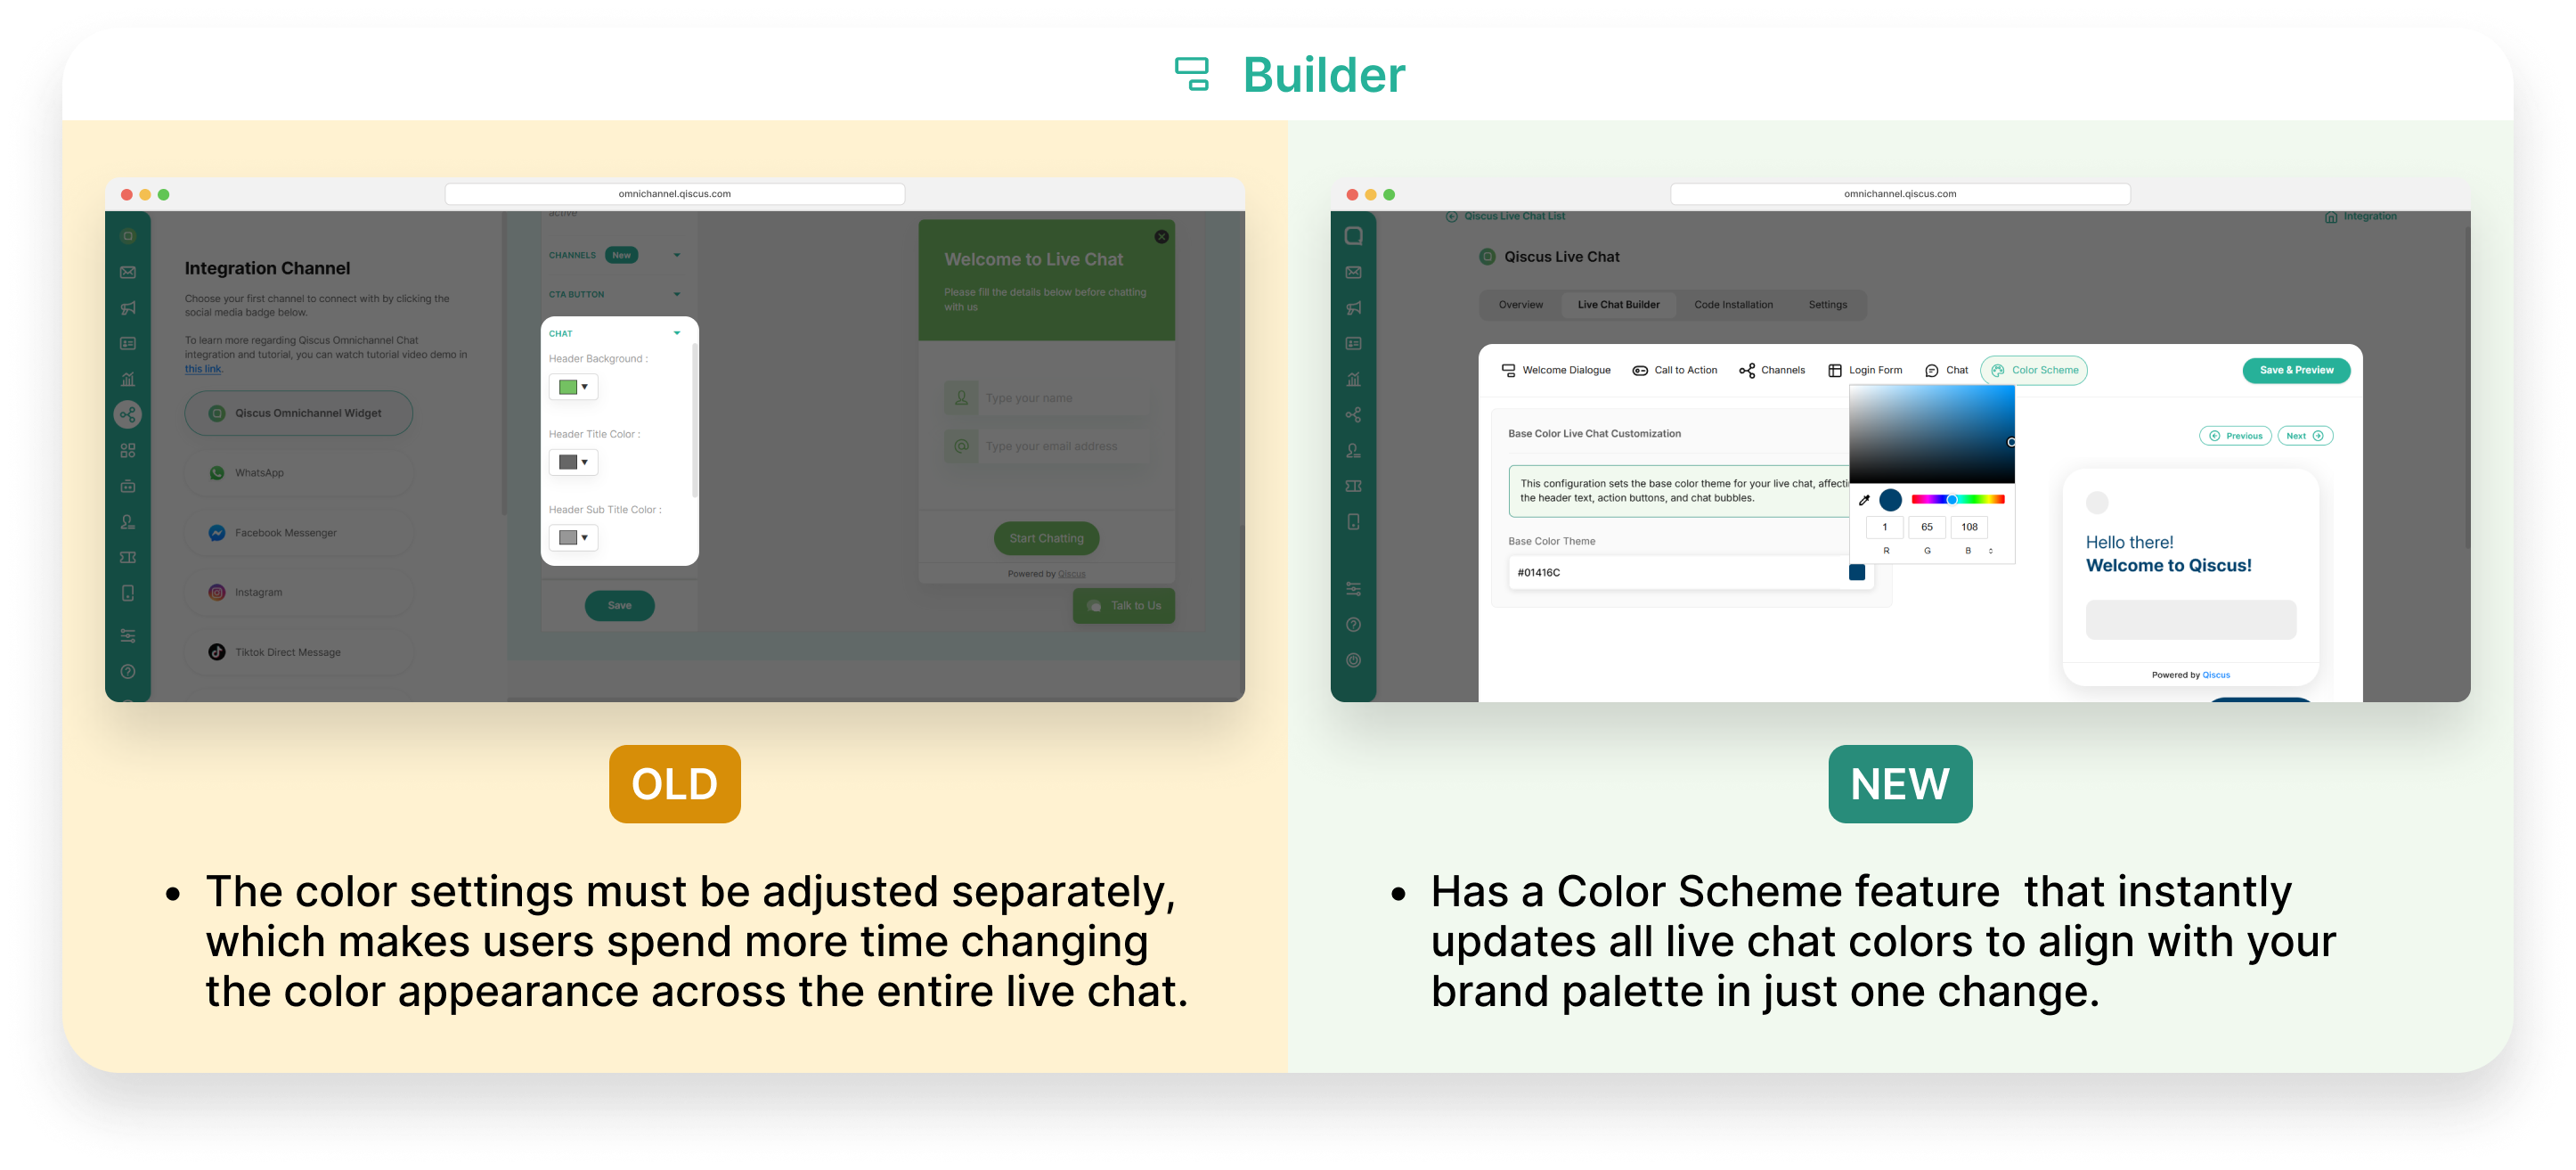
- Color Scheme
The Color Scheme allows you to change the visual appearance of the Qiscus Live Chat to match your brand’s color palette. It focuses on a single “Base Color” that is applied to key elements of the chat interface.
All changes are made through the interface. Once you are satisfied with the setup, you can preview the chat and publish it to your site.
When you adjust settings on the left panel, the right panel preview updates instantly. This is a static preview showing only the section you’re editing. After you have completed your settings, click the Save and Preview button. Your Qiscus Live Chat setting will be saved and you can see the preview in the right side of page.
Welcome Dialogue
To set the welcome dialogue, follow the steps below:
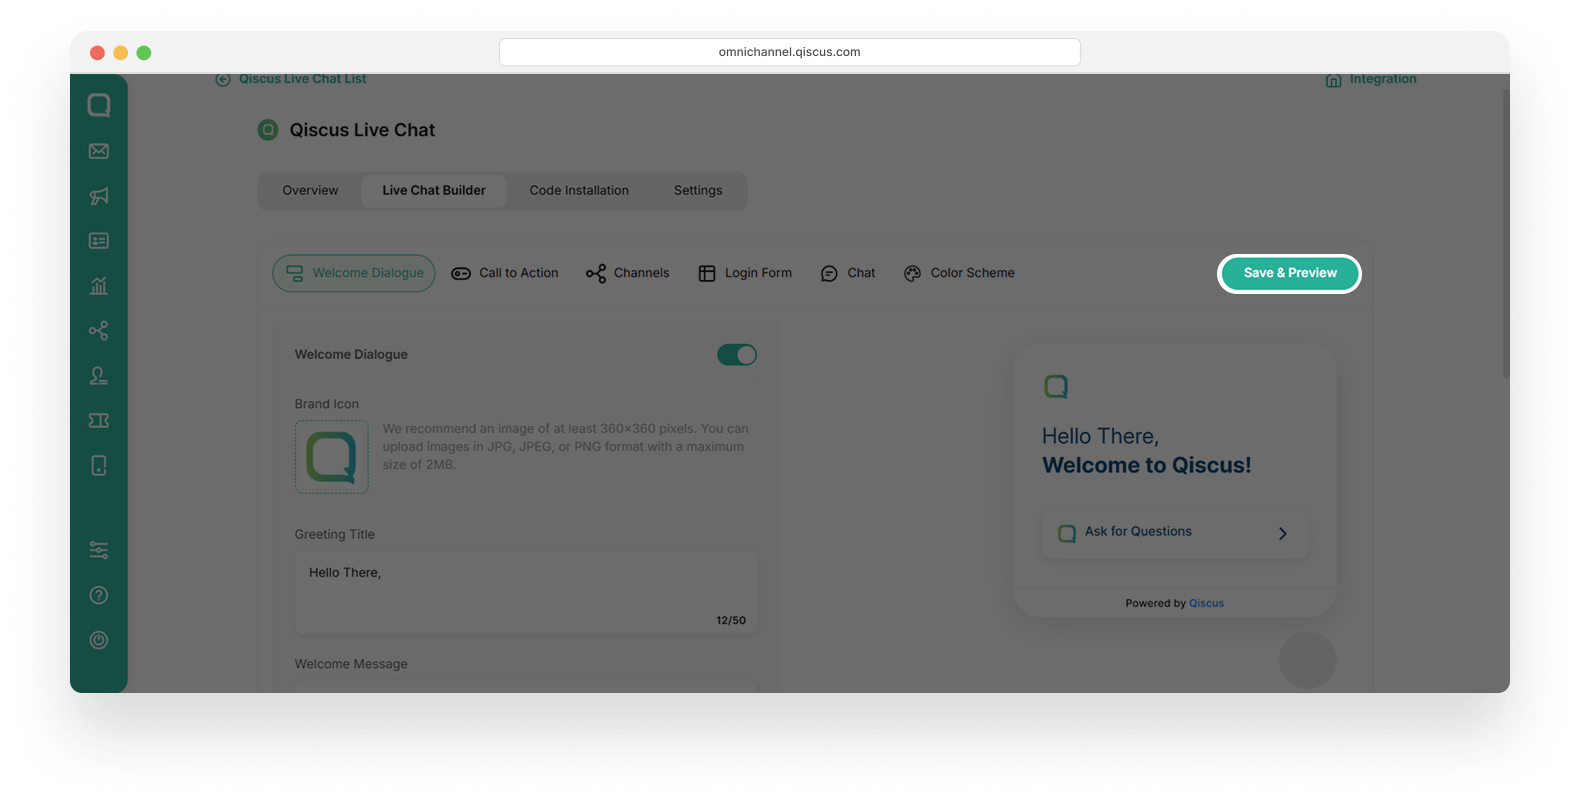
- Click the Live Chat Builder tab, then click Welcome Dialogue.
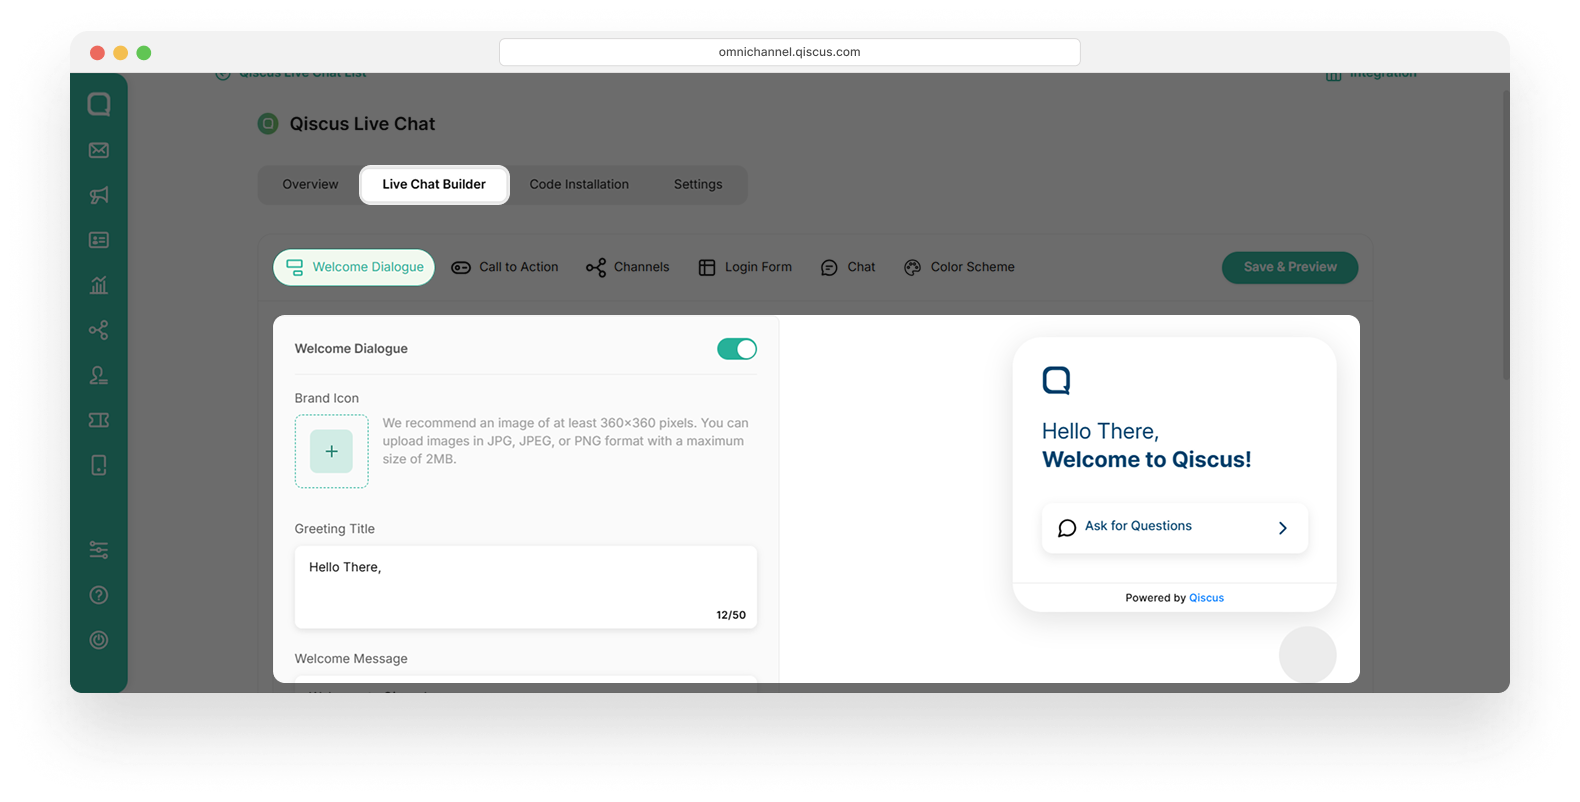
- To complete the live chat setup, fill in the following fields:
- Upload the brand icon (for example, the Qiscus icon). It will appear in the top-left corner of the live chat
- Enter the Greeting Title (for example, “Hello There”)
- Enter the Welcome Message (for example, “Welcome to Qiscus”)
- Upload the icon that will appear in the live chat preview.
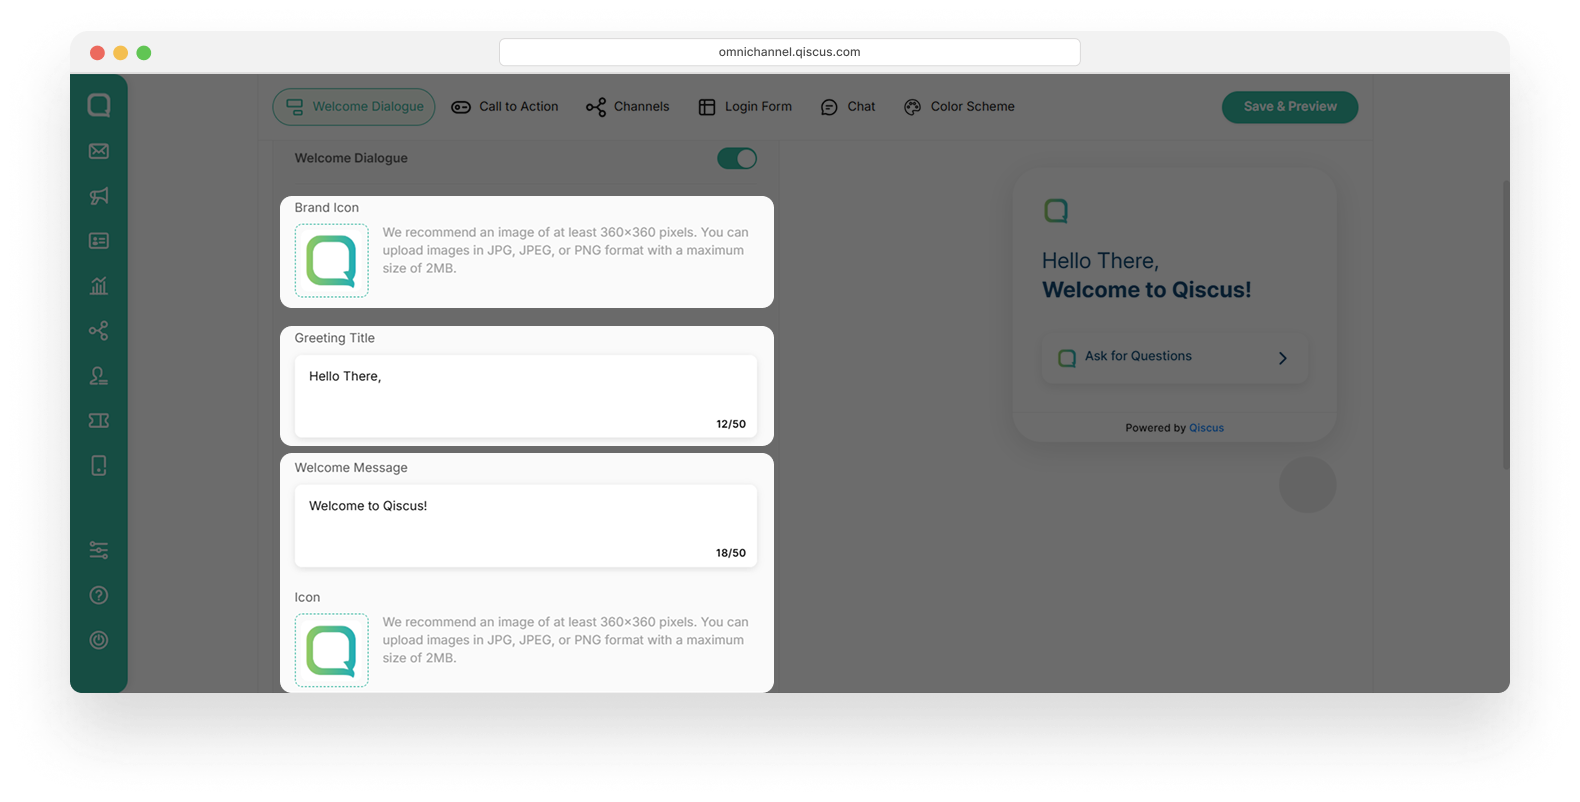
- Enter the Description. This text will appear on the CTA button (for example: "Ask a Question").
- Set the Delay Appear. This setting determines how many seconds it takes before the Qiscus Live Chat appears on the website (for example: 3 seconds).
- Enable Auto Expand by checking the box if you want the welcome dialog to automatically expand on Qiscus Live Chat without requiring users to click it.
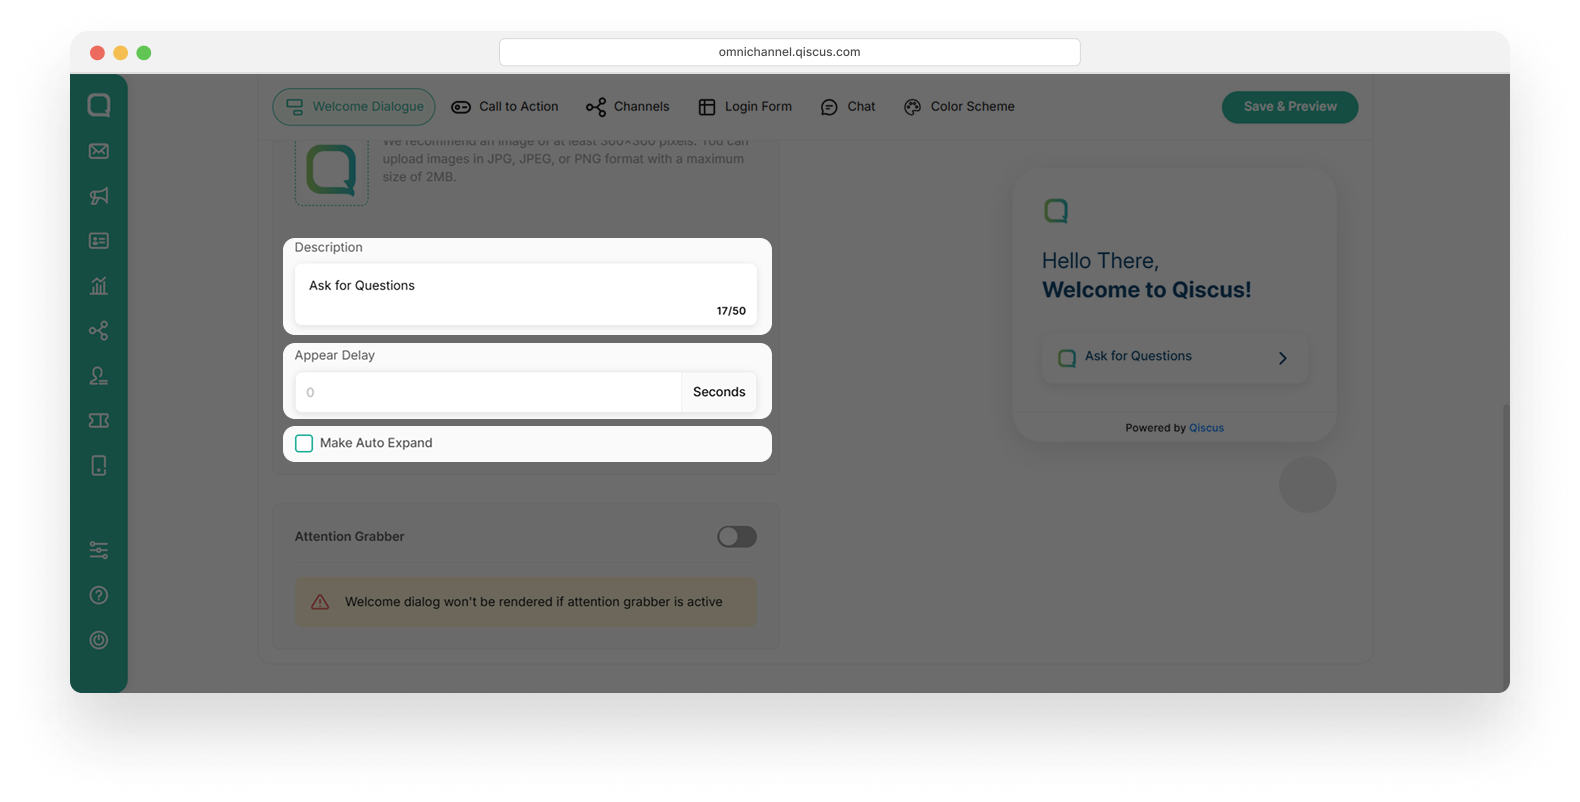
- Attention Grabber
The Attention Grabber is a visual popup message that appears automatically on your website to capture visitors’ attention. It typically includes an image or a short message, such as a promo, update, or greeting and helps increase user engagement by encouraging visitors to open the chat.
If the Attention Grabber is active, the Welcome Dialogue will not be displayed.
Below are the fields that need to be filled in when activating the Attention Grabber:
- Image: You can upload the image for grab attention. If you activate the toggle, the image will appear in the Qiscus Live Chat.
- Text: You can fill it with words to promote a sale or say hello to your new visitors.
- Appear Delay: You can set how many seconds after the page loads the attention grabber should appear. This setting enables precise control over the timing, preventing the popup from appearing too early or too late.
- After you have completed your settings, click the Save and Preview button. Your Qiscus Live Chat setting will be saved and you can see the preview in the right side of page
Call to Action
- To customize the CTA, click the Live Chat Builder tab, then click Call to Action.
- Complete the following fields:
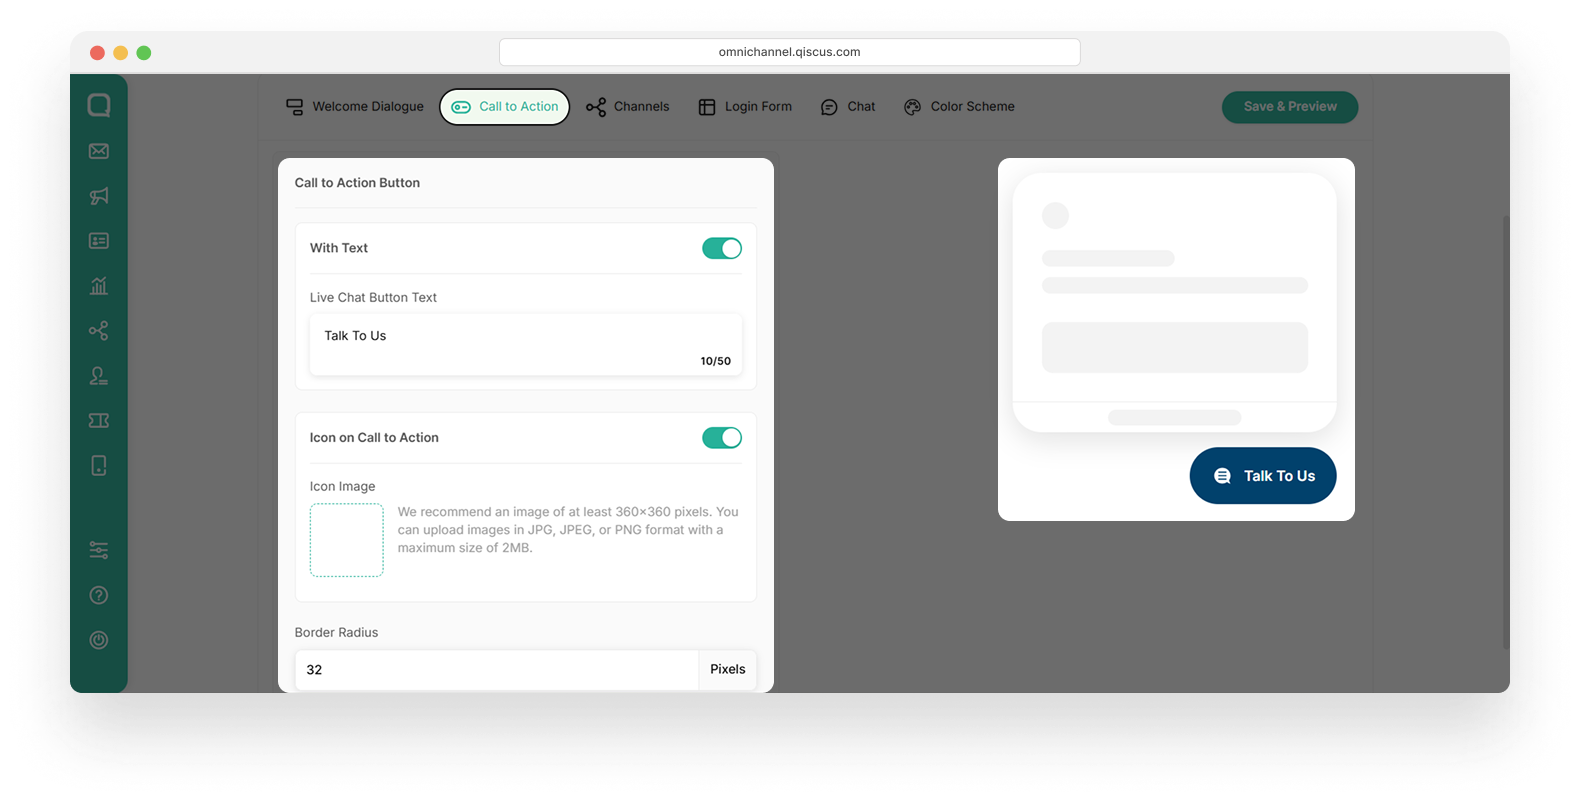
a. With Text
Enable this option to display text on the chat button. When enabled, you can customize the text that appears. For example, typing "Talk to Us" will update the button in the live preview.
b. Icon to Call to Action
Enable this option to add an icon next to the button text. You can then upload a custom image to be used as the icon.
c. Border Radius
This setting adjusts the roundness of the button’s corners.
- A larger value (for example, 32) makes the corners more rounded.
- A smaller value (for example, 0) makes the corners sharp and square.
Channels
- To customize the Channels, click Live Builder Chat tab, then click Channels
- Activate the toggle button
- Complete the following fields:
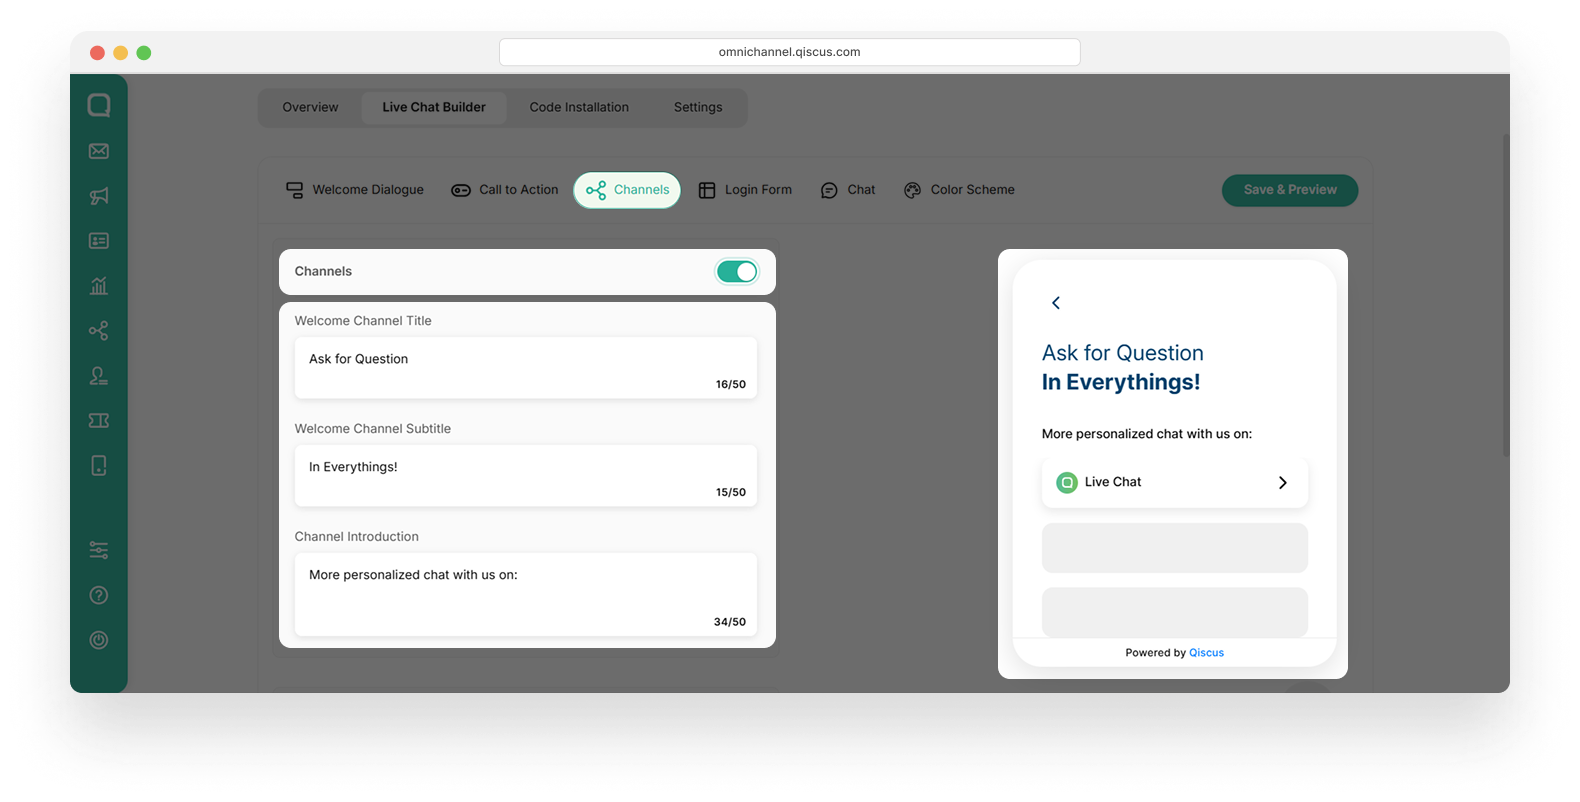
- Welcome Channel Title
Enter the main title of your welcome message (for example: “Ask a Question!”).
- Welcome Channel Subtitle
Enter a short sentence that appears below the title (for example: “In Everything!”).
- Channel Introduction
Enter introduction text that appears before the list of available chat channels. This helps users understand how they can chat with you (for example: “Have a more personalized chat with us on…”).
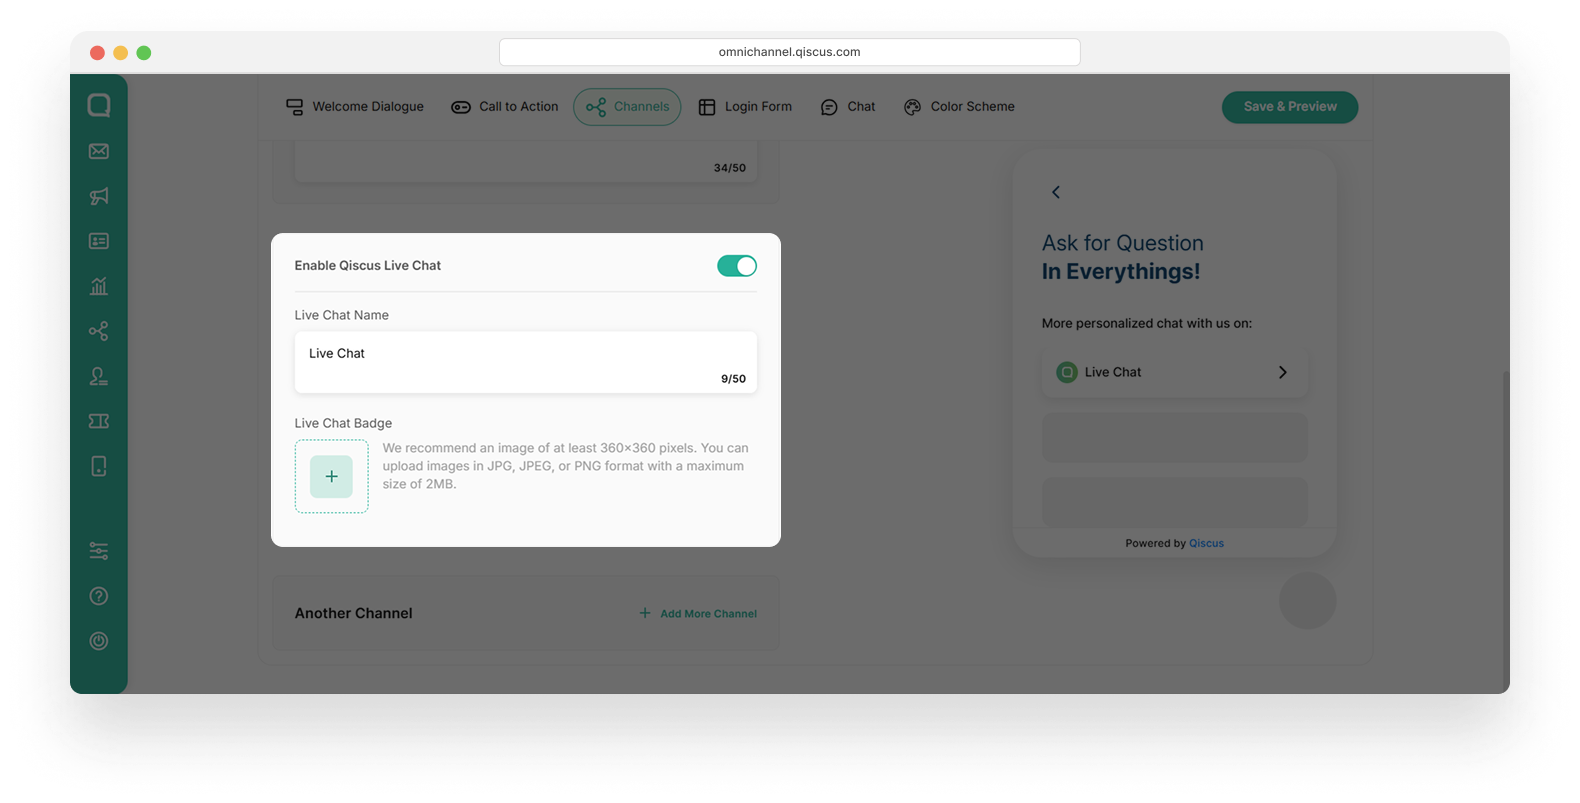
- Enable Qiscus Live Chat
This field includes a toggle button. If the toggle is turned on, the Qiscus Live Chat will be displayed on the screen.
- Live Chat Badge
You can upload a Live Chat Badge to make the chat interface more appealing to users.
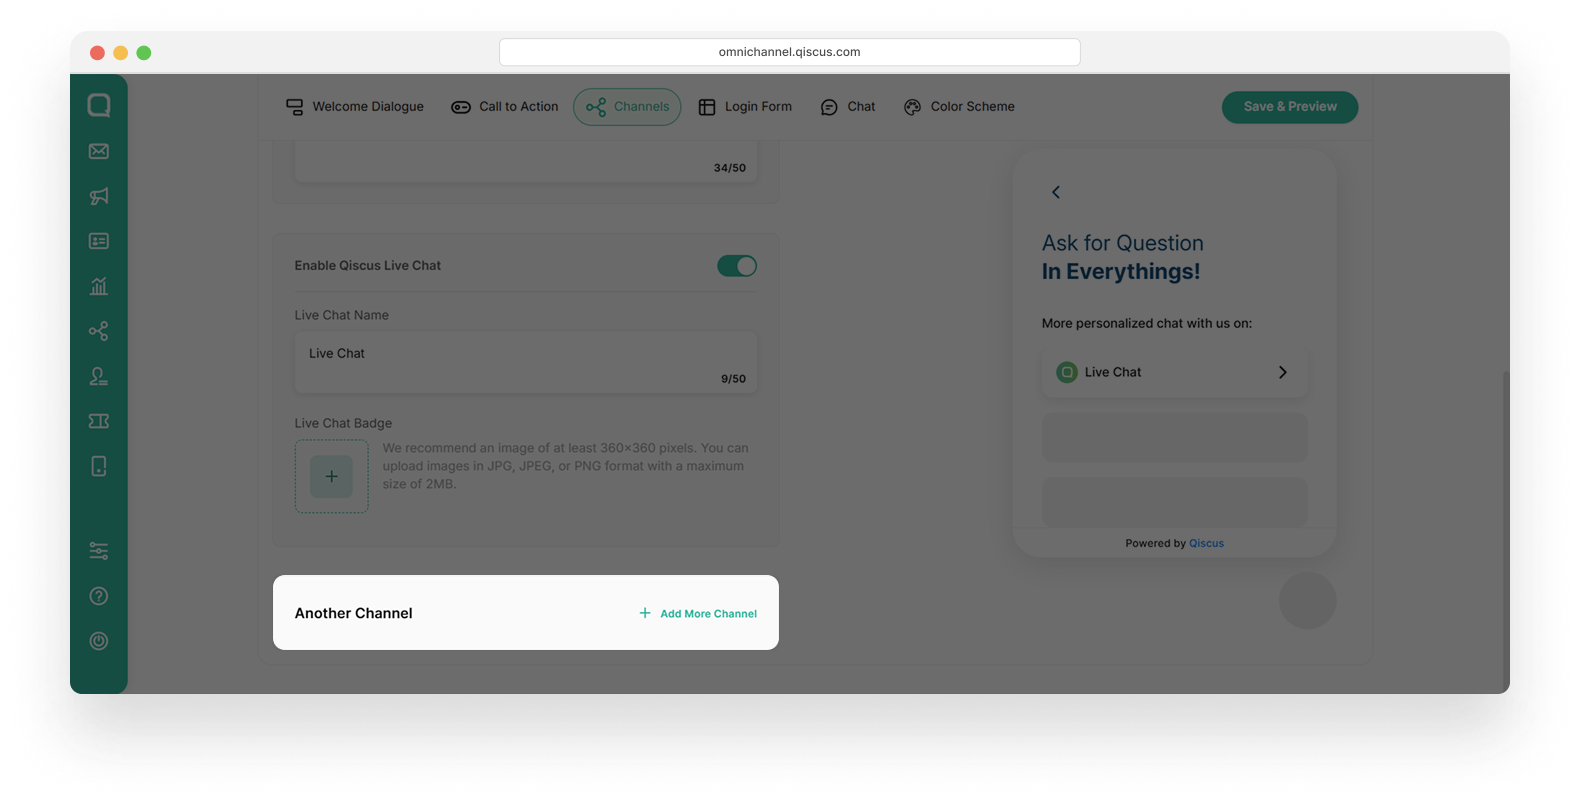
How to Add More Channels
You can add another channel by clicking the +Add More Channel button in the bottom of a page. Such as WhatsApp, Line, Telegram, Instagram, Line and Line Business. You can add up to six channels. If you need more, please contact our team.
Here is the steps on how you add more channels:
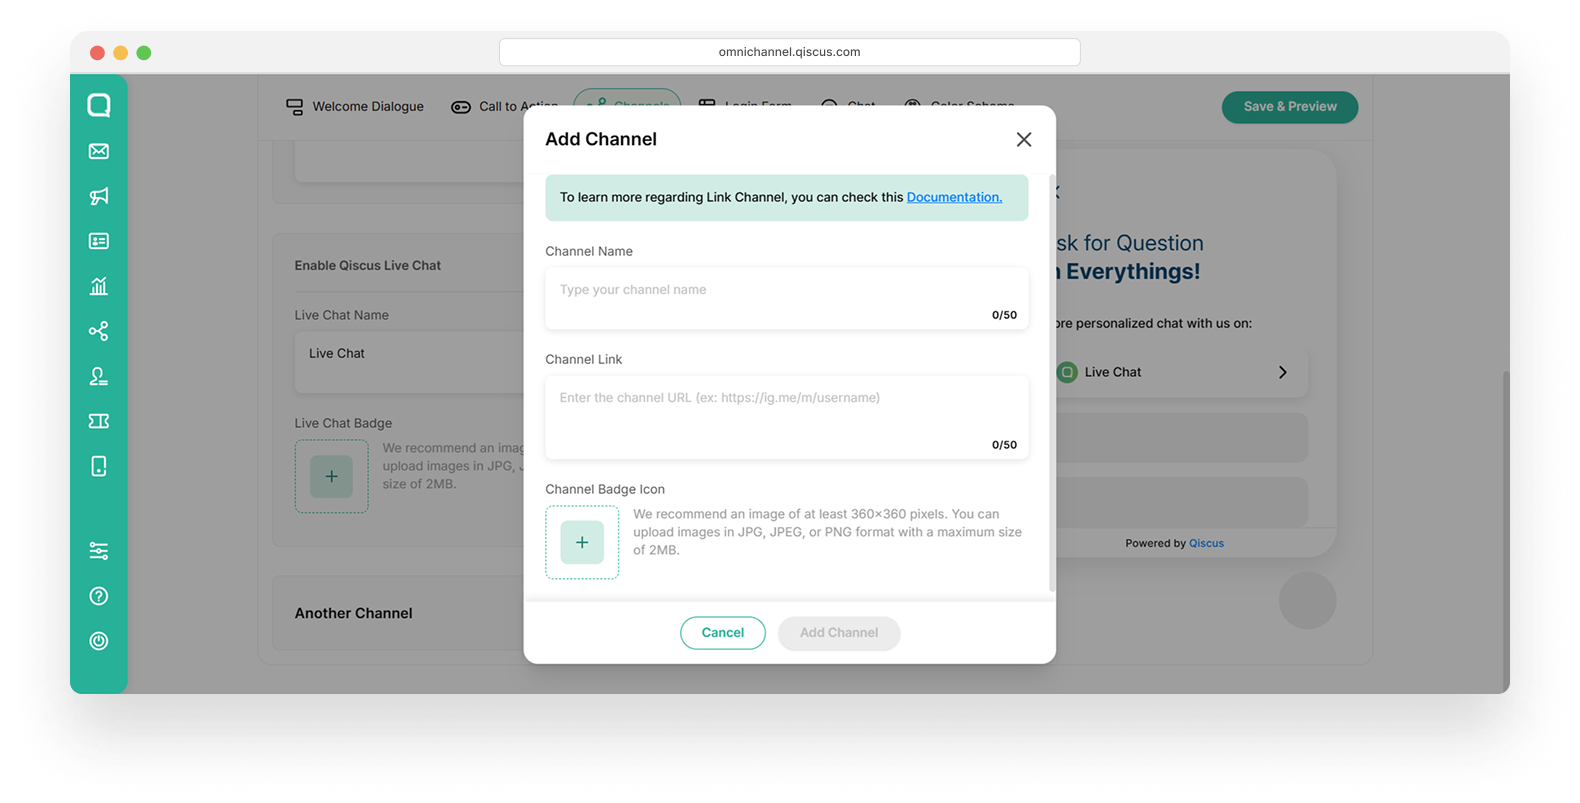
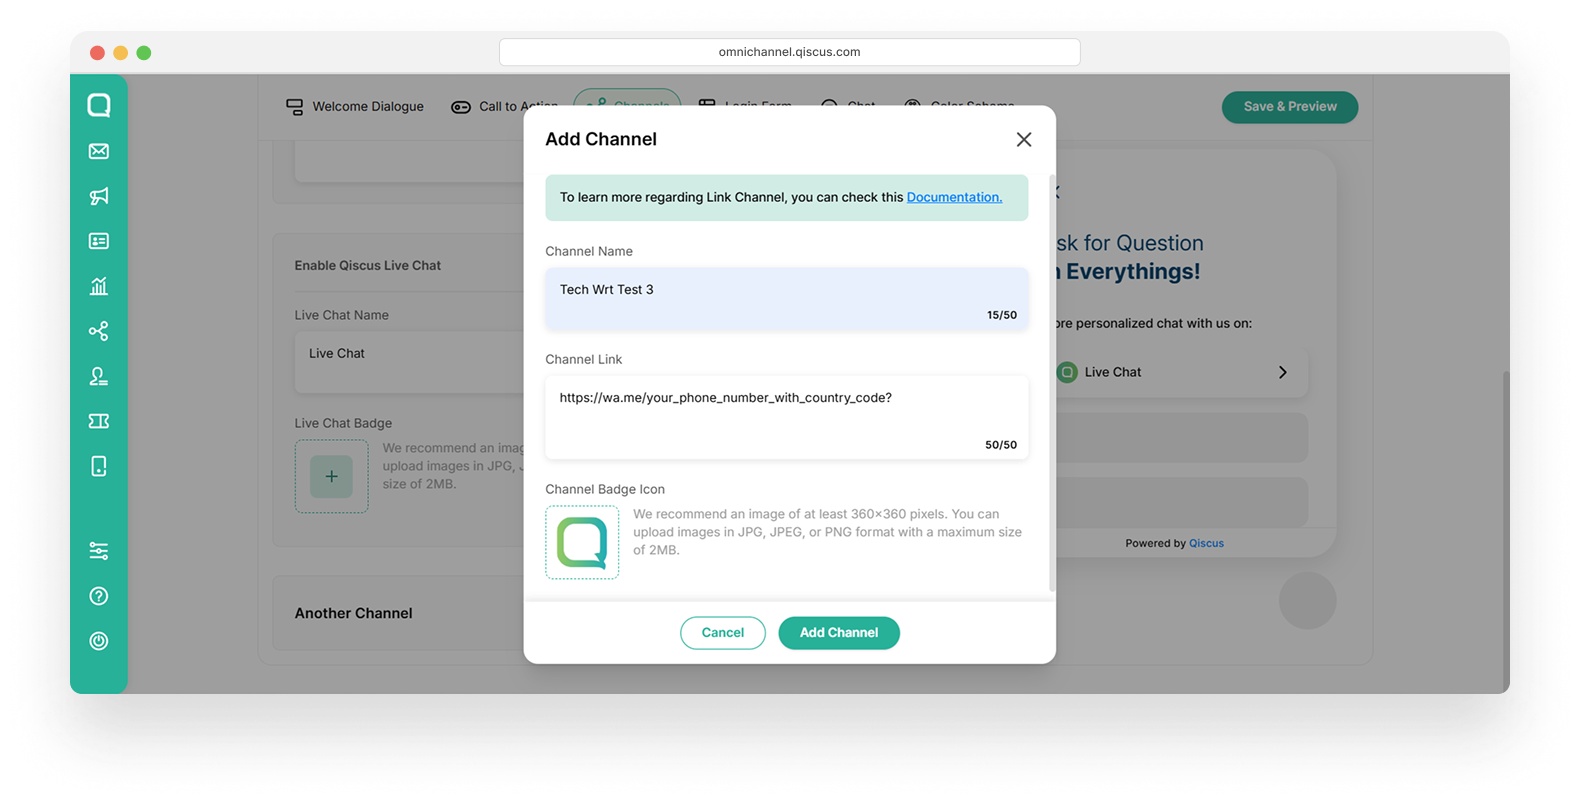
- Click the +Add More Channel button
- A pop up to add Channel Widget will appear. Fill in the channel name and the channel link. In this example, we will add WhatsApp channel.
| Channel | URL | Note |
|---|---|---|
| https://wa.me/your_phone_number_with_country_code?text=Hello+qiscus.com+team%2C+saya+ingin+berdiskusi+lebih+lanjut+mengenai+produk.%20From%20URL:%20https%3A%2F%2Fqiscus.com%2F | You can change the phone number and text as you desire | |
| http://m.me/page | Change page with your page name | |
| https://ig.me/m/username | Change username with your own Instagram's username | |
| LINE Non Business | https://line.me/ti/p/(LINE ID} | Change LINE ID with your own LINE ID |
| Telegram | https://t.me/{bot_name} | Change bot_name with your Telegram bot name |
| Line Business | https://line.me/R/ti/p/@page_id?from=page | You can change the page_id to your LINE bussines ID |
| Line Business | https://page.line.me/page_id | You can change the page_id to your LINE busines ID |
- Upload Channel Name, Channel Link, and Channel Badge. Then click Add Channel button
- Activate the toggle button on the new channel to add it on the Qiscus Live Chat
Login Form
- To customize the Login Form, click Live Chat Builder Live tab, then click Login Form
- Complete the following fields:
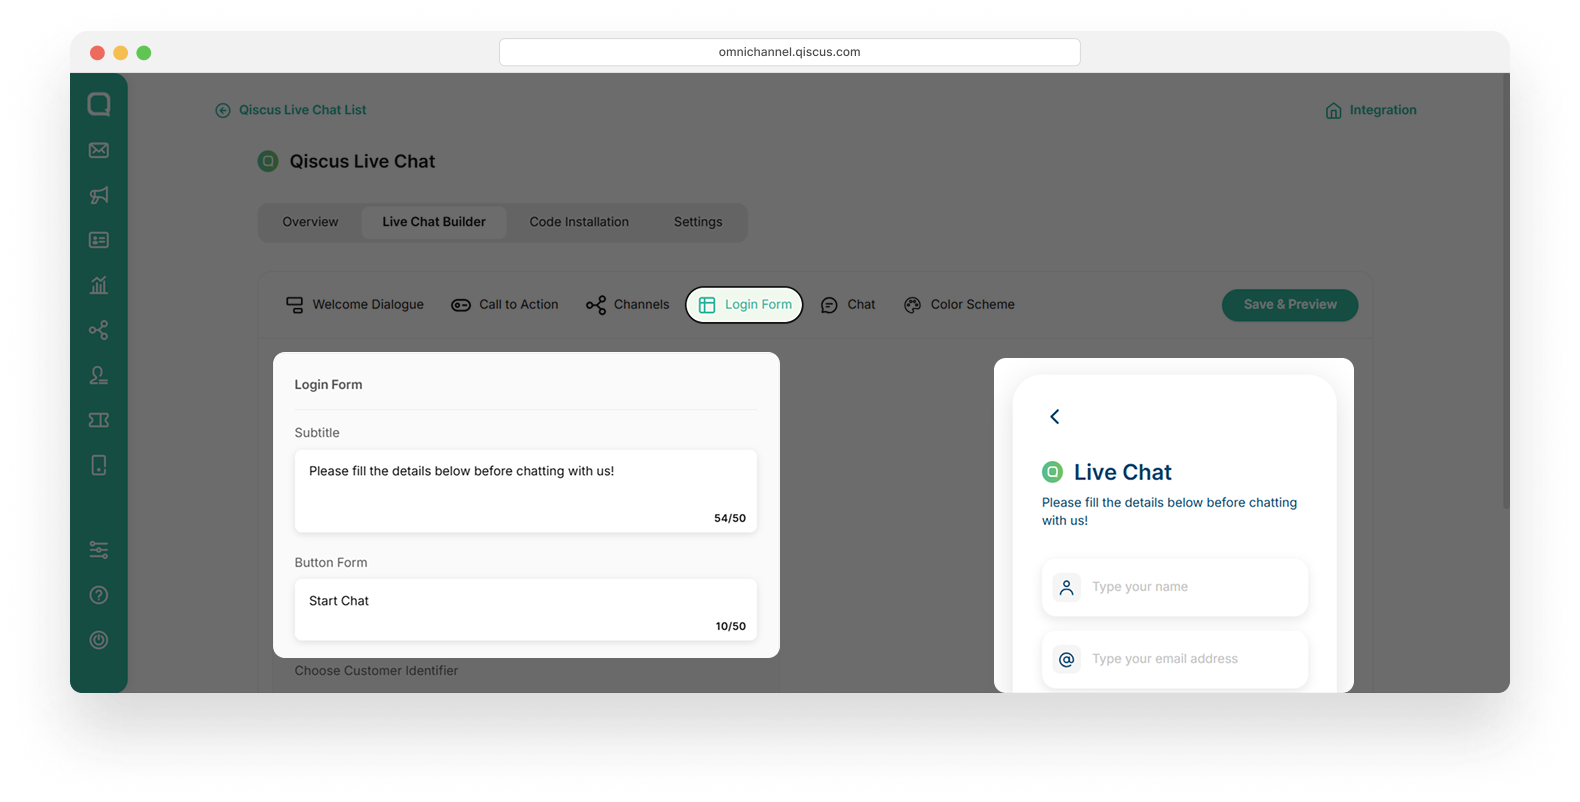
- Subtitle
Enter a custom message to display to users before they begin a chat (for example: “Please fill in the details below before chatting with us!”).
- Button form
Enter the text that appears on the button a user clicks to start the chat (for example: “Start Chat”)
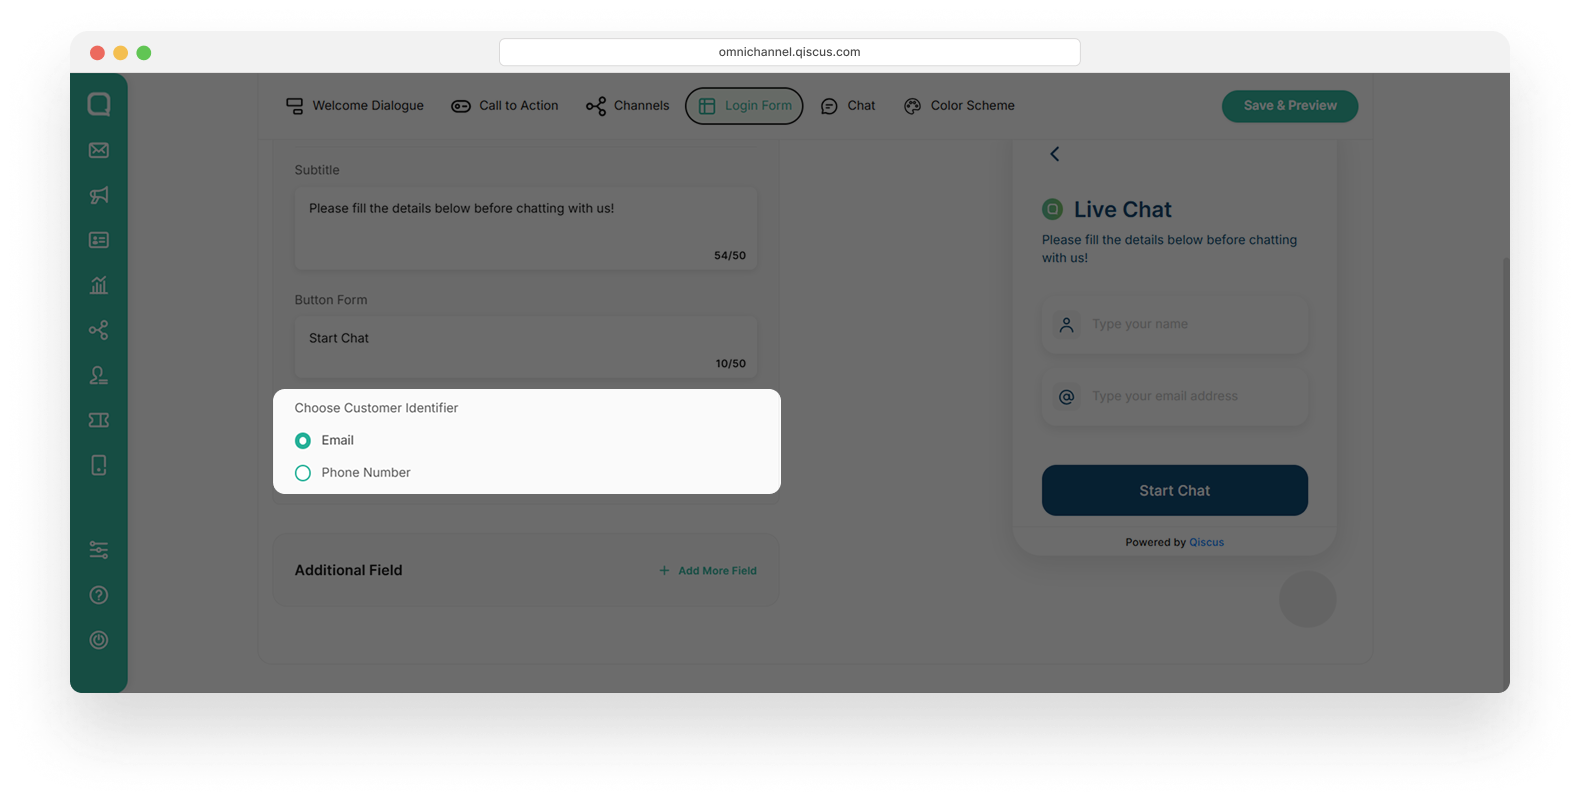
- Choose Customer Identifier
Choose how you want to identify users. You can select one of the following options:
- Email: The user will be prompted to enter their email address.
- Phone Number: The user will be prompted to enter their phone number.
- Additional field:
This feature allows you to add custom fields to the login form. Clicking the + Add More Field button lets you collect additional information from users, such as their name, company, or a specific question before the chat begins.
Chat
- To customize the Login Form, click Live Chat Builder Live tab, then click Chat
- Upload the Customer Service avatar and enter the Customer Service name as shown in the picture below:
Color Scheme
For changing the color scheme, you just need to click the color box and swipe it until you find the valid color for your brand.
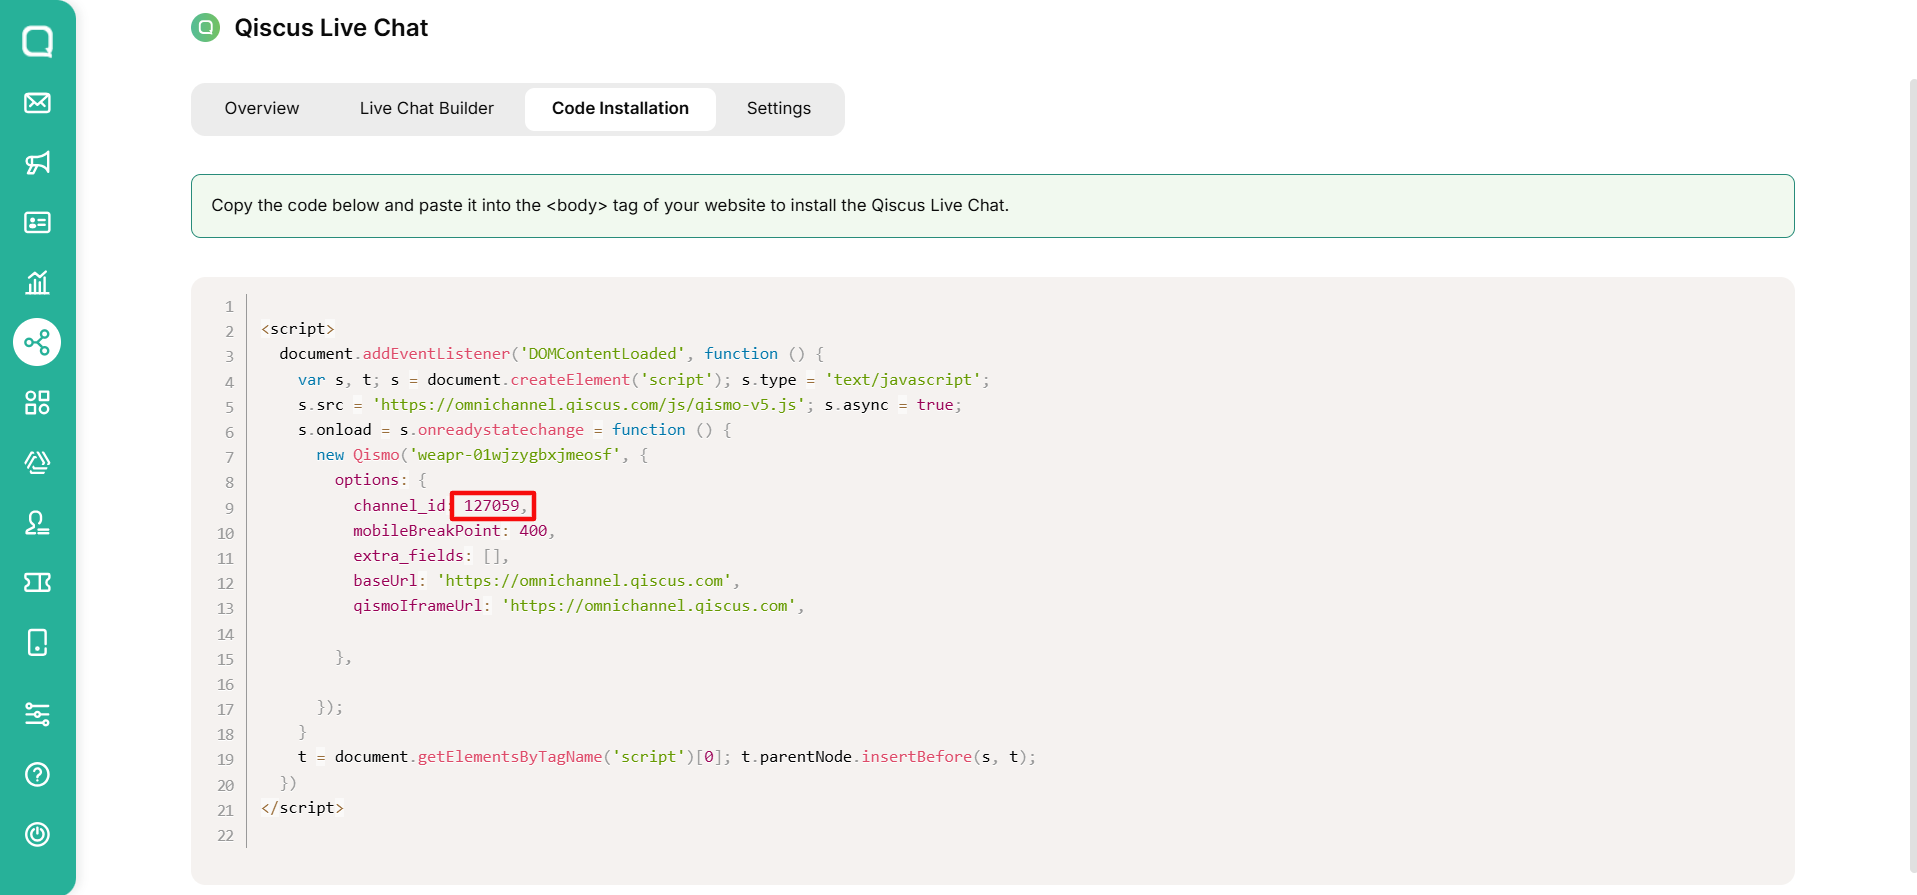
Add Code Installation to Your Website
The primary function of the Code Installation tab is to provide users with the necessary code snippet to embed Qiscus Live Chat into a website. To add your customized Qiscus Live Chat to your website, follow these steps:
- Click Code Installation tab

- Hover over the code, then click the Copy Code button
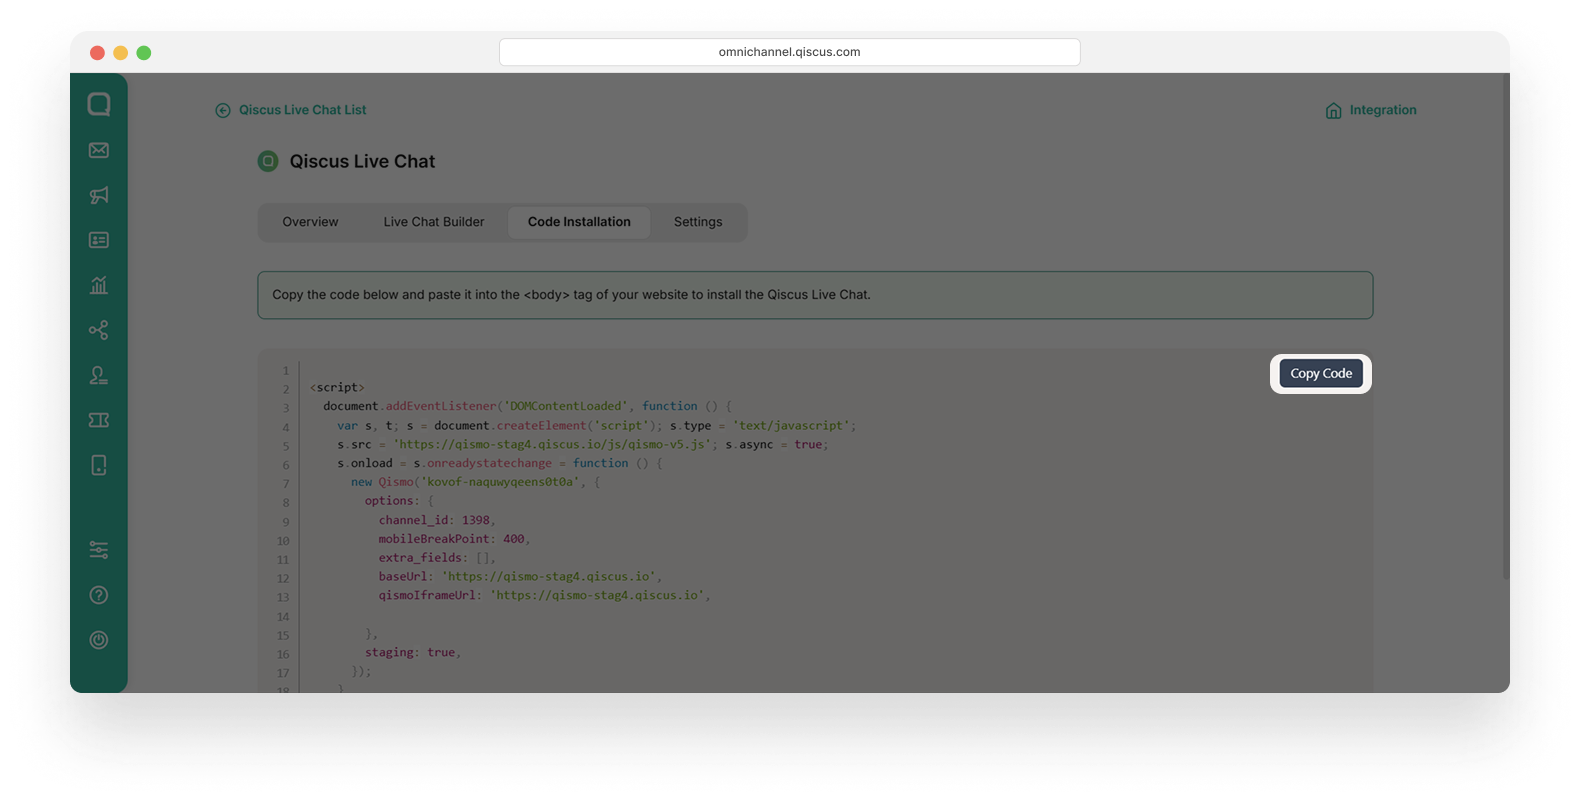
- Paste the code into the
<body>tag of your website to install Qiscus Live Chat. Below is an example showing Qiscus Live Chat appearing after the code is pasted into the<body>tag of a website.
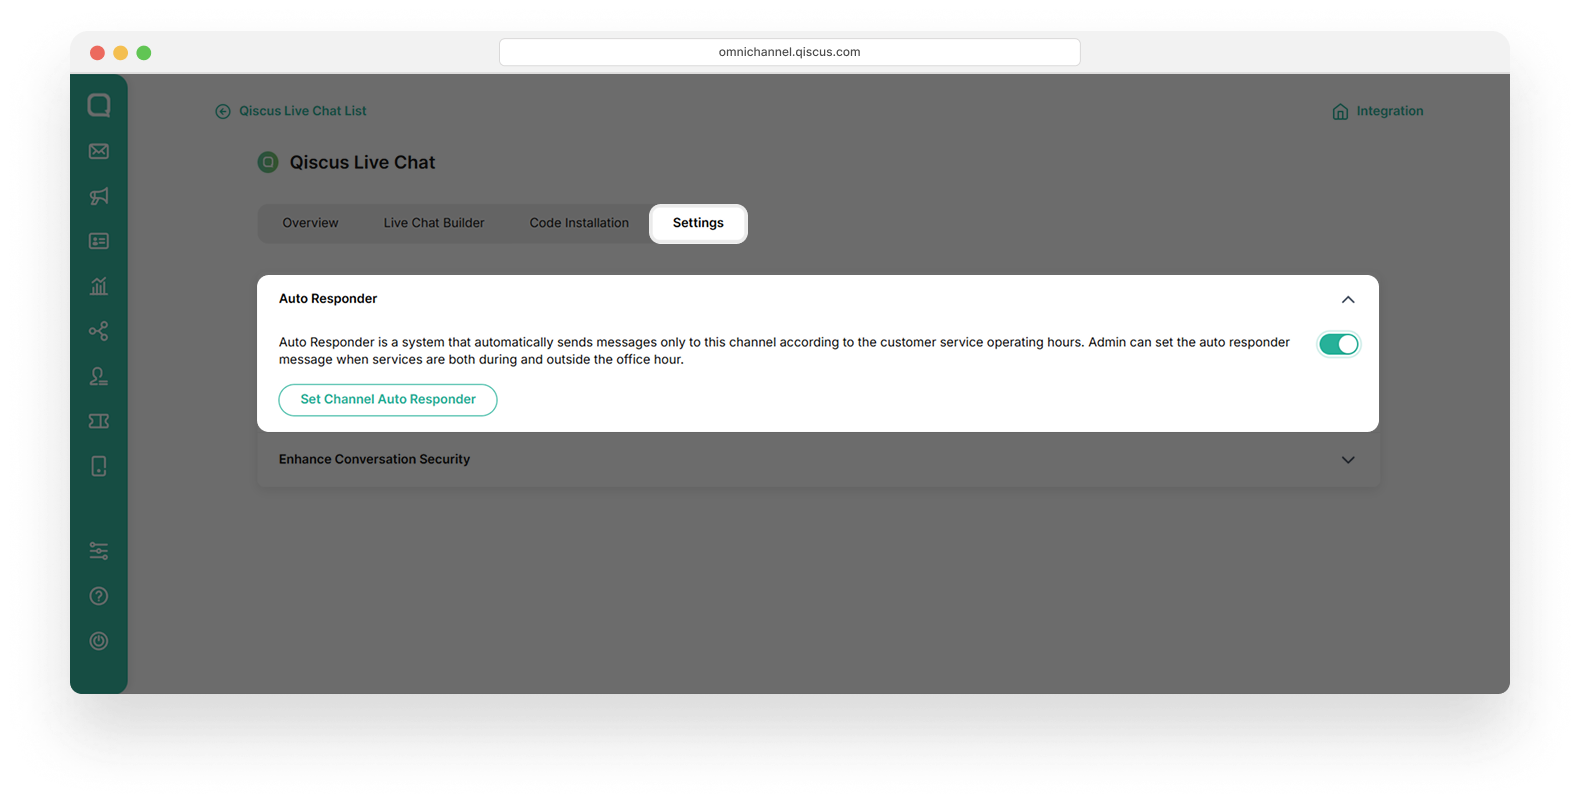
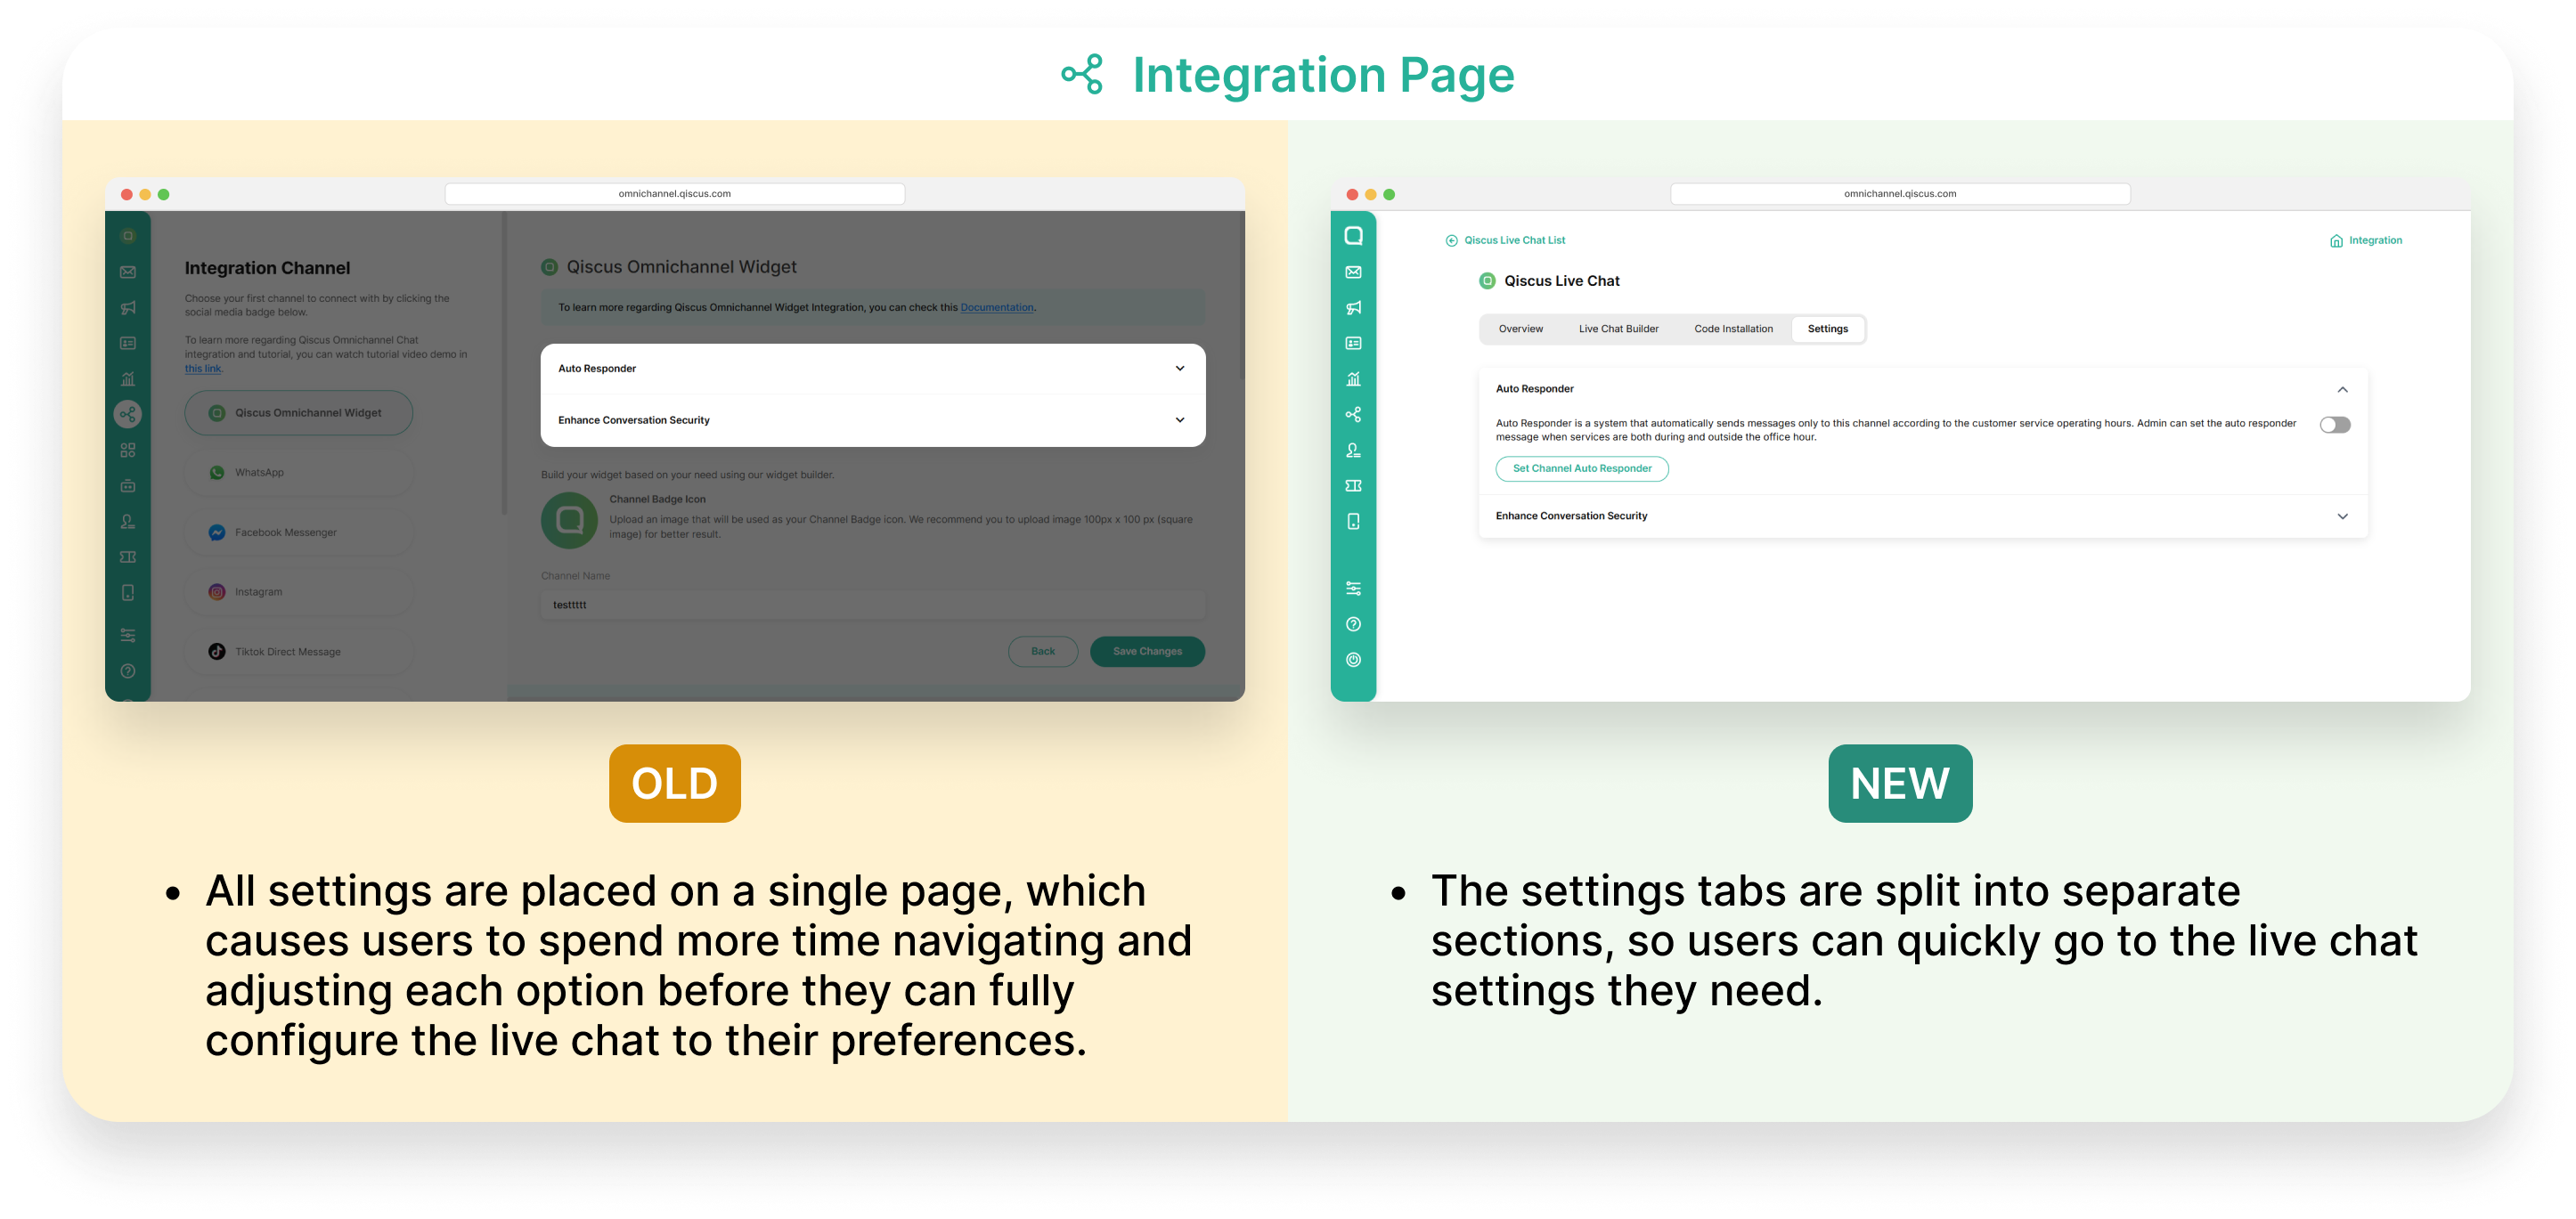
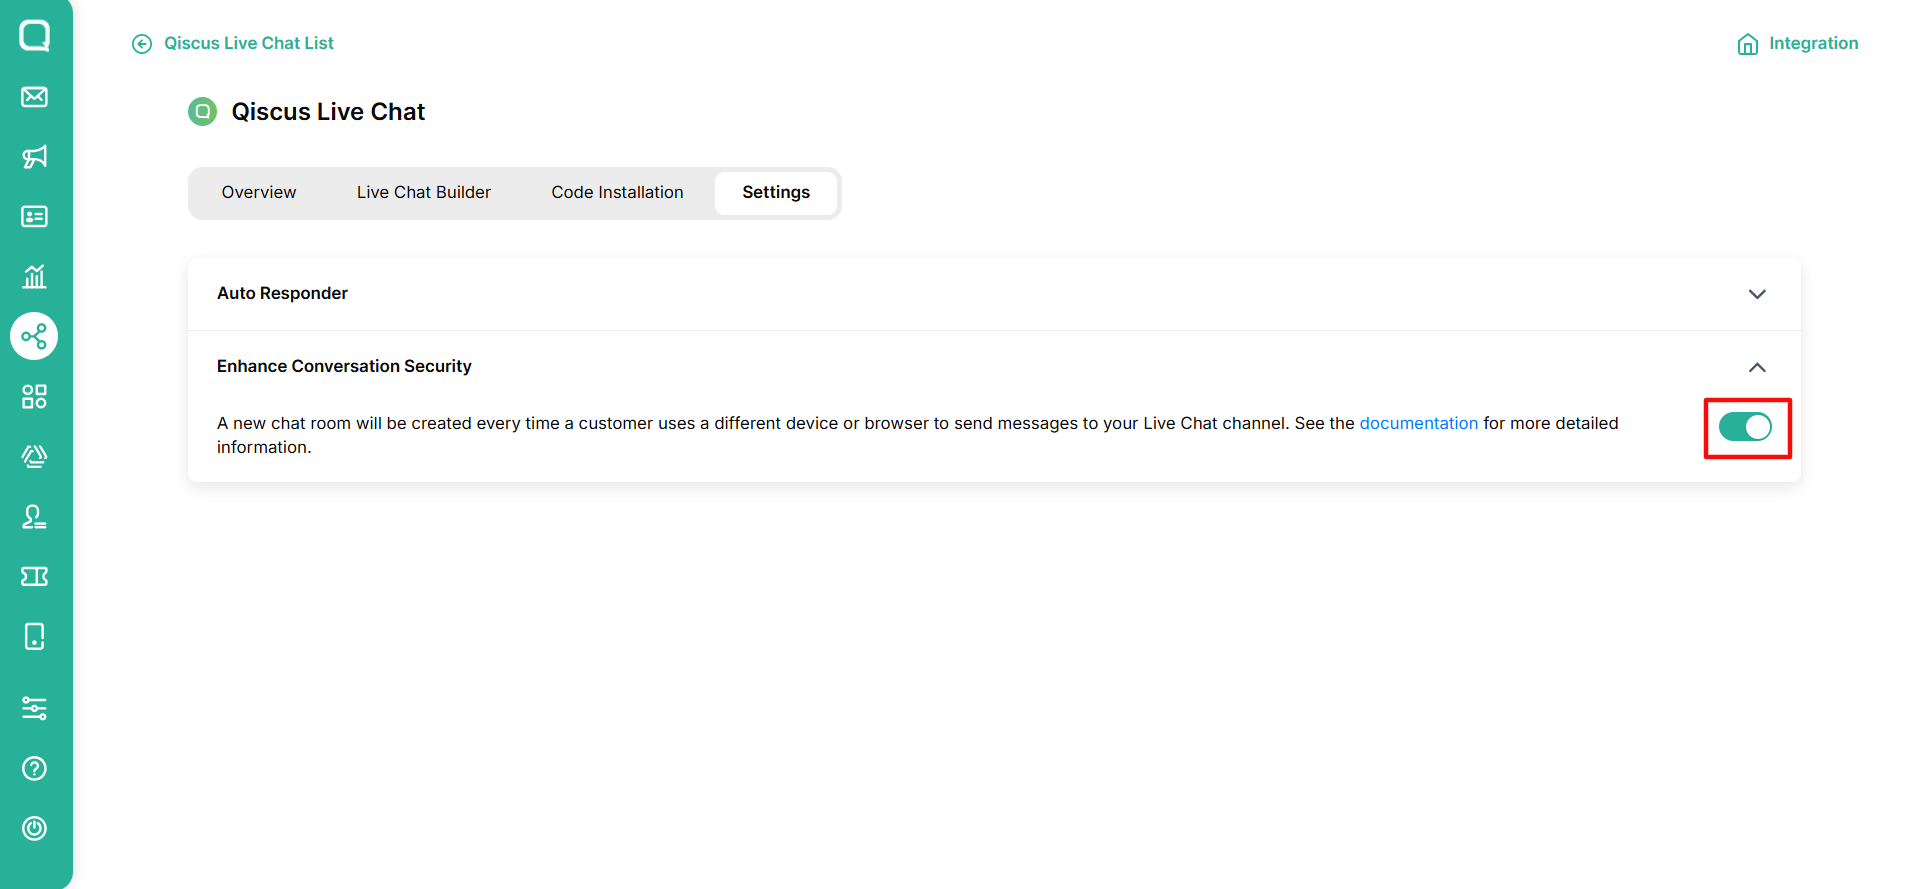
Settings
This feature has two settings: Channel Auto Responder and Enhance Conversation Security. For more details, see the next section.
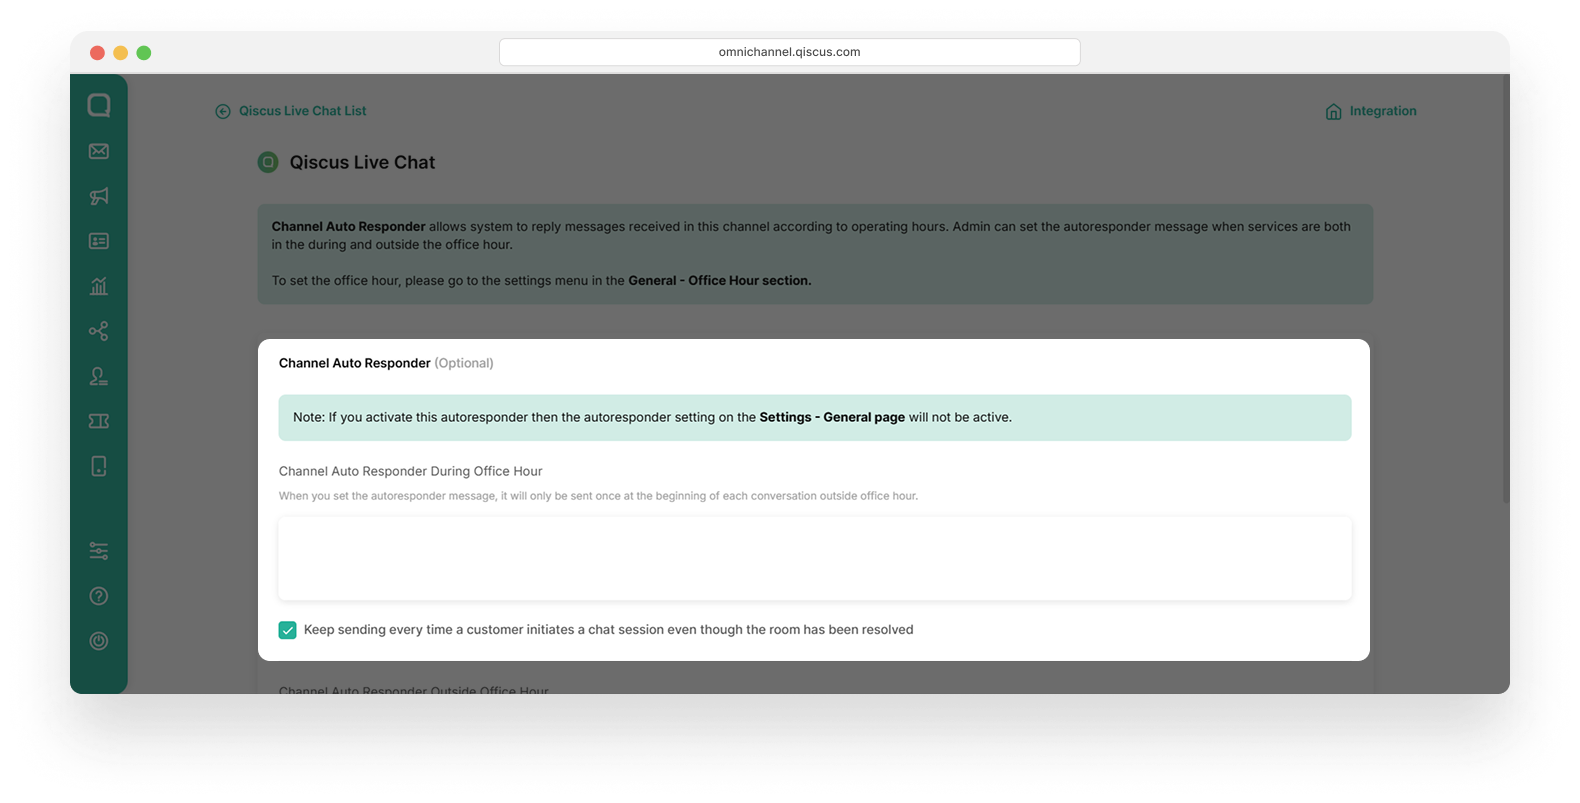
Channel Auto Responder
The Channel Auto Responder feature allows Qiscus Live Chat to automatically reply to messages received in the channel based on your operating hours. Admins can set autoresponder messages for both during and outside office hours. To configure office hours, go to Settings > General > Office Hour.
For setting the channel auto responder, follow these steps:
- Click Settings tab, enable the toggle button, then click Set Channel Auto Responder button

- Fill the message in Channel Auto Responder During Office Hour field. This message will be automatically sent to customers during working hours when they initiate a chat.
Info: Select the Keep sending every time a customer initiates a chat session, even if the room has been resolved checkbox if you want the message to be sent again each time the customer starts a new session, even in the same room.
- Fill the message in Channel Auto Responder Outside Office Hour field. This message will be automatically sent to customers outside working hours. Use this field to inform customers that you are currently offline and will respond once you are back online.
Select the Send every time a customer sends a message checkbox if you want the message to be sent for every incoming customer message received outside office hours.
- After all fields are filled, click the Save Changes button at the bottom of the page.
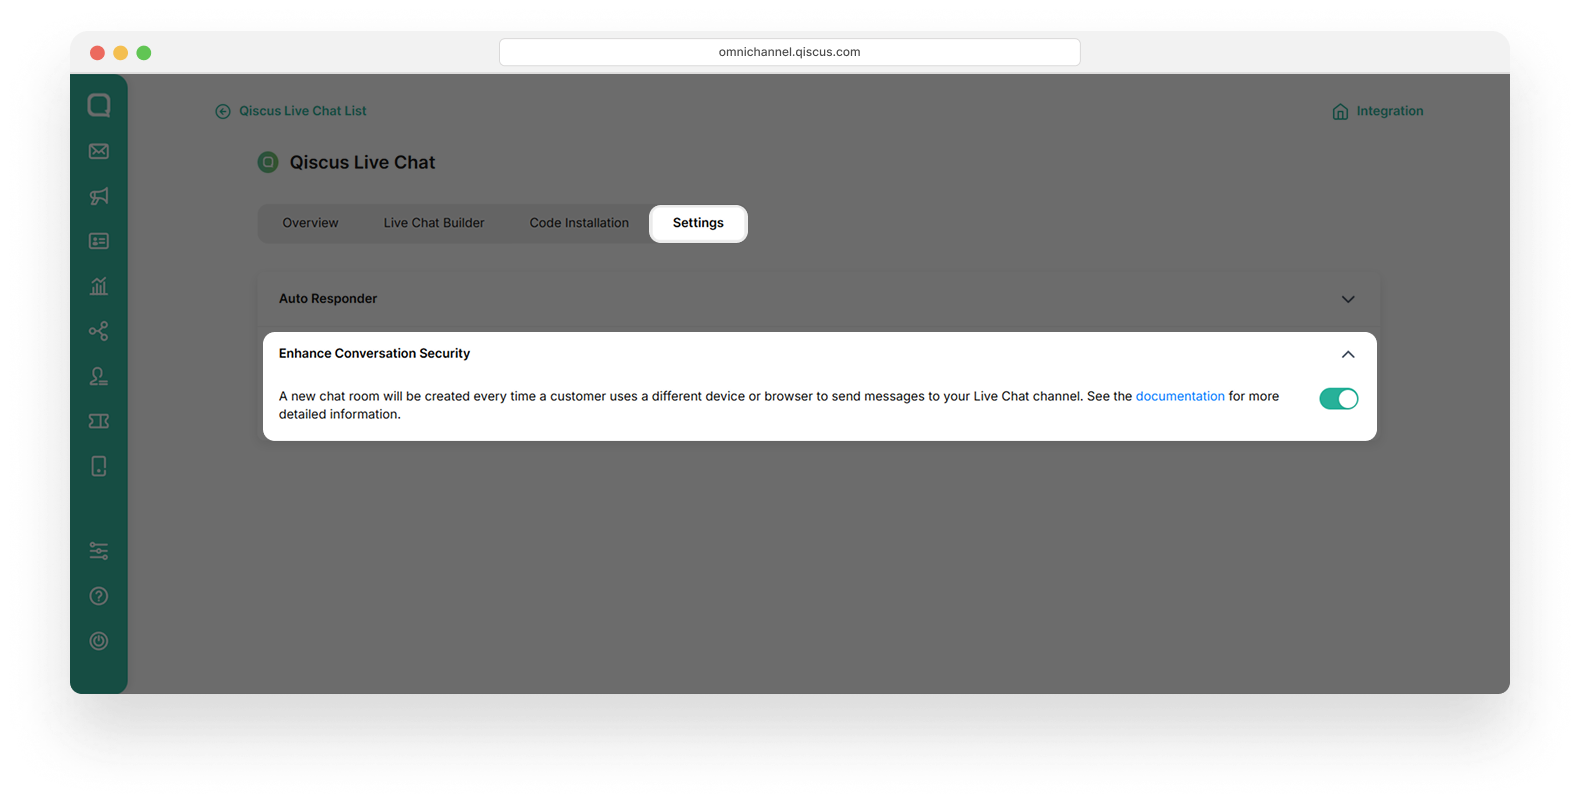
Enhance Conversation Security
This feature creates a new, unique chat room for a customer each time they start a chat from a different device or web browser.
When this toggle is enabled, the system ensures that if a customer initiates a chat on their phone and later uses their laptop, they will not see any previous conversation. This helps enhance security by preventing unauthorized access to past chat history, especially in situations where a device or browser is shared. Essentially, each chat session is isolated to the specific device and browser from which it originated.
How to Upgrade to the New Version
Enjoy full control with the new Live Chat. Customize it easily on your website and give visitors the perfect experience. Upgrading is a one-way step, but it’s a step forward.
Here is the comparison between old version and new version of Qiscus Live Chat:
- Builder
- Integration Page
- Channel

If you don’t update, you won’t be able to customize your Live Chat. Once you upgrade, you won’t be able to switch back to the old version.
If you want to update your live chat to the new version, follow these steps:
- Choose your Live Chat that you want to upgrade.
- Mark the “Yes, I’m ready to switch to the new Live Chat version” checkbox.

- Then click Update button.
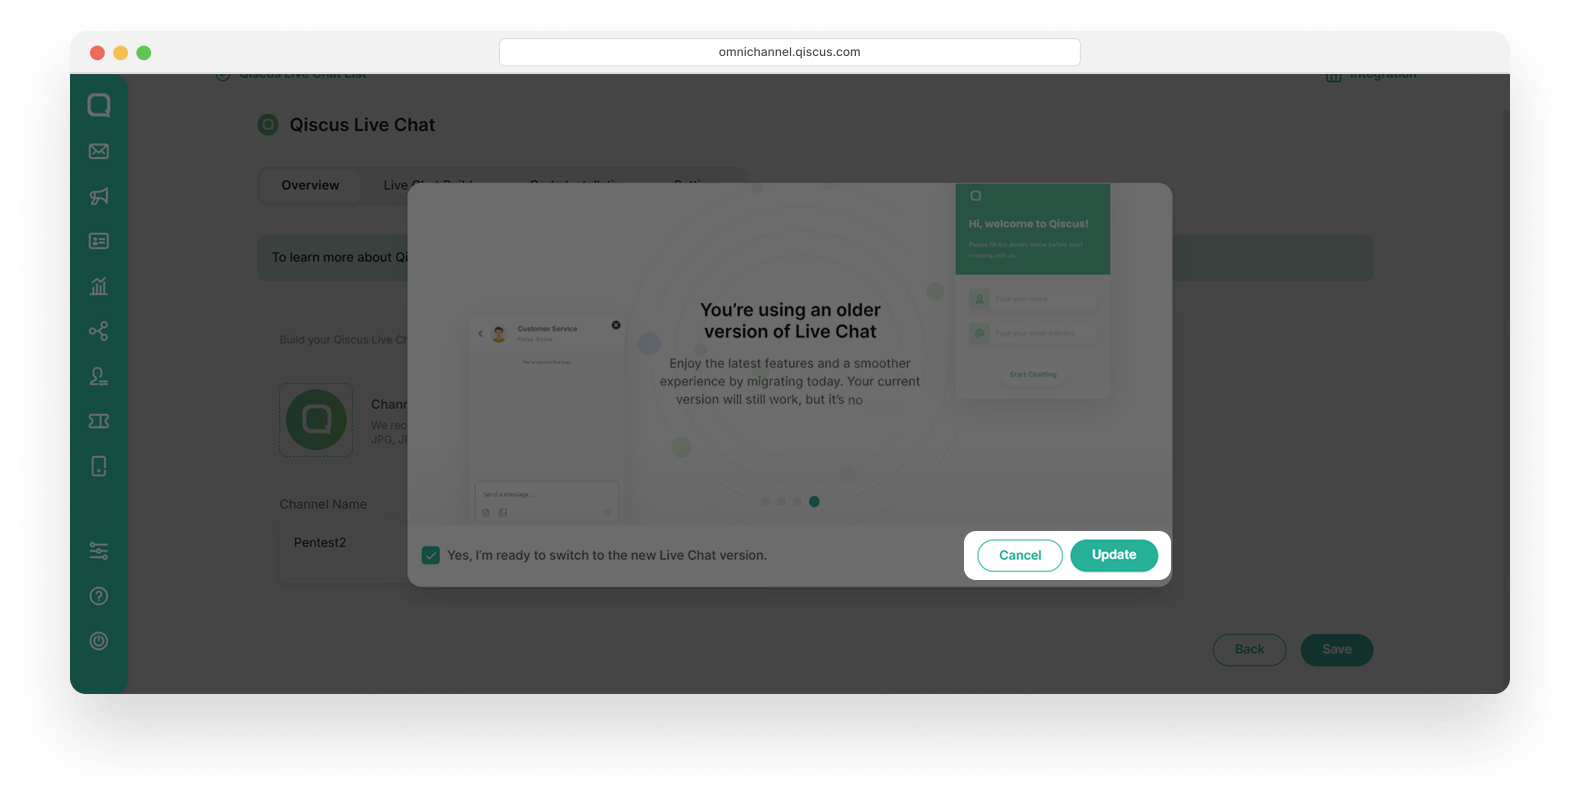
- You are now experiencing new version of a Qiscus Live Chat.
Android in-app Widget
Requirements
- Android Studio v4.1.3 or latest
- Min SDK 16
- Java 8
- Kotlin v1.3.50
Installation
Add this URL reference in your project build.gradle
xxxxxxxxxxallprojects { repositories { google() jcenter() maven { url "https://artifactory.qiscus.com/artifactory/qiscus-library-open-source" } }Then add this to your app build.gradle
xxxxxxxxxxdependencies { ... implementation 'com.qiscus.multichannel:multichannel-widget:2.1.2'}How To Use
- Initialization
In order to use QiscusMultichannelWidget, you need to initialize it with your AppID (YOUR_APP_ID). Get more information to get AppID from here
xxxxxxxxxxclass SampleApp : Application() { lateinit var qiscusMultichannelWidget: QiscusMultichannelWidget override fun onCreate() { super.onCreate() val qiscusCore = QiscusCore() qiscusMultichannelWidget = QiscusMultichannelWidget.setup(this, qiscusCore, "YOUR_APP_ID", "LOCALPREFKEY") ...LOCALPREFKEY : local data identifier
After the initialization, you can access all the widget's functions.
- Set The User
Set UserId before start the chat, this is mandatory.
qiscusMultichannelWidget.setUser(id: "UserId", displayName: "Cus Tom R", avatarUrl: "https://customer.avatar-url.com (https://customer.avatar-url.com/)")If you want to set user properties, you can set them using this function, for example:
xxxxxxxxxxval userProperties = mapOf("city" to "jogja", "job" to "developer")qiscusMultichannelWidget.setUser("user_id", "display_name", "avatar_url", userProperties)- Get Login Status
You can check whether the user has already logged in.
xxxxxxxxxxqiscusMultichannelWidget.isLoggedIn()- Start Chat
Use this function to start a chat.
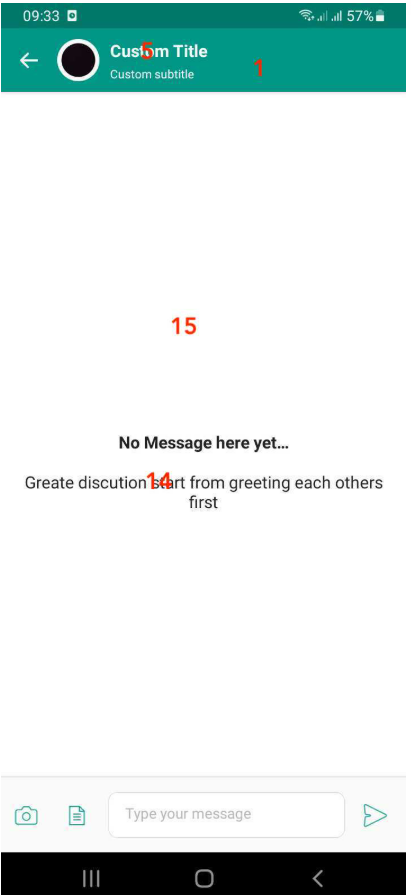
xxxxxxxxxxqiscusMultichannelWidget.initiateChat() .setRoomTitle("Custom Title") .setRoomSubtitle( QiscusMultichannelWidgetConfig.RoomSubtitle.EDITABLE, "Custom subtitle" ) .startChat(Context)| Title | Description |
|---|---|
| showLoadingWhenInitiate (Boolean) | set true if you want to show Qiscus Omnichannel Widget default loading |
| initiateAndOpenChatRoom | method to initiate chat and open Qiscus Omnichanel Widget Chat Room Activity |
Use this method to configure the widget properties.
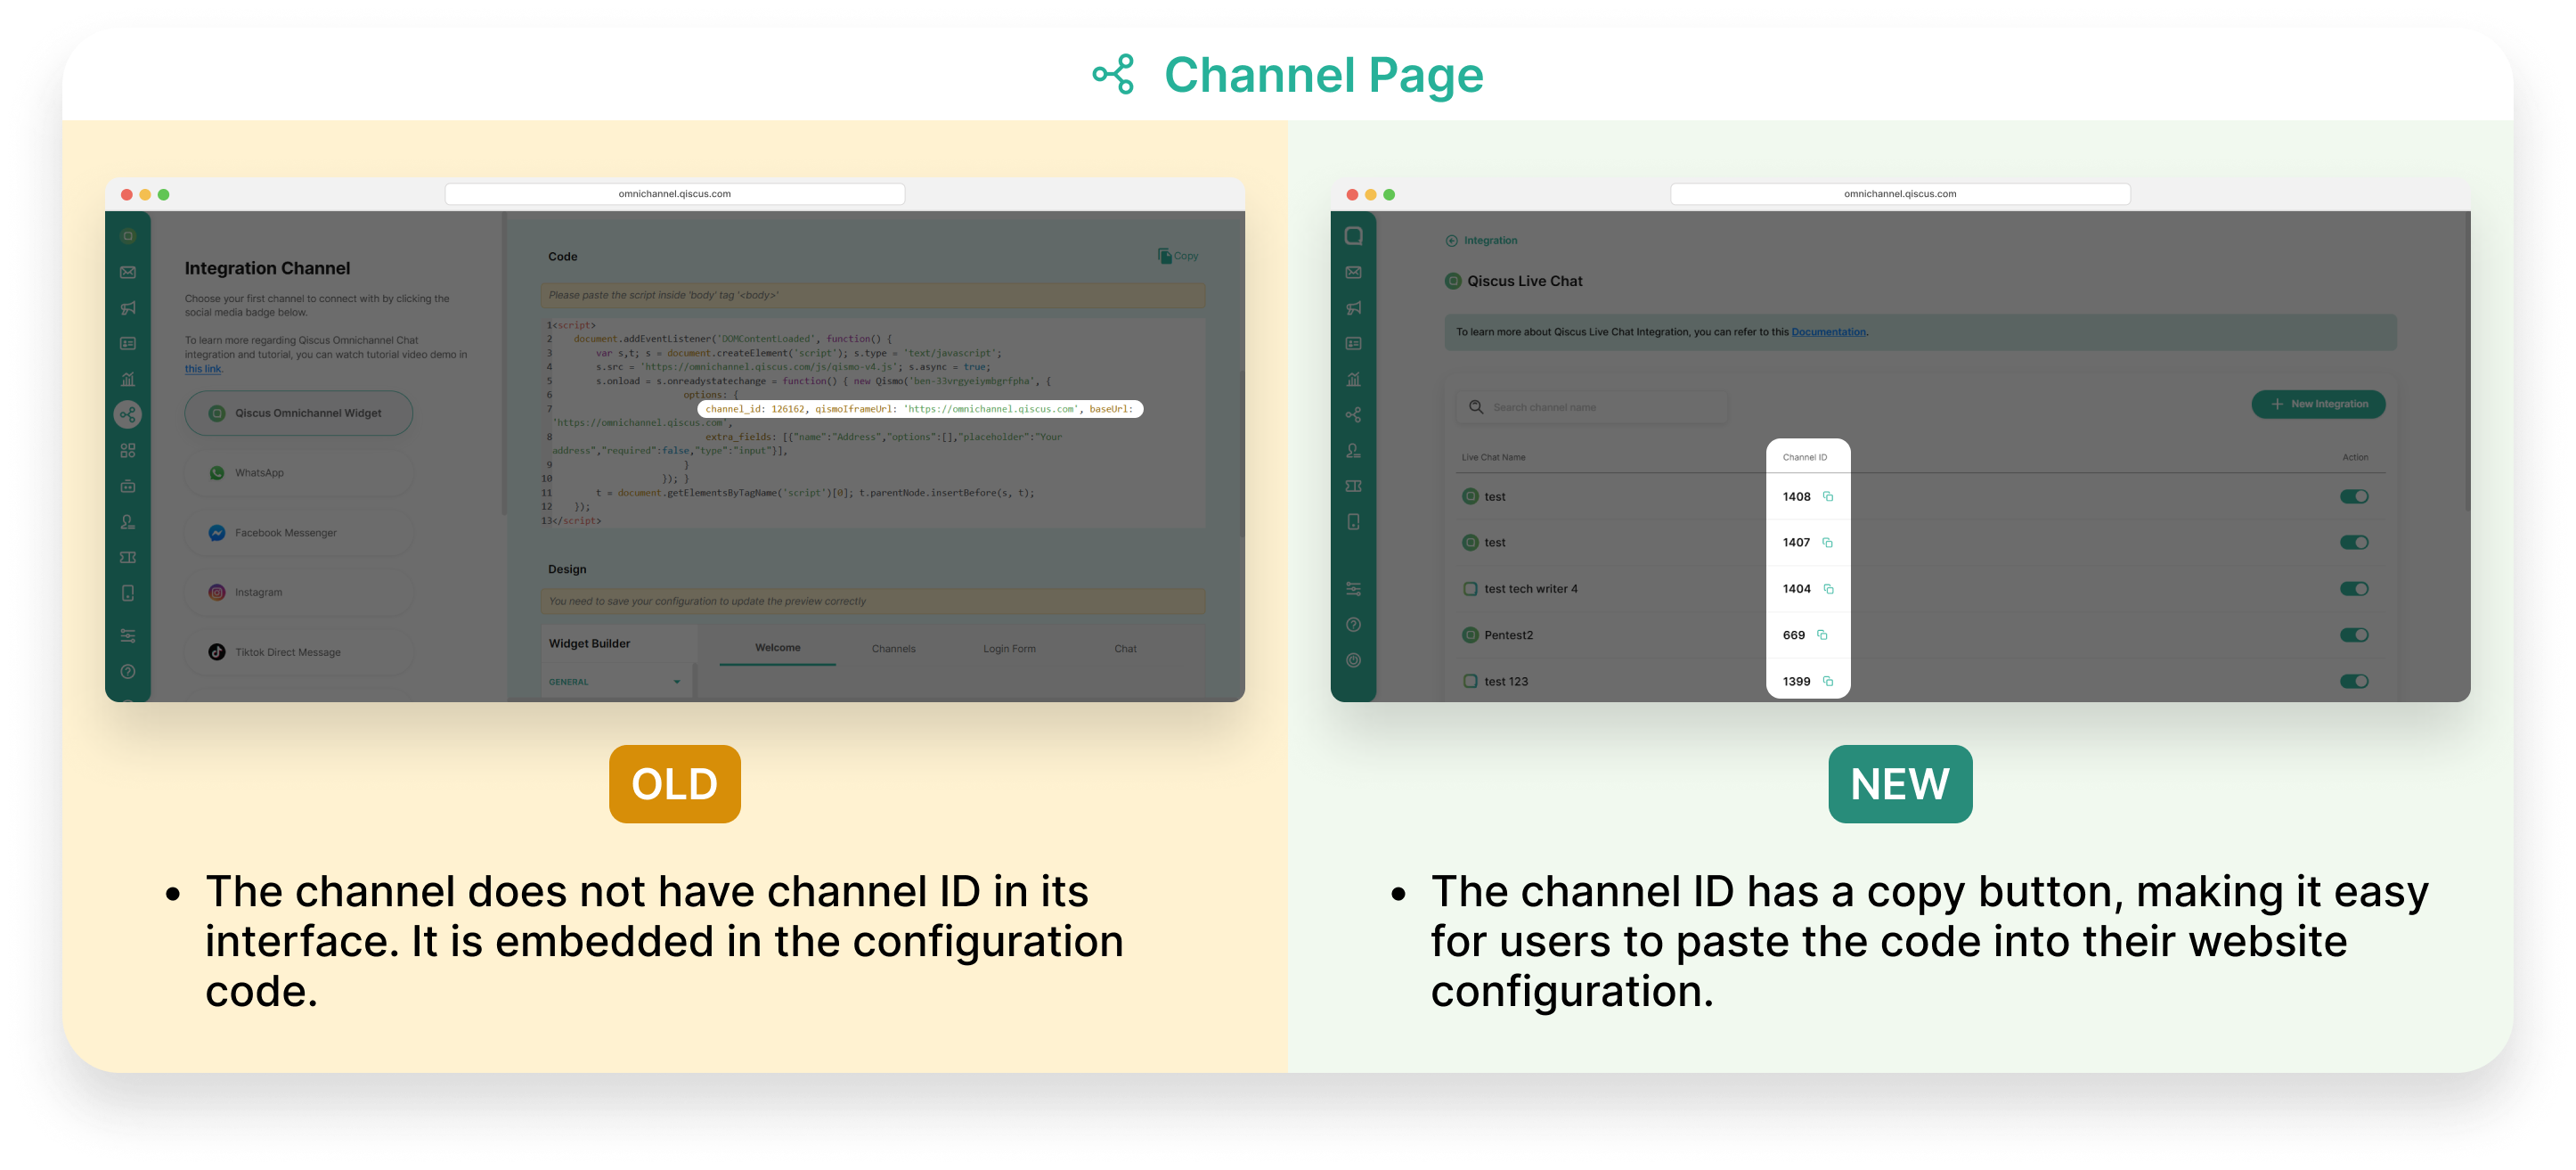
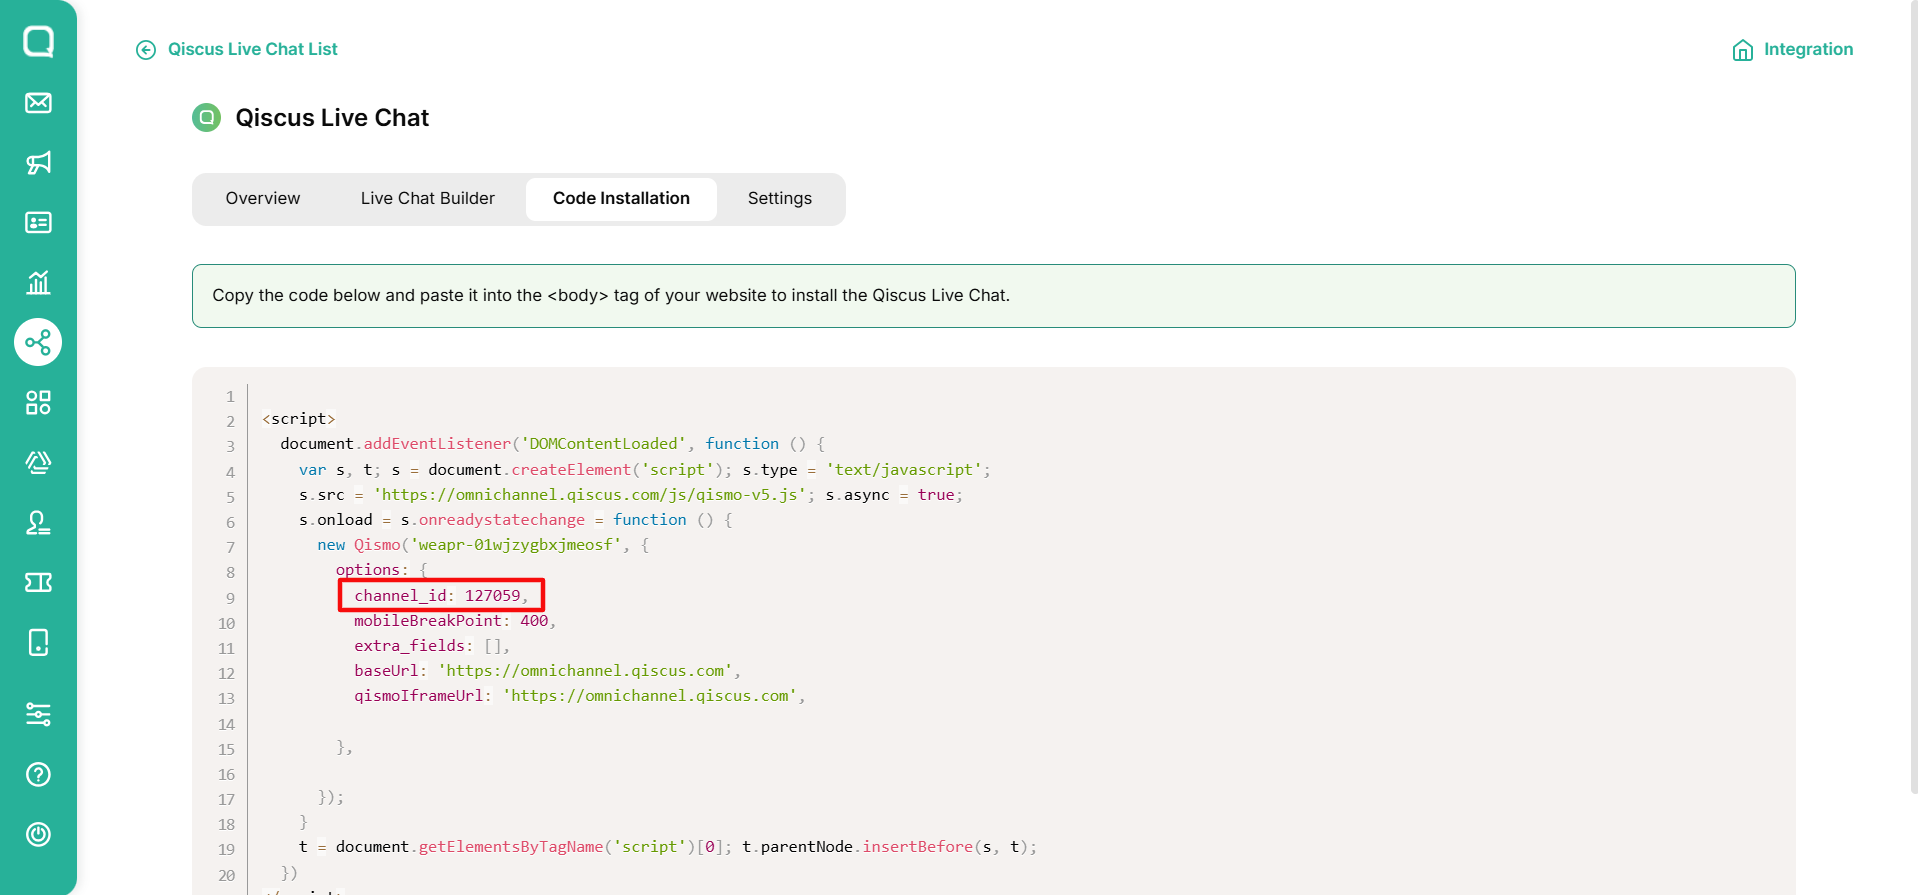
Channel Id is an identity for each widget channel. If you have a specific widget channel that you want to integrate into the mobile in-app widget, you can add your channel_id when you do initiateChat . You can get your list of channel id for the widget from:
- Go to the Integration menu on the left bar
- Click Live Chat tab and choose Qiscus Live Chat
- Select Qiscus Widget channel that you want to integrate
- Click Code Installation
- Spot the channel_id in array data
| Title | Description | |
|---|---|---|
| setRoomTitle | Set room name base on customer's name or static default. | |
| setRoomSubTitle | ||
| setRoomSubTitle(RoomSubtitle.Enabled) | Set enable room sub name by the system. | |
| setRoomSubTitle(RoomSubtitle.Disabled) | Set disable room sub name. | |
| setRoomSubTitle(RoomSubtitle.Editable, "Custom subtitle") | Set enable room sub name base on static default. | |
| setHideUIEvent | Show/hide system event. | |
| setAvatar | ||
| setAvatar(Avatar.Enable) | Set enable avatar and name. | |
| setAvatar(Avatar.Disabled) | Set disable avatar and name. | |
| setEnableNotification | Set enable app notification. | |
| setChannelId(channelId: channel_id) | Use this method to set your widget channel Id from Qiscus Omnichannel Chat. |
Example to custom the config:
xxxxxxxxxxval channelId : Int = 23 qiscusMultichannelWidget .initiateChat() .setChannelId(channelId) .startChat(context) .setRoomTitle("your_room_title")- Color
Use this method to customize the widget color according to your application.
| No | ||
|---|---|---|
| 1 | setNavigationColor | Set navigation color. |
| 2 | setSendContainerColor | Set icon send border-color. |
| 3 | setFieldChatBorderColor | Set field chat border-color. |
| 4 | setSendContainerBackgroundColor | Set send container background-color. |
| 5 | setNavigationTitleColor | Set room title, room subtitle, and back button border color. |
| 6 | setSystemEventTextColor | Set system event text and border color. |
| 7 | setLeftBubbleColor | Set left bubble chat color (for: Admin, Supervisor, Agent). |
| 8 | setRightBubbleColor | Set right bubble chat color (Customer). |
| 9 | setLeftBubbleTextColor | Set left bubble text color (for: Admin, Supervisor, Agent). |
| 10 | setRightBubbleTextColor | Set right bubble text color (Customer). |
| 11 | setTimeLabelTextColor | Set time text color. |
| 12 | setTimeBackgroundColor | Set time background color. |
| 13 | setBaseColor | Set background color of the room chat. |
| 14 | setEmptyTextColor | Set empty state text color. |
| 15 | setEmptyBackgroundColor | Set empty state background color. |
Push Notification
Follow these steps to set push notifications on your application
- Setup Firebase to Your Android App
If you already have setup Firebase in your Android app, you can skip this step and go to next step which is Generate FCM Server key. Otherwise, you can setup Firebase to your Android app by following these steps.
- Get FCM Server Key in Firebase Console
You can get FCM Server Key by following these steps:
- Go to Firebase Console
- Click your projects to see the overview your
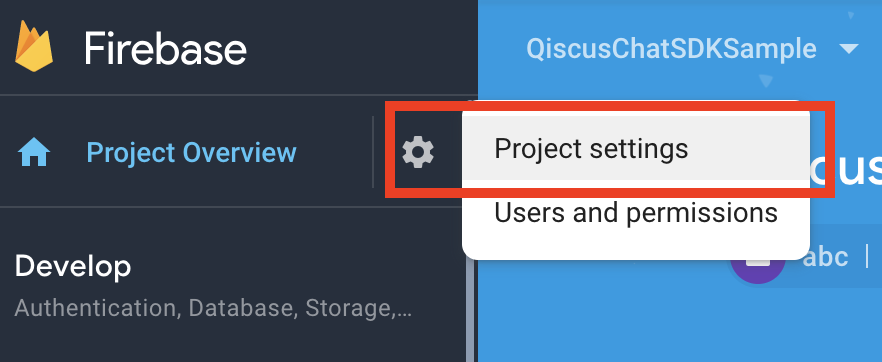
- On the top of left panel, click the gear icon on Project Overview menu. From the drop-down menu, click Project Settings.
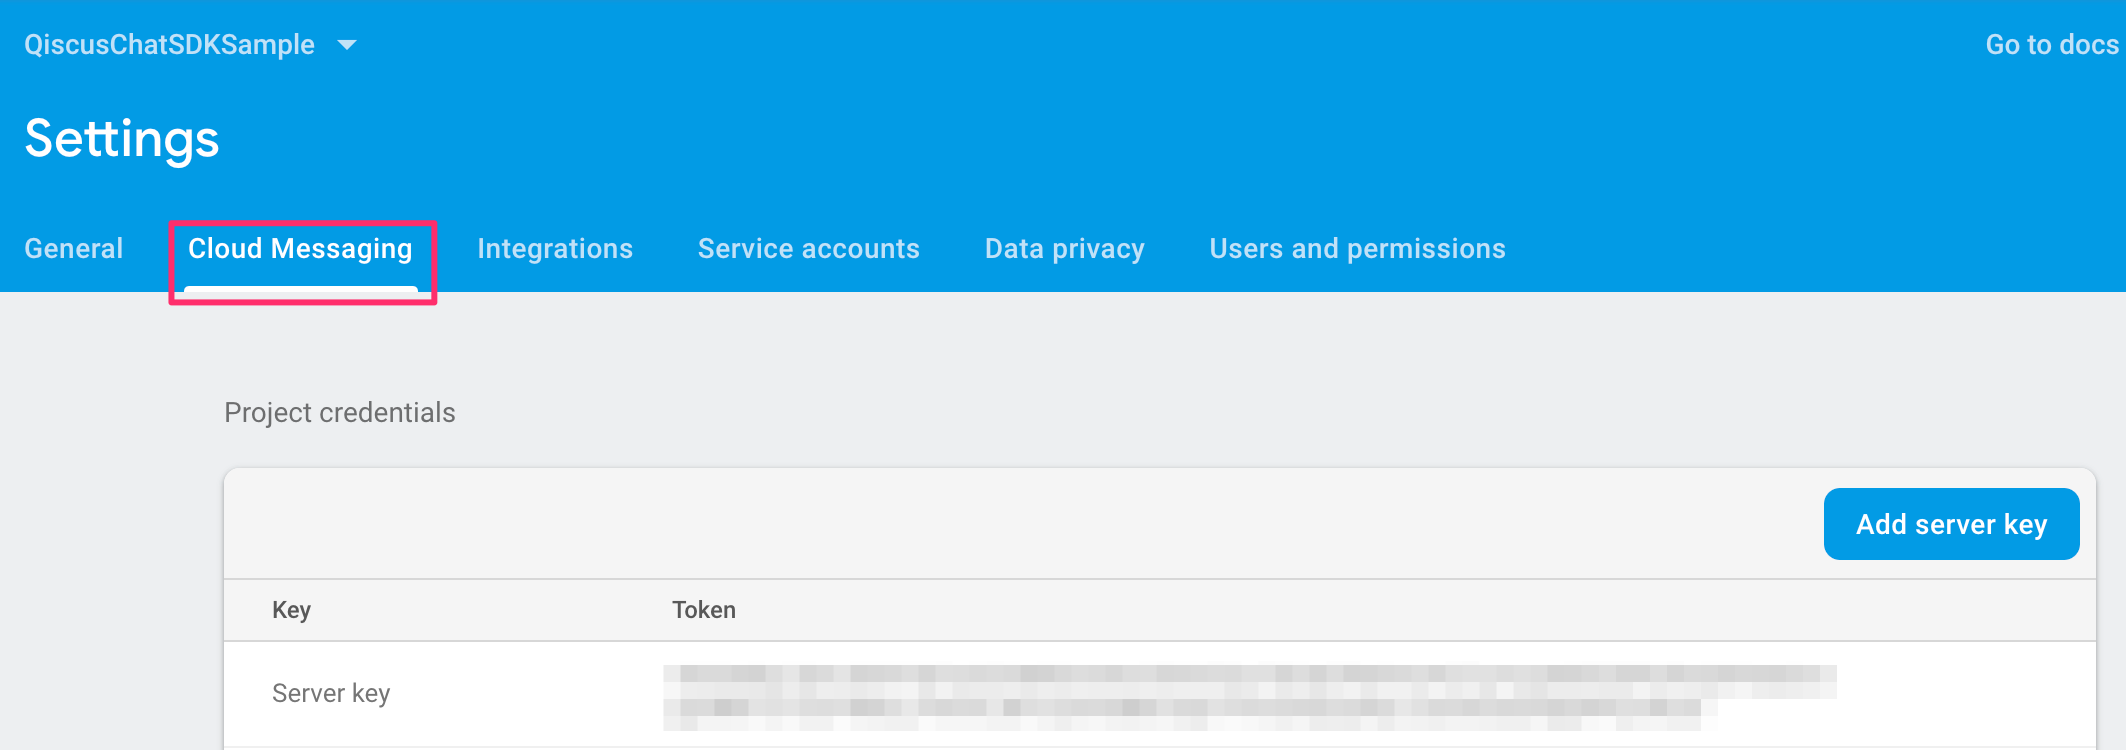
- Click the Cloud Messaging tab under Settings. On the Project Credentials, find and copy your Server Key.
- Setup FCM Server Key in The Qiscus Omnichannel Chat Dashboard
You can set FCM Secret Key by following these steps:
- Go to Qiscus Omnichannel Chat page to register your email
- Log in to Qiscus Omnichannel Chat with your email and password
- Go to Setting menu on the left bar
- Look for Notification
- Click Android's Customer Widget Push Notification
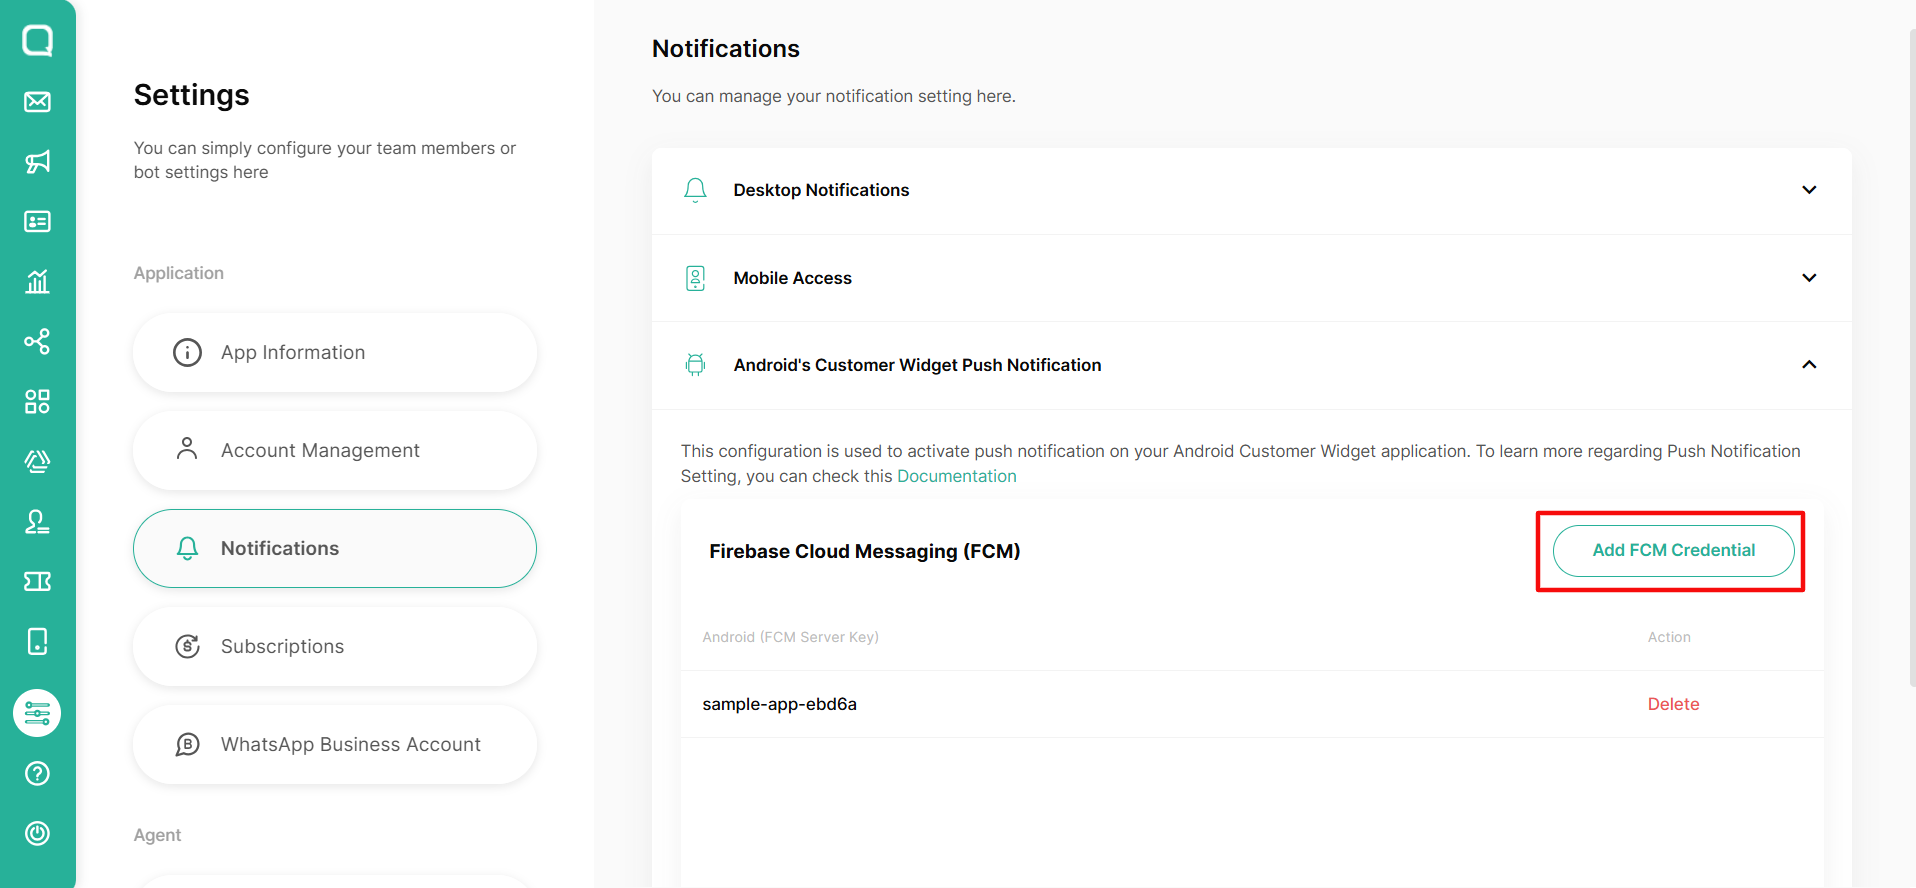
- In the Android (FCM Server Key) section, click +Add FCM Server Key to add your FCM Server Key,
- Paste FCM Server Key value and click Save change
One App Id can only be associated with one FCM Project, make sure the FCM Server keys are from the same FCM Project, If you already put multiple FCM server keys but they are different FCM project, then our system deletes the related device token and the effect you will not receive FCM notification.
- Register Your FCM Token to Qiscus Omnichannel Widget
First you need to enable FCM for your app by calling configuration, for example:
xxxxxxxxxxval config = QiscusMultichannelWidgetConfig() .setEnableNotification(true) // default is true .setNotificationListener(object : MultichannelNotificationListener { override fun handleMultichannelListener(context: Context?, qiscusComment: QMessage?) { // show your notification here } }) .setNotificationIcon(R.drawable.ic_notification)Set configuration before calling QiscusMultichannelWidget.setup() , for example:
xxxxxxxxxx// input the configuration QiscusMultichannelWidget.setup(application, qiscusCore, "YOUR_APP_ID", config, color, "LOCALPREFKEY")To enable FCM in ChatConfig, you need to register FCM token to notify Qiscus Omnichannel Widget, for example:
xxxxxxxxxxclass FirebaseServices : FirebaseMessagingService() { override fun onNewToken(newToken: String) { super.onNewToken(newToken) QiscusMultichannelWidget.instance.registerDeviceToken( qiscusCore, newToken ) }}You need to make sure every time open the app, the FCM token always needs to be registered in Qiscus Omnichannel Widget. To retrieve the current FCM token, you can see below code:
xxxxxxxxxxFirebaseInstanceId.getInstance().instanceId .addOnCompleteListener(OnCompleteListener { task -> if (!task.isSuccessful) { Log.e("Qiscus", "getCurrentDeviceToken Failed : " + task.exception) return } if (task.result != null) { val currentToken = task.result!!.token QiscusMultichannelWidget.instance.registerDeviceToken( qiscusCore, currentToken ) } })Add the service.FirebaseServices in Manifest, for example:
xxxxxxxxxx<service android:name="com.qiscus.multichannel.sample.widget.service.FirebaseServices"> <intent-filter> <action android:name="com.google.firebase.MESSAGING_EVENT" /> </intent-filter></service>Make sure always to register FCM token when open the app
- Handle Incoming Message From Push Notification
After registering your FCM token, you will get data from FCM Qiscus Omnichannel Widget, you can handle by using isMultichannelMessage() function, for example:
xxxxxxxxxxclass FirebaseServices : FirebaseMessagingService() { override fun onMessageReceived(remoteMessage: RemoteMessage) { super.onMessageReceived(remoteMessage) if (QiscusMultichannelWidget.instance.isMultichannelMessage( remoteMessage, allQiscusCore ) ) { return } }}Troubleshoot
If you facing error like this
xxxxxxxxxx`More than one file was found with OS independent path 'META-INF/rxjava.properties'`Add this to your app build.gradle
xxxxxxxxxx`android { ..... ..... packagingOptions { exclude 'META-INF/rxjava.properties' }} `How to Run the Example
- Get your APPID
- Go to Qiscus Omnichannel Chat page to register your email
- Log in to Qiscus Omnichannel Chat with your email and password
- Go to Setting menu on the left bar
- Look for App Information
- You can find APPID in the App Info
- Activate Qiscus Widget Integration
- Go to Integration menu on the left bar
- Look for Qiscus Widget
- Slide the toggle to activate the Qiscus widget
- Set YOUR_APP_ ID in the Example
- Open
SampleApp.kt - Replace the appId with
YOUR_APP_ID(step 1)
xxxxxxxxxxqiscusMultichannelWidget = QiscusMultichannelWidget.setup(application, qiscusCore, "YOUR_APP_ID", "LOCALPREFKEY")- Start Chat
The example is ready to use. You can start to chat with your agent from the Qiscus Omnichannel Chat dashboard.
iOS in-app Widget
Requirements
- iOS 10.0+
- minimum XCode 11.4 (Support XCode 14)
- Swift 5
Dependency
- Alamofire
- AlamofireImage
- SwiftyJSON
- QiscusCoreAPI
- SDWebImage
Installation
CocoaPods
CocoaPods is a dependency manager for Cocoa projects. For usage and installation instructions, visit their website. To integrate QiscusMultichannelWidget into your Xcode project using CocoaPods, specify it in your Podfile:
xxxxxxxxxxpod 'QiscusMultichannelWidget', '~> 2.2.1'How To Use
- Initialization
In order to use QiscusMultichannelWidget(), you need to initialize it with your AppID (YOUR_APP_ID). Get more information to get AppID from Qiscus Omnichannel Chat page
xxxxxxxxxxlet qiscusWidget = QiscusMultichannelWidget(appID: YOUR_APP_ID)After the initialization, you can access all the widget's functions.
- Set The User
Set UserId before start the chat, this is mandatory.
qiscusWidget.setUser(id: "UserId", displayName: "Cus Tom R", avatarUrl: "https://customer.avatar-url.com (https://customer.avatar-url.com/)")If you want to set user properties, you can set them by using this function, for example:
let userProp = [["key":"job","value":"development"],["key":"Location","value":"Yogyakarta"]] qiscusWidget.setUser(id: "UserId", displayName: "Cus Tom R", avatarUrl: "https://customer.avatar-url.com (https://customer.avatar-url.com/)", userProperties : userProp)- Get Login Status
User this function to check whether the user has already logged in.
xxxxxxxxxxqiscusWidget.isLoggedIn()- Start Chat
Use this function to start a chat.
xxxxxxxxxxqiscusWidget.initiateChat() .setRoomTitle(title: "TITLE".localized()) .setRoomSubTitle(enableSubtitle: RoomSubtitle.enable, subTitle: "SUBTITLE".localized()) .startChat { (chatViewController) in viewController.navigationController?.setViewControllers([viewController, chatViewController], animated: true)}- Clear User
Use this function to clear the logged-in users.
xxxxxxxxxxqiscusWidget.clearUser()- Hide System Message
Configure system message visibility by calling setShowSystemMessage(isShowing: Bool) .
qiscusWidget.initiateChat() ... .setShowSystemMessage(isShowing: false) ... .startChat { (chatViewController) in viewController.navigationController?.setViewControllers([viewController, chatViewController], animated: true) }Customization
We provide several functions to customize the User Interface.
- Config
Use this method to configure the widget properties.
Channel Id is an identity for each widget channel. If you have a specific widget channel that you want to integrate into the mobile in-app widget, you can add your channel_id when you do initiateChat. You can get your list of channel id for the widget from:
- Go to the Integration menu on the left bar
- Click Live Chat tab and choose Qiscus Live Chat
- Select Qiscus Widget channel that you want to integrate
- Click Code Installation
- Spot the channel_id in array data
| Title | Description |
|---|---|
| setRoomTitle | Set room name base on customer's name or static default. |
| setRoomSubTitle | |
| setRoomSubTitle(RoomSubtitle.Enabled) | Set enable room sub name by the system. |
| setRoomSubTitle(RoomSubtitle.Disabled) | Set disable room sub name. |
| setRoomSubTitle(RoomSubtitle.Editable, "Custom subtitle") | Set enable room sub name base on static default. |
| setHideUIEvent | Show/hide system event. |
| setAvatar | |
| setAvatar(Avatar.Enable) | Set enable avatar and name |
| setAvatar(Avatar.Disabled) | Set enable avatar and name |
| setEnableNotification | Set enable app notification. |
| setChannelId(channelId: channel_id) | Use this method to set your widget channel Id from Qiscus Omnichannel Chat. |
Example to custom in config:
xxxxxxxxxxqiscusWidget.initiateChat() .setChannelId(channelId: 99) .setRoomTitle(title: "TITLE".localized()) .setRoomSubTitle(enableSubtitle: RoomSubtitle.enable, subTitle: "SUBTITLE".localized()) .startChat { (chatViewController) in viewController.navigationController?.setViewControllers([viewController, chatViewController], animated: true)}- Color
Use this method to customize the widget color according to your application.
| No | Title | Description |
|---|---|---|
| 1 | setNavigationColor | Set navigation color. |
| 2 | setSendContainerColor | setSendContainerColor |
| 3 | setFieldChatBorderColor | Set field chat border-color. |
| 4 | setSendContainerBackgroundColor | Set send container background-color. |
| 5 | setNavigationTitleColor | Set room title, room subtitle, and back button border color. |
| 6 | setSystemEventTextColor | Set system event text and border color. |
| 7 | setLeftBubbleColor | Set left bubble chat color (for: Admin, Supervisor, Agent). |
| 8 | setRightBubbleColor | Set right bubble chat color (Customer). |
| 9 | setLeftBubbleTextColor | Set left bubble text color (for: Admin, Supervisor, Agent). |
| 10 | setRightBubbleTextColor | Set right bubble text color (Customer). |
| 11 | setTimeLabelTextColor | Set time text color. |
| 12 | setTimeBackgroundColor | Set time background color. |
| 13 | setBaseColor | Set background color of the room chat. |
| 14 | setEmptyTextColor | Set empty state text color. |
| 15 | setEmptyBackgroundColor | Set empty state background color. |

Push Notification
Follow these steps to set push notifications on your application
- Create the Certificate Signing Request (CSR)
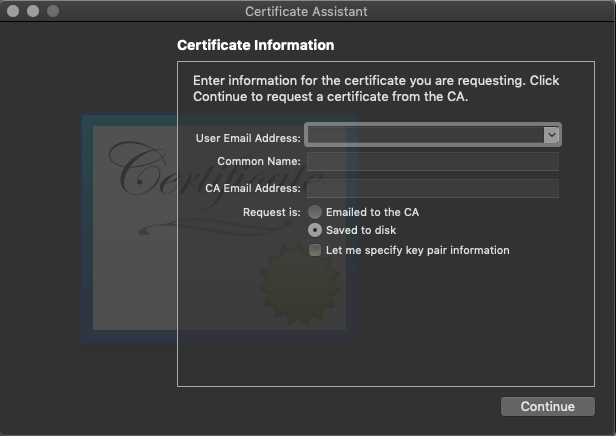
- Open Keychain Access on your Mac (Applications -> Utilities -> Keychain Access)
- Select Request a Certificate From a Certificate Authority
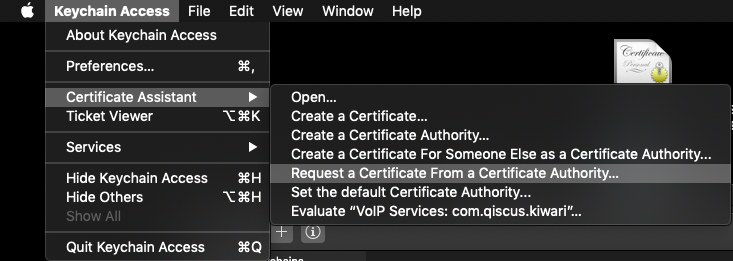
- Fill User Email Address, Common Name (Example: John Doe Dev Key), and select the Saved to disk on Request is group
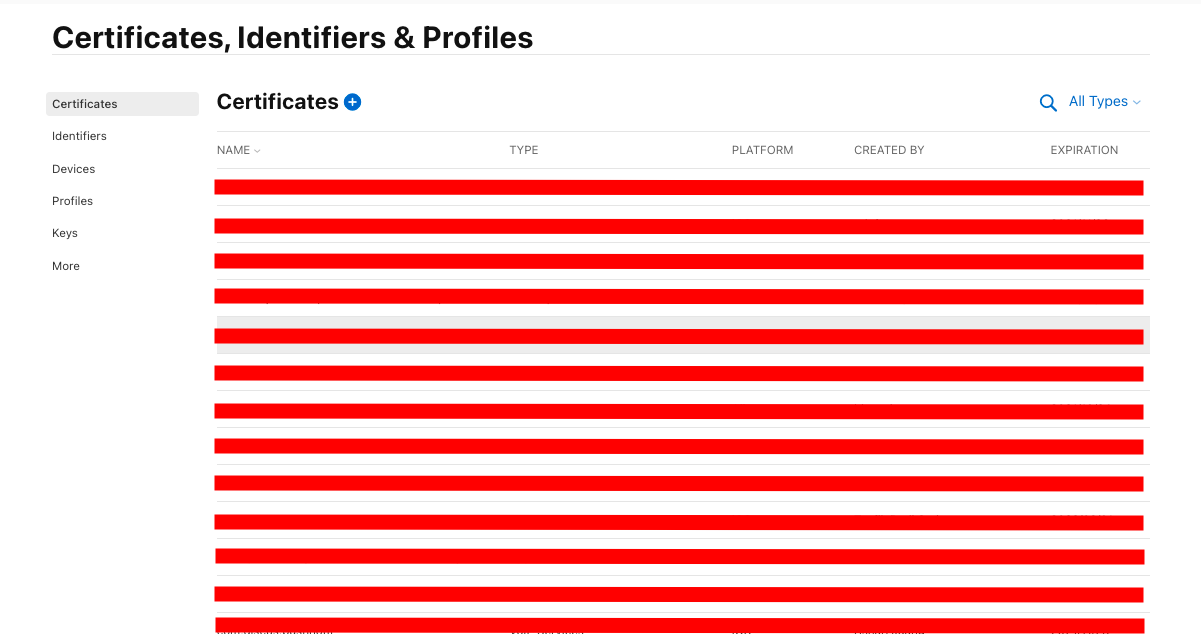
- Create the Push Notification SSL certificate in Apple Developer site
- Log in to the Apple Developer Member Center
- Go to the Certificates, Identifiers & Profiles menu
- Select Certificates , then click the Plus (+) button
- Select Apple Push Notification service SSL (Sandbox & Production) and click continue.
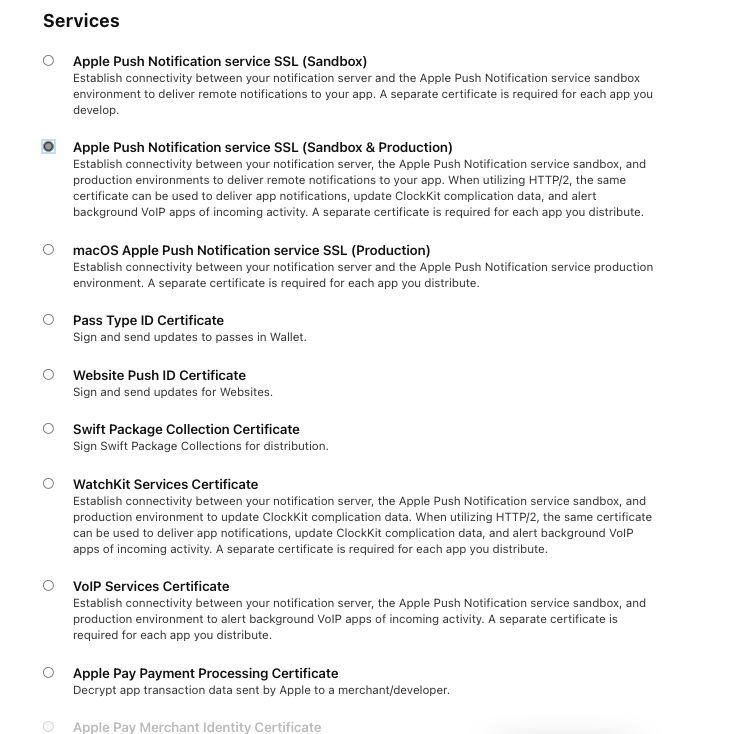
- Select AppID then click continue
- Upload the CSR file (step 1) to complete this process
- Download an SSL certificate
- Double-click the file and register it to your login Keychain
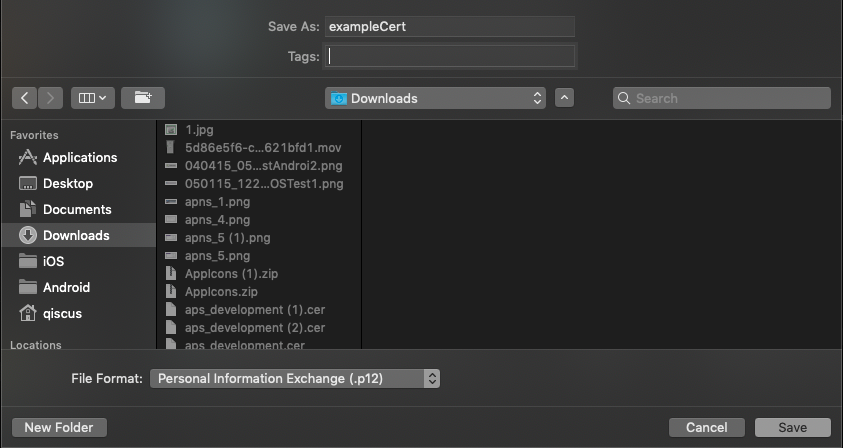
- Upload the p12 file to Qiscus dashboard
- Click the Certificates category from the left menu, under the Keychain Access
- Select the Push SSL certificate that you registered before
- Right-click the certificate
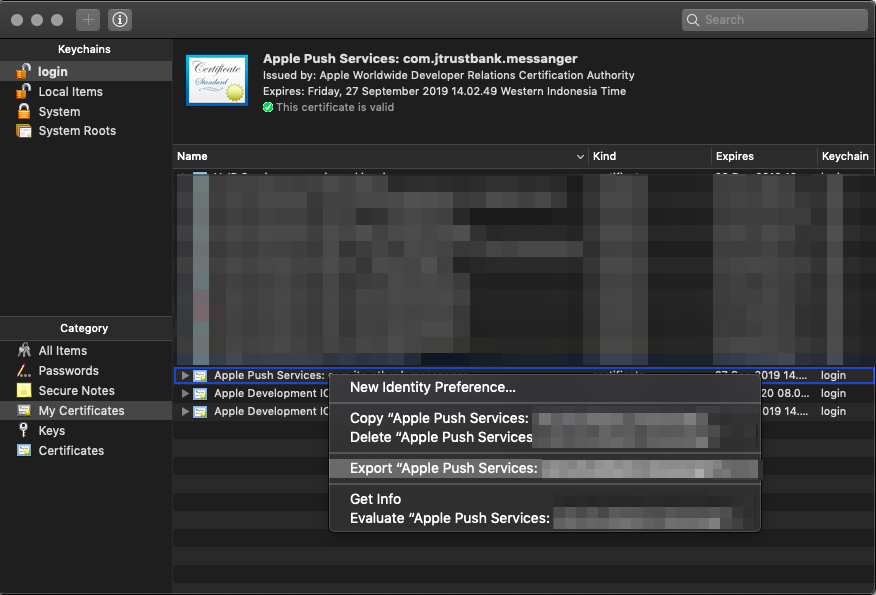
- Select export to save the file to your disk
Go to Qiscus Help page to submit your request
Full fill the requirements below:
- Title
- Category
- Summary
- Attachment (optional)
- Fill
YOUR_APP_IDin Application ID
Click Submit
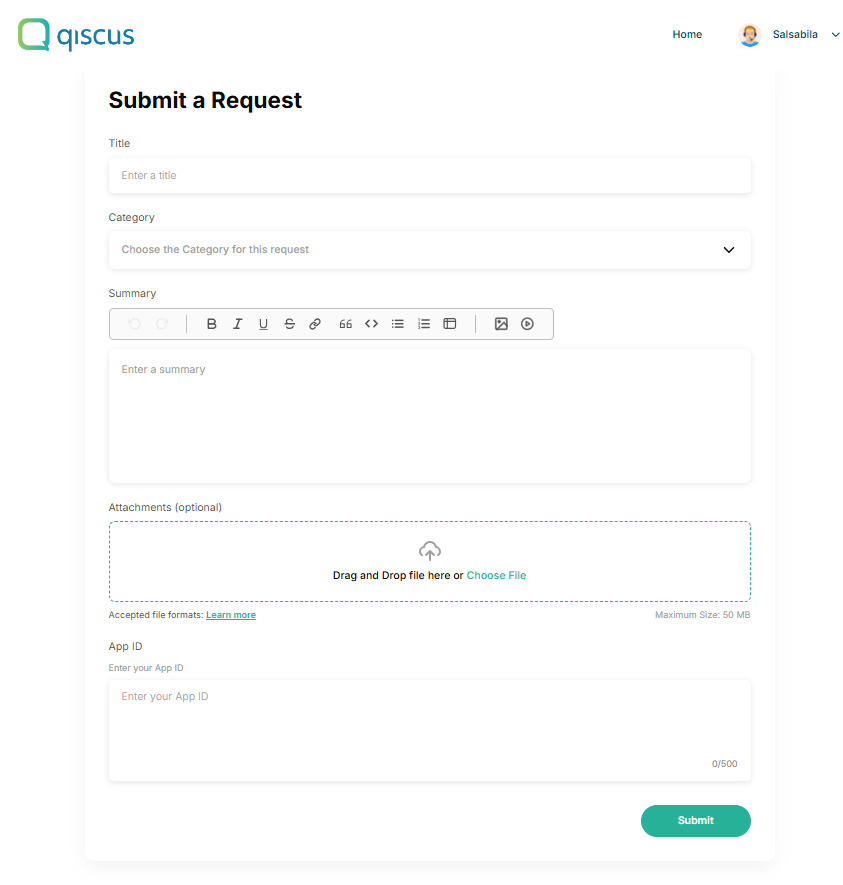
This example is a production push notification certificate. You need to create a development push notification certificate and p12 file, then submit it as an attachment for Xcode users.
- Register the device token to Qiscus Omnichannel Widget.
- Create a class to hold the Widget. In this example, we will use a Singleton Object class called
ChatManagerthat will wrap theQiscusMultichannelWidgetfunctionalities. In this step, we will highlight thedeviceTokenregistration and notification tap handling.
xxxxxxxxxxfinal class ChatManager { static let shared: ChatManager = ChatManager() lazy var qiscusWidget: QiscusMultichannelWidget = { return QiscusMultichannelWidget(appID: "YOUR_APP_ID") }() ... func register(deviceToken: Data?) { if let deviceToken = deviceToken { var tokenString: String = "" for i in 0..<deviceToken.count { tokenString += String(format: "%02.2hhx", deviceToken[i] as CVarArg) } self.qiscusWidget.register(deviceToken: tokenString, isDevelopment: false, onSuccess: { (response) in print("Multichannel widget success to register device token") }) { (error) in print("Multichannel widget failed to register device token") } } } func userTapNotification(userInfo : [AnyHashable : Any]) { self.qiscusWidget.tapNotification(userInfo: userInfo) } ...}- In your app's AppDelegate , store your device token as a variable.
import UserNotifications @UIApplicationMainclass AppDelegate: UIResponder, UIApplicationDelegate { func application(_ application: UIApplication, didFinishLaunchingWithOptions launchOptions [UIApplication.LaunchOptionsKey: Any]?) -> Bool { // MARK : Setup Push Notification if #available(iOS 10.0, *) { // For iOS 10 display notification (sent via APNS) UNUserNotificationCenter.current().delegate = self let authOptions: UNAuthorizationOptions = [.alert, .badge, .sound] UNUserNotificationCenter.current().requestAuthorization( options: authOptions, completionHandler: {_, _ in }) } else { let settings: UIUserNotificationSettings = UIUserNotificationSettings(types: [.alert, .badge, .sound], categories: nil) application.registerUserNotificationSettings(settings) } // MARK : register the app for remote notifications application.registerForRemoteNotifications() return true } func application(_ application: UIApplication, didRegisterForRemoteNotificationsWithDeviceToken deviceToken: Data) { ChatManager.shared.register(deviceToken: deviceToken) } func application(_ application: UIApplication, didReceiveRemoteNotification userInfo: [AnyHashable : Any]) { ChatManager.shared.userTapNotification(userInfo: userInfo) } } // [START ios_10_message_handling]@available(iOS 10, *)extension AppDelegate : UNUserNotificationCenterDelegate { // Receive displayed notifications for iOS 10 devices. func userNotificationCenter(_ center: UNUserNotificationCenter, willPresent notification: UNNotification, withCompletionHandler completionHandler: @escaping (UNNotificationPresentationOptions) -> Void) { completionHandler([.alert, .sound]) } func userNotificationCenter(_ center: UNUserNotificationCenter, didReceive response: UNNotificationResponse, withCompletionHandler completionHandler: @escaping () -> Void) { let userInfo = response.notification.request.content.userInfo ChatManager.shared.userTapNotification(userInfo: userInfo) completionHandler() }}// [END ios_10_message_handling]- Test the push notification from third party
Use the Easy APNs Provider tools
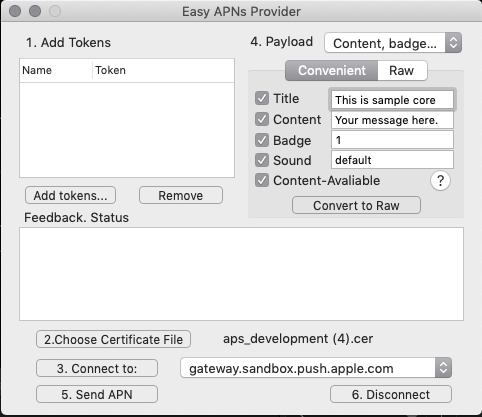
Follow steps 1 - 5 tools to test push notification. We use cert Apple Development IOS Push Service to test it
How to Run the Example
- Get your APPID
- Go to Qiscus Omnichannel Chat page to register your email
- Log in to Qiscus Omnichannel Chat with your email and password
- Go to Setting menu on the left bar
- Look for App Information
- You can find APPID in the App Info
- Activate Qiscus Widget Integration
- Go to Integration menu on the left bar
- Look for Qiscus Widget
- Slide the toggle to activate the Qiscus widget
- Run pod install
After cloning the example, you need to run this code to install all Cocoapods dependencies needed by the Example
xxxxxxxxxxpod install- Set YOUR_APP_ID in the Example
- Open
Example/ChatManager.swift - Replace the appId at line 21 with
YOUR_APP_ID(step 1)
xxxxxxxxxxlazy var qiscusWidget: QiscusMultichannelWidget = { return QiscusMultichannelWidget(appID: "YOUR_APP_ID")}()- Start Chat
The Example is ready to use. You can start to chat with your agent from the Qiscus Multichannel Chat dashboard.
React Native in-app
Requirements
- ReactNative: ^0.63.4
Dependency
- @react-native-async-storage/async-storage: ^1.15.9
- react-native-document-picker: ^7.1.0
Installation
xxxxxxxxxx# Qiscus Multichannel main packageyarn add @qiscus-community/react-native-multichannel-widget@2.0.1-beta.0 # Dependencies required for qiscus multichannelyarn add @react-native-async-storage/async-storage react-native-document-pickerHow To Use
- Initialization
In order to use MultichannelWidgetProvider, you need to initialize it with your AppID (YOUR_APP_ID). Get more information to get AppID from Qiscus Omnichannel Chat page
After the initialization, you can access all the widget's functions.
- Set The User
Set UserId before start the chat, this is mandatory.
- Get Login Status
Use this function to check whether the user has already logged in.
- Start Chat
Use this function to start a chat.
- Clear User
Use this function to clear the logged-in users.
- Hide System Event
Use this function to configure system message visibility
Customization
We provide several functions to customize the User Interface.
- Config
Use this method to configure the widget properties.
Channel Id is an identity for each widget channel. If you have a specific widget channel that you want to integrate into the mobile in-app widget, you can add your channel_id when you do initiateChat . You can get your list of channel id for the widget from:
- Go to the Integration menu on the left bar
- Click Live Chat tab and choose Qiscus Live Chat
- Select Qiscus Widget channel that you want to integrate
- Click Code Installation
- Spot the channel_id in array data

| Title | Description |
|---|---|
| setRoomTitle | Set room name base on customer's name or static default |
| setRoomSubTitle | |
| setRoomSubTitle(RoomSubtitle.Enabled) | Set enable room sub name by system |
| setRoomSubTitle(RoomSubtitle.disabled) | Set disable room sub name |
| setRoomSubTitle(RoomSubtitle.Editable, "Custom subtitle") | Set enable room sub name base on static default. |
| setHideUIEvent | Show/hide system event. |
| setAvatar | |
| setAvatar(Avatar.Enable) | Set enable avatar and name |
| setAvatar(Avatar.Disabled) | Set disable avatar and name |
| setEnableNotification | Set enable app notification |
| setChannel(channel_id) | Use this method to set your widget channel Id from Qiscus Omnichannel Chat. |
Example to custom the config:
- Color
Use this method to customize the widget color according to your application.
| No | Title | Description |
|---|---|---|
| 1 | setNavigationColor | Set navigation color. |
| 2 | setSendContainerColor | Set icon send border-color. |
| 3 | setFieldChatBorderColor | Set field chat border-color. |
| 4 | setSendContainerBackgroundColor | Set send container background-color. |
| 5 | setNavigationTitleColor | Set room title, room subtitle, and back button border color. |
| 6 | setSystemEventTextColor | Set system event text and border color. |
| 7 | setLeftBubbleColor | Set left bubble chat color (for: Admin, Supervisor, Agent). |
| 8 | setRightBubbleColor | Set right bubble chat color (Customer). |
| 9 | setLeftBubbleTextColor | Set left bubble text color (for: Admin, Supervisor, Agent). |
| 10 | setRightBubbleTextColor | Set right bubble text color (Customer). |
| 11 | setTimeLabelTextColor | Set time text color. |
| 12 | setTimeBackgroundColor | Set time background color. |
| 13 | setBaseColor | Set background color of the room chat. |
| 14 | setEmptyTextColor | Set empty state text color. |
| 15 | setEmptyBackgroundColor | Set empty state background color. |
Push Notification
In order to activate your push notification, you could ask us to set it up by creating a ticket at Qiscus Support and providing your FCM or iOS certificate within the ticket.
How To Run The Example
- Get your APPID
- Go to Qiscus Omnichannel Chat page to register your email
- Log in to Qiscus Omnichannel Chat with your email and password
- Go to ‘Setting’ menu on the left bar
- Select ‘App Information’ menu
- You can find APPID in the App Info
- Activate Qiscus Widget Integration
- Go to ‘Integration’ menu on the left bar
- Select ‘Qiscus Widget’
- Slide the toggle to activate the Qiscus widget
- Run
npm install
- Set YOUR__APP__ID in the Example
- Open
example/src/App.tsx - Replace the
APP_IDat line 12 with your appId
- Start Chat
The example is ready to use. You can start to chat with your agent from the Qiscus Omnichannel Chat dashboard.
Flutter in-app
Requirements
- Dart SDK version
>=2.16.0 <3.0.0 - Flutter SDK version
>=1.17.0
Installation
How to Use
- Initialization
In order to use QMultichannelWidget, you need to initialize it with your AppId (YOUR_APP_ID). Get more information to get AppId from Qiscus Omnichannel Chat Page.
After the initialization, you can access all the widget’s functions.
- Set The User
Set userId before start the chat, this is mandatory.
- Get Login Status
Use this getter to check whether the user has logged in or not.
- Start Chat
Use this function to start a chat
- Clear User
Use this function to clear the loged-in users.
- Hide system message
Configure system message visibility by providing parameter when initiating multichannel widget
Customization
We provide several functions to customize the User Interface.
- Config
Use this method to configure the widget properties.
Channel Id is an identity for each widget channel. If you have a specific widget channel that you want to integrate into the mobile in-app widget, you can add your channel_id when you do initiateChat. You can get your list of channel id for the widget from:
- Go to the Integration menu on the left bar
- Click Live Chat tab and choose Qiscus Live Chat
- Select Qiscus Widget channel that you want to integrate
- Click Code Installation
- Spot the channel_id in array data
| Title | Description |
|---|---|
| title | Set room name base on customer's name or static default |
| subtitle | Set enable room sub name by system |
| hideSystemUI | Show/hide system event. |
| avatar | Set enable avatar and name |
| channelId | Use this method to set your widget channel Id from Qiscus Omnichannel Chat. |
| theme | Change some basic colorization on the widget (more info on the table below) |
Example to custom the config:
- Color
Use this method to customize the widget color according to your application.
| Title | Description | |
|---|---|---|
| navigationColor | Set navigation color. | |
| sendContainerColor | Set icon send border-color. | |
| fieldChatBorderColor | Set field chat border-color | |
| sendContainerBackgroundColor | Set send container background-color. | |
| navigationTitleColor | Set room title, room subtitle, and back button border color. | |
| systemEventTextColor | Set system event text and border color. | |
| leftBubbleColor | Set left bubble chat color (for: Admin, Supervisor, Agent). | |
| rightBubbleColor | Set right bubble chat color (Customer). | |
| leftBubbleTextColor | Set left bubble text color (for: Admin, Supervisor, Agent). | |
| rightBubbleTextColor | Set right bubble text color (Customer). | |
| timeLabelTextColor | Set time text color. | |
| timeBackgroundColor | Set time background color. | |
| baseColor | Set background color of the room chat. | |
| emptyTextColor | Set empty state text color. | |
| emptyBackgroundColor | Set empty state background color. |
Push Notification
You can follow these steps to set push notifications using Flutter:
- Register Your FCM Token to Qiscus Omnichannel dashboard,
- Install/setup Firebase messaging on flutter project by following this guide,
- Register device token using
setDeviceId(your_device_token)method from Qiscus Omnichannel widget for flutter before callinginitiateChat()
How to run the example
- Get your APPID
- Go to Qiscus Omnichannel Chat page to register your email
- Log in to Qiscus Omnichannel Chat with yout email and password
- Go to ‘Setting’ menu on the left bar
- Look for ‘App Information’
- You can find APPID in the App Info
- Activate Qiscus Widget Integration
- Go to ‘Integration’ menu on the left bar
- Look for ‘Qiscus Widget’
- Slide the toggle to activate the Qiscus widget
- Run flutter pub get
After cloning the example, you need to run this code to install all C_ocoapods_ dependencies needed by the Example
- Set YOUR_APP_ID in the Example
Open example/lib/main.dart . Replace the YOUR_APP_ID at line 19 with your appId.
- Start Chat
The Example is ready to use. You can start to chat with your agent from the Qiscus Omnichannel Chat dashboard.
Security in Qiscus widget
Maintaining the security of sensitive information exchanged between businesses and customers is of utmost importance. The Enhance Conversation Security feature from Qiscus aims to increase the security of conversations that initiate from the Widget channel.
Enabling this feature triggers the automatic creation of a new chat room whenever a customer uses a different device or browser to send messages to your Widget channel. As a result, customers using distinct devices or browsers will be unable to access the conversation history. However, you must understand that enabling this feature could potentially lead to an increase in your total count of Monthly Active Users (MAU).
This feature becomes accessible starting from Qiscus Omnichannel iOS Widget v2.3.0, and Qiscus Omnichannel Android Widget v2.2.0.
You can enable this feature via the Settings menu on each Widget channel.
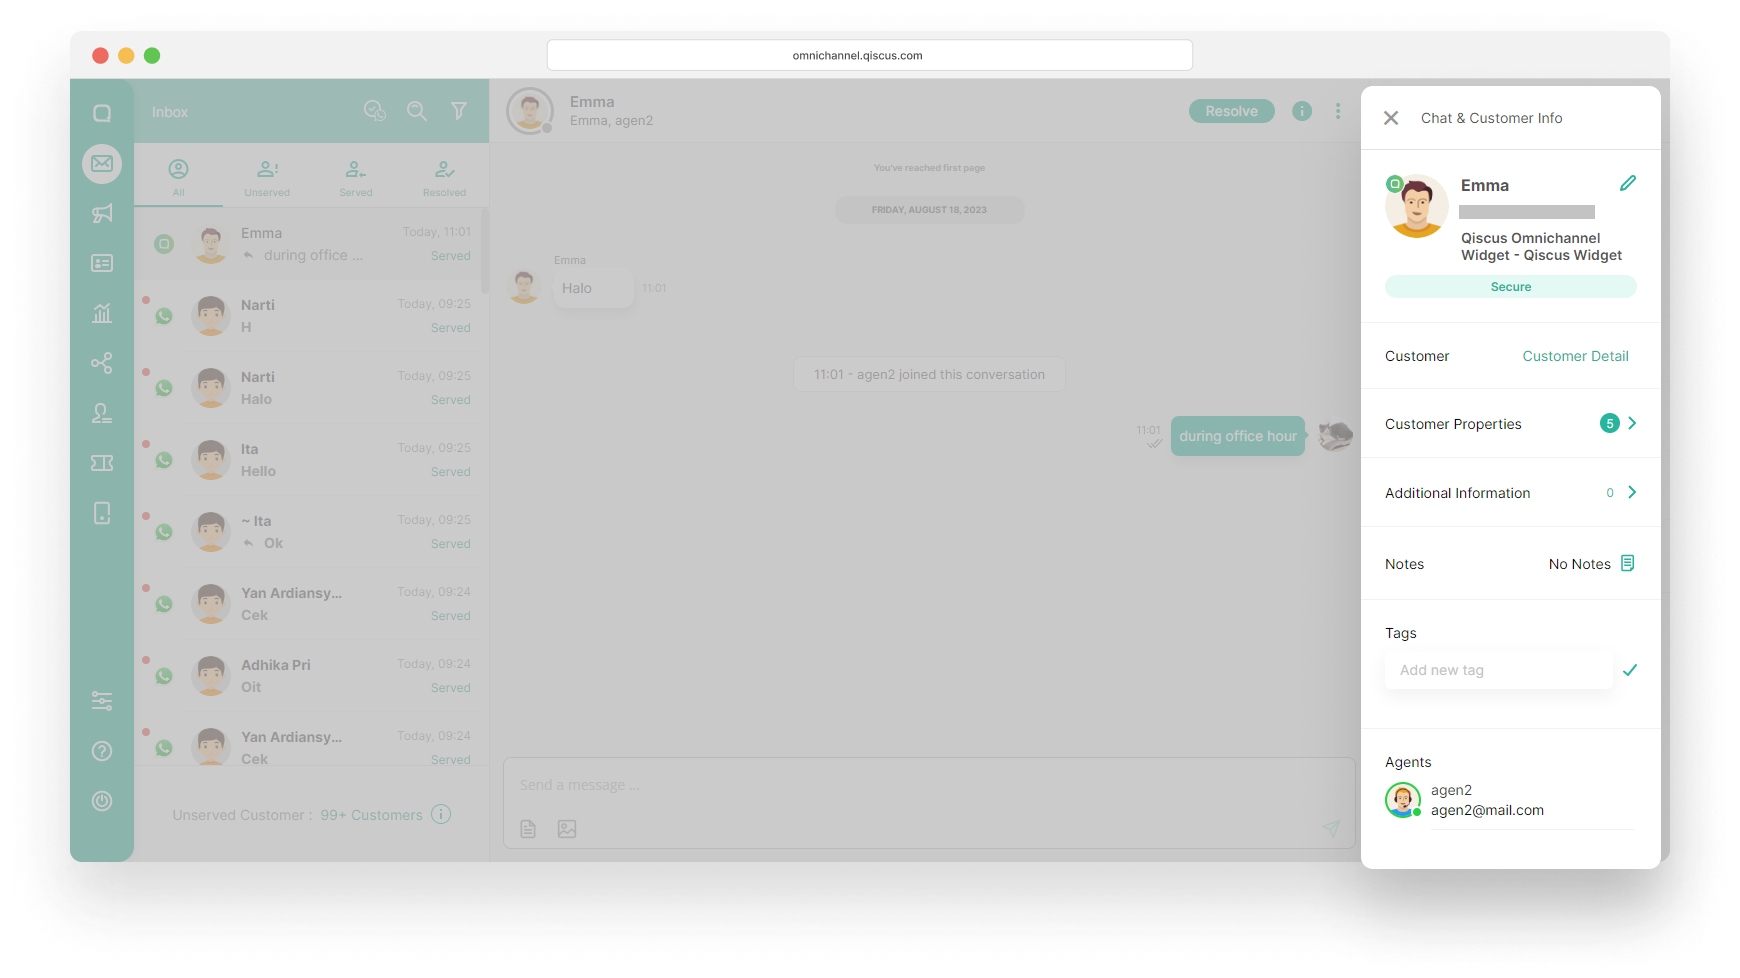
Once you enabled this feature, there will be a Secure icon on the Chat & Customer Info page.
When you add a new Qiscus Widget channel, you are required to agree to the Terms of Conditions that have been provided and the Enhance Conversation Security feature will be automatically enabled. But you can disable this feature afterwards via the Settings menu.