
We've already launched a new feature to support CC & BCC, which allows you to add emails as carbon copy and blind carbon copy. More information is available in the CC & BCC section of this documentation.
In helping your business stay connected with customers through the Qiscus App Center, Qiscus has released the Email App, which can be integrated into Qiscus Omnichannel Chat. Integrating the Email App allows you to easily connect your official email account into Qiscus Omnichannel Chat and access it with other channels on one dashboard.
Here’s how to set up the Email App in Qiscus App Center:
Setting Page
When the Email App has been activated, the Admin will be able to view the email settings page. To see the setting page, you can open My Apps page, then click Settings button on the Email add-on and will show the email setting page

Add Email
To add an email to be integrated, the Admin can click the + Add New button to add the email address on the email page. Currently, one Qiscus Omnichannel account can be linked to three email accounts. To connect to more than three accounts, you can contact us here.
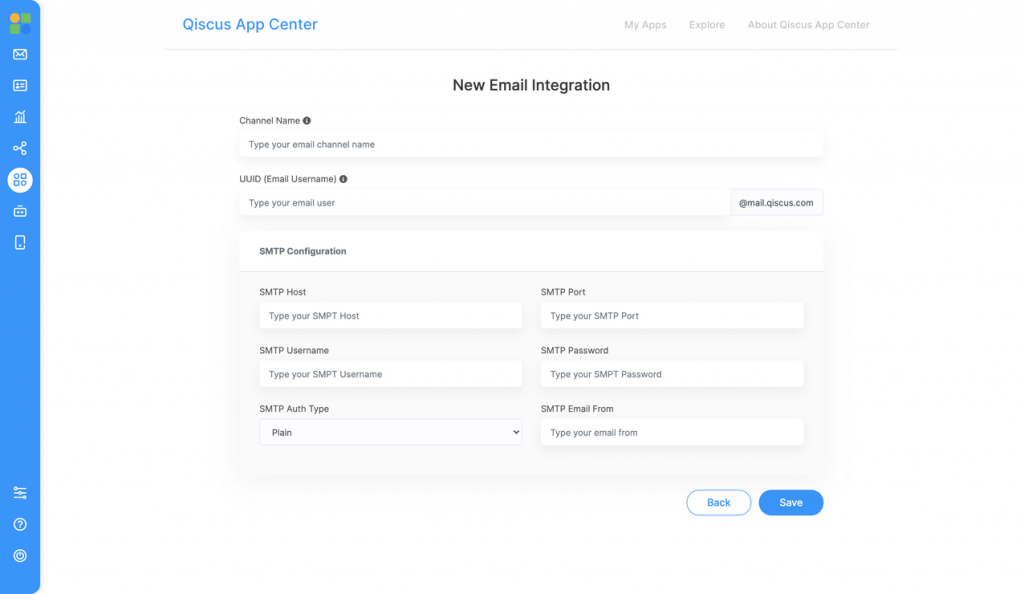
The following is an explanation for each field that needs to be completed:
Channel Name
Admin can fill in the channel name, which will later appear on the Qiscus Omnichannel page.
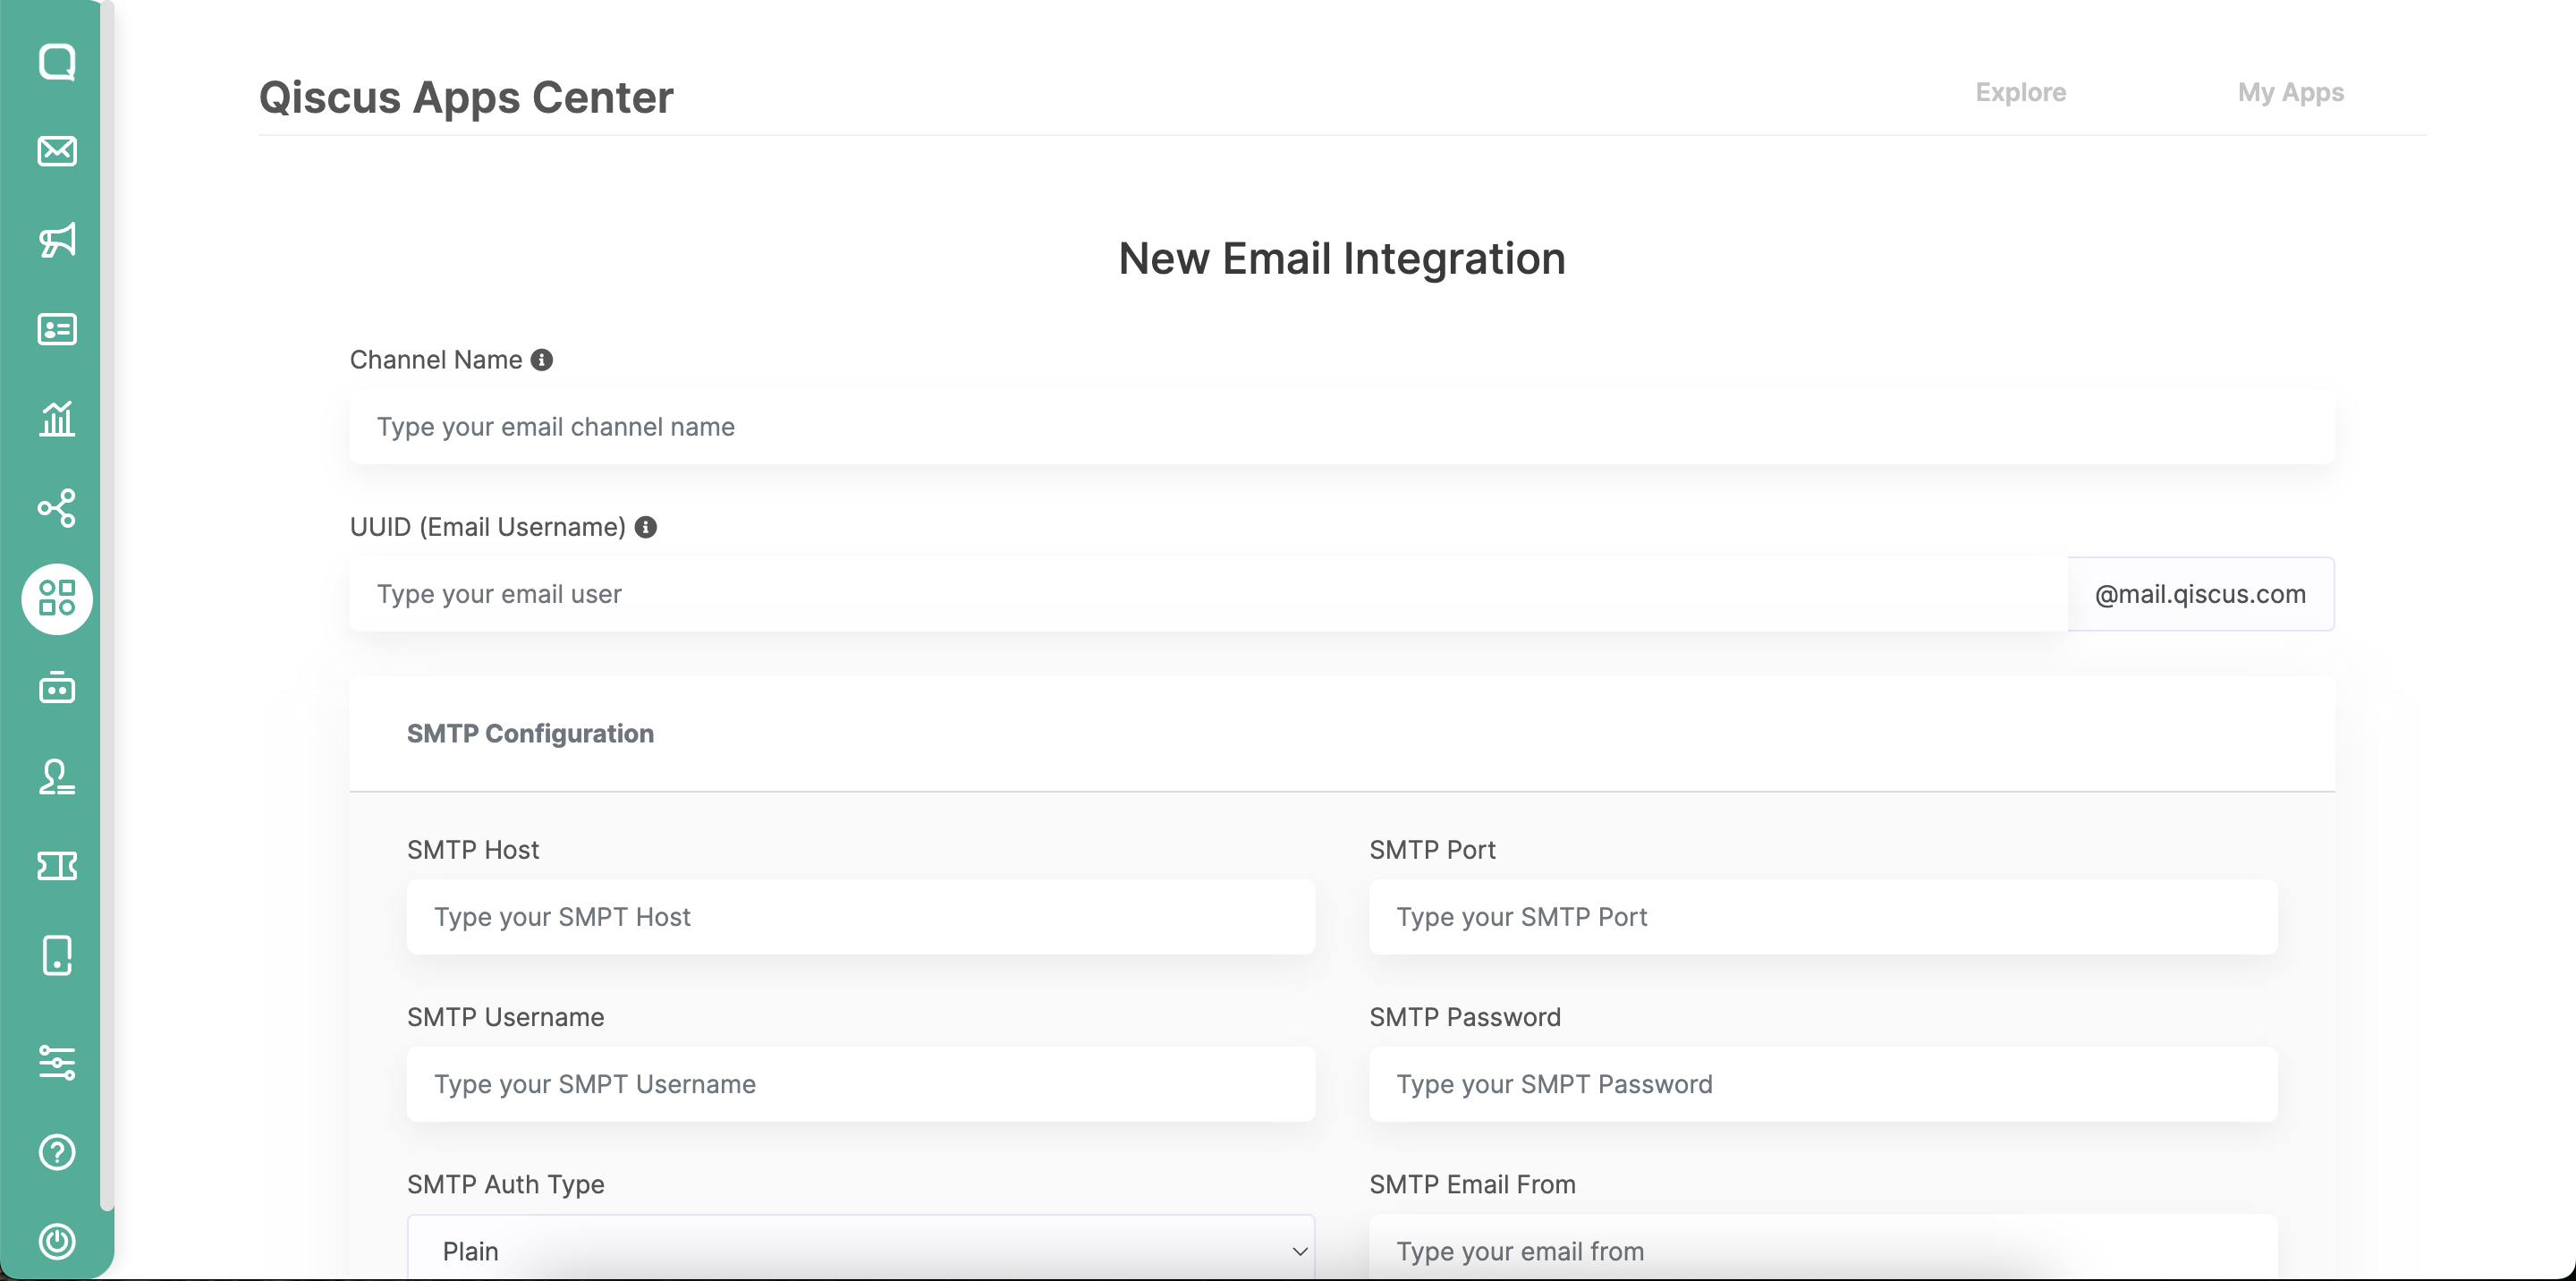
As shown in the image above, in the Chat & Customer Info section, we can see the name of the channel that we have set.
UUID (Email Username)
This UUID (User Unique ID) is used to create an email with the domain @mail.qiscus.com, which will then be used to forward incoming messages from the integrated email account to Qiscus Omnichannel Chat.
SMTP Configuration
Email App uses SMTP protocol for the outbound process and email forwarding mechanism for the inbound process. Regardless of what email provider is used, the integration process can be carried out as long as the email to be integrated supports the SMTP protocol and is allowed to forward emails to Qiscus Omnichannel.
For Microsoft 365 or Outlook.com mailboxes, choose the OAuth integration method (Login with Microsoft) instead of SMTP. See the Outlook / Microsoft 365 (OAuth) section below.
SMTP Host
The server name is used to redirect email messages, such as smtp.gmail.com for Gmail or smtp-mail.outlook.com for Microsoft Outlook Cloud.
SMTP Port
The Server port is used to redirect email messages and the recommended port is 465 as this port is used to send messages using SMTP with a secure path (SSL/TLS)
SMTP Username
This refers to the username for the email account to be integrated
SMTP Password
This is the password used for the email account to be integrated. Some email providers have unique methods to determine the password used for an account. For example, to integrate Google Mail (Gmail), the password used is not the password from the account that will be integrated, but a Google Mail (Gmail) App Password that needs to be created first. A full explanation can be seen on this page.
SMTP Auth Type
SMTP authentication allows a server to check whether an SMTP client is authorized or not. There are several types of authentication provided to support email integration.
Plain authentication mechanism using username and password which are sent in a string and encoded using Base64 format
Login and authentication mechanism using username and password encoded using Base64 format. The difference with Plain is that the username and password here are sent in stages (username first, then password)
Cram MD5, an authentication mechanism in which the server prompts the client to solve computing challenges using a password. The client response is a string containing the username and a 16-byte digest in hexadecimal notation. The string is BASE64 encoded.
SMTP Email From
The email that will later appear as a description of the email is sent from here, which can be different from the integrated email account.
The following is an example of a field that has been filled in and uses Google Mail (Gmail) as the email provider.
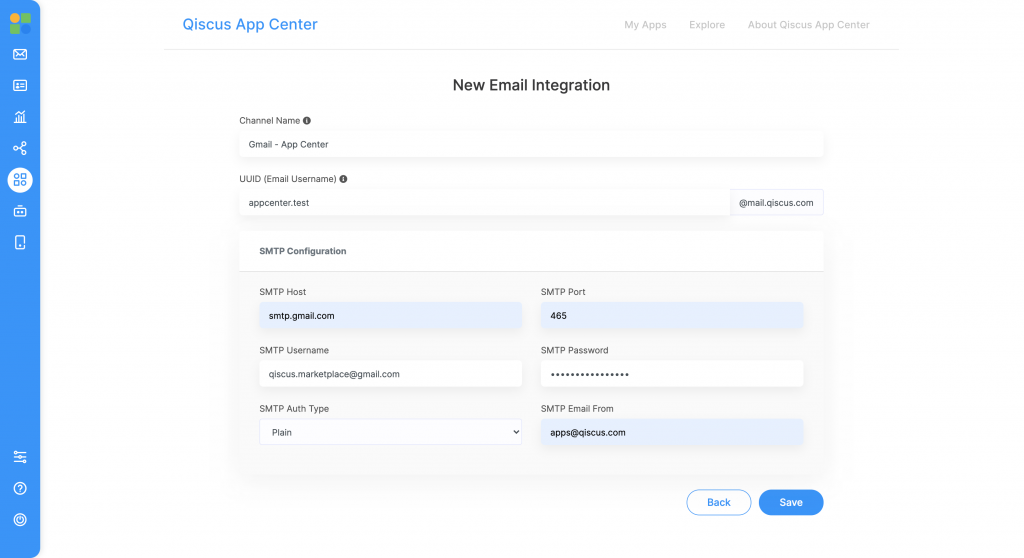
If all the fields have been filled in, save the settings by clicking the Save button on the lower right corner. If successful, you will be redirected to the email integration details page.
Email Integration Details
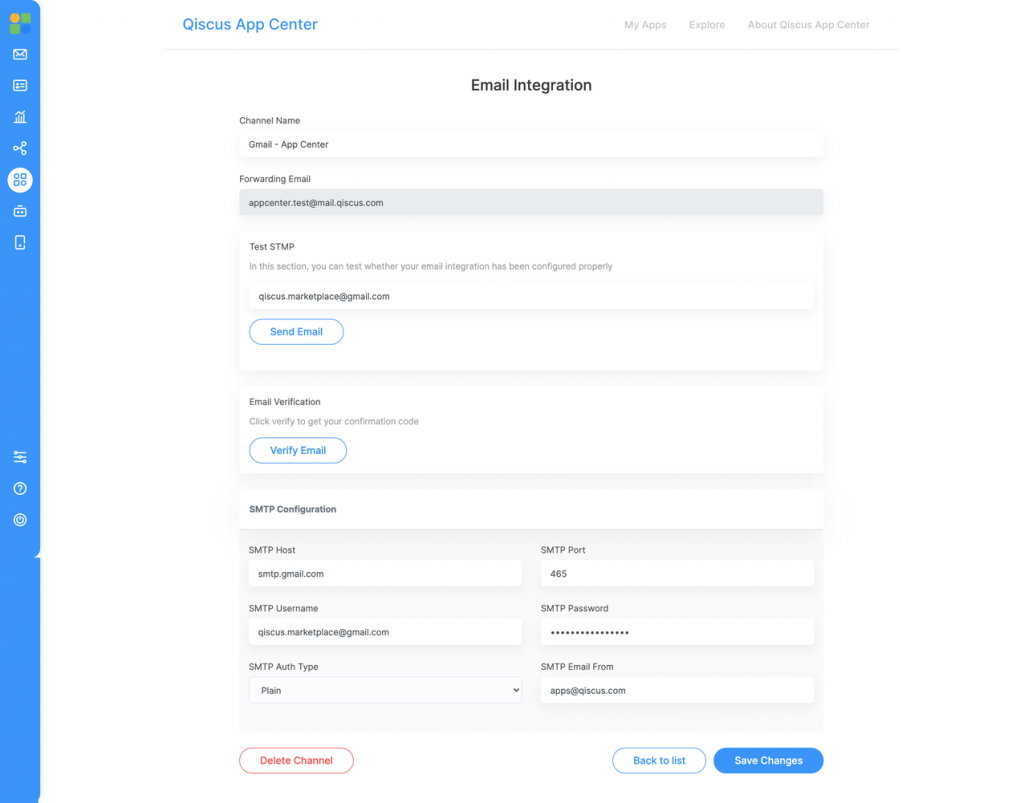
On this Email Integration Details page, the admin can change the SMTP settings.
Forwarding Email
After the email integration settings have been completed, the next step is to apply settings on every email provider that has been successfully integrated so that every message that comes into the email can be forwarded to Qiscus Omnichannel Chat.
For more details, in this example case, we use Google Mail (Gmail) as the email provider, which we will explain further in this article.
Forwarding Emails in Gmail
Some email providers, such as Gmail, require a verification process when forwarding emails. See how this is done below:
Login to the email account that has been integrated
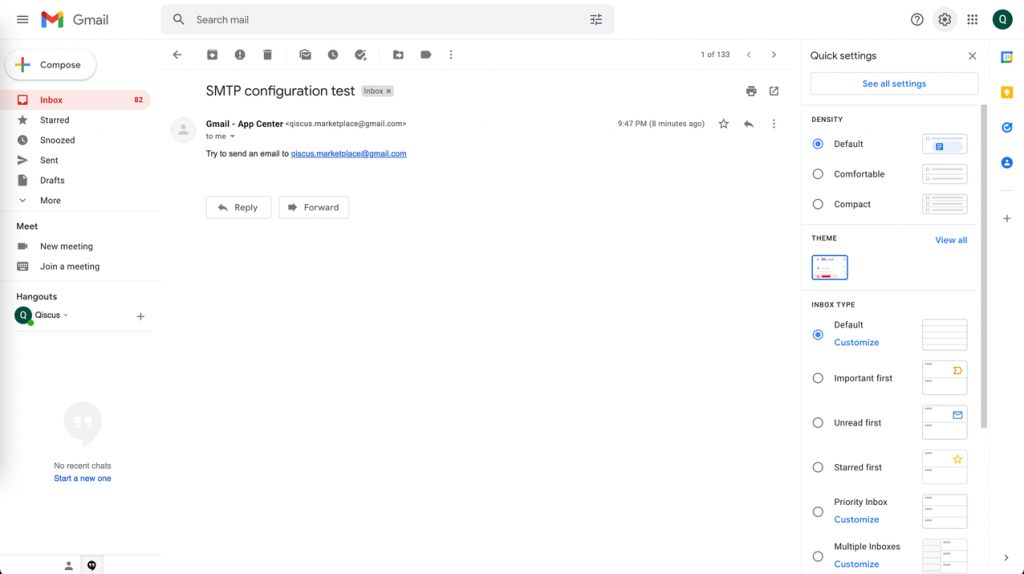
Click the Gear icon in the upper right corner and select See all settings
Then , navigate to the tab titled Forwarding
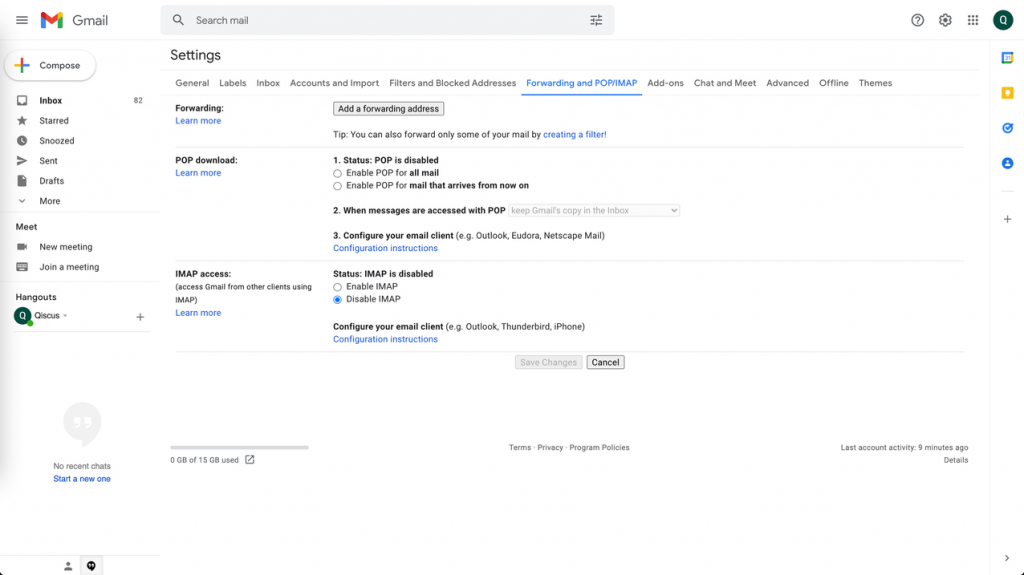
Select Add a forwarding address and enter the pre-set UUID.
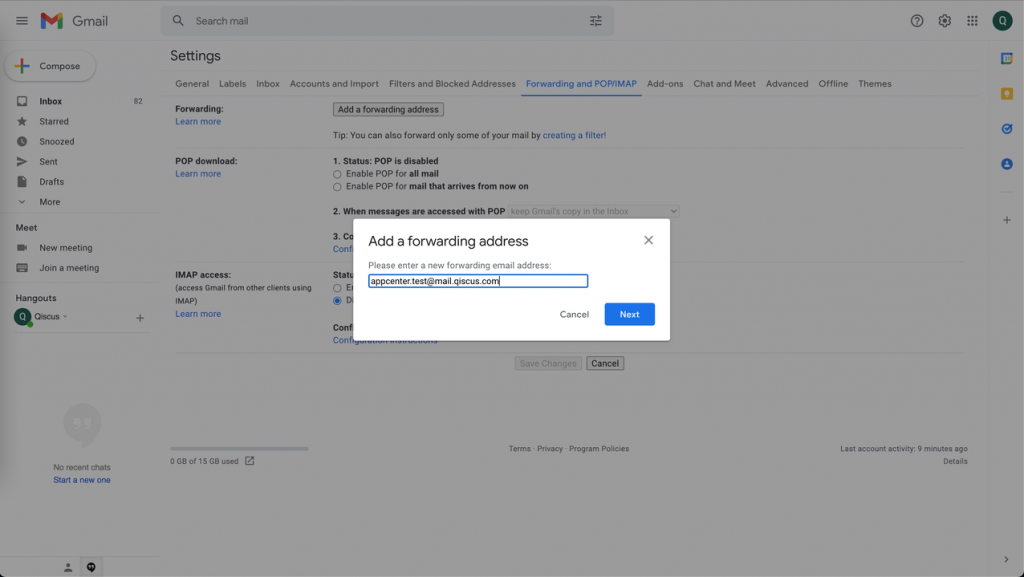
Click Next and a new window will appear. Select Proceed_._
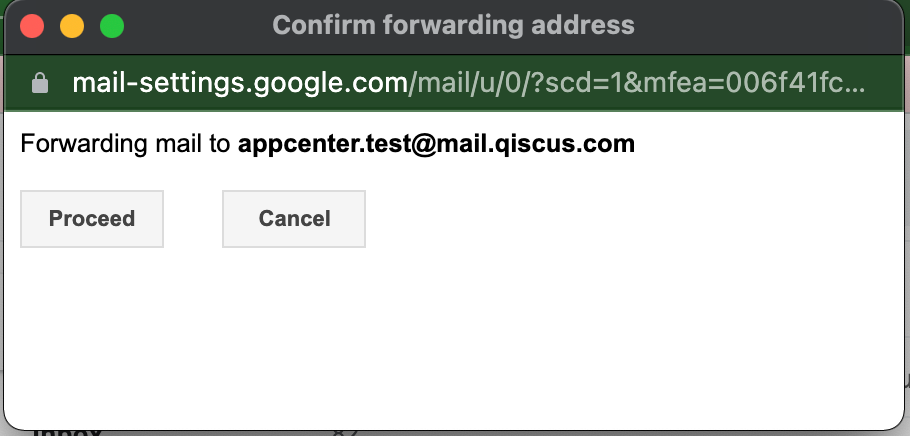
If successful, the following display will appear.
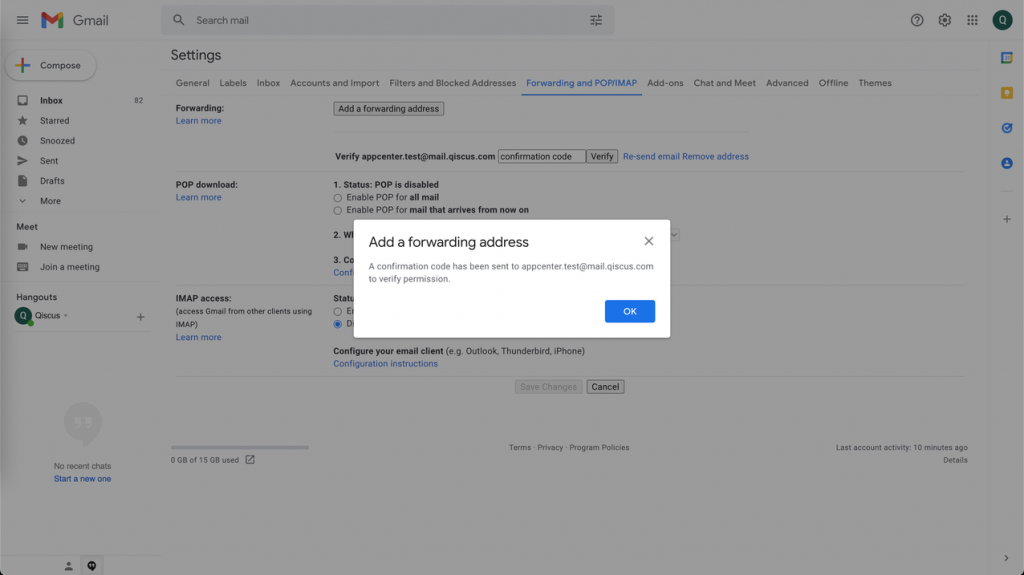
Gmail will send confirmation email similar to picture below. Please click the blue link to confirm the the request.
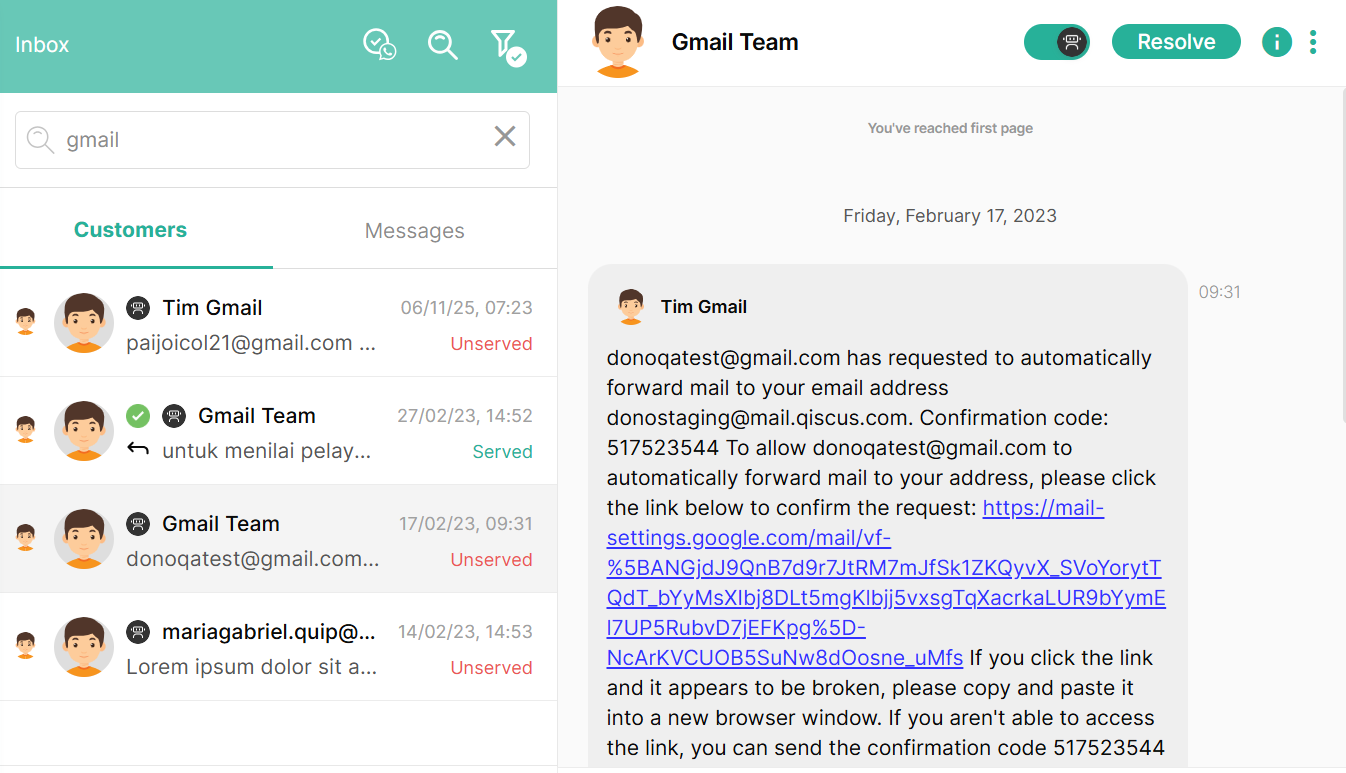
Or you can input the code. Click Next and a new window will appear. Then, select Proceed.Fill in the Confirmation Code field with the code.
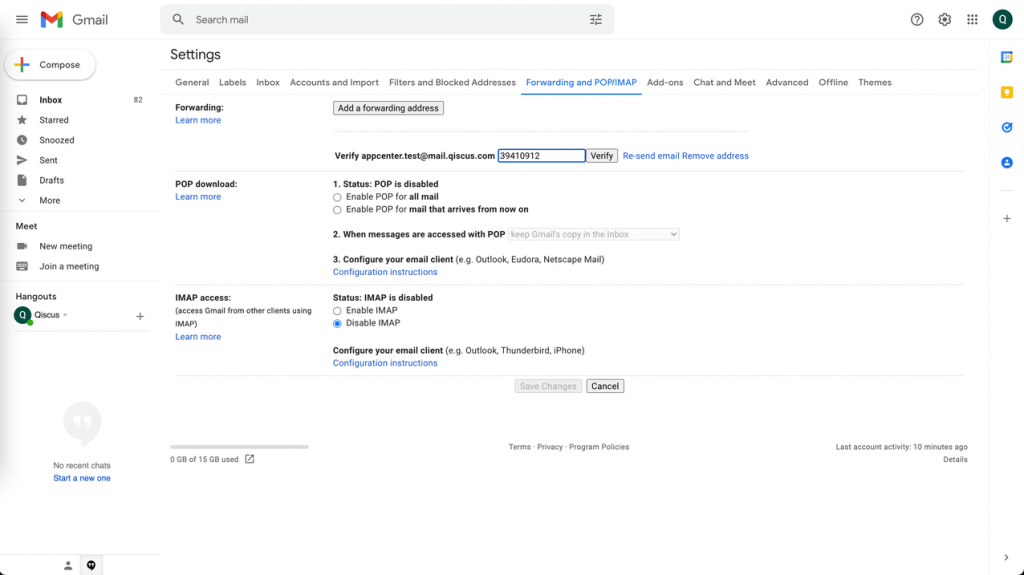
Click the Verify button and set the email to the Gmail account to be forwarded to Qiscus Omnichannel Chat.
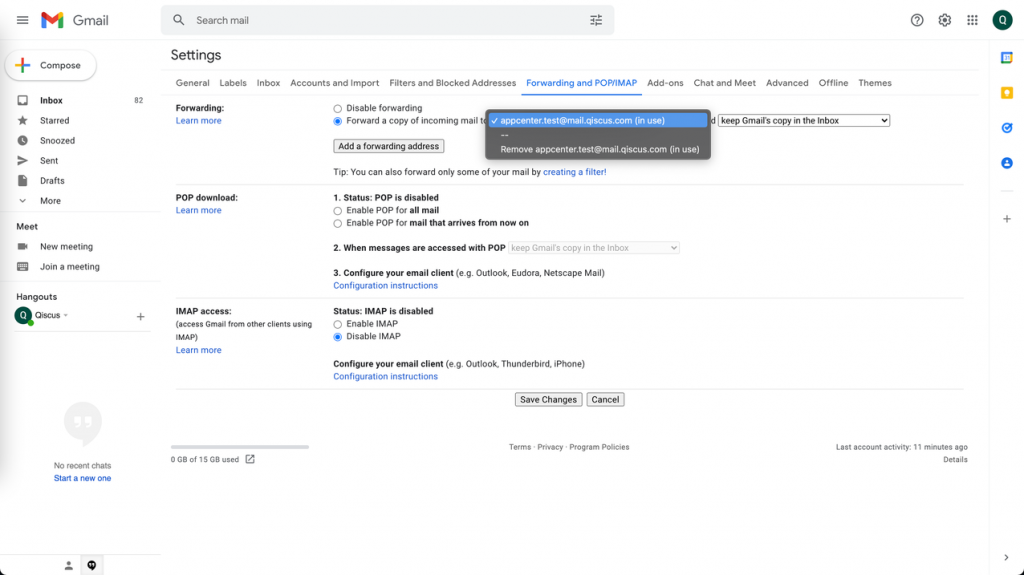
Save changes by clicking the Save Changes button for further email integration tests to be carried out.
Test Email
The admin can test the email. The flow is that the Email App will send a message to the email address registered based on the email settings that have been made. It can be done by clicking the Send Email button.
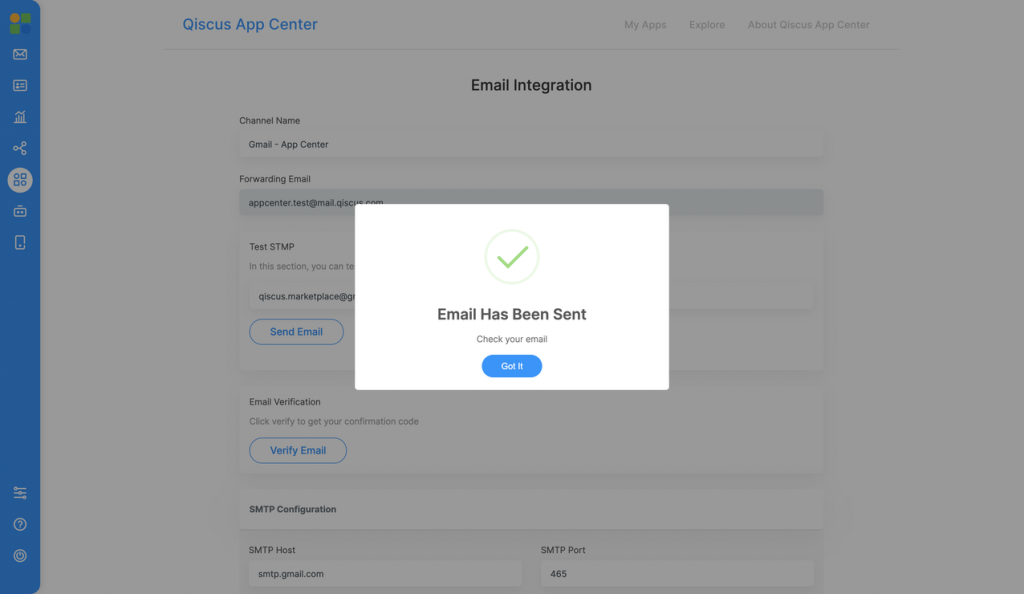
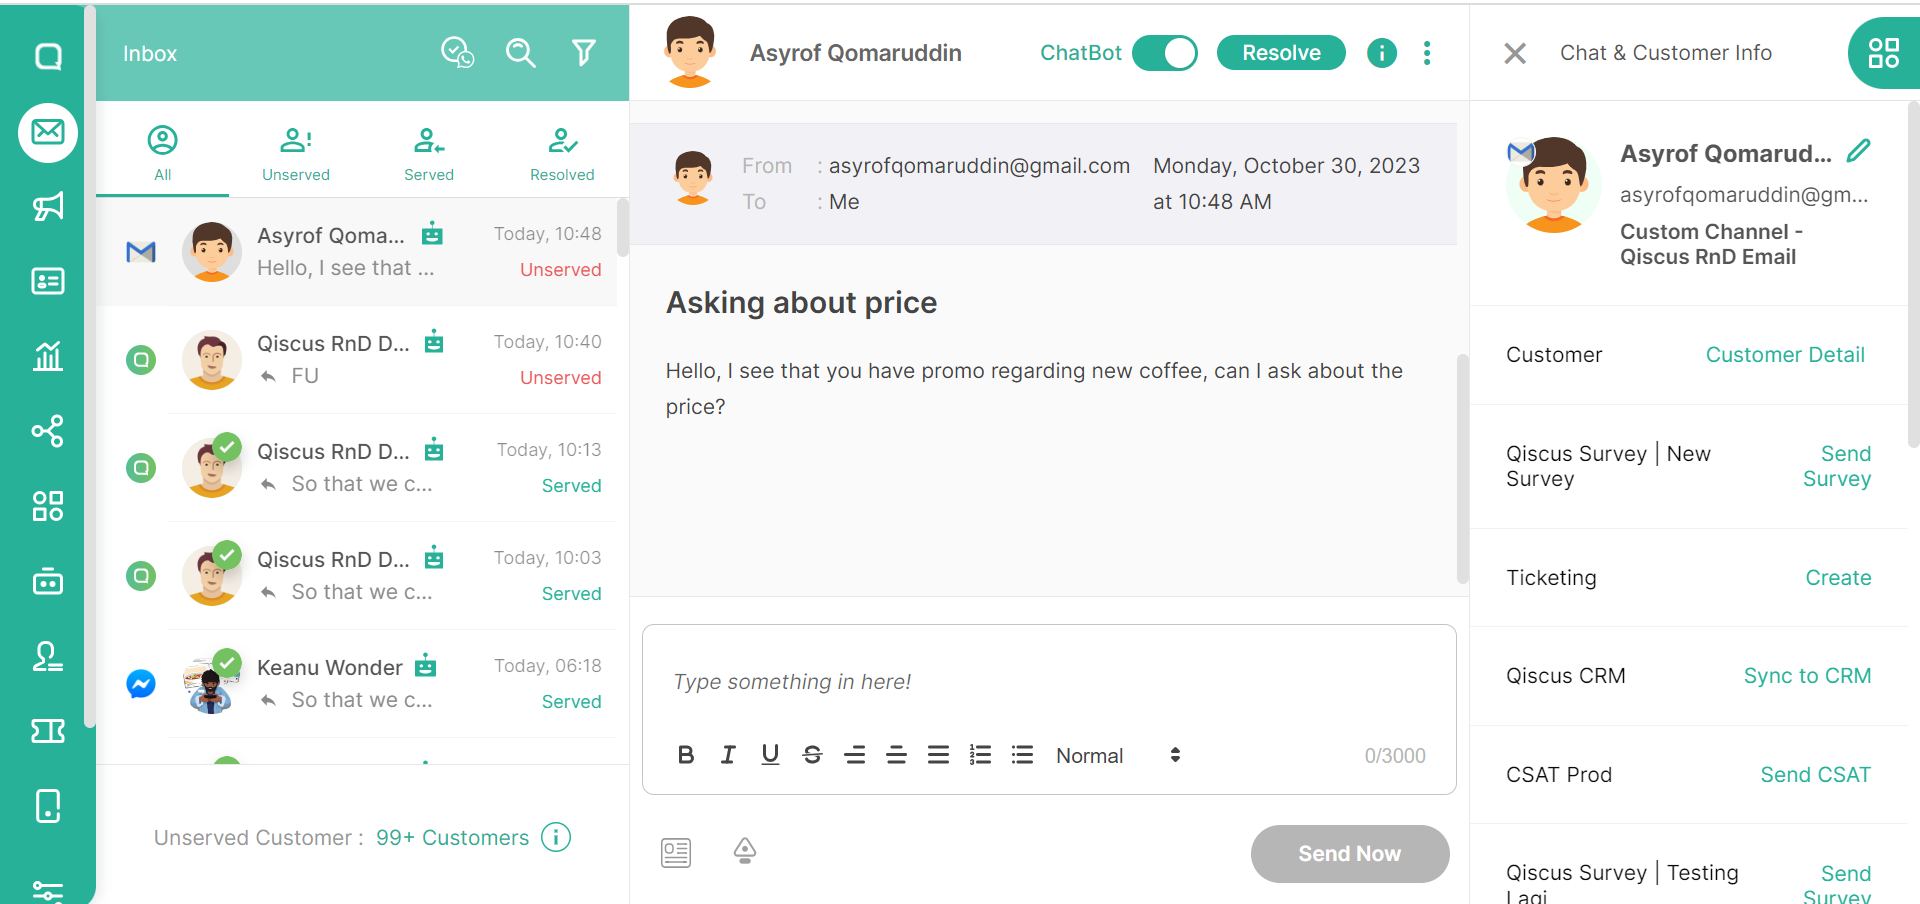
If the settings are appropriate, a message will appear to show that the email has been successfully sent.Send an email to the Gmail account that has been connected to Qiscus Omnichannel Chat. The email should appear on the Qiscus Omnichannel Chat dashboard as seen below.
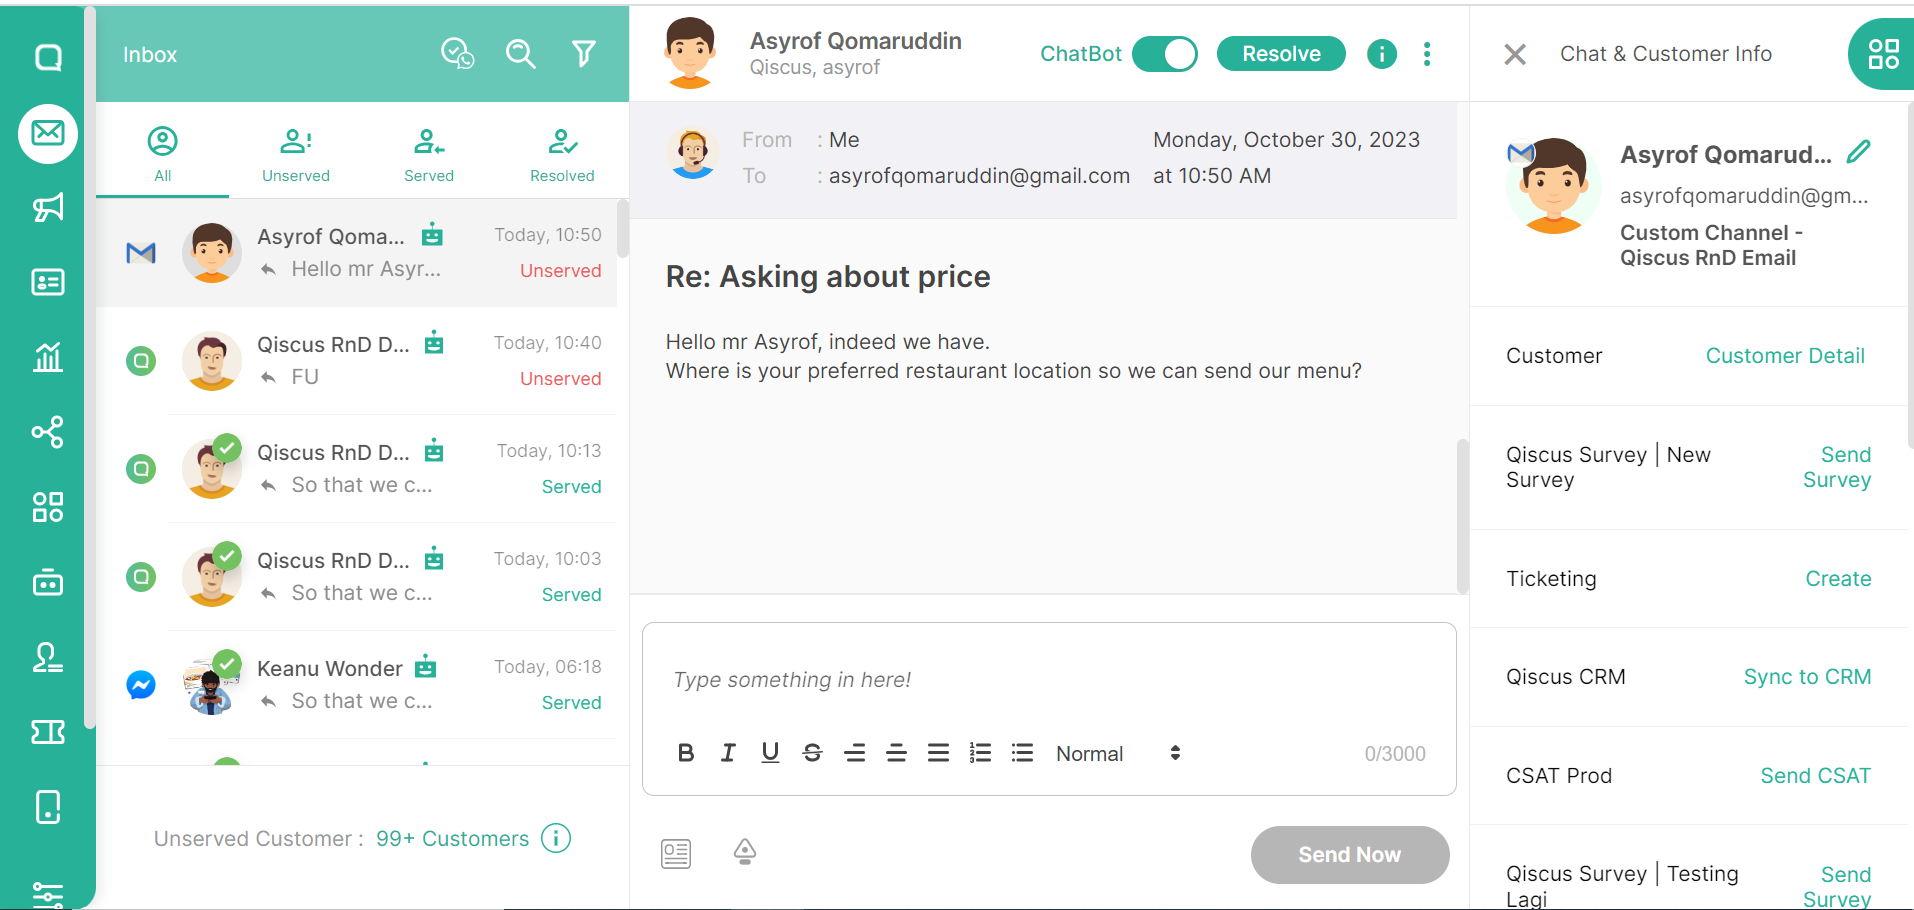
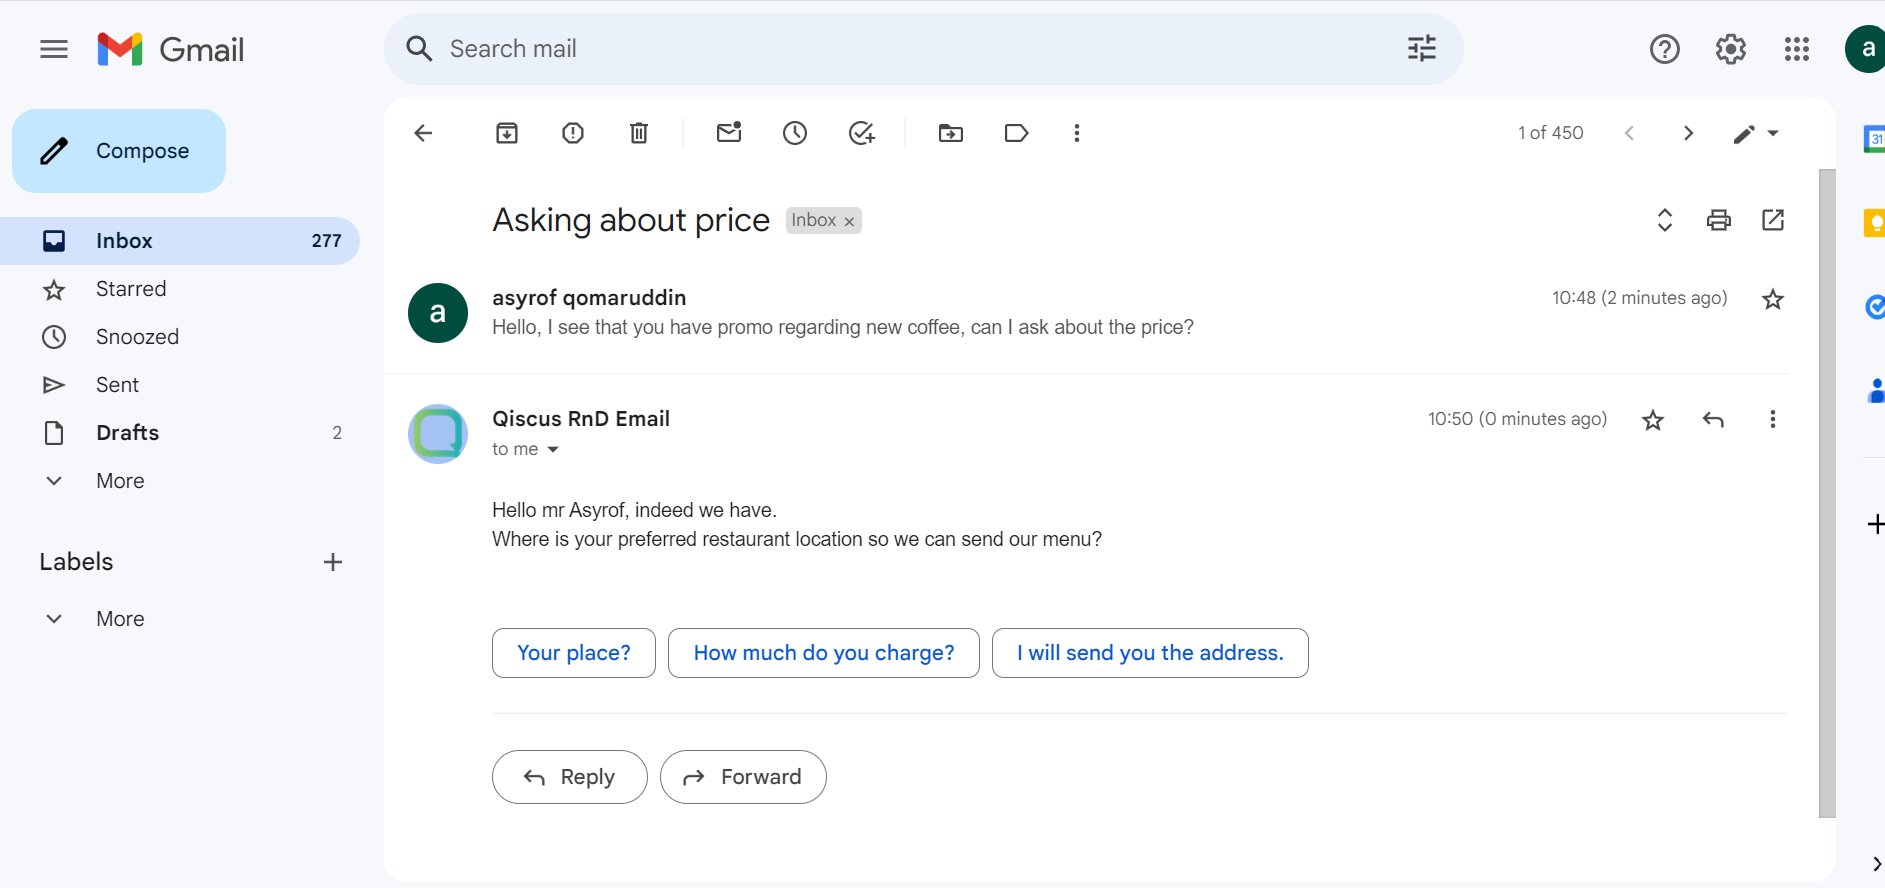
You will then find that the admin’s reply will be visible from the customer’s Gmail (see below email with the customer’s name asyrof qomaruddin)
You can manage your business email account more efficiently now by enabling and integrating your business email address into Qiscus Omnichannel Chat.
Outlook / Microsoft 365 (OAuth)
If your business email runs on Microsoft 365 or Outlook.com, use the OAuth integration method instead of SMTP. You sign in once with Login with Microsoft, and agents' replies are then sent through Microsoft's own mail service, as that mailbox.
Microsoft is turning off password-based SMTP (Basic authentication) for Exchange Online by default from the end of December 2026. If your Microsoft 365 mailbox is currently connected with SMTP (e.g. smtp-mail.outlook.com or smtp.office365.com), plan to move it to OAuth.
How it works
How it is handled | |
|---|---|
Incoming email | Same as every other provider: the mailbox forwards incoming email to your [email protected] address. No Microsoft login is needed for this part. |
Outgoing replies | Sent through Microsoft Graph as the signed-in mailbox. Replies also appear in that mailbox's Sent Items. |
Account binding | Each email channel is linked to exactly one Microsoft account, whichever account completes the login. One Microsoft account can only be linked to one channel. |
Before you start: Microsoft 365 admin consent
Many Microsoft 365 organizations don't let regular users approve third-party apps. If yours is one of them, the login window shows "Need admin approval" and the channel can't be connected until an admin approves the app. This is a setting in your Microsoft tenant, not a limit on Qiscus's side.
Ask your Microsoft 365 administrator to approve the app Qiscus Integration Outlook (Application (client) ID 23ca8f5e-292d-4138-b3fd-b67f20faf62e) before you set up the channel. The app asks for these delegated permissions:
Permission | Purpose |
|---|---|
| Identify the signed-in mailbox (email address and display name). |
| Keep the connection active without asking you to log in again. |
| Send agents' replies as the signed-in mailbox. |
Delegated means Qiscus acts only on behalf of the mailbox that signed in. It can't reach other mailboxes in your organization. Your admin can choose how far the approval goes:
Only specific mailboxes: grant consent for each channel's mailbox individually. See Microsoft's guide Grant consent on behalf of a single user.
Whole organization: Grant tenant-wide admin consent, optionally with Assignment required turned on so only the chosen mailboxes can use the app.
To learn more about how consent works, see User and admin consent in Microsoft Entra ID.
For Microsoft 365 administrators
Qiscus Integration Outlook is not listed in the Microsoft Entra app gallery, so you won't find it by searching. Add it to your tenant first, then approve it, using one of the options below.
Role needed: Cloud Application Administrator or Application Administrator. Global Administrator also works but isn't required.
Option A: Approve for specific mailboxes only (recommended)
Run this in Microsoft Graph PowerShell. No Qiscus login is needed. It adds the app to your tenant if it isn't there yet, then approves it for one mailbox. Repeat step 3 for each mailbox you connect to Qiscus.
Microsoft's reference for these steps: Grant consent on behalf of a single user.
Option B: Approve for the whole organization
In Qiscus, open the email channel and click Login with Microsoft.
Sign in with the administrator account. On the permission screen, tick Consent on behalf of your organization and click Accept.
The app is now added and approved for your organization. Because the channel is linked to whichever account logged in, open the channel, click Log Out Account, and log in again with the channel's own mailbox.
Optional: Limit who can use the app
Once the app is in your tenant, open Microsoft Entra admin center → Enterprise applications → Qiscus Integration Outlook:
Under Properties, set Assignment required to Yes and save.
Under Users and groups, add the mailboxes you connect to Qiscus.
Only those accounts can then use Login with Microsoft for this app.
Login with Microsoft needs an account that can sign in. Shared mailboxes are blocked from sign-in by default, so they can't be connected unless sign-in is enabled for them. Use a mailbox that can sign in.
Connect an Outlook mailbox
On the email page, click + Add New, fill in Channel Name and UUID (Email Username), and continue to Integration Details.
Under Integration Method, choose OAuth.
Click Login with Microsoft. A Microsoft sign-in window opens.
Sign in with the mailbox you want this channel to send from (e.g. [email protected]), not an admin's personal account.
When the window shows Login Success with the email address, click Continue Integration.
Set up forwarding from that mailbox to your [email protected] address (see Forwarding email from Outlook below), then send a test email and reply to it from Qiscus Omnichannel Chat to check both directions.
The channel is bound to whichever account completes the login. If an admin uses the "Have an admin account?" link on the approval screen, that's fine for granting consent, but the channel will then be linked to the admin's account. Afterwards, open the channel and click Log Out Account, then Login with Microsoft again using the correct mailbox.
Forwarding email from Outlook
Incoming email reaches Qiscus by forwarding. In Outlook on the web, open Settings → Mail → Forwarding (or create an inbox rule that forwards to [email protected]).
By default, Microsoft 365 may block automatic forwarding to external addresses. If forwarded emails don't arrive, ask your admin to allow external forwarding for this mailbox (Microsoft Defender → outbound spam filter policy → automatic forwarding).
Change or disconnect the Microsoft account
Open the channel's details page. Under OAuth Configuration you'll see the connected account. Click Log Out Account to disconnect it, then Login with Microsoft to link a different mailbox. The forwarding address ([email protected]) stays the same.
Troubleshooting
Symptom | Cause and fix |
|---|---|
"Need admin approval" in the Microsoft window | Your tenant blocks user consent. Ask your Microsoft 365 admin to approve Qiscus Integration Outlook (see For Microsoft 365 administrators above), then log in again. |
Login Failed with "email … already exists" | That Microsoft account is already linked to another channel. Use a different mailbox, or log out of it on the other channel first. |
"Request Header Fields Too Large" right after signing in to Microsoft | Your browser is sending too many saved cookies. Close the window and click Login with Microsoft again from a private/incognito window, or clear your browser cookies for qiscus.io. |
Incoming emails appear in Qiscus, but replies never reach the customer, and the room shows "Failed to send email, please try again later." | The channel has no valid Microsoft login (login never finished, or access was revoked). Open the channel, click Log Out Account if shown, and Login with Microsoft again. |
Replies are sent from the wrong address | The channel was logged in with a different account (often an admin's). Log out and log in again with the correct mailbox. |
Emails sent to the mailbox don't appear in Qiscus | Check the forwarding rule and that external auto-forwarding is allowed (see above). OAuth login doesn't affect incoming email. |
CC & BCC
CC and BCC are features that are currently used in email platforms, such as Gmail. The CC and BCC functionalities serve the same purpose. It's only that while using the BCC function, the recipient of the email cannot see if the email was sent to an email address that is on the BCC list. Because this function is highly popular, the App Center creates CC and BCC features to suit these requirements. for the following procedures:
Multichannel
To access the CC and BCC functions through Omnichannel, go to Chat & Customer Info, then select Additional Info, and the CC and BCC fields will be shown.
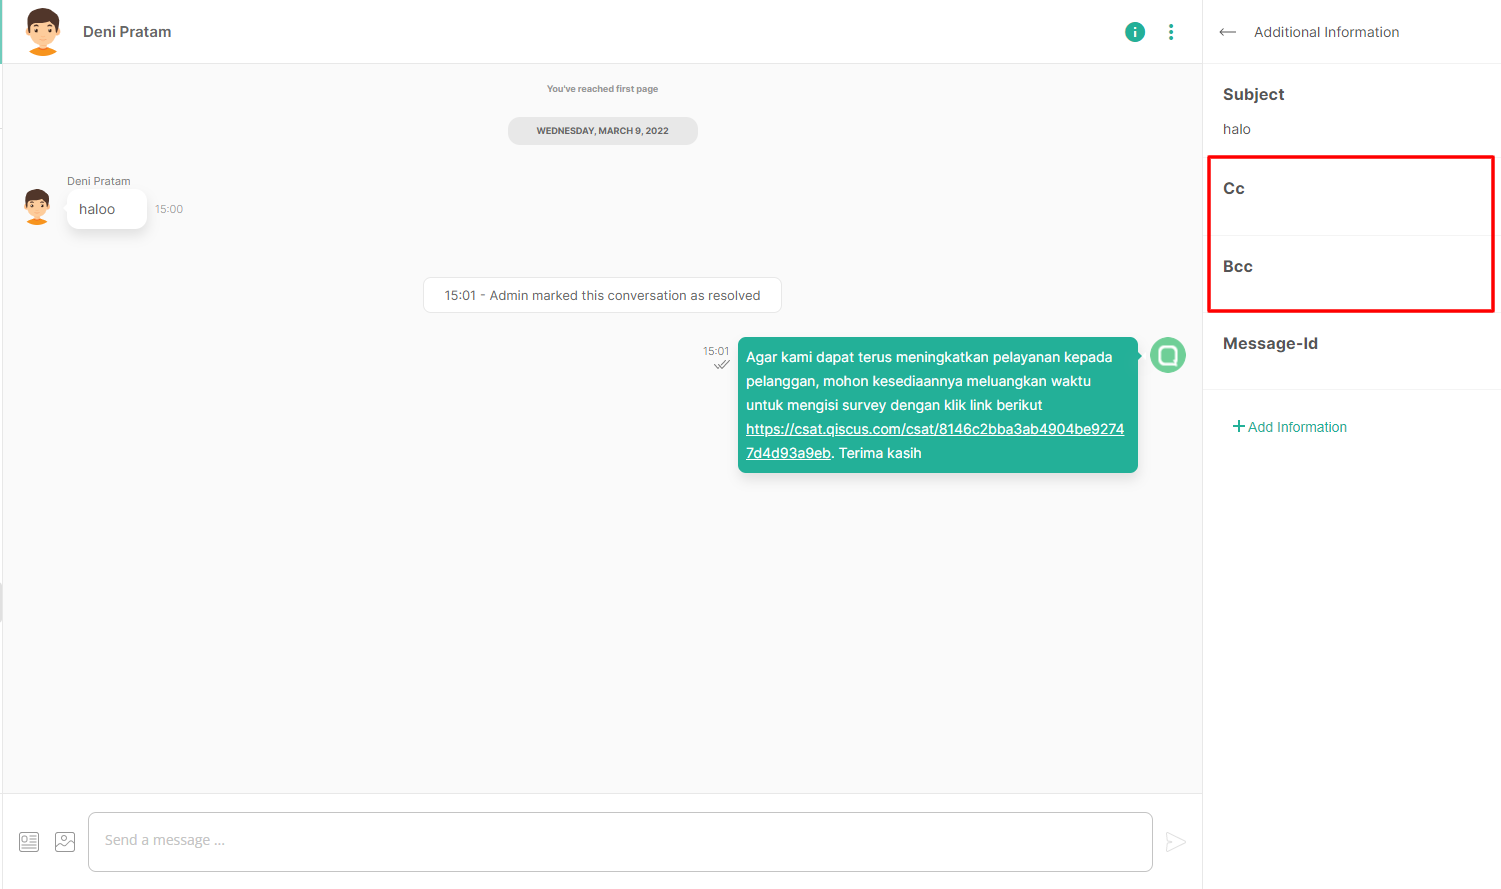
Next, if you want to send a conversation to your consumers, use email with CC and BCC. Simply enter your email address in that area. If more than one email may be specified, a separator "," should be used for example [email protected], [email protected]. Once you've add the email and save it, then you could send the message.
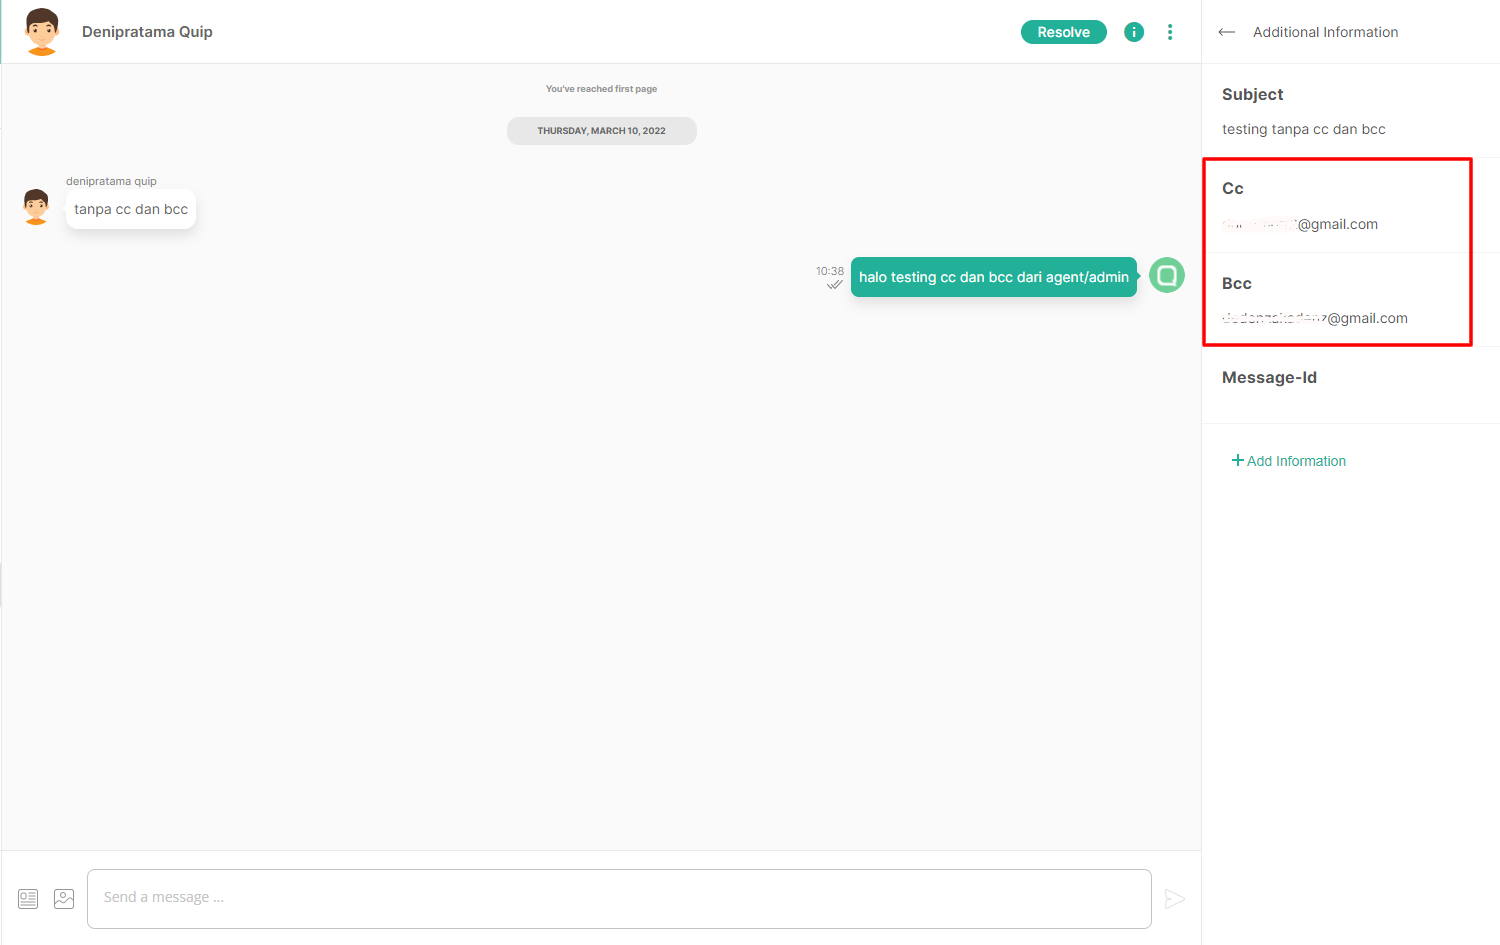
The email will be shown like this
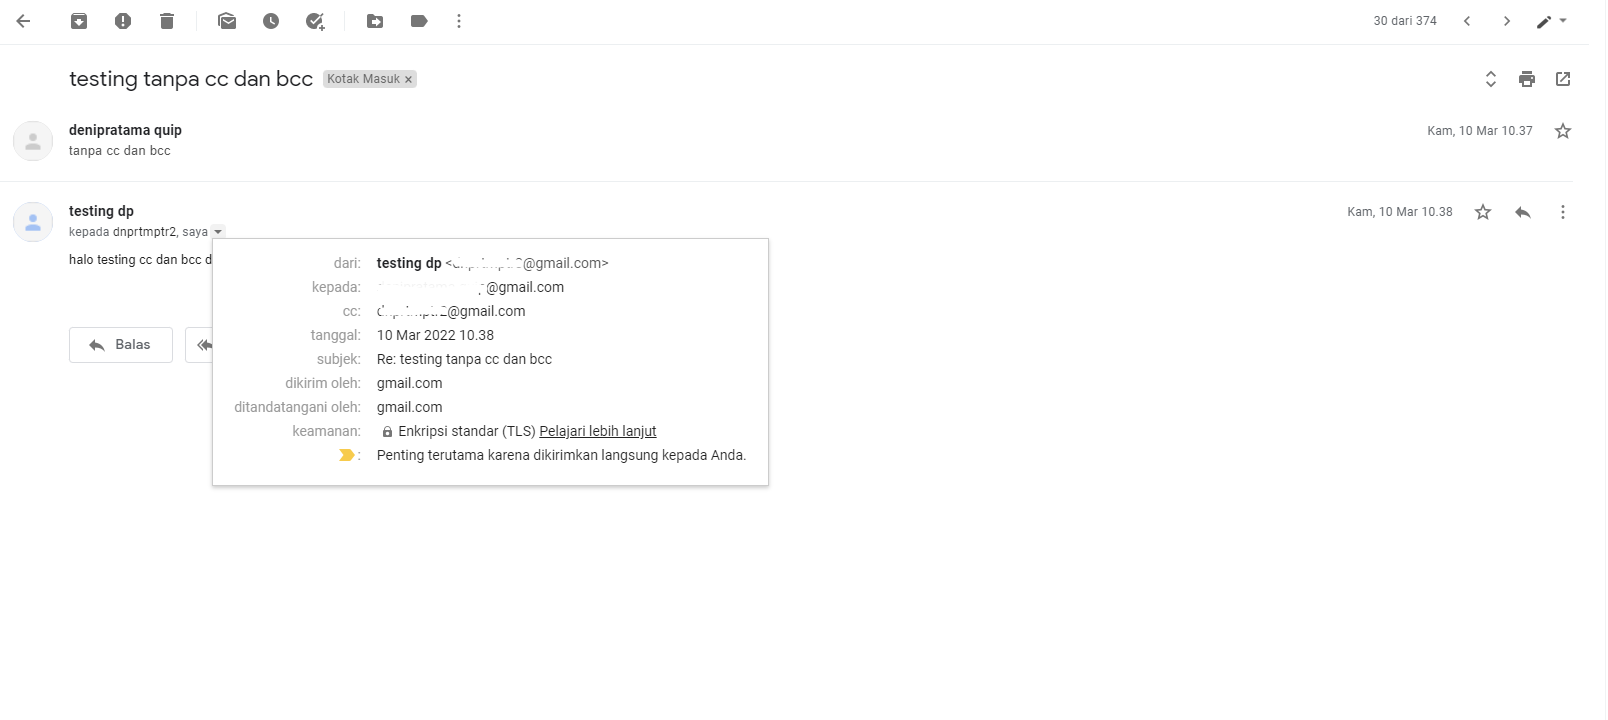
Let's take a look from the email view, any email that listed in the CC will be captured in the Qiscus Omnichannel.
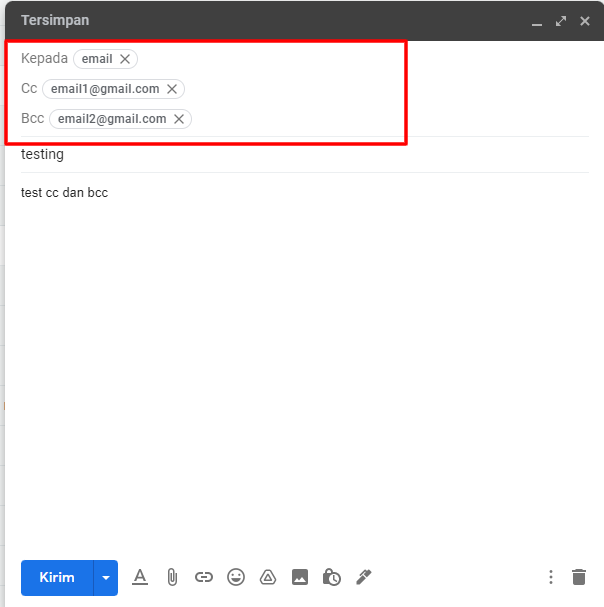
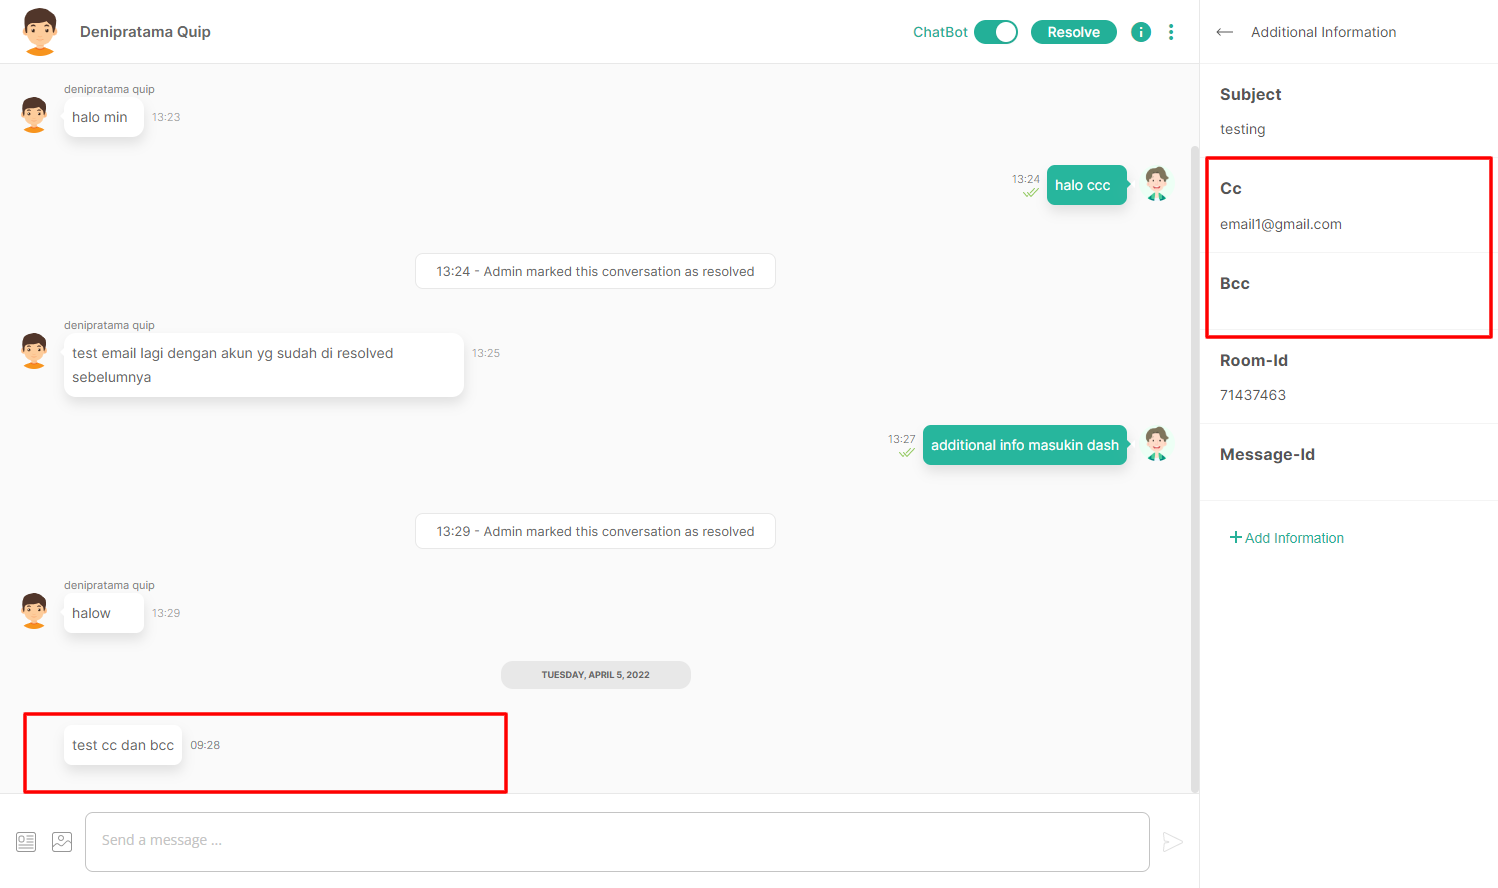
As seen above, CC's email already added to the CC's field in the additional information. However, BCC won't be added, because based on the BCC mechanism, it does not allow the recipient to be able to receive email data that is included in the BCC.
Notable thing is, every email that included in CC & BCC reply the email, it will become a new conversation.
Please contact our team via the following page if you have any problems or questions about the various stages listed above.
Custom Payload to reply in API Bot
Because email have different payload , then if you use Bot API, please use this: