To use Qiscus Chat SDK features, authentication to Qiscus Server is required. After that, your application needs to have user credential locally stored for further requests. The credential consists of a token that will identify a user in Qiscus Server. When you want to disconnect from Qiscus Server, terminating authentication will be done by clearing the stored credential.
You need to initiate your App ID for your chat application before carry out to Authentication. This initialization only needs to be done once in the app's lifecycle. Initialization can be implemented in the initial startup. Here is how you can do that:
QiscusCore.setup(application, appId);If you have your own server (On-Premise) you can change the URL, here's the example:
QiscusCore.setupWithCustomServer(application, appId, baseUrl, brokerUrl);For further details about on-premise information, you can contact us by sending an email to: [email protected]
The initialization should be called once across an Android app. The best practice you can put in Application class.
There are 2 types of authentication that you can choose: Client Authentication and Server Authentication.
- There are 2 types of authentication that you can choose: Client Authentication and Server Authentication.
- Client Authentication can be done simply by providing userId and userKey through your client app.
- In Server Authentication, the credential information is provided by your Server App. In this case, you need to prepare your own backend.
- The Client Authentication is easier to be implemented, but Server Authentication is more secure.
Client Authentication
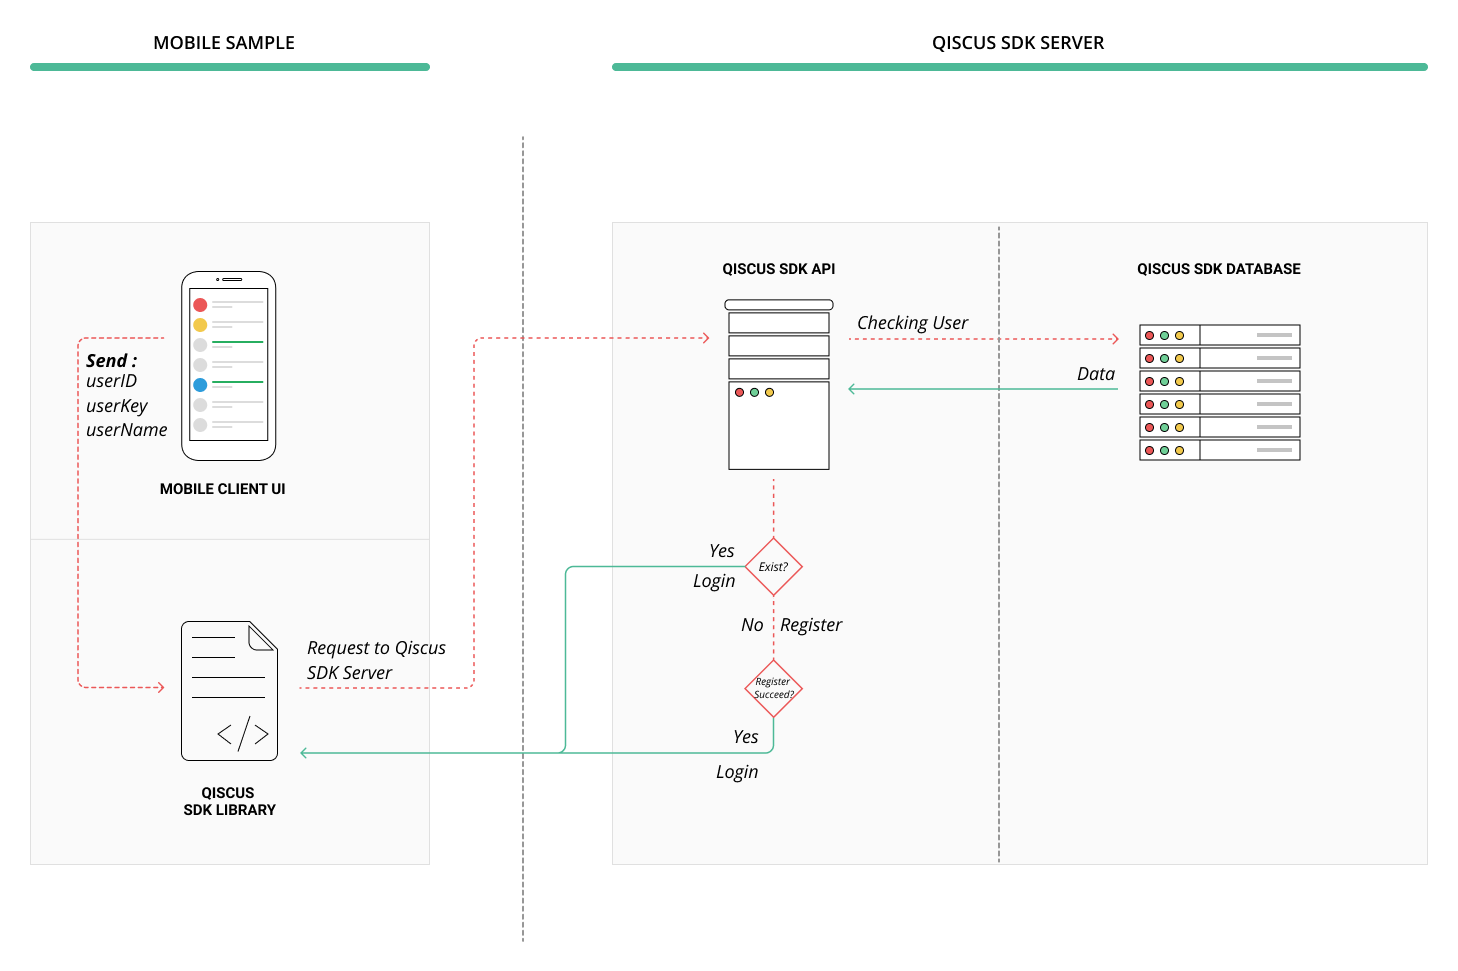
This authentication is done by calling setUser() function. This function will retrieve or create user credential based on the unique userId. Here is example:
QiscusCore.setUser(userId , userKey) .withUsername(username) .withAvatarUrl(avatarUrl) .withExtras(extras) .save(new QiscusCore.SetUserListener() { public void onSuccess(QiscusAccount qiscusAccount) { // on success } public void onError(Throwable throwable) { // on error } });Where:
userId(string, unique): a user identifier that will be used to identify a user and used whenever another user need to chat with this user. It can be anything, whether is is user's email, your user database index, etc. As long as it is unique and a string. This value is case sensitive.userKey(string): a user key for authentication purpose, so even if a stranger knows your user Id, he cannot access the user data.username(string): a username for display name inside chat room.avatarURL(string, optional): to display user's avatar, fallback to default avatar if not provided.extras(JSON, optional): to give additional information (metadata) to user, which consist key-value, for example key: position, and value: engineer.
You can learn from the figure below to understand what really happens when calling setUser() function:
Email address is a bad choice for user IDs because users may change their email address. It also unnecessarily exposes private information. We recommend to make it unique for every user in your app, and stable, means that they can never change.
Server Authentication (JWT Token)
Server Authentication is another option, which allows you to authenticate using JSON Web Tokens (JWT). JSON Web Tokens (JWT) contains your app account details which typically consists of a single string which contains information of two parts: JOSE Header, JWT Claims Set.
The steps to authenticate with JWT:
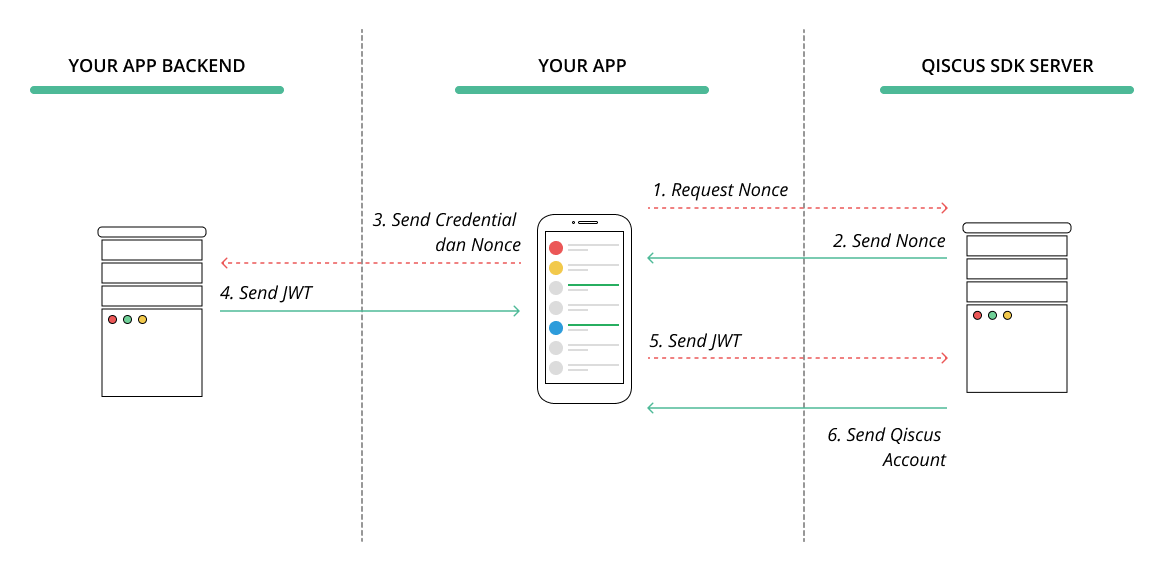
- Your App requests a Nonce from Qiscus Server
- Qiscus Server sends Nonce to Your App
- Your App sends user credentials and Nonce that is obtained from Qiscus Server to Your backend
- Your backend sends the token to Your App
- Your App sends that token to Qiscus Server
- Qiscus Server sends Qiscus Account to Your App
Do the following authentication tasks as described above:
- Step 1: Setting JOSE Header and JWT Claim Set in your backend
When your backend returns a JWT after receiving Nonce from your App, the JWT will be caught by your App and will be forwarded to Qiscus Server. In this phase, Qiscus Server will verify the JWT before returning Qiscus Account for your user. To allow Qiscus Server successfully recognize the JWT, you need to setup JOSE Header and JWT Claim Set in your backend as follow :
JOSE Header
{ "alg": "HS256", // must be HMAC algorithm "typ": "JWT", // must be JWT "ver": "v2" // must be v2 }JWT Claim Set
{ "iss": "QISCUS SDK APP ID", // your qiscus app id, can obtained from dashboard "iat": 1502985644, // current timestamp in unix "exp": 1502985704, // An arbitrary time in the future when this token should expire. In epoch/unix time. We encourage you to limit 2 minutes "nbf": 1502985644, // current timestamp in unix "nce": "nonce", // nonce string as Number used Once "prn": "YOUR APP USER ID", // your user identity, (userId), should be unique and stable "name": "displayname", // optional, string for user display name "avatar_url": "" // optional, string url of user avatar }Signature
JWT needs to be signed using Qiscus Secret Key, the one you get in dashboard. The signature is used to verify that the sender of JWT is who it says it is. To create the signature part, you have to take the encoded JOSE Header, the encoded JWT Claim Set, a Qiscus Secret Key, the algorithm specified in the header, and sign all of those.
The signature is computed using the following pseudo code:
HMACSHA256( base64UrlEncode(JOSE Header) + "." + base64UrlEncode(JWT Claim Set), Qiscus Secret Key)To make this easier, we provide sample backends in PHP. You can use any other languages or platforms.
JWT Sample backend in PHP can be found by clicking this following link: https://bitbucket.org/qiscus/qiscus-sdk-jwt-sample/src/master/
- Step 2: Start to get a Nonce
You need to request a Nonce from Qiscus Server. Nonce (Number Used Once) is a unique, randomly generated string that is used to identify a single request. Noted that a Nonce will expire in 10 minutes so you need to implement your code to request JWT from your backend right after you got the Nonce. Here's how to get a Nonce:
QiscusApi.getInstance() .getJWTNonce() .subscribeOn(Schedulers.io()) .observeOn(AndroidSchedulers.mainThread()) .subscribe(qiscusNonce -> { // on success }, throwable -> { // on error });- Step 3: Verify The JWT
Once you get a Nonce, you can request JWT from your backend by sending Nonce you got from Qiscus Server. When you got the JWT Token, you can pass that JWT to setUser() method to allow Qiscus to authenticate your user and return Qiscus Account as shown in the code below:
QiscusApi.getInstance() .getJWTNonce() .subscribeOn(Schedulers.io()) .observeOn(AndroidSchedulers.mainThread()) .subscribe(qiscusNonce -> { // on success // Here you get identityToken from your own server String jwt = getIdentityTokenFromServer(nonce) // Pass JWT here QiscusCore.setUser(jwt, new QiscusCore.SetUserListener() { public void onSuccess(QiscusAccount qiscusAccount) { //do anything if success } public void onError(Throwable throwable) { //do anything if error occurs } }); }, throwable -> { // on error });Clear User Data and Disconnected
As mentioned in previous section, when you do setUser(), user's data will be stored locally. When you want to disconnect from Qiscus Server, you need to clear the user data that is related to Qiscus Chat SDK, such as token, profile, messages, rooms, etc, from local device. Then, you will not get any message, or event. You can do this by calling this code:
QiscusCore.clearUser();